1.SimpleAdapter
上一篇博客介绍的ArrayAdapter只能接受数组作为数据源,一般用于显示一行文字,更复杂的内容的显示可以用SimpleAdapter来实现。
SimpleAdapter接受List<Map<String, Object>>作为数据源,每个Map对应一个item(比如购物车里的一件商品,书架上的一本书),Map中的key需要与视图控件相对应,这样value就可以显示到视图控件中了。
2.SimpleAdapter实现
1)item的layout文件
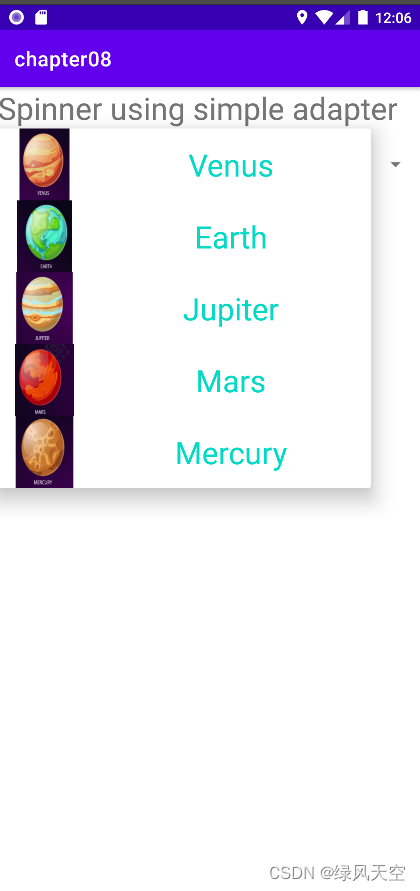
一个item中显示一张图片和一段text
<?xml version="1.0" encoding="utf-8"?>
<LinearLayout xmlns:android="http://schemas.android.com/apk/res/android"
    xmlns:tools="http://schemas.android.com/tools"
    android:orientation="horizontal"
    android:layout_width="match_parent"
    android:layout_height="wrap_content">

    <ImageView
        android:id="@+id/iv_icon"
        android:layout_width="0dp"
        android:layout_weight="1"
        android:layout_height="70dp"
        tools:src = "@drawable/earth"
        ></ImageView>
    <TextView
        android:id="@+id/tv_name"
        android:layout_width="0dp"
        android:layout_height="70dp"
        android:layout_weight="3"
        android:textColor="@color/teal_200"
        android:textSize="30dp"
        android:text="earth"
        android:gravity="center"
        ></TextView>

</LinearLayout>
2)主界面layout文件
用Spinner作为View容纳item
<?xml version="1.0" encoding="utf-8"?>
<LinearLayout xmlns:android="http://schemas.android.com/apk/res/android"
    xmlns:tools="http://schemas.android.com/tools"
    android:layout_width="match_parent"
    android:layout_height="match_parent"
    android:orientation="vertical"
    tools:context=".SpinnerActivity">

    <TextView
        android:layout_width="match_parent"
        android:layout_height="wrap_content"
        android:text="Spinner using simple adapter"
        android:textSize="30dp" />

    <Spinner
        android:id="@+id/sp_drop"
        android:layout_width="match_parent"
        android:layout_height="70dp"
        android:spinnerMode="dropdown"></Spinner>


</LinearLayout>
3)java文件
对比 ArrayAdapter,SimpleAdapter增加了后两个参数,表明Map<String, Object>中key和item的layout文件中的视图id的对应关系。
SimpleAdapter adapter = new SimpleAdapter(this,list,R.layout.item_icon,
new String[]{"icon", "name"},
new int[]{R.id.iv_icon,R.id.tv_name}
);
其中数据源list的构造如下: 放入每个item的各个属性
List<Map<String, Object>> list = new ArrayList<>();
for(int i=0;i<stars.length;i++){
Map<String , Object> mp = new HashMap<>();
mp.put("icon", icons[i]);
mp.put("name", stars[i]);
list.add(mp);
}
package com.example.chapter08;

import androidx.appcompat.app.AppCompatActivity;

import android.os.Bundle;
import android.view.View;
import android.widget.AdapterView;
import android.widget.SimpleAdapter;
import android.widget.Spinner;
import android.widget.Toast;

import java.util.ArrayList;
import java.util.HashMap;
import java.util.List;
import java.util.Map;

public class SimpleAdapterActivity extends AppCompatActivity implements AdapterView.OnItemSelectedListener {


    public static final String[] stars = {"Venus",  "Earth", "Jupiter", "Mars", "Mercury"};
    public static final int[] icons = {R.drawable.venus,R.drawable.earth,R.drawable.jupiter, R.drawable.mars,R.drawable.mercury};

    @Override
    protected void onCreate(Bundle savedInstanceState) {
        super.onCreate(savedInstanceState);
        setContentView(R.layout.activity_simple_adapter);

        List<Map<String, Object>> list = new ArrayList<>();
        for(int i=0;i<stars.length;i++){
            Map<String , Object> mp = new HashMap<>();
            mp.put("icon", icons[i]);
            mp.put("name", stars[i]);
            list.add(mp);
        }
        SimpleAdapter adapter = new SimpleAdapter(this,list,R.layout.item_icon,
                new String[]{"icon", "name"},
                new int[]{R.id.iv_icon,R.id.tv_name}
                );

        Spinner spinner = findViewById(R.id.sp_drop);
        spinner.setAdapter(adapter);
        spinner.setSelection(0);
        spinner.setOnItemSelectedListener(this);
    }

    @Override
    public void onItemSelected(AdapterView<?> adapterView, View view, int i, long l) {
        Toast.makeText(this,"You choose " + stars[i], Toast.LENGTH_LONG).show();
    }

    @Override
    public void onNothingSelected(AdapterView<?> adapterView) {

    }
}
4)效果图
3.BaseAdapter
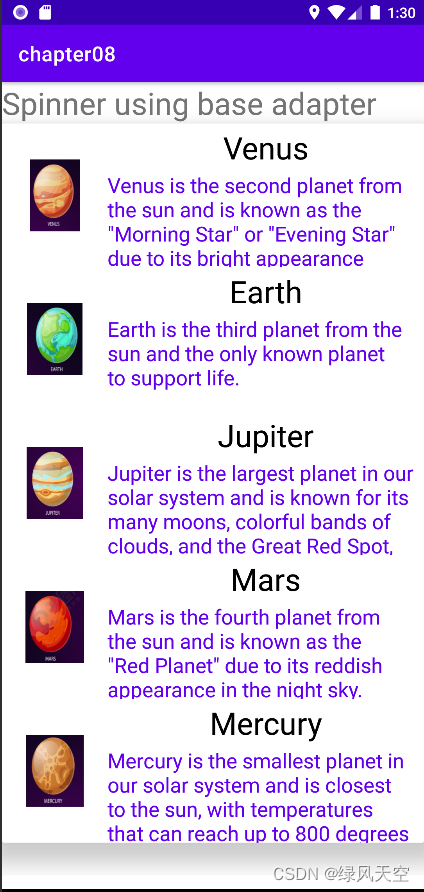
前文提到SimpleAdapter相比ArrayAdapter可以显示更复杂的数据,那么BaseAdapter 的适应性和灵活性则是三者中最好的,可以接受任何类型的数据源,例如数组、集合或自定义数据类型。
BaseAdapter是一个抽象类,使用时需创建新类继承它,并实现四个方法:getCount()、getItem()、getItemId()和getView()。
其中getView()方法用于将数据项绑定到视图上,可以使用自定义的布局文件来显示数据,也可以在代码中动态创建视图。
BaseAdapter适用于更为复杂的数据绑定场景。
4.BaseAdapter 实现
1)创建实体类,作为BaseAdapter中要操作的对象
package com.example.chapter08.entity;

import com.example.chapter08.R;

import java.util.ArrayList;
import java.util.List;

public class Planet {

    public int image;
    public String name;
    public String desc;

    public Planet(int image, String name, String desc) {
        this.image = image;
        this.name = name;
        this.desc = desc;
    }

    public static final String[] stars = {"Venus",  "Earth", "Jupiter", "Mars", "Mercury"};
    public static final int[] icons = {R.drawable.venus,R.drawable.earth,R.drawable.jupiter, R.drawable.mars,R.drawable.mercury};
    public static final String[] descs = { "Venus is the second planet from the sun and is known as the \"Morning Star\" or \"Evening Star\" due to its bright appearance in the sky.",
            "Earth is the third planet from the sun and the only known planet to support life.",
            "Jupiter is the largest planet in our solar system and is known for its many moons, colorful bands of clouds, and the Great Red Spot, a massive storm that has been raging for over 300 years.",
            "Mars is the fourth planet from the sun and is known as the \"Red Planet\" due to its reddish appearance in the night sky.",
            "Mercury is the smallest planet in our solar system and is closest to the sun, with temperatures that can reach up to 800 degrees Fahrenheit on its surface."
    };

    public static List<Planet> getDefaultList(){
        List<Planet> planets = new ArrayList<>();
        for(int i=0;i<stars.length;i++){
            planets.add(new Planet(icons[i],stars[i], descs[i] ));
        }
        return planets;
    }


}
2)创建新类继承BaseAdapter,并实现四个方法
gteView方法中将Item布局与数据绑定
package com.example.chapter08;

import android.content.Context;
import android.view.LayoutInflater;
import android.view.View;
import android.view.ViewGroup;
import android.widget.BaseAdapter;
import android.widget.ImageView;
import android.widget.TextView;

import com.example.chapter08.entity.Planet;

import java.util.List;

public class PlanetBaseAdapter extends BaseAdapter {

    public Context myContext;
    public List<Planet> planetList;

    public PlanetBaseAdapter(Context myContext, List<Planet> planetList) {
        this.myContext = myContext;
        this.planetList = planetList;
    }

    @Override
    public int getCount() {
        return planetList.size();
    }

    @Override
    public Object getItem(int i) {
        return planetList.get(i);
    }

    @Override
    public long getItemId(int i) {
        return i;
    }

    @Override
    public View getView(int i, View view, ViewGroup viewGroup) {
        View v = LayoutInflater.from(myContext).inflate(R.layout.item_planet,null);
        ImageView iv = v.findViewById(R.id.iv_icon);
        TextView tv_name = v.findViewById(R.id.tv_name);
        TextView tv_desc = v.findViewById(R.id.tv_desc);


        Planet planet = planetList.get(i);
        iv.setImageResource(planet.image);
        tv_name.setText(planet.name);
        tv_desc.setText(planet.desc);

        return v;
    }
}
3)Activity中Spinner使用BaseAdapter
package com.example.chapter08;

import androidx.appcompat.app.AppCompatActivity;

import android.os.Bundle;
import android.view.View;
import android.widget.AdapterView;
import android.widget.Spinner;
import android.widget.Toast;

import com.example.chapter08.entity.Planet;

import java.util.List;

public class BaseAdapterActivity extends AppCompatActivity implements AdapterView.OnItemSelectedListener {

    private List<Planet> list;

    @Override
    protected void onCreate(Bundle savedInstanceState) {
        super.onCreate(savedInstanceState);
        setContentView(R.layout.activity_base_adapter);

        Spinner sp = findViewById(R.id.sp_drop);

        list = Planet.getDefaultList();
        PlanetBaseAdapter baseAdapter = new PlanetBaseAdapter(this, list);

        sp.setAdapter(baseAdapter);
        sp.setSelection(0);
        sp.setOnItemSelectedListener(this);

    }

    @Override
    public void onItemSelected(AdapterView<?> adapterView, View view, int i, long l) {
        Toast.makeText(this,"You select " + list.get(i).name, Toast.LENGTH_SHORT).show();

    }

    @Override
    public void onNothingSelected(AdapterView<?> adapterView) {

    }
}
4)效果图
4.BaseAdapter优化getView()
页面能显示的Item有限,若要显示100个Item,则需要滚动页面。
如果每次都创建新的Item,会浪费内存,所有可以重复使用已经滚出页面的Item。
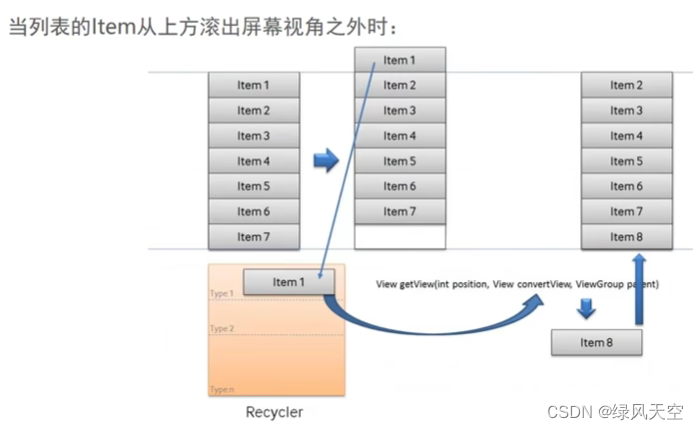
代码:
getView()每次判断convertView是否为空,若为空,则新建一个View并把item会用到的控件打包放进View中,若不为空,则代表可以复用已经滚出页面的item的View。
package com.example.chapter08;

import android.content.Context;
import android.view.LayoutInflater;
import android.view.View;
import android.view.ViewGroup;
import android.widget.BaseAdapter;
import android.widget.ImageView;
import android.widget.TextView;

import com.example.chapter08.entity.Planet;

import java.util.List;

public class PlanetBaseAdapter extends BaseAdapter {

    public Context myContext;
    public List<Planet> planetList;

    public PlanetBaseAdapter(Context myContext, List<Planet> planetList) {
        this.myContext = myContext;
        this.planetList = planetList;
    }

    @Override
    public int getCount() {
        return planetList.size();
    }

    @Override
    public Object getItem(int i) {
        return planetList.get(i);
    }

    @Override
    public long getItemId(int i) {
        return i;
    }

    @Override
    public View getView(int i, View convertView, ViewGroup viewGroup) {
        ViewHolder holder;
        if(convertView==null){
            convertView = LayoutInflater.from(myContext).inflate(R.layout.item_planet,null);
            holder = new ViewHolder();
            holder.iv = convertView.findViewById(R.id.iv_icon);
            holder.tv_name = convertView.findViewById(R.id.tv_name);
            holder.tv_desc = convertView.findViewById(R.id.tv_desc);
            convertView.setTag(holder);
        }else{
            holder = (ViewHolder) convertView.getTag();
        }

        Planet planet = planetList.get(i);
        holder.iv.setImageResource(planet.image);
        holder.tv_name.setText(planet.name);
        holder.tv_desc.setText(planet.desc);

        return convertView;
    }

    public class ViewHolder{
        ImageView iv;
        TextView tv_name;
        TextView tv_desc;


    }
}
View的setTag()方法用于给View设置一个标记,这个标记可以是任何类型的对象,通常用于在View中存储一些额外的信息,例如View的ID、位置、状态等等。通过setTag()方法设置标记后,可以使用getTag()方法来获取这个标记,并进行相应的操作。


