这篇论文是介绍《Prototypical Networks for Few-shot Learning》。作者公布了他的Pytorh代码。如果看不太懂原作者的代码话可以看一下这一个:https://github.com/orobix/Prototypical-Networks-for-Few-shot-Learning-PyTorch
0. Few-shot learning
Few-shot learning是一类机器学习问题,指的是从少量样本中学习新的任务或类别。传统的机器学习算法通常需要大量的数据来训练模型,而few-shot learning则试图通过利用少量数据来学习新的任务或类别,实现更加灵活、高效的学习。这种学习方式可以在很多领域使用,如自然语言处理、图像识别、计算机视觉等。
1. Prototypical Networks
Prototypical neural networks是一种基于原型的神经网络模型,用于解决分类问题。该模型的主要思想是将每个类别的样本表示成其原型,即该类别的所有样本的平均值。然后,使用欧几里得距离或余弦相似度等度量方法,将待分类的样本与每个类别的原型进行比较,从而确定其属于哪个类别。该模型在许多图像分类、语音识别等任务中取得了良好的效果,并且具有较强的泛化能力。
Prototypical网络的思想是每一个类别都存在一个prototype representation,样本点都是散落在prototype representation的周围。为了估计出类别的prototype representation,使用神经网络非线性映射将样本点映射到embedding space,所有support set在embedding space的均值记为prototype。在测试阶段,我们将离query point最近的prototype的类别作为预测类别。
[外链图片转存失败,源站可能有防盗链机制,建议将图片保存下来直接上传(img-uQ0X6vaU-1685938244078)(./figs/prototypical.png)]
Few-shot 分类任务一般提供了一个support set和一个querry set。对于querry set中的每一个例子,我们都希望从support set给定的例子中预测出相应的标签。
Prototypical networks也算作是一种metric learning算法。它有两个阶段:
- 将support set的样本和querry set的样本输入到网络中得到他们在特征空间中的向量;
- 将querry sample与support set中的sample作比较预测它的类别。
因此,对于few-shot问题我们的挑战是:
- 找到一个好的featuer space。将样本投射到该特征空间中使相同类别的样本距离较小,不同类别中的样本距离较大。
- 找到一个他们在特征空间中比较representations向量的方法。
Prototypical Networks就属于第二种,该模型提出了一种在feature space中比较representations的方法。Protypical Networks计算每一个类别的prototype,即support set中每一个样本embedding的均值。计算querry sample的representations与每一个prototype的欧式距离,距离最小的prototype所属类别作为该样本的预测类别。
2. Notations
通过一个映射函数
f
θ
:
R
D
→
R
M
f_\theta :\mathbb{R} ^D\to \mathbb{R} ^M
fθ:RD→RM将样本从样本空间映射到prototype representation空间,prototype记为
c
k
∈
R
M
c_k \in \mathbb{R}^{M}
ck∈RM,维度为
M
M
M。
每一个prototype是embeded support points向量的均值:
c
k
=
1
S
k
∑
(
x
i
,
y
i
)
∈
S
k
f
θ
(
x
i
)
c_k = \frac{1}{S _k}\sum_{(x_i,y_i)\in S_k}^{} f_{\theta }(x_i)
ck=Sk1(xi,yi)∈Sk∑fθ(xi)
给定一个距离公式
d
d
d,prototypical network产生query point
x
x
x与每个prototype距离的softmax:
p
θ
(
y
=
k
∣
x
)
=
exp
(
−
d
(
f
θ
(
x
)
,
c
k
)
)
∑
k
′
exp
(
−
d
(
f
θ
(
x
)
,
c
k
′
)
)
p_{\theta }(y=k|x) = \frac{\text{exp}(−d(f_{\theta }(x), c_k))}{ {\textstyle \sum_{k'}^{}} \text{exp}(−d(f_{\theta }(x), c_{k'}))}
pθ(y=k∣x)=∑k′exp(−d(fθ(x),ck′))exp(−d(fθ(x),ck))
通过减小类别
k
k
k下
P
P
P的负对数概率来优化模型:
J
(
θ
)
=
−
log
p
θ
(
y
=
k
∣
x
)
J(\theta ) = −\log p_{\theta }(y=k|x)
J(θ)=−logpθ(y=k∣x)
在每一个episodes,从训练集中随机选择一个子集来,然后再从子集中每个类别选择一部分数据作为support set,剩下的数据为query set。
- 首先,将support set输入到网络然后产生embedded representations,计算每一个类别样本的均值作为该类别的prototype
- 将query point输入到网络中得到embeded representation,计算它与每个prototype的距离,选择最近的一个prototype作为预测类别。
- 将预测类别与真实标签进行比较,然后使用损失函数 J J J优化模型。
3. Dataset
论文中使用的数据集是Omniglot数据集,它采集了来自50个字母表的1623个手写字符,每个字符都由20位不同的人书写。你可以使用torchvision包来下载该数据集:
image_size = 28
train_set = Omniglot(
    root="./data",
    background=True,
    transform=transforms.Compose(
        [
            transforms.Grayscale(num_output_channels=3),
            transforms.RandomResizedCrop(image_size),
            transforms.RandomHorizontalFlip(),
            transforms.ToTensor(),
        ]
    ),
    download=True,
)
test_set = Omniglot(
    root="./data",
    background=False,
    transform=transforms.Compose(
        [
            transforms.Grayscale(num_output_channels=3),
            transforms.Resize([
                int(image_size * 1.15), int(image_size * 1.15)
            ]),
            transforms.CenterCrop(image_size),
            transforms.ToTensor(),
        ]
    ),
    download=True,
)
background设置为True选择training data,background设置为False选择test data。
此外,Omniglot数据集是灰度图,只有一个channel,而模型是期望输入三个channels,所以需要使用transforms.Grayscale(num_output_channels=3)进行与处理。
4. Prototypical Networks
下面是一个Prototypical networks的一个简单部署,源代码来自于这里。
class PrototypicalNetworks(nn.Module):
    def __init__(self, backbone: nn.Module):
        super(PrototypicalNetworks, self).__init__()
        self.backbone = backbone

    def forward(
        self,
        support_images: torch.Tensor,
        support_labels: torch.Tensor,
        query_images: torch.Tensor,
    ) -> torch.Tensor:
        """
        Predict query labels using labeled support images.
        """

        # Extract the features of support and query images
        z_support = self.backbone.forward(support_images)
        z_query = self.backbone.forward(query_images)

        # Infer the number of classes from the labels of the support set
        n_way = len(torch.unique(support_labels))
        # Prototype i is the mean of all support features vector with label i
        z_proto = torch.cat(
            [
                z_support[torch.nonzero(support_labels == label)].mean(0)
                for label in range(n_way)
            ]
        )

        # Compute the euclidean distance from queries to prototypes
        dists = torch.cdist(z_query, z_proto)

        scores = -dists
        return scores


convolutional_network = resnet18(pretrained=True)
convolutional_network.fc = nn.Flatten()

model = PrototypicalNetworks(convolutional_network).cuda()
这里的backbone是一个特征提取器,可以定义成你想使用的任何网络。这里使用的是在ImageNet上预训练的ResNet-18网络作为backbone,FC layer被替换成了nn.Flatten(),因此backbone的输出是一个512维的向量。
5. Build Dataloader
Pytorch中给的dataloader一般不适用与few-shot learning问题,所以我们这里要自己定义一个dataloader。这个dataloader:
- 每个类别的数量应该相等;
- 需要将数据划分成为support set和querry set。
因此,首先我们要将数据集划分为 n n n-way个类别。然后,每个类别包含 n n n-shot和 n n n-query个样本 (每个batch包含 n n n-way*( n n n-shot + n n n-query)个样本)(注意:这里的 n n n不相等)。
N_WAY = 5 # Number of classes in a task
N_SHOT = 5 # Number of images per class in the support set
N_QUERY = 10 # Number of images per class in the query set
N_EVALUATION_TASKS = 100
在Pytorch中,定义dataloader时需要注意三个参数:dataset, sampler和collate_fn (只有在map style dataset的时候才会用到)。
test_set.labels = [
    instance[1] for instance in test_set._flat_character_images
]

test_sampler = TaskSampler(
    test_set,
    n_way=N_WAY,
    n_shot=N_SHOT,
    n_query=N_QUERY,
    n_tasks=N_EVALUATION_TASKS,
)

test_loader = DataLoader(
    test_set,
    batch_sampler=test_sampler,
    num_workers=12,
    pin_memory=True,
    collate_fn=test_sampler.episodic_collate_fn,
)
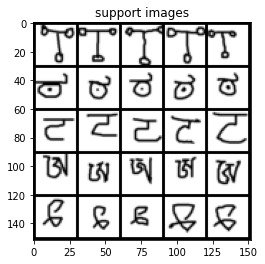
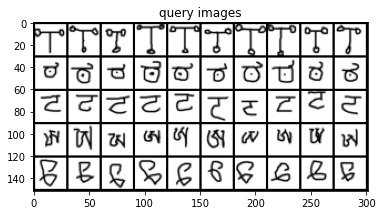
下面我们来看看对于一个 5 5 5-way 5 5 5-shot 任务,产生的数据集是什么样的:
(
    example_support_images,
    example_support_labels,
    example_query_images,
    example_query_labels,
    example_class_ids,
) = next(iter(test_loader))

plot_images(example_support_images, "support images", images_per_row=N_SHOT)
plot_images(example_query_images, "query images", images_per_row=N_QUERY)
产生的support set的数据集是这样的:
query set的数据集是这样的:
在获取到数据后对模型进行训练:
model.eval()
example_scores = model(
    example_support_images.cuda(),
    example_support_labels.cuda(),
    example_query_images.cuda(),
).detach()
_, example_predicted_labels = torch.max(example_scores.data, 1)
print("Ground Truth / Predicted")
for i in range(len(example_query_labels)):
    print(
        f"{test_set._characters[example_class_ids[example_query_labels[i]]]} / {test_set._characters[example_class_ids[example_predicted_labels[i]]]}"
    )
测试模型:
def evaluate_on_one_task(
    support_images: torch.Tensor,
    support_labels: torch.Tensor,
    query_images: torch.Tensor,
    query_labels: torch.Tensor,
) -> [int, int]:
    """
    Returns the number of correct predictions of query labels, and the total
    number of predictions.
    """
    return (
        torch.max(
            model(
                support_images.cuda(),
                support_labels.cuda(),
                query_images.cuda(),
            ).detach().data,
            1,
        )[1]
        == query_labels.cuda()
    ).sum().item(), len(query_labels)
def evaluate(data_loader: DataLoader):
    # We'll count everything and compute the ratio at the end
    total_predictions = 0
    correct_predictions = 0
    # eval mode affects the behaviour of some layers (such as batch normalization or dropout)
    # no_grad() tells torch not to keep in memory the whole computational graph (it's more lightweight this way)
    model.eval()
    with torch.no_grad():
        for episode_index, (
            support_images,
            support_labels,
            query_images,
            query_labels,
            class_ids,
        ) in tqdm(enumerate(data_loader), total=len(data_loader)):
            correct, total = evaluate_on_one_task(
                support_images, support_labels, query_images, query_labels
            )
            total_predictions += total
            correct_predictions += correct
    print(
        f"Model tested on {len(data_loader)} tasks. Accuracy: {(100 * correct_predictions/total_predictions):.2f}%"
    )
evaluate(test_loader)
在Omniglot数据集上 5 5 5-way的准确率为86%:
100%|██████████| 100/100 [00:06<00:00, 16.41it/s]
Model tested on 100 tasks. Accuracy: 86.32%
这个是原作者的Colab和Github。
Reference
- Your Own Few-Shot Classification Model Ready in 15mn with PyTorch
