上一篇:SpringSecurity[4]-访问控制url匹配/内置访问控制方法介绍/角色权限判断
链接:SpringSecurity[4]-访问控制url匹配/内置访问控制方法介绍/角色权限判断_豆虫儿的博客-CSDN博客
十一、基于表达式的访问控制
1.access()方法使用
之前学习的登录用户权限判断实际上底层实现都是调用access(表达式)

可以通过access()实现和之前学习的权限控制完成相同的功能。
1.1以hasRole和permitAll举例
下面代码和直接使用permitAll()和hasRole()是等效的。

2.使用自定义方法
虽然这里面已经包含了很多的表达式(方法)但是在实际项目中很有可能出现需要自己自定义逻辑的情况。
判断登录用户是否具有访问当前URL权限。
2.1新建接口及实现类
新建接口com.msb.service.MyService后新建实现类。
public interface MyService {
    boolean hasPermission(HttpServletRequest request, Authentication authentication);
}
@Component public class MyServiceImpl implements MyService { @Override public boolean hasPermission(HttpServletRequest request, Authentication authentication) { Object obj = authentication.getPrincipal(); if(obj instanceof UserDetails){ UserDetails user = (UserDetails) obj; Collection<? extends GrantedAuthority> authorities = user.getAuthorities(); return authorities.contains(new SimpleGrantedAuthority(request.getRequestURI())); } return false; } }
2.2修改配置类
在access中通过@bean的id名.方法(参数)的形式进行调用
配置类中修改如下:
 // url 拦截 (授权)
http.authorizeRequests()
        .antMatchers("/login.html").access("permitAll")
        .antMatchers("/fail.html").permitAll()
        .anyRequest().access("@myServiceImpl.hasPermission(request,authentication)");
十二、基于注解的访问控制
在Spring Security中提供了一些访问控制的注解。这些注解都是默认是都不可用的,需要通过@EnableGlobalMethodSecurity进行开启后使用。
如果设置的条件允许,程序正常执行。如果不允许会报500
![]()
这些注解可以写到Service接口或方法上上也可以写到Controller或Controller的方法上。通常情况下都是写在控制器方法上的,控制接口URL是否允许被访问。
1.@Secured
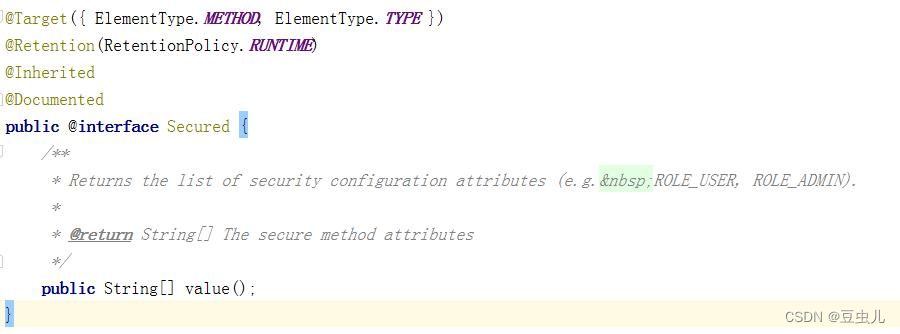
@Secured是专门用于判断是否具有角色的。能写在方法或类上。参数要以ROLE_开头。
1.1实现步骤
1.1.1 开启注解
在启动类(也可以在配置类等能够扫描的类上)上添加@EnableGlobalMethodSecurity(securedEnabled = true)
@SpringBootApplication
@EnableGlobalMethodSecurity(securedEnabled = true)
public class MyApp {
    public static void main(String [] args){
        SpringApplication.run(MyApp.class,args);
    }
}
1.1.2在控制器方法上添加@Secured注解
在LoginController中方法上添加注解
@Secured("abc")
@RequestMapping("/toMain")
public String toMain(){
    return "redirect:/main.html";
}
1.1.3配置类
配置类中方法配置保留最基本的配置即可。
protected void configure(HttpSecurity http) throws Exception {
// 表单认证
http.formLogin()
.loginProcessingUrl("/login") //当发现/login时认为是登录,需要执行UserDetailsServiceImpl
.successForwardUrl("/toMain") //此处是post请求
.loginPage("/login.html");
// url 拦截
http.authorizeRequests()
.antMatchers("/login.html").permitAll() //login.html不需要被认证
.anyRequest().authenticated();//所有的请求都必须被认证。必须登录后才能访问。
//关闭csrf防护
http.csrf().disable();
}
2.@PreAuthorize/@PostAuthorize
@PreAuthorize和@PostAuthorize都是方法或类级别注解。

@PreAuthorize表示访问方法或类在执行之前先判断权限,大多情况下都是使用这个注解,注解的参数和access()方法参数取值相同,都是权限表达式。
@PostAuthorize表示方法或类执行结束后判断权限,此注解很少被使用到。
2.1实现步骤
2.1.1开启注解
在启动类中开启@PreAuthorize注解。
@SpringBootApplication
@EnableGlobalMethodSecurity(prePostEnabled = true)
public class MyApp {
    public static void main(String [] args){
        SpringApplication.run(MyApp.class,args);
    }
}
2.1.2添加@PreAuthorize
在控制器方法上添加@PreAuthorize,参数可以是任何access()支持的表达式
@PreAuthorize("hasRole('abc')")
@RequestMapping("/toMain")
public String toMain(){
    return "redirect:/main.html";
}
十三、Remember Me功能实现
Spring Security 中Remember Me为“记住我”功能,用户只需要在登录时添加remember-me复选框,取值为true。Spring Security会自动把用户信息存储到数据源中,以后就可以不登录进行访问。
1.添加依赖
Spring Security实现Remember Me 功能时底层实现依赖Spring-JDBC,所以需要导入Spring-JDBC。以后多使用MyBatis框架而很少直接导入spring-jdbc,所以此处导入mybatis启动器
同时还需要添加MySQL驱动
<dependency>
    <groupId>org.mybatis.spring.boot</groupId>
    <artifactId>mybatis-spring-boot-starter</artifactId>
    <version>2.1.1</version>
</dependency>
<dependency>
    <groupId>mysql</groupId>
    <artifactId>mysql-connector-java</artifactId>
    <version>5.1.6</version>
</dependency>
2.配置数据源
在application.properties中配置数据源。请确保数据库中已经存在security数据库
spring.datasource.driver-class-name=com.mysql.jdbc.Driver
spring.datasource.url=jdbc:mysql://127.0.0.1:3306/mashibing
spring.datasource.username=root
spring.datasource.password=root
3.编写配置
新建com.msb.config.RememberMeConfig类,并创建Bean对象
@Configuration
public class RememberMeConfig {
    @Autowired
    private DataSource dataSource;
    @Bean
    public PersistentTokenRepository getPersistentTokenRepository() {
        JdbcTokenRepositoryImpl jdbcTokenRepositoryImpl=new JdbcTokenRepositoryImpl();
        jdbcTokenRepositoryImpl.setDataSource(dataSource);
        //自动建表,第一次启动时需要,第二次启动时注释掉
//        jdbcTokenRepositoryImpl.setCreateTableOnStartup(true);
        return jdbcTokenRepositoryImpl;
    }
}
4.修改SecurityConfig
在SecurityConfig中添加RememberMeConfig和UserDetailsService实现类对象,并自动注入。
在configure中添加下面配置内容。
http.rememberMe()
        .userDetailsService(userDetailsService) //登录逻辑交给哪个对象
        .tokenRepository(repository);   //持久层对象
5.在客户端页面中添加复选框
在客户端登录页面中添加remember-me的复选框,只要用户勾选了复选框下次就不需要进行登录了。
<form action = "/login" method="post">
    用户名:<input type="text" name="username"/><br/>
    密码:<input type="text" name="password"/><br/>
    <input type="checkbox" name="remember-me" value="true"/> <br/>
    <input type="submit" value="登录"/>
</form>
6.有效时间
默认情况下重启项目后登录状态失效了。但是可以通过设置状态有效时间,即使项目重新启动下次也可以正常登录。
//remember Me
http.rememberMe()
        .tokenValiditySeconds(120)//单位:秒
        .tokenRepository(repository)
        .userDetailsService(userDetailsServiceImpl);


![[附源码]Node.js计算机毕业设计防疫科普微课堂Express](https://img-blog.csdnimg.cn/6781557975f14564967f6f74db291a74.png)



![[附源码]Python计算机毕业设计Django基于vuejs的文创产品销售平台app](https://img-blog.csdnimg.cn/ddbd8c46ee864865b2b36ed38068a20e.png)
