作者:林江斌 岳沛霖 李锦扬
单位:北京理工大学 机械与车辆学院
指导老师:李忠新 朱杰
一、作品简介
1.设计背景
本作品是以自疫情爆发以来,结合实地考察北京理工大学附近多家大型超市在疫情防控工作及服务顾客作为应用背景,研发了一款形象逼真,灵活实用、多功能集成的校园迎新服务机器人。主要有人脸图像识别、消毒、测温、为新生发放新生大礼包、引导隔离、循迹超市、自动避障及蓝牙遥控等功能,可为学校迎新工作及疫情防控工作作出贡献。本文主要介绍通过对机器人系统的研究与设计,把想法与先进的功能技术用到了机器人上,使得机器人具有很高的人工智能特点。

2.机器人的创新点
2.1功能集成化高
大部分传统机器人功能单一,基本都只能实现单个功能,本作品设计的超市服务机器人将各个功能集成化,引导顾客、消毒测温、循迹引导等功能都集中在一个机器人上,保证了机器人在执行一系列超市服务的系统工作下效率更高,实用性更强。
2.2人工智能化程度高
当前社会仍处于疫情下,防疫已经成为常态化,本组超市服务机器人全程无人操作,极大降低了超市工作人员传染的风险,也极大减少超市人工成本,同时夹取、伸缩、避障、循迹、人脸图像识别及语音播报按指定顺序依次完成实现。
2.3三自由度机械臂的全方位运动
机器人主体主要由智能小车,机械臂和显示屏等组成,形状为类人型机器人,在小车运动时还可实现机械臂抓取、伸缩。以机械臂为例:每个机械臂上都由三个舵机控制,能够全方位、多角度运动(一种是串联型三自由度,另一种是联动型三自由度)。
2.4遥控与智能的巧妙结合
由于小车在循迹过程中传感器灵敏程度不是特别精准,为防止实际行走路线与指定寻迹路线有偏差,我们在原有基础训练上采用了蓝牙模块,当偏离路线时,可通过遥控手段使其减小或避免偏离(把灰度传感当作蓝牙模块的子函数),同时提高了智能机器人的灵活程度。
3.作品难点以及解决方案
3.1创意思路寻找
查阅相关服务机器人的市场资料,例如《2021服务机器人运用前景》等,以及在网上查询相关超市防疫情况,再联系疫情下超市服务工作存在的短板,最终敲定基于疫情防疫下的超市服务机器人。
3.2树莓派识别功能难以实现
由于树莓派的性能有限,在只使用一个CPU核心的情况下视频的帧数非常之低,只有5帧左右,以及库函数等问题效果不太理想。通过同时使用不同的XML文件,可以实现同时识别不同物体的功能,比如下面这段代码可以同时识别人脸和黑色手机,识别手机所需要的XML文件是由Radamés Ajna和Thiago Hersan制作,来源在这里。更进一步的我们可以根据自己的需要编写自己的Cascade文件,Naotoshi Seo在此处给出了详细的教程,比较简易的还有Thorsten Ball的香蕉识别教程进行改进完成。
3.3机械臂结构敲定
为了能够有足够高的自由度,我们讨论决定采用两种不同形式的机械臂:一种是串联型三自由度;另一种是联动型三自由度。
4.模拟超市环境测试
机器人整体分为上半部分(主要为机械臂、显示屏),下半部分(小车)调试过程为分开调试,单独检测小车部分的循迹、蓝牙、超声波模块。上部分主要测试机械臂能否连贯完成指定动作,显示屏及摄像头能否正常完成识别,以及语音模块和温度传感器能否正常播报与测温。校园环境以北京理工大学北校区为例进行等比例缩小,极大还原了超市复杂的路线环境。
5.应用前景分析
我国服务机器人市场规模在2023年有望达到751.8亿元,行业发展也迎来很多有利因素。一是目前增加的老年人口为服务机器人在医疗以及养老提供了发展机遇;二是服务机器人是一种由人工智能、人机交互等多种技术集成的载体,随着技术的发展,服务机器人的性能会得到提高,用户体验也会得到升级,有可能会进一步挖掘市场需求;三是国内已经形成了自上而下的政策体系,正在加速行业的发展;四是常态化的疫情防控为服务机器人在防疫以及公共服务提供了发展机遇。----《2021中国机器人专题论坛》
2020年我国服务机器人市场规模383.8亿元,同比增长37.4%,服务机器人主要为家用服务、医疗服务和公共服务机器人。根据中国电子学会统计数据,服务机器人市场规模占比47.7%,医疗服务机器人和公共服务机器人平分秋色,市场规模占比超20%,分别为28.2%和24.1%。随着5G、人工智能、物联网等技术的快速发展,进一步推动服务机器人行业技术升级、成本下降,助力服务机器人行业应用领域不断扩大,服务机器人行业前景光明。----《2021-2025中国服务机器人产业调研前景预测报告》
6.结语
本作品设计材料存在一定的局限性,机器人很难准确无误地完成全部流程,以后可以使用更加精密的材料、零部件,将校园迎新机器人做的更加完善,同时希望校园防疫迎新一体化机器人能够为校园迎新及防疫工作带来帮助。

二、技术说明
1.机器人整体结构设计
超市疫情防控及引导机器人主要功能在于保证超市疫情防控的同时,能够友好地带领顾客、引导顾客浏览超市。为了实现智能监测、智能服务和自主移动,设计了机器人大概模型(如下图所示):

在实际组装过程中进行部分改进,形成最终机器人(如下图所示):

机器人的总体设计为类人型机器人,由连接树莓派的LED显示屏、摄像头、温度传感器、灰度传感器、超声波传感器、红外传感器、蓝牙模块、语音模块、两个机械手臂、自制小车、电池等其它部分组成。它的功能模块包括:消毒测温模块、文字人脸识别模块、语音输出模块、机械臂运动模块、小车运动等模块。
2.机器人的功能设计
超市服务机器人具体的功能如下(不分先后):
① 对顾客的面部进行识别判断是否佩戴口罩,佩戴者允许通过,不符者小车将为顾客递取口罩;
② 对顾客进行消毒测温,合格者通过,高温者带入隔离点;
③ 让来访顾客进行北京健康宝扫码;
④ 语音播报;
⑤ 引领顾客浏览超市;
⑥ 可以蓝牙遥控机器人小车运动;
⑦ 自动避障功能。
校园迎新机器人工作流程图如下所示:

3.相关功能模块的实现
3.1人脸口罩识别模块
在基础零件上主要使用到了显示屏、摄像头、以及树莓派等,首先下载sdk启动摄像头对人脸及指定图像进行采集和检测,再对图像进行预处理,最后人脸图像特征提取匹配与识别,其中OpenCV提供了本地分类训练器。
Python实现人脸面部图像识别:
启动v412——编译OpenCV2.4.9——安装Pyqt4——执行sudo apt-get install realvnc-vnc-server命令——输入命令systemctl enable vncserver-virtuald.service(如下图所示),然后点击人脸图像录入就可以执行。

3.2消毒测温模块
主要由灰度传感器、红外传感器、气泵、温度传感器、伸缩机械臂等部件组成。
当红外传感器检测到有人靠近时,通过给温度传感器一个值,我们采用的临界条件是38摄氏度(+-2摄氏度),在测温的同时,控制板同时连接控制气泵对人进行喷杀消毒。如果温度过高则会触发灰度传感器的条件,通过黑线循迹把高温者带入我们指定的隔离点。
3.3语音输出模块
主要由语音模块以及喇叭等部件组成。
即通过TF卡片进行驱动,直接使用电脑更新spi flash的内容。通过简单的串口指令即可完成简单的声音(电平时可保持循环)。我们则是让语音模块完成“体温异常,随我至隔离点”、“体温正常”等简单语音。
3.4机械臂运动模块
主要由舵机等其它金属零件构成,拥有两个机械臂,每个机械臂上都装有三个舵机(如下图所示)。通过高自由度来实现伸缩、摇摆、抓取等功能,通过aurdino进行图形化编程,设置舵机运动方式角度,以及先后顺序等来共同完成。
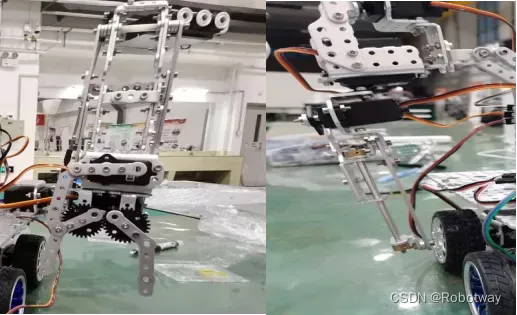
3.5运动小车模块
主要由蓝牙模块、灰度传感器、超声波传感器、电机等其它金属部件构成。
其中蓝牙模块通过控制电机来控制小车的动作。需要控制两个电机,电机包括转向(正转、反转、停止)、速度这两个参数。经过试验,发现电机能调步进速度的范围在1ms-30ms之间比较合适,用S代表设置(S:sta),后面跟1位数字作为状态表达。0:停止,2:逆(后退),1:顺(前进)。想继续用s代表设置速度的(s:speed),但想到两个‘S’不利于区分,而且状态只有3种的话就直接用一位数字就能完成所有的状态表达了,而速度的范围是1-30,需要两位数字,因此就使用数字代表设置速度了,同时也表示速度的十位。这样基本完成,通过手机按键遥控,另外两种传感器都是通过判断if条件来实现循迹、避障的功能。
三、程序代码
1. 示例程序
① 机械臂程序
#include <Servo.h>

Servo servo_pin_11;
Servo servo_pin_4;
Servo servo_pin_7;
Servo servo_pin_12;
Servo servo_pin_3;
Servo servo_pin_8;

void setup()
{
  pinMode( 16, INPUT);
  servo_pin_11.attach(11);
  servo_pin_4.attach(4);
  servo_pin_7.attach(7);
  servo_pin_12.attach(12);
  servo_pin_3.attach(3);
  servo_pin_8.attach(8);
}

void loop()
{
  if (!( digitalRead(16) ))
  {
    servo_pin_11.write( 15 );
    servo_pin_4.write( 40 );
    servo_pin_7.write( 150 );
    delay( 1000 );
    servo_pin_12.write( 180 );
    delay( 1000 );
    servo_pin_3.write( 50 );
    delay( 1000 );
    servo_pin_8.write( 90 );
    delay( 500 );
    servo_pin_8.write( 50 );
    delay( 500 );
    servo_pin_8.write( 90 );
    delay( 500 );
    servo_pin_8.write( 50 );
    delay( 500 );
    servo_pin_8.write( 90 );
    delay( 500 );
    servo_pin_8.write( 50 );
    delay( 500 );
    servo_pin_8.write( 90 );
    delay( 500 );
    servo_pin_8.write( 50 );
    delay( 500 );
    servo_pin_8.write( 90 );
    delay( 500 );
    servo_pin_8.write( 70 );
    delay( 500 );
    servo_pin_3.write( 0 );
    delay( 500 );
    servo_pin_12.write( 10 );
    delay( 1000 );
    servo_pin_11.write( 10 );
    servo_pin_4.write( 40 );
    servo_pin_7.write( 150 );
    servo_pin_3.write( 10 );
    delay( 1000 );
    servo_pin_7.write( 120 );
    delay( 500 );
    servo_pin_11.write( 40 );
    delay( 1000 );
    servo_pin_4.write( 70 );
    delay( 1000 );
    servo_pin_7.write( 150 );
    delay( 500 );
    servo_pin_11.write( 20 );
    delay( 5000 );
    servo_pin_12.write( 120 );
    delay( 1000 );
    servo_pin_8.write( 10 );
    delay( 1000 );
    servo_pin_3.write( 50 );
    delay( 2000 );
    servo_pin_3.write( 0 );
    delay( 500 );
    servo_pin_8.write( 70 );
    delay( 500 );
    servo_pin_12.write( 10 );
    delay( 3000 );
    servo_pin_7.write( 20 );
    delay( 500 );
    servo_pin_11.write( 40 );
    delay( 1000 );
    servo_pin_4.write( 30 );
    delay( 2000 );
    servo_pin_4.write( 70 );
    delay( 500 );
    servo_pin_7.write( 150 );
    delay( 500 );
    servo_pin_11.write( 15 );
    delay( 3000 );
  }
  else
  {
    servo_pin_11.write( 15 );
    servo_pin_4.write( 40 );
    servo_pin_7.write( 150 );
    delay( 1000 );
  }
}
② 蓝牙串口模块程序
#include<Servo.h>

const int x1=16;

const int x2=18;

const int x3=17;

const int x4=14;

const int x5=15;

const int y1=3;//左边第一个轮子插口

const int y2=12;//左边第2个轮子插口

const int y4=4;//右边第一个轮子插口

const int y5=11;//右边第二个轮子插口

const int y7=7;

const int p1=180;

const int p2=90;

const int p3=0;

char q;

Servo a1,a2,a3,a4,a5,a6;

void setup() {

  Serial.begin(9600);

  a1.attach(y1);

  a2.attach(y2);

  //a3.attach(y3);

  a4.attach(y4);

  a5.attach(y5);

  //a6.attach(y6);

}

void turnright(){

  a1.write(p3);

  a2.write(p3);

  //a3.write(p3);

  a4.write(p2);

  a5.write(p2);

  //a6.write(p2);

}

void turnleft(){

  a1.write(p2);

  a2.write(p2);

  //a3.write(p2);

  a4.write(p1);

  a5.write(p1);

  //a6.write(p1);

}

void turnright2(){

  a1.write(p3);

  a2.write(p3);

  //a3.write(p3);

  a4.write(p3);

  a5.write(p3);

  //a6.write(p2);

}

void turnleft2(){

  a1.write(p1);

  a2.write(p1);

  //a3.write(p2);

  a4.write(p1);

  a5.write(p1);

  //a6.write(p1);

}

void forward(){

  a1.write(p3);

  a2.write(p3);

  //a3.write(p3);

  a4.write(p1);

  a5.write(p1);

  //a6.write(p1);

}

void back(){

  a1.write(p1);

  a2.write(p1);

  //a3.write(p1);

  a4.write(p3);

  a5.write(p3);

  //a6.write(p3);

}

void sstop(){

  a1.write(p2);

  a2.write(p2);

  //a3.write(p2);

  a4.write(p2);

  a5.write(p2);

  //a6.write(p2);

}

void loop() {

    while(Serial.available()){

        q=Serial.read();

        if(q=='1') forward();

        if(q=='2') turnleft();

        if(q=='3') turnright();

        if(q=='4') back();

        if(q=='5') sstop();

    }

}
③ 超声波模块程序
#include<Servo.h>
const int x1=16;//x1,x2,x3分别是前三个灰度传感器,左中右
const int x2=18;
const int x3=17;
const int x4=18;//超声波输入引脚
const int x5=19;//超声波输出c引脚
const int x6=14;
const int x7=15;
const int y1=3;//y1,y2,y3,y4是六个轮子舵机,12左边,45右边
const int y2=12;
const int y4=4;
const int y5=11;
const int y7=8;
const int y8=7;
const int p1=180;//轮子转速
const int p2=90;
const int p3=0;
const int u=88,c=45;
int rightdistance1,rightdistance2;//超声波距离
int leftdistance1,leftdistance2;
int middledistance1,middledistance2;
Servo a1,a2,a3,a4,a5,a6,a7,a8;//a1-a6车轮,a7是超声波旋转
void setup() {
  Serial.begin(9600);
  pinMode(x1,INPUT);
  //pinMode(x2,INPUT);
  pinMode(x3,INPUT);
  pinMode(x4,INPUT);
  pinMode(x5,OUTPUT);
  pinMode(x6,INPUT);
  pinMode(x7,OUTPUT);
  a1.attach(y1);
  a2.attach(y2);
  //a3.attach(y3);
  a4.attach(y4);
  a5.attach(y5);
  //a6.attach(y6);
  a7.attach(y7);
  a8.attach(y8);

}

void turnright(){
  a1.write(p3);
  a2.write(p3);
  //a3.write(p3);
  a4.write(p2);
  a5.write(p2);
  //a6.write(p2);
}
void turnleft(){
  a1.write(p2);
  a2.write(p2);
  //a3.write(p2);
  a4.write(p1);
  a5.write(p1);
  //a6.write(p1);
}
void turnright2(){
  a1.write(p3);
  a2.write(p3);
  //a3.write(p3);
  a4.write(p3);
  a5.write(p3);
  //a6.write(p2);
}
void turnleft2(){
  a1.write(p1);
  a2.write(p1);
  //a3.write(p2);
  a4.write(p1);
  a5.write(p1);
  //a6.write(p1);
}
void forward(){
  a1.write(p3);
  a2.write(p3);
  //a3.write(p3);
  a4.write(p1);
  a5.write(p1);
  //a6.write(p1);
}
void back(){
  a1.write(p1);
  a2.write(p1);
  //a3.write(p1);
  a4.write(p3);
  a5.write(p3);
  //a6.write(p3);
}
void stop(){
  a1.write(p2);
  a2.write(p2);
  //a3.write(p2);
  a4.write(p2);
  a5.write(p2);
  //a6.write(p2);
}
int Distance_test1(){
    digitalWrite(x5,LOW);
    delayMicroseconds(2);
    digitalWrite(x5,HIGH);
    delayMicroseconds(20);
    digitalWrite(x5,LOW);
    float distance=pulseIn(x4,HIGH);
    distance=distance/58;
    return int(distance);
}
int Distance_test2(){
    digitalWrite(x7,LOW);
    delayMicroseconds(2);
    digitalWrite(x7,HIGH);
    delayMicroseconds(20);
    digitalWrite(x7,LOW);
    float distance=pulseIn(x6,HIGH);
    distance=distance/58;
    return int(distance);
}

void chaoshengbo(){
    if (a7.read()!=u){
        a7.write(u);
        delay(300);}
    if (a8.read()!=u){
        a8.write(u);
        delay(300);}
    middledistance1=Distance_test1();
    middledistance2=Distance_test2();
    if(middledistance1<=25 or middledistance2<=25){
        stop();
        delay(500);
        a7.write(u-c);
        a8.write(u+c);
        delay(500);
        rightdistance1=Distance_test1();
        leftdistance1=Distance_test2();
        delay(500);
        a7.write(u);
        a8.write(u);
        delay(1000);
        a7.write(u+c);
        a8.write(u-c);
        delay(500);
        leftdistance2=Distance_test1();
        rightdistance2=Distance_test2();
        delay(500);
        a7.write(u);
        a8.write(u);
        delay(1000);
        if(middledistance2>25 ){
           back();
            delay(500);
            turnright2();
            delay(int(500));
        }
        else if(middledistance1>25){
          back();
            delay(500);
            turnleft2();
            delay(int(500));
        }
        else{
        if (rightdistance2>leftdistance2){
            back();
            delay(500);
            turnright2();
            delay(int(500));
        }
        else if(rightdistance2<leftdistance2){
            back();
            delay(500);
            turnleft2();
            delay(int(500));
        }
        else forward();}
    }
    else forward();

}
void loop() {
  //huiduweiyi();
  chaoshengbo();
}
④ 温度传感器程序
float temp;
int tempPin = 0;

void setup() {
   Serial.begin(9600);
}

void loop() {
   temp = analogRead(tempPin);
   // read analog volt from sensor and save to variable temp
   temp = temp * 0.48828125;
   // convert the analog volt to its temperature equivalent
   Serial.print("TEMPERATURE = ");
   Serial.print(temp); // display temperature value
   Serial.println();
   delay(1000); // update sensor reading each one second
}
⑤ 灰度检测程序
#include<Servo.h>

const int x1=17;//x1,x2,x3分别是左中右的灰度传感器

const int x2=16;

const int x3=14;

const int y1=12;//y1,y2为左边第一第二轮子

const int y2=8;

const int y4=11;//y4,y5为右边第一第二轮子

const int y5=7;

const int p1=180;

const int p2=90;

const int p3=0;

Servo a1,a2,a3,a4,a5,a6;

void setup() {

  pinMode(x1,INPUT);

  pinMode(x2,INPUT);

  pinMode(x3,INPUT);

  a1.attach(y1);

  a2.attach(y2);

  //a3.attach(y3);

  a4.attach(y4);

  a5.attach(y5);

  //a6.attach(y6);

}

void turnright(){

  a1.write(p3);

  a2.write(p3);

  //a3.write(p3);

  a4.write(p2);

  a5.write(p2);

  //a6.write(p2);

}

void turnleft(){

  a1.write(p2);

  a2.write(p2);

  //a3.write(p2);

  a4.write(p1);

  a5.write(p1);

  //a6.write(p1);

}

void forward(){

  a1.write(p3);

  a2.write(p3);

  //a3.write(p3);

  a4.write(p1);

  a5.write(p1);

  //a6.write(p1);

}

void back(){

  a1.write(p1);

  a2.write(p1);

// a3.write(p1);

  a4.write(p3);

  a5.write(p3);

//a6.write(p3);

}

void loop() {

  int b1=digitalRead(x1);

  int b2=digitalRead(x2);

  int b3=digitalRead(x3);

  if(b1==0&&b2==0&&b3==0){back();}

  if(b1==0&&b2==0&&b3==1){turnright();}

  if(b1==0&&b2==1&&b3==0){forward();}

  if(b1==1&&b2==0&&b3==0){turnleft();}

  if(b1==0&&b2==1&&b3==1){turnright();}

  if(b1==1&&b2==1&&b3==0){turnleft();}

  if(b1==1&&b2==1&&b3==1){forward();}

}
程序源代码及样机stp图资料详见 超市服务机器人
