github 基础
前面讲了 git 的基本使用,这里简单的提一下 github 的基本使用,主要还是 pull 和 push 两个部分。其中 pull 好像有了一些变化,现在似乎是需要 rebase 而不是自动就帮你做了……?不过 rebase 的部分之后再提。
当然,不止是 github 用 git,gitlab、gitee、bitbucket 也都是使用 git 做版本控制,在不关注提供的其他功能(如 actions,copilot 等),使用哪个完全取决于个人偏好。
git 和 github(这里指代所有 git based 平台) 的区别为:
| git | github |
|---|---|
| 安装在本机的版本控制软件,不需要注册账号,不需要网络 | 一个在云端 host git repo 的服务,要使用该服务就需要注册账号,并且需要网络。使用 git 进行工作管理 |
顺便感叹一下,现 github 首页在推 copilt,看起来挺有趣的,有人用过吗。


clone
从云端拉代码的指令,指令为:git clone <repo_url>,一般点到项目中去就能看到对应的 url:
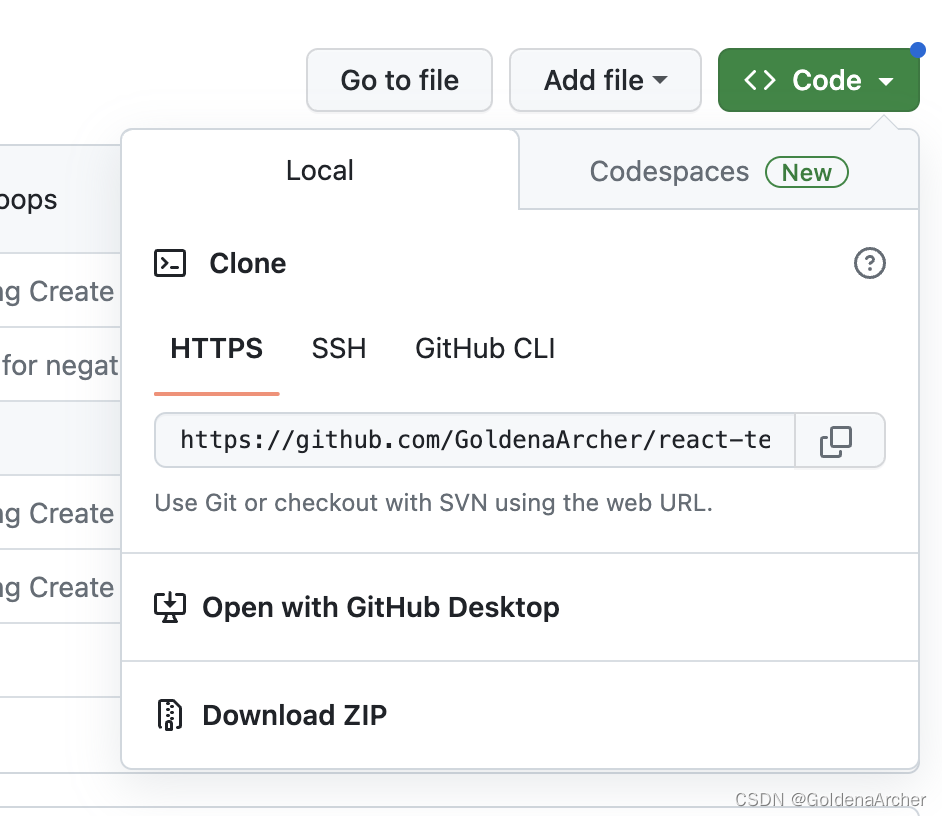
使用 clone 会将远程的项目,包括过去的 commits 全都克隆到本地。顺便,clone 也是一个 git 指令,并不是只能在 github 上用,如果你用的是 bitbucket、gitlab,也能 clone 到本地。
一般建议说不要再已经初始化的 git repo 下面新建一个 git repo。
这里随便找了一个过去的项目举个例子:
➜  git git clone https://github.com/GoldenaArcher/yt-clone.git
Cloning into 'yt-clone'...
remote: Enumerating objects: 89, done.
remote: Counting objects: 100% (89/89), done.
remote: Compressing objects: 100% (71/71), done.
remote: Total 89 (delta 23), reused 82 (delta 16), pack-reused 0
Receiving objects: 100% (89/89), 4.79 MiB | 24.54 MiB/s, done.
Resolving deltas: 100% (23/23), done.
➜  git cd yt-clone
➜  yt-clone git:(main) ls
README.md          package.json       src                tsconfig.json
package-lock.json  public             tailwind.config.js
➜  yt-clone git:(main) git log --oneline
2ae9975 (HEAD -> main, origin/main, origin/HEAD) update package.json
b1fbc4f updage gh-pages
d2e83ec finish impl
c74ecd5 Initialize project using Create React App
(END)
ssh 配置
这里官方文档其实说的挺全的了,跟着官方文档做就好了,参考下面 reference。
基本流程就是:
-
本地生成一个 ssh 密钥
指令为:
ssh-keygen -t ed25519 -C "your_email@example.com",其中-t后代表的加密方式,反正当时我生成的还是用rsa -b 4096这样会生成一对公钥和密钥,公钥可以拿去配对进行 match
以前这样就好了,不过现在从 github 的推荐页上看来,现在系统上似乎有一些 ssh-agent 可以管理 ssh?
-
将公钥放到 github 的 setting 里面去
可以通过
~/.ssh/id_ed25519.pub查看生成的公钥,然后 cv 到 github settings 下的 ssh key 中
create repo
这个也是跟着 github 的提示做就好了……我现在也没有记住全部的指令 OTL
remote
What does “git remote” mean? 的一个说法我觉得理解起来还是比较清晰的,以 git remote add origin git@github.com:peter/first_app.git 为例,它相当于是在本地新建了一个 remote(远程),将其命名为 origin(同样也可以命名为其他, origin 只是一个约定俗成的名字),这个 remote 的位置为 git@github.com:peter/first_app.git。这时候可以将其理解成一个书签,找到 origin 就可以找到 git@github.com:peter/first_app.git 了。
换言之,在一个本地使用 git init,云端没有 reference 的 repo 中,remote 是空的:
➜  undo git:(main) ✗ git remote
➜  undo git:(main) ✗ git remote -v
如果是从远程克隆下来的项目,就能通过 remote 找到对应的地址:
➜  yt-clone git:(main) git remote
origin
➜  yt-clone git:(main) git remote -v
origin  https://github.com/GoldenaArcher/yt-clone.git (fetch)
origin  https://github.com/GoldenaArcher/yt-clone.git (push)
git remote add
具体语法为:git remote add <name> <url>,理解成将 name 这个书签贴到 url 上,这样通过这个书签就能找到对应的网址。
其他
一些不太常用的指令包涵:
git remote rename <old> <new>
git remote remove <name>
git push
远程协作最重要的三件套之一,推进度,具体语法为 git push <remote> <branch>,如 git push origin main,这样会将当前分支推上去,而不是将本地所有的分支(有可能会有很多)推上去。
举个例子:
➜  yt-clone git:(main) git switch -c new-test-branch
Switched to a new branch 'new-test-branch'
➜  yt-clone git:(new-test-branch) touch test.txt
➜  yt-clone git:(new-test-branch) ✗ git add .
➜  yt-clone git:(new-test-branch) ✗ git commit -m "git tutorial"
[new-test-branch d6fc916] git tutorial
 1 file changed, 0 insertions(+), 0 deletions(-)
 create mode 100644 test.txt
➜  yt-clone git:(new-test-branch) git push origin new-test-branch
Enumerating objects: 4, done.
Counting objects: 100% (4/4), done.
Delta compression using up to 16 threads
Compressing objects: 100% (2/2), done.
Writing objects: 100% (3/3), 266 bytes | 266.00 KiB/s, done.
Total 3 (delta 1), reused 0 (delta 0), pack-reused 0
remote: Resolving deltas: 100% (1/1), completed with 1 local object.
remote:
remote: Create a pull request for 'new-test-branch' on GitHub by visiting:
remote:      https://github.com/GoldenaArcher/yt-clone/pull/new/new-test-branch
remote:
To https://github.com/GoldenaArcher/yt-clone.git
 * [new branch]      new-test-branch -> new-test-branch
因为远程并没有这个分支,因此使用 git push 这条指令会在远程创建一个名为 new-test-branch 的分支,如果远程已经有了 new-test-branch 分支,那么就会更新对应分支(如果 push.autoSetupRemote 为 true):
➜  yt-clone git:(new-test-branch) git touch no-branch.txt
git: 'touch' is not a git command. See 'git --help'.
➜  yt-clone git:(new-test-branch) git add .
➜  yt-clone git:(new-test-branch) git commit -m "update without creating new branch"
On branch new-test-branch
nothing to commit, working tree clean
➜  yt-clone git:(new-test-branch) git push origin new-test-branch
Everything up-to-date
➜  yt-clone git:(new-test-branch) git push
fatal: The current branch new-test-branch has no upstream branch.
To push the current branch and set the remote as upstream, use

    git push --set-upstream origin new-test-branch

To have this happen automatically for branches without a tracking
upstream, see 'push.autoSetupRemote' in 'git help config'.
push 到不同的 remote 分支上
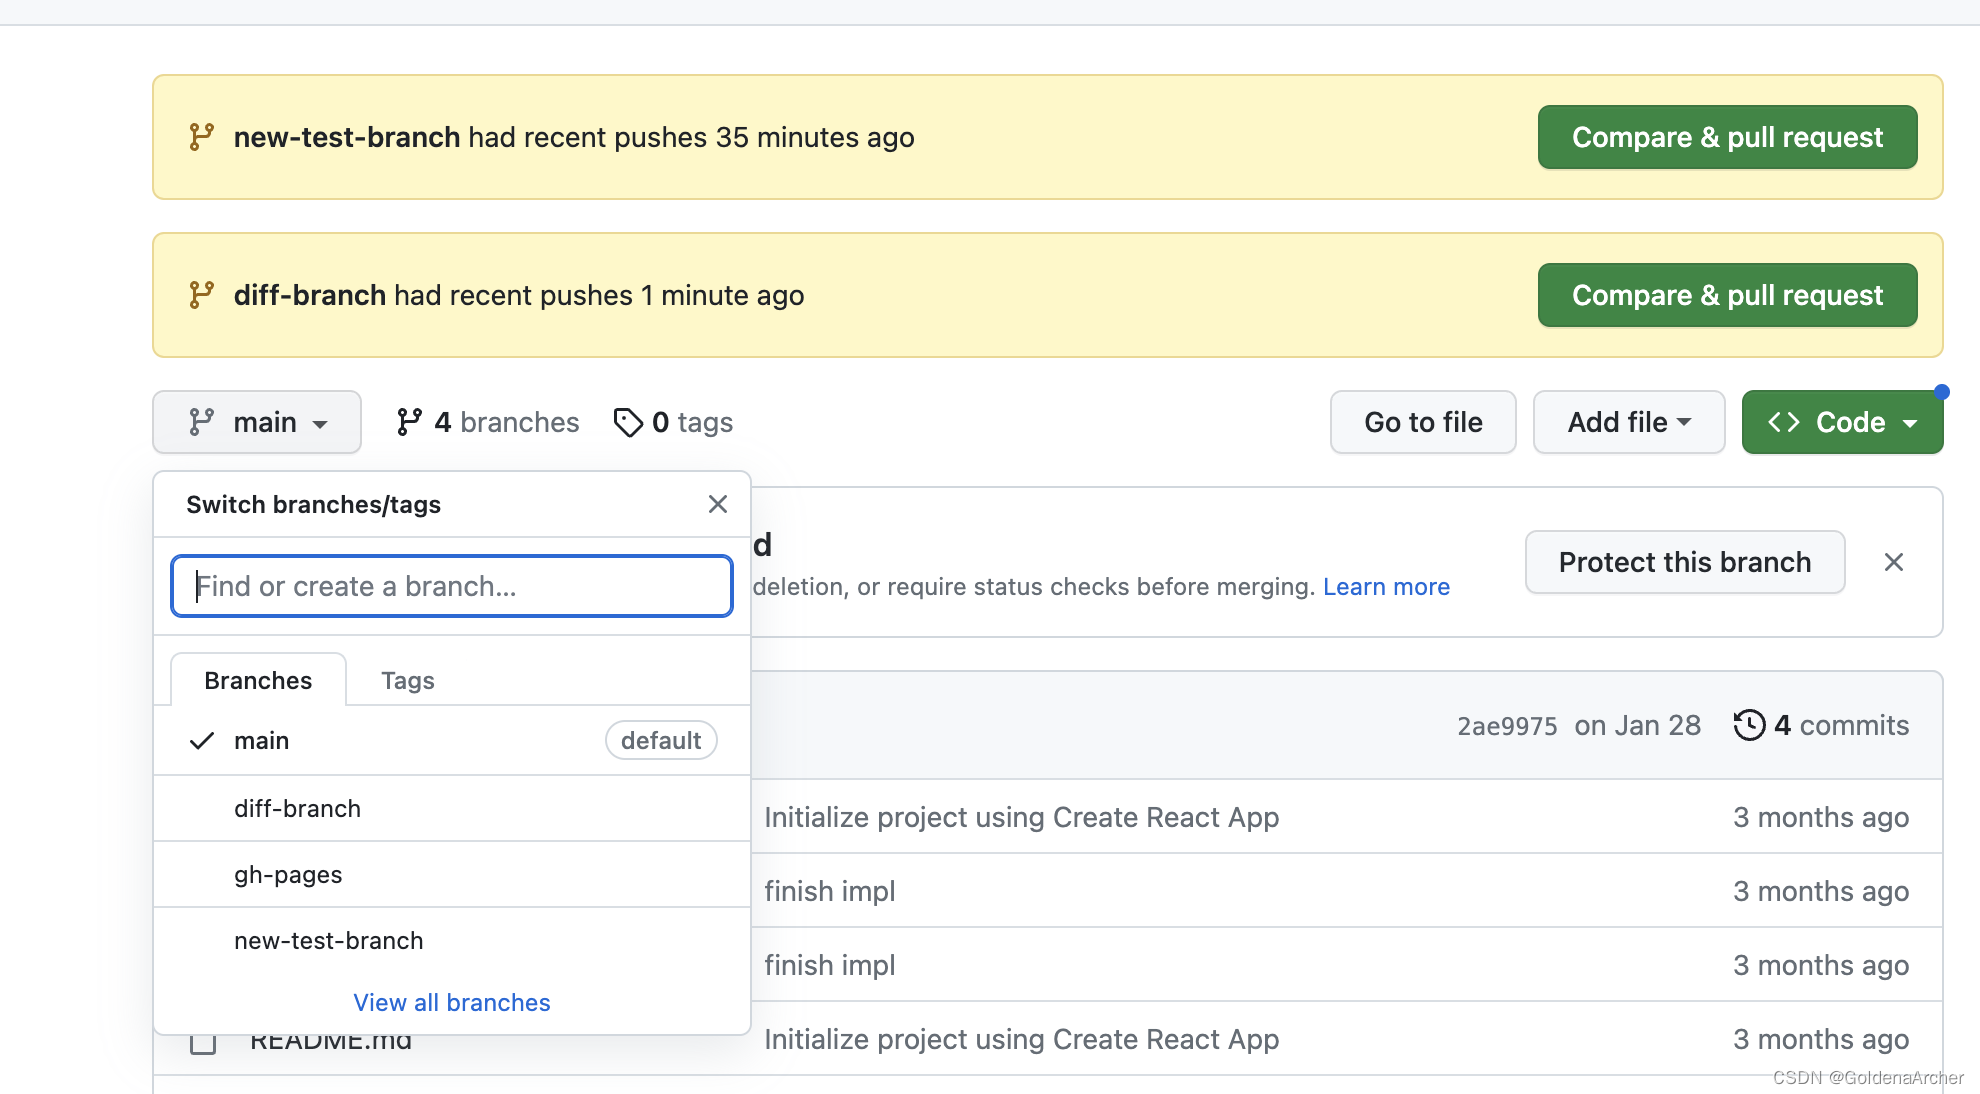
语法为: git push <remote> <local-branch>:<remote-branch>,因为上一个没推成功,这次就不修改文件,而是直接将其推到另一个分支上:
➜  yt-clone git:(new-test-branch) git push origin new-test-branch:diff-branch
Total 0 (delta 0), reused 0 (delta 0), pack-reused 0
remote:
remote: Create a pull request for 'diff-branch' on GitHub by visiting:
remote:      https://github.com/GoldenaArcher/yt-clone/pull/new/diff-branch
remote:
To https://github.com/GoldenaArcher/yt-clone.git
 * [new branch]      new-test-branch -> diff-branch
➜  yt-clone git:(new-test-branch)
这时候查看 git 网页:
git push -u
完整的语法是 git push -u <remote> <branch>,这样会 set upstream,也就是 git push --set-upstream origin new-test-branch。这样本地的分支会与远程的分支保持一致,变化会自动推到当前分支上。
依旧拿上面的分支为例:
➜  yt-clone git:(new-test-branch) git push -u origin new-test-branch
branch 'new-test-branch' set up to track 'origin/new-test-branch'.
Everything up-to-date
➜  yt-clone git:(new-test-branch) touch upstream.txt
➜  yt-clone git:(new-test-branch) ✗ git add .
➜  yt-clone git:(new-test-branch) ✗ git commit -m "set upstream"
[new-test-branch db88fbf] set upstream
 1 file changed, 0 insertions(+), 0 deletions(-)
 create mode 100644 upstream.txt
➜  yt-clone git:(new-test-branch) git push origin new-test-branch
Enumerating objects: 3, done.
Counting objects: 100% (3/3), done.
Delta compression using up to 16 threads
Compressing objects: 100% (2/2), done.
Writing objects: 100% (2/2), 263 bytes | 263.00 KiB/s, done.
Total 2 (delta 1), reused 0 (delta 0), pack-reused 0
remote: Resolving deltas: 100% (1/1), completed with 1 local object.
To https://github.com/GoldenaArcher/yt-clone.git
   d6fc916..db88fbf  new-test-branch -> new-test-branch
这时候查看 git,就会发现 upstream.txt 也推到了远程上:
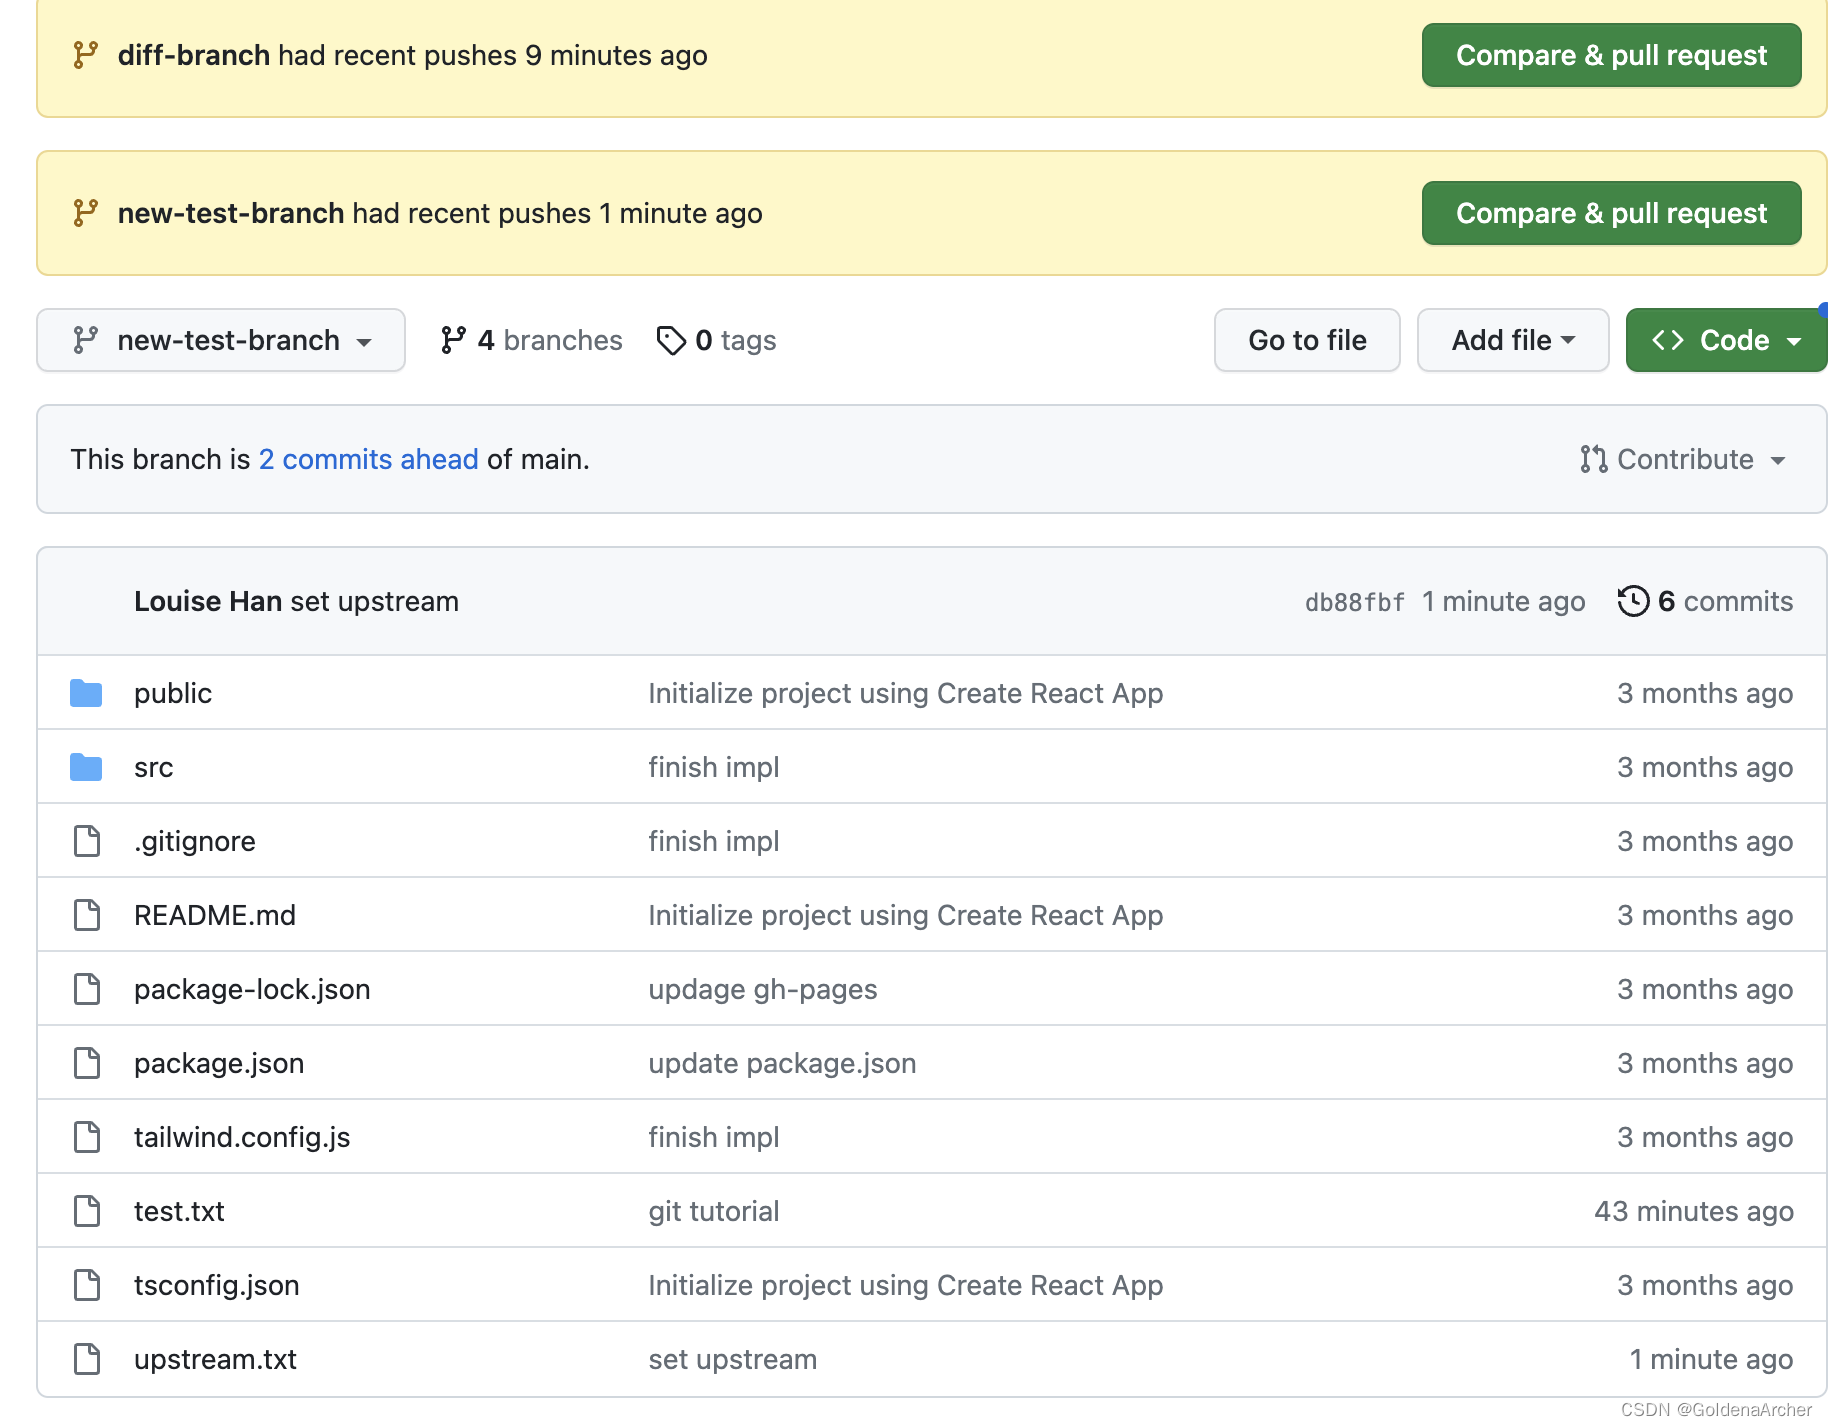
查看 remote 的指令为 git branch -r:
➜  yt-clone git:(new-test-branch) git branch -r
  origin/HEAD -> origin/main
  origin/diff-branch
  origin/gh-pages
  origin/main
  origin/new-test-branch
(END)
这里所有开始于 remote/ 的分支都是远程正在追踪的分支,假设远程包含了本地没有的变化,如:

现在本地所指向的 commit 为 db88fbf,这个时候因为本地没有云端的变化,如果强行提交就会重写历史树而报错:
➜  yt-clone git:(new-test-branch) touch non-conflict.txt
➜  yt-clone git:(new-test-branch) ✗ git add .
➜  yt-clone git:(new-test-branch) ✗ git commit -m "add non conflict file"
[new-test-branch e54963f] add non conflict file
 1 file changed, 0 insertions(+), 0 deletions(-)
 create mode 100644 non-conflict.txt
➜  yt-clone git:(new-test-branch) git push origin new-test-branch
To https://github.com/GoldenaArcher/yt-clone.git
 ! [rejected]        new-test-branch -> new-test-branch (fetch first)
error: failed to push some refs to 'https://github.com/GoldenaArcher/yt-clone.git'
hint: Updates were rejected because the remote contains work that you do
hint: not have locally. This is usually caused by another repository pushing
hint: to the same ref. You may want to first integrate the remote changes
hint: (e.g., 'git pull ...') before pushing again.
hint: See the 'Note about fast-forwards' in 'git push --help' for details.
所以接下来就会学习一下怎么从 remote 上拉代码 这个形容真的是,也就是 git 最重要的三步曲第二步。
fetch
fetch 会把远程的变化下载下来,但是不会 merge 远程上的变化,如果你没有 commit 之前想要拉一下远程的分支,用这个指令。
语法为:git fetch <remote> <branch>。其中remote 和 branch 可省略,git 会默认拉取当前 origin 上的所有分支,
➜  yt-clone git:(new-test-branch) git fetch
remote: Enumerating objects: 4, done.
remote: Counting objects: 100% (4/4), done.
remote: Compressing objects: 100% (2/2), done.
remote: Total 3 (delta 1), reused 0 (delta 0), pack-reused 0
Unpacking objects: 100% (3/3), 653 bytes | 108.00 KiB/s, done.
From https://github.com/GoldenaArcher/yt-clone
   db88fbf..f7d8e1e  new-test-branch -> origin/new-test-branch
这个时候查看状态,信息显示如下:
➜  yt-clone git:(new-test-branch) git status
On branch new-test-branch
Your branch and 'origin/new-test-branch' have diverged,
and have 1 and 1 different commits each, respectively.
  (use "git pull" to merge the remote branch into yours)

nothing to commit, working tree clean
这是因为我虽然拉了远程的代码,但是远程的变化并没有合并到本地上。比如说这时候如果我使用了 ls 去查看 remote.txt 这个文件的话,它是不存在的:
➜  yt-clone git:(new-test-branch) ls | grep remote
➜  yt-clone git:(new-test-branch)
想要将远程的变化同步到本地可以使用 git fetch + git merge,或者使用 git pull。
pull
语法和 fetch 相似,与 fetch 不同的就是,git 会拉最新的变化,并且会应用文件上的变化。
这里的处理会麻烦一些,因为分支已经产生分歧并且不用修 conflict,所以我这里会直接 rebase 掉(关于 rebase 的部分后面会说 ):
➜  yt-clone git:(new-test-branch) git pull origin new-test-branch --rebase
From https://github.com/GoldenaArcher/yt-clone
 * branch            new-test-branch -> FETCH_HEAD
Successfully rebased and updated refs/heads/new-test-branch.
➜  yt-clone git:(new-test-branch) git push origin new-test-branch
Enumerating objects: 3, done.
Counting objects: 100% (3/3), done.
Delta compression using up to 16 threads
Compressing objects: 100% (2/2), done.
Writing objects: 100% (2/2), 253 bytes | 253.00 KiB/s, done.
Total 2 (delta 1), reused 0 (delta 0), pack-reused 0
remote: Resolving deltas: 100% (1/1), completed with 1 local object.
To https://github.com/GoldenaArcher/yt-clone.git
   f7d8e1e..43441bd  new-test-branch -> new-test-branch
这个时候再刷新就能看到变化已经被推上去了:
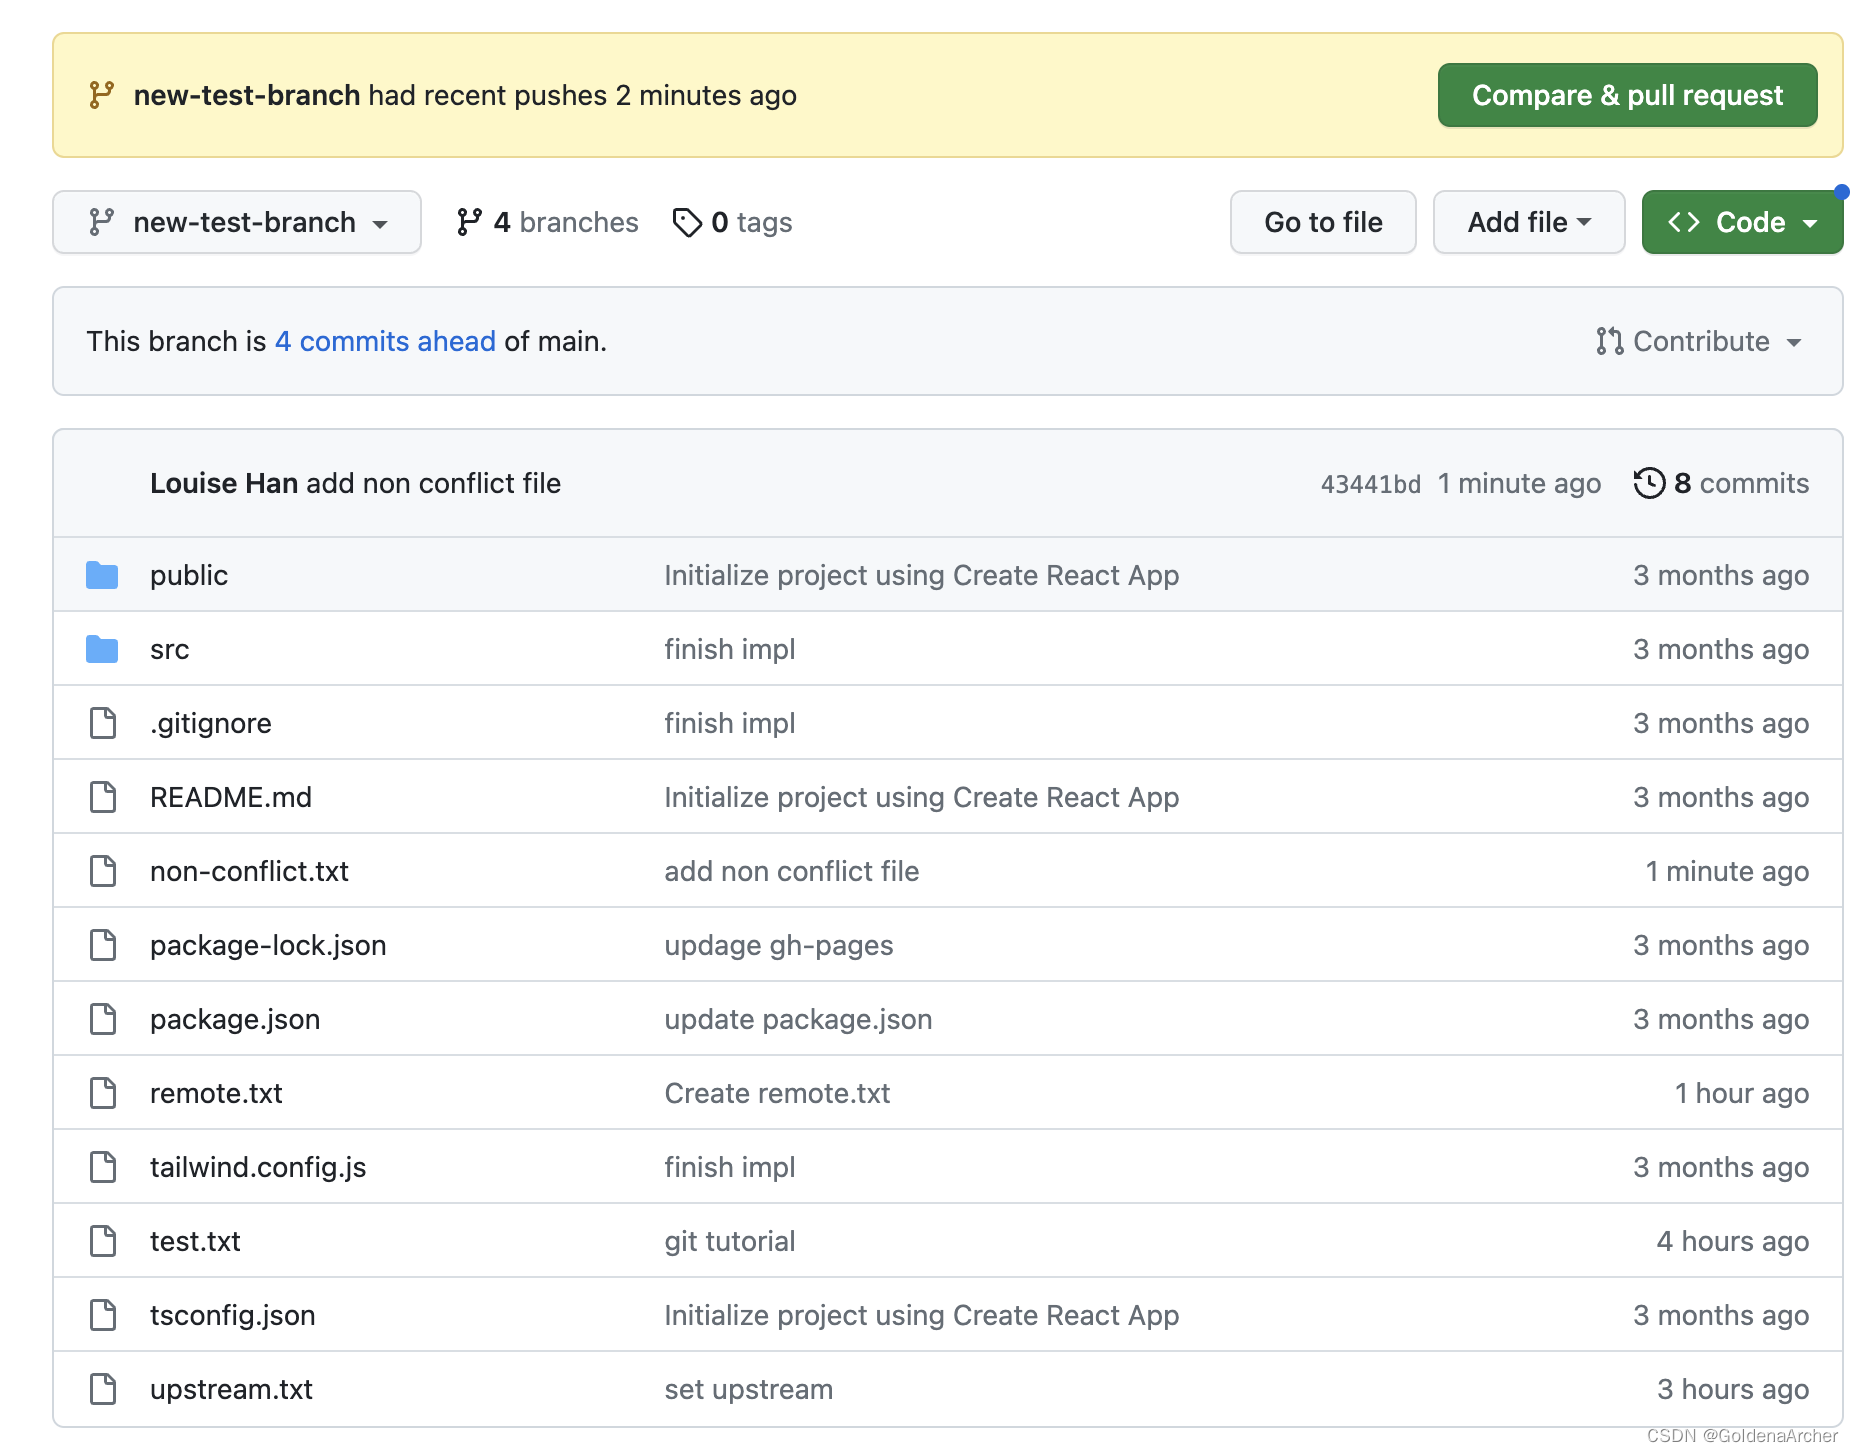
pull with conflict
这里做一下有冲突的掩饰,我会先在 remote 修改一下 remote.txt 的文件,再在本地修改文件并且拉一下代码并且推送:
➜  yt-clone git:(new-test-branch) git add .
➜  yt-clone git:(new-test-branch) ✗ git commit -m "add batman to remote.txt"
[new-test-branch f05a115] add batman to remote.txt
 1 file changed, 15 insertions(+)
➜  yt-clone git:(new-test-branch) git pull --no-ff # flag to turn off fast forward
Auto-merging remote.txt
CONFLICT (content): Merge conflict in remote.txt
error: could not apply f05a115... add batman to remote.txt
hint: Resolve all conflicts manually, mark them as resolved with
hint: "git add/rm <conflicted_files>", then run "git rebase --continue".
hint: You can instead skip this commit: run "git rebase --skip".
hint: To abort and get back to the state before "git rebase", run "git rebase --abort".
Could not apply f05a115... add batman to remote.txt
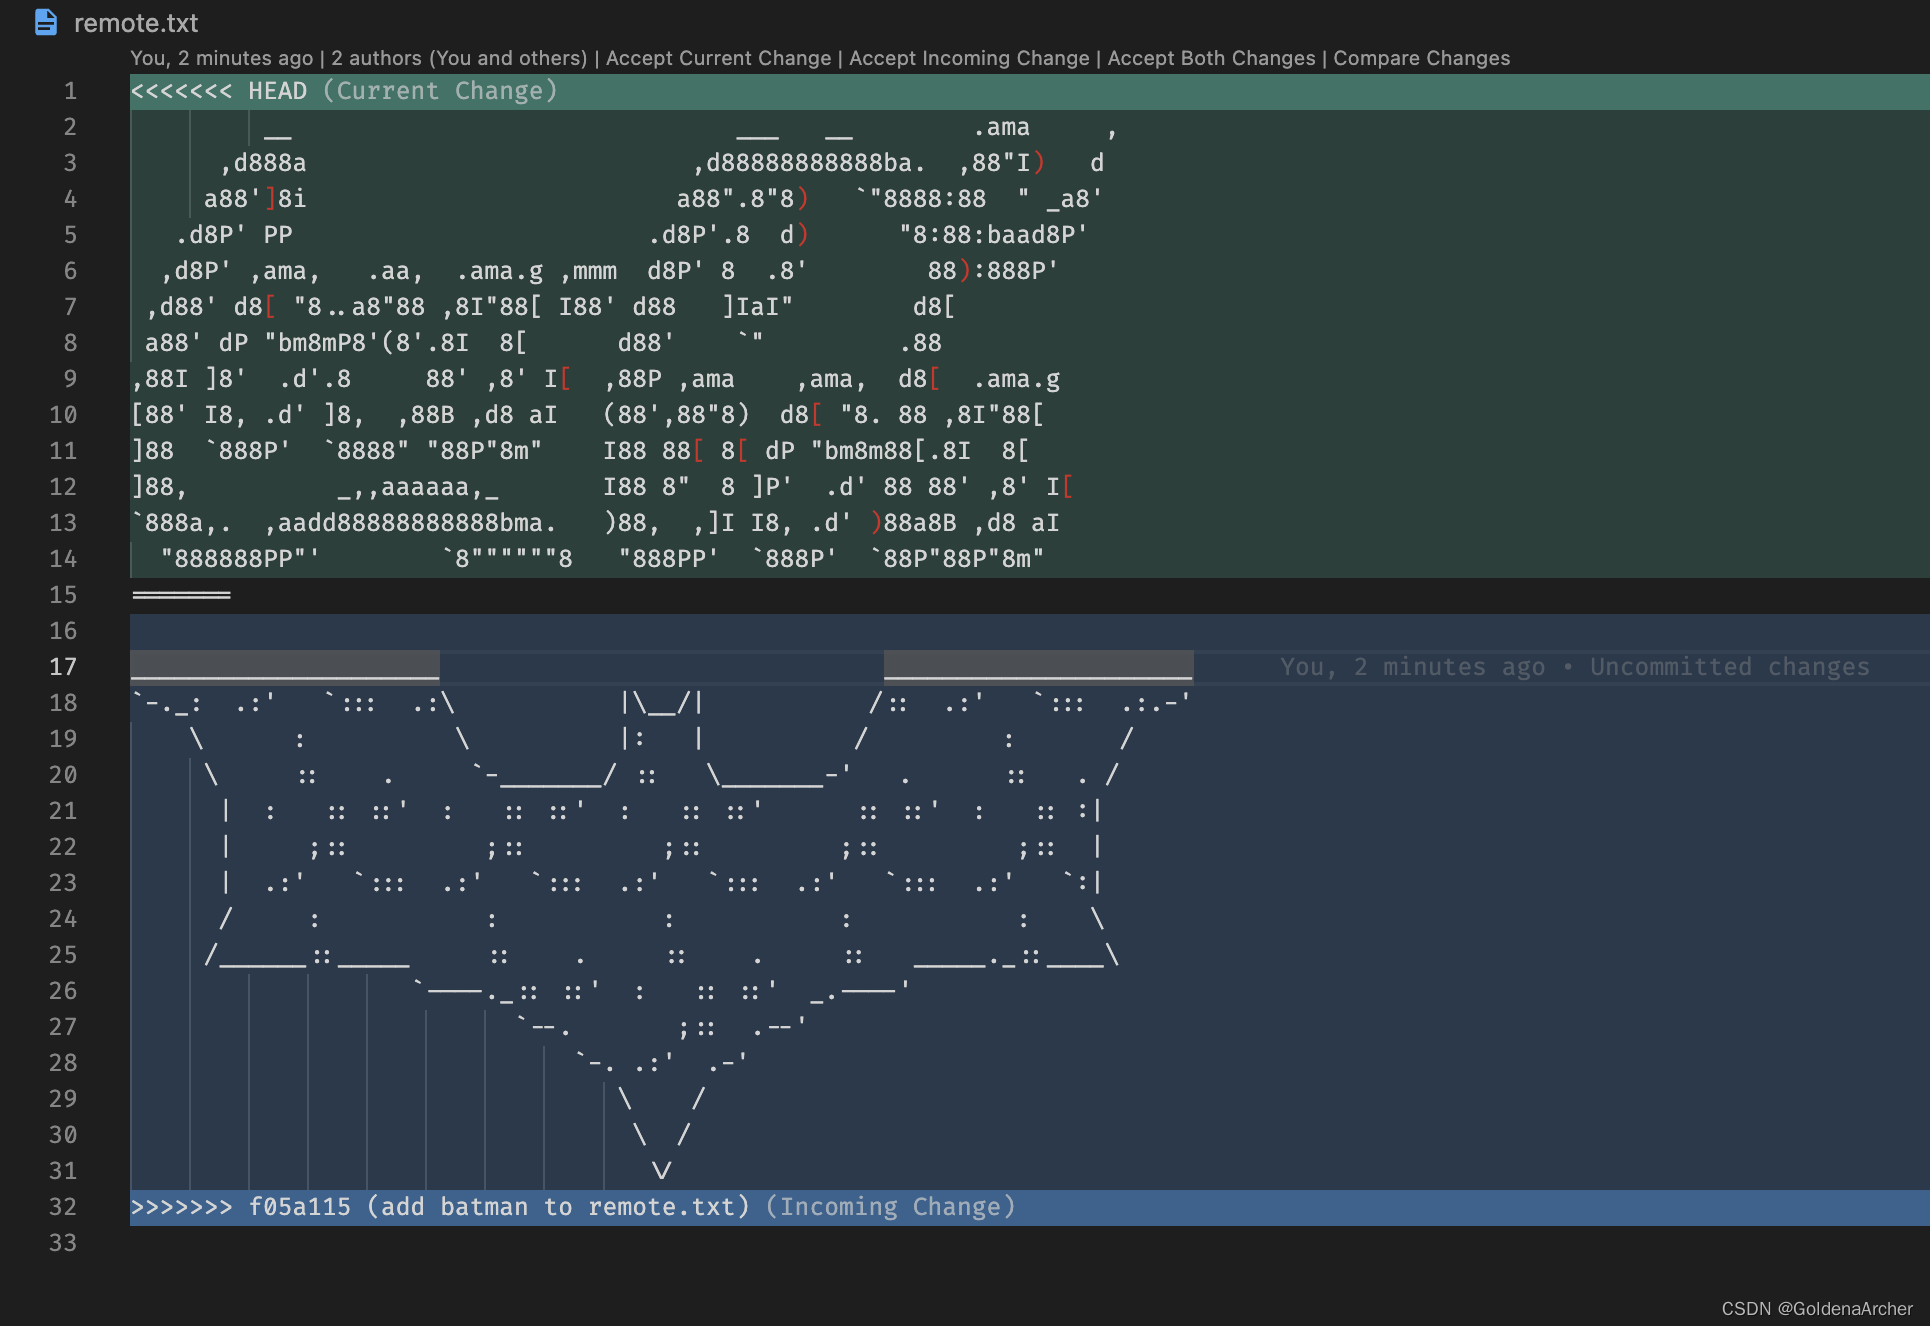
HEAD 的部分就是从远程拉下来的,incoming 则是本地想要合进 HEAD 的变化。这里修完了 conflict,根据提示继续 rebase 后就行了:
➜  yt-clone git:(81f4fb7) ✗ git add remote.txt
➜  yt-clone git:(81f4fb7) ✗ git commit -m "fix merge conflict"
[detached HEAD b00da6d] fix merge conflict
 1 file changed, 16 insertions(+)
➜  yt-clone git:(81f4fb7) ✗ git rebase --continue
Successfully rebased and updated refs/heads/new-test-branch.
唔……以前的话直接 commit 掉就完成 rebase 的过程了……git 的流程好像有点变化了……?
switch
使用 switch 到远程有的分支会直接拉那个分支的变化,语法为:git switch <branch>,checkout 的版本是:git checkout --track <remote-branch>
➜  yt-clone git:(new-test-branch) git fetch
remote: Enumerating objects: 4, done.
remote: Counting objects: 100% (4/4), done.
remote: Compressing objects: 100% (2/2), done.
remote: Total 3 (delta 1), reused 0 (delta 0), pack-reused 0
Unpacking objects: 100% (3/3), 667 bytes | 166.00 KiB/s, done.
From https://github.com/GoldenaArcher/yt-clone
 * [new branch]      switch-branch -> origin/switch-branch
➜  yt-clone git:(new-test-branch) git branch -r


  origin/HEAD -> origin/main
  origin/diff-branch
  origin/gh-pages
  origin/main
  origin/new-test-branch
  origin/switch-branch
(END)
➜  yt-clone git:(new-test-branch) git branch
  main
* new-test-branch
➜  yt-clone git:(new-test-branch) git switch switch-branch
branch 'switch-branch' set up to track 'origin/switch-branch'.
Switched to a new branch 'switch-branch'
(END)
reference
-
Generating a new SSH key and adding it to the ssh-agent
-
Adding a new SSH key to your GitHub account
-
What does “git remote” mean?
-
What does ‘–set-upstream’ do?
-
What is the difference between ‘git pull’ and ‘git fetch’?
