文章目录
- 一、实现目标
- 二、顶部实现(背景为黑色部分)
- 1. 内容布局
- 2. 左边部分
- 网易云logo
- 左边的列表
- 列表元素高亮
- 指向每个列表元素的小红色三角
- “下载客户端”后的hot标志
- 3. 右边部分
- 登陆
- 创作者中心
- 搜索
- 三、底部实现(背景为红色部分)
- 四、总代码
- 1. html
- 2. basic.css
- 3. reset.css
一、实现目标

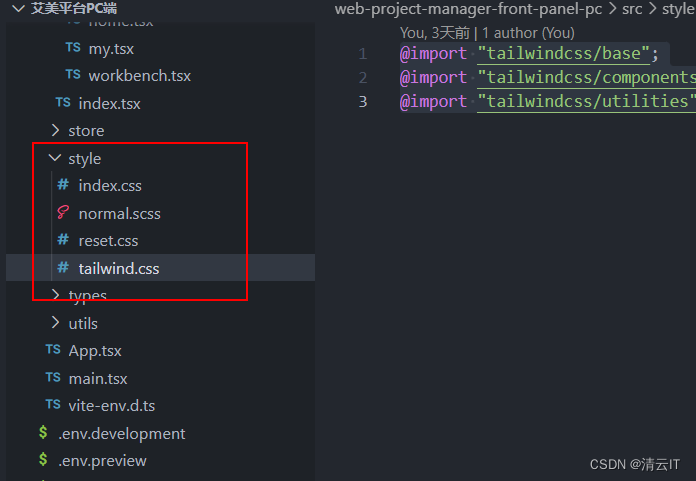
建立如下图所示文件夹及文件:

index_test.html是我们html的主要代码
basic.css是我们的细节样式
reset.css是重置样式(将某些个标签进行统一设置)
image用来存放我们要用的图片
image中的图片为:

整体框架:
<!DOCTYPE html>
<html lang="en">
<head>
    <meta charset="UTF-8">
    <meta http-equiv="X-UA-Compatible" content="IE=edge">
    <meta name="viewport" content="width=device-width, initial-scale=1.0">
    <title>网易云导航栏</title>
    <link rel="stylesheet" href="./css_test/basic.css">
    <link rel="stylesheet" href="./css_test/reset.css">
</head>
<body>
    <div class="top">
        <div class="topbar">
            <div class="top-left"></div>
            <div class="top-right"></div>
        </div>
    </div>
    <div class="bottom"></div>
</body>
</html>
top用来实现导航栏顶部,topbar是用来实现top里的内容,bottom用来实现导航栏底部,top-left用来实现顶部左边部分内容,top-right用来实现顶部右边内容部分。
二、顶部实现(背景为黑色部分)
1. 内容布局
/* basic */
.top {
    height: 70px;
    background-color: #242424;
    /* 源代码中应该还有一个1px的边框,所以height应该是69px,这里直接用border-box把边框的长度算在height里 */
    box-sizing: border-box;
    border-bottom: 1px solid #000;
}

.topbar {
    width: 1100px;
    height: 69px;
    /* 设置行高,让topbar的子元素继承行高,进而让其子元素内容垂直居中 */
    line-height: 69px;
    margin: 0 auto;
    background-color: antiquewhite;
}
页面如下:

在top-left和top-right中分别加入文字left、right,然后设置topbar为浮动布局,让left和right在一行排列,并且根据浮动布局的特性让它们分别处于内容的左右两端。
/* basic */
.topbar {
    /* 浮动布局 */
    display: flex;
    /* 让left和right分别处于内容的左右端 */
    justify-content: space-between;
    width: 1100px;
    height: 69px;
    /* 设置行高,让topbar的子元素继承行高,进而让其子元素内容垂直居中 */
    line-height: 69px;
    margin: 0 auto;
    background-color: antiquewhite;
}
页面如下:

至此,内容布局完成,下面来做网易云logo。
2. 左边部分
网易云logo
更改html代码:
            <div class="top-left">
                <h1 class="logo">
                    <a href="#">网易云音乐</a>
                </h1>
            </div>
重置h1,a属性:
/* reset */
body,h1{
    padding: 0;
    margin: 0;
}

a{
    text-decoration: none;
    color: #000;
}
网页如下:

原网页中这个logo并没有文字,它是一张图片。所以添加如下代码使文字消失
/* basic */
.topbar .top-left .logo a{
    /* 将a变为块级元素,因为text-indent对行内元素无效 */
    display: block;
    text-indent: -9999px;
}
下面我们将logo标志作为logo元素的背景:
/* basic */
.topbar .top-left .logo{
    background-image: url(../images/topbar.png);
    /* 前面我们也看到了这个logo是那张图里的一部分,所以我们需要确定logo这部分图片的位置
    以及它的宽度来获取这部分图片而不参杂图片中的其他成分*/
    width: 157px;
}
同时删除topbar的背景色,页面如下:

左边的列表
更改html中的内容
                <h1 class="logo">
                    <a href="#">网易云音乐</a>
                </h1>
                <ul class="list">
                    <li><a href="#" class="item">发现音乐</a></li>
                    <li><a href="#" class="item">我的音乐</a></li>
                    <li><a href="#" class="item">关注</a></li>
                    <li><a href="#" class="item">商城</a></li>
                    <li><a href="#" class="item">音乐人</a></li>
                    <li><a href="#" class="item">下载客户端</a></li>
                </ul>
重置ul、li
/* reset */
body,h1,ul,li{
    padding: 0;
    margin: 0;
}

a{
    text-decoration: none;
    color: #000;
}

li{
    list-style: none;
}
继续添加样式:
/* basic */
.topbar .top-left{
    /* 浮动布局,让logo和列表排列在同一行上 */
    display: flex;
}

.topbar .top-left .list{
    /* 浮动布局,让list的每个li排列在同一行上 */
    display: flex;
}

.topbar .top-left .list .item{
    color: #ccc;
    /* 每个a的文本内容距离a的左右边框20px */
    padding: 0 20px;
}
此时页面如下:

此时发现logo与列表靠的太近了,修改一下:
.topbar .top-left .list{
    /* 浮动布局,让list的每个li排列在同一行上 */
    display: flex;
    padding-left: 20px;
}
页面如下:

列表元素高亮
可以看到在原网页中,当鼠标移动到“发现音乐”、“我的音乐”等上时背景颜色变暗,字体变白。且就算不移动到上面,也有一个元素是高亮的,不过那要用到js,这里就简单地做一个静态的。
                <ul class="list">
                    <li><a href="#" class="item active">发现音乐</a></li>
                    <li><a href="#" class="item">我的音乐</a></li>
                    <li><a href="#" class="item">关注</a></li>
                    <li><a href="#" class="item">商城</a></li>
                    <li><a href="#" class="item">音乐人</a></li>
                    <li><a href="#" class="item">下载客户端</a></li>
                </ul>
/* basic */
.topbar .top-left .list .item:hover,
.topbar .top-left .list .item.active{
    color: #fff;
    background-color: #000;
}
页面如下:
可以看到每个列表元素的背景只有那么一点高度,这是因为我们我们设置文字颜色和背景颜色样式都是在a标签里的,而a标签是一个行内元素,不能设置宽高,所以背景的高度是由其内的文字撑起来的,这里我们将其转换成块级元素,继承父元素的高度即可。
/* basic */
.topbar .top-left .list .item{
    color: #ccc;
    /* 每个a的文本内容距离a的左右边框20px */
    padding: 0 20px;
    display: block;
}
页面如下:

指向每个列表元素的小红色三角
/* basic */
.topbar .top-left .list .item{
    color: #ccc;
    /* 每个a的文本内容距离a的左右边框20px */
    padding: 0 20px;
    display: block;
    /* 限制红色小三角的移动空间 */
    position: relative;
}

.topbar .top-left .list .item.active::after{
    content: "";
    position: absolute;
    background: url(../images/topbar.png) -226px 0;
    /* 引入图片后一定要设置宽高,不然图标无法显示出来 */
    width: 12px;
    height: 7px;
    /* 居中 */
    left: 0;
    right: 0;
    margin: auto;
    /* 让红色小三角从top的底部往下移一点点*/
}
页面如下:

“下载客户端”后的hot标志
                <ul class="list">
                    <li><a href="#" class="item active">发现音乐</a></li>
                    <li><a href="#" class="item">我的音乐</a></li>
                    <li><a href="#" class="item">关注</a></li>
                    <li><a href="#" class="item">商城</a></li>
                    <li><a href="#" class="item">音乐人</a></li>
                    <li><a href="#" class="item icon-hot">下载客户端</a></li>
                </ul>
.topbar .top-left .list .icon-hot::after{
    content: "";
    position: absolute;
    background: url(../images/topbar.png) -190px 0;
    width: 28px;
    height: 19px;
    /* 到这里上面已经出现了hot标志,下面进行偏移调整到合适的位置 */
    top: 21px;
    left: 100px;
    /* 到这里时,hot标志太靠近“下载客户端了”,调整一下间距 */
    margin-left: 10px;
}
页面如下:

到这里topbar的左边内容部分就完成了。
3. 右边部分
    <div class="top">
        <div class="topbar">
            <div class="top-left">
                <h1 class="logo">
                    <a href="#">网易云音乐</a>
                </h1>
                <ul class="list">
                    <li><a href="#" class="item active">发现音乐</a></li>
                    <li><a href="#" class="item">我的音乐</a></li>
                    <li><a href="#" class="item">关注</a></li>
                    <li><a href="#" class="item">商城</a></li>
                    <li><a href="#" class="item">音乐人</a></li>
                    <li><a href="#" class="item icon-hot">下载客户端</a></li>
                </ul>
            </div>
            <div class="top-right">
                <div class="search">搜索</div>
                <div class="author">创作者中心</div>
                <div class="login">登陆</div>
            </div>
        </div>
    </div>
此时页面如下:

下面添加css样式让三个div浮动到同一行排列
/* basic */
.topbar .top-right{
    display: flex;
    padding-right: 20px;
    font-size: 12px;
}
登陆
<div class="login"><a href="#">登陆</a></div>
首先观察一眼原网页的“登陆”。
当我们鼠标进入“登陆”这个div时,颜色变亮,移动到“登陆”字体上时颜色又变浅且有下划线。
/* basic */
/* 登陆 */
.topbar .top-right .login a{
    color: #787878;
}

.topbar .top-right .login:hover a{
    color: #fff;
}

.topbar .top-right .login a:hover{
    color: #787878;
    text-decoration: underline;
}
页面如下:


创作者中心
<div class="author"><a href="#">创作者中心</a></div>
/* basic */
/* 创作者中心 */
.topbar .top-right .author a{
    /* 为了设置宽高,将a设置为块级元素 */
    display: block;
    box-sizing: border-box;
    color: #ccc;
    width: 90px;
    height: 32px;
    /* 调整三个div的间距 */
    margin: 0 20px;
    /* 边框 */
    border: 1px solid #4F4F4F;
    border-radius: 20px;
    /* 使文字跑到边框的中心处*/
    line-height: 32px;
    text-align: center;
}

/* 鼠标移动到创作者中心处文字和边框高亮 */
.topbar .top-right .author:hover a{
    color: #fff;
    border-color: #fff;
}
页面如下:
此时发现这个创作者中心跑到上面去了,这是因为把a标设置为了块级元素的原因。
此时我们在bar-right里添加一行代码即可:
.topbar .top-right{
    display: flex;
    padding-right: 20px;
    font-size: 12px;
    /* 让其子元素居中 */
    align-items: center;
}
页面如下:

搜索
<div class="search"><input type="text"></div>
/* reset */
input{
    outline: none;
    border: none;
}
/* basic */
/* 搜索 */
.topbar .top-right .search{
    /* 让input输入框浮动到search椭圆框的中间 */
    display: flex;
    align-items: center;
    /* 让input输入框到search框的最后 */
    justify-content: flex-end;
    /* 此时input还有一点点在search外面,调整一下使其在search内部 */
    padding-right: 10px;
    /* 加入搜索图标后,图标有一部分被挡住了,在下面设置一下input框的长度 */
    background: url(../images/topbar.png) 0 -99px;
    /* search椭圆框基本设置 */
    width: 158px;
    height: 32px;
    border-radius: 30px;
    background-color: #fff;
}

.topbar .top-right .search input{
    width: 118px;
}
页面如下:

突然发现左边列表文字有点大了,调整一下:
.topbar .top-left .list{
    /* 浮动布局,让list的每个li排列在同一行上 */
    display: flex;
    padding-left: 20px;
    font-size: 12px;
}

/* 调整以后发现hot标志又离得远一些了,再调整一下left */

.topbar .top-left .list .icon-hot::after{
    content: "";
    position: absolute;
    background: url(../images/topbar.png) -190px 0;
    width: 28px;
    height: 19px;
    /* 到这里上面已经出现了hot标志,下面进行偏移调整到合适的位置 */
    top: 21px;
    left: 80px;
    /* 到这里时,hot标志太靠近“下载客户端了”,调整一下间距 */
    margin-left: 10px;
}
页面如下:

再填补一下搜索框的文字
<div class="search"><input type="text" placeholder="音乐/视频/电台/用户"></div>
同时修改文字的大小
.topbar .top-right .search input{
    width: 118px;
    font-size: 12px;
}
页面如下:

三、底部实现(背景为红色部分)
    <div class="bottom">
        <div class="botbar">
            <ul class="list">
                <li><a href="#" class="item">推荐</a></li>
                <li><a href="#" class="item">排行榜</a></li>
                <li><a href="#" class="item">歌单</a></li>
                <li><a href="#" class="item">主播电台</a></li>
                <li><a href="#" class="item">歌手</a></li>
                <li><a href="#" class="item">新碟上架</a></li>
            </ul>
        </div>
    </div>
页面如下:

添加样式(这里我发现顶部左边列表文字又调小了0.0,自己又去.topbar .bar-left .list里改成了14px)。
/* basic */
/* bottom */
.bottom{
    /* 背景设置 */
    height: 35px;
    background-color: #C20C0C;
    border-bottom: 1px solid #a40011;
    box-sizing: border-box;
    /* 让子元素继承行高,使list元素中的文字居中 */
    line-height: 35px;
}

.botbar{
	/* 与顶部列表对齐*/
    padding-left: 183px;
    box-sizing: border-box;
    width: 1100px;
    margin: 0 auto;
}


.botbar .list{
    /* 让list子元素浮动到一行排列 */
    display: flex;
}

.botbar .list .item span{
    /* span是行内元素,不能设置宽高,将其转换为块级元素 */
    display: block;
    /* 调整间距 */
    padding: 0 13px;
    margin: 7px 17px;
    height: 20px;
    /* 居中 */
    line-height: 20px;
    color: #fff;
    font-size: 12px;
}
页面如下:

再来实现高亮部分:
            <ul class="list">
                <li><a href="#" class="item active"><span>推荐</span></a></li>
                <li><a href="#" class="item"><span>排行榜</span></a></li>
                <li><a href="#" class="item"><span>歌单</span></a></li>
                <li><a href="#" class="item"><span>主播电台</span></a></li>
                <li><a href="#" class="item"><span>歌手</span></a></li>
                <li><a href="#" class="item"><span>新碟上架</span></a></li>
            </ul>
同时将list子元素的边框改为圆角
.botbar .list .item span{
    /* span是行内元素,不能设置宽高,将其转换为块级元素 */
    display: block;
    /* 调整间距 */
    padding: 0 13px;
    margin: 7px 17px;
    height: 20px;
    /* 居中 */
    line-height: 20px;
    color: #fff;
    font-size: 12px;
    border-radius: 21px;
}

.botbar .list .item:hover span,
.botbar .list .item.active span{
    background-color: #9B0909;
}
最终页面如下:

到这里网易云导航栏就制作完成啦!
有不足的地方还望大家多多指正
四、总代码
1. html
<!DOCTYPE html>
<html lang="en">
<head>
    <meta charset="UTF-8">
    <meta http-equiv="X-UA-Compatible" content="IE=edge">
    <meta name="viewport" content="width=device-width, initial-scale=1.0">
    <title>网易云导航栏</title>
    <link rel="stylesheet" href="./css_test/basic.css">
    <link rel="stylesheet" href="./css_test/reset.css">
</head>
<body>
    <div class="top">
        <div class="topbar">
            <div class="top-left">
                <h1 class="logo">
                    <a href="#">网易云音乐</a>
                </h1>
                <ul class="list">
                    <li><a href="#" class="item active">发现音乐</a></li>
                    <li><a href="#" class="item">我的音乐</a></li>
                    <li><a href="#" class="item">关注</a></li>
                    <li><a href="#" class="item">商城</a></li>
                    <li><a href="#" class="item">音乐人</a></li>
                    <li><a href="#" class="item icon-hot">下载客户端</a></li>
                </ul>
            </div>
            <div class="top-right">
                <div class="search"><input type="text" placeholder="音乐/视频/电台/用户"></div>
                <div class="author"><a href="#">创作者中心</a></div>
                <div class="login"><a href="#">登陆</a></div>
            </div>
        </div>
    </div>
    <div class="bottom">
        <div class="botbar">
            <ul class="list">
                <li><a href="#" class="item active"><span>推荐</span></a></li>
                <li><a href="#" class="item"><span>排行榜</span></a></li>
                <li><a href="#" class="item"><span>歌单</span></a></li>
                <li><a href="#" class="item"><span>主播电台</span></a></li>
                <li><a href="#" class="item"><span>歌手</span></a></li>
                <li><a href="#" class="item"><span>新碟上架</span></a></li>
            </ul>
        </div>
    </div>
</body>
</html>
2. basic.css
/* basic */
.top {
    height: 70px;
    background-color: #242424;
    /* 源代码中应该还有一个1px的边框,所以height应该是69px,这里直接用border-box把边框的长度算在height里 */
    box-sizing: border-box;
    border-bottom: 1px solid #000;
}

.topbar {
    /* 浮动布局 */
    display: flex;
    /* 让left和right分别处于内容的左右端 */
    justify-content: space-between;
    width: 1100px;
    height: 69px;
    /* 设置行高,让topbar的子元素继承行高,进而让其子元素内容垂直居中 */
    line-height: 69px;
    margin: 0 auto;
}

.topbar .top-left .logo a{
    /* 将a变为块级元素,因为text-indent对行内元素无效 */
    display: block;
    text-indent: -9999px;
}

.topbar .top-left .logo{
    background-image: url(../images/topbar.png);
    width: 157px;
}

.topbar .top-left{
    /* 浮动布局,让logo和列表排列在同一行上 */
    display: flex;
}

.topbar .top-left .list{
    /* 浮动布局,让list的每个li排列在同一行上 */
    display: flex;
    padding-left: 20px;
    font-size: 14px;
}

.topbar .top-left .list .item{
    color: #ccc;
    /* 每个a的文本内容距离a的左右边框20px */
    padding: 0 20px;
    display: block;
    /* 限制红色小三角的移动空间 */
    position: relative;
}

.topbar .top-left .list .item:hover,
.topbar .top-left .list .item.active{
    color: #fff;
    background-color: #000;
}

.topbar .top-left .list .item.active::after{
    content: "";
    position: absolute;
    background: url(../images/topbar.png) -226px 0;
    /* 引入图片后一定要设置宽高,不然图标无法显示出来 */
    width: 12px;
    height: 7px;
    bottom: -2px;
    /* 居中 */
    left: 0;
    right: 0;
    margin: auto;
}

.topbar .top-left .list .icon-hot::after{
    content: "";
    position: absolute;
    background: url(../images/topbar.png) -190px 0;
    width: 28px;
    height: 19px;
    /* 到这里上面已经出现了hot标志,下面进行偏移调整到合适的位置 */
    top: 21px;
    left: 80px;
    /* 到这里时,hot标志太靠近“下载客户端了”,调整一下间距 */
    margin-left: 10px;
}

.topbar .top-right{
    display: flex;
    padding-right: 20px;
    font-size: 12px;
    /* 居中 */
    align-items: center;
}

/* 登陆 */
.topbar .top-right .login a{
    color: #787878;
}

.topbar .top-right .login:hover a{
    color: #fff;
}

.topbar .top-right .login a:hover{
    color: #787878;
    text-decoration: underline;
}

/* 创作者中心 */
.topbar .top-right .author a{
    /* 为了设置宽高,将a设置为块级元素 */
    display: block;
    box-sizing: border-box;
    color: #ccc;
    width: 90px;
    height: 32px;
    /* 调整三个div的间距 */
    margin: 0 20px;
    /* 边框 */
    border: 1px solid #4F4F4F;
    border-radius: 20px;
    /* 使文字跑到边框的中心处*/
    line-height: 32px;
    text-align: center;
}

/* 鼠标移动到创作者中心处文字和边框高亮 */
.topbar .top-right .author:hover a{
    color: #fff;
    border-color: #fff;
}

/* 搜索 */
.topbar .top-right .search{
    /* 让input输入框浮动到search椭圆框的中间 */
    display: flex;
    align-items: center;
    /* 让input输入框到search框的最后 */
    justify-content: flex-end;
    /* 此时input还有一点点在search外面,调整一下使其在search内部 */
    padding-right: 10px;
    /* 加入搜索图标后,图标有一部分被挡住了,在下面设置一下input框的长度 */
    background: url(../images/topbar.png) 0 -99px;
    /* search椭圆框基本设置 */
    width: 158px;
    height: 32px;
    border-radius: 30px;
    background-color: #fff;
}

.topbar .top-right .search input{
    width: 118px;
    font-size: 12px;
}

/* bottom */
.bottom{
    /* 背景设置 */
    height: 35px;
    background-color: #C20C0C;
    border-bottom: 1px solid #a40011;
    box-sizing: border-box;
    /* 让子元素继承行高,使list元素中的文字居中 */
    line-height: 35px;
}

.botbar{
	/* 与顶部列表对齐*/
    padding-left: 183px;
    box-sizing: border-box;
    width: 1100px;
    margin: 0 auto;
}


.botbar .list{
    /* 让list子元素浮动到一行排列 */
    display: flex;
}

.botbar .list .item span{
    /* span是行内元素,不能设置宽高,将其转换为块级元素 */
    display: block;
    /* 调整间距 */
    padding: 0 13px;
    margin: 7px 17px;
    height: 20px;
    /* 居中 */
    line-height: 20px;
    color: #fff;
    font-size: 12px;
    border-radius: 21px;
}

.botbar .list .item:hover span,
.botbar .list .item.active span{
    background-color: #9B0909;
}
3. reset.css
body,h1,ul,li{
    margin: 0;
    padding: 0;
}

a{
    text-decoration: none;
    color: #000;
}

ul,li{
    list-style: none;
}

input{
    outline: none;
    border: none;
}
