文章目录
- 前言
- 环境
- 主要步骤
- xedbug的安装
- xedbug.so的安装
- 浏览器安装xdebug-helper
- phpstorm 配置xdebug
前言
主要借鉴
https://blog.csdn.net/yinhangbbbbb/article/details/79247331
但是在linux下搭建还是遇到了不少问题
环境
phpstudy
phpstorm
xdebug
主要步骤
phpstudy、phpstorm都没有要踩的坑
xedbug的安装
xedbug.so的安装
https://xdebug.org/wizard.php。
在页面中需要粘贴进去php版本信息,也就是phpinfo()函数的信息,如下图:
 点击分析按钮就有详细的安装步骤
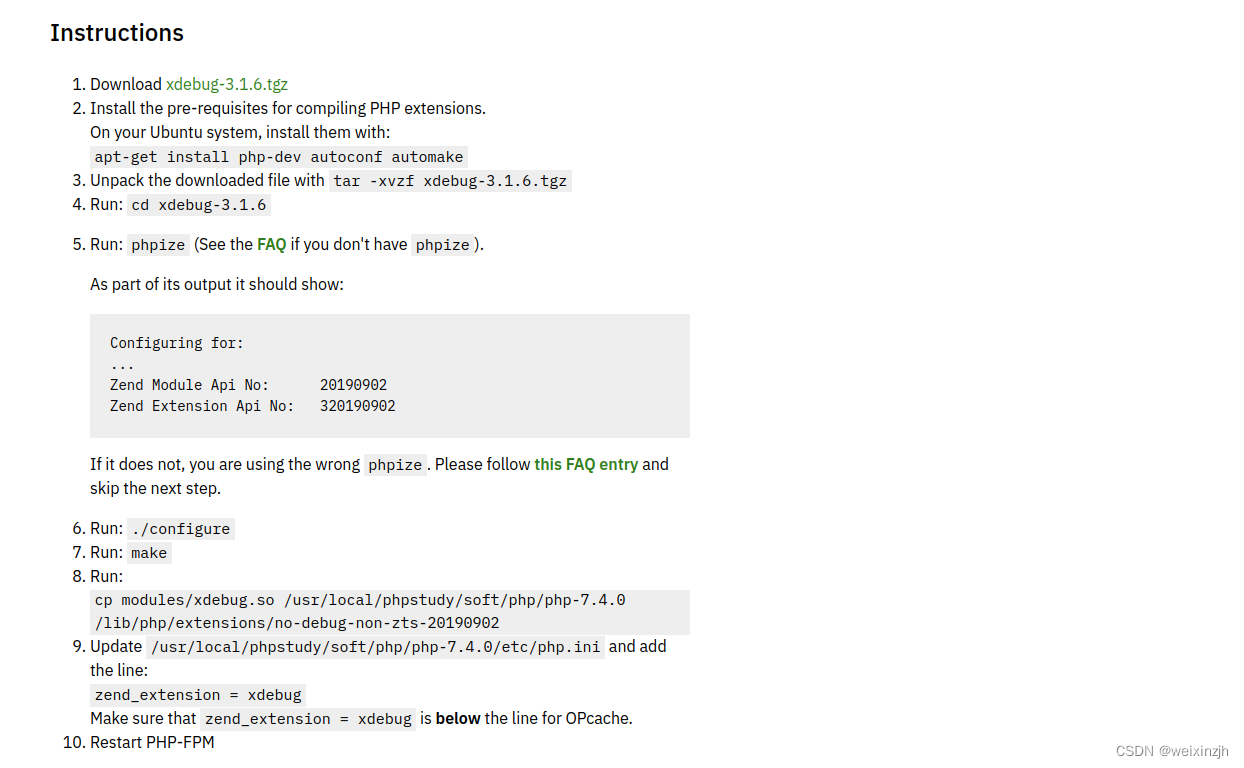 但是我们遇到了两个问题
- 我们本机并没有php的开发环境(是phpstudy的7.4)而且ubuntu22默认安装php是8.1
- 没有编译好的xdebug插件
所以我找了另一个方法:跳过编译,直接安装
- 添加php的ppa:sudo add-apt-repository ppa:ondrej/php
- sudo apt-get update& sudo apt-get upgrade
但是会把所有版本的php及其xdebug 下载好(我也没搞清楚)
xdebug的相应版本在/usr/lib/php/目录下
我们从上述步骤中看到Zend api为20190902相应版本的xdebug的so文件就在该目录下

我们直接到8步骤,复制后,9 更新ini文件如下
zend_extension = xdebug
xdebug.remote_enable = On
xdebug.mode = debug
xdebug.discover_client_host = true
xdebug.remote_host="127.0.0.1"
xdebug.remote_port=9001
xdebug.remote_handler=dbgp
;idekey 区分大小写
xdebug.idekey="PHPSTORM"
xdebug.profiler_enable = off
xdebug.profiler_enable_trigger = off
xdebug.profiler_output_name = cachegrind.out.%t.%p
xdebug.profiler_output_dir = "xxxx"
浏览器安装xdebug-helper
谷歌安装xdebug-helper插件,不多说
phpstorm 配置xdebug
详见上述博客
