前言:通过selector 的poll 来完成所有socket 事件的监听,当不需要selector时 通过selector.close() 完成通道的关闭和资源的释放;
1 selector.close()关闭:
AbstractSelector 类中close 方法:
public final void close() throws IOException {
    boolean open = selectorOpen.getAndSet(false);
    if (!open)
        return;
    implCloseSelector();
}
selectorOpen 是原子类型变量,并发时,只有一个线程能继续向下执行 implCloseSelector;
在看implCloseSelector:
public void implCloseSelector() throws IOException {
	 // 唤醒主线程
     this.wakeup();
     // 按照select() 加锁方向依次获取锁
     synchronized(this) {
         synchronized(this.publicKeys) {
             synchronized(this.publicSelectedKeys) {
                 this.implClose();
             }
         }

     }
 }
首先会调用 wakeup 唤醒选择器。这是有必要的,假如当前选择器正在做选择操作,如果不进行唤醒操作,由于 select 是阻塞的,这就可能会导致 close 被阻塞。回想一下 select 的加锁顺序,this->publicKeys->publicSelectedKeys,close 采用了通用的加锁顺序。因此调用 wakeup 唤醒选择器,当选择器 select 调用释放了相关的锁资源,close 才能顺序进行。
在看WindowsSelectorImpl 下的 this.implClose():
// private Object closeLock = new Object();
protected void implClose() throws IOException {
   synchronized(this.closeLock) {
   		// 获取closeLock 锁
        if (this.channelArray != null && this.pollWrapper != null) {
            synchronized(this.interruptLock) {
                this.interruptTriggered = true;
            }
			// 管道非空,关闭之前创建用于唤醒主线程的通道
            this.wakeupPipe.sink().close();
            this.wakeupPipe.source().close();
			//
            for(int var2 = 1; var2 < this.totalChannels; ++var2) {
            	// 遍历 totalChannels,调用 deregister 从通道的键集合中注销相应的选择键
                if (var2 % 1024 != 0) {
                    this.deregister(this.channelArray[var2]);
                    SelectableChannel var3 = this.channelArray[var2].channel();
                    if (!var3.isOpen() && !var3.isRegistered()) {
                    // 若通道已经关闭并且没有注册到其他选择器上,调用 kill () 关闭通道
                        ((SelChImpl)var3).kill();
                    }
                }
            }
			// 释放pollWrapper 资源
            this.pollWrapper.free();
            // 并将 pollWrapper,selectedKeys ,channelArray 引用置为 null便于gc回收
            this.pollWrapper = null;
            this.selectedKeys = null;
            this.channelArray = null;
            // 释放辅助线程将所有辅助线程设为空闲
            Iterator var7 = this.threads.iterator();

            while(var7.hasNext()) {
                WindowsSelectorImpl.SelectThread var8 = (WindowsSelectorImpl.SelectThread)var7.next();
                var8.makeZombie();
            }
			//  startLock.startThreads () 唤醒所有辅助线程,退出SelectThread 中线程的 run 方法
            this.startLock.startThreads();
        }

    }
}
protected final void deregister(AbstractSelectionKey key) {
    ((AbstractSelectableChannel)key.channel()).removeKey(key);
}
close 负责关闭选择器,并且释放相应的资源。首先加 closeLock,如果 channelArray 和 pollWrapper 非空,首先关闭 wakeupPipe 的 sink 通道和 source 通道;接下来遍历 totalChannels,调用 deregister 从通道的键集合中注销相应的选择键,若通道已经关闭并且没有注册到其他选择器上,调用 kill () 关闭通道;然后释放 pollWrapper,并将 pollWrapper,selectedKeys ,channelArray 引用置为 null;最后遍历 threads 集合,将所有辅助线程设为空闲,并调用 startLock.startThreads () 唤醒所有辅助线程,退出 run 方法。
2 selector 回顾:
public static void main(String[] args) {
   // Channel / Buffer  / Selector
    try {
    	// window 环境下,通过Selector.open() 完成WindowsSelectorImpl 实例的构建
        selector = Selector.open();
        // ServerSocketChannel.open() 只是做了初始化所以 后面要自己在增加 socket 的创建
        // 及对端口的监听
        ServerSocketChannel serverSocketChannel = ServerSocketChannel.open();
        serverSocketChannel.socket().bind(new InetSocketAddress(8080));
        // 连接事件注册到多路复用
        serverSocketChannel.register(selector, SelectionKey.OP_ACCEPT);
        while (true) {
            // select 最终通过poll() 方法向内核询问,是否有通道准备好,
            // 如果所有的通道都没有准备好,进行阻塞,并让出cpu 资源
            selector.select();
            // 程序执行到此说明有管道已经做好了准备,取出所有已经准备好的通道
            Set<SelectionKey> selectionKeySet = selector.selectedKeys();
            Iterator<SelectionKey> iterator = selectionKeySet.iterator();
            while (iterator.hasNext()) {
                SelectionKey selectionKey = iterator.next();
                // 根据通道的事件类型分别做业务处理
                if (selectionKey.isAcceptable()) {
                    // 有客户端连接事件
                    handleAcceptEvent(selectionKey,"selector");
                } else if (selectionKey.isReadable()) {
                    // 有客户端写事件--》服务端进行读取
                    handleReadEvent(selectionKey,"selector");
                } else if (selectionKey.isWritable()) {
                    System.out.println("\"server write\" = " + "server write");
//
                }
                // selectionKey.cancel();
                iterator.remove();
                // System.out.println("selectionKeySet.size() = " + selectionKeySet.size());
                Thread.sleep(3000);
            }
        }
    } catch (Exception ex) {
        ex.printStackTrace();
    }
    // 最终关闭所有通道,释放资源
	selector.close();
}
3 总结:
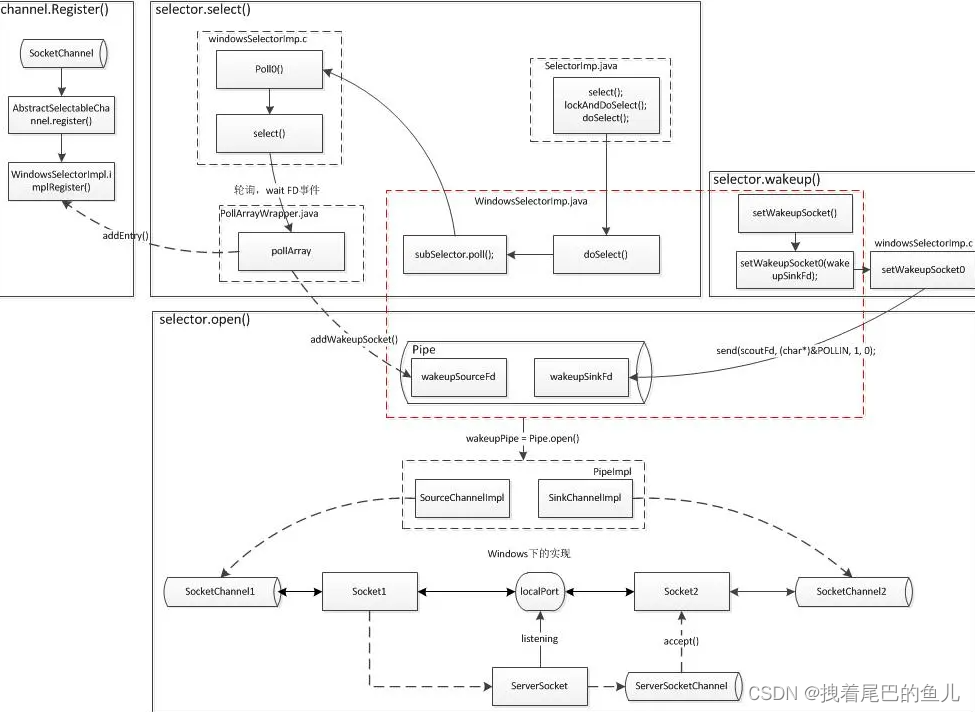
- 通过selector.open 建立管道并记录管道信息;
- register将通信管道感兴趣的事件通过注册到selector ;
- 在每次select()时 ,通过poll()函数向内核发起管道是否准备就绪事件,如果没有事件则阻塞select() 让出cpu资源,当有通道准备就绪,通过wakeup 唤醒所有线程 ,并将新的就绪事件添加到selectedKeys 中后返回;
- 最终通过轮询所有SelectionKey 对已经就绪的管道进行处理;
参考:
1 Selector 源码深入分析之 Window 实现(下篇);

