flutter开发实战-GetX响应式状态管理使用
GetX是一个简单的响应式状态管理解决方案。GetX是Flutter的一款超轻、功能强大的解决方案。它将高性能状态管理、智能依赖注入和路由管理快速而实用地结合在一起。这里简单使用一下GetX
一、引入GetX
在工程的pubspec.yaml中引入插件
get: 4.6.5
GetX功能强大,里面包括routes, snackbars, internationalization, bottomSheets, dialogs等等,使用这些功能可以将MaterialApp更改成GetMaterialApp。但是我这里暂时不使用到这些功能。
二、使用GetX
在flutter创建后会有一个计数的示例。这里使用GetxController,Controller中定义变量都是可被观察的。
ZCounterController代码如下
class ZCounterController extends GetxController {
  RxInt timestamp = 0.obs;

  void getTimestamp() {
    print("getTimestamp");
    int cur = DateTime.now().millisecondsSinceEpoch;
    timestamp.value = cur;
  }
}
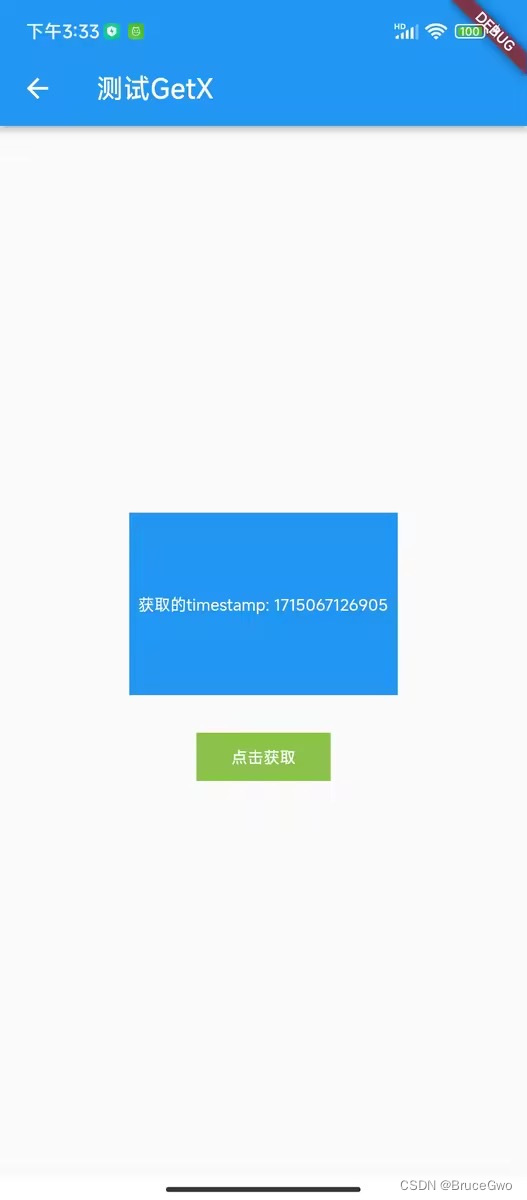
当点击按钮时候,重新获取时间戳,更改timestamp.value的值。
在使用的地方,我们需要实现
final ZCounterController c = Get.put(ZCounterController());
展示用到Obx函数
 Obx(() => Text(
               "获取的timestamp: ${c.timestamp}",
               style: TextStyle(fontSize: 12, color: Colors.white),
             )),
点击按钮调用c.getTimestamp();
效果图如下
使用完整代码如下
import 'package:flutter/material.dart';
import 'package:flutter/rendering.dart';
import 'package:get/get.dart';

class ZGetXPage extends StatefulWidget {
  const ZGetXPage({super.key});

  @override
  State<ZGetXPage> createState() => _ZGetXPageState();
}

class _ZGetXPageState extends State<ZGetXPage> {
  @override
  void initState() {
    // TODO: implement initState
    super.initState();
  }

  @override
  void dispose() {
    // TODO: implement dispose
    super.dispose();
  }

  @override
  Widget build(BuildContext context) {
    // Instantiate your class using Get.put() to make it available for all "child" routes there.
    final ZCounterController c = Get.put(ZCounterController());

    return Scaffold(
      appBar: AppBar(
        title: const Text('测试GetX'),
      ),
      body: Center(
        child: Column(
          mainAxisAlignment: MainAxisAlignment.center,
          crossAxisAlignment: CrossAxisAlignment.center,
          children: [
            Container(
              height: 136,
              width: 200,
              color: Colors.blue,
              alignment: Alignment.center,
              child: Obx(() => Text(
                "获取的timestamp: ${c.timestamp}",
                style: TextStyle(fontSize: 12, color: Colors.white),
              )),
            ),
            SizedBox(height: 20,),
            TextButton(
              onPressed: () {
                c.getTimestamp();
              },
              child: Container(
                height: 36,
                width: 100,
                color: Colors.lightGreen,
                alignment: Alignment.center,
                child: Text(
                  '点击获取',
                  style: TextStyle(fontSize: 12, color: Colors.white),
                ),
              ),
            ),
          ],
        )
      ),
    );
  }
}

class ZCounterController extends GetxController {
  RxInt timestamp = 0.obs;

  void getTimestamp() {
    print("getTimestamp");
    int cur = DateTime.now().millisecondsSinceEpoch;
    timestamp.value = cur;
  }
}
三、小结
flutter开发实战-GetX响应式状态管理使用
学习记录,每天不停进步。




![[华为OD]C卷 精准核算检测 100](https://img-blog.csdnimg.cn/direct/def0a2e0a8094829a341daf82da47c82.png)
