1、多线程启动
有两种启动方式
1、实现Runable接口
2、继承Thread类并且重写run()方法
在执行进程中的任务才会产生线程,所以需要实现Runable接口并且重写run()方法,然后将Runable的实现对象作为参数传递给Thread类。
代码示例:
public class cuo {
    public  static void main(String[] args){
        MyRunable m = new MyRunable();
        new Thread(m).start();
    }}
    class MyRunable implements Runnable{
        public void run(){
            System.out.println("我的任务开始执行。。。");
        }
    }
代码结果:

第二个方法的代码示例:
public class apci {
    public static void main(String[] args){
        Myth mt = new Myth();
        mt.start();
    }
}
class Myth extends Thread{
    public void run(){
        System.out.println("thread running");
    }
}
代码结果:

在一般情况下都会使用实现Runable接口然后启动线程,因为这样可以提高程序的灵活性和拓展性,使用Runable接口描述任务看更加容易理解
注意:执行start()方法的顺序并不是线程启动的的顺序。
2、线程标识
Thread类用于管理线程,如:设置管理线程优先级、设置Daemon属性,读取线程的名字和ID、启动线程任务、暂停线程任务、中断线程等等。
下面是关于ID和名称的代码示例:
public class apci {
    public static void main(String[] args){
        for(int i=0;i<5;i++){
            Myth mt = new Myth();
            Thread th = new Thread(mt);
            th.start();
            System.out.println(th.getId());
            System.out.println(th.getName());
    }}
}
class Myth extends Thread{
    public void run(){
        System.out.println("任务开始执行、、、");
    }
}
代码结果如下:
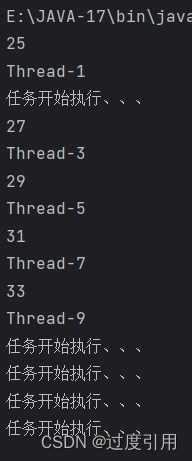
注意:因为线程的问题所以每次结果可能会出现大同小异的情况,不必担心,正常情况(我也执行了很多次都不一样,所以我只能把这个情况归咎为线程的抢占模式的问题)






![民航电子数据库:[E14024]事务内变更操作次数超过最大许可值10000,可通过系统参数max_trans_modify适当调整限制](https://img-blog.csdnimg.cn/direct/bf0860dc511c428ea02b5b76e388ad9b.jpeg)

