1. HarmonyOS next
ArkTS
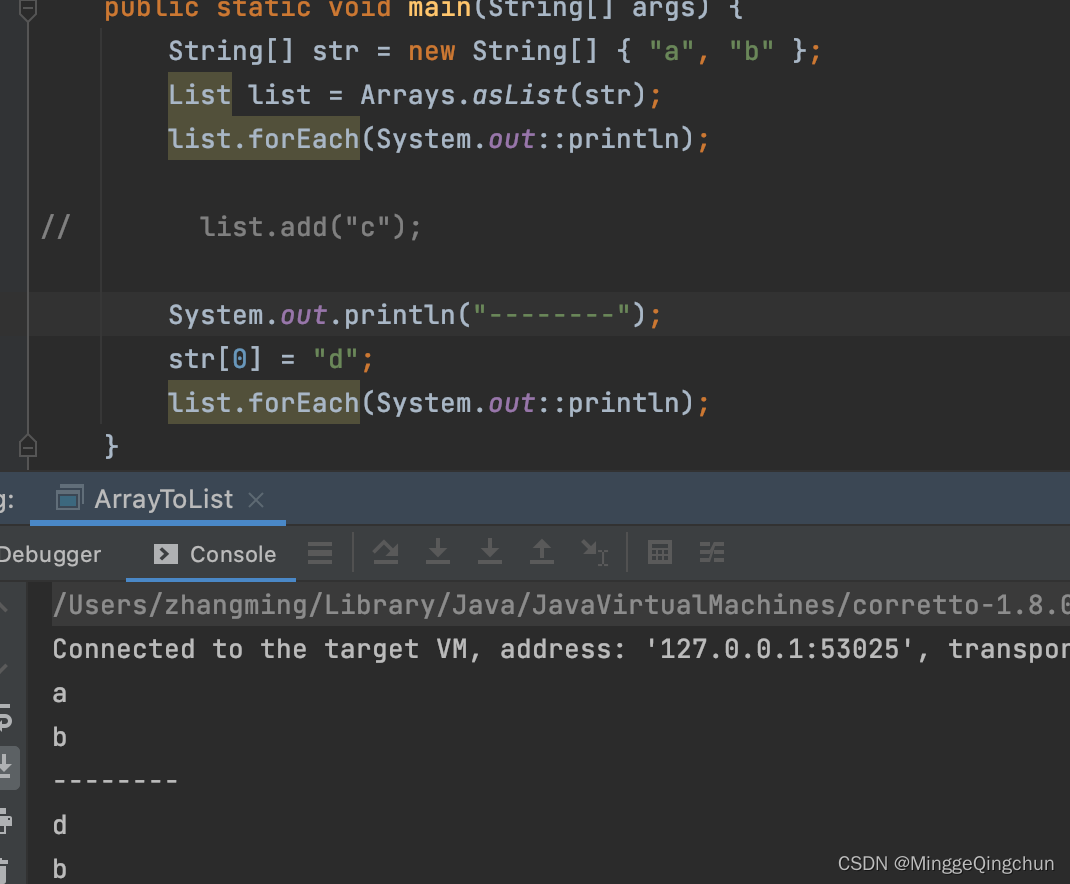
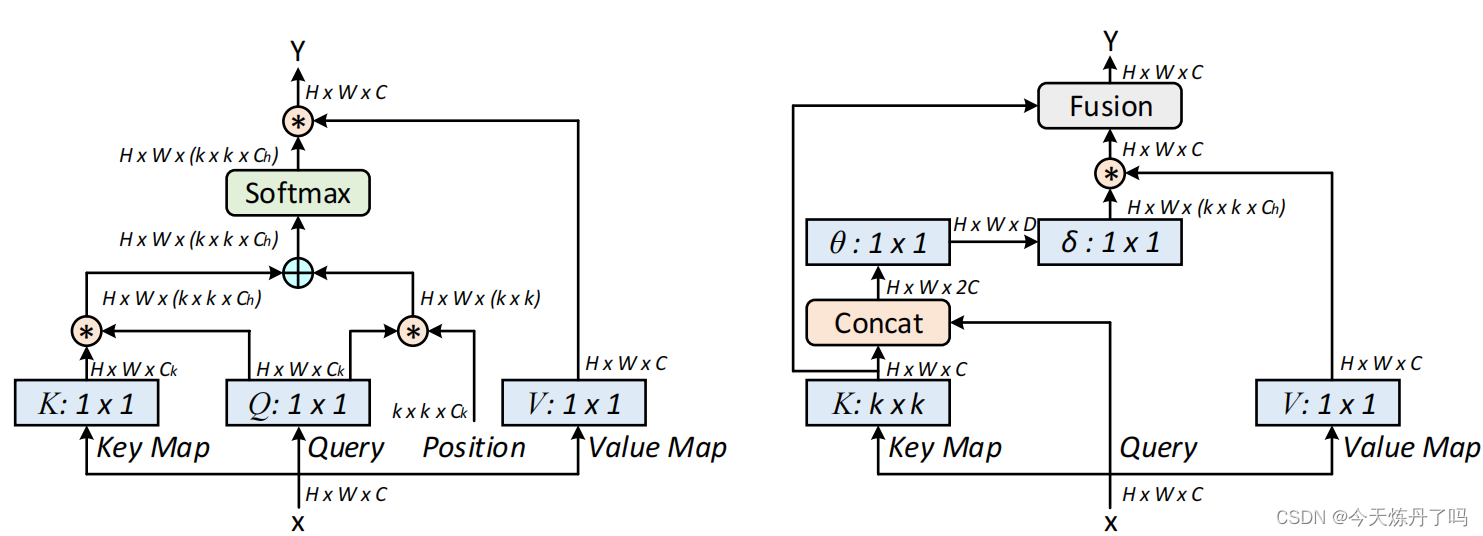
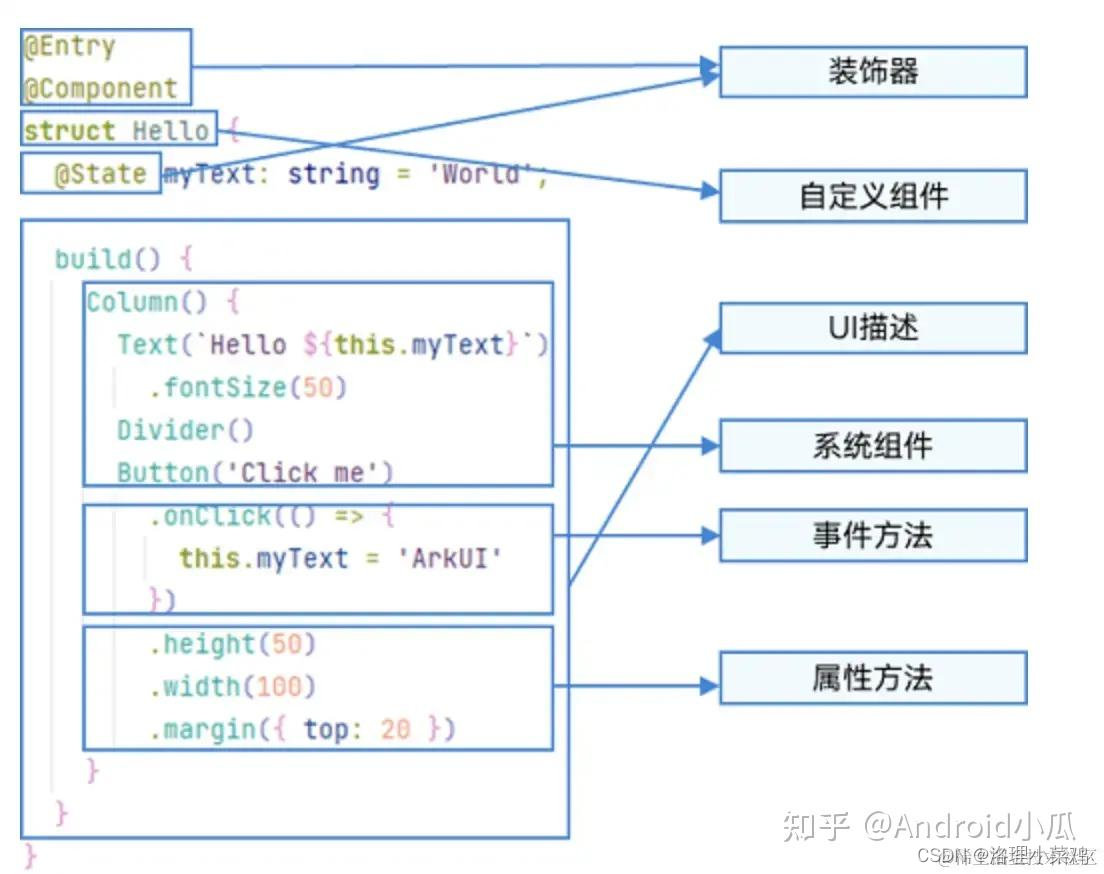
ArkTS围绕应用开发在 TypeScript (简称TS)生态基础上做了进一步扩展,继承了TS的所有特性,是TS的超集
ArkTS在TS的基础上扩展了struct和很多的装饰器以达到描述UI和状态管理的目的
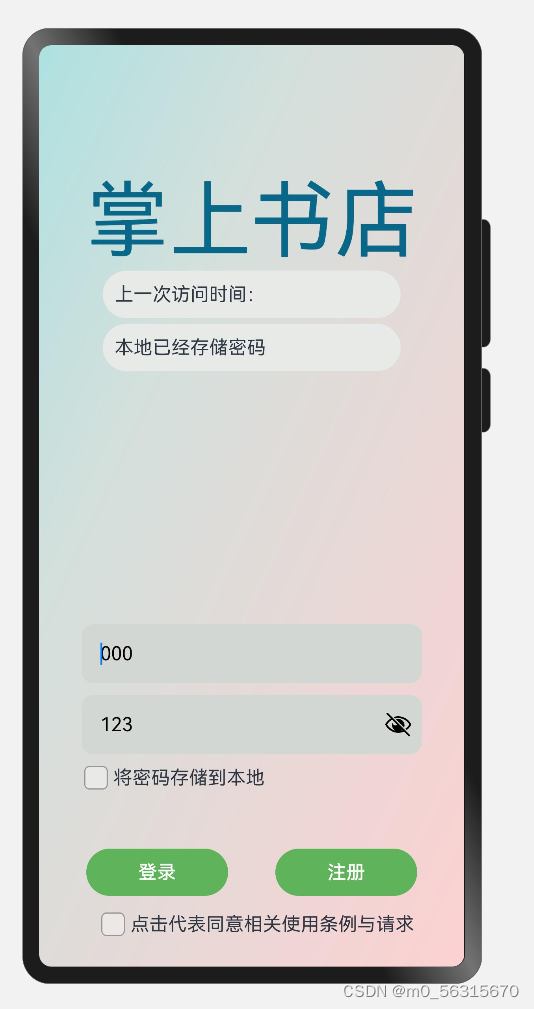
以下代码是一个基于 HarmonyOS 的登录页面组件的示例代码,主要实现了用户登录功能以及一些数据存储和页面跳转的操作。下面我会逐步解释每个部分并添加注释:
2. 实例
3. 功能分区
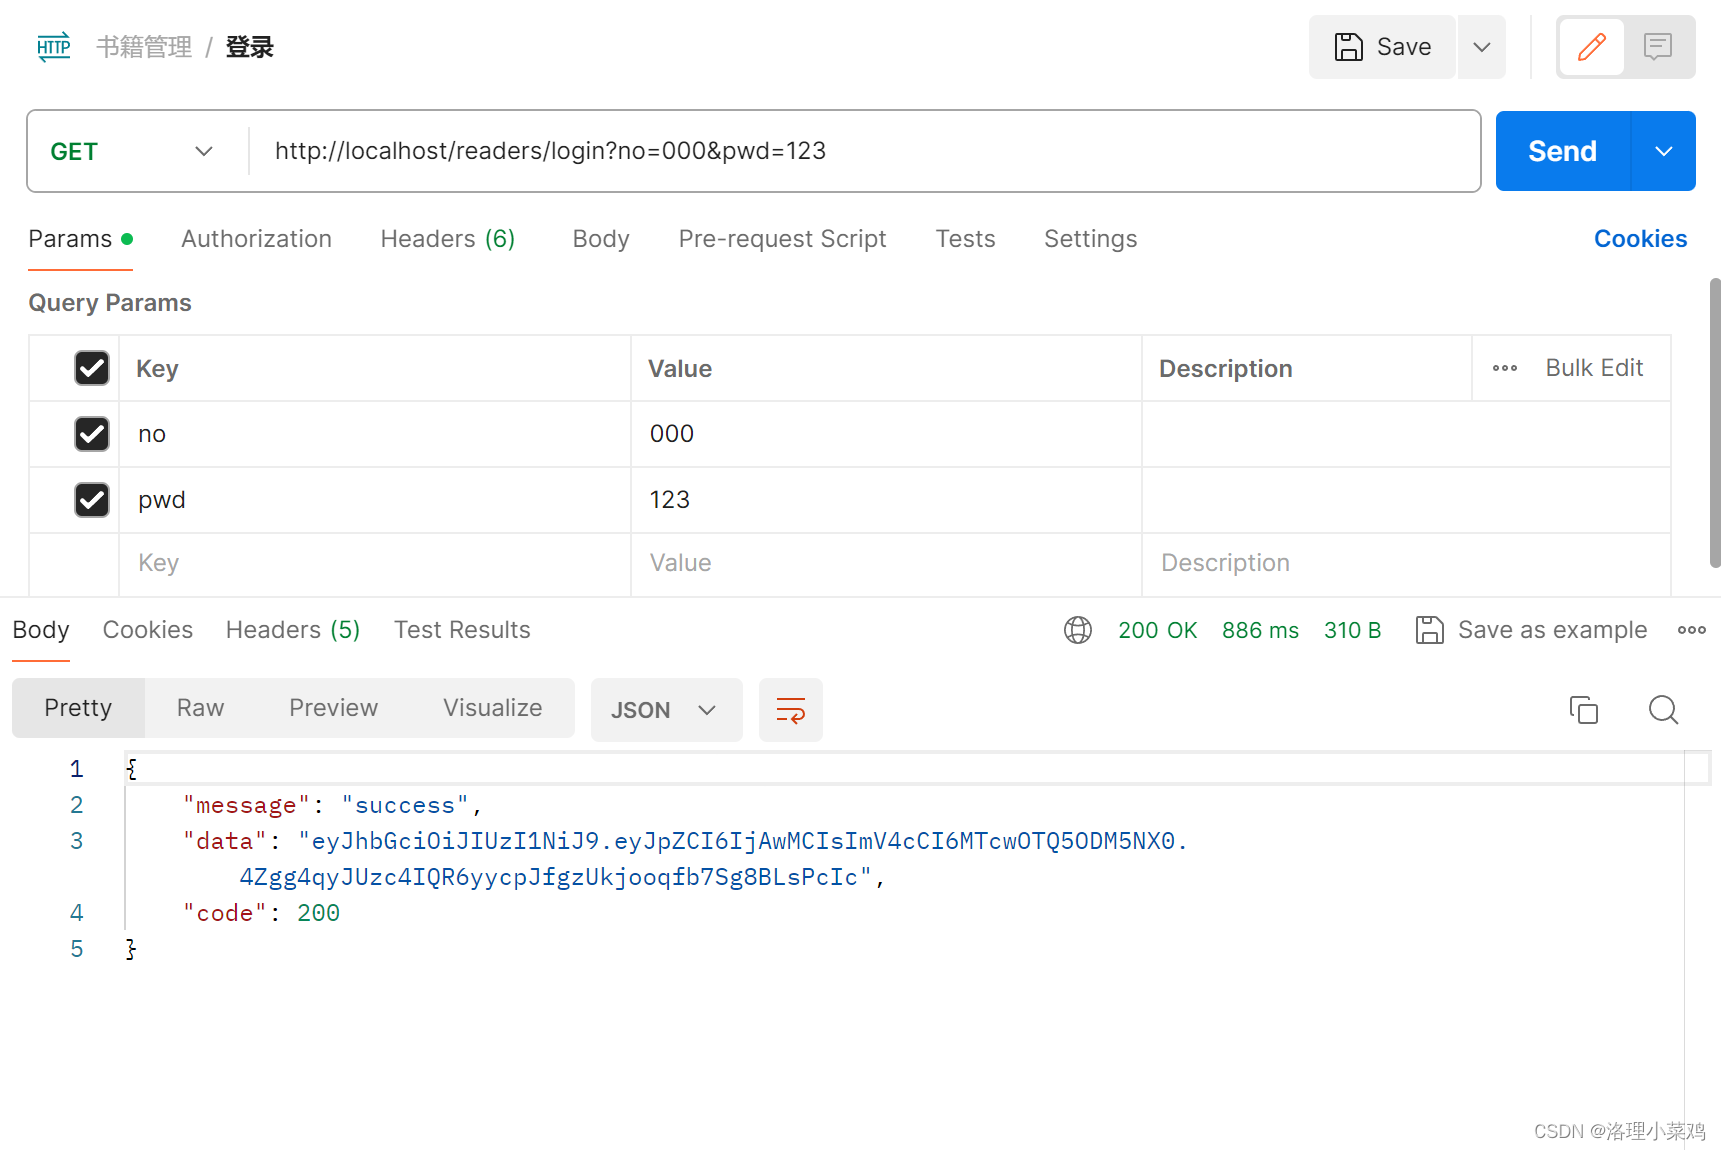
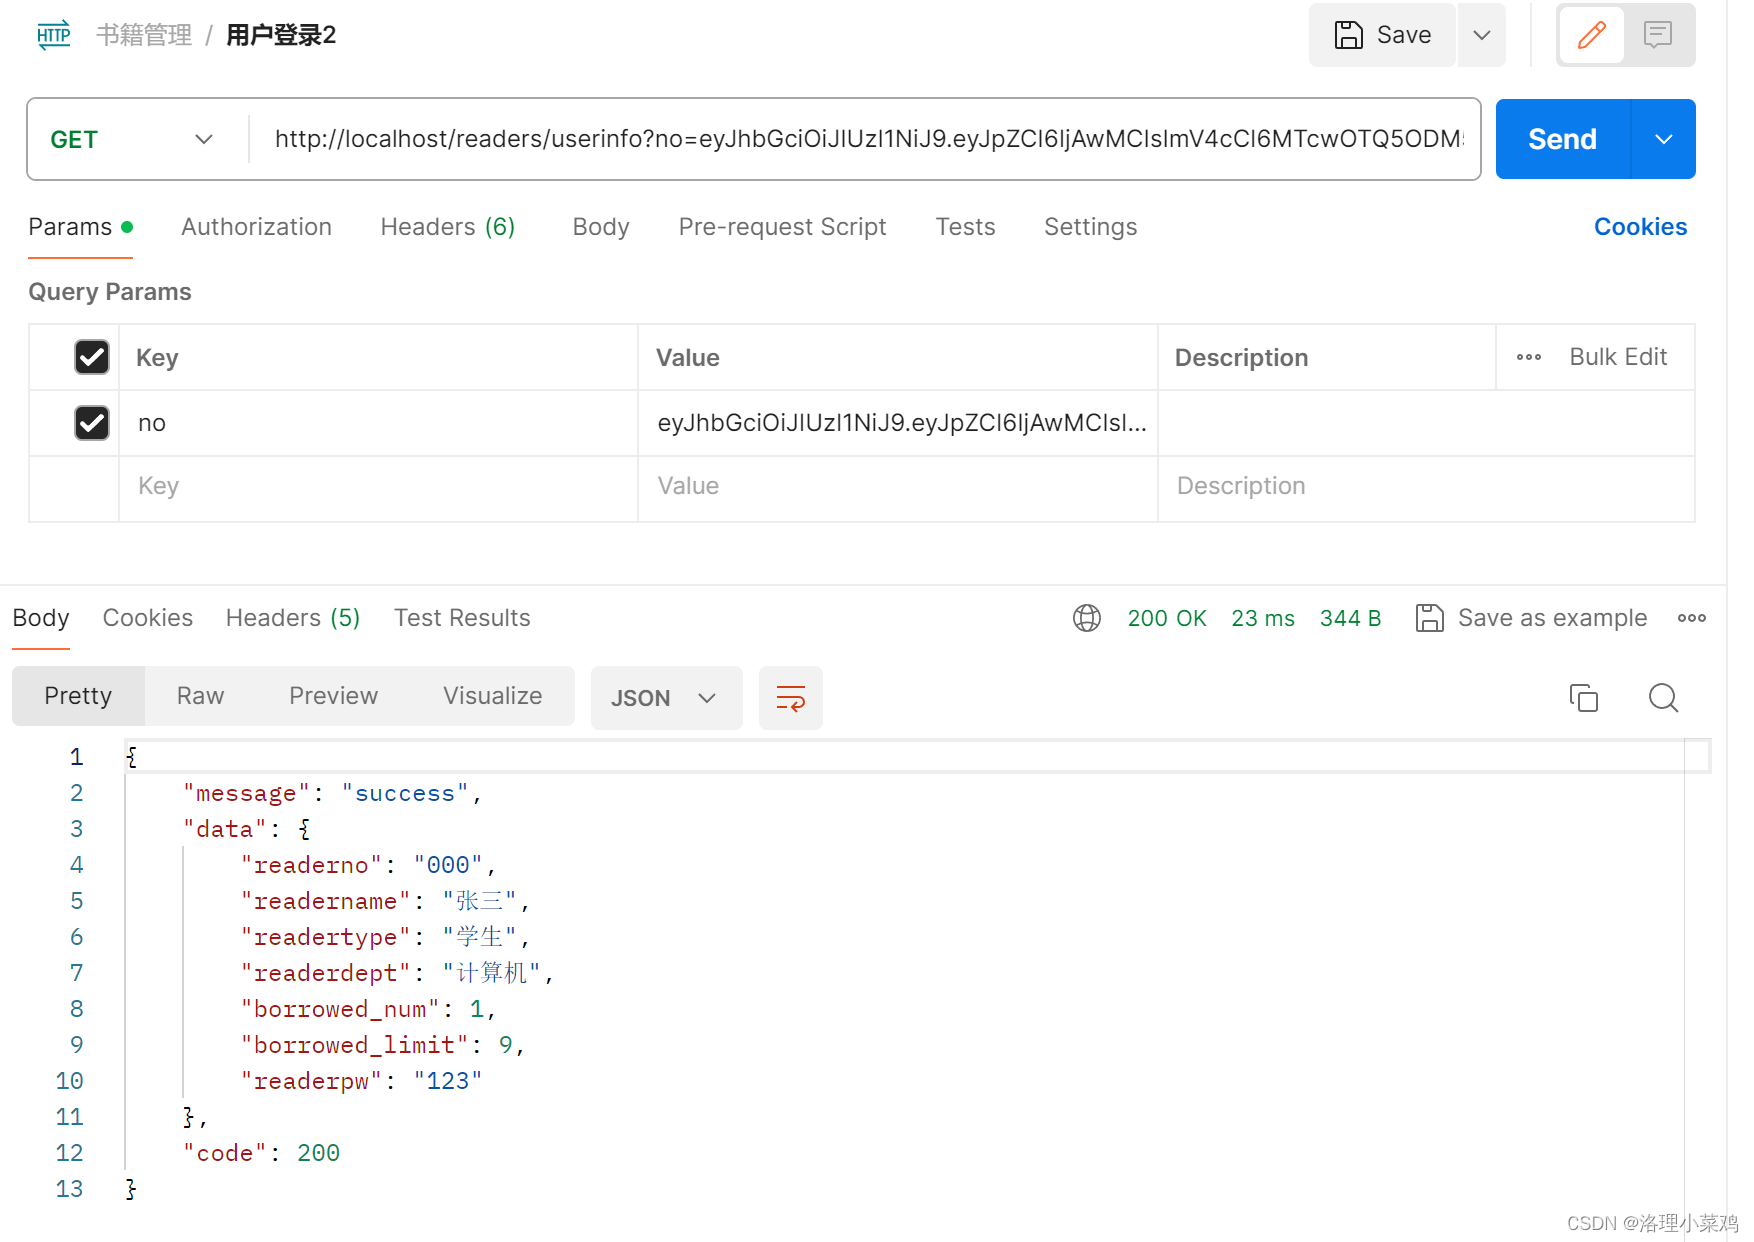
1.1. HTTP获取后台接口数据,以下是示例
  async jwt(jwt: string) {
    try {
      const res = await this.httpUtil.request(`192.168.xxx.xxx/readers/userinfo`, {
        method: http.RequestMethod.GET,
        extraData: { no: jwt },
      });
      let data = JSON.parse(res.result.toString());
      return data;
    } catch (error) {
      throw error;
    }
  }
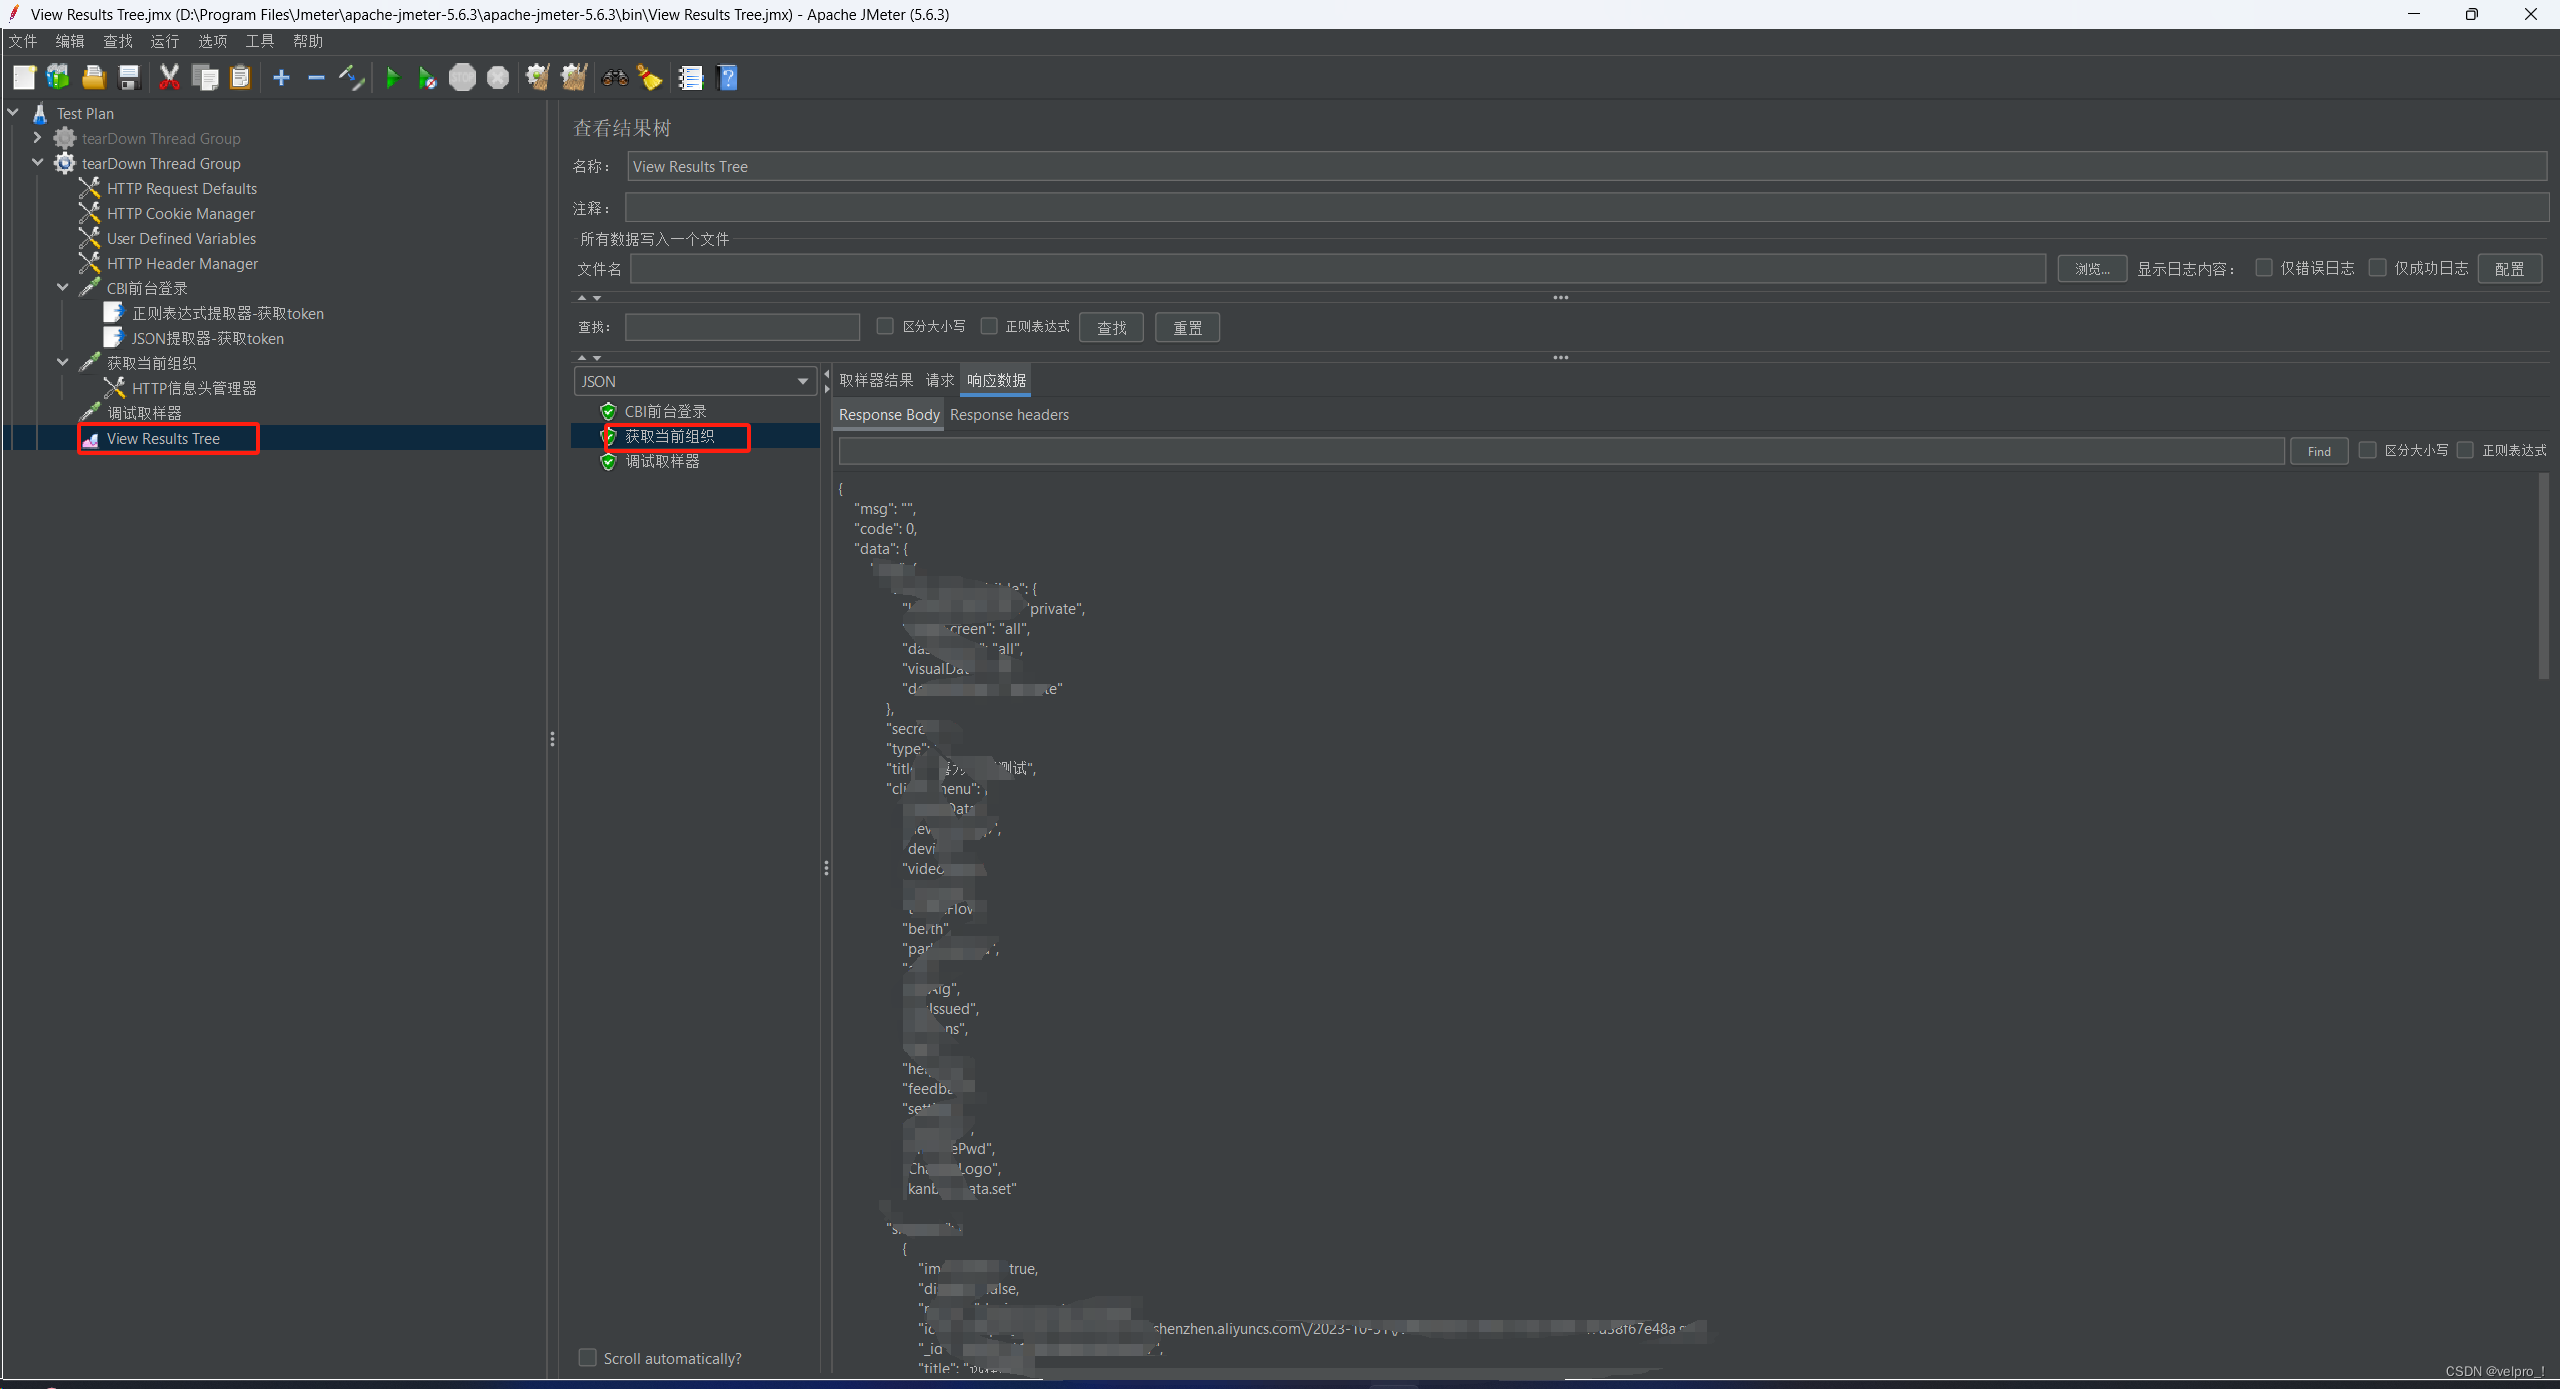
1.2 接口数据(作为测试,可以直接使用json):
2.生命周期函数的使用--AboutToAppear AboutToDisappear
  aboutToAppear() {
    let httpRequest = http.createHttp()
    this.httpUtil = httpRequest
    // todo 初始化上一次访问时间
    this.getPreTime()
    // todo 初始化当前时间
    this.getLocalTimeToPreference()
    // todo 初始化本地数据库的密码和用户名
    this.getUserInfo()
  }
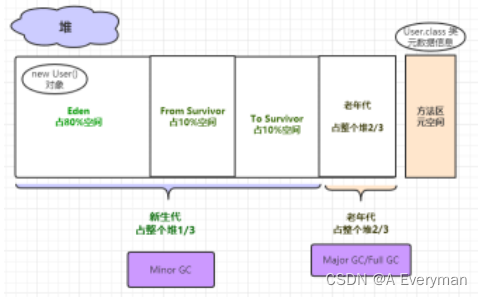
3.APPStorage进程作为缓存,只能在应用运行时使用
4.DATAPreference 数据持久化,存于用户本机
4. 分层结构
4.代码演示
1. 导入模块:
import router from '@ohos.router' // 导入路由模块
import storage from '@ohos.data.storage' // 导入数据存储模块
import App from '@system.app' // 导入应用模块
import Prompt from '@system.prompt' // 导入提示模块
import http from '@ohos.net.http' // 导入网络请求模块
import { RouterInfo } from '../../Pojo/RouterInfo' // 导入自定义的 RouterInfo 类
import common from '@ohos.app.ability.common' // 导入通用模块
import dataPreference from '@ohos.data.preferences' // 导入数据首选项模块
2. 定义 `Login` 结构体:
@Entry
@Component
struct Login {
  // 定义状态变量
  @State username: string = ""
  @State pwd: string = ""
  @State allow: boolean = false
  @State upload: boolean = true
  @State uploadTag: boolean = false
  @State lastLocalTime: string = ""

  // 其他属性和方法...
}
3. 实例化 `RouterInfo` 对象和初始化方法:
RouterInfo是一个自定义的类
export class RouterInfo{
  name:string
  url:string
  message:string

  constructor(name,url,message) {
    this.name=name
    this.url=url
    this.message=message
  }
}
Router = new RouterInfo("进入主页", "pages/Books/Main", "主页面")
aboutToAppear() {
// 初始化操作,包括创建 HTTP 请求对象、获取上次访问时间、初始化本地时间等
}4. 页面跳转方法 `goTo()`:
goTo(Router: RouterInfo) {
  // 调用路由模块进行页面跳转
}
5. 异步获取用户信息的方法 `jwt()`:
async jwt(jwt: string) {
  // 发起网络请求获取用户信息
}
6. 存储当前时间到用户首选项方法 `getLocalTimeToPreference()`:
// 获取当前时间并存入用户首选项
  getLocalTimeToPreference(){
    const currentDate: Date = new Date();
    const currentYear: number = currentDate.getFullYear();
    const currentMonth: number = currentDate.getMonth() + 1; // 注意:月份从 0 开始,需要加 1
    const currentDay: number = currentDate.getDate();
    const currentHour: number = currentDate.getHours();
    const currentMinute: number = currentDate.getMinutes();
    const currentSecond: number = currentDate.getSeconds();

    const curTime = `北京时间:${currentYear}-${currentMonth}-${currentDay} ${currentHour}:${currentMinute}:${currentSecond}`;

    dataPreference.getPreferences(this.context, "myBookStore").then(preferences => {
      preferences.put("curTime", curTime).then(_ => {
        preferences.flush();
      });
    }).catch((err: Error) => {
      console.error(err.message);
    });
  }
7. 获取上一次访问时间方法 `getPreTime()` 和关闭应用更新时间方法
 // 获取上一次的时间--lastTime
  getPreTime(){
    dataPreference.getPreferences(this.context, "myBookStore").then(preferences => {
      if (!preferences.has("lastTime")) {
        console.log("数据并未能保存");
      } else {
        preferences.get("lastTime", 'null').then((value) => {
          this.last=value.toLocaleString()
          // AlertDialog.show({message:`上一次访问时间:${this.last}`})
          console.log("数据为:" + value);
        }).catch(_ => {
          console.log("读取失败");
        });
      }
    });
  }

  // 关闭应用时将lastTime置换为curTime,并将curTime替换为空值
  closeAppAndUpdateTime(){
    dataPreference.getPreferences(this.context, "myBookStore").then(preferences => {
      preferences.get("curTime", '').then((curTime) => {
        preferences.put("lastTime", curTime);
        preferences.put("curTime", '');
        preferences.flush();
        console.log("上一次时间已更新,当前时间已清空");
      }).catch((err: Error) => {
        console.error(err.message)
      });
    }).catch((err: Error) => {
      console.error(err.message);
    });
  }
8. 用户登录方法 `login()` 和相关辅助方法:
login() {
  // 用户登录逻辑,包括密码验证、令牌解析、存储用户信息等操作
}

uploadUserInfo() {
  // 将用户信息上传到本地存储
}

getUserInfo() {
  // 获取本地存储的用户信息
}
9. 构建页面布局的方法 `build()`:
build() {
  // 构建页面布局,包括输入框、按钮、复选框等组件
}
这段代码实现了一个简单的登录页面,涵盖了用户输入、网络请求、数据存储等功能,并且使用 HarmonyOS 的一些模块来实现这些功能。
5.全代码
import router from '@ohos.router'
import storage from '@ohos.data.storage'
import App from '@system.app'
import Prompt from '@system.prompt'
import http from '@ohos.net.http'
import { RouterInfo } from '../../Pojo/RouterInfo'
import common from '@ohos.app.ability.common'
import dataPreference from '@ohos.data.preferences'
@Entry
@Component
struct Login {
  // todo 定义域
  @State username:string=""
  @State pwd:string=""
  @State allow:boolean = false
  @State upload:boolean = true
  @State uploadTag:boolean = false
  @State lastLocalTime:string=""
  httpUtil: http.HttpRequest
  context = getContext(this) as common.UIAbilityContext
  @State last:string=''
  Router = new RouterInfo("进入主页","pages/Books/Main","主页面")

  aboutToAppear() {
    let httpRequest = http.createHttp()
    this.httpUtil = httpRequest
    // todo 初始化上一次访问时间
    this.getPreTime()
    // todo 初始化当前时间
    this.getLocalTimeToPreference()
    // todo 初始化本地数据库的密码和用户名
    this.getUserInfo()
  }

  aboutToDisappear(){
    // todo 保存当前时间作为上一次的时间
    this.closeAppAndUpdateTime()
  }


  goTo(Router:RouterInfo){
    router.pushUrl({
      url: Router.url,
      params:{
        title:Router.message
      }
    },
      router.RouterMode.Single,
      err=> {
        if (err) {
          console.log("路由失败"+err.code+':'+err.message)
        }
      })
  }


  async jwt(jwt: string) {
    try {
      const res = await this.httpUtil.request(`192.168.137.1/readers/userinfo`, {
        method: http.RequestMethod.GET,
        extraData: { no: jwt },
      });
      let data = JSON.parse(res.result.toString());
      return data;
    } catch (error) {
      throw error;
    }
  }

  // 获取当前时间并存入用户首选项
  getLocalTimeToPreference(){
    const currentDate: Date = new Date();
    const currentYear: number = currentDate.getFullYear();
    const currentMonth: number = currentDate.getMonth() + 1; // 注意:月份从 0 开始,需要加 1
    const currentDay: number = currentDate.getDate();
    const currentHour: number = currentDate.getHours();
    const currentMinute: number = currentDate.getMinutes();
    const currentSecond: number = currentDate.getSeconds();

    const curTime = `北京时间:${currentYear}-${currentMonth}-${currentDay} ${currentHour}:${currentMinute}:${currentSecond}`;

    dataPreference.getPreferences(this.context, "myBookStore").then(preferences => {
      preferences.put("curTime", curTime).then(_ => {
        preferences.flush();
      });
    }).catch((err: Error) => {
      console.error(err.message);
    });
  }

  // 获取上一次的时间--lastTime
  getPreTime(){
    dataPreference.getPreferences(this.context, "myBookStore").then(preferences => {
      if (!preferences.has("lastTime")) {
        console.log("数据并未能保存");
      } else {
        preferences.get("lastTime", 'null').then((value) => {
          this.last=value.toLocaleString()
          // AlertDialog.show({message:`上一次访问时间:${this.last}`})
          console.log("数据为:" + value);
        }).catch(_ => {
          console.log("读取失败");
        });
      }
    });
  }

  // 关闭应用时将lastTime置换为curTime,并将curTime替换为空值
  closeAppAndUpdateTime(){
    dataPreference.getPreferences(this.context, "myBookStore").then(preferences => {
      preferences.get("curTime", '').then((curTime) => {
        preferences.put("lastTime", curTime);
        preferences.put("curTime", '');
        preferences.flush();
        console.log("上一次时间已更新,当前时间已清空");
      }).catch((err: Error) => {
        console.error(err.message)
      });
    }).catch((err: Error) => {
      console.error(err.message);
    });
  }


  // todo 函数定义域
  async login() {
    if (this.username && this.pwd && this.allow) {
      try {
        const res = await this.httpUtil.request(`192.168.137.1/readers/login`, {
          method: http.RequestMethod.GET,
          extraData: { no: this.username, pwd: this.pwd },
        });
        let jsonResult = res.result.toString();
        let responseObject = JSON.parse(jsonResult);
        if (responseObject['code'] === 200) {
          // todo 解析令牌
          const data = await this.jwt(responseObject['data']);

          // todo 上下文 -- 存储令牌
          AppStorage.SetOrCreate("info",data['data']['readerno'])

          // todo 是否将密码存储至本地
          if (this.upload===true) {
            this.uploadUserInfo()
          }

          // todo 跳转
          this.goTo(this.Router)

        }
      } catch (error) {
        console.error(error);
        Prompt.showDialog({
          message: "登录失败",
        });
      }
    } else {
      if (!this.username || !this.pwd) {
        Prompt.showDialog({
          message: "请输入用户名和密码",
        });
      } else if (!this.allow) {
        Prompt.showDialog({
          message: "请勾选允许登录选项",
        });
      }
    }
  }


  uploadUserInfo(){
    // 用户存储信息到本地,使用用户首选项
    dataPreference.getPreferences(this.context, "myBookStore").then(preferences => {
      let user:{}={'username':this.username,'pwd':this.pwd}
      preferences.put("userInfo",JSON.stringify(user)).then(_ => {
        preferences.flush();
      });
    }).catch((err: Error) => {
      console.error(err.message);
    });
  }

  getUserInfo(){
    dataPreference.getPreferences(this.context, "myBookStore").then(preferences => {
      preferences.get("userInfo", '').then((userInfo) => {
        let user = JSON.parse(userInfo.toLocaleString())
        if (user) {
          this.uploadTag=true
          this.username = user['username']
          this.pwd = user['pwd']
        }
      }).catch((err: Error) => {
        console.error(err.message)
      });
    }).catch((err: Error) => {
      console.error(err.message);
    });
  }


  build() {
      Column(){
        Column() {

            Text("掌上书店")
              .fontColor('#096789')
              .fontSize(70)
          this.displayLast("上一次访问时间:"+this.last)
          if (this.uploadTag===true){
            this.displayLast("本地已经存储密码")
          }
        }.margin({ bottom: 100 })
        .height('50%')
        .justifyContent(FlexAlign.Center)

        Column()
        {
          Row()
          {
            // 用户名输入框
            TextInput({ placeholder: this.username===''? "请输入您的用户名":this.username })
              .type(InputType.Normal)
              .width('80%')
              .height(50)
              .placeholderColor(Color.Black)
              .backgroundColor('#ffd3d7d3')
              .borderRadius(10)
              .margin({ bottom: 10})
              .onChange(val=>{
                this.username=val
                console.log(val)
              })

          }

          Row()
          {
            // 密码输入框
            TextInput({ placeholder: this.pwd===''?"请输入您的密码":this.pwd })
              .type(InputType.Password)
              .width('80%')
              .height(50)
              .placeholderColor(Color.Black)
              .backgroundColor('#ffd3d7d3')
              .borderRadius(10)
              .onChange(val=>{
                this.pwd=val
                console.log(val)
              })
          }
          Row(){
            Row(){
              Checkbox().onChange((val:boolean)=>{
                this.upload=val
                console.log('Checkbox2 change is'+val)
              })
              Text("将密码存储到本地")
            }.width('98%')
            .padding({left:30})
            .height('40')
          }.margin({ bottom: 40 })

          Row()
          {
            //登录按钮
            Button("登录")
              .width(120)
              .height(40)
              .fontColor(Color.White)
              .onClick(() => {
                this.login()

              })
              .backgroundColor('#ff5eb35b')
              .margin({right:40})
              .borderStyle(BorderStyle.Dotted)

            //  注册按钮
            Button("注册")
              .width(120)
              .height(40)
              .fontColor(Color.White)
              .onClick(() => {
                router.pushUrl({
                  url: "pages/Second"
                })
              })
              .backgroundColor('#ff5eb35b')
          }
          .justifyContent(FlexAlign.SpaceEvenly)
        }
        .width("100%")
        .height("30%")

        Row(){
          Checkbox().onChange((val:boolean)=>{
            this.allow=val
            console.log('Checkbox2 change is'+val)
          })
          Text("点击代表同意相关使用条例与请求")
        }.width('90%')
        .padding({left:30})
        .height('40')

      }
      .height('100%')
        .width('100%')
        .margin({bottom:20})
        .linearGradient({
          direction:GradientDirection.RightBottom,
          colors:[[0xAEE1E1, 0.0], [0xD3E0DC, 0.3], [0xFCD1D1, 1.0]]
        })

  }


  @Builder displayLast(message) {
    Row(){
      Text(message)
        .fontColor("b#ffe7eae7")
    }.width("70%").
    height("40")
    .backgroundColor("#ffe7eae7")
    .borderRadius(20)
    .padding({left:10})
    .margin({bottom:5})
  }
}