第一节:什么构成了微信小程序、创建一个自己的小程序
第二节:微信开发者工具使用教程
第三节:深入了解并掌握小程序核心组件
第四节:初始化云函数和数据库
第五节:云数据库的增删改查
第六节:项目大纲以及制作登录、注册页面
第七节:制作活动申请页面
第八节:活动申请页面的补充
第九节:我的页面制作
第十节:活动详情页面制作
第十一节:活动历史页面制作
第十二节:预约老师页面制作
第十三节:预约历史页面制作
第十四节:活动审批端制作
第十五节:预约审批端制作
目录
前言
成品图
核心思想
实现步骤
history2.wxml:
history2.wxss:
history2.js:
题外话
前言
上一节我们完成了预约老师页面的制作,这一节我们将制作与之相关的预约历史页面,该页面与活动历史的制作基本上是一样的,除了个别样式不同和状态state值的范围不同。那我们现在开始吧~预告!下节我们将开始制作审批端
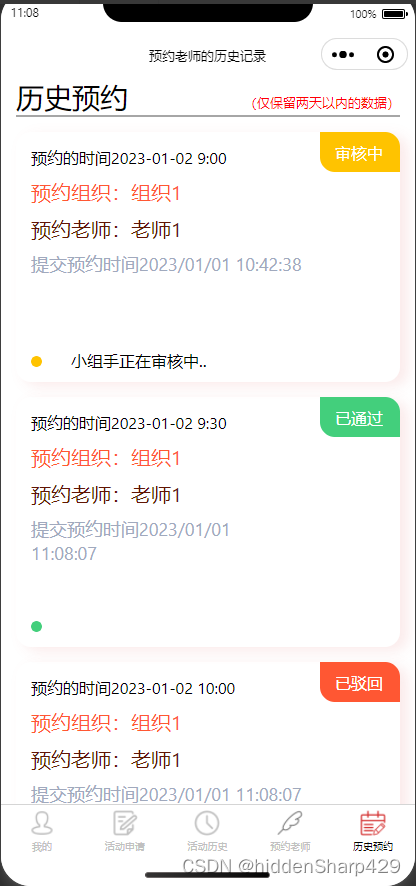
成品图
核心思想
与活动历史页面制作的思想基本一致,在这不再赘述,以下仅列写出不同点。
1.预约的state值只有0、1、2三种值,分别对应待审批、已通过、已驳回
2.待审批的预约盒子样式底部有提示字段
实现步骤
history2.wxml:
<view class="container">
  <view class="userinfo">
              <view class="mine_application">
                     <view class="mine_application_title">
                            历史预约
                            <view class="comment">(仅保留两天以内的数据)</view>
                     </view>

                     <view class="mine_application_content" wx:for="{{list}}">
                            <view class="event" bindtap="goDetail" data-id="{{item._id}}">
                                   <view class="appointmentTime">{{item.appointment}}</view>
                                   <view class="appointmentInstitute">预约组织:{{item.g1_orderInstitute}}</view>
                                   <view class='appointmentTeacher'>预约老师:{{item.g1_orderTeacher}}</view>
                                   <view class="time">{{item.time}}</view>
                                   <!-- 只有已驳回才显示 -->
                                   <block wx:if="{{item.state==2}}">
                                          <view class="rejectReason">驳回理由:{{item.rejectReason}}</view>
                                   </block>

                            </view>
                <!-- 状态为1为预约已通过,2为预约已驳回 -->
                <block wx:if="{{item.state==0}}">
                            <!-- 审核中 -->
                            <view class="state_0">
                            <view class="state_content">审核中</view>
                            </view>
                            <!-- 活动下方的小点 -->
                            <image src="../../icon/yellow.png" style="width: 11px;height: 11px;position: absolute;left: 15px;bottom: 15px;"></image>
                            <text style="width: 140px; height: 17px;position: absolute;left: 55px;bottom: 15px;">小组手正在审核中..</text>
                     </block>
                     <block wx:if="{{item.state==1}}">
                            <!-- 已通过 -->
                            <view class="state_1">
                            <view class="state_content">已通过</view>
                            </view>
                            <!-- 活动下方的小点 -->
                            <image src="../../icon/green.png" style="width: 11px;height: 11px;position: absolute;left: 15px;bottom: 15px;"></image>
                     </block>


                     <block wx:if="{{item.state==2}}">
                            <view class="state_2">
                            <view class="state_content">已驳回</view>
                            </view>
                     <!-- 活动下方的小点 -->
                     <image src="../../icon/red.png" style="width: 11px;height: 11px;position: absolute;left: 15px;bottom: 15px;"></image>
                     </block>
                     </view>
              </view>
  </view>
</view>
history2.wxss:
.mine_application{
       margin-left: 15px;
       margin-right: 15px;
     }
     .mine_application_title{
       border-bottom: 5rpx solid #A6A6A6;
       font-size: 28px;
       font-family: 'Segoe UI', Tahoma, Geneva, Verdana, sans-serif;
     }

     .mine_application_content{
            height: 250px;
            width: 100%;
            display: flex;
            position: relative;
            box-shadow: 16rpx 8rpx 24rpx rgba(212,48,48, 0.1);
            margin-top: 15px;
            border-radius: 15px;

     }
     .event{
            font-size: 20px;
            font-family: 'Segoe UI', Tahoma, Geneva, Verdana, sans-serif;
            position: relative;
            margin:15px;
            width: 90%;
            flex: 1;
     }
     .appointmentTime{
            margin-top: 0px;
            font-size: 16px;
            color: black;
     }
       .state_0{
                     float: right;
                     width: 80px;
                     height: 40px;
                     background-color:#FFC300;
                     border-radius: 0 15px 0 15px;
       }
       .state_1{
              width: 80px;
              height: 40px;
              background-color:#43CF7C;
              border-radius: 0 15px 0 15px;
              z-index: 2;
              flex-direction: row;
              position: relative;
              margin-left: 20px;
       }
       .state_2{
              width: 80px;
              height: 40px;
              background-color:#FF5733;
              border-radius: 0 15px 0 15px;
              z-index: 2;

       }
     .state_content{
            position: relative;
            margin-top:10px ;
            margin-left: 15px;
            font-size: 12;
            color: white;
     }
     .button_detail{
       background-color: white;
       color:#727885;
     }
    .appointmentInstitute{

         font-size: 20px;
         color:#FF5733;
         margin-top: 10px;
    }
    .appointmentTeacher{

       font-size: 20px;
       color:#611504;
       margin-top: 10px;
  }
  .time{
       margin-top: 10px;
       font-size: 18px;
       color: #A0A9BD;
  }
  .pass{
       float: left;
       border-radius: 80rpx;
       margin-top: 2%;
       color:#FFFFFF;
       background-color: #D43030;
       box-shadow: 16rpx 8rpx 24rpx rgba(212,48,48, 0.35);

  }
  .reject{
       border-radius: 40rpx;
       margin-top: 2%;
       color:#FFFFFF;
       background-color: #D43030;
       box-shadow: 16rpx 8rpx 24rpx rgba(212,48,48, 0.35);
       float: left;
  }

.comment{
       font-size: 13px;
       float: right;
       margin-top: 16px;
       color: red;
}
history2.js:
const db  = wx.cloud.database()
const app = getApp()
Page({
       data: {
         list:[],
       },
       //获取活动列表
       getList(){
              //调用云函数来获取用户openid
              wx.cloud.callFunction({
                     name:'getData'
              })
                     .then(res=>{
                            console.log("用户openid",res.result.openid)
                            db.collection("appointment")
                            .where({
                                   //使用用户的openid来筛选活动
                                 _openid:res.result.openid,
                            })
                            .get()
                            .then(res=>{
                                   console.log('查询数据库成功',res.data)
                                   wx.stopPullDownRefresh()
                                   //将返回的res.data里面的值赋值给list
                                   this.setData({
                                          list:res.data
                                   })
                            })
                     })
                     .catch(err=>{
                            console.log("请求云函数失败",err)
                     })
       },
       onLoad() {
       wx.startPullDownRefresh()
       this.getList()
       },

       //监听下拉刷新
       onPullDownRefresh:function(){
              console.log('用户刷新了页面')
              //刷新页面数据
              this.getList()
       },
})
题外话
这一系列文章会持续更新,手把手教你从零创建一个小程序项目!并且免费提供源码。如果有什么疑问欢迎大家在底下留言讨论!你的赞和收藏是我最大的动力!!




![[UE笔记]延迟与延迟补偿](https://img-blog.csdnimg.cn/2420d56cf00f4ab8a6365f289187145a.png)

