文章目录
- 部署规划
- 机器准备
- 统一配置
- hosts设置
- 设置机器名和静态ip
- 关闭大页
- 配置信息查看
- 时钟源ntp配置(需要所有机器root)
- 磁盘规划
- 创建用户
- 配置limits.conf
- 配置sysctl.conf
- 关闭防火墙
- 关闭SELinux
- 克隆虚拟机
- 差异化配置
- 中控机设置无密码SSH登录目标机器
- 时钟源ntp配置(需要所有机器root)
- 部署
- 下载&解压
- 安装OBD
- 安装数据库
部署规划
本文主要是安装部署oceanbase4.0.
按照官方的要求,测试环境要求最低2C8G(实测可用内存最少10g,虚拟机设置12g采购)我准备了几台centos7.9的虚拟机,配置如下
| 机器名 | ip地址 | 配置 | 说明 |
|---|---|---|---|
| dev3 | 192.168.1.153 | 4C12G 磁盘80g | /app/observer 部署OceanBase ,/data作为数据目录 |
| dev4 | 192.168.1.154 | 4C12G 磁盘80g | /app/observer 部署OceanBase ,/data作为数据目录 |
| dev5 | 192.168.1.155 | 4C12G磁盘80g | /app/observer 部署OceanBase ,/data作为数据目录 |
| dev6 | 192.168.1.156 | 4C12G | 中控机、OBD、OBProxy、OCP、NTP服务器 |
名词解析
- 中控机:存储Oceanbase数据库安装包和集群配置信息的机器
- 目标机器:安装OceanBase数据库的机器
- OBD:Oceanbase Deployer,Oceanbase 开源软件的安装部署工具,简称OBD
- OBProxy:Oceanbase Database Proxy, OceanBase高性能反向代理服务器,简称OBProxy
- OCP: OceanBase cloud Platform OceanBase运维管理工具,简称OCP
note: 1,ob数据库的安装需要至少50g的磁盘,如果你计划将ob安装到指定目录,必须保证磁盘空间大于50g,我使用虚拟机,手动分区;2,部署ob虚拟机设置内存最少12g(可用内存得10g,cache不算进去);
机器准备
说明几点:
-
我物理机48G内存,使用VMware虚拟机;
-
服务统一使用centos 7.9;
-
虚拟机创建时,最大磁盘填写100g,将虚拟机磁盘存储为单个文件
-
内存设置12g,11g内存ob在操作时只识别到5.7,最低要求可用8g内存(4.0应该是至少10G内存);
- 通过
echo 3 > /proc/sys/vm/drop_caches释放缓存
- 通过
-
cpu设置为2个处理器,每个处理器2核
-
网络模式为桥接模式
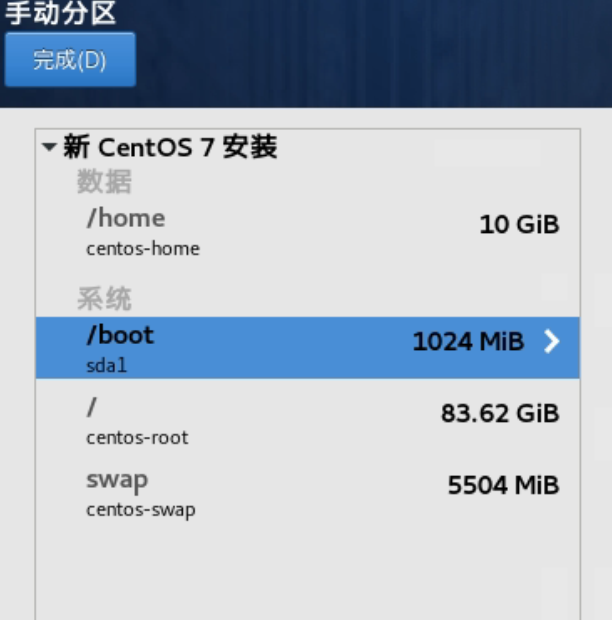
特别提醒:安装操作系统时磁盘要选手动设置,如果不选手动设置,自动分区,会平分,导致不够50g,手动分区如下:
统一配置
note:先在一个虚拟机里把所有的配置都配置好,等配置完成后,再复制出来3台,个性化的修改下,省的一个个的配置了。
hosts设置
[root@dev ~]# vim /etc/hosts
# 添加的内容
192.168.1.153 dev3
192.168.1.154 dev4
192.168.1.155 dev5
192.168.1.156 dev6
# 保存并退出
设置机器名和静态ip
#修改主机名,先统一为dev
[root@dev ~]# vim /etc/hostname

# 修改为静态ip
[root@dev ~]#  vim /etc/sysconfig/network-scripts/ifcfg-ens33
#替换为以下内容
TYPE=Ethernet
PROXY_METHOD=none
BROWSER_ONLY=no
BOOTPROTO=static
DEFROUTE=yes
IPV4_FAILURE_FATAL=no
IPV6INIT=no
IPV6_AUTOCONF=no
IPV6_DEFROUTE=no
IPV6_FAILURE_FATAL=no
IPV6_ADDR_GEN_MODE=stable-privacy
NAME=ens33
UUID=7ab82905-739a-4a1a-8784-57f62d25ef32
DEVICE=ens33
ONBOOT=yes
IPADDR=192.168.1.153
NETMASK=255.255.255.0
GATEWAY=192.168.1.1
DNS1=114.114.114.114
DNS2=8.8.8.8
关闭大页
#关闭透明大页
echo never > /sys/kernel/mm/transparent_hugepage/enabled
配置信息查看
# 查看内存
[root@dev ~]# free -g
              total        used        free      shared  buff/cache   available
Mem:             10           1           8           0           1           5
Swap:             5           0           5
#查看磁盘
[root@dev ~]# df -h
文件系统                 容量  已用  可用 已用% 挂载点
devtmpfs                 5.3G     0  5.3G    0% /dev
tmpfs                    5.3G     0  5.3G    0% /dev/shm
tmpfs                    5.3G   13M  5.3G    1% /run
tmpfs                    5.3G     0  5.3G    0% /sys/fs/cgroup
/dev/mapper/centos-root   84G  4.2G   80G    5% /
/dev/mapper/centos-home   10G   33M   10G    1% /home
/dev/sda1               1014M  185M  830M   19% /boot
tmpfs                    1.1G  4.0K  1.1G    1% /run/user/42
tmpfs                    1.1G   24K  1.1G    1% /run/user/0
/dev/sr0                 4.4G  4.4G     0  100% /run/media/root/CentOS 7 x86_64

#查看网卡,网卡为ens33
[root@dev ~]# ifconfig
ens33: flags=4163<UP,BROADCAST,RUNNING,MULTICAST>  mtu 1500
        inet 192.168.1.153  netmask 255.255.255.0  broadcast 192.168.1.255
时钟源ntp配置(需要所有机器root)
先把所有虚拟机的ntp的server都设置为192.168.1.156,等到虚拟机配置调整完毕,复制出几份以后,再调整156的配置
OceanBase集群中的服务器时间必须保持一致。
- 不一致会导致无法启动,运行时无主
- 误差在50ms以下认为是同步状态
- 最大容忍误差不超过100ms,超过100ms会出现无主情况;
#首先在所有的机器上安装ntp服务(默认有)
[root@dev ~]# yum install ntp ntpdate -y

[root@dev ~]# vim /etc/ntp.conf
#修改内容如下
#默认Centos提供了4个时间同步服务器,都注释掉
#server 0.centos.pool.ntp.org iburst
#server 1.centos.pool.ntp.org iburst
#server 2.centos.pool.ntp.org iburst
#server 3.centos.pool.ntp.org iburst
#以156的ntp服务,作为其他机器的ntp源,prefer优先本地主机
server 192.168.1.156  prefer
# 保存并退出

# 重启ntp服务端
[root@dev ~]# service ntpd restart

# 设置ntp开启自动启动
[root@dev ~]# chkconfig ntpd on
注意:正在将请求转发到“systemctl enable ntpd.service”。
Created symlink from /etc/systemd/system/multi-user.target.wants/ntpd.service to /usr/lib/systemd/system/ntpd.service.
磁盘规划
生产环境做好划分,测试环境,就自己玩了;
/data/ob为数据盘/redo/ob存放redo日志(可以不配置,不配置就和数据一起了,注意:配置的话不能放到/data/ob目录下)/app/observer存放ob数据库的二进制文件和运行日志
创建用户
个人自己玩,直接root即可,如果是生产,最好创建一个账户,并把ob相关的目录授权给该用户;
注意:我直接用root,没有创建用户
# 创建appuser账户
[root@dev ~]# useradd -U appuser -d /home/appuser -s /bin/bash
[root@dev ~]# mkdir -p /home/appuser
[root@dev ~]# sudo chown -R appuser:appuser /home/appuser
# 更改密码
[root@dev ~]# passwd appuser
101790
# 为appuser设置sudo 权限
[root@dev ~]# vim /etc/sudoers
#修改为sudo 的时候不需要密码
%wheel  ALL=(ALL)       NOPASSWD:ALL   # 修改
appuser ALL=(ALL)       NOPASSWD:ALL   #添加

# 查看目录权限
[root@dev ~]# ls -al /home/
总用量 0
drwxr-xr-x.  3 root    root     21 11月 27 19:40 .
dr-xr-xr-x. 19 root    root    267 11月 27 19:24 ..
drwx------   5 appuser appuser 128 11月 27 19:43 appuser
# 将ob的运行目录的所有权改为appuser
[root@dev ~]# chown -R appuser.appuser /data /app /redo
配置limits.conf
调整最大栈空间大小、可打开的最大文件句柄数、core文件大小;(不需要压测的话,不需要调整)
[root@dev ~]# vim /etc/security/limits.conf
# 添加的内容
root soft nofile 655350
root hard nofile 655350
* soft nofile 655350
* hard nofile 655350
* soft stack 20480
* hard stack 20480
* soft nproc 655360
* hard nproc 655360
* soft core unlimited
* hard core unlimited

# 注意下limits.d 目录下的文件,这里的默认值4096,不更改,这个appuser不会生效
[root@dev ~]#  vim /etc/security/limits.d/20-nproc.conf
# 所有用户默认为4096,我改成了10240
*          soft    nproc     4096

# 切换到appuser账户,查看下max user processes  是否已经变了
[appuser@dev root]$ ulimit -a
配置sysctl.conf
优化服务器,调整服务器的sysctl.conf,以提高linux系统的性能;(不需要压测的话,开发环境不需要调整)
[root@dev ~]# vim /etc/sysctl.conf
# for oceanbase
## 修改内核异步 I/O 限制 (测试环境,可以只设置这里)
fs.aio-max-nr=1048576

## 网络优化
net.core.somaxconn = 2048
net.core.netdev_max_backlog = 10000
net.core.rmem_default = 16777216
net.core.wmem_default = 16777216
net.core.rmem_max = 16777216
net.core.wmem_max = 16777216

net.ipv4.ip_local_port_range = 3500 65535
net.ipv4.ip_forward = 0
net.ipv4.conf.default.rp_filter = 1
net.ipv4.conf.default.accept_source_route = 0
net.ipv4.tcp_syncookies = 0
net.ipv4.tcp_rmem = 4096 87380 16777216
net.ipv4.tcp_wmem = 4096 65536 16777216
net.ipv4.tcp_max_syn_backlog = 16384
net.ipv4.tcp_fin_timeout = 15
net.ipv4.tcp_max_syn_backlog = 16384
net.ipv4.tcp_tw_reuse = 1
net.ipv4.tcp_tw_recycle = 1
net.ipv4.tcp_slow_start_after_idle=0

vm.swappiness = 0
vm.min_free_kbytes = 2097152
# 此处为 OceanBase 数据库的 data 目录
kernel.core_pattern = /data/ob/core-%e-%p-%t
# 保存退出

# 加载配置
[root@dev ~]# sysctl -p
fs.aio-max-nr = 1048576
net.core.somaxconn = 2048
net.core.netdev_max_backlog = 10000
net.core.rmem_default = 16777216
net.core.wmem_default = 16777216
net.core.rmem_max = 16777216
net.core.wmem_max = 16777216
net.ipv4.ip_local_port_range = 3500 65535
net.ipv4.ip_forward = 0
net.ipv4.conf.default.rp_filter = 1
net.ipv4.conf.default.accept_source_route = 0
net.ipv4.tcp_syncookies = 0
net.ipv4.tcp_rmem = 4096 87380 16777216
net.ipv4.tcp_wmem = 4096 65536 16777216
net.ipv4.tcp_max_syn_backlog = 16384
net.ipv4.tcp_fin_timeout = 15
net.ipv4.tcp_max_syn_backlog = 16384
net.ipv4.tcp_tw_reuse = 1
net.ipv4.tcp_tw_recycle = 1
net.ipv4.tcp_slow_start_after_idle = 0
vm.swappiness = 0
vm.min_free_kbytes = 209715
kernel.core_pattern = /data/ob/core-%e-%p-%t
关闭防火墙
#依次执行以下命令关闭防火墙
systemctl disable firewalld
systemctl stop firewalld
systemctl status firewalld

[root@dev ~]# systemctl disable firewalld
Removed symlink /etc/systemd/system/multi-user.target.wants/firewalld.service.
Removed symlink /etc/systemd/system/dbus-org.fedoraproject.FirewallD1.service.
[root@dev ~]# systemctl stop firewalld
[root@dev ~]# systemctl status firewalld
● firewalld.service - firewalld - dynamic firewall daemon
   Loaded: loaded (/usr/lib/systemd/system/firewalld.service; disabled; vendor preset: enabled)
   Active: inactive (dead)
     Docs: man:firewalld(1)
关闭SELinux
[root@dev ~]# vim /etc/selinux/config
将配置
SELINUX=enforcing
改为
SELINUX=disabled
# 保存并退出

# 更改前的状态
[root@dev ~]# sestatus
SELinux status:                 enabled
SELinuxfs mount:                /sys/fs/selinux
SELinux root directory:         /etc/selinux
Loaded policy name:             targeted
Current mode:                   enforcing
Mode from config file:          disabled
Policy MLS status:              enabled
Policy deny_unknown status:     allowed
Max kernel policy version:      31

# 使生效(重启服务器,或执行以下命令)
[root@dev ~]# setenforce 0
# 重启
[root@dev ~]# reboot
# 重启后的状态
[root@dev ~]# sestatus
SELinux status:                 disabled
克隆虚拟机
关闭虚拟机,将配置好的机器再克隆出来3份(注意,是完整克隆)
差异化配置
每次开启一台虚拟机(ip相同,别同时起,这样一个ssh就搞定了),调整主机名和ip地址,一次设置为
153、154、155、156
#修改主机名
[root@dev ~]# vim /etc/host
改为对应的dev3、dev4、dev5
# 修改静态ip
[root@dev ~]# vim /etc/sysconfig/network-scripts/ifcfg-ens33
# 修改IPADDR
IPADDR=192.168.1.156
中控机设置无密码SSH登录目标机器
ps: 需要拥有目标机器的root用户权限。原理,就是通过
ssh-copy-id将本机的密钥复制到目标机器的authorized_keys文件中,让目标机器信任中控机;可以跳过这3步,复制下面的脚本
-
检查中控机上是否有密钥存在(新机器铁定没有)
ls ~/.ssh/id_rsa.pub -
中控机生成SSH公钥和私钥(执行命令后后一直回车即可)
[root@dev6 ~]# ssh-keygen -t rsa -
在中控机器上登录目标机器(需要输入密码,输入密码后,以后就不用再输密码了)
[root@dev6 ~]# ssh-copy-id root@192.168.1.153
/usr/bin/ssh-copy-id: INFO: Source of key(s) to be installed: "/root/.ssh/id_rsa.pub"
The authenticity of host '192.168.1.153 (192.168.1.153)' can't be established.
ECDSA key fingerprint is SHA256:/3F5WaADETxAuquKv63YuXs/bAWZu50NOHetNZCKa9o.
ECDSA key fingerprint is MD5:f8:c0:de:e0:e8:46:80:2f:af:56:fc:14:d7:78:29:7a.
Are you sure you want to continue connecting (yes/no)? yes
/usr/bin/ssh-copy-id: INFO: attempting to log in with the new key(s), to filter out any that are already installed
/usr/bin/ssh-copy-id: INFO: 1 key(s) remain to be installed -- if you are prompted now it is to install the new keys
root@192.168.1.153's password:

Number of key(s) added: 1

Now try logging into the machine, with:   "ssh 'root@192.168.1.153'"
and check to make sure that only the key(s) you wanted were added.
# 完成以后,就可以直接免密登录了
[root@dev6 ~]# ssh root@192.168.1.153
Last failed login: Sun Nov 27 10:33:46 CST 2022 from 192.168.1.156 on ssh:notty
There was 1 failed login attempt since the last successful login.
Last login: Sat Nov 26 21:27:10 2022 from 192.168.1.108
#在中控机上做appuser免密登录
[root@dev6 ~]# ssh-copy-id appuser@192.168.1.153
[root@dev6 ~]# ssh-copy-id appuser@192.168.1.154
[root@dev6 ~]# ssh-copy-id appuser@192.168.1.155
[root@dev6 ~]# ssh-copy-id appuser@192.168.1.156
注意,用什么用户部署,就需要这个用户做免密登录,执行类似的ssh-copy-id appuser@192.168.1.156
以上的三步可以封装成脚本
我的root和appuser的密码都一样,shell没有进行id_rsa.pub 校验,每次执行都是重新生成
#!/usr/bin/bash
   SERVERS=("root@192.168.1.153" "root@192.168.1.154" "root@192.168.1.155" "appuser@192.168.1.153" "appuser@192.168.1.154" "appuser@192.168.1.155" "appuser@192.168.1.156")
   PASSWORD="101790"
   keygen() {
   yum -y install expect
   expect -c "
      spawn ssh-keygen -t rsa
      expect {
         *(/root/.ssh/id_rsa):* { send -- \r;exp_continue}
         *(y/n)* { send -- y\r;exp_continue}
         *Enter* { send -- \r;exp_continue}
         *(y/n)* { send -- y\r;exp_continue}
         *Enter* { send -- \r;exp_continue}
         eof {exit 0}
      }
      expect eof
   "
   }
   copy(){
   expect -c "
      set timeout -1
      spawn ssh-copy-id $1
      expect {
         *(yes/no)* { send -- yes\r; exp_continue }
         *password:* { send -- $PASSWORD\r; exp_continue}
         eof {exit 0}
      }
      expect eof
   "
   }
   ssh_copy_id_to_all(){
   keygen ;
   for host in ${SERVERS[@]}
   do
         copy $host
   done
   }
   ssh_copy_id_to_all
时钟源ntp配置(需要所有机器root)
修改中控的ntp源
[root@dev6 ~]# vim /etc/ntp.conf
#将下面一行
server  192.168.1.156
# 修改为 阿里云的ntp服务,作为中控机的ntp源
server  ntp.aliyun.com
# 保存并退出

# 重启ntp服务端
[root@dev6 ~]# service ntpd restart
# 查看ntp是否启动成功
[root@dev6 ~]# netstat -anp | grep   ntpd
udp        0      0 192.168.122.1:123       0.0.0.0:*                           12498/ntpd
udp        0      0 192.168.1.156:123       0.0.0.0:*                           12498/ntpd
udp        0      0 127.0.0.1:123           0.0.0.0:*                           12498/ntpd
udp        0      0 0.0.0.0:123             0.0.0.0:*                           12498/ntpd
udp6       0      0 fe80::20c:29ff:fea2:123 :::*                                12498/ntpd
udp6       0      0 ::1:123                 :::*                                12498/ntpd
udp6       0      0 :::123                  :::*                                12498/ntpd
unix  2      [ ]         DGRAM                    140639   12498/ntpd

#我们看下ntp.aliyun.com的ip地址是什么
[root@dev6 ~]# ping ntp.aliyun.com
PING ntp.aliyun.com (203.107.6.88) 56(84) bytes of data.
64 bytes from 203.107.6.88 (203.107.6.88): icmp_seq=1 ttl=53 time=17.1 ms
#我们看下ntp 服务的源也是203.107.6.88 ,说明配置成功
[root@dev6 ~]# ntpq -p
     remote           refid      st t when poll reach   delay   offset  jitter
==============================================================================
 203.107.6.88    100.107.25.114   2 u    3   64    3   20.746  -145.90   0.787

#刚配置完,并没有同步
[root@dev6 ~]# ntpstat
unsynchronised
  time server re-starting
   polling server every 8 s
#同步成功以后
[root@dev6 ~]# ntpstat
synchronised to NTP server (203.107.6.88) at stratum 3
   time correct to within 26 ms
   polling server every 64 s
在目标机器开启NTP客户端服务
ps: NTP 服务端服务启动后,您需要等待 5 分钟再开启 NTP 客户端服务。否则系统会提示
no server suitable for synchronization found。
使用ntpdate手动立即同步
# 修改客户端时间
[root@dev3 ~]# date -s "2022-10-30 10:27:16"
2022年 10月 30日 星期日 10:27:16 CST
# 查看修改后的时间
[root@dev3 ~]# date
2022年 10月 30日 星期日 10:27:32 CST
#使用ntpdate立即同步ntp服务器时间
[root@dev3 ~]# ntpdate 192.168.1.156
27 Nov 15:51:50 ntpdate[14021]: step time server 192.168.1.156 offset 2438624.076604 sec
# 同步后的时间
[root@dev3 ~]# date
2022年 11月 27日 星期日 15:52:25 CST
注意:以上只是同步一次时间,可以设置为定时任务,每天进行同步
[root@dev3 ~]# crontab -e
0 12 * * * /usr/sbin/ntpdate 192.168.1.156
自动同步(以ntp作为客户端)
[root@dev3 ~]#  vim /etc/ntp.conf
#修改内容如下
server 192.168.1.156  prefer
# 保存并退出

# 启动ntpd服务
#[root@dev3 ~]# service ntpd restart
# 查看ntp的状态,可以看到已经指向了192.168.1.156
[root@dev3 ~]# ntpstat
synchronised to NTP server (192.168.1.156) at stratum 4
   time correct to within 37 ms
   polling server every 128 s
部署
从4.0开始,ob提供了统一的安装包all-in-one package。我们可以通过这个包一次性完成OBD、OceanBase数据库、OBProxy、obagent等的安装。
下载&解压
在dev6上下载
# 下载
[root@dev6 ~]# cd /app/
[root@dev6 app]# wget https://obbusiness-private.oss-cn-shanghai.aliyuncs.com/download-center/opensource/oceanbase-all-in-one/7/x86_64/oceanbase-all-in-one.4.0.0.0-beta-100120221102135736.el7.x86_64.tar.gz

#解压
[root@dev6 app]# tar zxvf oceanbase-all-in-one.4.0.0.0-beta-100120221102135736.el7.x86_64.tar.gz
安装OBD
[root@dev6 app]# cd oceanbase-all-in-one/bin/
[root@dev6 bin]# ls
env.sh  install.sh  uninstall.sh
#安装
[root@dev6 bin]# ./install.sh
# 检验obd
[root@dev6 bin]# which obd
/root/.oceanbase-all-in-one/obd/usr/bin/obd
[root@dev6 bin]# which obclient
/root/.oceanbase-all-in-one/obclient/u01/obclient/bin/obclient
安装数据库
安装成功以后,在 ~/.oceanbase-all-in-one/conf/autodeploy目录下会有相关的配置文件,我们重点看下autodeploy目录下的配置文件。
single-example.yaml单机版部署配置文件default-example.yaml集群版部署配置文件
我部署的是集群版
[root@dev6 autodeploy]# cd ~/.oceanbase-all-in-one/conf/autodeploy
[root@dev6 autodeploy]# vim default-example.yaml
# 说明
##  如果使用root部署,就不需要再改user这里了,我用appuser部署,就改了(root之前已经做了免密登录)
user:
   username: appuser
   password: 101790
## 修改部署的服务器和相关目录
oceanbase-ce:
  servers:
    - name: server1 # 起的名字,在后面可以根据名字配置不同的配置,后面只配置了zone
      # Please don't use hostname, only IP can be supported
      ip: 192.168.1.153
    - name: server2
      ip: 192.168.1.154
    - name: server3
      ip: 192.168.1.155
  global:
    # ob 部署的目录
    home_path: /app/observer
    # 数据目录,数据目录一定要是空的,存储的是sstable的文件
    data_dir: /data/ob
    # ob的 clog, ilog, and slog. 不配置在data目录,测试就放一起了
    #redo_dir: /redo/ob
    # 前面找的网卡名称,跟servers里指定的ip对应的网卡,如果网卡不同,可以参考zone那里,每个server填写
    devname: ens33
    #进程observer对应的链接端口,默认2181
    #mysql_port: 2881
    #observer跟其他进程之间的rpc通信端口,默认2182
    #rpc_port: 2882
    #ob设置的最大内存,最小不少于8G
    #memory_limit: 8G
    # OB留给集群内部用的保留内存,会占用memory_limit
    #system_memory: 4G
    #运行日志的级别,默认日志级别是INFO,支持 DEBUG, TRACE, INFO, WARN, USER_ERR, ERROR 六种级别
    #syslog_level: WARN
    # 日志是否覆盖,最多保留max_syslog_file_count 数量的日志文件
    #enable_syslog_recycle: TRUE
    #日志文件数量,这里默认保留最多 10 个历史运行日志文件
    #max_syslog_file_count: 10
    #OB集群的超级管理员root@sys的密码,默认为空
    #root_password: 密码
    #OBProxy连接OB集群使用的账户名(proxyro)的密码,默认为空
    #proxyro_password: 密码
  server1:
    zone: zone1 # 逻辑机房的概念
  server2:
    zone: zone2
  server3:
    zone: zone3
obproxy-ce:
  depends:
    - oceanbase-ce
  servers:
    - 192.168.1.156
  global:
    # The working directory for obproxy. Obproxy is started under this directory. This is a required field.
    home_path: /app/obproxy
    skip_proxy_sys_private_check: true
    enable_strict_kernel_release: false
obagent:
  depends:
    #依赖的配置,会自动复用集群的`proxyro`密码、集群名等
    - oceanbase-ce
  servers:
    - name: server1
      # Please don't use hostname, only IP is supported.
      ip: 192.168.1.153
    - name: server2
      ip: 192.168.1.154
    - name: server3
      ip: 192.168.1.155
  global:
    # The working directory for obagent. obagent is started under this directory. This is a required field.
    home_path: /app/obagent
#prometheus:
#  servers:
#    - 192.168.1.156
#  global:
#    home_path: /app/prometheus
#grafana:
#  servers:
#    - 192.168.1.156
#  depends:
#    - prometheus
#  global:
#    home_path: /app/grafana
#    login_password: oceanbase
部署
#在  ~/.oceanbase-all-in-one/conf/autodeploy  目录下执行
[root@dev6 autodeploy]$ obd cluster autodeploy obtest -c default-example.yaml
友情提示:deploy name 使用
_命名不要用-命名,否则在ocp中无法显示,ob的命名规范是_
# 如果部署过程中失败,[ERROR] Deploy "obdev" is deployed. You could not deploy an deployed cluster.
# 通过obd cluster list 查看部署的集群,然后,删除对应的配置
[root@dev6 autodeploy]# obd cluster list
+------------------------------------------------------+
|                     Cluster List                     |
+--------+---------------------------+-----------------+
| Name   | Configuration Path        | Status (Cached) |
+--------+---------------------------+-----------------+
| obtest | /root/.obd/cluster/obtest | deployed        |
| obdev  | /root/.obd/cluster/obdev  | deployed        |
+--------+---------------------------+-----------------+
#删除
[root@dev6 autodeploy]# rm -rf ~/.obd/cluster/obtest
部署成功后,default-example.yaml会复制到/root/.obd/cluster/obtest 目录下,并改名,以后集群读取的就是这个文件了
我们看下obd的语法
#我们可以一层层的使用 -help获取对应命令的帮助文档
[root@dev6 autodeploy]# obd cluster autodeploy -help
Usage: obd cluster autodeploy <deploy name> [options]
- deploy name 为集群名称,友情提示下,如果
Options:
  -c CONFIG, --config=CONFIG  # 指定配置文件
                        Path to the configuration file.
  -f, --force           Force autodeploy, overwrite the home_path.
  -C, --clean           Clean the home path if the directory belong to you.
  -U, --unuselibrepo, --ulp
                        Disable OBD from installing the libs mirror
                        automatically.
  -A, --auto-create-tenant, --act
                        Automatically create a tenant named `test` by using
                        all the available resource of the cluster.
  --force-delete        Force delete, delete the registered cluster.
  -s, --strict-check    Throw errors instead of warnings when check fails.
  -h, --help            Show help and exit.
  -v, --verbose         Activate verbose output.


