文章目录
- 1. 线性表的链式表示: 链表
- 1.1 顺序表的优缺点
- 1.2 链表的概念
- 1.3 链表的优缺点
- 1.4 链表的结构
- 2. 单链表的定义
- 2.1 单链表的结构体
- 2.2 接口函数
- 3. 接口函数的实现
- 3.1 动态申请一个结点 (BuySListNode)
- 3.2 单链表打印 (SListPrint)
- 3.3 单链表尾插 (SListPushBack)
- 3.4 单链表头插 (SListPushFront)
- 3.5 单链表尾删 (SListPopBack)
- 3.6 单链表头删 (SListPopFront)
- 3.7 单链表查找 (SListFind)
- 3.8 单链表在 pos 位置之前插入 (SListInsert)
- 3.9 单链表在 pos 位置上删除 (SListErase)
- 3.10 单链表在 pos 位置之后插入 (SListInsertAfter)
- 3.11 单链表在 pos 位置之后删除 (SListEraseAfter)
- 3.12 单链表销毁 (SListDestroy)
- 4. 完整代码
1. 线性表的链式表示: 链表
1.1 顺序表的优缺点
在介绍链表之前, 先回顾一下顺序表的优缺点

- 顺序表的优点:
存储密度高: 无需为表示表中元素之间的逻辑关系而增加额外的存储空间.
随机访问: 通过首地址和元素序号可以在时间 O ( 1 ) O(1) O(1) 内找到指定的元素.
- 顺序表的缺点:
顺序表逻辑上相邻的元素物理上也相邻, 插入和删除操作需要移动大量元素,时间复杂度为 O ( N ) O(N) O(N).
当线性表长度变化较大时, 难以确定存储空间的容量
造成存储空间的"碎片"
1.2 链表的概念
为了避免顺序表插入和删除的线性开销, 我们允许表可以不连续存储, 否则表的部分或全部需要整体移动.

链表由一系列不必在内存中相连的结构组成.
每个结构均含有表元素和指向包含该元素后继元的结构的指针.我们称为
next指针.最后一个单元的next指针指向NULL;该值由C定义并且不能与其他指针混淆.ANSI C 规定NULL为 0
如果 P 被声明为一个指向一个结构的指针, 那么存储在 P中的值就被解释为主存中的一个位置, 在该位置能够找到一个结构.
该结构的一个域可以通过 P->FieldName 访问, 其中 FieldName 是我们想要考察的域的名字.
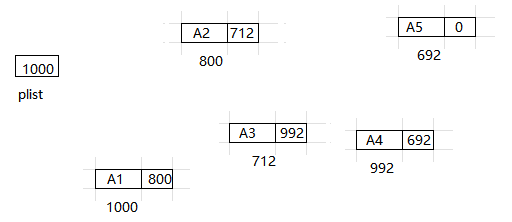
以下是表的具体表示, 即物理存储结构. 这个表含有 5 个结构, 内存分给它们的位置分别是 1000, 800, 712, 992 和 692.
第一个结构的指针含有值 800, 它提供了第二个结构所在的位置. 其余每个结构也都有一个指针用于类似的目的. 通过指针值, 可以访问到下一结构体的位置. 为了访问该表, 需要知道该表的第一个单元.

1.3 链表的优缺点
由此可以分析出单链表的优缺点:
- 链表的优点
更加合理使用空间: 按需申请空间, 不用则释放空间
元素的插入和删除效率更高, 只需要 O ( 1 ) O(1) O(1) 的时间
不存在空间浪费
- 链表的缺点
访问速度慢: 查找某一元素需要从头开始依次查找, 消耗 O ( N ) O(N) O(N) 的时间
存储密度低: 每个元素还需要额外空间存放指针空间, 用于将表中数据链接起来
1.4 链表的结构
typedef int SLTDateType;

typedef struct SListNode
{
	SLTDateType data;
	struct SListNode* next;
}SListNode;
-
逻辑结构: 便于理解想象出来的, 实际不存在, 一般用箭头表示, 实际箭头不存在

-
物理结构: 主存中实际的存储方式, 不一定是处在连续存储的空间
2. 单链表的定义
2.1 单链表的结构体

typedef int SLTDateType;

typedef struct SListNode
{
	SLTDateType data;
	struct SListNode* next;
}SListNode;
- 为了后续代码便于复用, 使用
typedef将数据类型和结构体类型重命名
- 每一个单链表结点包含两个域: 数据域
data和指针域next
struct SListNode* next实现结构体指向结构体
2.2 接口函数
// 动态申请一个结点
SListNode* BuySListNode(SLTDataType x);
// 单链表打印
void SListPrint(SListNode* pHead);
// 单链表尾插
void SListPushBack(SListNode** ppHead, SLTDataType x);
// 单链表头插
void SListPushFront(SListNode** ppHead, SLTDataType x);
// 单链表尾删
void SListPopBack(SListNode** pHead);
// 单链表头删
void SListPopFront(SListNode** pHead);
// 单链表查找
SListNode* SListFind(SListNode* pHead, SLTDataType x);
// 单链表在 pos 位置之前插入
void SListInsert(SListNode** ppHead, SListNode* pos, SLTDataType x);
// 单链表在 pos 位置上删除
void SListErase(SListNode** ppHead, SListNode* pos);
// 单链表在 pos 位置之后插入
void SListInsertAfter(SListNode* pos, SLTDataType x);
// 单链表在 pos 位置之后删除
void SListEraseAfter(SListNode* pos);
// 单链表的销毁
void SListDestroy(SListNode** ppHead);
3. 接口函数的实现
3.1 动态申请一个结点 (BuySListNode)
单链表插入元素必然要新向内存动态申请一个结点的空间, 这个操作可以直接封装成一个函数, 便于后续创建结点使用.
SList.h
SListNode* BuySListNode(SLTDataType x);
SList.c
// 动态申请一个结点
SListNode* BuySListNode(SLTDataType x)
{
    SListNode* newNode = (SListNode*)malloc(sizeof(SListNode));

    if (newNode == NULL)
    {
        perror("BuySListNode:");
        exit(-1);
    }

    newNode->data = x;
    newNode->next = NULL;

    return newNode;
}
test.c
void SListTest1()
{
    SListNode* newNode = BuySListNode(3);
    free(newNode);
}

int main(void)
{
    SListTest1();

    return 0;
}
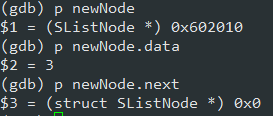
通过调试,创建结点成功:
3.2 单链表打印 (SListPrint)

通过plist的地址访问到第一个结点, 打印该结点的数据值, 同时访问下一结点直至该结点是空指针.
在访问链表的时候, 最好使用一个临时指针来访问, 避免后续增删元素的时候对链表首地址进行修改
SList.h
void SListPrint(SListNode* pHead);
SList.c
// 单链表打印
void SListPrint(SListNode* pHead)
{
   SListNode* cur = pHead;  //定义一个局部变量指针用来访问链表

   //从头依次访问链表, cur不为空进入循环
   while(cur != NULL)
   {
        printf("%d -> ", cur->data);    //打印结构的数据域
        cur = cur->next;    //使cur指向下一结点
   }

   printf("NULL\n");
}
test.c
后续其他功能测试都会用到, 这里就先不测试了
3.3 单链表尾插 (SListPushBack)

创建一个新结点, 让原最后一个结点指向新结点, 同时新结点指向空指针.
SList.h
void SListPushBack(SListNode** ppHead, SLTDateType x);
涉及对结构体指针的修改, 需要用到二级指针.虽然是尾插,但如果该链表没有一个元素, 就需要将新结点的地址赋值给实参
pList;想要函数修改指针的值,就需要形参是二级指针,也就是函数需要传址调用.

SList.c
// 单链表尾插
void SListPushBack(SListNode** ppHead, SLTDateType x);
{
    SListNode* newNode = BuySListNode(x);   //创建一个新结点

    if(*ppHead == NULL)    //没有结点, 直接将新结点的地址赋值
    {
        *ppHead = newNode;  //修改结构体指针, 需要用到二级指针
    }
    else    //有结点, 依次访问直到最后一个元素
    {
        SListNode* tail = *ppHead;  //tail 用于访问链表
        while (tail->next != NULL)
        {
            tail = tail->next;
        }

        tail->next = newNode;   //修改结构体, 只要用到一级指针
    }
}
- 首先创建一个新结点
newNode
- 接着判断链表是否为空,若为空,则直接使用二级指针将新结点的地址赋值给实参
pList
- 若链表不为空,则只需要修改结构体的内容,用到一级指针即可.当访问到该结点的
next为空时,进行尾插操作.
test.c
void SListTest1()
{
    SListNode* pList = NULL;

    SListPushBack(&pList, 1);
    SListPushBack(&pList, 2);
    SListPushBack(&pList, 3);
    SListPushBack(&pList, 4);
    SListPushBack(&pList, 5);
    SListPushBack(&pList, 6);

    SListPrint(pList);
    SListDestroy(&pList);
}

int main(void)
{
    SListTest1();

    return 0;
}
测试运行结果如下:
3.4 单链表头插 (SListPushFront)

修改pList,让pList指向新结点,同时新结点的next指向原链表第一个结点
SList.h
void SListPushFront(SListNode** ppHead, SLTDateType x);
同样这里需要修改实参
pList的值,函数的形参需要传入二级指针.
SList.c
// 单链表的头插
void SListPushFront(SListNode** ppHead, SLTDateType x)
{
    SListNode* newNode = BuySListNode(x);   //创建新结点

    newNode->next = *ppHead;    //新结点指向原链表第一个结点
    *ppHead = newNode;          //更新头结点
}
- 首先创建新结点
newNode
- 随后先将新结点指向原头结点, 再更头结点的值.
注意这两步不可颠倒,否则头结点的地址就丢失了
test.c
void SListTest1()
{
    SListNode* pList = NULL;

    SListPushBack(&pList, 1);
    SListPushBack(&pList, 2);
    SListPushBack(&pList, 3);
    SListPushBack(&pList, 4);
    SListPushBack(&pList, 5);
    SListPushBack(&pList, 6);

    SListPrint(pList);

    SListPushFront(&pList, -1);
    SListPushFront(&pList, -2);
    SListPushFront(&pList, -3);
    SListPushFront(&pList, -4);
    SListPushFront(&pList, -5);
    SListPushFront(&pList, -6);

    SListPrint(pList);
    SListDestroy(&pList);
}

int main(void)
{
    SListTest1();

    return 0;
}
测试结果如下:
3.5 单链表尾删 (SListPopBack)

注意分三种情况
SList.h
void SListPopBack(SListNode** ppHead);
同样有修改结构体指针的情况,需要用到二级指针
SList.c
// 单链表的尾删
void SListPopBack(SListNode** ppHead)
{
    assert(*ppHead);    //没有结点的情况

    if ((*ppHead)->next == NULL)  //只有一个结点的情况
    {
        free(*ppHead);
        *ppHead = NULL; //修改实参的值需要用到二级指针
    }
    else    //有两个结点以上的情况
    {
        SListNode* tail = *ppHead;   //tail用来访问结构体成员

        while (tail->next->next != NULL) //需要修改倒数第二个结点的值, 则访问到倒数第二个结点即停止
        {
            tail = tail->next;
        }

        free(tail->next);  //先释放最后一个结点的空间
        tail->next = NULL;  //倒数第二个结点指向NULL
    }
}
- 若链表为空,没有结点,程序直接结束
- 若只有一个结点,则需要用到二级指针来修改实参
pList的值为NULL,同时释放头结点空间
- 若有两个及以上结点,只用修改结构体.若要修改倒数第二个结点的值,则只要访问到倒数第二个结点就可以了.这是单向链表,不可返回访问
test.c
void SListTest2()
{
    SListNode* pList = NULL;

    SListPushBack(&pList, 1);
    SListPushBack(&pList, 2);
    SListPushBack(&pList, 3);
    SListPushBack(&pList, 4);
    SListPushBack(&pList, 5);
    SListPushBack(&pList, 6);

    SListPrint(pList);

    SListPopBack(&pList);
    SListPopBack(&pList);

    SListPrint(pList);

    SListPopBack(&pList);
    SListPopBack(&pList);
    SListPopBack(&pList);

    SListPrint(pList);

    SListPopBack(&pList);       //一个结点

    SListPrint(pList);

    SListPopBack(&pList);       //没有结点

    SListPrint(pList);
    SListDestroy(&pList);
}

int main(void)
{
    SListTest2();

    return 0;
}
测试运行结果如下:
3.6 单链表头删 (SListPopFront)
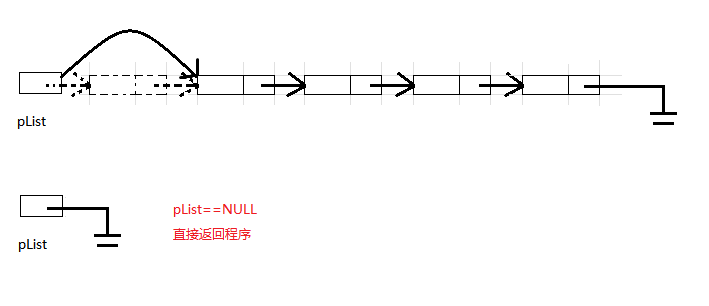
单链表头删则只有两种情况,若链表为空直接终止程序.链表不为空,使pList指向头结点指向的空间.
SList.h
void SListPopFront(SListNode** ppHead);
同样有修改结构体指针的情况,需要用到二级指针
SList.c
// 单链表头删
void SListPopFront(SListNode** ppHead)
{
    assert(*ppHead);    //链表为空

    //链表非空
    SListNode* newNode = (*ppHead)->next;   //记录新的头结点
    free(*ppHead);      //释放原头结点空间
    *ppHead = newNode;  //更新头结点
}
- 首先判断链表是否为空,若链表为空程序直接结束
- 接着先记录新的头结点,释放原头结点空间后,更新头结点.
同样两个操作不可颠倒,否则原头结点失去位置,造成内存泄漏
test.c
void SListTest3()
{
    SListNode* pList = NULL;

    SListPushBack(&pList, 1);
    SListPushBack(&pList, 2);
    SListPushBack(&pList, 3);
    SListPushBack(&pList, 4);
    SListPushBack(&pList, 5);
    SListPushBack(&pList, 6);

    SListPrint(pList);

    SListPopFront(&pList);
    SListPopFront(&pList);

    SListPrint(pList);

    SListPopFront(&pList);
    SListPopFront(&pList);
    SListPopFront(&pList);

    SListPrint(pList);

    SListPopFront(&pList);

    SListPrint(pList);

    SListPopFront(&pList);       //没有结点

    SListPrint(pList);
    SListDestroy(&pList);
}

int main(void)
{
    SListTest3();

    return 0;
}
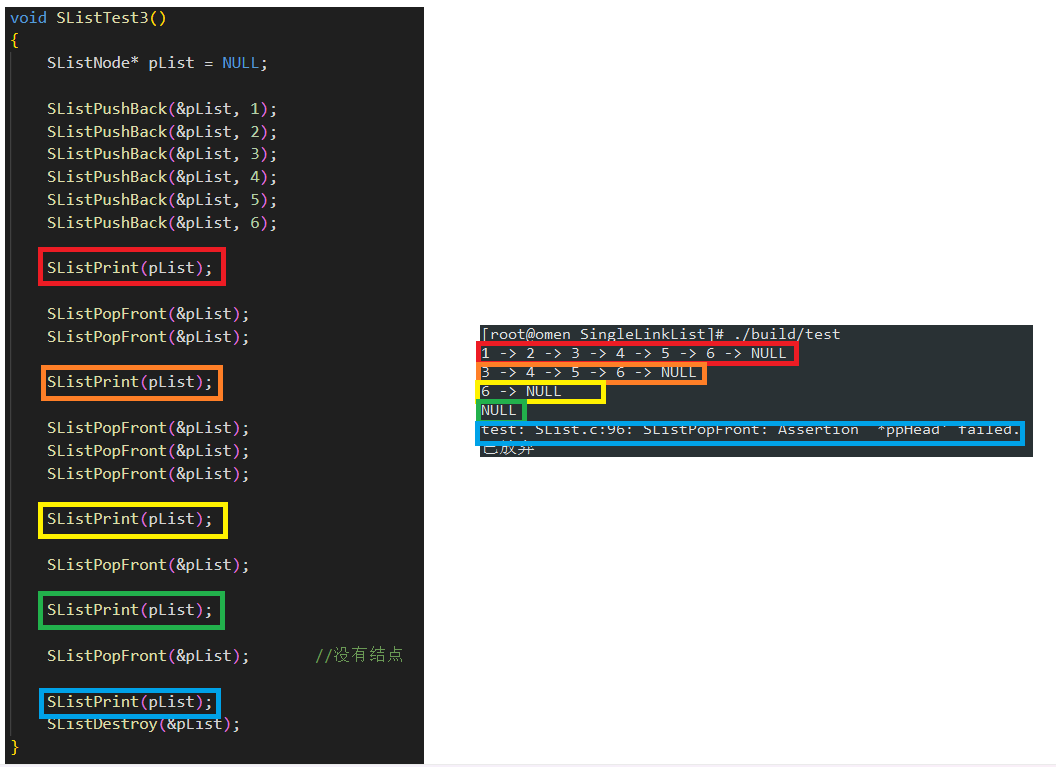
测试运行结果如下:
3.7 单链表查找 (SListFind)

从头依次访问每一个结点,并与要查找的值进行比较,若找到则直接返回该结点的地址,若找不到则返回空指针.
SList.h
SListNode* SListFind(SListNode* pHead, SLTDateType x);
SList.c
// 单链表查找
SListNode* SListFind(SListNode* pHead, SLTDateType x)
{
    SListNode* cur = pHead; //cur访问每个结点

    while (cur != NULL)
    {
        if (cur->data == x)
        {
            return cur;
        }
        cur = cur->next;
    }

    return NULL;
}
test.c
void SListTest4()
{
    SListNode* pList = NULL;

    SListPushBack(&pList, 1);
    SListPushBack(&pList, 2);
    SListPushBack(&pList, 3);
    SListPushBack(&pList, 4);
    SListPushBack(&pList, 5);
    SListPushBack(&pList, 6);

    SListPrint(pList);

    SListNode* pos;
    pos = SListFind(pList, 3);
    SListPrint(pos);

    pos = SListFind(pList, 6);
    SListPrint(pos);

    pos = SListFind(pList, 8);
    SListPrint(pos);
    SListDestroy(&pList);
}

int main(void)
{
    SListTest4();

    return 0;
}
测试运行结果如下:
3.8 单链表在 pos 位置之前插入 (SListInsert)
将pos位置的之前插入分为两种情况: pos 指向头结点 和 其他情况

SList.h
void SListInsert(SListNode** ppHead, SListNode* pos, SLTDataType x);
涉及对实参
pList的修改需要用到二级指针
SList.c
// 单链表在 pos 位置之前插入
void SListInsert(SListNode** ppHead, SListNode* pos, SLTDataType x)
{
	assert(ppHead);
	assert(pos);

	SListNode* newNode = BuySListNode(x);	//创建新结点

	if (*ppHead == pos)	//如果pos指向第一个结点
	{
		//头插
		newNode->next = *ppHead;
		*ppHead = newNode;
	}
	else
	{
		SListNode* prev = *ppHead;	//prev用于访问到pos前一个结点的位置

		while (prev->next != pos)
		{
			prev = prev->next;
		}

		//插入
		newNode->next = pos;
		prev->next = newNode;
	}
}
- 首先确保
ppHead和pos值合法
- 创建新结点后, 判断
pos是否指向头结点, 若指向头结点, 直接头插操作就可以了, 注意要使用二级指针以修改实参pList的值
- 若
pos不指向头结点, 因为要涉及对pos指向结点的前一个结点进行修改, 所以定义prev顺序访问单链表直至访问到pos指向结点的前一个结点. 这时进行插入操作, 直接修改newNode和prev的next即可
test.c
void SListTest5()
{
	SListNode* pList = NULL;

	SListPushBack(&pList, 1);
    SListPushBack(&pList, 2);
    SListPushBack(&pList, 3);
    SListPushBack(&pList, 4);
    SListPushBack(&pList, 5);
    SListPushBack(&pList, 6);

    SListPrint(pList);

	SListNode* pos;
	pos = SListFind(pList, 1);
	if (pos != NULL)
	{
		SListInsert(&pList, pos, -1);
	}
	SListPrint(pList);

	pos = SListFind(pList, 5);
	if (pos != NULL)
	{
		SListInsert(&pList, pos, -5);
	}
	SListPrint(pList);

	pos = SListFind(pList, 10);
	if (pos != NULL)
	{
		SListInsert(&pList, pos, -10);
	}
	SListPrint(pList);
	SListDestroy(&pList);

}

int main(void)
{
    SListTest5();

    return 0;
}
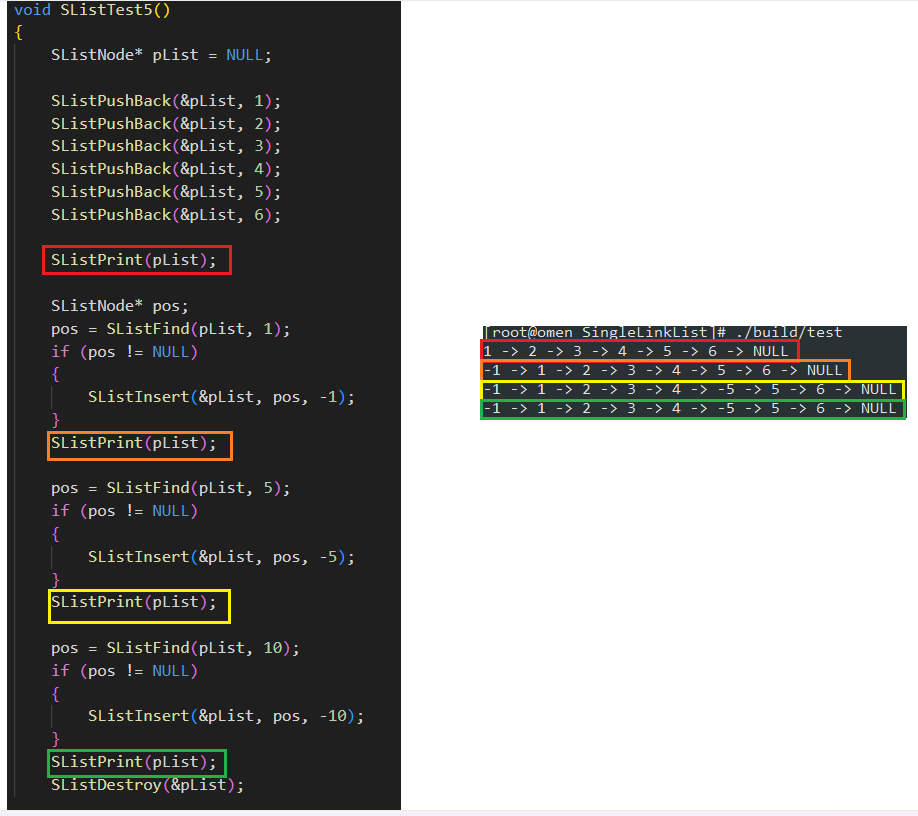
测试运行结果如下:
3.9 单链表在 pos 位置上删除 (SListErase)
单链表在 pos 位置上删除, 也是有两种情况: 删除的是头结点 和 删除的不是头结点

SList.h
void SListErase(SListNode** ppHead, SListNode* pos);
涉及对实参
pList的修改需要用到二级指针
SList.c
// 单链表在 pos 位置上删除
void SListErase(SListNode** ppHead, SListNode* pos)
{
	assert(ppHead);
	assert(pos);

	if (*ppHead == pos)	//如果 pos 指向第一个结点
	{
		*ppHead = pos->next;
		free(pos);		//释放空间
	}
	else	//有两个及以上结点
	{
		SListNode* prev = *ppHead;	//prev 访问到pos之前的一个结点

		while (prev->next != pos)
		{
			prev = prev->next;
		}

		//删除
		prev->next = pos->next;
		free(pos);
	}
}
- 首先确保
ppHead和pos的值合法
- 接着判断
pos是否指向头结点, 如果指向头结点, 则按照头删的方式进行删除结点
- 如果
pos不指向头结点, 因为需要修改pos前面的结点的数据, 所以定义了变量prev, 顺序访问单链表直至访问到pos位置结点的前一个结点, 直接prev->next = pos->next
test.c
void SListTest6()
{
	SListNode* pList = NULL;

	SListPushBack(&pList, 1);
	SListPushBack(&pList, 2);
	SListPushBack(&pList, 3);
	SListPushBack(&pList, 4);
	SListPushBack(&pList, 5);
	SListPushBack(&pList, 6);
	SListPrint(pList);

	SListNode* pos;
	pos = SListFind(pList, 1);
	if (pos != NULL)
	{
		SListErase(&pList, pos);
	}
	SListPrint(pList);

	pos = SListFind(pList, 5);
	if (pos != NULL)
	{
		SListErase(&pList, pos);;
	}
	SListPrint(pList);

	pos = SListFind(pList, 10);
	if (pos != NULL)
	{
		SListErase(&pList, pos);
	}
	SListPrint(pList);
	SListDestroy(&pList);
}

int main(void)
{
    SListTest6();

    return 0;
}
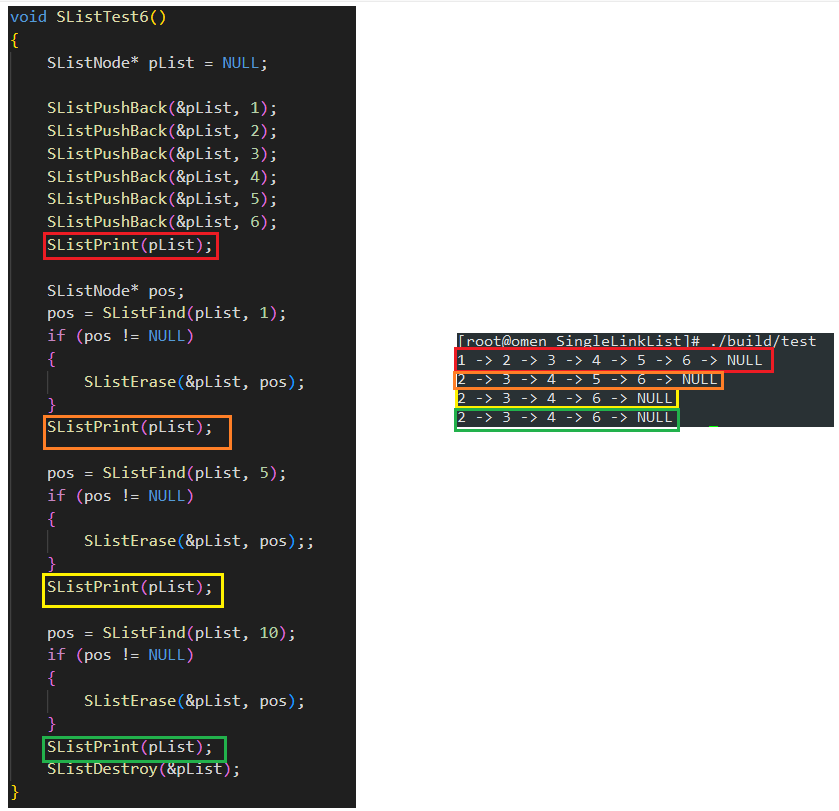
测试运行结果如下:
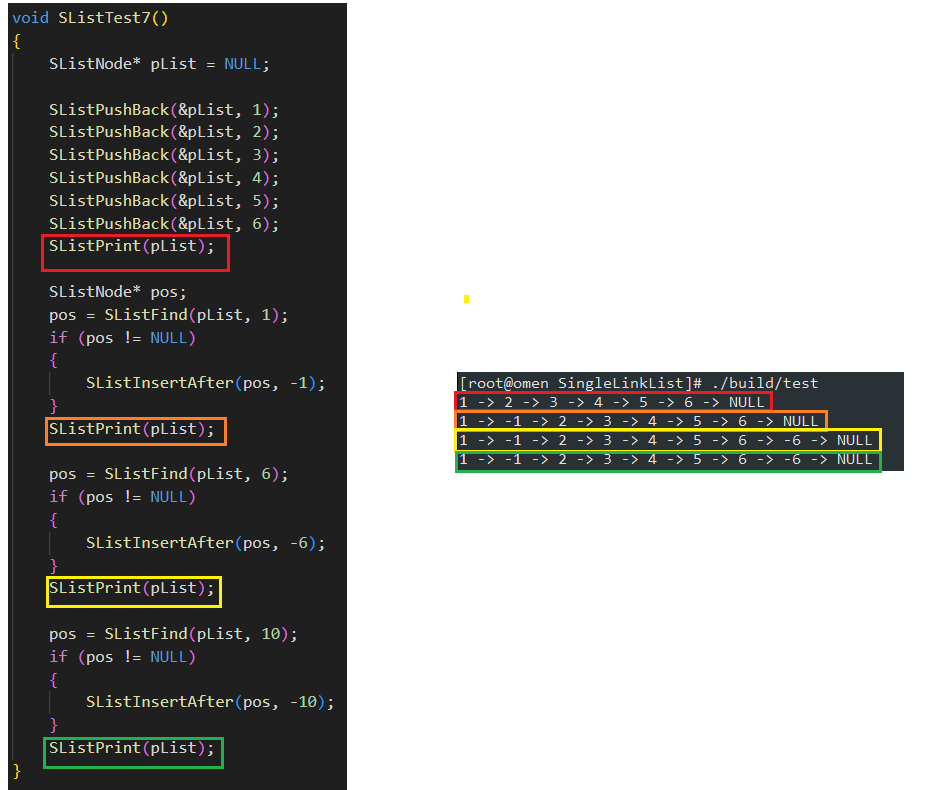
3.10 单链表在 pos 位置之后插入 (SListInsertAfter)
直接插入即可, 时间复杂度相比 SListInsert 要少很多

SList.h
void SListInsertAfter(SListNode* pos, SLTDataType x);
SList.c
// 单链表在 pos 位置后插入
void SListInsertAfter(SListNode* pos, SLTDataType x)
{
	assert(pos);	//确保插入位置合法

	SListNode* newNode = BuySListNode(x);
	newNode->next = pos->next;
	pos->next = newNode;
}
- 确保
pos的值合法
- 注意
newNode->next = pos->next;和pos->next = newNode;的顺序不可以颠倒, 否则会出现newNode指向自己的情况
test.c
void SListTest7()
{
	SListNode* pList = NULL;

	SListPushBack(&pList, 1);
	SListPushBack(&pList, 2);
	SListPushBack(&pList, 3);
	SListPushBack(&pList, 4);
	SListPushBack(&pList, 5);
	SListPushBack(&pList, 6);
	SListPrint(pList);

	SListNode* pos;
	pos = SListFind(pList, 1);
	if (pos != NULL)
	{
		SListInsertAfter(pos, -1);
	}
	SListPrint(pList);

	pos = SListFind(pList, 6);
	if (pos != NULL)
	{
 		SListInsertAfter(pos, -6);
	}
	SListPrint(pList);

	pos = SListFind(pList, 10);
	if (pos != NULL)
	{
		SListInsertAfter(pos, -10);
	}
	SListPrint(pList);
    SListDestroy(&pList);
}

int main(void)
{
    SListTest7();

    return 0;
}
测试运行结果如下:
3.11 单链表在 pos 位置之后删除 (SListEraseAfter)
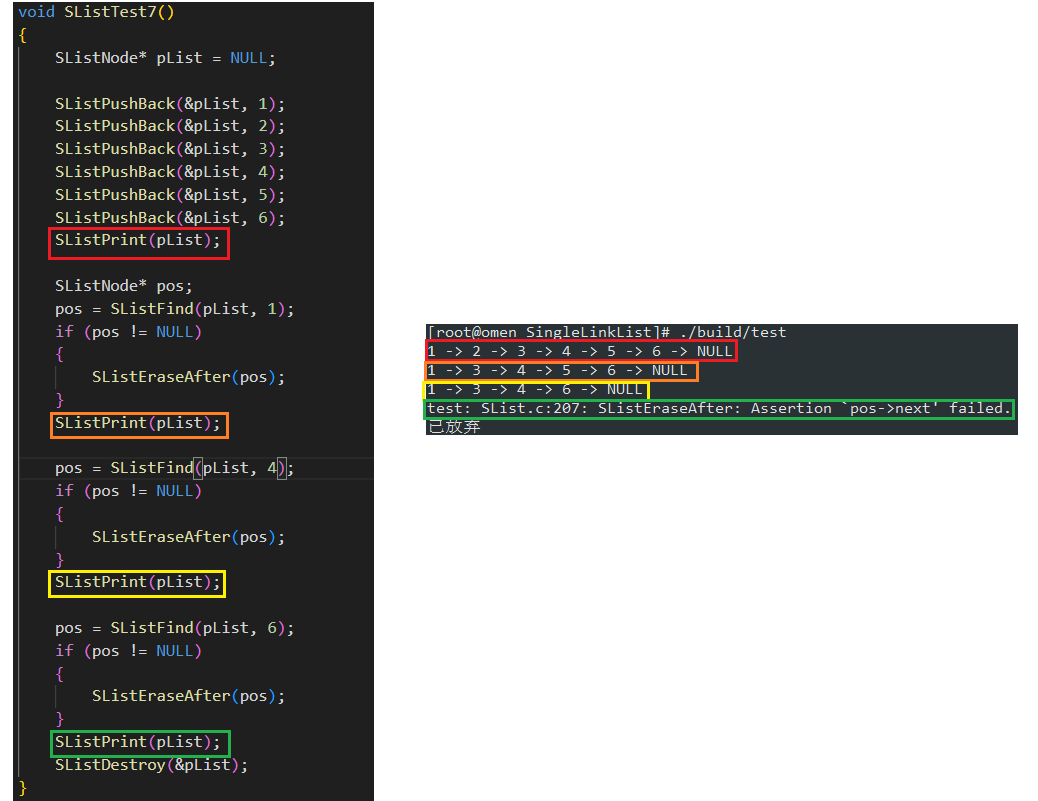
直接改变 pos 位置结点的指向即可, pos 不可指向链表结尾

SList.h
void SListEraseAfter(SListNode* pos);
SList.c
// 单链表在 pos 位置之后删除
void SListEraseAfter(SListNode* pos)
{
	assert(pos);	//确保删除位置合法
	assert(pos->next);

	SListNode* deleteNode = pos->next;
	pos->next = deleteNode->next;
	free(deleteNode);
}
- 确保
pos和pos->next合法
- 将要删除的结点命名为
deleteNode, 随后直接修改pos位置的next, 并释放空间即可
test.c
void SListTest7()
{
	SListNode* pList = NULL;

	SListPushBack(&pList, 1);
	SListPushBack(&pList, 2);
	SListPushBack(&pList, 3);
	SListPushBack(&pList, 4);
	SListPushBack(&pList, 5);
	SListPushBack(&pList, 6);
	SListPrint(pList);

	SListNode* pos;
    pos = SListFind(pList, 1);
	if (pos != NULL)
	{
		SListEraseAfter(pos);
	}
	SListPrint(pList);

	pos = SListFind(pList, 4);
	if (pos != NULL)
	{
		SListEraseAfter(pos);
	}
	SListPrint(pList);

	pos = SListFind(pList, 6);
	if (pos != NULL)
	{
		SListEraseAfter(pos);
	}
	SListPrint(pList);
    SListDestroy(&pList);
}

int main(void)
{
    SListTest7();

    return 0;
}
测试运行结果如下:
3.12 单链表销毁 (SListDestroy)
SList.h
void SListDestroy(SListNode** ppHead);
涉及对实参
pList的修改需要用到二级指针
SList.c
// 单链表销毁
void SListDestroy(SListNode** ppHead)
{
	assert(ppHead);

	SListNode* cur = *ppHead;

	while (cur != NULL)
	{
		SListNode* next = cur->next;
		free(cur);
		cur = next;
	}

	*ppHead = NULL;
}
顺序访问链表并依次释放结点空间
由此可以看出: 单链表更多的还是头插和头删是最便利的, 在后面的复杂数据结构中会用到单链表, 算法相关笔试题也是单链表居多(单链表的坑比较多!)
4. 完整代码
SList.h
#pragma once

#include <stdio.h>
#include <stdlib.h>
#include <assert.h>

typedef int SLTDataType;
//单链表结点结构体
typedef struct SListNode
{
	SLTDataType data;
	struct SListNode* next;
}SListNode;

//动态申请一个结点
SListNode* BuySListNode(SLTDataType x);
//单链表打印
void SListPrint(SListNode* pHead);
//单链表尾插
void SListPushBack(SListNode** ppHead, SLTDataType x);
//单链表头插
void SListPushFront(SListNode** ppHead, SLTDataType x);
//单链表尾删
void SListPopBack(SListNode** pHead);
//单链表头删
void SListPopFront(SListNode** pHead);
//单链表查找
SListNode* SListFind(SListNode* pHead, SLTDataType x);
//单链表在 pos 位置之前插入
void SListInsert(SListNode** ppHead, SListNode* pos, SLTDataType x);
//单链表在 pos 位置上删除
void SListErase(SListNode** ppHead, SListNode* pos);
//单链表在 pos 位置之后插入
void SListInsertAfter(SListNode* pos, SLTDataType x);
//单链表在 pos 位置之后删除
void SListEraseAfter(SListNode* pos);
//单链表的销毁
void SListDestroy(SListNode** ppHead);
SList.c
#include "SList.h"

// 动态申请一个结点
SListNode* BuySListNode(SLTDataType x)
{
    SListNode* newNode = (SListNode*)malloc(sizeof(SListNode));

    if (newNode == NULL)
    {
        perror("BuySListNode:");
        exit(-1);
    }

    newNode->data = x;
    newNode->next = NULL;

	return newNode;
}

// 单链表打印
void SListPrint(SListNode* pHead)
{
   SListNode* cur = pHead;  //定义一个局部变量指针用来访问链表

   //从头依次访问链表, cur不为空进入循环
   while(cur != NULL)
   {
        printf("%d -> ", cur->data);    //打印结构的数据域
        cur = cur->next;    //使cur指向下一结点
   }

   printf("NULL\n");
}

// 单链表尾插
void SListPushBack(SListNode** ppHead, SLTDataType x)
{
	assert(ppHead);

    SListNode* newNode = BuySListNode(x);   //创建一个新结点

    if(*ppHead == NULL)    //没有结点, 直接将新结点的地址赋值
    {
        *ppHead = newNode;  //修改结构体指针, 需要用到二级指针
    }
    else    //有结点, 依次访问直到最后一个元素
    {
        SListNode* tail = *ppHead;  //tail 用于访问链表
        while (tail->next != NULL)
        {
            tail = tail->next;
        }

        tail->next = newNode;   //修改结构体, 只要用到一级指针
    }
}

// 单链表的头插
void SListPushFront(SListNode** ppHead, SLTDataType x)
{
    SListNode* newNode = BuySListNode(x);   //创建新结点

    newNode->next = *ppHead;    //新结点指向原链表第一个结点
    *ppHead = newNode;          //更新头结点
}

// 单链表的尾删
void SListPopBack(SListNode** ppHead)
{
	assert(ppHead);
    assert(*ppHead);    //没有结点的情况

    if ((*ppHead)->next == NULL)  //只有一个结点的情况
    {
        free(*ppHead);
        *ppHead = NULL; //修改实参的值需要用到二级指针
    }
    else    //有两个结点以上的情况
    {
        SListNode* tail = *ppHead;   //tail用来访问结构体成员

        while (tail->next->next != NULL) //需要修改倒数第二个结点的值, 则访问到倒数第二个结点即停止
        {
            tail = tail->next;
        }

        free(tail->next);  //先释放最后一个结点的空间
        tail->next = NULL;  //倒数第二个结点指向NULL
    }
}

// 单链表头删
void SListPopFront(SListNode** ppHead)
{
	assert(ppHead);
    assert(*ppHead);    //链表为空

    //链表非空
    SListNode* newNode = (*ppHead)->next;   //记录新的头结点
    free(*ppHead);      //释放原头结点空间
    *ppHead = newNode;  //更新头结点
}

// 单链表查找
SListNode* SListFind(SListNode* pHead, SLTDataType x)
{
    SListNode* cur = pHead; //cur访问每个结点

    while (cur != NULL)
    {
        if (cur->data == x)
        {
            return cur;
        }
        cur = cur->next;
    }

    return NULL;
}

// 指定位置前插
void SListInsert(SListNode** ppHead, SListNode* pos, SLTDataType x)
{
	assert(ppHead);
	assert(pos);

	SListNode* newNode = BuySListNode(x);	//创建新结点

	if (*ppHead == pos)	//如果pos指向第一个结点
	{
		//头插
		newNode->next = *ppHead;
		*ppHead = newNode;
	}
	else
	{
		SListNode* prev = *ppHead;	//prev用于访问到pos前一个结点的位置

		while (prev->next != pos)
		{
			prev = prev->next;
		}

		//插入
		newNode->next = pos;
		prev->next = newNode;
	}
}

// 单链表在 pos 位置上删除
void SListErase(SListNode** ppHead, SListNode* pos)
{
	assert(ppHead);
	assert(pos);

	if (*ppHead == pos)	//如果 pos 指向第一个结点
	{
		*ppHead = pos->next;
		free(pos);		//释放空间
	}
	else	//有两个及以上结点
	{
		SListNode* prev = *ppHead;	//prev 访问到pos之前的一个结点

		while (prev->next != pos)
		{
			prev = prev->next;
		}

		//删除
		prev->next = pos->next;
		free(pos);
	}
}

// 单链表销毁
void SListDestroy(SListNode** ppHead)
{
	assert(ppHead);

	SListNode* cur = *ppHead;

	while (cur != NULL)
	{
		SListNode* next = cur->next;
		free(cur);
		cur = next;
	}

	*ppHead = NULL;
}

// 单链表在 pos 位置后插入
void SListInsertAfter(SListNode* pos, SLTDataType x)
{
	assert(pos);	//确保插入位置合法

	SListNode* newNode = BuySListNode(x);
	newNode->next = pos->next;
	pos->next = newNode;
}

// 单链表在 pos 位置之后删除
void SListEraseAfter(SListNode* pos)
{
	assert(pos);	//确保删除位置合法
	assert(pos->next);

	SListNode* deleteNode = pos->next;
	pos->next = deleteNode->next;
	free(deleteNode);
}
test.c
#include "SList.h"

void SListTest1()
{
	SListNode* pList = NULL;

	SListPushBack(&pList, 1);
	SListPushBack(&pList, 2);
	SListPushBack(&pList, 3);
	SListPushBack(&pList, 4);
	SListPushBack(&pList, 5);
	SListPushBack(&pList, 6);

	SListPrint(pList);

	SListPushFront(&pList, -1);
	SListPushFront(&pList, -2);
	SListPushFront(&pList, -3);
	SListPushFront(&pList, -4);
	SListPushFront(&pList, -5);
	SListPushFront(&pList, -6);

	SListPrint(pList);

	SListDestroy(&pList);
}

void SListTest2()
{
    SListNode* pList = NULL;

    SListPushBack(&pList, 1);
    SListPushBack(&pList, 2);
    SListPushBack(&pList, 3);
    SListPushBack(&pList, 4);
    SListPushBack(&pList, 5);
    SListPushBack(&pList, 6);

    SListPrint(pList);

    SListPopBack(&pList);
    SListPopBack(&pList);

    SListPrint(pList);

    SListPopBack(&pList);
    SListPopBack(&pList);
    SListPopBack(&pList);

    SListPrint(pList);

    SListPopBack(&pList);

    SListPrint(pList);

	SListPopBack(&pList);

	SListPrint(pList);
	SListDestroy(&pList);
}

void SListTest3()
{
    SListNode* pList = NULL;

    SListPushBack(&pList, 1);
    SListPushBack(&pList, 2);
    SListPushBack(&pList, 3);
    SListPushBack(&pList, 4);
    SListPushBack(&pList, 5);
    SListPushBack(&pList, 6);

    SListPrint(pList);

    SListPopFront(&pList);
    SListPopFront(&pList);

    SListPrint(pList);

    SListPopFront(&pList);
    SListPopFront(&pList);
    SListPopFront(&pList);

    SListPrint(pList);

    SListPopFront(&pList);

    SListPrint(pList);

    SListPopFront(&pList);       //没有结点

    SListPrint(pList);
	SListDestroy(&pList);
}

void SListTest4()
{
    SListNode* pList = NULL;

    SListPushBack(&pList, 1);
    SListPushBack(&pList, 2);
    SListPushBack(&pList, 3);
    SListPushBack(&pList, 4);
    SListPushBack(&pList, 5);
    SListPushBack(&pList, 6);

    SListPrint(pList);

    SListNode* pos;
    pos = SListFind(pList, 3);
    SListPrint(pos);

    pos = SListFind(pList, 6);
    SListPrint(pos);

    pos = SListFind(pList, 8);
    SListPrint(pos);
	SListDestroy(&pList);
}

void SListTest5()
{
	SListNode* pList = NULL;

	SListPushBack(&pList, 1);
    SListPushBack(&pList, 2);
    SListPushBack(&pList, 3);
    SListPushBack(&pList, 4);
    SListPushBack(&pList, 5);
    SListPushBack(&pList, 6);

    SListPrint(pList);

	SListNode* pos;
	pos = SListFind(pList, 1);
	if (pos != NULL)
	{
		SListInsert(&pList, pos, -1);
	}
	SListPrint(pList);

	pos = SListFind(pList, 5);
	if (pos != NULL)
	{
		SListInsert(&pList, pos, -5);
	}
	SListPrint(pList);

	pos = SListFind(pList, 10);
	if (pos != NULL)
	{
		SListInsert(&pList, pos, -10);
	}
	SListPrint(pList);
	SListDestroy(&pList);

}

void SListTest6()
{
	SListNode* pList = NULL;

	SListPushBack(&pList, 1);
	SListPushBack(&pList, 2);
	SListPushBack(&pList, 3);
	SListPushBack(&pList, 4);
	SListPushBack(&pList, 5);
	SListPushBack(&pList, 6);
	SListPrint(pList);

	SListNode* pos;
	pos = SListFind(pList, 1);
	if (pos != NULL)
	{
		SListErase(&pList, pos);
	}
	SListPrint(pList);

	pos = SListFind(pList, 5);
	if (pos != NULL)
	{
		SListErase(&pList, pos);;
	}
	SListPrint(pList);

	pos = SListFind(pList, 10);
	if (pos != NULL)
	{
		SListErase(&pList, pos);
	}
	SListPrint(pList);
	SListDestroy(&pList);
}

void SListTest7()
{
	SListNode* pList = NULL;

	SListPushBack(&pList, 1);
	SListPushBack(&pList, 2);
	SListPushBack(&pList, 3);
	SListPushBack(&pList, 4);
	SListPushBack(&pList, 5);
	SListPushBack(&pList, 6);
	SListPrint(pList);

	SListNode* pos;
	pos = SListFind(pList, 1);
	if (pos != NULL)
	{
		SListInsertAfter(pos, -1);
	}
	SListPrint(pList);

	pos = SListFind(pList, 6);
	if (pos != NULL)
	{
 		SListInsertAfter(pos, -6);
	}
	SListPrint(pList);

	pos = SListFind(pList, 10);
	if (pos != NULL)
	{
		SListInsertAfter(pos, -10);
	}
	SListPrint(pList);

	pos = SListFind(pList, -1);
	if (pos != NULL)
	{
		SListEraseAfter(pos);
	}
	SListPrint(pList);

	pos = SListFind(pList, 5);
	if (pos != NULL)
	{
		SListEraseAfter(pos);
	}
	SListPrint(pList);

	pos = SListFind(pList, -6);
	if (pos != NULL)
	{
		SListEraseAfter(pos);
	}
	SListPrint(pList);
	SListDestroy(&pList);
}

int main(void)
{
	//SListTest1();
	//SListTest2();
	//SListTest3();
	//SListTest4();
	//SListTest5();
	//SListTest6();
	SListTest7();


	return 0;
}
本章完.
