一、XML 序列化
序列化:把对象转化为可传输的字节序列过程称为序列化,就是把想要存储的内容转换为字节序列用于存储或传递
反序列化:把字节序列还原为对象的过程称为反序列化,就是把存储或收到的字节序列信息解析读取出来使用
(一)XML 序列化
1.准备数据结构
public class Lesson1Test
{
    public    int          testPublic    = 10;
    private   int          testPrivate   = 11;
    protected int          testProtected = 12;
    internal  int          testInternal  = 13;
    public    string       testPUblicStr = "123";
    public    int          testPro { get; set; }
    public    Lesson1Test2 testClass = new Lesson1Test2();
    public    int[]        arrayInt  = new int[3] { 5, 6, 7 };

    public    List<int> listInt = new List<int>() { 1, 2, 3, 4 };

    public    List<Lesson1Test2> listItem = new List<Lesson1Test2>() { new Lesson1Test2(), new Lesson1Test2() };

    // 不支持字典
    // public Dictionary<int, string> testDic = new Dictionary<int, string>() { { 1, "123" } };
}

public class Lesson1Test2
{
    public int test1 = 1;
    public float test2 = 1.1f;
    public bool test3 = true;
}

Lesson1Test lt = new Lesson1Test();
2.进行序列化
XmlSerializer:用于序列化对象为 xml 的关键类
StreamWriter:用于存储文件
using:用于方便流对象释放和销毁
using System.Xml.Serialization;

// 第一步:确定存储路径
string path = Application.persistentDataPath + "/Lesson1Test.xml";

// 第二步:结合 using知识点 和 StreamWriter这个流对象 来写入文件
// 括号内的代码:写入一个文件流 如果有该文件 直接打开并修改 如果没有该文件 直接新建一个文件
// using 的新用法 括号当中包裹的声明的对象 会在 大括号语句块结束后 自动释放掉
// 当语句块结束 会自动帮助我们调用 对象的 Dispose这个方法 让其进行销毁
// using一般都是配合 内存占用比较大 或者 有读写操作时  进行使用的
using (StreamWriter stream = new StreamWriter(path)) {
    // 第三步:进行xml文件序列化
    XmlSerializer s = new XmlSerializer(typeof(Lesson1Test));

    // 这句代码的含义 就是通过序列化对象 对我们类对象进行翻译 将其翻译成我们的xml文件 写入到对应的文件中
    // 第一个参数:文件流对象
    // 第二个参数:想要备翻译 的对象
    // 注意:翻译机器的类型 一定要和传入的对象是一致的 不然会报错
    s.Serialize(stream, lt);
}
3.运行测试
运行后可以看到如下的文件内容(在 path 文件夹中查看)
可以发现,只能保存 public 类型的数据
<?xml version="1.0" encoding="utf-8"?>
<Lesson1Test xmlns:xsd="http://www.w3.org/2001/XMLSchema" xmlns:xsi="http://www.w3.org/2001/XMLSchema-instance">
  <testPublic>10</testPublic>
  <testPUblicStr>123</testPUblicStr>
  <testClass>
    <test1>1</test1>
    <test2>1.1</test2>
    <test3>true</test3>
  </testClass>
  <arrayInt>
    <int>5</int>
    <int>6</int>
    <int>7</int>
  </arrayInt>
  <listInt>
    <int>1</int>
    <int>2</int>
    <int>3</int>
    <int>4</int>
  </listInt>
  <listItem>
    <Lesson1Test2>
      <test1>1</test1>
      <test2>1.1</test2>
      <test3>true</test3>
    </Lesson1Test2>
    <Lesson1Test2>
      <test1>1</test1>
      <test2>1.1</test2>
      <test3>true</test3>
    </Lesson1Test2>
  </listItem>
  <testPro>0</testPro>
</Lesson1Test>
4.自定义节点名或设置属性
public class Lesson1Test
{
    [XmlElement("testPublic123123")]  // 将该变量对应的结点名字改为 "testPublic123123"
    public    int          testPublic    = 10;
    private   int          testPrivate   = 11;
    protected int          testProtected = 12;
    internal  int          testInternal  = 13;
    public    string       testPUblicStr = "123";
    public    int          testPro { get; set; }
    public    Lesson1Test2 testClass = new Lesson1Test2();
    public    int[]        arrayInt  = new int[3] { 5, 6, 7 };

    [XmlArray("IntList")]    // 改变数组对应的结点名字
    [XmlArrayItem("Int32")]  // 改变数组成员对应的结点名字
    public List<int> listInt = new List<int>() { 1, 2, 3, 4 };

    public List<Lesson1Test2> listItem = new List<Lesson1Test2>() { new Lesson1Test2(), new Lesson1Test2() };

    // 不支持字典
    // public Dictionary<int, string> testDic = new Dictionary<int, string>() { { 1, "123" } };
}

public class Lesson1Test2
{
    [XmlAttribute("Test1")]    // 将该变量存储为XML属性,并改名为 "Test1"
    public int test1 = 1;

    [XmlAttribute]             // 将该变量存储为XML属性
    public float test2 = 1.1f;

    [XmlAttribute]
    public bool test3 = true;
}
<?xml version="1.0" encoding="utf-8"?>
<Lesson1Test xmlns:xsd="http://www.w3.org/2001/XMLSchema" xmlns:xsi="http://www.w3.org/2001/XMLSchema-instance">
  <testPublic>10</testPublic>
  <testPUblicStr>123</testPUblicStr>
  <testClass Test1="1" test2="1.1" test3="true" />
  <arrayInt>
    <int>5</int>
    <int>6</int>
    <int>7</int>
  </arrayInt>
  <IntList>
    <Int32>1</Int32>
    <Int32>2</Int32>
    <Int32>3</Int32>
    <Int32>4</Int32>
  </IntList>
  <listItem>
    <Lesson1Test2 Test1="1" test2="1.1" test3="true" />
    <Lesson1Test2 Test1="1" test2="1.1" test3="true" />
  </listItem>
  <testPro>0</testPro>
</Lesson1Test>
5. 总结:
- 序列化流程
- 有一个想要保存的类对象
- 使用 XmlSerializer 序列化该对象
- 通过 StreamWriter 配合 using 将数据存储 写入文件
- 注意:
- 只能序列化公共成员
- 不支持字典序列化
- 可以通过特性修改节点信息或者设置属性信息
- Stream 相关要配合 using 使用
二、XML 反序列化
(一)判断文件是否存在
using System.IO;

string path = Application.persistentDataPath + "/Lesson1Test.xml";
if(File.Exists(path)) { ... }
(二)反序列化
关键知识:
- using 和 StreamReader
- XmlSerializer 的 Deserialize 反序列化方法
using System.Xml.Serialization;

// 读取文件
using (StreamReader reader = new StreamReader(path))
{
    // 产生了一个 序列化反序列化的翻译机器
    XmlSerializer s = new XmlSerializer(typeof(Lesson1Test));
    Lesson1Test lt = s.Deserialize(reader) as Lesson1Test;
}
运行后调试,可以发现 List 类型的内容被重复添加,原因是变量 lt 初始化后, List 中有默认值,而反序列化时,Deserialize 方法会往 List 中用 Add 方法添加值,而不是覆盖原有的值。

总结:
-
判断文件是否存在
File.Exists() -
文件流获取
StreamReader reader = new StreamReader(path) -
根据文件流 XmlSerializer 通过 Deserialize 反序列化出对象
注意:List 对象如果有默认值,反序列化时不会清空,会往后面添加
三、IXmlSerializable 接口
C# 的 XmlSerializer 提供了可拓展内容,可以让一些不能被序列化和反序列化的特殊类能被处理
让特殊类继承 IXmlSerializable 接口,实现其中的方法即可
(一)回顾序列化与反序列化
using System.IO;
using System.Xml;
using System.Xml.Serialization;

public class TestLesson3 : IXmlSerializable
{
    public int test1;
    public string test2;
}

TestLesson3 t = new TestLesson3();
t.test2 = "123";
string path = Application.persistentDataPath + "/TestLesson3.xml";
// 序列化
using (StreamWriter writer = new StreamWriter(path))
{
    // 序列化"翻译机器"
    XmlSerializer s = new XmlSerializer(typeof(TestLesson3));
    // 在序列化时  如果对象中的引用成员 为空 那么xml里面是看不到该字段的
    s.Serialize(writer, t);
}
// 反序列化
using (StreamReader reader = new StreamReader(path))
{
    // 序列化"翻译机器"
    XmlSerializer s = new XmlSerializer(typeof(TestLesson3));
    TestLesson3 t2 = s.Deserialize(reader) as TestLesson3;
}
<?xml version="1.0" encoding="utf-8"?>
<TestLesson3 xmlns:xsd="http://www.w3.org/2001/XMLSchema" xmlns:xsi="http://www.w3.org/2001/XMLSchema-instance">
  <test1>0</test1>
  <test2>123</test2>
</TestLesson3>
(二)继承 IXmlSerializable 接口
1.继承接口并实现接口函数
public class TestLesson3 : IXmlSerializable
{
    public int test1;
    public string test2;

    // 返回结构,返回 null 即可,不用过多了解
    public XmlSchema GetSchema()
    {
        return null;
    }

    // 反序列化时 会自动调用的方法
    public void ReadXml(XmlReader reader) { }

    // 序列化时 会自动调用的方法
    public void WriteXml(XmlWriter writer) { }
}
2.WriteXml
public void WriteXml(XmlWriter writer)
{
    // 在里面可以自定义序列化 的规则

    // 如果要自定义 序列化的规则 一定会用到 XmlWriter中的一些方法 来进行序列化
    // 1.写属性
    writer.WriteAttributeString("test1", this.test1.ToString());
    writer.WriteAttributeString("test2", this.test2);

    // 2.写节点
    writer.WriteElementString("test1", this.test1.ToString());
    writer.WriteElementString("test2", this.test2);

    // 3.写包裹节点
    XmlSerializer s = new XmlSerializer(typeof(int));
    writer.WriteStartElement("test1");  // 写 <test1>
    s.Serialize(writer, test1);         // 用序列化翻译机器写 test1 的内容
    writer.WriteEndElement();           // 写 </test1>

    XmlSerializer s2 = new XmlSerializer(typeof(string));
    writer.WriteStartElement("test2");  // 写 <test2>
    s.Serialize(writer, test2);         // 用序列化翻译机器写 test2 的内容
    writer.WriteEndElement();           // 写 </test2>
}
3.ReadXml
public void ReadXml(XmlReader reader)
{
    // 在里面可以自定义反序列化 的规则
    // 1.读属性
    this.test1 = int.Parse(reader["test1"]);
    this.test2 = reader["test2"];

    // 2.读节点
    // 方式一
    reader.Read();                         // 这时是读到的test1节点          <test1>
    reader.Read();                         // 这时是读到的test1节点包裹的内容  0
    this.test1 = int.Parse(reader.Value);  // 得到当前内容的值=
    reader.Read();                         // 这时读到的是尾部包裹节点        </test1>
    reader.Read();                         // 这时是读到的test2节点          <test2>
    reader.Read();                         // 这时是读到的test2节点包裹的内容  123
    this.test2 = reader.Value;

    // 方式二
    while (reader.Read())
    {
        if (reader.NodeType == XmlNodeType.Element)
        {
            switch (reader.Name)
            {
                case "test1":
                    reader.Read();
                    this.test1 = int.Parse(reader.Value);
                    break;
                case "test2":
                    reader.Read();
                    this.test2 = reader.Value;
                    break;
            }
        }
    }

    // 3.读包裹元素节点
    XmlSerializer s = new XmlSerializer(typeof(int));
    XmlSerializer s2 = new XmlSerializer(typeof(string));

    reader.Read();  // 跳过根节点

    reader.ReadStartElement("test1");     // 读 <test1>
    test1 = (int)s.Deserialize(reader);   // 用反序列化翻译机器读 test1 的内容
    reader.ReadEndElement();              // 读 </test1>

    reader.ReadStartElement("test2");            // 读 <test2>
    test2 = s2.Deserialize(reader).ToString();   // 用反序列化翻译机器读 test2 的内容
    reader.ReadEndElement();                     // 读 </test2>
}
四、Dictionary 支持序列化与反序列化
-
我们没办法修改 C# 自带的类
-
那我们可以重写一个类继承 Dictionary,然后让这个类继承序列化拓展接口 IXmlSerializable
-
实现里面的序列化和反序列化方法即可
public class SerizlizedDictionary<TKey, TValue> : Dictionary<TKey, TValue>, IXmlSerializable
{
    public XmlSchema GetSchema() {
        return null;
    }

    // 自定义字典的 反序列化 规则
    public void ReadXml(XmlReader reader) {
        XmlSerializer keySer   = new XmlSerializer(typeof(TKey));
        XmlSerializer valueSer = new XmlSerializer(typeof(TValue));

        // 要跳过根节点
        reader.Read();
        // 判断 当前不是元素节点 结束 就进行 反序列化
        while (reader.NodeType != XmlNodeType.EndElement) {
            // 反序列化键
            TKey key = (TKey)keySer.Deserialize(reader);
            // 反序列化值
            TValue value = (TValue)valueSer.Deserialize(reader);
            // 存储到字典中
            this.Add(key, value);
        }
    }

    // 自定义 字典的 序列化 规则
    public void WriteXml(XmlWriter writer) {
        XmlSerializer keySer   = new XmlSerializer(typeof(TKey));
        XmlSerializer valueSer = new XmlSerializer(typeof(TValue));

        foreach (KeyValuePair<TKey, TValue> kv in this) {
            // 键值对 的序列化
            keySer.Serialize(writer, kv.Key);
            valueSer.Serialize(writer, kv.Value);
        }
    }
}
(一)序列化测试
public class TestLesson4
{
    public int test1;

    public SerizlizerDictionary<int, string> dic;
}

public class Lesson4 : MonoBehaviour
{
    // Start is called before the first frame update
    void Start() {
        TestLesson4 tl4 = new TestLesson4();
        tl4.dic = new SerizlizerDictionary<int, string>();
        tl4.dic.Add(1, "123");
        tl4.dic.Add(2, "234");
        tl4.dic.Add(3, "345");

        string path = Application.persistentDataPath + "/TestLesson4.xml";
        using (StreamWriter writer = new StreamWriter(path)) {
            XmlSerializer s = new XmlSerializer(typeof(TestLesson4));
            s.Serialize(writer, tl4);
        }
    }
}
<?xml version="1.0" encoding="utf-8"?>
<TestLesson4 xmlns:xsd="http://www.w3.org/2001/XMLSchema" xmlns:xsi="http://www.w3.org/2001/XMLSchema-instance">
  <test1>0</test1>
  <dic>
    <int>1</int>
    <string>123</string>
    <int>2</int>
    <string>234</string>
    <int>3</int>
    <string>345</string>
  </dic>
</TestLesson4>
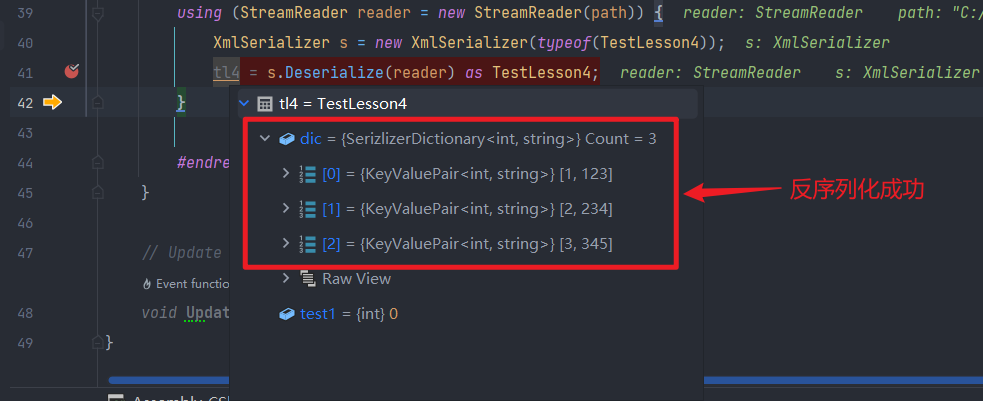
(二)反序列化测试
void Start() {
    TestLesson4 tl4 = new TestLesson4();
    using (StreamReader reader = new StreamReader(path)) {
        XmlSerializer s = new XmlSerializer(typeof(TestLesson4));
        tl4 = s.Deserialize(reader) as TestLesson4;
    }
}
五、自定义 XML 数据管理类
using System;
using System.IO;
using System.Xml.Serialization;
using UnityEngine;

public class XmlDataMgr
{
    // 单例模式
    public static XmlDataMgr Instance { get; } = new XmlDataMgr();

    // 防止外部实例化该管理类
    private XmlDataMgr() { }

    /// <summary>
    /// 保存数据到xml文件中
    /// </summary>
    /// <param name="data">数据对象</param>
    /// <param name="fileName">文件名</param>
    public void SaveData(object data, string fileName) {
        // 1.得到存储路径
        string path = Application.persistentDataPath + "/" + fileName + ".xml";
        // 2.存储文件
        using (StreamWriter writer = new StreamWriter(path)) {
            // 3.序列化
            XmlSerializer s = new XmlSerializer(data.GetType());
            s.Serialize(writer, data);
        }
    }

    /// <summary>
    /// 从xml文件中读取内容
    /// </summary>
    /// <param name="type">对象类型</param>
    /// <param name="fileName">文件名</param>
    /// <returns></returns>
    public object LoadData(Type type, string fileName) {
        // 1.首先要判断文件是否存在
        string path = Application.persistentDataPath + "/" + fileName + ".xml";
        if (!File.Exists(path)) {
            path = Application.streamingAssetsPath + "/" + fileName + ".xml";
            if (!File.Exists(path)) {
                // 如果根本不存在文件 两个路径都找过了
                // 那么直接new 一个对象 返回给外部 无非 里面都是默认值
                return Activator.CreateInstance(type);
            }
        }
        // 2.存在就读取
        using (StreamReader reader = new StreamReader(path)) {
            // 3.反序列化 取出数据
            XmlSerializer s = new XmlSerializer(type);
            return s.Deserialize(reader);
        }
    }
}
  if (!File.Exists(path)) {
            path = Application.streamingAssetsPath + "/" + fileName + ".xml";
            if (!File.Exists(path)) {
                // 如果根本不存在文件 两个路径都找过了
                // 那么直接new 一个对象 返回给外部 无非 里面都是默认值
                return Activator.CreateInstance(type);
            }
        }
        // 2.存在就读取
        using (StreamReader reader = new StreamReader(path)) {
            // 3.反序列化 取出数据
            XmlSerializer s = new XmlSerializer(type);
            return s.Deserialize(reader);
        }
    }
}


![包装设计软件 CubeDesigner[CubeMaster] 10.0 Crack](https://img-blog.csdnimg.cn/4365944595074bee9d82a2a525353412.png)