文章目录
- dog年龄预测
- 论文Deep expectation of real and apparent age from a single image without facial landmarks
- 分类的损失函数
- 1.多分类交叉熵损失函数:
- 2.KLDiv Loss: 分布差异
- 3.facenet 三元组损失函数
- timm and torchvision
- torchvision
- 尝试一:分类模型,按年龄分为1-191个类别
- 尝试二:回归模型
- 尝试三:分类模型
- 尝试四:KLDivLoss 拟合年龄分布
- 尝试五:首先提取狗的face,然后再训练模型
- 最后主要根据二和五进行优化。prediect
dog年龄预测
阿里天池宠物年龄预测
https://tianchi.aliyun.com/competition/
实验了多种方法,最终成绩并不是特别好,比赛结束后如果有更好的思路,欢迎指教。
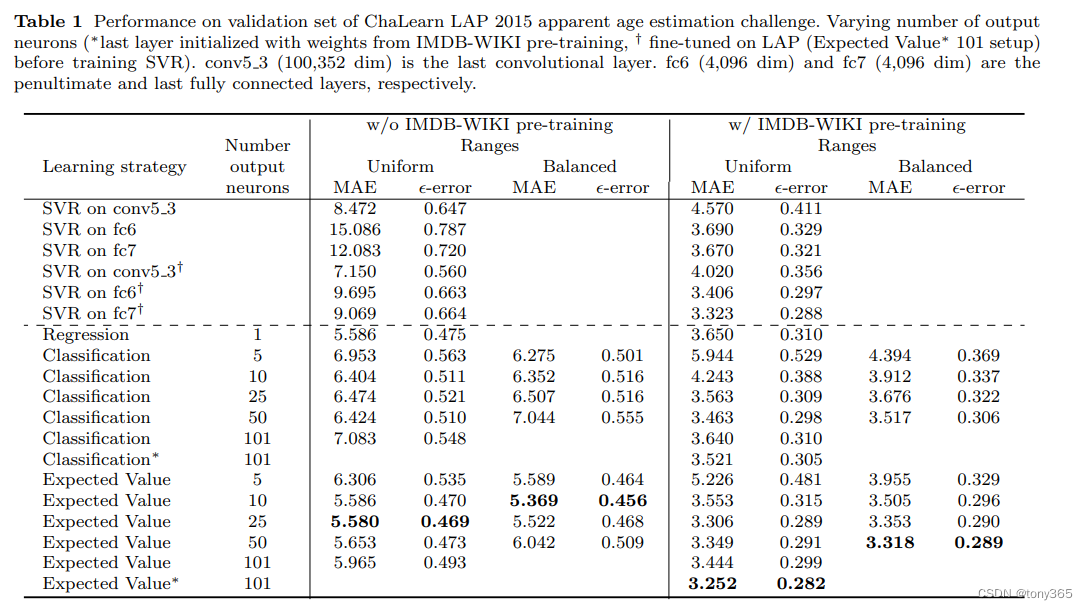
论文Deep expectation of real and apparent age from a single image without facial landmarks
- 直接回归
- 分段分类
- 分段求概率,求加权期望,其实相当于回归。
三种方法的表现
其他方法:
- 拟合分布,而不是one-hot
- 排序的方式
- 数据均衡性
参考:
https://github.com/NICE-FUTURE/predict-gender-and-age-from-camera/tree/master
分类的损失函数
1.多分类交叉熵损失函数:
torch.nn.CrossEntropyLoss() = log_softmax + nll_loss
详细介绍:https://zhuanlan.zhihu.com/p/159477597
2.KLDiv Loss: 分布差异
描述分布的差异,如果分类的目标不是one-hot而是soft-label的时候可以用
https://zhuanlan.zhihu.com/p/340088331
3.facenet 三元组损失函数
https://github.com/kvsnoufal/Pytorch-FaceNet-DogDataset
timm and torchvision
https://datawhalechina.github.io/thorough-pytorch/index.html
https://datawhalechina.github.io/thorough-pytorch/%E7%AC%AC%E5%85%AD%E7%AB%A0/6.3%20%E6%A8%A1%E5%9E%8B%E5%BE%AE%E8%B0%83-timm.html
torchvision
import torchvision.models as models
resnet18 = models.resnet18()
# resnet18 = models.resnet18(pretrained=False)  等价于与上面的表达式
alexnet = models.alexnet()
vgg16 = models.vgg16()
squeezenet = models.squeezenet1_0()
densenet = models.densenet161()
inception = models.inception_v3()
googlenet = models.googlenet()
shufflenet = models.shufflenet_v2_x1_0()
mobilenet_v2 = models.mobilenet_v2()
mobilenet_v3_large = models.mobilenet_v3_large()
mobilenet_v3_small = models.mobilenet_v3_small()
resnext50_32x4d = models.resnext50_32x4d()
wide_resnet50_2 = models.wide_resnet50_2()
mnasnet = models.mnasnet1_0()
尝试一:分类模型,按年龄分为1-191个类别
主要参考:dog品种分类
利用交叉熵损失,然后当成一个分类模型来训练
import glob
import os

import cv2
import numpy as np
import torch
from torch import nn, optim
from torchvision import datasets,transforms
from torch.utils.data import DataLoader

import torch
import torchvision.models as models
from PIL import Image
import torchvision.transforms as transforms

from tqdm import tqdm

from dog_age2 import Net


def VGG16_predict(img_path):
    '''
    Use pre-trained VGG-16 model to obtain index corresponding to
    predicted ImageNet class for image at specified path

    Args:
        img_path: path to an image

    Returns:
        Index corresponding to VGG-16 model's prediction
    '''
    # define VGG16 model
    VGG16 = models.vgg16(pretrained=True)
    # check if CUDA is available
    use_cuda = torch.cuda.is_available()
    # move model to GPU if CUDA is available
    if use_cuda:
        VGG16 = VGG16.cuda()
    ## Load and pre-process an image from the given img_path
    ## Return the *index* of the predicted class for that image
    # Image Resize to 256
    image = Image.open(img_path)
    mean = [0.485, 0.456, 0.406]
    std = [0.229, 0.224, 0.225]
    image_transforms = transforms.Compose([transforms.Resize(256),
                                           transforms.CenterCrop(224),
                                           transforms.ToTensor(),
                                           transforms.Normalize(mean, std)])
    image_tensor = image_transforms(image)
    image_tensor.unsqueeze_(0)
    if use_cuda:
        image_tensor = image_tensor.cuda()
    output = VGG16(image_tensor)
    _, classes = torch.max(output, dim=1)
    return classes.item()  # predicted class index

### returns "True" if a dog is detected in the image stored at img_path
def dog_detector(img_path):
    ## TODO: Complete the function.
    class_dog=VGG16_predict(img_path)
    return class_dog >= 151 and class_dog <=268 # true/false


def resnet50_predict(img_path):
    resnet50 = models.resnet50(pretrained=True)
    use_cuda = torch.cuda.is_available()
    if use_cuda:
        resnet50.cuda()
    image = Image.open(img_path)
    mean=[0.485, 0.456, 0.406]
    std=[0.229, 0.224, 0.225]
    image_transforms = transforms.Compose([transforms.Resize(256),
                                           transforms.CenterCrop(224),
                                           transforms.ToTensor(),
                                           transforms.Normalize(mean,std)])
    image_tensor = image_transforms(image)
    image_tensor.unsqueeze_(0)
    if use_cuda:
        image_tensor=image_tensor.cuda()
    resnet50.eval()
    output = resnet50(image_tensor)
    _,classes = torch.max(output,dim=1)
    return classes.item()
def resnet50_dog_detector(image_path):
    class_idx = resnet50_predict(image_path)
    return class_idx >= 151 and class_idx <=268


def get_train_set_info(dir):
    dog_files_train = glob.glob(dir + '\\*.jpg')
    mean = np.array([0.,0.,0.])
    std = np.array([0.,0.,0.])
    for i in tqdm(range(len(dog_files_train))):
        image=cv2.imread(dog_files_train[i])
        image = cv2.cvtColor(image,cv2.COLOR_BGR2RGB)
        image = image/255.0
        mean[0] += np.mean(image[:,:,0])
        mean[1] += np.mean(image[:,:,1])
        mean[2] += np.mean(image[:,:,2])
        std[0] += np.std(image[:,:,0])
        std[1] += np.std(image[:,:,1])
        std[2] += np.std(image[:,:,2])
    mean = mean/len(dog_files_train)
    std = std/len(dog_files_train)
    return mean,std

from PIL import ImageFile


def train(n_epochs, loaders, model, optimizer, criterion, use_cuda, save_path):
    """returns trained model"""
    # initialize tracker for minimum validation loss
    valid_loss_min = np.Inf

    for epoch in range(1, n_epochs + 1):
        # initialize variables to monitor training and validation loss
        train_loss = 0.0
        valid_loss = 0.0

        ###################
        # train the model #
        ###################
        model.train()
        for batch_idx, (data, target) in enumerate(tqdm(loaders['train'])):
            # move to GPU
            if use_cuda:
                data, target = data.cuda(), target.cuda()
            ## find the loss and update the model parameters accordingly
            ## record the average training loss, using something like
            ## train_loss = train_loss + ((1 / (batch_idx + 1)) * (loss.data - train_loss))
            optimizer.zero_grad()
            output = model(data)
            loss = criterion(output, target)
            loss.backward()
            optimizer.step()
            train_loss = train_loss + ((1 / (batch_idx + 1)) * (loss.data - train_loss))
        ######################
        # validate the model #
        ######################
        correct = 0.
        correct2 = 0
        correct3 = 0
        correct4 = 0
        total = 0.
        model.eval()
        for batch_idx, (data, target) in enumerate(tqdm(loaders['valid'])):
            # move to GPU
            if use_cuda:
                data, target = data.cuda(), target.cuda()
            ## update the average validation loss
            output = model(data)
            loss = criterion(output, target)
            valid_loss = valid_loss + ((1 / (batch_idx + 1)) * (loss.data - valid_loss))

            pred = output.data.max(1, keepdim=True)[1]
            # compare predictions to true label
            correct += np.sum(np.squeeze(pred.eq(target.data.view_as(pred))).cpu().numpy())
            correct2 += np.sum(np.squeeze(np.abs(pred.cpu().numpy() - (target.data.view_as(pred).cpu().numpy())) < 5))
            correct3 += np.sum(np.squeeze(np.abs(pred.cpu().numpy() - (target.data.view_as(pred).cpu().numpy())) < 10))
            correct4 += np.sum(np.squeeze(np.abs(pred.cpu().numpy() - (target.data.view_as(pred).cpu().numpy()))))
            total += data.size(0)

        # print training/validation statistics
        print('Epoch: {} \tTraining Loss: {:.6f} \tValidation Loss: {:.6f}'.format(
            epoch,
            train_loss,
            valid_loss
        ))
        print('Test Accuracy: %2d%% (%2d/%2d)' % (
            100. * correct / total, correct, total))
        print('Test Accuracy: %2d%% (%2d/%2d)' % (
            100. * correct2 / total, correct2, total))
        print('Test Accuracy: %2d%% (%2d/%2d)' % (
            100. * correct3 / total, correct3, total))
        print('Test Accuracy: %2d' % (
                correct4 / total))

        ## TODO: save the model if validation loss has decreased
        if valid_loss_min > valid_loss:
            print('Saving Model...')
            valid_loss_min = valid_loss
            torch.save(model.state_dict(), save_path)
    # return trained model
    return model


if __name__ == "__main__":

    # 1. vgg16 和 resnet50 的识别能力

    dir = r'D:\commit\trainset\trainset'
    # dog_files = glob.glob(dir + '\\*.jpg')
    #
    # dog_files_short = dog_files[:100]
    #
    # dog_percentage_dog = 0
    # dog_percentage_dog2 = 0
    # for i in tqdm(range(100)):
    #     dog_percentage_dog += int(dog_detector(dog_files_short[i]))
    #     dog_percentage_dog2 += int(resnet50_dog_detector(dog_files_short[i]))
    #
    # print(' Dog Percentage in Dog Dataset:{}% {} %'.format( dog_percentage_dog, dog_percentage_dog2)) # 98%, 97%
    # 2. 训练数据的均值和方差
    # mean, std = get_train_set_info(dir)
    # print(mean, std) # [0.595504   0.54956806 0.51172713] [0.2101685  0.21753638 0.22078435]

    # 3. 训练
    mean_train_set = [0.595504,  0.54956806, 0.51172713]
    std_train_set = [0.2101685, 0.21753638, 0.22078435]
    train_dir = r'D:\commit\trainset\trainset2'
    valid_dir = r'D:\commit\valset\valset2'
    test_dir = r'D:\commit\valset\valset2'
    train_transforms = transforms.Compose([transforms.Resize([256, 256]),
                                           transforms.ColorJitter(brightness=0.5, contrast=0.2, saturation=0.2, hue=0.1),
                                           transforms.RandomHorizontalFlip(p=0.5),
                                           transforms.ToTensor(),
                                           transforms.Normalize(mean_train_set, std_train_set)])
    valid_test_transforms = transforms.Compose([transforms.Resize([256, 256]),
                                                #transforms.CenterCrop(256),
                                                transforms.ToTensor(),
                                                transforms.Normalize(mean_train_set, std_train_set)])

    train_dataset = datasets.ImageFolder(train_dir, transform=train_transforms)
    valid_dataset = datasets.ImageFolder(valid_dir, transform=valid_test_transforms)
    #test_dataset = datasets.ImageFolder(test_dir, transform=valid_test_transforms)

    # num_workers=8, pin_memory=True 很重要,训练速度明显
    trainloader = DataLoader(train_dataset, batch_size=32, shuffle=True, num_workers=16, pin_memory=True)
    validloader = DataLoader(valid_dataset, batch_size=32, shuffle=False,num_workers=8, pin_memory=True)
    #testloader = DataLoader(test_dataset, batch_size=32, shuffle=False)

    loaders_scratch = {}
    loaders_scratch['train'] = trainloader
    loaders_scratch['valid'] = validloader
    #loaders_scratch['test'] = testloader
    use_cuda = torch.cuda.is_available()

    # instantiate the CNN
    num_class = 191
    # model_scratch = Net(num_class)
    model_scratch = models.resnet50(pretrained=True)
    for param in model_scratch.parameters():
        param.requires_grad = True
    # model_scratch.classifier = nn.Sequential(nn.Linear(1024, 512),
    #                                           nn.ReLU(),
    #                                           nn.Dropout(0.2),
    #                                           nn.Linear(512, 133))
    #
    # model_scratch.load_state_dict(torch.load('model_transfer.pt', map_location='cuda:0'))
    model_scratch.classifier = nn.Sequential(nn.Linear(1024, 512),
                                             nn.ReLU(),
                                             nn.Dropout(0.2),
                                             nn.Linear(512, num_class))
    # move tensors to GPU if CUDA is available
    if use_cuda:
        model_scratch.cuda()
    criterion_scratch = nn.CrossEntropyLoss()
    optimizer_scratch = optim.Adam(model_scratch.parameters(), lr=0.0005)
    print('training !')
    # epoch
    ImageFile.LOAD_TRUNCATED_IMAGES = True
    model_scratch = train(100, loaders_scratch, model_scratch, optimizer_scratch,
                          criterion_scratch, use_cuda, 'model_scratch2.pt')

    # load the model that got the best validation accuracy
    # model_scratch.load_state_dict(torch.load('model_scratch.pt'))
效果不好。
尝试二:回归模型
model.py
import torch
import torch.nn as nn
from torchinfo import summary

import timm

class base_net(nn.Module):
    def __init__(self, input_features, num_features=64):
        super().__init__()
        self.num_features = num_features
        self.conv = nn.Sequential(
            nn.Conv2d(input_features, num_features, kernel_size=3, padding=3//2),
            #nn.BatchNorm2d(num_features),
            nn.ReLU(inplace=True),
            nn.Conv2d(num_features, num_features*2, kernel_size=3, padding=3//2),
            #nn.BatchNorm2d(num_features*2),
            nn.ReLU(inplace=True),

            nn.Conv2d(num_features*2, num_features, kernel_size=3, padding=3 // 2),
            #nn.BatchNorm2d(num_features),
            nn.ReLU(inplace=True),
            nn.Conv2d(num_features, num_features, kernel_size=3, padding=3 // 2),
            #nn.BatchNorm2d(num_features),
            nn.ReLU(inplace=True),

            nn.Conv2d(num_features, num_features, kernel_size=3, padding=3//2),
        )

    def forward(self, x):
        x = self.conv(x)

        return x
class Predictor(nn.Module):
    """ The header to predict age (regression branch) """

    def __init__(self, num_features, num_classes=1):
        super().__init__()
        self.conv = nn.Sequential(
            nn.Conv2d(num_features, num_features // 4, kernel_size=3, padding=3 // 2),
            nn.BatchNorm2d(num_features // 4),
            nn.ReLU(inplace=True),
            nn.Dropout(0.5),
            nn.Conv2d(num_features // 4, num_features // 8, kernel_size=3, padding=3 // 2),
            nn.BatchNorm2d(num_features // 8),
            nn.ReLU(inplace=True),
            nn.Dropout(0.5),
            nn.Conv2d(num_features // 8, num_features // 16, kernel_size=3, padding=3 // 2),
        )
        self.gap = nn.AdaptiveAvgPool2d(1)
        self.fc = nn.Conv2d(num_features//16, num_classes, kernel_size=1, bias=True)
        #self.dp = nn.Dropout(0.5)
    def forward(self, x):
        x = self.conv(x)
        x = self.gap(x)
        #x = self.dp(x)
        x = self.fc(x)
        x = x.squeeze(-1).squeeze(-1).squeeze(-1)
        return x


class Classifier(nn.Module):
    """ The header to predict gender (classification branch) """

    def __init__(self, num_features, num_classes=100):
        super().__init__()
        self.conv = nn.Sequential(
            nn.Conv2d(num_features, num_features // 4, kernel_size=3, padding=3 // 2),
            nn.BatchNorm2d(num_features // 4),
            nn.ReLU(inplace=True),
            nn.Dropout(0.5),
            nn.Conv2d(num_features // 4, num_features // 8, kernel_size=3, padding=3 // 2),
            nn.BatchNorm2d(num_features // 8),
            nn.ReLU(inplace=True),
            nn.Dropout(0.5),
            nn.Conv2d(num_features // 8, num_features // 16, kernel_size=3, padding=3 // 2),
        )
        self.gap = nn.AdaptiveAvgPool2d(1)
        self.fc = nn.Conv2d(num_features//16, num_classes, kernel_size=1, bias=True)
        self.dp = nn.Dropout(0.4)


    def forward(self, x):
        x = self.conv(x)
        x = self.gap(x)

        x = self.dp(x)
        x = self.fc(x)
        x = x.squeeze(-1).squeeze(-1)
        # x = nn.functional.softmax(x, dim=1)
        return x

#https://github.com/NICE-FUTURE/predict-gender-and-age-from-camera/tree/master
class Model(nn.Module):
    """ A model to predict age and gender """

    def __init__(self, timm_pretrained=True):
        super().__init__()

        self.backbone = timm.create_model("resnet18", pretrained=timm_pretrained)
        self.predictor = Predictor(self.backbone.num_features)
        # self.classifier = Classifier(self.backbone.num_features)


    def forward(self, x):

        x = self.backbone.forward_features(x)  # shape: B, D, H, W
        age = self.predictor(x)
        #gender = self.classifier(x)

        return age

class Model2(nn.Module):
    """ A model to predict age and gender """

    def __init__(self, timm_pretrained=True):
        super().__init__()

        self.backbone = timm.create_model("resnet18", pretrained=timm_pretrained)  #base_net(3, 64) #

        # self.predictor = Predictor(self.backbone.num_features)
        self.classifier = Classifier(self.backbone.num_features) # 100类概率


    def forward(self, x):

        x = self.backbone.forward_features(x)  # shape: B, D, H, W
        #x = self.backbone.forward(x)  # shape: B, D, H, W
        prob = self.classifier(x)
        #gender = self.classifier(x)

        return prob

class Model3(nn.Module):
    """ A model to predict age and gender """

    def __init__(self, timm_pretrained=False):
        super().__init__()

        self.backbone = base_net(3, 64) # timm.create_model("resnet18", pretrained=timm_pretrained)  #

        # self.predictor = Predictor(self.backbone.num_features)
        self.classifier = Classifier(self.backbone.num_features) # 100类概率


    def forward(self, x):

        #x = self.backbone.forward_features(x)  # shape: B, D, H, W
        x = self.backbone.forward(x)  # shape: B, D, H, W
        prob = self.classifier(x)
        #gender = self.classifier(x)

        return prob
if __name__ == "__main__":
    device = torch.device('cuda' if torch.cuda.is_available() else 'cpu')
    # device = 'cpu'
    print(device)
    modelviz = Model2().to(device)
    # 打印模型结构
    print(modelviz)
    summary(modelviz, input_size=(2, 3, 256, 256), col_names=["kernel_size", "output_size", "num_params", "mult_adds"])
    # for p in modelviz.parameters():
    #     if p.requires_grad:
    #         print(p.shape)

    input = torch.rand(2, 3, 256, 256).to(device)
    out = modelviz(input)


    from ptflops import get_model_complexity_info

    macs, params = get_model_complexity_info(modelviz, (3, 256, 256), verbose=True, print_per_layer_stat=True)
    print(macs, params)
    params = float(params[:-3])
    macs = float(macs[:-4])

    print(macs * 2, params)  # 8个图像的 FLOPs, 这里的结果 和 其他方法应该一致
    print('out:', out.shape, out)
训练模型:
import glob
import os.path

import cv2
import numpy as np
import rawpy
import torch
import torch.optim as optim
from torch import nn
from torch.utils.data import DataLoader
from torchvision import transforms
from tqdm import tqdm


from datasets import BatchDataset
from model import Model, Model2

import torchvision


if __name__ == "__main__":
    # 1.当前版本信息
    print(torch.__version__)
    print(torch.version.cuda)
    print(torch.backends.cudnn.version())
    print(torch.cuda.get_device_name(0))

    np.random.seed(0)
    torch.manual_seed(0)
    torch.cuda.manual_seed_all(0)
    torch.backends.cudnn.deterministic = True
    torch.backends.cudnn.benchmark = False

    # 2. 设置device信息 和 创建model
    # os.environ['CUDA_VISIBLE_DEVICES'] = '2,3'
    # device = torch.device("cuda:2" if torch.cuda.is_available() else "cpu")
    model = Model()

    gpus = [2,3]
    model = nn.DataParallel(model, device_ids=gpus)
    device = torch.device('cuda:2')
    model = model.cuda(device=gpus[0])

    # 3. dataset 和 data loader, num_workers设置线程数目,pin_memory设置固定内存
    img_size = 256
    transform1 = transforms.Compose([
        transforms.ToTensor(),
        transforms.Resize([img_size, img_size]),
        transforms.RandomHorizontalFlip(p=0.5),
        transforms.ColorJitter(brightness=0.4, contrast=0.2, saturation=0.2, hue=0.1),
        #transforms.RandomPerspective(distortion_scale=0.6, p=1.0),
        transforms.RandomRotation(degrees=(-90, 90)),
    ])
    transform2 = transforms.Compose([
        transforms.ToTensor(),
        transforms.Resize([img_size, img_size]),
    ])
    train_dataset = BatchDataset('train', transform1)
    train_dataset_loader = DataLoader(train_dataset, batch_size=32*4, shuffle=True, num_workers=8, pin_memory=True)

    eval_dataset = BatchDataset('eval', transform2)
    eval_dataset_loader = DataLoader(eval_dataset, batch_size=8, shuffle=True, num_workers=8, pin_memory=True)
    print('load dataset !', len(train_dataset), len(eval_dataset))

    # 4. 损失函数 和  优化器
    age_criterion = nn.MSELoss()
    gender_criterion = nn.CrossEntropyLoss().to(device)
    loss_fn = nn.L1Loss().to(device)
    loss_fn2 = nn.SmoothL1Loss().to(device)

    learning_rate = 1 * 1e-4
    #optimizer = optim.Adam(model.parameters(), lr=learning_rate)
    optimizer = optim.SGD(model.parameters(), lr=learning_rate, momentum=0.9)

    lr_step = 50
    scheduler = torch.optim.lr_scheduler.StepLR(optimizer, lr_step, gamma=0.5)

    # 5. hyper para 设置
    epochs = 800

    save_epoch = 100
    save_model_dir = 'saved_model_age'

    eval_epoch = 100
    save_sample_dir = 'saved_sample_age'
    if not os.path.exists(save_model_dir):
        os.makedirs(save_model_dir)

    # 6. 是否恢复模型
    resume = 1
    last_epoch = 12
    if resume and last_epoch > 1:
        model.load_state_dict(torch.load(
            save_model_dir + '/checkpoint_%04d.pth' % (last_epoch),
            map_location=device))
        print('resume ' , save_model_dir + '/checkpoint_%04d.pth' % (last_epoch))

    # 7. 训练epoch

    f1 = open('traininfo1.txt', 'a')
    f2 = open('evalinfo1.txt', 'a')

    for epoch in range(last_epoch + 1, epochs + 1):
        print('current epoch:', epoch, 'current lr:', optimizer.state_dict()['param_groups'][0]['lr'])
        if epoch < last_epoch + 101:
            save_epoch = 2
            eval_epoch = 2
        else:
            save_epoch = 10
            eval_epoch = 10
        # 8. train loop
        model.train()
        g_loss = []
        g_mae = []
        for data in tqdm(train_dataset_loader):
            image, age, filename = data
            # print(image.shape, age, filename)
            image = image.to(device)
            age = age.to(device)

            pred_age = model(image)
            #print(image.shape, pred_age.shape)
            loss = loss_fn(age, pred_age)
            #loss = age_criterion(age, pred_age)
            #print('dd:', age.detach().cpu().numpy().reshape(-1), pred_age.detach().cpu().numpy().reshape(-1))


            optimizer.zero_grad()
            loss.backward()
            optimizer.step()

            # training result
            g_loss.append(loss.item())
            mae = np.sum(np.abs(age.detach().cpu().numpy().reshape(-1) - pred_age.detach().cpu().numpy().reshape(-1))) / len(age)
            g_mae.append(mae)
            #print( loss.item(), mae)
        #print(len(g_loss), len(g_mae))
        mean_loss = np.mean(np.array(g_loss))
        mean_mae = np.mean(np.array(g_mae))
        print(f'epoch{epoch:04d} ,train loss: {mean_loss},train mae: {mean_mae}')
        f1.write("%d, %.6f, %.4f\n" % (epoch, mean_loss, mean_mae))

        # 9. save model
        if epoch % save_epoch == 0:
            save_model_path = os.path.join(save_model_dir, f'checkpoint_{epoch:04d}.pth')
            torch.save(model.state_dict(), save_model_path)
        # 10. eval test and save some samples if needed

        if epoch % eval_epoch == 0:
            model.eval()
            maes = []
            with torch.no_grad():

                for data in  tqdm(eval_dataset_loader):
                    image, age, filename = data
                    image = image.to(device)
                    age = age.to(device)

                    out = model(image)
                    mae = loss_fn(out, age)
                    #print( age.detach().cpu().numpy().reshape(-1), out.detach().cpu().numpy().reshape(-1), mae.item())
                    maes.append(mae.item())

                print('eval dataset  mae: ', np.array(maes).mean())
                f2.write("%d, %.6f\n" % (epoch,  np.array(maes).mean()))
        scheduler.step()  # 更新学习率
效果还可以,eval mae 可以达到22左右
尝试三:分类模型
1)为了应对数据不均衡,五个年龄何为一组数据,这样每组取50个得到一个epoch的dataset进行训练
2)分类得到的是概率,除了交叉熵损失,再加上一个期望损失
效果不佳
尝试四:KLDivLoss 拟合年龄分布
除了 age的 mae损失
还有 年龄分布损失, 利用KLDivLoss来实现。
比如 label =21 的年龄设置分布为 21周边的年龄不为0,其他为0
 prob = model(image)
pred_age = torch.sum(prob * torch.arange(0, 100).reshape(1, -1).to(device), axis=1) * 2 + 1

#print(prob.shape, label.shape)
loss1 = loss_kl(prob.log(), label) # label是一个分布
loss2 = loss_fn(age, pred_age)
loss =   loss1 + loss2 / 10
尝试五:首先提取狗的face,然后再训练模型
由于直接训练很容易过拟合,因此怀疑图片中的其他特征干扰了模型训练,因此提取狗face后进行训练效果会不会好一些,如何提取狗face呢?
主要利用下面的仓库
https://github.com/metinozkan/DogAndCat-Face-Opencv
import glob
import os

import cv2

files = glob.glob(r'D:\commit\testset\testset' + '\\*.jpg')

for file in files:
    #file = r'D:\commit\trainset\trainset\02e5218a80b44139ab07c547e1d6c4b9.jpg'
    img=cv2.imread(file)#picture path

    height, width, channel = img.shape
    yuz_cascade=cv2.CascadeClassifier('dog_face.xml')#used haarcascade Classifier
    #kedi_cascade=cv2.CascadeClassifier('haarcascade_frontalcatface.xml path')#used haarcascade Classifier


    griton = cv2.cvtColor(img, cv2.COLOR_BGR2GRAY)#Picture conversion gray tone with haarcascade
    it = yuz_cascade.detectMultiScale(griton,1.1,4)#search for the object you want in photos
    #kedi=kedi_cascade.detectMultiScale(griton,1.1,4)
    kopeksay=0#increases the number of found objects
    kedisay=0

    #objects in the rectangle

    wh = 0
    i = 0
    if len(it) == 0:
        x, y, w, h = 0,0,width,height
        print(file, 'not changed ')
    else:
        for (x, y, w, h) in it:
            if w* h > wh:
                wh = w*h
                j = i
            i += 1
        (x, y, w, h) = it[j]

    T = 20
    # save
    img2 = img[ max(y-T, 0): min(y + h+T, height), max(x-T, 0) : min(x + w + T,width)]
    cv2.imwrite(os.path.join(r'D:\commit\testset\testset3', os.path.basename(file)), img2)


    # show
    show_fig = 0
    if show_fig:
        cv2.rectangle(img, (x, y), (x + w, y + h), (0, 255, 0), 3)
        cv2.rectangle(img, (max(x-T, 0), max(y-T, 0)), (min(x + w + T,width) ,  min(y + h+T, height)), (0, 255, 255), 3)
        kopeksay=kopeksay+1
        # for (x, y, w, h) in kedi:
        #     cv2.rectangle(img, (x, y), (x + w,y + h), (0, 10, 0), 3)
        #     kedisay=kedisay+1

        print("kopek->",kopeksay)#number of found objects
        print("kedi-->",kedisay)
        cv2.imshow('yuzler', img)
        cv2.waitKey(0)
        cv2.destroyAllWindows()
最后主要根据二和五进行优化。prediect
import glob
import os.path

import cv2
import numpy as np
import rawpy
import torch
import torch.optim as optim
from PIL import Image
from torch import nn
from torch.utils.data import DataLoader
from torchvision import transforms
from tqdm import tqdm

from skimage.metrics import peak_signal_noise_ratio as compare_psnr
from skimage.metrics import structural_similarity as compare_ssim

from datasets import BatchDataset, get_images
from model import UNetSeeInDark, Model, Model2

if __name__ == "__main__":
    img_size = 256
    transform2 = transforms.Compose([
        transforms.ToTensor(),
        transforms.Resize([img_size, img_size]),
    ])

    model = Model()
    gpus = [0]
    # model = nn.DataParallel(model, device_ids=gpus)

    device = torch.device('cuda:0')
    print(device)
    m_path = 'saved_model_age/checkpoint_0014.pth'
    #m_path = 'saved_model_res18_reg/checkpoint_0010.pth'
    checkpoint = torch.load(m_path, map_location=device)
    model.load_state_dict({k.replace('module.', ''): v for k, v in checkpoint.items()})
    #model.load_state_dict(torch.load(m_path, map_location=device))


    model = model.cuda(device=gpus[0])
    model.eval()

    files = glob.glob("testset\\testset\\*.jpg")

    # image_dir = 'valset\\valset'
    # file_txt = 'annotations\\annotations\\val.txt'
    # files = get_images(image_dir, file_txt)
    print(len(files))

    f = open('predict_res50_14.txt', 'w')
    st = ''

    ret = []
    for file in files:
        # file, label = file
        image = Image.open(file).convert('RGB')
        # image = cv2.imread(file, 1).astype(np.float32) / 255
        image = np.array(image)
        input = transform2(image).unsqueeze(0).to(device)
        #print(input.shape)

        out = model(input)
        out = out.detach().cpu().numpy().reshape(-1)

        pred_age = out[0]
        #pred_age = np.sum(out * np.arange(0, 100).reshape(1, -1)) * 2 + 1
        #print(int(label), pred_age, np.abs(pred_age -int(label)))
        #ret.append([int(label), pred_age, pred_age -int(label), np.abs(pred_age -int(label))])
        #print(out)
        st = os.path.basename(file)+'\t%.2f\n' % (pred_age.item())
        f.write(st)

    # ret = np.array(ret)
    # print(ret)
    # print(np.mean(ret, axis=0))
    #np.savetxt('ret54.txt', ret+2, fmt='%.1f', delimiter=' ')


