用户权限
- 1、访问权限
- 2、chmod 命令
- 3、chown 命令
- 4、chgrp命令
- 5、权限掩码
- 6、lsattr 命令
- 7、chattr命令
- 8、文件的特别权限
- suid权限
- set位权限
- 粘滞位权限(Sticky)
- 9、ACL访问控制列表
- setfacl命令
- getfacl命令
- 示例
- 10、sudo
- 11、SELinux
1、访问权限
shell在创建子进程的时候,需要检查权限
访问权限
可读(read):允许查看文件内容、显示目录列表
可写(write):允许修改文件内容,允许在目录中新建、移动、删除文件或子目录
可执行(execute):允许运行程序、切换目录
归属(所有权)
文件拥有者(owner):拥有该文件或目录的用户帐号
属组(group):拥有该文件或目录的组帐号
其它人(others):除了属主和属组的其他人
文件:
读 ——》命令:cat,vim,grep,head,tail,more,less等
写——》命令:vim, >>, >,rm
执行——》命令: 运行脚本里的命令 ./a.sh /lianxi/a.sh
文件夹:
读——》命令: ls
写——》命令: cp、mv、rm、touch、mkdir等
执行——》命令:cd
查看文件权限
[root@mysql-binary ~]# ls -ld /home  #查看目录权限
drwxr-xr-x. 34 root root 4096 11月  6 15:36 /home
[root@mysql-binary ~]# ls -al *.sh
-rw-r--r--  1 root root  317 11月  6 10:48 group_member.sh
-rw-r--r--. 1 root root 2372 10月  6 15:47 onekey_binary_install_mysql.sh
-rw-r--r--  1 root root 2421 10月  7 14:46 onekey_binary_install_mysql_v2.sh
第一列:文件类型与权限
- 普通文件 file
d 表示目录
l 链接文件
s 表示socket文件 socket(套接字)进程之间通信的一种方式。
p 管道文件pipe
c 字符设备文件 tty
b 块设备文件 磁盘
权限 r 可读 w 可写 x 可执行
第2-第4个字符  ——   表示属主的权限
第5-第7个字符  ——   表示属组的权限
后三个:      ——    其他人的权限
2、chmod 命令
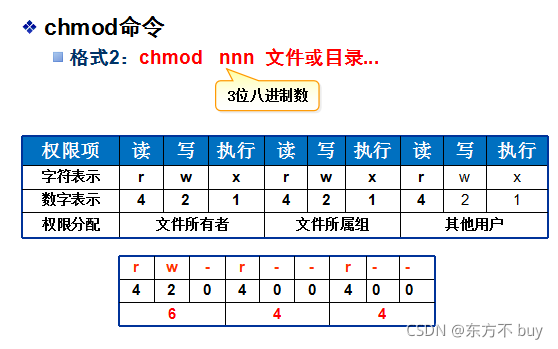

- 普通用户可以在自己的家目录和/tmp目录新建文件或文件夹
- root用户新建文件夹,u是有rwx权限,g和o默认只有读(r)和执行(x)权限
[root@localhost lianxi]# mkdir changsha
[root@localhost lianxi]# ls -lrt
drwxr-xr-x  2 root root       6 11月 25 11:46 changsha
修改ugo的权限
[root@localhost lianxi]# chmod u=rwx,g+w,o-rx changsha
[root@localhost lianxi]# ls -lrt
drwxrwx---  2 root root       6 11月 25 11:46 changsha
[root@localhost lianxi]# chmod u-w,g=---,o=rwx changsha -R
[root@localhost lianxi]# ls -lrt 递归修改权限
dr-x---rwx  2 root root       6 11月 25 11:46 changsha
直接用数字修改去权限
[root@localhost lianxi]# chmod 777 changsha
[root@localhost lianxi]# ll -d changsha
drwxrwxrwx 2 root root 6 11月 25 11:46 changsha
3、chown 命令
这个命令只能root用户使用
用来改变文件的属主和属组
用户和组必须存在
格式:
- chown 属主 文件
- chown :属组 文件
- chown 属主:属组 文件
- 常用选项:-R 递归修改指定目录下的所有文件
[root@lamp-test lianxi]# chown song:song xiaotang # 修改属主和属组
drwxrwxrwx 2 song     song      6 11月 25 14:50 xiaotang

[root@lamp-test lianxi]# chown tangseng xiaotang # 修改属组
drwxrwxrwx 2 tangseng xiyouji   6 11月 25 14:50 xiaotang

[root@lamp-test lianxi]# chown song:song  xiaotang  -R  #递归修改属主属组
drwxrwxrwx 5 song     song     33 11月 25 15:01 xiaotang
[root@lamp-test lianxi]# ll xiaotang/
总用量 0
drwxr-xr-x 2 song song 6 11月 25 15:01 a
drwxr-xr-x 2 song song 6 11月 25 15:01 b
4、chgrp命令
格式:chgrp 属组 文件
必须是root或者是文件的所有者
必须是新组的成员
常用选项:-R 递归修改指定目录下的所有文件
[sanchuang10@mysql-binary ~]$ chgrp sanchuang5 aa
[sanchuang10@mysql-binary ~]$ ls -al
总用量 20
drwx------   2 sanchuang10 sanchuang4  103 11月  6 11:31 .
drwxr-xr-x. 34 root        root       4096 11月  6 15:36 ..
-rw-r--r--   1 sanchuang10 sanchuang5    0 11月  6 11:24 aa
chomd chown chgrp的区别:
chmod ——root和文件所有者
chgrp —— root和文件所有者(必须是组成员)
chown—— 只有root
5、权限掩码
umask是用来设定文件创建的初始。
·在内核级别,文件的初始权限666
·在内核级别,文件夹的初始权限777
·用umask命令控制默认权限,临时有效
[root@localhost lianxi]# umask
0022
umask为002 则表示新建文件的默认权限为664,新建文件的文件夹权限为775
umask为022 则表示新建文件的默认权限为644,新建文件的文件夹权限为755

[root@localhost lianxi]# umask -S  #查看文件目前默认权限是多少
u=rwx,g=rx,o=rx
为什么root用户和普通用户创建文件或目录的默认权限不一样?
因为配置文件/etc/profile里面对于两种用户的设置不同
#uid大于199,并且当前用户的group_name和user_name名字相同的时候
if [ $UID -gt 199 ] && [ "`/usr/bin/id -gn`" = "`/usr/bin/id -un`" ]; then
    umask 002
else
    umask 022
fi

id -gn 获取当前用户组名
id -un 获取当前用户名
[root@localhost lianxi]# umask 422 #临时更改umask
#想要修改某个用户的umask,永久修改
#在家目录.bashrc下添加umask
#/etc/profile , /etc/bashrc 基本上不要更改。
`/usr/bin/id -gn`——命令替换——$(/usr/bin/id -gn)
cp -a  :保留文件的属性(权限、时间、用户、组)
6、lsattr 命令
查看文件的隐藏属性
普通用户设置不了文件的隐藏属性
-a 显示所有文件和目录,包括以".“为名称开头字符的额外内建,现行目录”.“与上层目录”…"。
-d 显示目录名称,而非其内容。
-R 递归处理,将指定目录下的所有文件及子目录一并处理。
-v 显示文件或目录版本。
-V 显示版本信息
[root@localhost lianxi]# lsattr /etc/passwd
-------------------- /etc/passwd
[root@localhost lianxi]# chattr +i /etc/passwd
[root@localhost lianxi]# lsattr /etc/passwd
----i--------------- /etc/passwd
[root@localhost lianxi]# useradd ppp
useradd:无法打开 /etc/passwd
7、chattr命令
设置文件的隐藏属性
格式:chattr [±=] [ai] 文件或目录
注:+、-、= 分别表示 增加、去除、设置参数
常用命令选项
-a 只能追加,不能修改 append only
用传统的vim增加是不行的,只能重定向追加;
-i 不能动文件或文件夹里面的内容,不能增删改和移动 immutable;
-R:递归修改
[root@mysql-binary pem]# chattr +i hosts  #设置锁定保护文件
[root@mysql-binary pem]# rm -rf hosts
rm: 无法删除"hosts": 不允许的操作
[root@mysql-binary pem]# vim hosts
[root@mysql-binary pem]# mv hosts{,.bak}
mv: 无法将"hosts" 移动至"hosts.bak": 不允许的操作
[root@mysql-binary pem]# ls -al hosts
-rwxr-x--- 1 root root 158 11月  7 16:24 hosts
[root@mysql-binary pem]# lsattr hosts
----i----------- hosts
[root@mysql-binary pem]# chattr -i hosts  #去除锁定
[root@mysql-binary pem]# lsattr hosts
---------------- hosts
[root@mysql-binary pem]# chattr +a hosts
[root@mysql-binary pem]# lsattr hosts
-----a---------- hosts
[root@mysql-binary pem]# vim hosts
[root@mysql-binary pem]# echo "aaaa" >> hosts  #可以增加文件内容,但是无法修改和删除
[root@mysql-binary pem]# cat hosts
127.0.0.1   localhost localhost.localdomain localhost4 localhost4.localdomain4
::1         localhost localhost.localdomain localhost6 localhost6.localdomain6
aaaa
[root@mysql-binary pem]# rm -rf hosts
rm: 无法删除"hosts": 不允许的操作
8、文件的特别权限
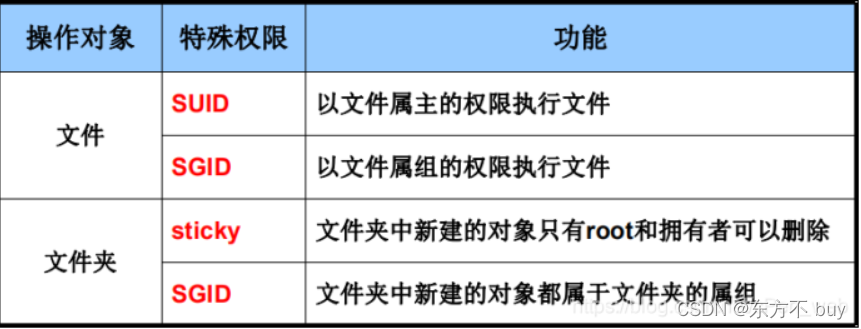
文件的特别权限
用途:普通用户在执行命令的时候,以root用户的身份执行
suid权限
用途: 让本来没有相应权限的用户运行这个程序时,可以访问他没有权限访问的资源。
注意: 这个SUID只能运行在二进制的程序上(系统中的一些命令),不能用在脚本上,同样也不能放到目录上,放上也是无效的。
[root@localhost ~]# ll /usr/bin/passwd
-rwsr-xr-x. 1 root root 27832 6月  10 2014 /usr/bin/passwd
# passwd命令有s权限位,所以普通用户也可以使用passwd命令为自己改密码

[root@localhost lianxi]# ll /usr/bin/mkdir
-rwxr-xr-x. 1 root root 79768 8月 20 2019 /usr/bin/mkdir
# root用户可以在/目录下面新建文件夹,但是普通用户不可以
# 普通用户默认只可以在自己家目录和/tmp目录下面新建文件和文件夹
# 如果mkdir命令有suid权限位的话,那么普通用户也可在/目录下面新建文件和目录
如何使普通用户也可以在/下新建文件夹?
1、让mkdir具有suid权限位
chmod u+s /usr/bin/mkdir
此时创建的文件夹,属主是root、属组是普通用户。
这是因为在使用mkdir命令的时候,普通用户拥有root用户权限位,即euid变为0了
但是他的egid还是用户本身的gid号,所以属组还是用户自己的组
但是不要轻易给命令授予suid权限位,因为普通用户在使用命令的时候会拥有root用户权限
2、设置/目录权限位777
chmod 777 /
# 给mkdir设置suid权限位:
[root@localhost lianxi]# ll /usr/bin/mkdir
-rwxr-xr-x. 1 root root 79768 8月 20 2019 /usr/bin/mkdir

# mkdir 基本权限位 755 ,添加suid权限位为4
[root@localhost lianxi]# chmod 4755 /usr/bin/mkdir
[root@localhost lianxi]# ll /usr/bin/mkdir
-rwsr-xr-x. 1 root root 79768 8月 20 2019 /usr/bin/mkdir

# 给mkdir去除suid权限位:
[root@localhost lianxi]# chmod 0755 /usr/bin/mkdir
[root@localhost lianxi]# ll /usr/bin/mkdir
-rwxr-xr-x. 1 root root 79768 8月 20 2019 /usr/bin/mkdir
set位权限
- 主要用途:为可执行文件设置权限字符为“s”,其他用户执行该文件时,将拥有属主或属组用户的权限。
- SET位权限类型:
SUID:表示对属主用户增加SET位权限
SGID:表示对属组内的用户增加SET位权限
chmod ug±s 可执行文件… # 注:设置set位
[root@sanchuang-linux sbin]# which mkdir
/usr/bin/mkdir
[root@sanchuang-linux sbin]# ls -ld /usr/bin/mkdir
-rwxr-xr-x. 1 root root 195192 4月  10 2020 /usr/bin/mkdir
[root@sanchuang-linux sbin]# chmod u+s /bin/mkdir	 # 注:让普通用户运行mkdir时以root(属主)权限去运行
[root@sanchuang-linux sbin]# ls -ld /usr/bin/mkdir 		# 注:变成s位了
-rwsr-xr-x. 1 root root 195192 4月  10 2020 /usr/bin/mkdir


[root@sanchuang-linux sbin]# su - sanchuang9
上一次登录:六 11月  7 16:09:48 CST 2020pts/0 上
[sanchuang9@sanchuang-linux pem]$ mkdir aa 			# 注:普通用户有写的权限了
[sanchuang9@sanchuang-linux pem]$ ls -ld /pem
d-wxr-xr-x 3 root root 57 11月  7 16:59 /pem
[sanchuang9@sanchuang-linux pem]$ touch dd			# 注:touch没有这个权限
touch: 无法创建 'dd': 权限不够


[sanchuang9@sanchuang-linux pem]$ exit
注销
[root@sanchuang-linux sbin]# chmod u-s /bin/mkdir
[root@sanchuang-linux sbin]# ls -ld /bin/mkdir
-rwxr-xr-x. 1 root root 195192 4月  10 2020 /bin/mkdir
#注:s位基本不会给
粘滞位权限(Sticky)
主要用途:
- 为公共目录(例如,权限为777的)设置,权限字符为“t”
注:t 粘滞位标记字符 - 用户不能删除该目录中其他用户的文件
注:一般作用于文件夹
chmod o±t 目录名… # 注:设置粘滞位
[root@sanchuang-linux sbin]# ls -ld /tmp
drwxrwxrwt. 12 root root 4096 11月  7 16:30 /tmp	# 注:/tmp目录 任何用户 都有读写执行权限
#注:因为粘滞位权限,用户在/tmp目录下只能创建自己的,删除自己的
#注:sanchuang10用户不能删除sanchuang用户创建的文件
[sanchuang9@sanchuang-linux tmp]$ ls -ld /tmp
drwxrwxrwt. 13 root root 4096 11月  7 17:07 /tmp # 注:/tmp目录设置了1个粘滞位
[sanchuang9@sanchuang-linux ~]$ touch /tmp/sanchuang9
[sanchuang9@sanchuang-linux ~]$ exit
[root@sanchuang-linux ~]# su - sanchuang
上一次登录:日 11月  8 19:05:55 CST 2020pts/3 上
[sanchuang@sanchuang-linux ~]$ rm -rf /tmp/sanchuang9		# 注:因为设置了1个粘滞位
rm: 无法删除'/tmp/sanchuang9': 不允许的操作			# 注:用户只能在/tmp目录下创建 删除自己的
[root@mysql-binary pem]# chmod 1777 /pem
[root@mysql-binary pem]# ls -ld /pem   # root用户在pem目录下设置了粘滞位
drwxrwxrwt 3 root root 57 11月  7 17:11 /pem
[root@mysql-binary pem]# ls -ld /bin/mkdir
-rwxr-xr-x. 1 root root 79768 8月  20 2019 /bin/mkdir
[root@mysql-binary pem]# chmod 4755 /bin/mkdir  #SUID=4 表示对属主用户增加SET位权限
[root@mysql-binary pem]# ls -ld /bin/mkdir
-rwsr-xr-x. 1 root root 79768 8月  20 2019 /bin/mkdir
[root@mysql-binary pem]# chmod 755 /bin/mkdir
[root@mysql-binary pem]# ls -ld /bin/mkdir
-rwxr-xr-x. 1 root root 79768 8月  20 2019 /bin/mkdir
9、ACL访问控制列表
access control list 一个文件或目录的访问控制列表,可以针对任意指定的用户/组使用权限字符分配rwx权限
默认的ACL权限的作用是:如果个父目录设定了默认ACL权限,那么父目录中所有新建的子文件都会继承父目录的ACL权限。需要注意的是,默认ACL权限只对目录生效
拒绝权限高于一切——》针对用户
setfacl命令
格式: setfacl 选项 规则 文件
常用选项
-m:新增或修改ACL中的规则
-b: 删除所有ACL规则
-x: 删除指定的ACL规则
常用规则
格式:类型:特定的用户或组:权限
user:(uid/name):(perms) 指定某位使用者的权限
group:(gid/name):(perms) 指定某一群组的权限
other::(perms) 指定其它使用者的权限
mask::(perms) 设定有效的最大权限
注: user、group、other、mask简写为:u , g , o , m
perms使用rwx
getfacl命令
查看ACl:
格式:getfacl 文件
示例
[root@mysql-binary lianxi]# getfacl bb
# file: bb
# owner: root
# group: root
user::rw-
group::r--
other::r--

# 设置bb文件的sanle用户有读写权限
[root@mysql-binary lianxi]# setfacl -m u:sanle:rw bb
[root@mysql-binary lianxi]# getfacl bb
# file: bb
# owner: root
# group: root
user::rw-
user:sanle:rw-
group::r--
mask::rw-
other::r--

# 设置bb文件对sanchuang05组又读写权限
[root@mysql-binary lianxi]# setfacl -m g:sanchuang05:rw bb
[root@mysql-binary lianxi]# getfacl bb
[root@mysql-binary lianxi]# getfacl bb
# file: bb
# owner: root
# group: root
user::rw-
user:sanle:rw-
group::r--
group:sanchuang05:rw-
mask::rw-
other::r--

## 指定bb文件的有效的最大权限为r
[root@mysql-binary lianxi]# setfacl -m m::r bb
[root@mysql-binary lianxi]# getfacl bb
# file: bb
# owner: root
# group: root
user::rw-
user:sanle:rw-                  #effective:r--     #即使sanle的权限是rw,但是有效最大权限是r
group::r--
group:sanchuang05:rw-           #effective:r--
mask::r--
other::r--
ACL类型
存取型ACL(Access ACL):文件或目录
预设型ACL(Default ACL):只能对目录
预设型ACL(Default ACL)
格式:setfacl –m default:类型:特定的用户或组:权限
setfacl –m d:类型:特定的用户或组:权限
设置了预设型ACL的目录,其下的所有文件或者子目录就都具有了主目录的ACL权限,并且子目录也同样有预设的ACl权限
setfacl -m u:song:rwx,g:xiyouji:rwx test/ 设定用户或群组对指定文件的访问权限
[root@mysql-binary lianxi]# setfacl -m d:u:sanle:rw bb_test
[root@mysql-binary lianxi]# getfacl bb_test
# file: bb_test
# owner: root
# group: root
user::rwx
group::r-x
other::r-x
default:user::rwx
default:user:sanle:rw-
default:group::r-x
default:mask::rwx
default:other::r-x
10、sudo
单独给某个用户授权,让普通用户获得root用户的权限
/etc/sudoers 授权书,sudo的配置文件。
编辑配置文件 可以使用vim 也可以使用visudo,使用visudo不需要接文件名
推荐使用visudo去编辑/etc/sudoers,它会检测语法

/var/log/secure 授权普通用户做事,有专门的日志记录
为什么要有用sudo?
1.其实就是为了让普通用户可以享有root用户的权限去执行命令
2.不需要使用root用户登录了,因为root权利比较大,尽量不要使用root操作,容易出现误操作
3.为了避免root用户的密码
4.使用过的命令都可以在日志文件里面查询
给用户授权使用sudo好还是suid好?
suid是不认用户的。任何用户都可以执行,而sudo是认用户名的,不是任何操作都可以执行的,更加精准。
##      user    MACHINE=COMMANDS
##
## The COMMANDS section may have other options added to it.
##
## Allow root to run any commands anywhere
root    ALL=(ALL)       ALL
#第一个ALL表示允许任何终端、机器访问sudo,一般就表示本机
#第二个ALL表示sudo命令可以允许以任何用户身份去执行
#第三个ALL表示可以执行任何命令

sanle   ALL=(ALL)   ALL #表示sanle用户可以在这台主机上执行任何用户的任何密码,但是使用sudo执行时需要输入sanle用户的密码

sanle11   ALL=(ALL)   NOPASSWD:ALL   #表示sanle用户,可以在这台主机上执行任何用户的任何命令,无需输入sanle11的密码

%sanchuang05  ALL=(ALL) NOPASSWD:ALL
#表示sanchuang05这个组的用户,在这台主机上可以执行任何用户的任何命令,无需输入密码

 wy      ALL=(ALL)   /bin/chown,/bin/passwd #表示wy用户在这台主机上,拥有chown,passwd命令执行授权,命令路径写绝对路径。
生成随机密码yum  install  expect -y
[root@mysql-binary sanle]#  mkpasswd -l 15 -d 3 -c 4 -C 4 -s 2
7vaH:Nhyx|Gt32X

-l # (密码的长度定义, 默认是 9)
-d # (数字个数, 默认是 2)
-c # (小写字符个数, 默认是 2)
-C # (大写字符个数, 默认是 2)
-s # (特殊字符个数, 默认是 1)
11、SELinux
一文彻底明白linux中的selinux到底是什么
安全增强型 Linux(Security-Enhanced Linux)简称 SELinux,它是一个 Linux 内核模块,也是 Linux 的一个安全子系统。
是内核集成的一个安全相关的子系统,可以让系统更加的安全。
内核版本2.6以上支持
[root@mysql-binary baigujing]# uname -r # 查看内核版本
3.10.0-1127.el7.x86_64
SELinux 的作用
SELinux 主要作用就是最大限度地减小系统中服务进程可访问的资源(最小权限原则)。
  1
  2 # This file controls the state of SELinux on the system.
  3 # SELINUX= can take one of these three values:
  开启状态(强制加载安全策略)
  4 #     enforcing - SELinux security policy is enforced.
  宽容状态(打印警告)
  5 #     permissive - SELinux prints warnings instead of enforcing.
  关闭状态(不加载安全策略 )
  6 #     disabled - No SELinux policy is loaded.
  7 SELINUX=disabled
  类型:
  8 # SELINUXTYPE= can take one of these three values:
  9 #     targeted - Targeted processes are protected,
 10 #     minimum - Modification of targeted policy. Only selected processes are protecte    d.
 11 #     mls - Multi Level Security protection.
 12 SELINUXTYPE=targeted
临时配置,重新启动系统会失效
0  --》Permissive 宽容模式
1 --》Enforcing  强制执行模式
[root@cali selinux]# setenforce 0
[root@cali selinux]# getenforce
Permissive
[root@cali selinux]#
[root@cali selinux]# setenforce 1
[root@cali selinux]# getenforce
Enforcing
永久生效:修改配置文件
配置文件:/etc/selinux/config
# This file controls the state of SELinux on the system.
# SELINUX= can take one of these three values:
#     disabled - SELinux security policy is enforced.
#     permissive - SELinux prints warnings instead of disabled.
#     disabled - No SELinux policy is loaded.
SELINUX=disabled  #指定工作模式
# SELINUXTYPE= can take one of three values:
#     targeted - Targeted processes are protected,
#     minimum - Modification of targeted policy. Only selected processes are protected.
#     mls - Multi Level Security protection.
SELINUXTYPE=targeted
#修改之后生效,需要重启电脑
