1.桥接模式 bridge(抽象类的实现的子类,通过聚合间接调用接口方法 就是桥)
- 实现和抽象分开,使他可以独立改变
- 结构型设计模式
- 基于类的最小设计原则(增加功能,增加最少个数的类),通过封装 聚合和继承让不同类实现不同职责
图 23桥接模式原理图
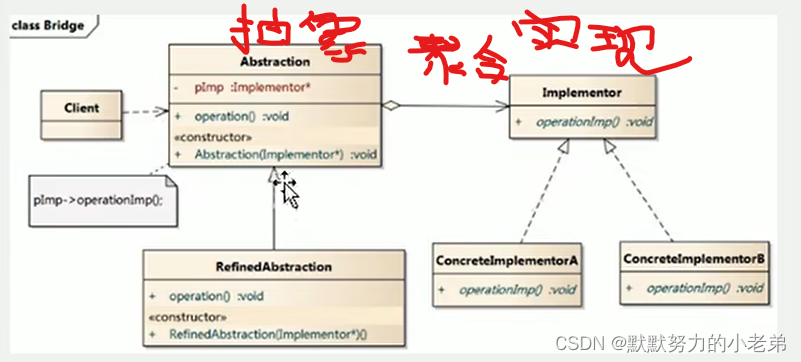
图 26桥接模式传统解决手机操作问题
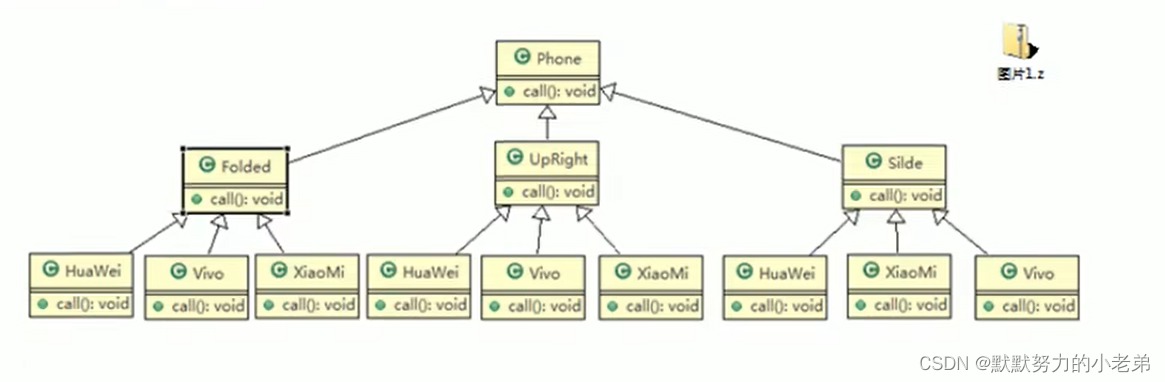
图 24桥接模式解决手机操作问题

图 27桥接模式代码结构

--------传统方式实现,需要先实现后继承------
public interface Phone {
    void open();
    void call();
    void close();
}

public class Folded implements Phone {

    @Override
    public void open() {
        System.out.println("折叠手机开机");
    }

    @Override
    public void call() {
        System.out.println("折叠手机打电话");
    }

    @Override
    public void close() {
        System.out.println("折叠手机关机");

    }
}
public class VIVOFold extends Folded {

    public void open() {
        super.open();
        System.out.println("VIVO手机开机");
    }


    public void call() {
        super.call();
        System.out.println("VIVO手机打电话");
    }


    public void close() {
        super.close();
        System.out.println("VIVO手机关机");
    }
}
public class XIAOMIFold extends Folded {
    @Override
    public void open() {
        super.open();
        System.out.println("小米手机开机");
    }

    @Override
    public void call() {
        super.call();
        System.out.println("小米手机打电话");
    }

    @Override
    public void close() {
        super.close();
        System.out.println("小米手机关机");
    }
}

public class UpRight implements Phone {
    @Override
    public void open() {
        System.out.println("直立手机开机");
    }

    @Override
    public void call() {
        System.out.println("直立手机打电话");
    }

    @Override
    public void close() {
        System.out.println("直立手机关机");

    }
}
public class VIVOUpRight extends UpRight {

    public void open() {
        super.open();
        System.out.println("VIVO手机开机");
    }


    public void call() {
        super.call();
        System.out.println("VIVO手机打电话");
    }


    public void close() {
        super.close();
        System.out.println("VIVO手机关机");
    }
}
public class XIAOMIUpRight extends UpRight {
    @Override
    public void open() {
        super.open();
        System.out.println("小米手机开机");
    }

    @Override
    public void call() {
        super.call();
        System.out.println("小米手机打电话");
    }

    @Override
    public void close() {
        super.close();
        System.out.println("小米手机关机");
    }
}
//测试类
public class Client {
    public static void main(String[] args) {
        Phone phone=new VIVOFold();
        phone.open();
        phone.call();;
        phone.close();
        System.out.println("--------------");
        Phone phone1=new XIAOMIFold();
        phone1.open();
        phone1.call();;
        phone1.close();
        System.out.println("--------------");
        Phone phone2=new XIAOMIUpRight();
        phone2.open();
        phone2.call();;
        phone2.close();
    }
}
---改进的代码----------
   //1. 写桥接接口 子类实现接口
public interface BrandBridge {
    void open();
    void call();
    void close();
}
public class Vivo implements BrandBridge {
    @Override
    public void open() {
        System.out.println("vivo打开手机");
    }

    @Override
    public void call() {
        System.out.println("vivo打电话");
    }

    @Override
    public void close() {
        System.out.println("vivo关闭手机");

    }
}
public class XiaoMi implements BrandBridge {
    @Override
    public void open() {
        System.out.println("xiaomi打开手机");
    }

    @Override
    public void call() {
        System.out.println("xiaomi打电话");
    }

    @Override
    public void close() {
        System.out.println("xiaomi关闭手机");

    }
}


    //2.再写手机类, 聚合桥接类,写继承的手机子类
       public class Phone {
    BrandBridge brand;
    Phone(BrandBridge brand){
        this.brand=brand;
    }
    void open(){
        brand.open();
    }
    void call(){
        brand.call();
    }
    void close(){
        brand.close();
    }


}
  public class FoldedPhone extends Phone {
    public FoldedPhone(BrandBridge brand) {
        super(brand);
    }
    public void open(){
        System.out.println("折叠手机");
        super.open();
    }
    public void call(){
        System.out.println("折叠手机");
        super.call();
    }
    public void close(){
        System.out.println("折叠手机");
        super.close();
    }


}
//设计模式好不好用主要看客户端调用方便
public class Client {
    public static void main(String[] args) {
        FoldedPhone foldedPhone = new FoldedPhone(new Vivo());
        foldedPhone.open();
        foldedPhone.call();
        foldedPhone.close();
        System.out.println("====================");
        UpRightPhone upRightPhone = new UpRightPhone(new XiaoMi());
        upRightPhone.open();
        upRightPhone.call();
        upRightPhone.close();


    }
}
//总结: 如果我想一个类拓展性好, 那我先写桥接接口 再子类实现
//然后写个这个类聚合,然后子类调用桥接类方法,
//一句话: 逆序写代码…
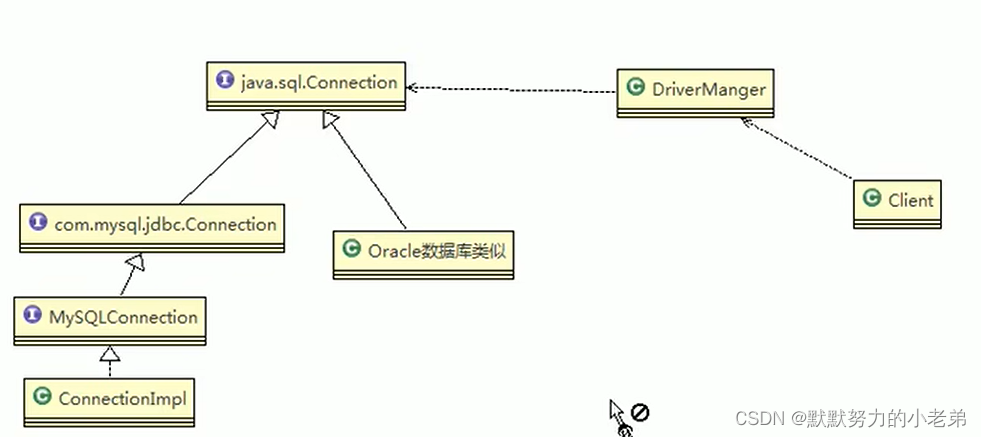
2.桥接模式在JDBC的应用(与标准的有出入)
图 25桥接模式在JDBC源码分析 DriverManager是桥接类(不变的部分),(增加的部分是) ConnectionImpl …Oracle…
1.调用了getConnection方法返回Connection对象
 Class.forName("com.mysql.jdbc.Driver");
Connection connection = DriverManager.getConnection("jdbc:mysql://localhost:3306/jams", "root", "root");
//源代码 getConnection()方法
  @CallerSensitive
public static Connection getConnection(String url,
    String user, String password) throws SQLException {
    java.util.Properties info = new java.util.Properties();

    if (user != null) {
        info.put("user", user);
    }
    if (password != null) {
        info.put("password", password);
    }

    return (getConnection(url, info, Reflection.getCallerClass()));
}
//往里面找
 //  Worker method called by the public getConnection() methods.
    private static Connection getConnection(
        String url, java.util.Properties info, Class<?> caller) throws SQLException {

        ClassLoader callerCL = caller != null ? caller.getClassLoader() : null;
        synchronized(DriverManager.class) {
            // synchronize loading of the correct classloader.
            if (callerCL == null) {
                callerCL = Thread.currentThread().getContextClassLoader();
            }
        }

        if(url == null) {
            throw new SQLException("The url cannot be null", "08001");
        }

        println("DriverManager.getConnection(\"" + url + "\")");

        // Walk through the loaded registeredDrivers attempting to make a connection.
        // Remember the first exception that gets raised so we can reraise it.
        SQLException reason = null;

        for(DriverInfo aDriver : registeredDrivers) { //我认为这里可能使用了桥接模式,寻找对应的驱动,找到mysql驱动返回
            // If the caller does not have permission to load the driver then
            // skip it.
            if(isDriverAllowed(aDriver.driver, callerCL)) {
                try {
                    println("    trying " + aDriver.driver.getClass().getName());
                    Connection con = aDriver.driver.connect(url, info);  //这里调用了Driver类实际上调用了DriverManager的 DriverManager.registerDriver(new Driver());,桥接了DriverManager
             //他的这个聚合直接使用静态类实现....
                    if (con != null) {
                        // Success!
                        println("getConnection returning " + aDriver.driver.getClass().getName());
                        return (con);
                    }
                } catch (SQLException ex) {
                    if (reason == null) {
                        reason = ex;
                    }
                }

            } else {
                println("    skipping: " + aDriver.getClass().getName());
            }

        }

        // if we got here nobody could connect.
        if (reason != null)    {
            println("getConnection failed: " + reason);
            throw reason;
        }

        println("getConnection: no suitable driver found for "+ url);
        throw new SQLException("No suitable driver found for "+ url, "08001");
    }
   //aDriver.driver.connect(url, info); 方法有DriverManager
public class Driver extends NonRegisteringDriver implements java.sql.Driver {
    public Driver() throws SQLException {
    }

    static {
        try {
            DriverManager.registerDriver(new Driver());
        } catch (SQLException var1) {
            throw new RuntimeException("Can't register driver!");
        }
    }
}
//public class NonRegisteringDriver implements Driver的类中
    public Connection connect(String url, Properties info) throws SQLException {
        if (url != null) {
            if (StringUtils.startsWithIgnoreCase(url, "jdbc:mysql:loadbalance://")) {
                return this.connectLoadBalanced(url, info);
            }

            if (StringUtils.startsWithIgnoreCase(url, "jdbc:mysql:replication://")) {
                return this.connectReplicationConnection(url, info);
            }
        }

        Properties props = null;
        if ((props = this.parseURL(url, info)) == null) {
            return null;
        } else {
            try {
                com.mysql.jdbc.Connection newConn = ConnectionImpl.getInstance(this.host(props), this.port(props), props, this.database(props), url); //ConnectionImpl其实是Mysql连接的类,没有注册过类,则默认注册mysql
                return newConn;
            } catch (SQLException var6) {
                throw var6;
            } catch (Exception var7) {
                SQLException sqlEx = SQLError.createSQLException(Messages.getString("NonRegisteringDriver.17") + var7.toString() + Messages.getString("NonRegisteringDriver.18"), "08001");
                sqlEx.initCause(var7);
                throw sqlEx;
            }
        }
    }
//总结: 1.如何学会看源代码 ,先看类的头部关系画uml类图(一个一个点进去,逐步画类 然后找类和类的关系),然后debug调试运行过程
3.优缺点
- 提高系统灵活性.帮助系统分层设计
- 桥接替代多层继承,可以减少类爆炸问题,减低系统维护成本
- 增加系统理解难度
- 要正确区分系统独立变化的2个维度(抽象和实现)
4.应用场景(一句话,代码需要增加分类功能 可以采用聚合调用聚合的方法)
- jdbc驱动
- 银行转账 普通用户(抽象 不变) 和网上转账(实现 后期增加的)
- 消息分类 消息类型:即时消息和延时消息(抽象) 消息分类: 数据短信 QQ消息(实现)
5.装饰者模式(工作常用)
图28装饰者模式原理图
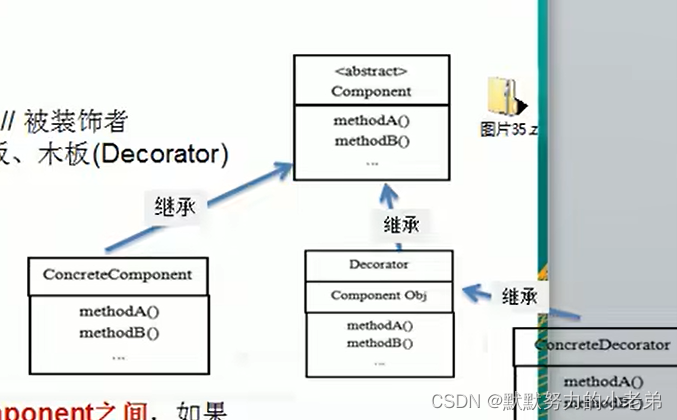
图31装饰者模式星巴克咖啡传统
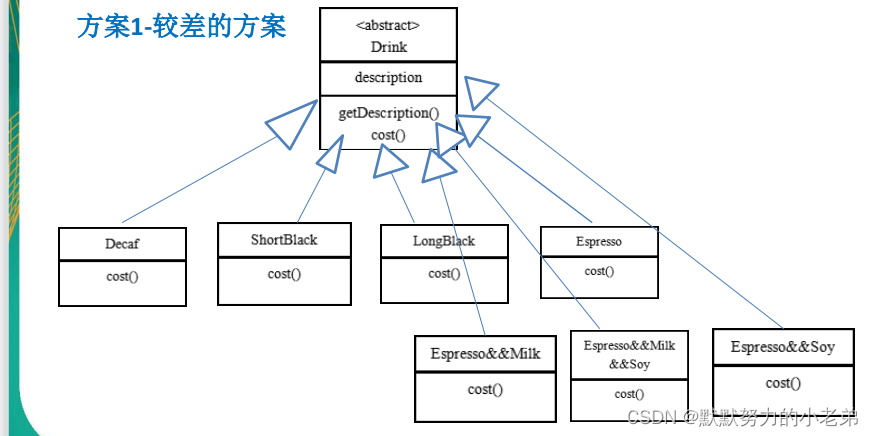
- 星巴克咖啡订单问题(计算不同搭配的钱/单品咖啡)导致类爆炸(排列组合实现cost方法)
- 改进为装饰者(使用非常方便,并且只加一个类就可以与其他类组合) 满足ocp原则
图 29装饰者模式星巴克咖啡改进
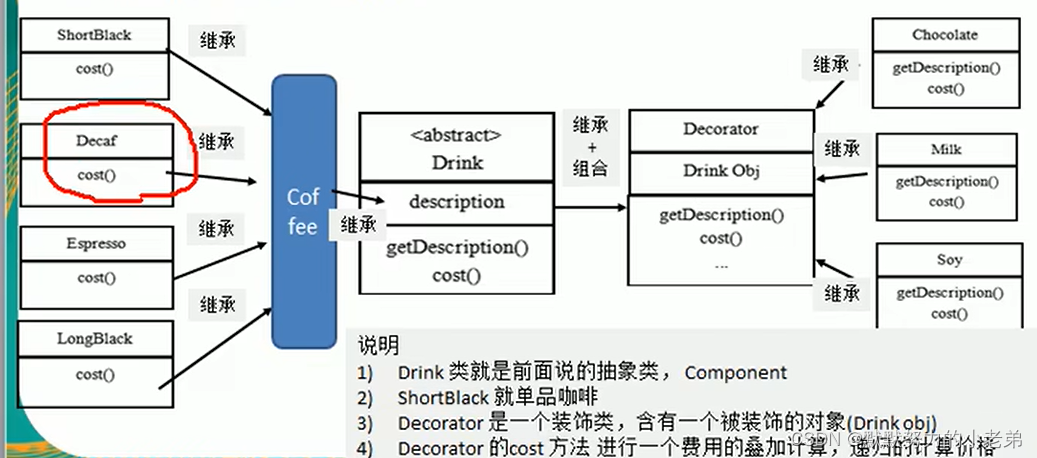
                   Drink coffee=new Coffee();
                        coffee.cost();//计算多少钱
                   Drink add=new Chocolate(coffee);
                      add.cost(); //计算咖啡和巧克力的全部费用

              像打包一个快递 :主体(Component)  衣服 陶瓷 被装饰者
                                        包装(Decorator) 泡沫 木板    装饰者(递归加上价格)
-----全部代码-------
//全部方法和成员由父类创建 继承给子类调用
//1.创建抽象类
public abstract class Drink {
    private String desciption;
    private float price;

    public String getDesciption() {
        return desciption;
    }

    public void setDesciption(String desciption) {
        this.desciption = desciption;
    }

    public float getPrice() {
        return price;
    }

    public void setPrice(float price) {
        this.price = price;
    }
}
//2.继承抽象类
public  class Coffee extends Drink{
}
//3.创建子类
public class Decaf extends Coffee {
    public Decaf(){
        setDesciption("Decaf");
        setPrice(9.0f);
    }
}
public class ShortBlack extends Coffee {
    ShortBlack(){
        setDesciption("ShortBlack");
        setPrice(10.0f);
    }
}
//4.创建装饰者类 继承和组合 被装饰者类  !!!
public  class Decorator extends Drink {
    Drink obj;
    Decorator(Drink obj){
        this.obj=obj;
    }


}
//5.创建装饰者的子类
public class Chocolate extends Decorator{
    public Chocolate(Drink obj) {
        super(obj);
        setDesciption(obj.getDesciption()+"巧克力");
        setPrice(obj.getPrice()+3.0f);
    }
}
public class Milk extends Decorator{
    Milk(Drink obj) {
        super(obj);
        setDesciption(obj.getDesciption()+"牛奶");
        setPrice(obj.getPrice()+2.0f);
    }
}
//测试类
public class Client {
    public static void main(String[] args) {
        Drink decaf = new Decaf();
        Drink chocolate = new Chocolate(decaf);
        Drink chocolate1 = new Chocolate(chocolate);
        float cost = chocolate1.getPrice();
        System.out.println(cost); //会得到全部加入购物车饮料的总钱数
        System.out.println(chocolate1.getDesciption());


    }
}
6.装饰者在JDK IO流的应用 InputStream(被装饰者)的FilterInputStream相当于(装饰者),下面的DataInputStream也继承
30装饰者模式jdkio源码原理图

//核心代码装饰者类继承和组合父类
public
class FilterInputStream extends InputStream { //继承父类 和 DataInputStream同级
    /**
     * The input stream to be filtered.
     */
    protected volatile InputStream in; //装饰父类 构造方法也是传入这个
//测试代码,子类的子类可以把父类组合到类内,这样的形式可能是装饰者模式
      DataInputStream dis = new DataInputStream(new FileInputStream("d:\\1.txt"));
        DataInputStream dis1 = new DataInputStream(dis);
        //之前我就好奇为什么要把自己作为参数传给自己,原来是使用了装饰者
        System.out.println(dis1.read());
        dis.close();
7.组合模式(部分整体模式) 解决继承难以管理,树型结构组合对象,需要对象间有共同的功能
图组合32 33


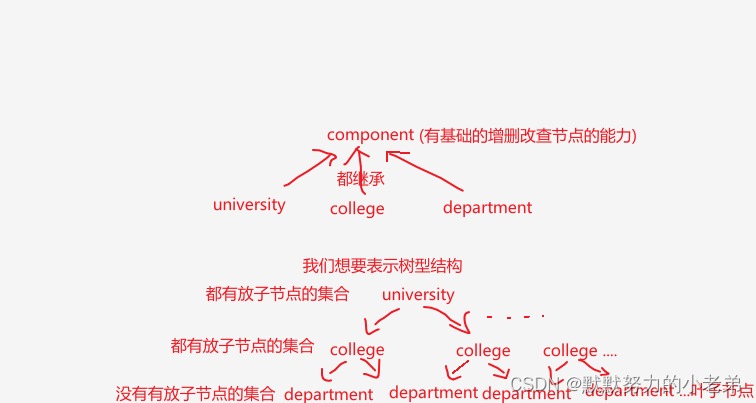
1.几个概念
所有 整体和部分类继承 component(可以是接口/抽象类)然后实现他的 add() remove() print()方法空实现,方便管理,leaf是实现基础的get set方法
//传统的学校院系问题 学校 继承 学院 继承 院系 方便管理
----所有代码-----
//先写一个抽象类或接口,定义好整颗树,通用的方法
public abstract class Component {
    private String name; // 名字
    private String des; // 说明
    Component(String name,String des){

        this.name = name;
        this.des = des;
    }

    void add(Component component){
        throw new UnsupportedOperationException();
    };
    void remove(Component component){
        throw new UnsupportedOperationException();
    }
    void print(){
        throw new UnsupportedOperationException();
    }

    public String getName() {
        return name;
    }

    public void setName(String name) {
        this.name = name;
    }

    public String getDes() {
        return des;
    }

    public void setDes(String des) {
        this.des = des;
    }
}
//每一层的树都继承 组件,使用list存放他的孩子
public class University extends Component{

    List<Component> components=new ArrayList<Component>();
    University(String name, String des) {
        super(name, des);
    }
    void add(Component component){
        components.add(component);
    };
    void remove(Component component){
        components.remove(component);
    }
    void print(){

        System.out.println("--------------" + getName() + "--------------");
        for (Component component : components) {
            component.print();
        }
    }
}
public class College extends Component {

    List<Component> components=new ArrayList<Component>();
    College(String name, String res) {
        super(name, res);
    }
    void add(Component component){
        components.add(component);
    };
    void remove(Component component){
        components.remove(component);
    }
    void print(){
        System.out.println("--------------" + getName() +"--------------");
        for (Component component : components) {
            component.print();
        }
    }
}
//最后一层叶子不放东西,所以不用list存放数据
public class Department extends Component {
    Department(String name,String res) {
        super(name, res);
    }

    void print(){
        System.out.println(getName()+getDes() );
    }
    public String getName() {
        return super.getName();
    }

    public String getDes() {
        return super.getDes();
    }


}
//这才是设计模式的精髓,直接让代码富有逻辑性,可读性增强,写新代码也容易
public class Client {
    public static void main(String[] args) {
        University university = new University("清华大学","中国一流大学");
        College college = new College("计算机学院", "计算机学院很好");
        college.add(new Department("计算机科学与技术", "王牌专业"));
        college.add(new Department("软件工程", "也是王牌专业"));
        university.add(college);

        College college1 = new College("财经学院", "财经很好");
        college1.add(new Department("会计专业","都是金融人才"));
        college1.add(new Department("金融工程专业","都是金融人才1"));
        university.add(college1);
        university.print();

    }
}
//输出结果(非常简单)
--------------清华大学--------------
--------------计算机学院--------------
计算机科学与技术王牌专业
软件工程也是王牌专业
--------------财经学院--------------
会计专业都是金融人才
金融工程专业都是金融人才1
//删除一个专业,可以自己定义删除的代码细节
public class Client {
    public static void main(String[] args) {
        University university = new University("清华大学","中国一流大学");
        College college = new College("计算机学院", "计算机学院很好");
        Department department = new Department("计算机科学与技术", "王牌专业");
        college.add(department);
        college.add(new Department("软件工程", "也是王牌专业"));
        college.remove(department);
        university.add(college);

        College college1 = new College("财经学院", "财经很好");
        college1.add(new Department("会计专业","都是金融人才"));
        college1.add(new Department("金融工程专业","都是金融人才1"));
        university.add(college1);
        university.print();

    }
}
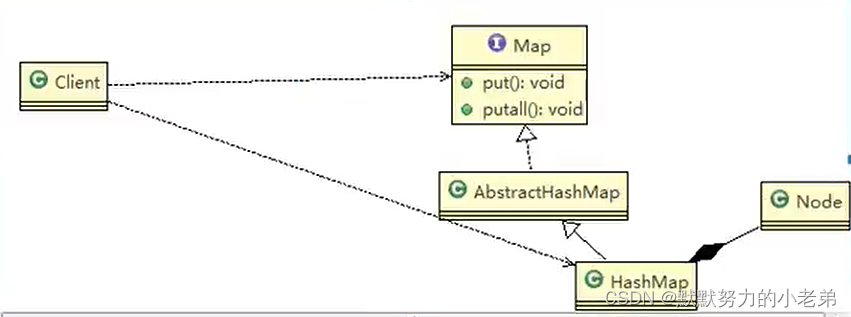
8.组合模式在HashMap的应用
Map是component HashMap是composite 有put putall方法
Node是hashMap的静态内部类(叶子节点的),实现Map 相当于 Leaf没有put putall方法
全部都实现了Map所以map是component
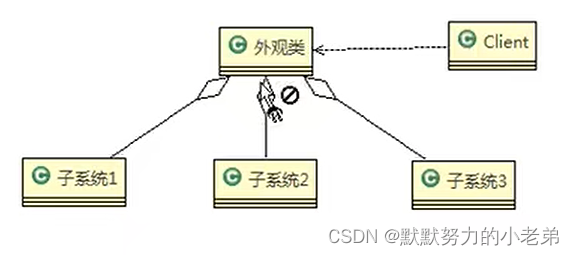
9.外观(界面)(过程facade)模式,就是封装类的思想,加一层类 来屏蔽子系统的调用 和简单工厂越看越像不同的是工厂是创建类的,而外观是调用不同功能的
外观类: 知道哪些子系统负责什么,给调用端的请求到子系统
子系统: 处理外观类给的任务,功能的实际提供者
- 传统方式实现影院系统 直接Client调用各个子系统 如图: 35外观模式解决传统问题
- 外观模式实现 创建影院设备类, (通过构造方法饿汉式初始化,分成多个阶段的方法调用的类) client调用外观类 如图 36外观模式

//客户端调用
public class Client {
    public static void main(String[] args) {
        Facade facade = new Facade();
        facade.ready();
        System.out.println("----------");
        facade.stop();
    }
}
//外观类 核心类
public class Facade {
    private  DVD dvd;
    private  Projector projector;
    private  Screen screen;
    private  Stere stere;
    private Lighting lighting;
    Facade(){
        dvd=DVD.getInstance();
        projector=Projector.getInstance();
        screen=Screen.getInstance();
        stere=Stere.getInstance();
        lighting=Lighting.getInstance();
    }

    public void ready(){
        screen.open();
        lighting.stop();
        projector.open();
        stere.open();
        dvd.play();
    }

    public void stop(){
        dvd.stop();
        stere.stop();
        projector.close();
        lighting.open();
        screen.close();

    }


}


//下面是子系统类
public class DVD {
    private static DVD instance=new DVD();

    public static DVD getInstance() {
        return instance;
    }
    public  void play(){
        System.out.println("开启播放dvd");
    }
    public  void stop(){
        System.out.println("关闭dvd");
    }
}
public class Lighting {
    private static Lighting instance=new Lighting();

    public static Lighting getInstance() {
        return instance;
    }
    public  void open(){
        System.out.println("开灯");
    }
    public  void stop(){
        System.out.println("关灯");
    }
}
public class Projector {
    private static Projector instance=new Projector();

    public static Projector getInstance() {
        return instance;
    }
    public  void open(){
        System.out.println("开启投影仪");
    }
    public  void close(){
        System.out.println("关闭投影仪");
    }


}
public class Screen {
    private static Screen instance=new Screen();

    public static Screen getInstance() {
        return instance;
    }
    public  void open(){
        System.out.println("打开幕布");
    }
    public  void close(){
        System.out.println("关闭幕布");
    }


}
public class Stere {
    private static Stere instance=new Stere();

    public static Stere getInstance() {
        return instance;
    }
    public  void open(){
        System.out.println("开启立体声");
    }
    public  void stop(){
        System.out.println("关闭立体声");
    }
}
10.外观模式在mybatis的应用
图 37.外观模式mybastis源码分析Configuration(外观类)的newMetaObject()方法
Configuration是外观类,子系统是DefaultObjectFactory DefaultObjectWrapperFactory DefaultReflectorFactory

import org.apache.ibatis.session.Configuration;
  public MetaObject newMetaObject(Object object) {
    return MetaObject.forObject(object, objectFactory, objectWrapperFactory);
  }
  public static MetaObject forObject(Object object, ObjectFactory objectFactory, ObjectWrapperFactory objectWrapperFactory) {
    if (object == null) {
      return SystemMetaObject.NULL_META_OBJECT;
    } else {
      return new MetaObject(object, objectFactory, objectWrapperFactory);
    }
  }
//到MetaObject类
  private MetaObject(Object object, ObjectFactory objectFactory, ObjectWrapperFactory objectWrapperFactory) {
    this.originalObject = object;
    this.objectFactory = objectFactory;
    this.objectWrapperFactory = objectWrapperFactory;

    if (object instanceof ObjectWrapper) {
      this.objectWrapper = (ObjectWrapper) object;
    } else if (objectWrapperFactory.hasWrapperFor(object)) {
      this.objectWrapper = objectWrapperFactory.getWrapperFor(this, object);
    } else if (object instanceof Map) {
      this.objectWrapper = new MapWrapper(this, (Map) object);
    } else if (object instanceof Collection) {
      this.objectWrapper = new CollectionWrapper(this, (Collection) object);
    } else {
      this.objectWrapper = new BeanWrapper(this, object);
    }
  }
11.外观模式的注意事项
- 降低客户端访问子系统复杂性(解耦)
- 用于系统太过复杂需要分层的时候
- 子系统太少了,不如直接使用,不用外观模式
- 维护遗留大项目 可以使用外观模式
12.享元(蝇量 flyweight)(共享对象)模式(开发用得多 string和池技术) 需求相似度高不要copy
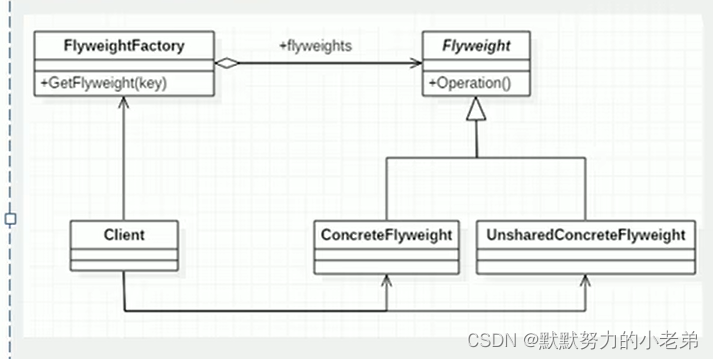
- 解决的问题 38享元模式原理图
1. 避免重复对象内存浪费的问题,但是提供系统复杂度 s1=“aaa” 和new String(“aaa”);指向常量池的同一个位置
2. 解决网站外包复用问题,传统方案是复制粘贴定制修改- 4个角色
1. FlyWeight 抽象的享元角色,定义了对象的内部和外部状态的接口/实现
2. ConcreteFlyWeight 具体的享元角色,返回共享对象
3. UnSharedConcreteFlyWeight 不可共享的享元角色,一般不会出现在享元工厂里
4. FlyWeightFactory 享元工厂类,得到对象的方法 用集合HashMap/HashTable存放共享的对象,
3.内部和外部状态 (内部放在集合,外部构造器传进来)
内部: 不随环境改变的状态(对象内) 5子棋 棋的颜色
外部: 随环境改变的 5子棋 位置
----解决外包问题完整代码------
//抽象类
public abstract class WebSite {

    abstract void  use(User user);
}
//创建类
public class ConcreteWebSite extends WebSite {
    String type=""; //内部状态
    ConcreteWebSite(String type) {
        this.type=type;
    }

    @Override
    void use(User user) { //外部状态
        System.out.println("网站类型为"+type+"正在被"+user.getName()+"使用");
    }
}
//外部状态类
public class User {
    private String name;
    User(String name){
        this.name=name;
    }

    public String getName() {
        return name;
    }

    public void setName(String name) {
        this.name = name;
    }
}

//享元工厂类!!!,共享数据类
public class WebSiteFactory {
    HashMap<String, ConcreteWebSite> pool=new HashMap<>();
    public WebSite getWebSiteCategory(String type){
        if(!pool.containsKey(type)){
            pool.put(type,new ConcreteWebSite(type));
        }
        return (WebSite)pool.get(type);

    }
    int getCount(){
        return pool.size();
    }
}
//客户端调用测试发现有缓存的效果
//其实强智系统也可能使用了享元模式,一个强智系统由多个大学使用
public class Client {
    public static void main(String[] args) {
        WebSiteFactory webSiteFactory = new WebSiteFactory();
        WebSite blog = webSiteFactory.getWebSiteCategory("博客"); //设置内部状态为博客(由我决定)
        blog.use(new User("小明"));  //外部状态为小明(由客户决定)
        WebSite blog1 = webSiteFactory.getWebSiteCategory("博客");
        blog1.use(new User("小叶"));
        WebSite webSite = webSiteFactory.getWebSiteCategory("房地产");
        webSite.use(new User("小李子"));
        System.out.println(webSiteFactory.getCount());
    }
}
//输出
网站类型为博客正在被小明使用
网站类型为博客正在被小叶使用
网站类型为房地产正在被小李子使用
2 //创建了2个网站,博客和房地产,重复创建的会直接返回
13.jdk里面Integer使用了享元模式
   x=Integer.valueOf(127);//  x==y  -128到127使用享元模式,返回相同的对象,比new要快
   y=Integer.valueOf(127);
public static Integer valueOf(int i) { //外部状态
    if (i >= IntegerCache.low && i <= IntegerCache.high)  //-128 到127  内部状态
        return IntegerCache.cache[i + (-IntegerCache.low)];   //数组也是个集合 static final Integer cache[];
    return new Integer(i);
}
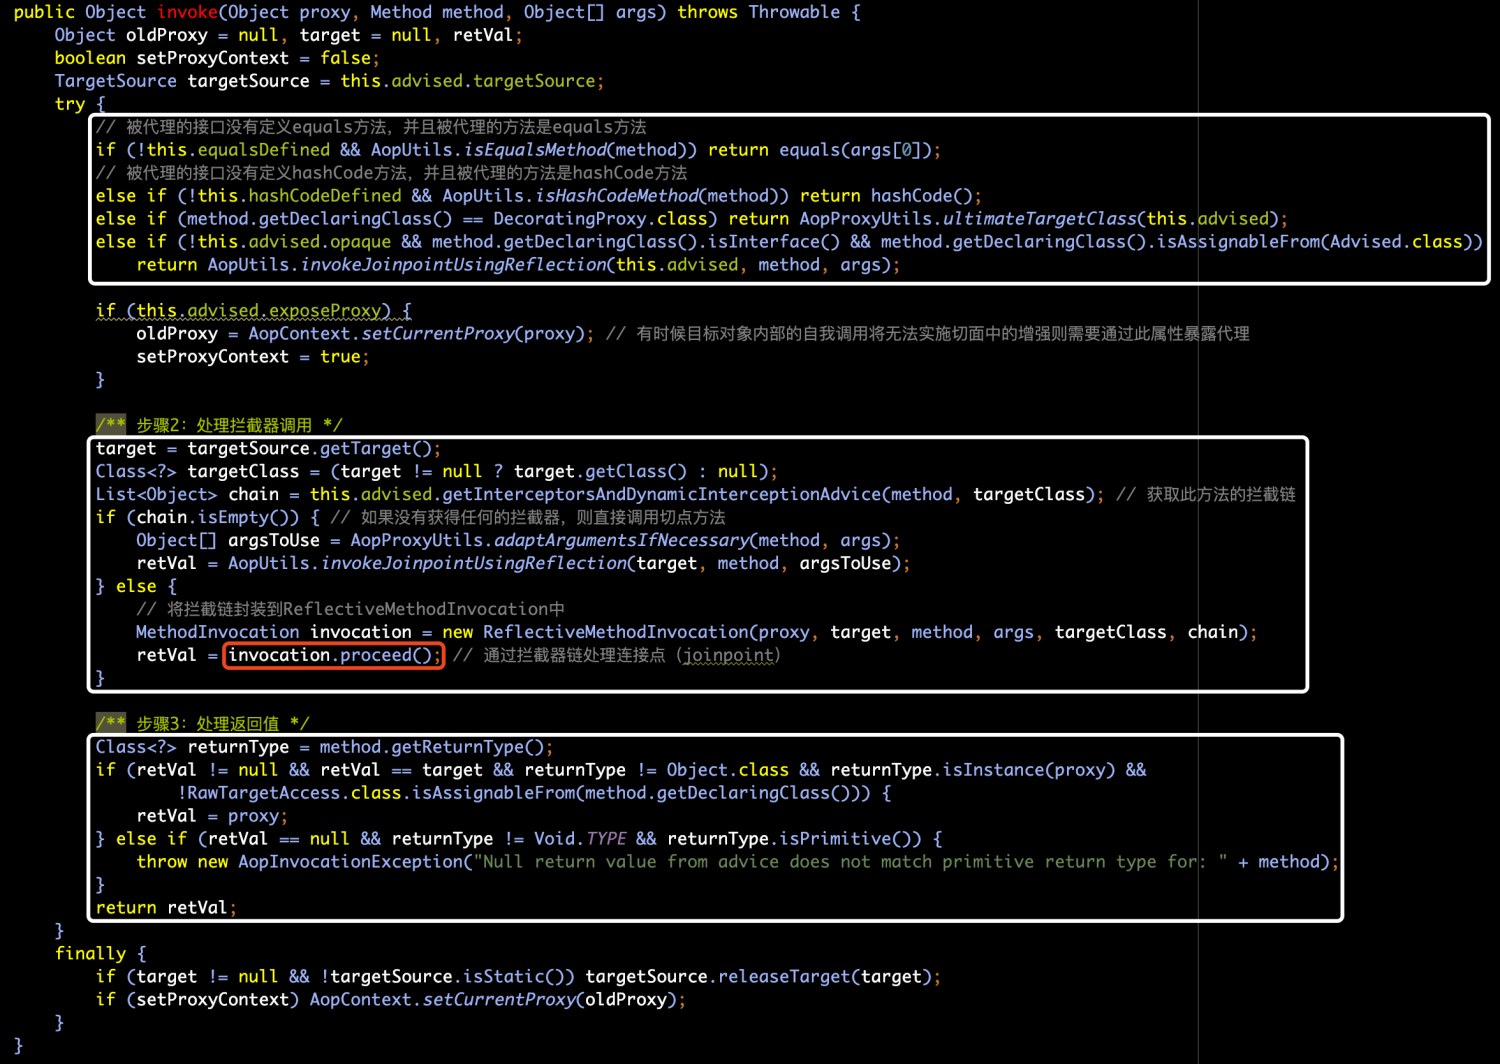
14.代理(proxy)模式(替你做事,增强你的能力) 给对象(类)创建替身增强功能
- 解决的问题
1.动态增加对象的功能
2. 缺点 代理对象和被代理对象需要实现相同的接口,导致创建大量的代理对象,不好维护- 代理的对象可以是远程对象,创建开销大的对象,需要安全控制的对象
- 代理的分类
1.静态代理 需要类实现接口和聚合,有个代理类和被代理类

public interface Play {
    void play();
}
//被代理类
public class PlayImpl implements Play{

    @Override
    public void play() {
        System.out.println("被代理类的方法");
    }
}
//代理类
public class PlayPoxy implements Play{
    Play play;
    public PlayPoxy(Play play){
        this.play=play;
    }

    @Override
    public void play() {
        System.out.println("代理前");
        play.play();
        System.out.println("代理后");

    }
}
public class Client {
    public static void main(String[] args) {
        PlayPoxy playPoxy = new PlayPoxy(new PlayImpl());
        playPoxy.play();
    }
}
2.动态代理(JDK代理) 使用jdk的方法, 传入一个接口 写个工厂
Proxy.newProxyInstance(target.getClass().getClassLoader(),target.getClass().getInterfaces(),new InvocationHandler(){ invoke方法的 returnVal=method.invoke(target,args); return returnVal;//可以没有,观察一下args})输出对象hashcode带有 $proxy说明是代理对象
public interface Play {
    void play();
}
public class PlayImpl implements Play {

    @Override
    public void play() {
        System.out.println("被代理类的方法");
    }
}
public class PlayPoxy {
    Object target;

    public PlayPoxy(Object target) {
        this.target=target;
    }

    public Object getProxyInstance(){

         return Proxy.newProxyInstance(target.getClass().getClassLoader(), target.getClass().getInterfaces(), new InvocationHandler() {
            @Override
            public Object invoke(Object proxy, Method method, Object[] args) throws Throwable {    //代理全部方法调用可用method的方法判断调用哪个方法
                System.out.println("jdk动态代理前");
                Object invoke = method.invoke(target, args);
                System.out.println("jdk动态代理后");
                return invoke;
            }
        });
    }

}
public class Client {
    public static void main(String[] args) {
        Play target = new PlayImpl();
        PlayPoxy playPoxy = new PlayPoxy(target);
        Play proxyInstance = (Play)playPoxy.getProxyInstance();
        proxyInstance.play();
    }
}
3.Cglib动态代理 在内存创建单个对象,不需要实现接口和聚合 spring AOP的底层
//导入cglib的jar文件 ,代理类实现 MethodIntercepttor类的方法 intercept和jdk代理写法一样
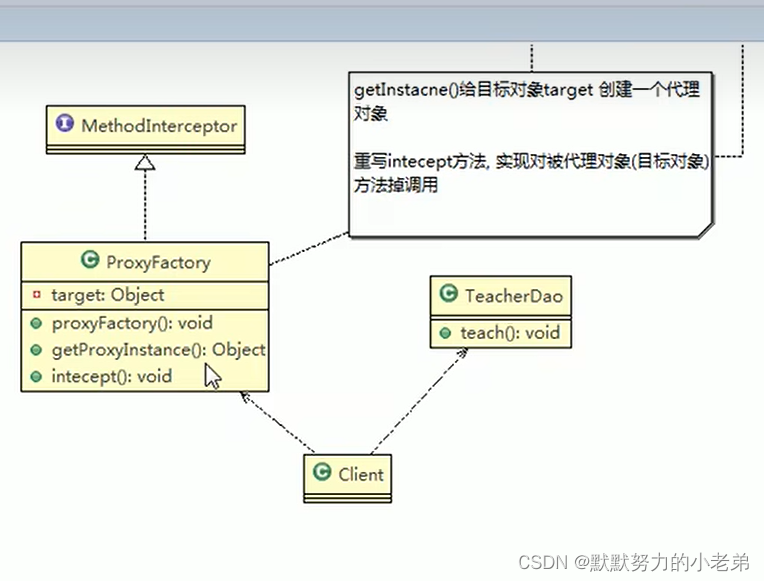
- 不能为final/static会报错,不会拦截和执行业务方法
public class PlayImpl {
public int play() {
System.out.printl
n("被代理类的方法"); return 1;
}
}
public class PlayPoxy implements MethodInterceptor {
private Object target;
PlayPoxy(Object target){
this.target = target;
}
//设置返回的代理对象方法
public Object getProxyInstance() {
Enhancer enhancer = new Enhancer();
enhancer.setSuperclass(target.getClass());
enhancer.setCallback(this);
return enhancer.create();
}
//具体处理增强功能的方法
@Override
public Object intercept(Object o, Method method, Object[] args, MethodProxy methodProxy) throws Throwable {
System.out.println("Cglib代理模式 ~~ 开始");
Object returnVal = method.invoke(target, args);
System.out.println("Cglib代理模式 ~~ 提交");
return returnVal; //依赖函数的返回值也可以修改
}
}
public class Client {
public static void main(String[] args) {
PlayPoxy playPoxy = new PlayPoxy(new PlayImpl());
PlayImpl proxyInstance = (PlayImpl) playPoxy.getProxyInstance();
proxyInstance.play();
}
}
4.其他代理
防火墙代理:(内网穿透服务器对公网的访问)
缓存代理: 请求文件先到缓存取,如果没有就到数据库或公网取
远程代理: 本地的对象代理远程的对象像本地访问一样访问资源
同步代理: 代理需要多线程同步的对象(加上同步代码块)
1
5.模板(template method)模式
- 是什么?
1.是行为型模式
2.几个类的几个方法是一样的,部分不一样,有一个final方法写调用处理流程
3.缺点是每个不同实现需要子类实现,类爆炸
  //抽象类写一个final方法以免被子类覆盖
   //改进加入构子方法直接返回状态,如果模板方法判断是否加另外的东西,不用改模板,可以让子类覆盖达到灵活控制的效果
  //覆盖,增加灵活性(实现其他功能)
public abstract class SoyMilk {

    final void  make(){
        select();
        if(customWantAdditions()==true){
            add();
        }
        soap();
        beat();
     };
    void  select(){
        System.out.println("挑选大豆");
    };
    abstract void  add();
    void  soap(){
        System.out.println("吸水");
    };
    void  beat(){
        System.out.println("打碎");
    };

    //构子增加拓展性
    boolean customWantAdditions(){
       return true;
    }
}

//写他的子类
public class RedSoyMilk extends SoyMilk {
    @Override
    void add() {
        System.out.println("添加红豆");
    }
}
public class GreenSoyBean extends SoyMilk {
    @Override
    void add() {
        System.out.println("加绿豆");
    }
}
public class PureSoyMilk extends SoyMilk {
    @Override
    void add() {
    }
    @Override
     boolean customWantAdditions(){
        return false;
    }
}
//测试
public class Client {
    public static void main(String[] args) {
        SoyMilk redSoyMilk = new RedSoyMilk();
        redSoyMilk.make();
        System.out.println("--------------");
        SoyMilk greenSoyBean = new GreenSoyBean();
        greenSoyBean.make();
        System.out.println("制作纯豆奶");

        SoyMilk pureSoyMilk = new PureSoyMilk();
        pureSoyMilk.make();
    }
}
//运行结果
挑选大豆
添加红豆
吸水
打碎
--------------
挑选大豆
加绿豆
吸水
打碎
制作纯豆奶
挑选大豆
吸水
打碎
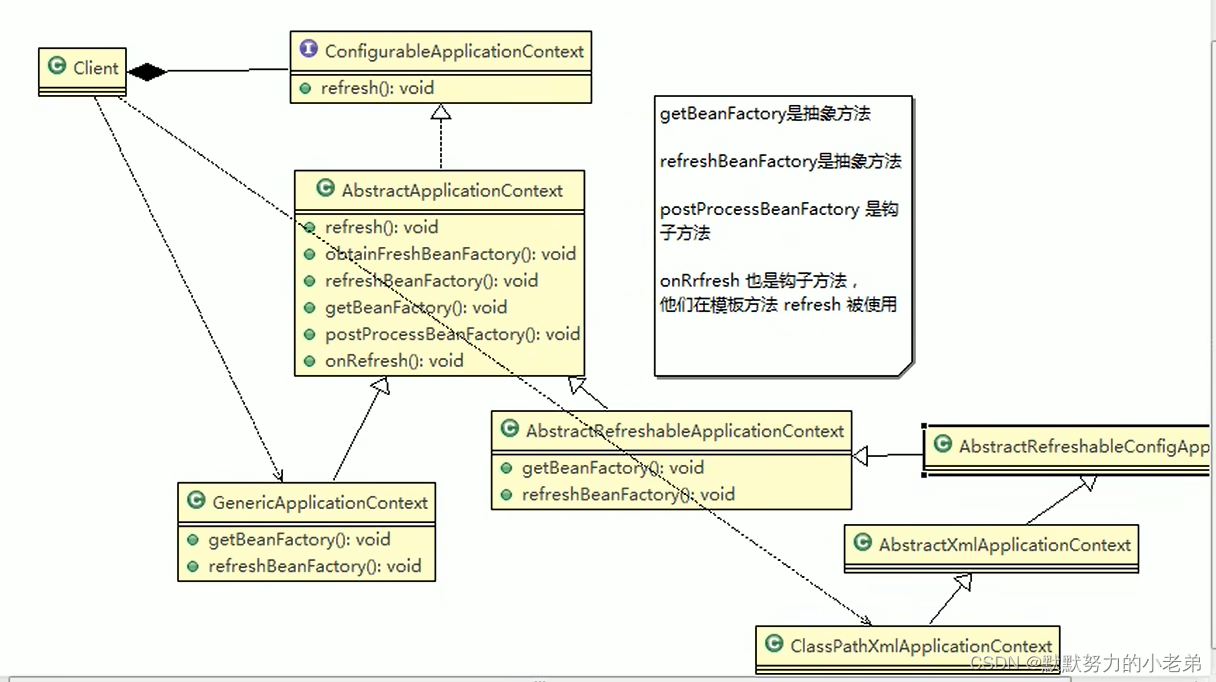
16.模板方法在spring是应用
//抽象类定义模板方法的实现过程
//上面的类又有继承 ,到ClassPathXmlApplicationContext我们就可以直接使用了因为一层一层方法继承下来,所有功能完成了实现
public interface ConfigurableApplicationContext extends ApplicationContext, Lifecycle, Closeable {
    String CONFIG_LOCATION_DELIMITERS = ",; \t\n";
    String CONVERSION_SERVICE_BEAN_NAME = "conversionService";
    String LOAD_TIME_WEAVER_BEAN_NAME = "loadTimeWeaver";
    String ENVIRONMENT_BEAN_NAME = "environment";
    String SYSTEM_PROPERTIES_BEAN_NAME = "systemProperties";
    String SYSTEM_ENVIRONMENT_BEAN_NAME = "systemEnvironment";

    void setId(String var1);

    void setParent(ApplicationContext var1);

    ConfigurableEnvironment getEnvironment();

    void setEnvironment(ConfigurableEnvironment var1);

    void addBeanFactoryPostProcessor(BeanFactoryPostProcessor var1);

    void addApplicationListener(ApplicationListener<?> var1);

    void refresh() throws BeansException, IllegalStateException;

    void registerShutdownHook();

    void close();

    boolean isActive();

    ConfigurableListableBeanFactory getBeanFactory() throws IllegalStateException;
}
//AbstractApplicationContext的refresh相当于make
 public abstract class AbstractApplicationContext extends DefaultResourceLoader implements ConfigurableApplicationContext, DisposableBean //继承和实现确定处理过程
    public void refresh() throws BeansException, IllegalStateException {
        synchronized(this.startupShutdownMonitor) {
            this.prepareRefresh();
            ConfigurableListableBeanFactory beanFactory = this.obtainFreshBeanFactory();
            this.prepareBeanFactory(beanFactory);
	//处理的过程 只是这里依赖外部依赖(组合进来)
            try {
                this.postProcessBeanFactory(beanFactory);
                this.invokeBeanFactoryPostProcessors(beanFactory);
                this.registerBeanPostProcessors(beanFactory);
                this.initMessageSource();
                this.initApplicationEventMulticaster();
                this.onRefresh();
                this.registerListeners();
                this.finishBeanFactoryInitialization(beanFactory);
                this.finishRefresh();
            } catch (BeansException var5) {
                this.destroyBeans();
                this.cancelRefresh(var5);
                throw var5;
            }

        }
    }
  //空实现
  //onfreash是构子
  protected void onRefresh() throws BeansException {
    }
  //GenericApplicationContext类覆盖了父类的方法(子类覆盖父类具体实现方法,但没有全部实现的流程)

    protected final void refreshBeanFactory() throws IllegalStateException {
        if (this.refreshed) {
            throw new IllegalStateException("GenericApplicationContext does not support multiple refresh attempts: just call 'refresh' once");
        } else {
            this.beanFactory.setSerializationId(this.getId());
            this.refreshed = true;
        }
    }