文章目录
- 一、引言
- 二、了解
- 三、编码
- 1、UI设计
- 2、编码
一、引言
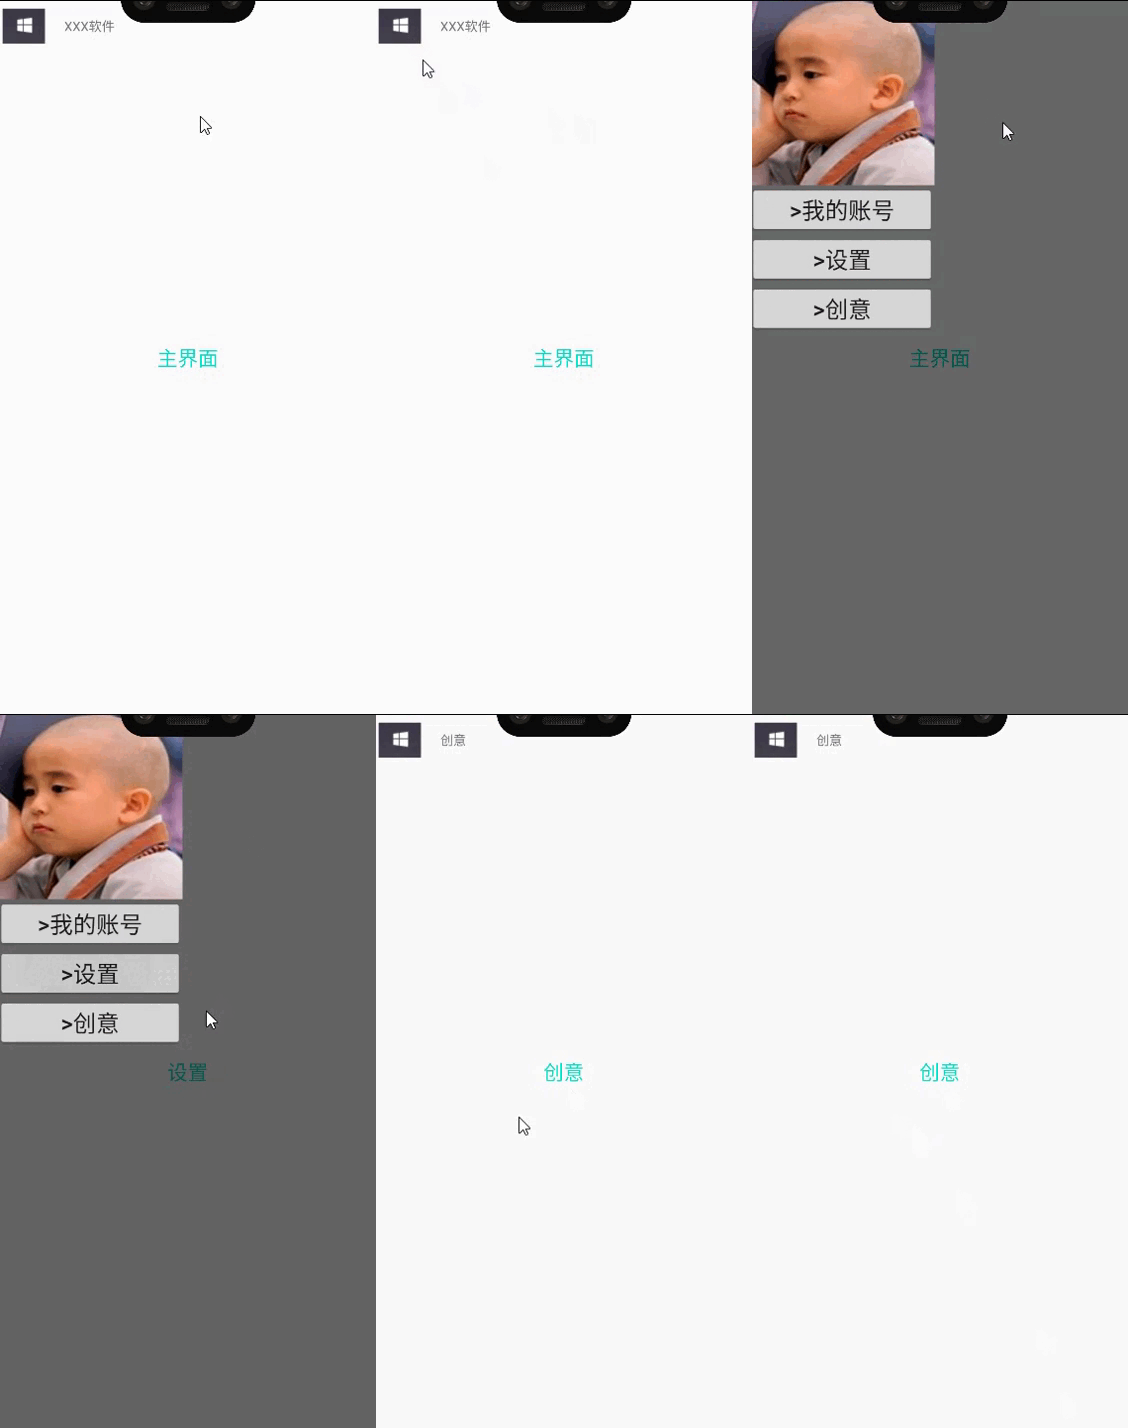
- 描述:需要设计一个主界面,菜单通过主界面的左边界划入,实现点击跳转修改主界面内容的一个效果,并且点击非内容区域恢复原界面的一个效果。做到菜单的弹出,其实还可以加难度,通过向右滑动实现菜单的弹出。这里就作为一个思考问题,其实在我之前的几篇博客里都有使用到这个方法,就看看初学者有没有仔细去了解那些代码,与其双手奉上,不是自己创造。
- 知识点:Toolbar的使用
- 难度:简单
- 效果
二、了解
用于应用程序内容的标准工具栏(图片截取自官网关于Toolbar的介绍)。其主要元素组合:导航按钮、品牌徽标图像、标题和副标题、标题和副标题、可选溢出菜单。
- 导航按钮:向上箭头、导航菜单切换、关闭、折叠、完成或应用选择的其他字形。
- 品牌徽标图像:延伸到条形的高度,并且可以任意宽。
- 标题和副标题:是工具栏在导航层次结构中的当前位置以及其中包含的内容的路标
- 自定义视图:可以向工具栏添加任意子视图,它们将显示在布局中的此位置。
- 可选溢出菜单:提供一些频繁、重要或典型的操作

三、编码
1、UI设计
关于菜单内容,我就随便添加了几个按钮和图片,进行修饰一下,如果需要设计的精美可以查看同栏目下的【AndroidUI设计】个人信息界面 这篇博客,进行进一步的个性化设计。
<?xml version="1.0" encoding="utf-8"?>
<androidx.drawerlayout.widget.DrawerLayout xmlns:android="http://schemas.android.com/apk/res/android"
    android:layout_width="match_parent"
    android:layout_height="match_parent"
    xmlns:app="http://schemas.android.com/apk/res-auto"
    android:id="@+id/drawerlayout_drawer">

    <RelativeLayout
        android:id="@+id/drawerlayout_main_layout"
        android:layout_width="match_parent"
        android:layout_height="match_parent">

        <androidx.appcompat.widget.Toolbar
            android:id="@+id/drawer_layout_rl_toolbar"
            android:layout_width="match_parent"
            android:layout_height="wrap_content">

            <TextView
                android:id="@+id/title_name"
                android:layout_width="wrap_content"
                android:layout_height="wrap_content"
                android:text="XXX软件"/>
        </androidx.appcompat.widget.Toolbar>

        <TextView
            android:id="@+id/main_text"
            android:layout_width="match_parent"
            android:layout_height="match_parent"
            android:gravity="center"
            android:text="主界面"
            android:textColor="@color/colorAccent"
            android:textSize="22sp" />
    </RelativeLayout>

    <LinearLayout
        android:id="@+id/drawerlayout_side_tv"
        android:layout_width="200dp"
        android:layout_height="match_parent"
        android:layout_gravity="left"
        android:orientation="vertical">

        <!--    菜单内容    -->

        <ImageView
            android:layout_width="200dp"
            android:layout_height="200dp"
            android:background="@drawable/b"/>

        <Button
            android:id="@+id/user"
            android:layout_width="match_parent"
            android:layout_height="wrap_content"
            android:textSize="25dp"
            android:text=">我的账号"/>

        <Button
            android:id="@+id/shezhi"
            android:layout_width="match_parent"
            android:layout_height="wrap_content"
            android:textSize="25dp"
            android:text=">设置"/>

        <Button
            android:id="@+id/cy"
            android:layout_width="match_parent"
            android:layout_height="wrap_content"
            android:textSize="25dp"
            android:text=">创意"/>
    </LinearLayout>
</androidx.drawerlayout.widget.DrawerLayout>
2、编码
关于Toolbar和ActionBar的使用,请参考官方给出的方案。因为最近有点忙,就不进行详细介绍了,直接copy即可(可以直接使用)。
- 控件初始化
控件的绑定我就不详细讲了,这在前几篇博客已经讲烂了,始终记住代码规范,主要是方便定位bug位置和简化代码排列。
	private DrawerLayout drawerLayout;
    private Button user,shezhi,cy;
    private TextView title, main;

	// 初始化代码
	private void init() {
        user = findViewById(R.id.user);
        shezhi = findViewById(R.id.shezhi);
        cy = findViewById(R.id.cy);
        title = findViewById(R.id.title_name);
        main = findViewById(R.id.main_text);
    }
- 导航控制
侧滑菜单的一个控制部分,分别导航按钮的显示和隐藏、内容的切换(这里只是简单的将内容进行了更替,至于具体设计则看需求如何)
	private void initToolbar() {
        final Toolbar toolbar = findViewById(R.id.drawer_layout_rl_toolbar);
        setSupportActionBar(toolbar);                   //传入ToolBar实例
        ActionBar actionBar = getSupportActionBar();    //得到ActionBar实例

        if (actionBar != null){
            //显示导航按钮
            actionBar.setDisplayHomeAsUpEnabled(true);
            //设置导航按钮图片
            actionBar.setHomeAsUpIndicator(R.drawable.j5);
        }
        drawerLayout = findViewById(R.id.drawerlayout_drawer);
        //设置toolbar的导航按钮监听事件
        toolbar.setNavigationOnClickListener(new View.OnClickListener() {
            @Override
            public void onClick(View view) {
                //显示侧滑菜单
                drawerLayout.openDrawer(GravityCompat.START);
            }
        });

        user.setOnClickListener(new View.OnClickListener() {
            @Override
            public void onClick(View v) {
                title.setText("我的账号");
                main.setText("我的账号");
            }
        });

        shezhi.setOnClickListener(new View.OnClickListener() {
            @Override
            public void onClick(View v) {
                title.setText("设置");
                main.setText("设置");
            }
        });

        cy.setOnClickListener(new View.OnClickListener() {
            @Override
            public void onClick(View v) {
                title.setText("创意");
                main.setText("创意");
            }
        });
    }
- onCreate
生命周期-初始化,仅有一次运行
    @Override
    protected void onCreate(Bundle savedInstanceState) {
        super.onCreate(savedInstanceState);
        setContentView(R.layout.activity_main);

        init();
        initToolbar();
    }
