目录
1. platform平台简介
1.1 platform总线
1.2 platform 驱动
1.3 platform设备
2.platform平台总线初始化
3. platform驱动框架
4.实验
4.1 无设备树的platform设备注册
4.2 无设备树的platform驱动
4.3 有设备树的platform驱动
1. platform平台简介

当我们向系统注册一个驱动的时候,总线就会在设备列表中查找,看看有没有与之匹配的设备,如果有的话就将两者联系起来。同样的,当向系统中注册一个设备的时候,总线就会在驱动列表中查找看有没有与之匹配的设备,有的话也联系起来。驱动和设备之间的匹配就是依靠总线bus的match函数进行匹配的。
但是在 SOC 中有些外设是没有总线这个概念的,但是又要使用总线、驱动和设备模型该怎么办呢?为了解决此问题, Linux 提出了 platform 这个虚拟总线,相应的就有 platform_driver 和 platform_device。
1.1 platform总线
Linux系统内核使用bus_type结构体表示总线,此结构体定义在文件include/linux/device.h, bus_type 结构体内容如下:
struct bus_type {
	const char		*name;//总线类型名称
	const char		*dev_name;//该总线下的设备节点名称
	struct device		*dev_root;//该总线下的根设备节点
	struct device_attribute	*dev_attrs;	/* use dev_groups instead *///该总线下所有设备的属性组
	const struct attribute_group **bus_groups;//该总线的属性组
	const struct attribute_group **dev_groups;//该总线下所有设备的属性组
	const struct attribute_group **drv_groups;//该总线下所有设备驱动程序的属性组

	int (*match)(struct device *dev, struct device_driver *drv);//用于检查设备是否匹配总线类型的函数
	int (*uevent)(struct device *dev, struct kobj_uevent_env *env);//发送uevent消息的函数
	int (*probe)(struct device *dev);//在设备被添加到总线上时调用的函数
	int (*remove)(struct device *dev);//当设备被移除时调用的函数
	void (*shutdown)(struct device *dev);//在系统关机时调用的函数

	int (*online)(struct device *dev);//在设备被启用时调用的函数
	int (*offline)(struct device *dev);//在设备被禁用时调用的函数

	int (*suspend)(struct device *dev, pm_message_t state);//在设备被暂停时调用的函数
	int (*resume)(struct device *dev);//在设备从暂停状态恢复时调用的函数

	const struct dev_pm_ops *pm;//设备的电源管理操作

	const struct iommu_ops *iommu_ops;//用于执行输入/输出内存管理单元操作的指针

	struct subsys_private *p; //用于保存总线私有数据的指针
	struct lock_class_key lock_key;//用于调试锁问题的锁类别密钥
};
match 函数,此函数很重要,单词 match 的意思就是“匹配、相配”,因此此函数就是完成设备和驱动之间匹配的,总线就是使用 match 函数来根据注册的设备来查找对应的驱动,或者根据注册的驱动来查找相应的设备,因此每一条总线都必须实现此函数。 match 函数有两个参数: dev 和 drv,这两个参数分别为 device 和 device_driver 类型,也就是设备和驱动。platform 总线是 bus_type 的一个具体实例,定义在文件 drivers/base/platform.c, platform 总线定义如下:
struct bus_type platform_bus_type = {
	.name		= "platform",//设备名称
	.dev_groups	= platform_dev_groups,//设备属性、含获取sys文件名,该总线会放在/sys/bus下
	.match		= platform_match,//匹配设备和驱动,匹配成功就调用driver的.probe函数
	.uevent		= platform_uevent,//消息传递,比如热插拔操作
	.pm		= &platform_dev_pm_ops,
};
platform_bus_type 就是 platform 平台总线,其中 platform_match 就是匹配函数。我们来看一下驱动和设备是如何匹配的, platform_match 函数定义在文件 drivers/base/platform.c 中,函数内容如下所示:
static int platform_match(struct device *dev, struct device_driver *drv)
{
	struct platform_device *pdev = to_platform_device(dev);
	struct platform_driver *pdrv = to_platform_driver(drv);

	/* When driver_override is set, only bind to the matching driver */
	if (pdev->driver_override)
		return !strcmp(pdev->driver_override, drv->name);

	/* Attempt an OF style match first */
	//设备树匹配方式
	if (of_driver_match_device(dev, drv))
		return 1;

	/* Then try ACPI style match */
	//ACPI匹配方式
	if (acpi_driver_match_device(dev, drv))
		return 1;

	/* Then try to match against the id table */
	//id_table匹配方式
	if (pdrv->id_table)
		return platform_match_id(pdrv->id_table, pdev) != NULL;

	/* fall-back to driver name match */
	//name匹配方式
	return (strcmp(pdev->name, drv->name) == 0);
}
1.2 platform 驱动
platform_driver结构体表示平台驱动:
struct platform_driver {
	//当驱动和硬件信息匹配成功之后,就会调用probe函数,驱动所有的资源的注册和初始化全部放在probe函数中
	int (*probe)(struct platform_device *);
	//硬件信息被移除了,或者驱动被卸载了,全部要释放,释放资源的操作就放在该函数中
	int (*remove)(struct platform_device *);
	void (*shutdown)(struct platform_device *);
	int (*suspend)(struct platform_device *, pm_message_t state);
	int (*resume)(struct platform_device *);
	//内核维护的所有的驱动必须包含该成员,通常driver->name用于和设备进行匹配
	struct device_driver driver;
	//往往一个驱动可能能同时支持多个硬件,这些硬件的名字都放在该结构体数组中
	const struct platform_device_id *id_table;
	bool prevent_deferred_probe;
};
driver 成员,为 device_driver 结构体变量, Linux 内核里面大量使用到了面向对象的思维, device_driver 相当于基类,提供了最基础的驱动框架:
struct device_driver {
	const char		*name; //用于和硬件进行匹配。
	struct bus_type		*bus; //指向总线描述符的指针,总线连接所支持的设备。

	struct module		*owner;//设备驱动的owner,通常为THIS_MODULE
	const char		*mod_name;	/* used for built-in modules */
	// 通过sysfs操作设备驱动的bind/unbind,用来使能/关闭设备与驱动的自动匹配
	bool suppress_bind_attrs;	/* disables bind/unbind via sysfs */
	enum probe_type probe_type;

	const struct of_device_id	*of_match_table;//device_tree中使用,用于匹配设备。
	const struct acpi_device_id	*acpi_match_table;

	int (*probe) (struct device *dev);//当设备匹配/移除的时候,会调用设备驱动的probe/remove函数。
	int (*remove) (struct device *dev);
	void (*shutdown) (struct device *dev);//代表设备驱动在调用管理的时候的回调函数
	int (*suspend) (struct device *dev, pm_message_t state);
	int (*resume) (struct device *dev);
	const struct attribute_group **groups;

	const struct dev_pm_ops *pm;

	struct driver_private *p;
};
of_match_table 就是采用设备树的时候驱动使用的匹配表,同样是数组,每个匹配项都为 of_device_id 结构体类型,此结构体定义在文件 include/linux/mod_devicetable.h 中,内容如下:
/*
 * Struct used for matching a device
 */
struct of_device_id {
	char	name[32];
	char	type[32];
	char	compatible[128];
	const void *data;
};
compatible 非常重要,因为对于设备树而言,就是通过设备节点的 compatible 属性值和 of_match_table 中每个项目的 compatible 成员变量进行比较,如果有相等的就表示设备和此驱动匹配成功。
在编写 platform 驱动的时候,首先定义一个 platform_driver 结构体变量,然后实现结构体中的各个成员变量,重点是实现匹配方法以及 probe 函数。当驱动和设备匹配成功以后 probe函数就会执行,具体的驱动程序在 probe 函数里面编写,比如字符设备驱动等等。
1.3 platform设备
platform 驱动已经准备好了,我们还需要 platform 设备,否则的话单单一个驱动也做不了什么。 platform_device 这个结构体表示 platform 设备,这里我们要注意,如果内核支持设备树的话就不要再使用 platform_device 来描述设备了,因为改用设备树去描述了。当然了,你如果一定要用 platform_device 来描述设备信息的话也是可以的。 platform_device 结构体定义在文件include/linux/platform_device.h 中,结构体内容如下:
struct platform_device {
	const char	*name;//设备的名称
	int		id; //用于标识该设备的ID
	bool		id_auto;
	struct device	dev;//内核中维护的所有的设备必须包含该成员,
	u32		num_resources;//资源个数
	struct resource	*resource;//描述资源

	const struct platform_device_id	*id_entry;
	char *driver_override; /* Driver name to force a match */

	/* MFD cell pointer */
	struct mfd_cell *mfd_cell;

	/* arch specific additions */
	struct pdev_archdata	archdata;
};
resource 表示资源,也就是设备信息,比如外设寄存器等。 Linux 内核使用 resource结构体表示资源, resource 结构体内容如下:
struct resource {
	resource_size_t start;//表示资源的起始值,
	resource_size_t end;//表示资源的最后一个字节的地址, 如果是中断,end和satrt相同
	const char *name;// 可不写
	unsigned long flags;//资源的类型
	struct resource *parent, *sibling, *child;
};
start 和 end 分别表示资源的起始和终止信息,对于内存类的资源,就表示内存起始和终止地址, name 表示资源名字, flags 表示资源类型,可选的资源类型都定义在了文件include/linux/ioport.h 里面,如下所示:
/*
 * IO resources have these defined flags.
 */
#define IORESOURCE_BITS		0x000000ff	/* Bus-specific bits */

#define IORESOURCE_TYPE_BITS	0x00001f00	/* Resource type */
#define IORESOURCE_IO		0x00000100	/* PCI/ISA I/O ports */
#define IORESOURCE_MEM		0x00000200
#define IORESOURCE_REG		0x00000300	/* Register offsets */
#define IORESOURCE_IRQ		0x00000400
#define IORESOURCE_DMA		0x00000800
#define IORESOURCE_BUS		0x00001000
在以前不支持设备树的Linux版本中,用户需要编写platform_device变量来描述设备信息,然后使用 platform_device_register 函数将设备信息注册到 Linux 内核中,此函数原型如下所示:
int platform_device_register(struct platform_device *pdev)
{
	device_initialize(&pdev->dev);
	arch_setup_pdev_archdata(pdev);
	return platform_device_add(pdev);
}
int platform_device_add(struct platform_device *pdev)
{
	int i, ret;

	if (!pdev)
		return -EINVAL;

	if (!pdev->dev.parent)
		pdev->dev.parent = &platform_bus;;//父设备设置为platform_bus

	pdev->dev.bus = &platform_bus_type;//设置挂在platform总线上

	switch (pdev->id) {
	default:
		dev_set_name(&pdev->dev, "%s.%d", pdev->name,  pdev->id);
		break;
	case PLATFORM_DEVID_NONE:
		dev_set_name(&pdev->dev, "%s", pdev->name);
		break;
	case PLATFORM_DEVID_AUTO:
		/*
		 * Automatically allocated device ID. We mark it as such so
		 * that we remember it must be freed, and we append a suffix
		 * to avoid namespace collision with explicit IDs.
		 */
		ret = ida_simple_get(&platform_devid_ida, 0, 0, GFP_KERNEL);
		if (ret < 0)
			goto err_out;
		pdev->id = ret;
		pdev->id_auto = true;
		dev_set_name(&pdev->dev, "%s.%d.auto", pdev->name, pdev->id);
		break;
	}

	for (i = 0; i < pdev->num_resources; i++) {
		struct resource *p, *r = &pdev->resource[i];

		if (r->name == NULL)
			r->name = dev_name(&pdev->dev);

		p = r->parent;
		if (!p) {
			if (resource_type(r) == IORESOURCE_MEM)
				p = &iomem_resource;
			else if (resource_type(r) == IORESOURCE_IO)
				p = &ioport_resource;
		}

		if (p && insert_resource(p, r)) {
			dev_err(&pdev->dev, "failed to claim resource %d\n", i);
			ret = -EBUSY;
			goto failed;
		}
	}

	pr_debug("Registering platform device '%s'. Parent at %s\n",
		 dev_name(&pdev->dev), dev_name(pdev->dev.parent));

	ret = device_add(&pdev->dev); //向内核中sys/device中注册一个设备
	if (ret == 0)
		return ret;

 failed:
	if (pdev->id_auto) {
		ida_simple_remove(&platform_devid_ida, pdev->id);
		pdev->id = PLATFORM_DEVID_AUTO;
	}

	while (--i >= 0) {
		struct resource *r = &pdev->resource[i];
		if (r->parent)
			release_resource(r);
	}

 err_out:
	return ret;
}
2.platform平台总线初始化
初始化过程:
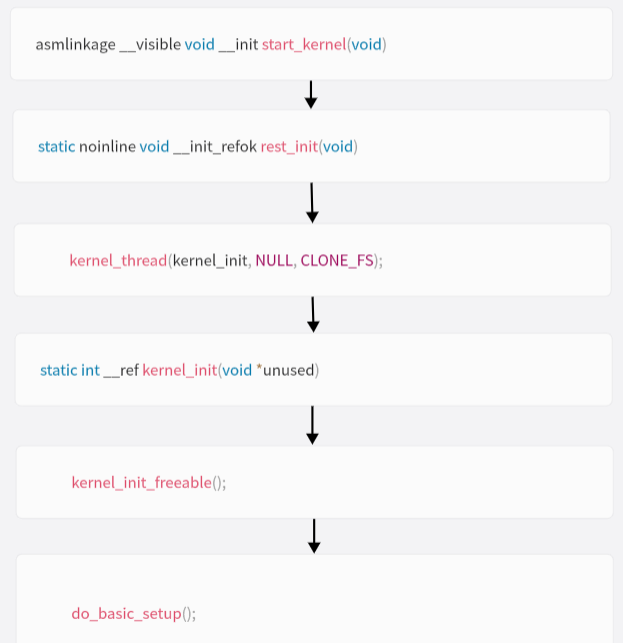
在do_basic_setup中会通过driver_init调用platform_bus_init()函数初始化platform总线:
void __init driver_init(void)
{
	/* These are the core pieces */
	devtmpfs_init();
	devices_init();
	buses_init();
	classes_init();
	firmware_init();
	hypervisor_init();

	/* These are also core pieces, but must come after the
	 * core core pieces.
	 */
	platform_bus_init();
	cpu_dev_init();
	memory_dev_init();
	container_dev_init();
	of_core_init();
}
struct device platform_bus = {
	.init_name	= "platform",
};
struct bus_type platform_bus_type = {
	.name		= "platform",//设备名称
	.dev_groups	= platform_dev_groups,//设备属性、含获取sys文件名,该总线会放在/sys/bus下
	.match		= platform_match,//匹配设备和驱动,匹配成功就调用driver的.probe函数
	.uevent		= platform_uevent,//消息传递,比如热插拔操作
	.pm		= &platform_dev_pm_ops,
};
int __init platform_bus_init(void)
{
	int error;

	early_platform_cleanup();

	error = device_register(&platform_bus);
	if (error)
		return error;
	error =  bus_register(&platform_bus_type);
	if (error)
		device_unregister(&platform_bus);
	of_platform_register_reconfig_notifier();
	return error;
}
int device_register(struct device *dev)
{
	        device_initialize(dev);
	        return device_add(dev);
}
void device_initialize(struct device *dev)
{
	//所有的dev都有公共的device_set,在系统初始化的时候动态分配
	dev->kobj.kset = devices_kset;
	kobject_init(&dev->kobj, &device_ktype); //初始化kobject
	INIT_LIST_HEAD(&dev->dma_pools);//初始化链表
	mutex_init(&dev->mutex); //初始化锁
	lockdep_set_novalidate_class(&dev->mutex);
	spin_lock_init(&dev->devres_lock);
	INIT_LIST_HEAD(&dev->devres_head); //将此dev加入链表中
	device_pm_init(dev); //电源管理的初始化
	set_dev_node(dev, -1);
#ifdef CONFIG_GENERIC_MSI_IRQ
	INIT_LIST_HEAD(&dev->msi_list);
#endif
}
通过函数device_add()把已经初始化完成的设备添加到相对应的总线下:
int device_add(struct device *dev)
{
	struct device *parent = NULL;
	struct kobject *kobj;
	struct class_interface *class_intf;
	int error = -EINVAL;

	dev = get_device(dev); //增加设备的引用计数dev->kobj->kref
	if (!dev)
		goto done;

	if (!dev->p) {
		//私有数据没有的话,申请并初始化:是连接bus,parent,对应驱动等重要连接点
		error = device_private_init(dev);
		if (error)
			goto done;
	}

	/*
	 * for statically allocated devices, which should all be converted
	 * some day, we need to initialize the name. We prevent reading back
	 * the name, and force the use of dev_name()
	 */
	if (dev->init_name) {
		//用dev的init_name初始化dev->kobject->name,实际是目录名
		dev_set_name(dev, "%s", dev->init_name);
		dev->init_name = NULL;
	}

	/* subsystems can specify simple device enumeration */
	//dev的init_name不存在且dev->kobject->name也不存在,则用bus的dev_name和dev_id来设置目录名
	if (!dev_name(dev) && dev->bus && dev->bus->dev_name)
		dev_set_name(dev, "%s%u", dev->bus->dev_name, dev->id);

	if (!dev_name(dev)) { //如果上面几个步骤都还没找到可设的目录名,则失败返回,设备必须要放在某个目录下
		error = -EINVAL;
		goto name_error;
	}

	pr_debug("device: '%s': %s\n", dev_name(dev), __func__);

	parent = get_device(dev->parent); //父节点引用计数加1
	kobj = get_device_parent(dev, parent); //拿到父节点
	//拿到父节点赋值给本dev->kobj.parent,确定设备父子关系,也确定了sysfs中的目录关系
	if (kobj)
		dev->kobj.parent = kobj;

	/* use parent numa_node */
	//设置该设备节点为-1
	if (parent)
		set_dev_node(dev, dev_to_node(parent));

	/* first, register with generic layer. */
	/* we require the name to be set before, and pass NULL */
	//把内嵌的kobject注册到设备模型中,将设备加入到kobject模型中,创建sys项目目录,目录名字为kobj->name
	error = kobject_add(&dev->kobj, dev->kobj.parent, NULL);
	if (error)
		goto Error;

	/* notify platform of device entry */
	if (platform_notify)
		platform_notify(dev);
	/*创建sys目录下设备的uevent属性文件,通过它可以查看设备的uevent事件,主要是在/sys/devices/.../中添加dev的uevent属性文件*/
	error = device_create_file(dev, &dev_attr_uevent);
	if (error)
		goto attrError;
	/*实际创建的kobject都是在device下面,其他class,bus之类的里面的具体设备都是device目录下设备的符号链接,这里是在class下创建符号链接 */
	error = device_add_class_symlinks(dev);
	if (error)
		goto SymlinkError;
	error = device_add_attrs(dev);//创建sys目录下设备其他属性文件(添加设备属性文件)
	if (error)
		goto AttrsError;
	error = bus_add_device(dev);//添加设备的总线属性,将设备加入到管理它的bus总线的设备连表上,创建subsystem链接文件,链接class下的具体的子系统文件夹 将设备添加到其总线的设备列表中。
	if (error)
		goto BusError;
	error = dpm_sysfs_add(dev);//把设备增加到sysfs电源管理power目录(组)下,如果该设备设置电源管理相关的内容
	if (error)
		goto DPMError;
	device_pm_add(dev);//设备添加到电源管理相关的设备列表中

	//主设备号存在,则产生dev属性,在/dev目录下产生设备节点文件
	if (MAJOR(dev->devt)) {
		/*创建sys目录下设备的设备号属性,即major和minor /主要是在sys/devices/...中添加dev属性文件*/
		error = device_create_file(dev, &dev_attr_dev);
		if (error)
			goto DevAttrError;
		/*在/sys/dev/char/或者/sys/dev/block/创建devt的属性的连接文件,形如10:45,由主设备号和次设备号构成,指向/sys/devices/.../的具体设备目录*/
		error = device_create_sys_dev_entry(dev);//该链接文件只具备读属性,显示主设备号:次设备号,如10:45,用户空间udev响应uevent事件时,将根据设备号在/dev下创建节点文件
		if (error)
			goto SysEntryError;

		devtmpfs_create_node(dev);
	}

	/* Notify clients of device addition.  This call must come
	 * after dpm_sysfs_add() and before kobject_uevent().
	 */
	if (dev->bus)//通知客户端,有新设备加入
		blocking_notifier_call_chain(&dev->bus->p->bus_notifier,
					     BUS_NOTIFY_ADD_DEVICE, dev);
	/*产生一个内核uevent事件(这里是有设备加入),可以是helper,也可是通过netlink机制和用户空间通信该事件可以被内核以及应用层捕获,属于linux设备模型中热插拔机制*/
	kobject_uevent(&dev->kobj, KOBJ_ADD);
	//给设备探测寻找相对应的驱动,在bus上找dev对应的drv,主要执行__device_attach,主要进行match,sys_add,执行probe函数和绑定等操作
	bus_probe_device(dev);
	if (parent)
		klist_add_tail(&dev->p->knode_parent,//添加新设备到父设备的子列表中
			       &parent->p->klist_children);

	if (dev->class) {//如果改dev有所属类,则将dev的添加到类的设备列表里面
		mutex_lock(&dev->class->p->mutex);//要使用class的互斥锁
		/* tie the class to the device */
		klist_add_tail(&dev->knode_class,//dev添加到class的klist_device链表(对driver也有klist_driver链表)
			       &dev->class->p->klist_devices);

		/* notify any interfaces that the device is here */
		/*通知有新设备加入,执行该dev的class_intf->add_dev(),好处是只有设备匹配注册成功了,才进行其它的注册工作(如字符设备的注册,生成/dev/***节点文件)以及部分初始化工作。*/
		list_for_each_entry(class_intf,
				    &dev->class->p->interfaces, node)
			if (class_intf->add_dev)
				class_intf->add_dev(dev, class_intf);
		mutex_unlock(&dev->class->p->mutex);
	}
done:
	put_device(dev);
	return error;
 SysEntryError:
	if (MAJOR(dev->devt))
		device_remove_file(dev, &dev_attr_dev);
 DevAttrError:
	device_pm_remove(dev);
	dpm_sysfs_remove(dev);
 DPMError:
	bus_remove_device(dev);
 BusError:
	device_remove_attrs(dev);
 AttrsError:
	device_remove_class_symlinks(dev);
 SymlinkError:
	device_remove_file(dev, &dev_attr_uevent);
 attrError:
	kobject_uevent(&dev->kobj, KOBJ_REMOVE);
	kobject_del(&dev->kobj);
 Error:
	cleanup_device_parent(dev);
	put_device(parent);
name_error:
	kfree(dev->p);
	dev->p = NULL;
	goto done;
}
会通过bus_probe_device函数为设备探测驱动:
void bus_probe_device(struct device *dev)
{
	struct bus_type *bus = dev->bus;
	struct subsys_interface *sif;

	if (!bus) //确定总线存在
		return;
	/*drivers_autoprobe是一个bit变量,为l则允许本条总线上的device注册时自动匹配driver,drivers_autoprobe默认总是为1,除非用户空间修改*/
	if (bus->p->drivers_autoprobe)
		device_initial_probe(dev);//匹配设备和驱动

	mutex_lock(&bus->p->mutex);
	list_for_each_entry(sif, &bus->p->interfaces, node)
		if (sif->add_dev)
			sif->add_dev(dev, sif);
	mutex_unlock(&bus->p->mutex);
}
void device_initial_probe(struct device *dev)
{
	__device_attach(dev, true);
}
static int __device_attach(struct device *dev, bool allow_async)
{
	int ret = 0;

	device_lock(dev);
	if (dev->driver) {//driver已经放在device了(初始化device,时,手动添加的driver)
		if (klist_node_attached(&dev->p->knode_driver)) {
			ret = 1;
			goto out_unlock;
		}
		ret = device_bind_driver(dev);//driver放在device里了,但还没真正的绑定 ,则执行这个函数绑定
		if (ret == 0)
			ret = 1;
		else {
			dev->driver = NULL;
			ret = 0;
		}
	} else {//刚注册的device,没有添加对应的driver,需要查找匹配对应的驱动
		struct device_attach_data data = {
			.dev = dev,
			.check_async = allow_async,
			.want_async = false,
		};

		if (dev->parent)
			pm_runtime_get_sync(dev->parent);
		//遍历总线上的driver链表,一个一个进行匹配
		ret = bus_for_each_drv(dev->bus, NULL, &data,
					__device_attach_driver);
		if (!ret && allow_async && data.have_async) {
			/*
			 * If we could not find appropriate driver
			 * synchronously and we are allowed to do
			 * async probes and there are drivers that
			 * want to probe asynchronously, we'll
			 * try them.
			 */
			dev_dbg(dev, "scheduling asynchronous probe\n");
			get_device(dev);
			async_schedule(__device_attach_async_helper, dev);
		} else {
			pm_request_idle(dev);
		}

		if (dev->parent)
			pm_runtime_put(dev->parent);
	}
out_unlock:
	device_unlock(dev);
	return ret;
}
如果设备是第一次添加进来的话,会通过bus_for_each_drv函数来调用__device_attach_driver函数进行驱动的探测:
static int __device_attach_driver(struct device_driver *drv, void *_data)
{
	struct device_attach_data *data = _data;
	struct device *dev = data->dev;
	bool async_allowed;

	/*
	 * Check if device has already been claimed. This may
	 * happen with driver loading, device discovery/registration,
	 * and deferred probe processing happens all at once with
	 * multiple threads.
	 */
	if (dev->driver)
		return -EBUSY;

	if (!driver_match_device(drv, dev))
		return 0;

	async_allowed = driver_allows_async_probing(drv);

	if (async_allowed)
		data->have_async = true;

	if (data->check_async && async_allowed != data->want_async)
		return 0;

	return driver_probe_device(drv, dev);
}
static inline int driver_match_device(struct device_driver *drv,
				      struct device *dev)
{
	//调用总线下的match函数
	return drv->bus->match ? drv->bus->match(dev, drv) : 1;
}
然后通过调用bus总线下的match函数进行设备与驱动的匹配。
int driver_probe_device(struct device_driver *drv, struct device *dev)
{
	int ret = 0;

	if (!device_is_registered(dev))
		return -ENODEV;

	pr_debug("bus: '%s': %s: matched device %s with driver %s\n",
		 drv->bus->name, __func__, dev_name(dev), drv->name);

	if (dev->parent)
		pm_runtime_get_sync(dev->parent);

	pm_runtime_barrier(dev);
	ret = really_probe(dev, drv);//真正的probe函数
	pm_request_idle(dev);

	if (dev->parent)
		pm_runtime_put(dev->parent);

	return ret;
}
当设备与驱动匹配完成后,在really_probe函数中执行我们在驱动中定义的probe函数:
static int really_probe(struct device *dev, struct device_driver *drv)
{
	int ret = 0;
	int local_trigger_count = atomic_read(&deferred_trigger_count);

	atomic_inc(&probe_count);
	pr_debug("bus: '%s': %s: probing driver %s with device %s\n",
		 drv->bus->name, __func__, drv->name, dev_name(dev));
	WARN_ON(!list_empty(&dev->devres_head));

	dev->driver = drv;//匹配好后的驱动信息记录到设备内部

	/* If using pinctrl, bind pins now before probing */
	ret = pinctrl_bind_pins(dev);
	if (ret)
		goto probe_failed;

	if (driver_sysfs_add(dev)) {//driver加入sysfs(其实就是创建各种符号链接,前面device默认绑定有driver那里已经分析过了)
		printk(KERN_ERR "%s: driver_sysfs_add(%s) failed\n",
			__func__, dev_name(dev));
		goto probe_failed;
	}

	if (dev->pm_domain && dev->pm_domain->activate) {
		ret = dev->pm_domain->activate(dev);
		if (ret)
			goto probe_failed;
	}

	/*
	 * Ensure devices are listed in devices_kset in correct order
	 * It's important to move Dev to the end of devices_kset before
	 * calling .probe, because it could be recursive and parent Dev
	 * should always go first
	 */
	devices_kset_move_last(dev);

	if (dev->bus->probe) {//如果设备上定义probe函数则调用
		ret = dev->bus->probe(dev);
		if (ret)
			goto probe_failed;
	} else if (drv->probe) {//否则调用驱动上的probe函数
		ret = drv->probe(dev);
		if (ret)
			goto probe_failed;
	}

	if (dev->pm_domain && dev->pm_domain->sync)
		dev->pm_domain->sync(dev);

	driver_bound(dev);//将设备加入到驱动支持的设备链表中,一个设备需要一个驱动,一个驱动支持多个设备,前面device默认绑定driver那里已经分析过了
	ret = 1;
	pr_debug("bus: '%s': %s: bound device %s to driver %s\n",
		 drv->bus->name, __func__, dev_name(dev), drv->name);
	goto done;

probe_failed:
	devres_release_all(dev);
	driver_sysfs_remove(dev);
	dev->driver = NULL;
	dev_set_drvdata(dev, NULL);
	if (dev->pm_domain && dev->pm_domain->dismiss)
		dev->pm_domain->dismiss(dev);

	switch (ret) {
	case -EPROBE_DEFER:
		/* Driver requested deferred probing */
		dev_dbg(dev, "Driver %s requests probe deferral\n", drv->name);
		driver_deferred_probe_add(dev);
		/* Did a trigger occur while probing? Need to re-trigger if yes */
		if (local_trigger_count != atomic_read(&deferred_trigger_count))
			driver_deferred_probe_trigger();
		break;
	case -ENODEV:
	case -ENXIO:
		pr_debug("%s: probe of %s rejects match %d\n",
			 drv->name, dev_name(dev), ret);
		break;
	default:
		/* driver matched but the probe failed */
		printk(KERN_WARNING
		       "%s: probe of %s failed with error %d\n",
		       drv->name, dev_name(dev), ret);
	}
	/*
	 * Ignore errors returned by ->probe so that the next driver can try
	 * its luck.
	 */
	ret = 0;
done:
	atomic_dec(&probe_count);
	wake_up(&probe_waitqueue);
	return ret;
}
以上是设备与驱动匹配的相关流程。
当完成了platform_bus设备的注册后,platform_bus_init()函数会执行bus_register()函数将platform总线注册到系统中:
 /*bus_register:工作就是完成bus_type_private的初始化.创建 注册的这条总线需要的目录文件.
             在这条总线目录下创建/device  /driver 目录
             初始化这条总线上的设备链表:struct klist klist_devices;
             初始化这条总线上的驱动链表:struct klist klist_drivers;*/
int bus_register(struct bus_type *bus)
{
	int retval;
	struct subsys_private *priv;
	struct lock_class_key *key = &bus->lock_key;

	priv = kzalloc(sizeof(struct subsys_private), GFP_KERNEL);
	if (!priv)
		return -ENOMEM;

	priv->bus = bus;//struct bus_type_private *p;所指向的内容动态分配.
	bus->p = priv;//subsys_private

	BLOCKING_INIT_NOTIFIER_HEAD(&priv->bus_notifier);

	//kobject对应一个目录,这个目录就是我们看到的总线名字/bus/platform
	retval = kobject_set_name(&priv->subsys.kobj, "%s", bus->name);
	if (retval)
		goto out;
	//bus_kset = kset_create_and_add("bus", &bus_uevent_ops, NULL);
	priv->subsys.kobj.kset = bus_kset;//platform目录在bus下,即/bus/platform:初始化kset的成员kobject,为kset_register()做准备.
	priv->subsys.kobj.ktype = &bus_ktype;//static struct kobj_type bus_ktype = {    .sysfs_ops = &bus_sysfs_ops, };
	priv->drivers_autoprobe = 1;//设置该标志,	当有driver注册时,会自动匹配devices上的设备并用probe初始化,
	//当有device注册时,也同样找到driver并会初始化
	//int bus_add_driver(struct device_driver *drv)
	//if (drv->bus->p->drivers_autoprobe) { error = driver_attach(drv); }
	retval = kset_register(&priv->subsys);//注册kset,创建目录结构,以及层次关系  生成/bus/platform
	if (retval)
		goto out;

	retval = bus_create_file(bus, &bus_attr_uevent);//platform目录下生成bus_attr_uevent属性文件
	if (retval)
		goto bus_uevent_fail;

	priv->devices_kset = kset_create_and_add("devices", NULL,
						 &priv->subsys.kobj); //在platform下面创建一个platform/device,是platform这条总线的device的根目录.
	if (!priv->devices_kset) {
		retval = -ENOMEM;
		goto bus_devices_fail;
	}

	priv->drivers_kset = kset_create_and_add("drivers", NULL,//在platform下面创建一个platform/driver,是platform这条总线的driver的根目录.
						 &priv->subsys.kobj);
	if (!priv->drivers_kset) {
		retval = -ENOMEM;
		goto bus_drivers_fail;
	}

	INIT_LIST_HEAD(&priv->interfaces);
	__mutex_init(&priv->mutex, "subsys mutex", key);
	//初始化 platform_bus_type->p->klist_devices  就是初始化device的list_head
	klist_init(&priv->klist_devices, klist_devices_get, klist_devices_put);
	klist_init(&priv->klist_drivers, NULL, NULL);//device,driver注册都挂在对应的链表上.

	retval = add_probe_files(bus);//创建文件
	if (retval)
		goto bus_probe_files_fail;

	retval = bus_add_groups(bus, bus->bus_groups);
	if (retval)
		goto bus_groups_fail;

	pr_debug("bus: '%s': registered\n", bus->name);
	return 0;

bus_groups_fail:
	remove_probe_files(bus);
bus_probe_files_fail:
	kset_unregister(bus->p->drivers_kset);
bus_drivers_fail:
	kset_unregister(bus->p->devices_kset);
bus_devices_fail:
	bus_remove_file(bus, &bus_attr_uevent);
bus_uevent_fail:
	kset_unregister(&bus->p->subsys);
out:
	kfree(bus->p);
	bus->p = NULL;
	return retval;
}
其实就是创建platform目录下的一些目录和属性文件信息。
3. platform驱动框架
当我们定义并初始化好 platform_driver 结构体变量以后,需要在驱动入口函数里面调用platform_driver_register 函数向 Linux 内核注册一个 platform 驱动, platform_driver_register 函数
原型如下所示:
#define platform_driver_register(drv) \
	__platform_driver_register(drv, THIS_MODULE)
extern int __platform_driver_register(struct platform_driver *,
					struct module *);

int __platform_driver_register(struct platform_driver *drv,
				struct module *owner)
{
	drv->driver.owner = owner;
	drv->driver.bus = &platform_bus_type;
	if (drv->probe)
		drv->driver.probe = platform_drv_probe;
	if (drv->remove)
		drv->driver.remove = platform_drv_remove;
	if (drv->shutdown)
		drv->driver.shutdown = platform_drv_shutdown;

	return driver_register(&drv->driver);
}

int driver_register(struct device_driver *drv)
{
	int ret;
	struct device_driver *other;

	BUG_ON(!drv->bus->p);//driver的总线必须要有自己的subsys,因为这个才是整个bus连接device和driver的核心
	/* driver和bus两种都实现了下面函数,而实际最只能执行一个,所以告警说重复 */
	if ((drv->bus->probe && drv->probe) ||
	    (drv->bus->remove && drv->remove) ||
	    (drv->bus->shutdown && drv->shutdown))
		printk(KERN_WARNING "Driver '%s' needs updating - please use "
			"bus_type methods\n", drv->name);
	/* 查找驱动是否已经装载注册,已经装载的则直接返回 */
	other = driver_find(drv->name, drv->bus);
	if (other) {
		printk(KERN_ERR "Error: Driver '%s' is already registered, "
			"aborting...\n", drv->name);
		return -EBUSY;
	}
	/* 把驱动加入总线的驱动链表 */
	ret = bus_add_driver(drv);
	if (ret)
		return ret;
	ret = driver_add_groups(drv, drv->groups);//把驱动加入驱动的group中
	if (ret) {
		bus_remove_driver(drv);
		return ret;
	}
	//将事件发送到用户空间
	kobject_uevent(&drv->p->kobj, KOBJ_ADD);

	return ret;
}

int bus_add_driver(struct device_driver *drv)
{
	struct bus_type *bus;
	struct driver_private *priv;
	int error = 0;

	bus = bus_get(drv->bus);//拿到driver所属的总线
	if (!bus)
		return -EINVAL;

	pr_debug("bus: '%s': add driver %s\n", bus->name, drv->name);
	 /* bus有自己的private,device有自己的private,driver也有,功能就是负责连接对方 */
	priv = kzalloc(sizeof(*priv), GFP_KERNEL);
	if (!priv) {
		error = -ENOMEM;
		goto out_put_bus;
	}
	//初始化klist,以及填充driver的private里面的内容
	klist_init(&priv->klist_devices, NULL, NULL);
	priv->driver = drv;
	drv->p = priv;
	priv->kobj.kset = bus->p->drivers_kset;//driver绑定bus(通过各自里面的privte)
	error = kobject_init_and_add(&priv->kobj, &driver_ktype, NULL,
				     "%s", drv->name);
	if (error)
		goto out_unregister;
	 /*把driver在bus的节点,加入到bus的driver链表的最后一个*/
	klist_add_tail(&priv->knode_bus, &bus->p->klist_drivers);
	if (drv->bus->p->drivers_autoprobe) {
		if (driver_allows_async_probing(drv)) {
			pr_debug("bus: '%s': probing driver %s asynchronously\n",
				drv->bus->name, drv->name);
			async_schedule(driver_attach_async, drv);
		} else {
			error = driver_attach(drv);//driver匹配device
			if (error)
				goto out_unregister;
		}
	}
	module_add_driver(drv->owner, drv);
	//添加driver的属性
	error = driver_create_file(drv, &driver_attr_uevent);
	if (error) {
		printk(KERN_ERR "%s: uevent attr (%s) failed\n",
			__func__, drv->name);
	}
	error = driver_add_groups(drv, bus->drv_groups);
	if (error) {
		/* How the hell do we get out of this pickle? Give up */
		printk(KERN_ERR "%s: driver_create_groups(%s) failed\n",
			__func__, drv->name);
	}

	if (!drv->suppress_bind_attrs) {
		error = add_bind_files(drv);
		if (error) {
			/* Ditto */
			printk(KERN_ERR "%s: add_bind_files(%s) failed\n",
				__func__, drv->name);
		}
	}

	return 0;

out_unregister:
	kobject_put(&priv->kobj);
	kfree(drv->p);
	drv->p = NULL;
out_put_bus:
	bus_put(bus);
	return error;
}
int driver_attach(struct device_driver *drv)
{
	return bus_for_each_dev(drv->bus, NULL, drv, __driver_attach);
}
可以看到当向系统中注册一个platform驱动时,同样会调用__driver_attach函数进行设备的匹配,匹配完成后会执行probe函数。
还需要在驱动卸载函数中通过 platform_driver_unregister 函数卸载 platform 驱动,platform_driver_unregister 函数原型如下:
void platform_driver_unregister(struct platform_driver *drv)
{
	driver_unregister(&drv->driver);
}
4.实验
4.1 无设备树的platform设备注册
#include <linux/types.h>
#include <linux/kernel.h>
#include <linux/delay.h>
#include <linux/ide.h>
#include <linux/init.h>
#include <linux/module.h>
#include <linux/errno.h>
#include <linux/gpio.h>
#include <linux/cdev.h>
#include <linux/device.h>
#include <linux/of_gpio.h>
#include <linux/semaphore.h>
#include <linux/timer.h>
#include <linux/irq.h>
#include <linux/wait.h>
#include <linux/poll.h>
#include <linux/fs.h>
#include <linux/fcntl.h>
#include <linux/platform_device.h>
#include <asm/mach/map.h>
#include <asm/uaccess.h>
#include <asm/io.h>


/*
 * 寄存器地址定义
 */
#define CCM_CCGR1_BASE				(0X020C406C)
#define SW_MUX_GPIO1_IO03_BASE		(0X020E0068)
#define SW_PAD_GPIO1_IO03_BASE		(0X020E02F4)
#define GPIO1_DR_BASE				(0X0209C000)
#define GPIO1_GDIR_BASE				(0X0209C004)
#define REGISTER_LENGTH				4

/* @description		: 释放flatform设备模块的时候此函数会执行
 * @param - dev 	: 要释放的设备
 * @return 			: 无
 */
static void	led_release(struct device *dev)
{
	printk("led device released!\r\n");
}

/*
 * 设备资源信息,也就是LED0所使用的所有寄存器
 */
static struct resource led_resources[] = {
	[0] = {
		.start 	= CCM_CCGR1_BASE,
		.end 	= (CCM_CCGR1_BASE + REGISTER_LENGTH - 1),
		.flags 	= IORESOURCE_MEM,
	},
	[1] = {
		.start	= SW_MUX_GPIO1_IO03_BASE,
		.end	= (SW_MUX_GPIO1_IO03_BASE + REGISTER_LENGTH - 1),
		.flags	= IORESOURCE_MEM,
	},
	[2] = {
		.start	= SW_PAD_GPIO1_IO03_BASE,
		.end	= (SW_PAD_GPIO1_IO03_BASE + REGISTER_LENGTH - 1),
		.flags	= IORESOURCE_MEM,
	},
	[3] = {
		.start	= GPIO1_DR_BASE,
		.end	= (GPIO1_DR_BASE + REGISTER_LENGTH - 1),
		.flags	= IORESOURCE_MEM,
	},
	[4] = {
		.start	= GPIO1_GDIR_BASE,
		.end	= (GPIO1_GDIR_BASE + REGISTER_LENGTH - 1),
		.flags	= IORESOURCE_MEM,
	},
};


/*
 * platform设备结构体
 */
static struct platform_device leddevice = {
	.name = "imx6ul-led",
	.id = -1,
	.dev = {
		.release = &led_release,
	},
	.num_resources = ARRAY_SIZE(led_resources),
	.resource = led_resources,
};

/*
 * @description	: 设备模块加载
 * @param 		: 无
 * @return 		: 无
 */
static int __init leddevice_init(void)
{
	return platform_device_register(&leddevice);
}

/*
 * @description	: 设备模块注销
 * @param 		: 无
 * @return 		: 无
 */
static void __exit leddevice_exit(void)
{
	platform_device_unregister(&leddevice);
}

module_init(leddevice_init);
module_exit(leddevice_exit);
MODULE_LICENSE("GPL");
4.2 无设备树的platform驱动
#include <linux/types.h>
#include <linux/kernel.h>
#include <linux/delay.h>
#include <linux/ide.h>
#include <linux/init.h>
#include <linux/module.h>
#include <linux/errno.h>
#include <linux/gpio.h>
#include <linux/cdev.h>
#include <linux/device.h>
#include <linux/of_gpio.h>
#include <linux/semaphore.h>
#include <linux/timer.h>
#include <linux/irq.h>
#include <linux/wait.h>
#include <linux/poll.h>
#include <linux/fs.h>
#include <linux/fcntl.h>
#include <linux/platform_device.h>
#include <asm/mach/map.h>
#include <asm/uaccess.h>
#include <asm/io.h>


#define LEDDEV_CNT		1			/* 设备号长度 	*/
#define LEDDEV_NAME		"platled"	/* 设备名字 	*/
#define LEDOFF 			0
#define LEDON 			1

/* 寄存器名 */
static void __iomem *IMX6U_CCM_CCGR1;
static void __iomem *SW_MUX_GPIO1_IO03;
static void __iomem *SW_PAD_GPIO1_IO03;
static void __iomem *GPIO1_DR;
static void __iomem *GPIO1_GDIR;

/* leddev设备结构体 */
struct leddev_dev{
	dev_t devid;			/* 设备号	*/
	struct cdev cdev;		/* cdev		*/
	struct class *class;	/* 类 		*/
	struct device *device;	/* 设备		*/
	int major;				/* 主设备号	*/
};

struct leddev_dev leddev; 	/* led设备 */

/*
 * @description		: LED打开/关闭
 * @param - sta 	: LEDON(0) 打开LED,LEDOFF(1) 关闭LED
 * @return 			: 无
 */
void led0_switch(u8 sta)
{
	u32 val = 0;
	if(sta == LEDON){
		val = readl(GPIO1_DR);
		val &= ~(1 << 3);
		writel(val, GPIO1_DR);
	}else if(sta == LEDOFF){
		val = readl(GPIO1_DR);
		val|= (1 << 3);
		writel(val, GPIO1_DR);
	}
}

/*
 * @description		: 打开设备
 * @param - inode 	: 传递给驱动的inode
 * @param - filp 	: 设备文件,file结构体有个叫做private_data的成员变量
 * 					  一般在open的时候将private_data指向设备结构体。
 * @return 			: 0 成功;其他 失败
 */
static int led_open(struct inode *inode, struct file *filp)
{
	filp->private_data = &leddev; /* 设置私有数据  */
	return 0;
}

/*
 * @description		: 向设备写数据
 * @param - filp 	: 设备文件,表示打开的文件描述符
 * @param - buf 	: 要写给设备写入的数据
 * @param - cnt 	: 要写入的数据长度
 * @param - offt 	: 相对于文件首地址的偏移
 * @return 			: 写入的字节数,如果为负值,表示写入失败
 */
static ssize_t led_write(struct file *filp, const char __user *buf, size_t cnt, loff_t *offt)
{
	int retvalue;
	unsigned char databuf[1];
	unsigned char ledstat;

	retvalue = copy_from_user(databuf, buf, cnt);
	if(retvalue < 0) {
		return -EFAULT;
	}

	ledstat = databuf[0];		/* 获取状态值 */
	if(ledstat == LEDON) {
		led0_switch(LEDON);		/* 打开LED灯 */
	}else if(ledstat == LEDOFF) {
		led0_switch(LEDOFF);	/* 关闭LED灯 */
	}
	return 0;
}

/* 设备操作函数 */
static struct file_operations led_fops = {
	.owner = THIS_MODULE,
	.open = led_open,
	.write = led_write,
};

/*
 * @description		: flatform驱动的probe函数,当驱动与
 * 					  设备匹配以后此函数就会执行
 * @param - dev 	: platform设备
 * @return 			: 0,成功;其他负值,失败
 */
static int led_probe(struct platform_device *dev)
{
	int i = 0;
	int ressize[5];
	u32 val = 0;
	struct resource *ledsource[5];

	printk("led driver and device has matched!\r\n");
	/* 1、获取资源 */
	for (i = 0; i < 5; i++) {
		ledsource[i] = platform_get_resource(dev, IORESOURCE_MEM, i); /* 依次MEM类型资源 */
		if (!ledsource[i]) {
			dev_err(&dev->dev, "No MEM resource for always on\n");
			return -ENXIO;
		}
		ressize[i] = resource_size(ledsource[i]);
	}

	/* 2、初始化LED */
	/* 寄存器地址映射 */
 	IMX6U_CCM_CCGR1 = ioremap(ledsource[0]->start, ressize[0]);
	SW_MUX_GPIO1_IO03 = ioremap(ledsource[1]->start, ressize[1]);
  	SW_PAD_GPIO1_IO03 = ioremap(ledsource[2]->start, ressize[2]);
	GPIO1_DR = ioremap(ledsource[3]->start, ressize[3]);
	GPIO1_GDIR = ioremap(ledsource[4]->start, ressize[4]);

	val = readl(IMX6U_CCM_CCGR1);
	val &= ~(3 << 26);				/* 清除以前的设置 */
	val |= (3 << 26);				/* 设置新值 */
	writel(val, IMX6U_CCM_CCGR1);

	/* 设置GPIO1_IO03复用功能,将其复用为GPIO1_IO03 */
	writel(5, SW_MUX_GPIO1_IO03);
	writel(0x10B0, SW_PAD_GPIO1_IO03);

	/* 设置GPIO1_IO03为输出功能 */
	val = readl(GPIO1_GDIR);
	val &= ~(1 << 3);			/* 清除以前的设置 */
	val |= (1 << 3);			/* 设置为输出 */
	writel(val, GPIO1_GDIR);

	/* 默认关闭LED1 */
	val = readl(GPIO1_DR);
	val |= (1 << 3) ;
	writel(val, GPIO1_DR);

	/* 注册字符设备驱动 */
	/*1、创建设备号 */
	if (leddev.major) {		/*  定义了设备号 */
		leddev.devid = MKDEV(leddev.major, 0);
		register_chrdev_region(leddev.devid, LEDDEV_CNT, LEDDEV_NAME);
	} else {						/* 没有定义设备号 */
		alloc_chrdev_region(&leddev.devid, 0, LEDDEV_CNT, LEDDEV_NAME);	/* 申请设备号 */
		leddev.major = MAJOR(leddev.devid);	/* 获取分配号的主设备号 */
	}

	/* 2、初始化cdev */
	leddev.cdev.owner = THIS_MODULE;
	cdev_init(&leddev.cdev, &led_fops);

	/* 3、添加一个cdev */
	cdev_add(&leddev.cdev, leddev.devid, LEDDEV_CNT);

	/* 4、创建类 */
	leddev.class = class_create(THIS_MODULE, LEDDEV_NAME);
	if (IS_ERR(leddev.class)) {
		return PTR_ERR(leddev.class);
	}

	/* 5、创建设备 */
	leddev.device = device_create(leddev.class, NULL, leddev.devid, NULL, LEDDEV_NAME);
	if (IS_ERR(leddev.device)) {
		return PTR_ERR(leddev.device);
	}

	return 0;
}

/*
 * @description		: platform驱动的remove函数,移除platform驱动的时候此函数会执行
 * @param - dev 	: platform设备
 * @return 			: 0,成功;其他负值,失败
 */
static int led_remove(struct platform_device *dev)
{
	iounmap(IMX6U_CCM_CCGR1);
	iounmap(SW_MUX_GPIO1_IO03);
	iounmap(SW_PAD_GPIO1_IO03);
	iounmap(GPIO1_DR);
	iounmap(GPIO1_GDIR);

	cdev_del(&leddev.cdev);/*  删除cdev */
	unregister_chrdev_region(leddev.devid, LEDDEV_CNT); /* 注销设备号 */
	device_destroy(leddev.class, leddev.devid);
	class_destroy(leddev.class);
	return 0;
}

/* platform驱动结构体 */
static struct platform_driver led_driver = {
	.driver		= {
		.name	= "imx6ul-led",			/* 驱动名字,用于和设备匹配 */
	},
	.probe		= led_probe,
	.remove		= led_remove,
};

/*
 * @description	: 驱动模块加载函数
 * @param 		: 无
 * @return 		: 无
 */
static int __init leddriver_init(void)
{
	return platform_driver_register(&led_driver);
}

/*
 * @description	: 驱动模块卸载函数
 * @param 		: 无
 * @return 		: 无
 */
static void __exit leddriver_exit(void)
{
	platform_driver_unregister(&led_driver);
}

module_init(leddriver_init);
module_exit(leddriver_exit);
MODULE_LICENSE("GPL");
4.3 有设备树的platform驱动
#include <linux/types.h>
#include <linux/kernel.h>
#include <linux/delay.h>
#include <linux/ide.h>
#include <linux/init.h>
#include <linux/module.h>
#include <linux/errno.h>
#include <linux/gpio.h>
#include <linux/cdev.h>
#include <linux/device.h>
#include <linux/of_gpio.h>
#include <linux/semaphore.h>
#include <linux/timer.h>
#include <linux/irq.h>
#include <linux/wait.h>
#include <linux/poll.h>
#include <linux/fs.h>
#include <linux/fcntl.h>
#include <linux/platform_device.h>
#include <asm/mach/map.h>
#include <asm/uaccess.h>
#include <asm/io.h>

#define LEDDEV_CNT		1				/* 设备号长度 	*/
#define LEDDEV_NAME		"dtsplatled"	/* 设备名字 	*/
#define LEDOFF 			0
#define LEDON 			1

/* leddev设备结构体 */
struct leddev_dev{
	dev_t devid;				/* 设备号	*/
	struct cdev cdev;			/* cdev		*/
	struct class *class;		/* 类 		*/
	struct device *device;		/* 设备		*/
	int major;					/* 主设备号	*/
	struct device_node *node;	/* LED设备节点 */
	int led0;					/* LED灯GPIO标号 */
};

struct leddev_dev leddev; 		/* led设备 */

/*
 * @description		: LED打开/关闭
 * @param - sta 	: LEDON(0) 打开LED,LEDOFF(1) 关闭LED
 * @return 			: 无
 */
void led0_switch(u8 sta)
{
	if (sta == LEDON )
		gpio_set_value(leddev.led0, 0);
	else if (sta == LEDOFF)
		gpio_set_value(leddev.led0, 1);
}

/*
 * @description		: 打开设备
 * @param - inode 	: 传递给驱动的inode
 * @param - filp 	: 设备文件,file结构体有个叫做private_data的成员变量
 * 					  一般在open的时候将private_data指向设备结构体。
 * @return 			: 0 成功;其他 失败
 */
static int led_open(struct inode *inode, struct file *filp)
{
	filp->private_data = &leddev; /* 设置私有数据  */
	return 0;
}

/*
 * @description		: 向设备写数据
 * @param - filp 	: 设备文件,表示打开的文件描述符
 * @param - buf 	: 要写给设备写入的数据
 * @param - cnt 	: 要写入的数据长度
 * @param - offt 	: 相对于文件首地址的偏移
 * @return 			: 写入的字节数,如果为负值,表示写入失败
 */
static ssize_t led_write(struct file *filp, const char __user *buf, size_t cnt, loff_t *offt)
{
	int retvalue;
	unsigned char databuf[2];
	unsigned char ledstat;

	retvalue = copy_from_user(databuf, buf, cnt);
	if(retvalue < 0) {

		printk("kernel write failed!\r\n");
		return -EFAULT;
	}

	ledstat = databuf[0];
	if (ledstat == LEDON) {
		led0_switch(LEDON);
	} else if (ledstat == LEDOFF) {
		led0_switch(LEDOFF);
	}
	return 0;
}

/* 设备操作函数 */
static struct file_operations led_fops = {
	.owner = THIS_MODULE,
	.open = led_open,
	.write = led_write,
};

/*
 * @description		: flatform驱动的probe函数,当驱动与
 * 					  设备匹配以后此函数就会执行
 * @param - dev 	: platform设备
 * @return 			: 0,成功;其他负值,失败
 */
static int led_probe(struct platform_device *dev)
{
	printk("led driver and device was matched!\r\n");
	/* 1、设置设备号 */
	if (leddev.major) {
		leddev.devid = MKDEV(leddev.major, 0);
		register_chrdev_region(leddev.devid, LEDDEV_CNT, LEDDEV_NAME);
	} else {
		alloc_chrdev_region(&leddev.devid, 0, LEDDEV_CNT, LEDDEV_NAME);
		leddev.major = MAJOR(leddev.devid);
	}

	/* 2、注册设备      */
	cdev_init(&leddev.cdev, &led_fops);
	cdev_add(&leddev.cdev, leddev.devid, LEDDEV_CNT);

	/* 3、创建类      */
	leddev.class = class_create(THIS_MODULE, LEDDEV_NAME);
	if (IS_ERR(leddev.class)) {
		return PTR_ERR(leddev.class);
	}

	/* 4、创建设备 */
	leddev.device = device_create(leddev.class, NULL, leddev.devid, NULL, LEDDEV_NAME);
	if (IS_ERR(leddev.device)) {
		return PTR_ERR(leddev.device);
	}

	/* 5、初始化IO */
	leddev.node = of_find_node_by_path("/gpioled");
	if (leddev.node == NULL){
		printk("gpioled node nost find!\r\n");
		return -EINVAL;
	}

	leddev.led0 = of_get_named_gpio(leddev.node, "led-gpio", 0);
	if (leddev.led0 < 0) {
		printk("can't get led-gpio\r\n");
		return -EINVAL;
	}

	gpio_request(leddev.led0, "led0");
	gpio_direction_output(leddev.led0, 1); /* led0 IO设置为输出,默认高电平	*/
	return 0;
}

/*
 * @description		: platform驱动的remove函数,移除platform驱动的时候此函数会执行
 * @param - dev 	: platform设备
 * @return 			: 0,成功;其他负值,失败
 */
static int led_remove(struct platform_device *dev)
{
	gpio_set_value(leddev.led0, 1); 	/* 卸载驱动的时候关闭LED */
	gpio_free(leddev.led0);				/* 释放IO 			*/

	cdev_del(&leddev.cdev);				/*  删除cdev */
	unregister_chrdev_region(leddev.devid, LEDDEV_CNT); /* 注销设备号 */
	device_destroy(leddev.class, leddev.devid);
	class_destroy(leddev.class);
	return 0;
}

/* 匹配列表 */
static const struct of_device_id led_of_match[] = {
	{ .compatible = "atkalpha-gpioled" },
	{ /* Sentinel */ }
};

/* platform驱动结构体 */
static struct platform_driver led_driver = {
	.driver		= {
		.name	= "imx6ul-led",			/* 驱动名字,用于和设备匹配 */
		.of_match_table	= led_of_match, /* 设备树匹配表 		 */
	},
	.probe		= led_probe,
	.remove		= led_remove,
};

/*
 * @description	: 驱动模块加载函数
 * @param 		: 无
 * @return 		: 无
 */
static int __init leddriver_init(void)
{
	return platform_driver_register(&led_driver);
}

/*
 * @description	: 驱动模块卸载函数
 * @param 		: 无
 * @return 		: 无
 */
static void __exit leddriver_exit(void)
{
	platform_driver_unregister(&led_driver);
}

module_init(leddriver_init);
module_exit(leddriver_exit);
MODULE_LICENSE("GPL");