目录
一、launch启动程序
1.1 run_optimiser.launch标定优化程序
1.2 assess_results.launch重投影误差评估程序
二、主要代码
2.1 feature_extraction_node.cpp文件
2.2 feature_extractor.cpp文件
2.2.1 FeatureExtractor::callback_camerainfo函数
2.2.2 serviceCB函数
2.2.3 compare_voq函数
2.2.4 FeatureExtractor::optimise函数
2.2.5 FeatureExtractor::publishBoardPointCloud函数
2.2.6 boundsCB函数
2.2.7 FeatureExtractor::visualiseSamples函数
2.2.8 FeatureExtractor::passthrough函数
2.2.9 FeatureExtractor::chessboardProjection函数
2.2.10 FeatureExtractor::locateChessboard函数
2.2.11 FeatureExtractor::extractBoard函数
2.2.12 FeatureExtractor::findEdges函数
2.2.14 FeatureExtractor::distoffset_passthrough 函数
2.2.15 FeatureExtractor::extractRegionOfInterest函数
2.2.16 FeatureExtractor::find_octant函数
2.2.17 FeatureExtractor::getDateTime函数
2.3 point_xyzir.h文件
2.4 load_params.cpp文件
2.5 optimiser.h文件
使用cam_lidar_calibration标定速腾激光雷达和单目相机外参(可见一班的博客)实现了功能,但是对于它内部的机理不是很懂。于是对采样、优化部分的代码进行了仔细阅读,同时把自己的自己的一些理解和笔记分享在这里,供大家一起探讨、进步!
一、launch启动程序
1.1 run_optimiser.launch标定优化程序
主要内容:
- 传入参数import_samples决定执行示例/自己的参数
- 执行feature_extraction_node.cpp
- num_lowestvoq
- 定义distance_offset_mm = 0,用于修正lidar内参
<?xml version="1.0" encoding="utf-8"?>

<!-- roslaunch cam_lidar_calibration run_optimiser.launch import_samples:=false -->

<launch>
    <!-- 读取params里的参数 -->
	<rosparam file="$(find cam_lidar_calibration)/cfg/params.yaml" />

    <!-- 执行的是feature_extraction_node.cpp -->
  	<node pkg="cam_lidar_calibration" type="feature_extraction_node" name="feature_extraction" output="screen">
		<param name="num_lowestvoq" type="int" value="50" />
		<param name="import_samples" value="$(arg import_samples)"/>
		<param name="import_path" value="$(find cam_lidar_calibration)/data/vlp/poses.csv"/>

		<!-- If your lidar is not calibrated well interally, it may require a distance offset (millimetres) on each point -->
		<param name="distance_offset_mm" value="0" />
  	</node>

  	<!-- Only open rviz and rqt if not importing samples -->
    <!-- 运行示例时,输入参数为import_samples:=false,不执行以下内容,不打开rviz和rqt_reconfigure -->
  	<group unless="$(arg import_samples)">
		<node type="rviz" name="rviz" pkg="rviz" args="-d $(find cam_lidar_calibration)/rviz/cam_lidar_calibration.rviz" />
		<node type="rqt_reconfigure" name="rqt_reconfigure" pkg="rqt_reconfigure"/>
	</group>

</launch>
1.2 assess_results.launch重投影误差评估程序
既使用camera_info,又在yaml中配置,为什么?因为要二次检验相机参数!
可以切换弧度和角度的表示。
- 执行visualise_results.py
- trans_binwidth
- rot_binwidth_deg
- visualise_pose_num
<!-- degree: true to display plot in degrees, false for radians -->
<param name="degree" value="false"/>
二、主要代码
首先,根据标定优化程序展开学习,也就是开源程序的第一部分。
2.1 feature_extraction_node.cpp文件
主函数,包含
- 定义类,feature_extractor特征提取,调用feature_extractor.cpp里函数的功能
- 参数优化 SimpleActionServer<cam_lidar_calibration::RunOptimiseAction> optimise_action,通过actionlib库实现,ROS的一种通讯机制action通信机制
简介:Action通信简介及案例1:发送单导航目标点_action 通信
2.2 feature_extractor.cpp文件
一系列函数名和命名空间定义在头文件feature_extractor.h里,命名空间为cam_lidar_calibration,含为类FeatureExtractor,具体包括以下函数:
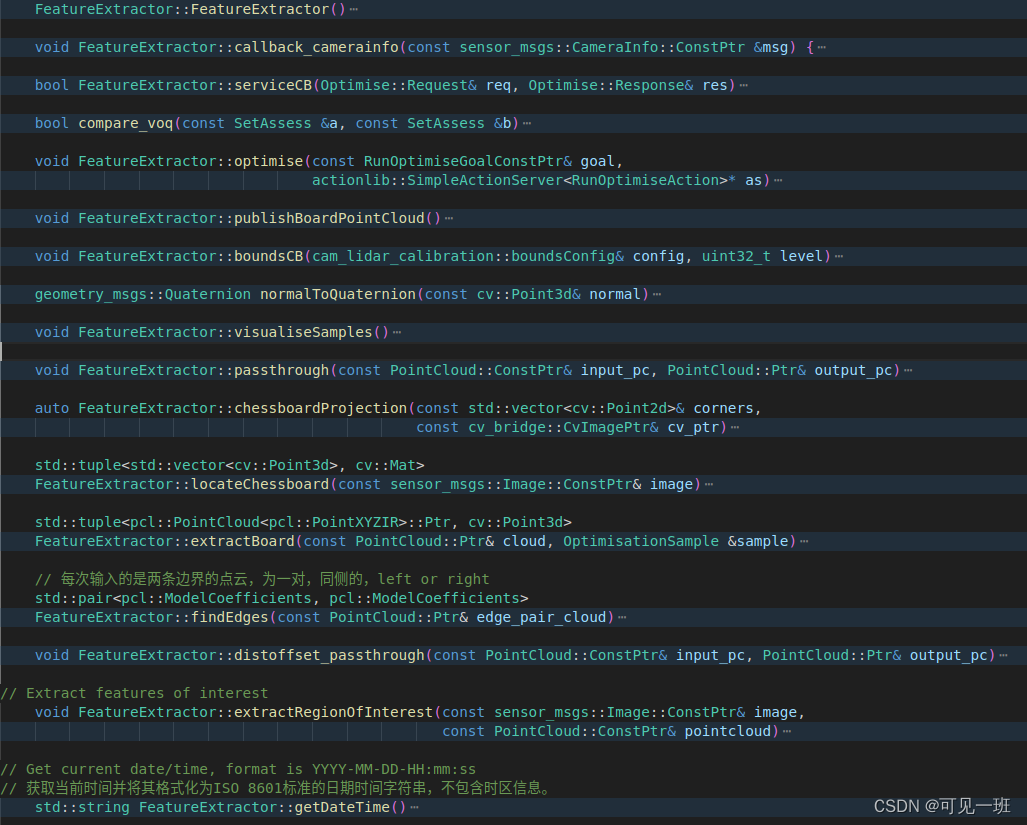
2.2.1 FeatureExtractor::callback_camerainfo函数
功能:将相机参数从“camera_info”话题里读进来,包括内参和畸变系数。
2.2.2 serviceCB函数
与通讯机制action有关的函数
传入:Optimise::Request类型的req和Optimise::Response类型的res。
2.2.3 compare_voq函数
这个很简单,比较标定质量指标voq大小的。使用的数据格式是SetAssess,自定义类型。
2.2.4 FeatureExtractor::optimise函数
这个是cam_lidar_calibration标定程序包的核心思路。这里暂时只进行思路梳理,后面再仔细研究一下。总的目标是根据提取的特征,计算VOQ指标,对标定位姿进行优化。
功能1:根据启动程序时import_samples的值读取或写入参数,进行优化求解。import_samples为true时从文件里读取,也就是调用作者数据集的时候。import_samples为false时,往文件里写入。读取流程:按行读取数据,装入point3D向量row,写入时与此相反:
- 把read_samples里的数据读入到line
- 用逗号将line分割为word
- 把word装入向量line_double,一个一个push_back到后面
- 把{line_double[0], line_double[1], line_double[2]}装入row
包括相机中心、法向量;雷达中心、法向量;宽度、高度、偏移距离等等,19个为一组,。
功能2:从N个数据中构建3个为一组(set)的求解对象,如果少于100个样本,我们可以得到所有的100C3,再多一些样本,NC3就会变得太大,所以为了速度我们只能随机抽样。
2.2.5 FeatureExtractor::publishBoardPointCloud函数
发布激光点云采样的点,就是标定板上的点。
2.2.6 boundsCB函数
传入:boundsConfig类型的引用变量config和一个uint32_t类型的变量level
返回:void
功能:由cam_lidar_calibration::boundsConfig支持,重新读取gui中滑动条运动对应的值
2.2.7 FeatureExtractor::visualiseSamples函数
功能:可视化函数,显示提取激光点云提取到的标定板,绿色方框表述位置(单位为m),蓝色箭头表示法向量,赋值marker后进行发布。
2.2.8 FeatureExtractor::passthrough函数
功能:根据串口滑动条配置的区间,进行直通滤波。输入input_pc,按照xzy顺序进行滤波,定义了中间点云x、z,输出output_pc,不定义中间点云或者少定义中间点云可以节省内存。
2.2.9 FeatureExtractor::chessboardProjection函数
功能:提取图像中的棋盘格、标定板。标定板有四个角点和一个中心点;棋盘格有好多个内角点,一般加工方式下有白边。并且将世界坐标系下的物理坐标值,投影到图像坐标系下。
输入:角点向量corners和图像cv_ptr
输出:旋转矩阵、平移向量、板子的三维点(物理坐标,mm)
auto FeatureExtractor::chessboardProjection(const std::vector<cv::Point2d>& corners,
                                                const cv_bridge::CvImagePtr& cv_ptr)
    {
        // Find the chessboard in 3D space - in it's own object frame (position is arbitrary, so we place it flat)
        // 在3D空间中找到棋盘——在它自己的对象框架中(位置是任意的,所以我们把它放平)

        // Location of board frame origin from the bottom left inner corner of the chessboard
        //从棋盘左下角内角开始的棋盘框架原点位置
        // 这段代码是用于生成棋盘格的三维坐标点的。首先,通过输入参数i_params中的棋盘格大小和方格长度计算出棋盘格左下角的坐标。然后,通过两个for循环遍历整个棋盘格,计算每个方格的三维坐标点,并将其存储在corners_3d向量中。具体地,对于每个方格,先计算出其在棋盘格中的二维坐标,然后将其乘以方格长度并减去棋盘格左下角的坐标,即可得到该方格的三维坐标点。最终,corners_3d向量中存储的就是整个棋盘格的所有三维坐标点。
        cv::Point3d chessboard_bleft_corner((i_params.chessboard_pattern_size.width - 1) * i_params.square_length / 2,
                                      (i_params.chessboard_pattern_size.height - 1)*i_params.square_length/2, 0);

        std::vector<cv::Point3d> corners_3d;
        for (int y = 0; y < i_params.chessboard_pattern_size.height; y++)
        {
            for (int x = 0; x < i_params.chessboard_pattern_size.width; x++)
            {
                corners_3d.push_back(cv::Point3d(x, y, 0) * i_params.square_length - chessboard_bleft_corner);
            }
        }

        // chessboard corners, middle square corners, board corners and centre
        std::vector<cv::Point3d> board_corners_3d;

        // Board corner coordinates from the centre of the chessboard
        // 这段代码是用于计算棋盘角点在三维空间中的坐标。其中,board_corners_3d是一个存储棋盘角点坐标的向量。代码中使用了cv::Point3d来表示三维坐标点,其中x、y、z分别表示点在x、y、z轴上的坐标值。i_params是一个结构体,包含了棋盘的尺寸和平移误差等参数。代码中通过计算棋盘中心点到棋盘四个角点的距离,来确定棋盘角点在三维空间中的坐标。具体来说,代码中先计算出棋盘中心点到棋盘左上角点的距离,然后根据棋盘尺寸和平移误差计算出棋盘左上角点在三维空间中的坐标,接着按照同样的方式计算出棋盘的其他三个角点的坐标。最后将这些坐标点存储到board_corners_3d向量中。
        board_corners_3d.push_back(cv::Point3d((i_params.board_dimensions.width - i_params.cb_translation_error.x)/2.0,
                                                (i_params.board_dimensions.height - i_params.cb_translation_error.y)/2.0,0.0));

        board_corners_3d.push_back(cv::Point3d(-(i_params.board_dimensions.width + i_params.cb_translation_error.x)/2.0,
                                               (i_params.board_dimensions.height - i_params.cb_translation_error.y)/2.0,0.0));

        board_corners_3d.push_back(cv::Point3d(-(i_params.board_dimensions.width + i_params.cb_translation_error.x)/2.0,
                                               -(i_params.board_dimensions.height + i_params.cb_translation_error.y)/2.0,0.0));

        board_corners_3d.push_back(cv::Point3d((i_params.board_dimensions.width - i_params.cb_translation_error.x)/2.0,
                                               -(i_params.board_dimensions.height + i_params.cb_translation_error.y)/2.0,0.0));

        // Board centre coordinates from the centre of the chessboard (due to incorrect placement of chessboard on board)从棋盘中心开始的棋盘中心坐标(由于棋盘格在板子上的位置不正确)
        board_corners_3d.push_back(cv::Point3d(-i_params.cb_translation_error.x/2.0, -i_params.cb_translation_error.y/2.0, 0.0));

        std::vector<cv::Point2d> inner_cbcorner_pixels, board_image_pixels;
        cv::Mat rvec(3, 3, cv::DataType<double>::type);  // Initialization for pinhole and fisheye cameras
        cv::Mat tvec(3, 1, cv::DataType<double>::type);

        if (valid_camera_info) {
            if (i_params.fisheye_model)
            {
                // Undistort the image by applying the fisheye intrinsic parameters
                // the final input param is the camera matrix in the new or rectified coordinate frame.
                // We put this to be the same as i_params_.cameramat or else it will be set to empty matrix by default.
                std::vector<cv::Point2d> corners_undistorted;
                cv::fisheye::undistortPoints(corners, corners_undistorted, i_params.cameramat, i_params.distcoeff,
                                             i_params.cameramat);
                cv::solvePnP(corners_3d, corners_undistorted, i_params.cameramat, cv::noArray(), rvec, tvec);
                cv::fisheye::projectPoints(corners_3d, inner_cbcorner_pixels, rvec, tvec, i_params.cameramat, i_params.distcoeff);
                cv::fisheye::projectPoints(board_corners_3d, board_image_pixels, rvec, tvec, i_params.cameramat,
                                           i_params.distcoeff);
            } else {
                // Pinhole model
                // 使用了OpenCV库中的solvePnP函数和projectPoints函数。solvePnP函数用于解决相机的位姿问题,即将3D物体坐标系中的点映射到2D图像坐标系中。它需要输入3D物体坐标系中的点和对应的2D图像坐标系中的点,以及相机的内参矩阵和畸变系数,输出相机的旋转向量和平移向量。projectPoints函数则用于将3D物体坐标系中的点投影到2D图像坐标系中,需要输入3D物体坐标系中的点、相机的旋转向量和平移向量,以及相机的内参矩阵和畸变系数,输出对应的2D图像坐标系中的点。这段代码中,corners_3d和corners分别表示3D物体坐标系中的点和对应的2D图像坐标系中的点,i_params.cameramat和i_params.distcoeff分别表示相机的内参矩阵和畸变系数,rvec和tvec分别表示相机的旋转向量和平移向量,inner_cbcorner_pixels和board_image_pixels分别表示对应的2D图像坐标系中的点。
                cv::solvePnP(corners_3d, corners, i_params.cameramat, i_params.distcoeff, rvec, tvec);
                cv::projectPoints(corners_3d, rvec, tvec, i_params.cameramat, i_params.distcoeff, inner_cbcorner_pixels);
                cv::projectPoints(board_corners_3d, rvec, tvec, i_params.cameramat, i_params.distcoeff, board_image_pixels);
            }
        } else {
            ROS_FATAL("No msgs from /camera_info - check camera_info topic in cfg/params.yaml is correct and is being published");
        }
        //检测到的角点,画圆
        for (int i = 0; i < board_image_pixels.size(); i++){
            if (i == 0){
                cv::circle(cv_ptr->image, board_image_pixels[i], 4, CV_RGB(255, 0, 0), -1);//红色,右下角
            } else if (i == 1) {
                cv::circle(cv_ptr->image, board_image_pixels[i], 4, CV_RGB(0, 255, 0), -1);
            } else if (i == 2) {
                cv::circle(cv_ptr->image, board_image_pixels[i], 4, CV_RGB(0, 0, 255), -1);
            } else if (i == 3) {
                cv::circle(cv_ptr->image, board_image_pixels[i], 4, CV_RGB(255, 255, 0), -1);//黄色
            } else if (i == 4) {
                cv::circle(cv_ptr->image, board_image_pixels[i], 4, CV_RGB(0, 255, 255), -1);//青色,中心偏移点
            }
        }

        for (auto& point : inner_cbcorner_pixels)
        {
            cv::circle(cv_ptr->image, point, 3, CV_RGB(255, 0, 0), -1);
        }

        //这段代码计算了一个棋盘格的 对角线长度 与 像素 之间的比例。首先,它使用了sqrt函数和pow函数来计算内部棋盘格角点的x和y坐标之间的距离,然后将它们平方相加并开方,得到了像素对角线的长度。接着,它使用同样的方法计算了3D角点的x和y坐标之间的距离,得到了实际对角线的长度。最后,将实际对角线的长度除以像素对角线的长度,得到了每个像素代表的实际长度,即米/像素。
        double pixdiagonal = sqrt(pow(inner_cbcorner_pixels.front().x-inner_cbcorner_pixels.back().x,2)+(pow(inner_cbcorner_pixels.front().y-inner_cbcorner_pixels.back().y,2)));

        double len_diagonal = sqrt(pow(corners_3d.front().x-corners_3d.back().x,2)+(pow(corners_3d.front().y-corners_3d.back().y,2)));
        metreperpixel_cbdiag = len_diagonal /(1000*pixdiagonal);

        // Return all the necessary coefficients
        return std::make_tuple(rvec, tvec, board_corners_3d);
    }
2.2.10 FeatureExtractor::locateChessboard函数
功能:调用OpenCV库中的函数findChessboardCorners提取图像中棋盘格角点,再使用cornerSubPix寻找亚像素坐标。最后再利用FeatureExtractor::chessboardProjection函数对图像角点进行投影。得到棋盘格的法向量。函数返回旋转、平移后的角点,和棋盘格法向量。
std::tuple<std::vector<cv::Point3d>, cv::Mat>
FeatureExtractor::locateChessboard(const sensor_msgs::Image::ConstPtr& image)
    {
        // Convert to OpenCV image object
        cv_bridge::CvImagePtr cv_ptr;
        cv_ptr = cv_bridge::toCvCopy(image, sensor_msgs::image_encodings::BGR8);

        cv::Mat gray;
        cv::cvtColor(cv_ptr->image, gray, CV_BGR2GRAY); //CV_BGR2GRAY是一个预定义的常量,表示将BGR颜色空间转换为灰度颜色空间。
        std::vector<cv::Point2f> cornersf;
        std::vector<cv::Point2d> corners;
        // Find chessboard pattern in the image
        // gray是输入的灰度图像,i_params.chessboard_pattern_size是棋盘格的大小,cornersf是输出的角点坐标,cv::CALIB_CB_ADAPTIVE_THRESH和cv::CALIB_CB_NORMALIZE_IMAGE是用于调整阈值和归一化图像的标志位。最终返回一个布尔值,表示是否找到了棋盘格角点。
        bool pattern_found = findChessboardCorners(gray, i_params.chessboard_pattern_size, cornersf,
                                                   cv::CALIB_CB_ADAPTIVE_THRESH + cv::CALIB_CB_NORMALIZE_IMAGE);
        if (!pattern_found)
        {
            ROS_WARN("No chessboard found");
            std::vector<cv::Point3d> empty_corners;
            cv::Mat empty_normal;
            return std::make_tuple(empty_corners, empty_normal);
        }
        ROS_INFO("Chessboard found");
        // Find corner points with sub-pixel accuracy
        // This throws an exception if the corner points are doubles and not floats!?!
        // 使用OpenCV库中的cornerSubPix函数对灰度图像中的角点进行亚像素级别的精确化处理。其中,gray表示输入的灰度图像,cornersf表示输入的角点坐标,Size(11, 11)表示窗口大小,Size(-1, -1)表示不使用搜索窗口,TermCriteria(CV_TERMCRIT_EPS + CV_TERMCRIT_ITER, 30, 0.1)表示停止条件,即最大迭代次数为30次或者精度达到0.1。
        cornerSubPix(gray, cornersf, Size(11, 11), Size(-1, -1), TermCriteria(CV_TERMCRIT_EPS + CV_TERMCRIT_ITER, 30, 0.1));

        for (auto& corner : cornersf)
        {
            corners.push_back(cv::Point2d(corner));
        }

        auto [rvec, tvec, board_corners_3d] = chessboardProjection(corners, cv_ptr); //使用OpenCV库中的函数chessboardProjection来进行棋盘格的投影。输出参数包括rvec(旋转向量)、tvec(平移向量)和board_corners_3d(棋盘格的三维坐标)
        // 使用OpenCV库中的函数对旋转向量进行转换,将其转换为旋转矩阵。然后创建一个三维点,其中z轴的值为-1,表示该点在z轴上的方向为向下。接着,使用旋转矩阵将该点的方向进行变换,得到棋盘的法向量。
        cv::Mat rmat;
        cv::Rodrigues(rvec, rmat);
        cv::Mat z = cv::Mat(cv::Point3d(0., 0., -1.)); // TODO: why is this normal -1 in z? Surabhi's is just 1
        auto chessboard_normal = rmat * z;

        std::vector<cv::Point3d> corner_vectors;
        for (auto& corner : board_corners_3d)
        {
            cv::Mat m(rmat * cv::Mat(corner).reshape(1) + tvec);
            corner_vectors.push_back(cv::Point3d(m));
        }

        // Publish the image with all the features marked in it
        ROS_INFO("Publishing chessboard image");
        image_publisher.publish(cv_ptr->toImageMsg());
        return std::make_tuple(corner_vectors, chessboard_normal);
    }
2.2.11 FeatureExtractor::extractBoard函数
功能:
- 输入手动直通滤波后的点云,求出 z max,再减去对角线长度,得到 z min,再进行一次直通滤波,这个z min是粗略的,如果板子倾斜状态下,板子上的真实z min应该大一点。
- RANSAC拟合平面,迭代次数1000,阈值0.004m,得到平面表达式及法向量,对法向量反向、归一化
- 将板子上的点都投影到这个求得的平面表达式上,得到点云cloud_projected,并发布
    FeatureExtractor::extractBoard(const PointCloud::Ptr& cloud, OptimisationSample &sample)
    {
        PointCloud::Ptr cloud_filtered(new PointCloud);
        // Filter out the board point cloud
        // find the point with max height(z val) in cloud_passthrough
        pcl::PointXYZIR cloud_min, cloud_max;
        pcl::getMinMax3D(*cloud, cloud_min, cloud_max);
        double z_max = cloud_max.z;
        // subtract by approximate diagonal length (in metres)
        double diag = std::hypot(i_params.board_dimensions.height, i_params.board_dimensions.width) /
                      1000.0;  // board dimensions are in mm
        double z_min = z_max - diag;
        pcl::PassThrough<pcl::PointXYZIR> pass_z;
        pass_z.setFilterFieldName("z");
        pass_z.setFilterLimits(z_min, z_max);
        pass_z.setInputCloud(cloud);
        pass_z.filter(*cloud_filtered);  // board point cloud

        // Fit a plane through the board point cloud
        // Inliers give the indices of the points that are within the RANSAC threshold
        pcl::ModelCoefficients::Ptr coefficients(new pcl::ModelCoefficients());
        pcl::PointIndices::Ptr inliers(new pcl::PointIndices());
        pcl::SACSegmentation<pcl::PointXYZIR> seg;
        seg.setOptimizeCoefficients(true);
        seg.setModelType(pcl::SACMODEL_PLANE);
        seg.setMethodType(pcl::SAC_RANSAC);
        seg.setMaxIterations(1000);
        seg.setDistanceThreshold(0.004);
        pcl::ExtractIndices<pcl::PointXYZIR> extract;
        seg.setInputCloud(cloud_filtered);
        seg.segment(*inliers, *coefficients);

        // Check that segmentation succeeded
        PointCloud::Ptr cloud_projected(new PointCloud);
        if (coefficients->values.size() < 3)
        {
            ROS_WARN("Chessboard plane segmentation failed");
            cv::Point3d null_normal;
            return std::make_tuple(cloud_projected, null_normal);
        }

        // Plane normal vector magnitude
        cv::Point3d lidar_normal(coefficients->values[0], coefficients->values[1], coefficients->values[2]);
        lidar_normal /= -cv::norm(lidar_normal);  // Normalise and flip the direction  cv::norm函数用于计算向量的模长,然后将该向量除以其模长的相反数,即可实现归一化并翻转方向的操作。

        // Project the inliers on the fitted plane
        // When it freezes the chessboard after capture, what you see are the inlier points (filtered from the original)
        pcl::ProjectInliers<pcl::PointXYZIR> proj;
        proj.setModelType(pcl::SACMODEL_PLANE);
        proj.setInputCloud(cloud_filtered);
        proj.setModelCoefficients(coefficients);
        proj.filter(*cloud_projected);


        // Publish the projected inliers
        pc_samples_.push_back(cloud_projected);
        // publishBoardPointCloud();
        return std::make_tuple(cloud_projected, lidar_normal);
    }
2.2.12 FeatureExtractor::findEdges函数
功能:根据输入点云edge_pair_cloud,提取出两条边缘线。第一次执行:左上边缘的直线参数,左下边缘的直线参数 ;第二次执行:右上,右下 。
提取方法:RANSAC,阈值 0.02m
基本步骤:
    FeatureExtractor::findEdges(const PointCloud::Ptr& edge_pair_cloud)
    {
        pcl::ModelCoefficients full_coeff, half_coeff;
        pcl::PointIndices::Ptr full_inliers(new pcl::PointIndices), half_inliers(new pcl::PointIndices);
        PointCloud::Ptr half_cloud(new PointCloud);

        //拟合出第一条直线参数
        pcl::SACSegmentation<pcl::PointXYZIR> seg;
        seg.setModelType(pcl::SACMODEL_LINE);
        seg.setMethodType(pcl::SAC_RANSAC);
        seg.setDistanceThreshold(0.02);

        //分割出第一条直线外的点
        seg.setInputCloud(edge_pair_cloud);
        seg.segment(*full_inliers, full_coeff);  // Fitting line1 through all points

         // Failed RANSAC returns empty coeffs
        if (full_coeff.values.empty()) {
            return std::make_pair(full_coeff, full_coeff);
        }

        pcl::ExtractIndices<pcl::PointXYZIR> extract;
        extract.setInputCloud(edge_pair_cloud);
        extract.setIndices(full_inliers);
        extract.setNegative(true);      //第一条边界外的点云half_cloud
        extract.filter(*half_cloud);

        //拟合第二条直线参数
        seg.setInputCloud(half_cloud);
        seg.segment(*half_inliers, half_coeff);

         // Failed RANSAC returns empty coeffs
        if (half_coeff.values.empty()) {
            return std::make_pair(half_coeff, half_coeff);
        }

        // Fitting line2 through outlier points
        // Determine which is above the other
        // 区分两条直线的上 下
        // 返回的一对里,大的再前,也就是上面的边缘线在前
        pcl::PointXYZIR full_min, full_max, half_min, half_max;
        pcl::getMinMax3D(*edge_pair_cloud, full_min, full_max);
        pcl::getMinMax3D(*half_cloud, half_min, half_max);
        if (full_max.z > half_max.z)
        {
            return std::make_pair(full_coeff, half_coeff);
        }
        else
        {
            return std::make_pair(half_coeff, full_coeff);
        }
    }
2.2.14 FeatureExtractor::distoffset_passthrough 函数
输入:点云input_pc
输出:点云output_pc
功能:补偿雷达内参,参数distance_offset由launch文件distance_offset_mm传入,默认为0,不执行补偿,该函数不产生效果。若虚补充lidar内参,执行流程如下:
- 笛卡尔坐标系转极坐标系,配合最后一个函数FeatureExtractor::find_octant区分所在象限
- 标记笛卡尔坐标系象限,通过 FeatureExtractor::find_octant实现
- 根据标记把水平夹角phi转换到[-90,90]内,以利用 atan 进行反变换到笛卡尔坐标系
2.2.15 FeatureExtractor::extractRegionOfInterest函数
传入:sensor_msgs::Image::ConstPtr& img和pcl::PointCloud<pcl::PointXYZIR>::ConstPtr& pc
返回:void
具体内容定义在feature_extractor.cpp中
功能:
- 确定lidar_ring数目,32
- 雷达内参修正,定义、处理、发布,FeatureExtractor::distoffset_passthrough
- 获取棋盘格信息,用FeatureExtractor::locateChessboard
- 赋值sample,由cam_lidar_calibration::OptimisationSample定义
- 找出每个ring对应的最大和最小点,FeatureExtractor::extractBoard实现
- 根据ring和每条ring的y坐标进行排序,雷达y轴指向侧边,x轴向前
- 通过最小点和最大值拟合直线,用FeatureExtractor::findEdges实现
- 计算标定板角度,构建向量(这里为什么用345?)、计算夹角 acos()+dot() 函数
- 找标定板四个角点,用PCL库中的函数lineWithLineIntersection实现,逆时针存储
- 还考虑到相机在lidar后面的情况,对lidar法向量反转方向
- 计算标定板检测边长、面积真值、检测面积、边长误差(论文中公式4)、距离
- 计算板子参数的误差be_dim_err
- 打印输出一次采样的信息
- 激光雷达板的误差超过真值的10%,则拒绝该采样。说明该次截取的点云检测效果不佳。终端报错"Plane fitting error, LiDAR board dimensions incorrect; discarding sample - try capturing again"
代码注释:
void FeatureExtractor::extractRegionOfInterest(const sensor_msgs::Image::ConstPtr& image,
                                                   const PointCloud::ConstPtr& pointcloud)
    {
        // Check if we have deduced the lidar ring count
        // load_params.h里定义的lidar_ring_count初始值为0
        if (i_params.lidar_ring_count == 0)
        {
            // pcl::getMinMax3D only works on x,y,z
            for (const auto& p : pointcloud->points)
            {
                if (p.ring + 1 > i_params.lidar_ring_count)
                {
                    i_params.lidar_ring_count = p.ring + 1;
                }
            } // 得到最大ring值
            lidar_frame_ = pointcloud->header.frame_id;  // frame_id赋值给lidar_frame_变量
        }

        // 定义、直通滤波、发布
        PointCloud::Ptr cloud_bounded(new PointCloud);
        distoffset_passthrough(pointcloud, cloud_bounded);

        // Publish the experimental region point cloud
        bounded_cloud_pub_.publish(cloud_bounded);

        if (flag == Optimise::Request::CAPTURE)  //load_params.h里定义的flag初始值为0
        {
            ROS_INFO("Processing sample");
            auto [corner_vectors, chessboard_normal] = locateChessboard(image);     //返回一个包含角点坐标的向量和一个表示棋盘平面法向量的向量,这两个向量被分别赋值给了corner_vectors和chessboard_normal。
            if (corner_vectors.size() == 0)
            {
                flag = Optimise::Request::READY;
                ROS_ERROR("Sample capture failed: can't detect chessboard in camera image");
                ROS_INFO("Ready to capture sample");
                return;
            }

            // 一系列赋值操作,定义在optimiser.h
            cam_lidar_calibration::OptimisationSample sample;
            num_samples++;
            sample.sample_num = num_samples;
            sample.camera_centre = corner_vectors[4];  // Centre of board
            corner_vectors.pop_back();
            sample.camera_corners = corner_vectors;
            sample.camera_normal = cv::Point3d(chessboard_normal);
            sample.pixeltometre = metreperpixel_cbdiag;

            // FIND THE MAX AND MIN POINTS IN EVERY RING CORRESPONDING TO THE BOARD
            // extractBoard定义在前面
            auto [cloud_projected, lidar_normal] = extractBoard(cloud_bounded, sample);
            if (cloud_projected->points.size() == 0)
            {
                return;
            }
            sample.lidar_normal = lidar_normal;

            // First: Sort out the points in the point cloud according to their ring numbers
            // 首先:根据点云的环数对点云中的点进行排序
            // 创建了一个vector容器ring_pointclouds,容器的大小为i_params.lidar_ring_count
            std::vector<PointCloud> ring_pointclouds(i_params.lidar_ring_count);

            for (const auto& point : cloud_projected->points)
            {
                ring_pointclouds[point.ring].push_back(point);
            }

            // Second: Arrange points in every ring in descending order of y coordinate
            // 第二:按y坐标降序排列每个环上的点
            // 遍历了一个名为ring_pointclouds的容器中的每一个元素,并将其赋值给了一个名为ring的引用
            // 排序的是y坐标
            for (auto& ring : ring_pointclouds)
            {
                std::sort(ring.begin(), ring.end(), [](pcl::PointXYZIR p1, pcl::PointXYZIR p2) { return p1.y > p2.y; });
            }

            // Third: Find minimum and maximum points in a ring 求环上的极小点和最大值
            // 如果ring不为空,则将ring中最后一个元素添加到min_points容器的末尾,将ring中第一个元素添加到max_points容器的末尾。这段代码的作用是将ring_pointclouds中每个元素的最后一个和第一个点分别添加到min_points和max_points容器中。
            PointCloud::Ptr max_points(new PointCloud);
            PointCloud::Ptr min_points(new PointCloud);
            for (const auto& ring : ring_pointclouds)
            {
                if (ring.size() == 0)
                {
                    continue;
                }
                min_points->push_back(ring[ring.size() - 1]);
                max_points->push_back(ring[0]);
            }

            // Fit lines through minimum and maximum points
            //调用了一个函数findEdges,返回了两个点的坐标top_left、bottom_left和top_right、bottom_right。然后判断这四个点的values是否为空,如果有任何一个为空,就会输出一个错误信息
            // 所以,应该修改坐标系!
            auto [top_left, bottom_left] = findEdges(max_points);
            auto [top_right, bottom_right] = findEdges(min_points);

            if (top_left.values.empty() | top_right.values.empty()
            | bottom_left.values.empty() | bottom_right.values.empty()) {
                ROS_ERROR("RANSAC unsuccessful, discarding sample - Need more lidar points on board");
                pc_samples_.pop_back();
                num_samples--;
                flag = Optimise::Request::READY;
                ROS_INFO("Ready for capture\n");
                return;
            }

            // Get angles of targetboard
            // 为什么是 345 ?  是到0点的向量
            cv::Mat top_left_vector = (cv::Mat_<double>(3,1) << top_left.values[3], top_left.values[4], top_left.values[5]);
            cv::Mat top_right_vector = (cv::Mat_<double>(3,1) << top_right.values[3], top_right.values[4], top_right.values[5]);
            cv::Mat bottom_left_vector = (cv::Mat_<double>(3,1) << bottom_left.values[3], bottom_left.values[4], bottom_left.values[5]);
            cv::Mat bottom_right_vector = (cv::Mat_<double>(3,1) << bottom_right.values[3], bottom_right.values[4], bottom_right.values[5]);

            double a0 = acos(top_left_vector.dot(top_right_vector))*180/M_PI;
            double a1 = acos(bottom_left_vector.dot(bottom_right_vector))*180/M_PI;
            double a2 = acos(top_left_vector.dot(bottom_left_vector))*180/M_PI;
            double a3 = acos(top_right_vector.dot(bottom_right_vector))*180/M_PI;
            sample.angles_0.push_back(a0);
            sample.angles_0.push_back(a1);
            sample.angles_1.push_back(a2);
            sample.angles_1.push_back(a3);

            // Find the corners
            // 3D Lines rarely intersect - lineWithLineIntersection has default threshold of 1e-4
            // PCL库中的函数lineWithLineIntersection来计算两条直线的交点,坐标放入c0~c4
            Eigen::Vector4f corner;
            pcl::lineWithLineIntersection(top_left, top_right, corner);
            cv::Point3d c0(corner[0], corner[1], corner[2]);
            pcl::lineWithLineIntersection(bottom_left, bottom_right, corner);
            cv::Point3d c1(corner[0], corner[1], corner[2]);
            pcl::lineWithLineIntersection(top_left, bottom_left, corner);
            cv::Point3d c2(corner[0], corner[1], corner[2]);
            pcl::lineWithLineIntersection(top_right, bottom_right, corner);
            cv::Point3d c3(corner[0], corner[1], corner[2]);

            // Add points in same order as the paper
            // Convert to mm
            sample.lidar_corners.push_back(c3 * 1000);
            sample.lidar_corners.push_back(c0 * 1000);
            sample.lidar_corners.push_back(c2 * 1000);
            sample.lidar_corners.push_back(c1 * 1000);

            for (const auto& p : sample.lidar_corners)
            {
                // Average the corners
                sample.lidar_centre.x += p.x / 4.0;
                sample.lidar_centre.y += p.y / 4.0;
                sample.lidar_centre.z += p.z / 4.0;
            }

            // Flip the lidar normal if it is in the wrong direction (mainly happens for rear facing cameras)
            // Sample属于OptimisationSample
            // 一个点到一个向量的距离,若大于圆的半径,将向量反向,为啥???看lidar_normal解决
            double top_down_radius = sqrt(pow(sample.lidar_centre.x,2)+pow(sample.lidar_centre.y,2));
            double vector_dist = sqrt(pow(sample.lidar_centre.x + sample.lidar_normal.x,2) +
            	pow(sample.lidar_centre.y + sample.lidar_normal.y,2));
            if (vector_dist > top_down_radius) {
            	sample.lidar_normal.x = -sample.lidar_normal.x;
            	sample.lidar_normal.y = -sample.lidar_normal.y;
            	sample.lidar_normal.z = -sample.lidar_normal.z;
            }

            // Get line lengths for comparison with real board dimensions
            std::vector <double> lengths;
            lengths.push_back(sqrt(pow(c0.x - c3.x, 2) + pow(c0.y - c3.y, 2) + pow(c0.z - c3.z, 2)) * 1000);
            lengths.push_back(sqrt(pow(c0.x - c2.x, 2) + pow(c0.y - c2.y, 2) + pow(c0.z - c2.z, 2)) * 1000);
            lengths.push_back(sqrt(pow(c1.x - c3.x, 2) + pow(c1.y - c3.y, 2) + pow(c1.z - c3.z, 2)) * 1000);
            lengths.push_back(sqrt(pow(c1.x - c2.x, 2) + pow(c1.y - c2.y, 2) + pow(c1.z - c2.z, 2)) * 1000);

            std::sort(lengths.begin(), lengths.end());      //默认为less<T>(),即升序排序,如果需要降序排序,可以使用greater<T>()
            double w0 = lengths[0];
            double w1 = lengths[1];
            double h0 = lengths[2];
            double h1 = lengths[3];
            sample.widths.push_back(w0);
            sample.widths.push_back(w1);
            sample.heights.push_back(h0);
            sample.heights.push_back(h1);

            // 面积真值
            double gt_area = (double)i_params.board_dimensions.width/1000*(double)i_params.board_dimensions.height/1000;
            // 检测面积 = 小*小/2 + 大*大/2
            double b_area = (w0/1000*h0/1000)/2 + (w1/1000*h1/1000)/2;

            // Board dimension errors
            double w0_diff = abs(w0 - i_params.board_dimensions.width);
            double w1_diff = abs(w1 - i_params.board_dimensions.width);
            double h0_diff = abs(h0 - i_params.board_dimensions.height);
            double h1_diff = abs(h1 - i_params.board_dimensions.height);
            double be_dim_err = w0_diff + w1_diff + h0_diff + h1_diff;

            double distance = sqrt(pow(sample.lidar_centre.x/1000-0, 2) + pow(sample.lidar_centre.y/1000-0, 2) + pow(sample.lidar_centre.z/1000-0, 2));
            sample.distance_from_origin = distance;

            printf("\n--- Sample %d ---\n", num_samples);
            printf("Measured board has: dimensions = %dx%d mm; area = %6.5f m^2\n", i_params.board_dimensions.width, i_params.board_dimensions.height, gt_area);    //%6.5f表示输出浮点数,保留小数点后5位,整个输出文本中占据6个字符的宽度
            printf("Distance = %5.2f m\n", sample.distance_from_origin);
            printf("Board angles     = %5.2f,%5.2f,%5.2f,%5.2f degrees\n",a0, a1, a2, a3);
            printf("Board area       = %7.5f m^2 (%+4.5f m^2)\n", b_area, b_area-gt_area);
            printf("Board avg height = %6.2fmm (%+4.2fmm)\n", (h0+h1)/2, (h0+h1)/2-i_params.board_dimensions.height);
            printf("Board avg width  = %6.2fmm (%+4.2fmm)\n", (w0+w1)/2, (w0+w1)/2-i_params.board_dimensions.width);
            printf("Board dim        = %6.2f,%6.2f,%6.2f,%6.2f mm\n", w0, h0, h1, w1);
            printf("Board dim error  = %7.2f\n\n", be_dim_err);

            // If the lidar board dim is more than 10% of the measured, then reject sample
            if (abs(w0-i_params.board_dimensions.width) > i_params.board_dimensions.width*0.1 |
                abs(w1 - i_params.board_dimensions.width) > i_params.board_dimensions.width * 0.1 |
                abs(h0 - i_params.board_dimensions.height) > i_params.board_dimensions.height * 0.1 |
                abs(h1 - i_params.board_dimensions.height) > i_params.board_dimensions.height * 0.1) {
                ROS_ERROR("Plane fitting error, LiDAR board dimensions incorrect; discarding sample - try capturing again");
                pc_samples_.pop_back();
                num_samples--;
                flag = Optimise::Request::READY;
                ROS_INFO("Ready for capture\n");
                return;
            }

            ROS_INFO("Found line coefficients and outlined chessboard");
            publishBoardPointCloud();

            // cv_bridge库中的toCvCopy函数将ROS图像消息image转换为BGR8格式的OpenCV图像
            cv_bridge::CvImagePtr cv_ptr;
            cv_ptr = cv_bridge::toCvCopy(image, sensor_msgs::image_encodings::BGR8);

            // Save image
            if(boost::filesystem::create_directory(newdatafolder))
            {
                boost::filesystem::create_directory(newdatafolder + "/images");
                boost::filesystem::create_directory(newdatafolder + "/pcd");
                ROS_INFO_STREAM("Save data folder created at " << newdatafolder);
            }
            std::string img_filepath = newdatafolder + "/images/pose" + std::to_string(num_samples)  + ".png" ;
            std::string target_pcd_filepath = newdatafolder + "/pcd/pose" + std::to_string(num_samples)  + "_target.pcd" ;
            std::string full_pcd_filepath = newdatafolder + "/pcd/pose" + std::to_string(num_samples)  + "_full.pcd" ;

            // 使用ROS中的ROS_ASSERT宏来确保cv::imwrite函数成功将cv_ptr指向的图像保存到img_filepath指定的文件中。如果保存失败,ROS_ASSERT宏将会抛出一个错误。
            ROS_ASSERT( cv::imwrite( img_filepath,  cv_ptr->image ) );
            pcl::io::savePCDFileASCII (target_pcd_filepath, *cloud_bounded);
            pcl::io::savePCDFileASCII (full_pcd_filepath, *pointcloud);
            ROS_INFO_STREAM("Image and pcd file saved");    //ROS_INFO_STREAM是ROS中用于输出信息的一个函数,可以将信息输出到ROS的日志系统中,方便调试和记录程序运行状态。


            if (num_samples == 1){
                // Check if save_dir has camera_info topic saved
                std::string pkg_path = ros::package::getPath("cam_lidar_calibration");

                std::ofstream camera_info_file;
                std::string camera_info_path = pkg_path + "/cfg/camera_info.yaml";
                ROS_INFO_STREAM("Camera_info saved at: " << camera_info_path);
                camera_info_file.open(camera_info_path, std::ios_base::out | std::ios_base::trunc);     // 以写入模式打开(即std::ios_base::out),如果文件已经存在则清空文件内容(即std::ios_base::trunc)
                std::string dist_model = (i_params.fisheye_model) ? "fisheye": "non-fisheye";
                camera_info_file << "distortion_model: \"" << dist_model << "\"\n";
                camera_info_file << "width: " << i_params.image_size.first << "\n";
                camera_info_file << "height: " << i_params.image_size.second << "\n";
                camera_info_file << "D: [" << i_params.distcoeff.at<double>(0)
                                        << "," << i_params.distcoeff.at<double>(1)
                                        << "," << i_params.distcoeff.at<double>(2)
                                        << "," << i_params.distcoeff.at<double>(3) << "]\n";
                camera_info_file << "K: [" << i_params.cameramat.at<double>(0,0)
                                        << ",0.0"
                                        << "," << i_params.cameramat.at<double>(0,2)
                                        << ",0.0"
                                        << "," << i_params.cameramat.at<double>(1,1)
                                        << "," << i_params.cameramat.at<double>(1,2)
                                        << ",0.0,0.0"
                                        << "," << i_params.cameramat.at<double>(2, 2)
                                        << "]\n";
                camera_info_file.close();
            }

            // Push this sample to the optimiser
            optimiser_->samples.push_back(sample);
            flag = Optimise::Request::READY;  // Reset the capture flag
            ROS_INFO("Ready for capture\n");
        }  // if (flag == Optimise::Request::CAPTURE)
    }  // End of extractRegionOfInterest
2.2.16 FeatureExtractor::find_octant函数
功能:将点具体划分到 8 个坐标系象限,并添加标签,在2.2.14函数中使用
输入:xyz坐标
输出:坐标系标签1~8
2.2.17 FeatureExtractor::getDateTime函数
功能:获取时间作为文件存储路径,在 FeatureExtractor::optimise里使用。
// Get current date/time, format is YYYY-MM-DD-HH:mm:ss
// 获取当前时间并将其格式化为ISO 8601标准的日期时间字符串,不包含时区信息。
    std::string FeatureExtractor::getDateTime()
    {
        auto time = std::time(nullptr);     //它返回当前的系统时间(以秒为单位),并将其转换为 std::time_t 类型的值
        std::stringstream ss;
        ss << std::put_time(std::localtime(&time), "%F_%T"); // ISO 8601 without timezone information.
        auto s = ss.str();      //将stringstream对象ss中存储的字符串转换为标准字符串(string类型)
        std::replace(s.begin(), s.end(), ':', '-');     //该函数属于 C++ STL 中的 algorithm 头文件中的函数,其功能是在指定范围内将指定值替换为另一个值。
        return s;
    }
2.3 point_xyzir.h文件
用到的点云类型,XYZIR,格式和速腾的一致,所以可以直接执行程序而不用转velodyne雷达。
namespace pcl
{
struct PointXYZIR
{
  PCL_ADD_POINT4D;
  float intensity;
  uint16_t ring;
  EIGEN_MAKE_ALIGNED_OPERATOR_NEW
} EIGEN_ALIGN16;
}  // namespace pcl

POINT_CLOUD_REGISTER_POINT_STRUCT(PointXYZIR, (float, x, x)(float, y, y)(float, z, z)(float, intensity,
                                                                                      intensity)(uint16_t, ring, ring))
2.4 load_params.cpp文件
引用头文件load_params.h,里面定义了初始参数initial_parameters_t。通过loadParams从ROS参数服务器中读取参数,并将这些参数存储在initial_parameters_t类型的变量i_params中。其中,ros::NodeHandle类型的引用n用于指定参数服务器的命名空间。
功能:
- 定义变量名
- 从params.yaml文件中读取数据,并赋值给变量
2.5 optimiser.h文件
功能:定义FeatureExtractor::optimise优化函数用到的数据结构,SetAssess等。
暂时没有仔细分析这部分计算过程,后期补上!


