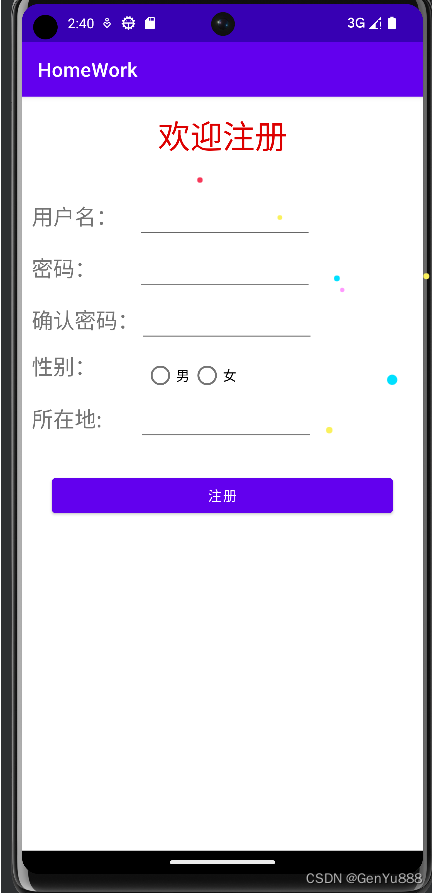
1.效果展示
2.实现
1.主页面activity_main.xml
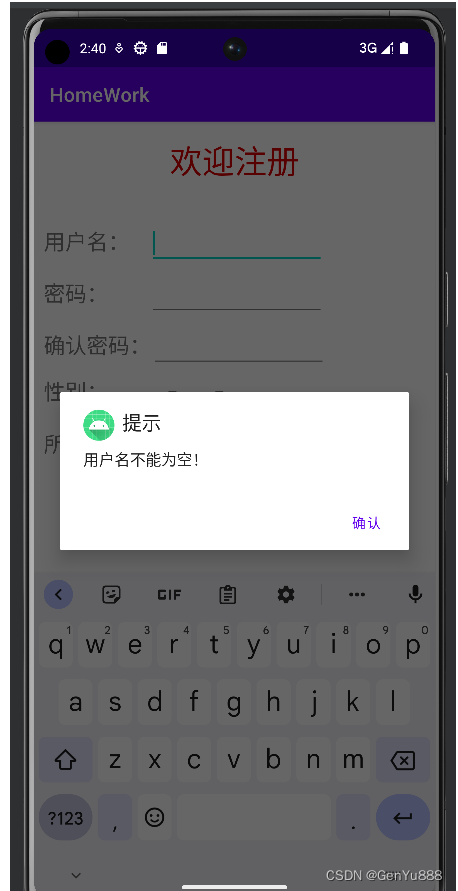
主页面就是简单的几个TextView和EditText以及单选框组成的一个注册表单。
<?xml version="1.0" encoding="utf-8"?>
<LinearLayout
    xmlns:android="http://schemas.android.com/apk/res/android"
    xmlns:app="http://schemas.android.com/apk/res-auto"
    xmlns:tools="http://schemas.android.com/tools"
    android:layout_width="match_parent"
    android:layout_height="match_parent"
    android:orientation="vertical">

    <TextView
        android:layout_marginTop="18sp"
        android:layout_gravity="center"
        android:textSize="33sp"
        android:text="欢迎注册"
        android:textColor="#FFDD0000"
        android:layout_width="wrap_content"
        android:layout_height="wrap_content"/>

    <LinearLayout
        android:layout_marginTop="40sp"
        android:orientation="horizontal"
        android:layout_width="match_parent"
        android:layout_height="wrap_content">

        <TextView
            android:layout_marginLeft="10sp"
            android:textSize="22sp"
            android:text="用户名:"
            android:layout_width="wrap_content"
            android:layout_height="wrap_content"/>

        <EditText
            android:id="@+id/ed_username"
            android:layout_marginLeft="20sp"
            android:layout_width="180sp"
            android:layout_height="wrap_content"/>
    </LinearLayout>

    <LinearLayout
        android:layout_marginTop="8sp"
        android:orientation="horizontal"
        android:layout_width="match_parent"
        android:layout_height="wrap_content">

        <TextView
            android:layout_marginLeft="10sp"
            android:textSize="22sp"
            android:text="密码:"
            android:layout_width="wrap_content"
            android:layout_height="wrap_content"/>

        <EditText
            android:id="@+id/ed_password"
            android:inputType="textPassword"
            android:layout_marginLeft="42sp"
            android:layout_width="180sp"
            android:layout_height="wrap_content"/>
    </LinearLayout>

    <LinearLayout
        android:layout_marginTop="8sp"
        android:orientation="horizontal"
        android:layout_width="match_parent"
        android:layout_height="wrap_content">

        <TextView
            android:layout_marginLeft="10sp"
            android:textSize="22sp"
            android:text="确认密码:"
            android:layout_width="wrap_content"
            android:layout_height="wrap_content"/>

        <EditText
            android:id="@+id/ed_password2"
            android:inputType="textPassword"
            android:layout_width="180sp"
            android:layout_height="wrap_content"/>
    </LinearLayout>

    <LinearLayout
        android:layout_marginTop="8sp"
        android:orientation="horizontal"
        android:layout_width="match_parent"
        android:layout_height="wrap_content">

        <TextView
            android:layout_marginLeft="10sp"
            android:textSize="22sp"
            android:text="性别:"
            android:layout_width="wrap_content"
            android:layout_height="wrap_content"/>

        <RadioGroup
            android:layout_marginLeft="50sp"
            android:id="@+id/radiogroup1"
            android:layout_height="wrap_content"
            android:layout_width="wrap_content"
            android:orientation="horizontal">

            <RadioButton
                android:id="@+id/radiobutton1"
                android:layout_height="wrap_content"
                android:layout_width="match_parent"
                android:text="男" />

            <RadioButton
                android:id="@+id/radiobutton2"
                android:layout_height="wrap_content"
                android:layout_width="match_parent"
                android:text="女" />
        </RadioGroup>

    </LinearLayout>

    <LinearLayout
        android:layout_width="match_parent"
        android:layout_height="wrap_content">

        <TextView
            android:layout_marginLeft="10sp"
            android:textSize="22sp"
            android:text="所在地:"
            android:layout_width="wrap_content"
            android:layout_height="wrap_content"/>

        <EditText
            android:id="@+id/ed_addr"
            android:layout_marginLeft="37sp"
            android:layout_width="180sp"
            android:layout_height="wrap_content"/>

    </LinearLayout>


    <Button
        android:id="@+id/signUp_btn"
        android:layout_gravity="center"
        android:layout_marginTop="30sp"
        android:text="注册"
        android:layout_width="350sp"
        android:layout_height="wrap_content"/>
</LinearLayout>
2.MainActivity.java
package com.example.homework;
import androidx.annotation.Nullable;
import androidx.appcompat.app.AlertDialog;
import androidx.appcompat.app.AppCompatActivity;
import android.content.Intent;
import android.graphics.Paint;
import android.os.Bundle;
import android.text.TextUtils;
import android.util.Log;
import android.view.View;
import android.widget.Button;
import android.widget.EditText;
import android.widget.RadioButton;
public class MainActivity extends AppCompatActivity {
private EditText username;
private EditText password;
private EditText password2;
private RadioButton radiobutton1;
private RadioButton radiobutton2;
private EditText addr;
private Button signUpBtn;
@Override
protected void onCreate(Bundle savedInstanceState) {
super.onCreate(savedInstanceState);
setContentView(R.layout.activity_main);
initView();
initListener();
}
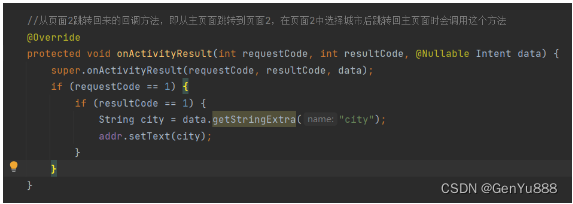
//从页面2跳转回来的回调方法,即从主页面跳转到页面2,在页面2中选择城市后跳转回主页面时会调用这个方法
@Override
protected void onActivityResult(int requestCode, int resultCode, @Nullable Intent data) {
super.onActivityResult(requestCode, resultCode, data);
if (requestCode == 1) {
if (resultCode == 1) {
String city = data.getStringExtra("city");
addr.setText(city);
}
}
}
//这个方法是注册表单提交前的检查,要求输入的用户名、密码等都要规范
private boolean signUpCheck() {
String usernameText = this.username.getText().toString().trim();
if (TextUtils.isEmpty(usernameText)) {
alert("用户名不能为空!");
return false;
}
String passwordText = this.password.getText().toString().trim();
if (TextUtils.isEmpty(passwordText) || passwordText.length() < 6 || passwordText.length() > 15) {
alert("密码不符合规范!");
return false;
}
String password2Text = this.password2.getText().toString().trim();
if (TextUtils.isEmpty(password2Text) || password2Text.length() < 6 || password2Text.length() > 15) {
alert("确认密码不符合规范!");
return false;
}
if (!passwordText.equals(password2Text)) {
alert("两次输入的密码不一致!");
return false;
}
if (!radiobutton1.isChecked() && !radiobutton2.isChecked()) {
alert("请选择性别!");
return false;
}
String addrText = addr.getText().toString().trim();
if (TextUtils.isEmpty(addrText)) {
alert("请选择地区!");
return false;
}
return true;
}
//监听器的初始化,在这里绑定事件
private void initListener() {
addr.setOnFocusChangeListener(new View.OnFocusChangeListener() {
@Override
public void onFocusChange(View view, boolean b) {
Intent intent = new Intent(MainActivity.this, ListActivity.class);
startActivityForResult(intent, 1);
}
});
signUpBtn.setOnClickListener(new View.OnClickListener() {
@Override
public void onClick(View view) {
if (signUpCheck()) {
alert("注册成功");
}
}
});
}
//将弹窗封装成一个方法,便于多次调用,否则每次调用都要new一个AlertDialog,代码冗余
private void alert(String msg) {
AlertDialog alertDialog = new AlertDialog.Builder(this)
//标题
.setTitle("提示")
//内容
.setMessage(msg)
//图标
.setIcon(R.mipmap.ic_launcher)
//选项
.setPositiveButton("确认", null)
.create();
alertDialog.show();
}
//视图组件的初始化
private void initView() {
username = findViewById(R.id.ed_username);
password = findViewById(R.id.ed_password);
password2 = findViewById(R.id.ed_password2);
addr = findViewById(R.id.ed_addr);
radiobutton1 = findViewById(R.id.radiobutton1);
radiobutton2 = findViewById(R.id.radiobutton2);
signUpBtn = findViewById(R.id.signUp_btn);
}
}
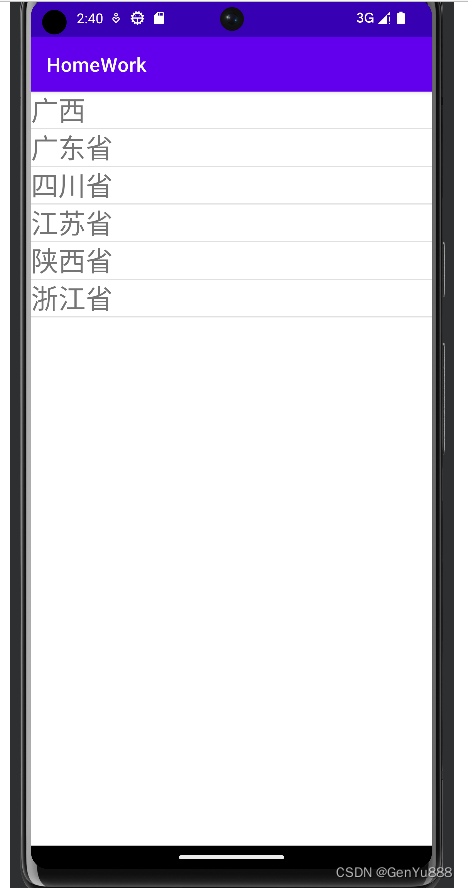
3.页面2(选择地区的页面)
这里使用了DrawerLayout和ListView,DrawerLayout是一个抽屉效果的布局,他的第一个子元素是默认显示的,第二个子元素一般是设置点击第一个子元素后显示;ListView虽然是已经弃用的组件,但我比较懒,懒得学RecycleView,就将就着用了,他就是一个列表展示的组件。
页面2的xml文件:activity_list.xml
<?xml version="1.0" encoding="utf-8"?>
<LinearLayout
    xmlns:android="http://schemas.android.com/apk/res/android"
    android:layout_width="match_parent"
    android:layout_height="match_parent"
    android:orientation="vertical"
    >

    <androidx.drawerlayout.widget.DrawerLayout
        android:id="@+id/drawer_layout"
        android:layout_width="match_parent"
        android:layout_height="match_parent"
        >

        <ListView
            android:id="@+id/province"
            android:layout_width="match_parent"
            android:layout_height="wrap_content"/>

        <ListView
            android:background="#009EFF"
            android:id="@+id/city"
            android:layout_gravity="start"
            android:choiceMode="singleChoice"
            android:dividerHeight="0dp"
            android:layout_width="wrap_content"
            android:layout_height="wrap_content"/>
    </androidx.drawerlayout.widget.DrawerLayout>
</LinearLayout>
页面2的activity:ListActivity.java
package com.example.homework;
import androidx.appcompat.app.AppCompatActivity;
import androidx.drawerlayout.widget.DrawerLayout;
import android.content.Intent;
import android.os.Bundle;
import android.view.Gravity;
import android.view.View;
import android.widget.AdapterView;
import android.widget.ListView;
import android.widget.TextView;
import java.util.ArrayList;
import java.util.List;
public class ListActivity extends AppCompatActivity {
private List<Bean> provinceData = new ArrayList<>();
private List<Bean> cityData = new ArrayList<>();
private final static String[] provinceName = {
"广西","广东省","四川省","江苏省","陕西省","浙江省"
};
private final static String[] guangxi = {
"南宁","柳州","桂林","河池","梧州","百色","北海","崇左","玉林","防城港","贺州"
};
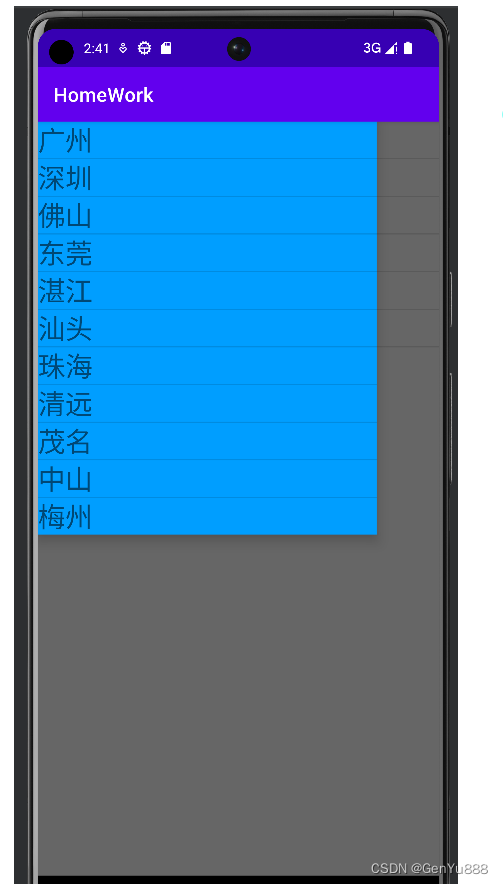
private final static String[] guangdong = {
"广州","深圳","佛山","东莞","湛江","汕头","珠海","清远","茂名","中山","梅州"
};
private final static String[] sichuan = {
"成都","绵阳","眉山","乐山","自贡","南充","广元","达州","巴中","广安"
};
private final static String[] jiangsu = {
"南京","泰州","苏州","常州","马鞍山","无锡","徐州","南通","连云港","扬州"
};
private final static String[] shanxi = {
"西安","榆林","咸阳","宝鸡","渭南","延安","汉中","安康","商洛","铜川"
};
private final static String[] zhejiang = {
"杭州","宁波","温州","嘉兴","湖州","绍兴","金华","舟山","台州","丽水"
};
private ListView cities;
//这个是页面2中的DrawerLayout
private DrawerLayout dl;
private ListView provinces;
@Override
protected void onCreate(Bundle savedInstanceState) {
super.onCreate(savedInstanceState);
setContentView(R.layout.activity_list);
initView();
initListView();
initListener();
}
private void initListener() {
//给省份的每一项绑定单击事件
provinces.setOnItemClickListener(new AdapterView.OnItemClickListener() {
@Override
public void onItemClick(AdapterView<?> adapterView, View view, int i, long l) {
//当点击某个省份项的时候就调用DrawerLayout布局的这个方法,展示隐藏的第二个元素(城市的ListView)
dl.openDrawer(Gravity.LEFT);
cities.setAdapter(new CityAdapter(provinceData, ListActivity.this));
cityData.clear();
//根据偏移量(选择的省份,展示对应省份的城市)
switch (i) {
case 0:
for (String name : guangxi){
Bean bean = new Bean();
bean.setName(name);
cityData.add(bean);
}
break;
case 1:
for (String name : guangdong){
Bean bean = new Bean();
bean.setName(name);
cityData.add(bean);
}
break;
case 2:
for (String name : sichuan){
Bean bean = new Bean();
bean.setName(name);
cityData.add(bean);
}
break;
case 3:
for (String name : jiangsu){
Bean bean = new Bean();
bean.setName(name);
cityData.add(bean);
}
break;
case 4:
for (String name : shanxi){
Bean bean = new Bean();
bean.setName(name);
cityData.add(bean);
}
break;
case 5:
for (String name : zhejiang){
Bean bean = new Bean();
bean.setName(name);
cityData.add(bean);
}
break;
}
//装配数据到ListView
cities.setAdapter(new CityAdapter(cityData, ListActivity.this));
}
});
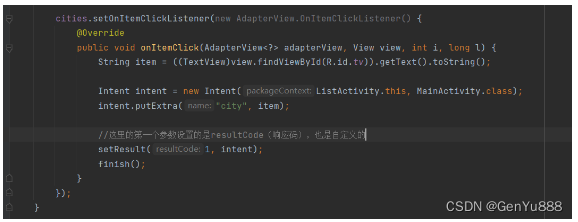
//给城市的每一项绑定也单击事件
cities.setOnItemClickListener(new AdapterView.OnItemClickListener() {
@Override
public void onItemClick(AdapterView<?> adapterView, View view, int i, long l) {
String item = ((TextView)view.findViewById(R.id.tv)).getText().toString();
Intent intent = new Intent(ListActivity.this, MainActivity.class);
intent.putExtra("city", item);
//这里的第一个参数设置的是resultCode(响应码),也是自定义的
setResult(1, intent);
//调用finish返回主页面
finish();
}
});
}
//初始化省份的ListView
private void initListView() {
provinces.setAdapter(new CityAdapter(provinceData, this));
for (String name : provinceName){
Bean bean = new Bean();
bean.setName(name);
provinceData.add(bean);
}
provinces.setAdapter(new CityAdapter(provinceData, this));
}
private void initView() {
cities = findViewById(R.id.city);
dl = findViewById(R.id.drawer_layout);
provinces = findViewById(R.id.province);
}
}
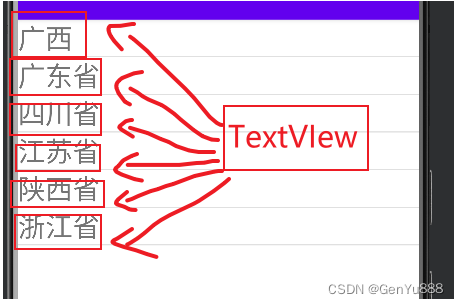
3.1ListVIew的使用
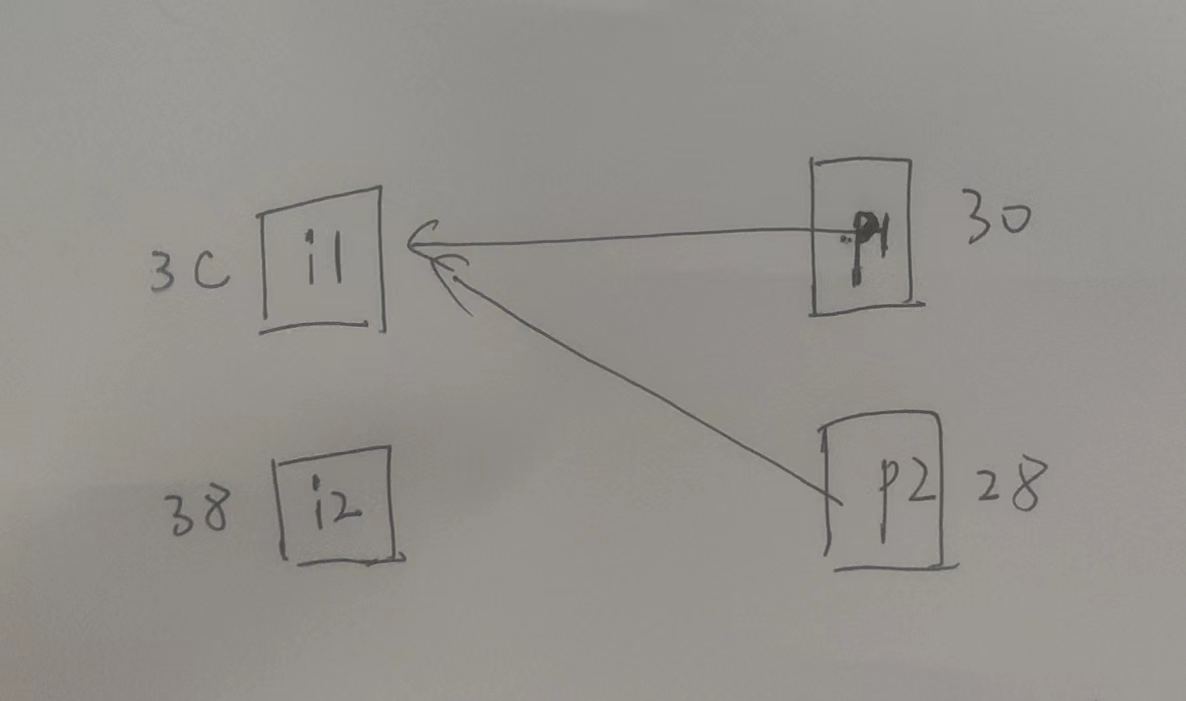
1)首先建一个xml:area_item.xml,这个可以理解为就是ListView列表中的每一项,在这个xml中定义ListView列表中每一项的布局。
<?xml version="1.0" encoding="utf-8"?>
<LinearLayout xmlns:android="http://schemas.android.com/apk/res/android"
    android:layout_width="match_parent"
    android:layout_height="match_parent">

    <TextView
        android:id="@+id/tv"
        android:textSize="28sp"
        android:layout_width="wrap_content"
        android:layout_height="wrap_content"/>


</LinearLayout>
比如我这里就是一个TextView,则ListView列表中的每一项/每一个元素都是一个TextView。
图解:
2)然后要自定义一个适配器
适配器的作用就是将List集合中的数据装配到ListView列表上,例如我这里是List data,其中Bean其实就是一个实体类,用来装载数据的。适配器比较关键的就是getView方法,这个方法的作用就是将List中的数据装配到视图上(ListView),这个方法的实现其实可以直接copy然后来改里面的视图id,想要理解装配过程的话请自行百度哈。
package com.example.homework;

import android.content.Context;
import android.view.LayoutInflater;
import android.view.View;
import android.view.ViewGroup;
import android.widget.BaseAdapter;
import android.widget.TextView;

import java.util.List;

public class CityAdapter extends BaseAdapter {

    private List<Bean> data;

    private Context context;

    public CityAdapter(List<Bean> data, Context context) {
        this.data = data;
        this.context = context;
    }

    @Override
    public int getCount() {
        return data.size();
    }

    @Override
    public Object getItem(int i) {
        return null;
    }

    @Override
    public long getItemId(int i) {
        return i;
    }

    @Override
    public View getView(int i, View view, ViewGroup viewGroup) {
        ViewHolder viewHolder;
        if (view == null) {
            view = LayoutInflater.from(context).inflate(R.layout.area_item, viewGroup, false);
            viewHolder = new ViewHolder();
            viewHolder.textView = view.findViewById(R.id.tv);
            view.setTag(viewHolder);
        } else {
            viewHolder = (ViewHolder) view.getTag();
        }
        viewHolder.textView.setText(data.get(i).getName());
        return view;
    }

    private final class ViewHolder {
        TextView textView;
    }


}
Bean.java
package com.example.homework;

public class Bean {
    private String name;

    public String getName() {
        return name;
    }

    public void setName(String name) {
        this.name = name;
    }
}
3.2页面回传数据
主页面中跳转页面2(选择地区的页面),要使用startActivityForResult方法跳转,其中第一个参数是intent,第二个参数是requestCode(请求码),这个是可以自定义的。
主页面中的跳转代码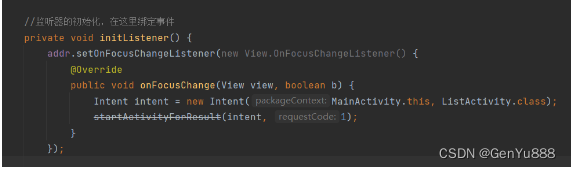
主页面中还要定义一个回调方法onActivityResult,这个方法是页面2跳转回来后会执行这个方法,在这里设置页面2选择的城市到视图中。
在页面2中给每个列表项绑定单击事件,获取到选中的城市,设置到intent中并回传主页面。
在这里有个坑,如果跳转时那个requestCode和resultCode你使用负值的话,在页面2跳转回主页面的时候是不会调用回调方法onActivityResult的,一定要使用正值,如果使用RESULT_OK那个自带常量的话是不行的,因为这个常量的值是-1,我之前就是使用这个常量作为requestCode和resultCode,导致跳转回主页面的时候一直没有调用回调方法,查资料后才知道了这个问题,希望大家不要踩坑!
更多精彩内容关注博客原站:盐鱼律己
![[附源码]JAVA毕业设计口腔医院网站(系统+LW)](https://img-blog.csdnimg.cn/f26d505f6f544f2e9cd40f78d79c1266.png)
![[附源码]JAVA毕业设计课程答疑系统(系统+LW)](https://img-blog.csdnimg.cn/4305212a32ef4fd8b6fa7b774d83b1ab.png)
![[LeetCode周赛复盘] 第 322 场周赛20221204](https://img-blog.csdnimg.cn/13704aaa394e4710b5355955dff685a5.png)


![[附源码]Python计算机毕业设计Django汽车美容店管理系统](https://img-blog.csdnimg.cn/07ab0e30abf14c7496e562d0ca8a2715.png)