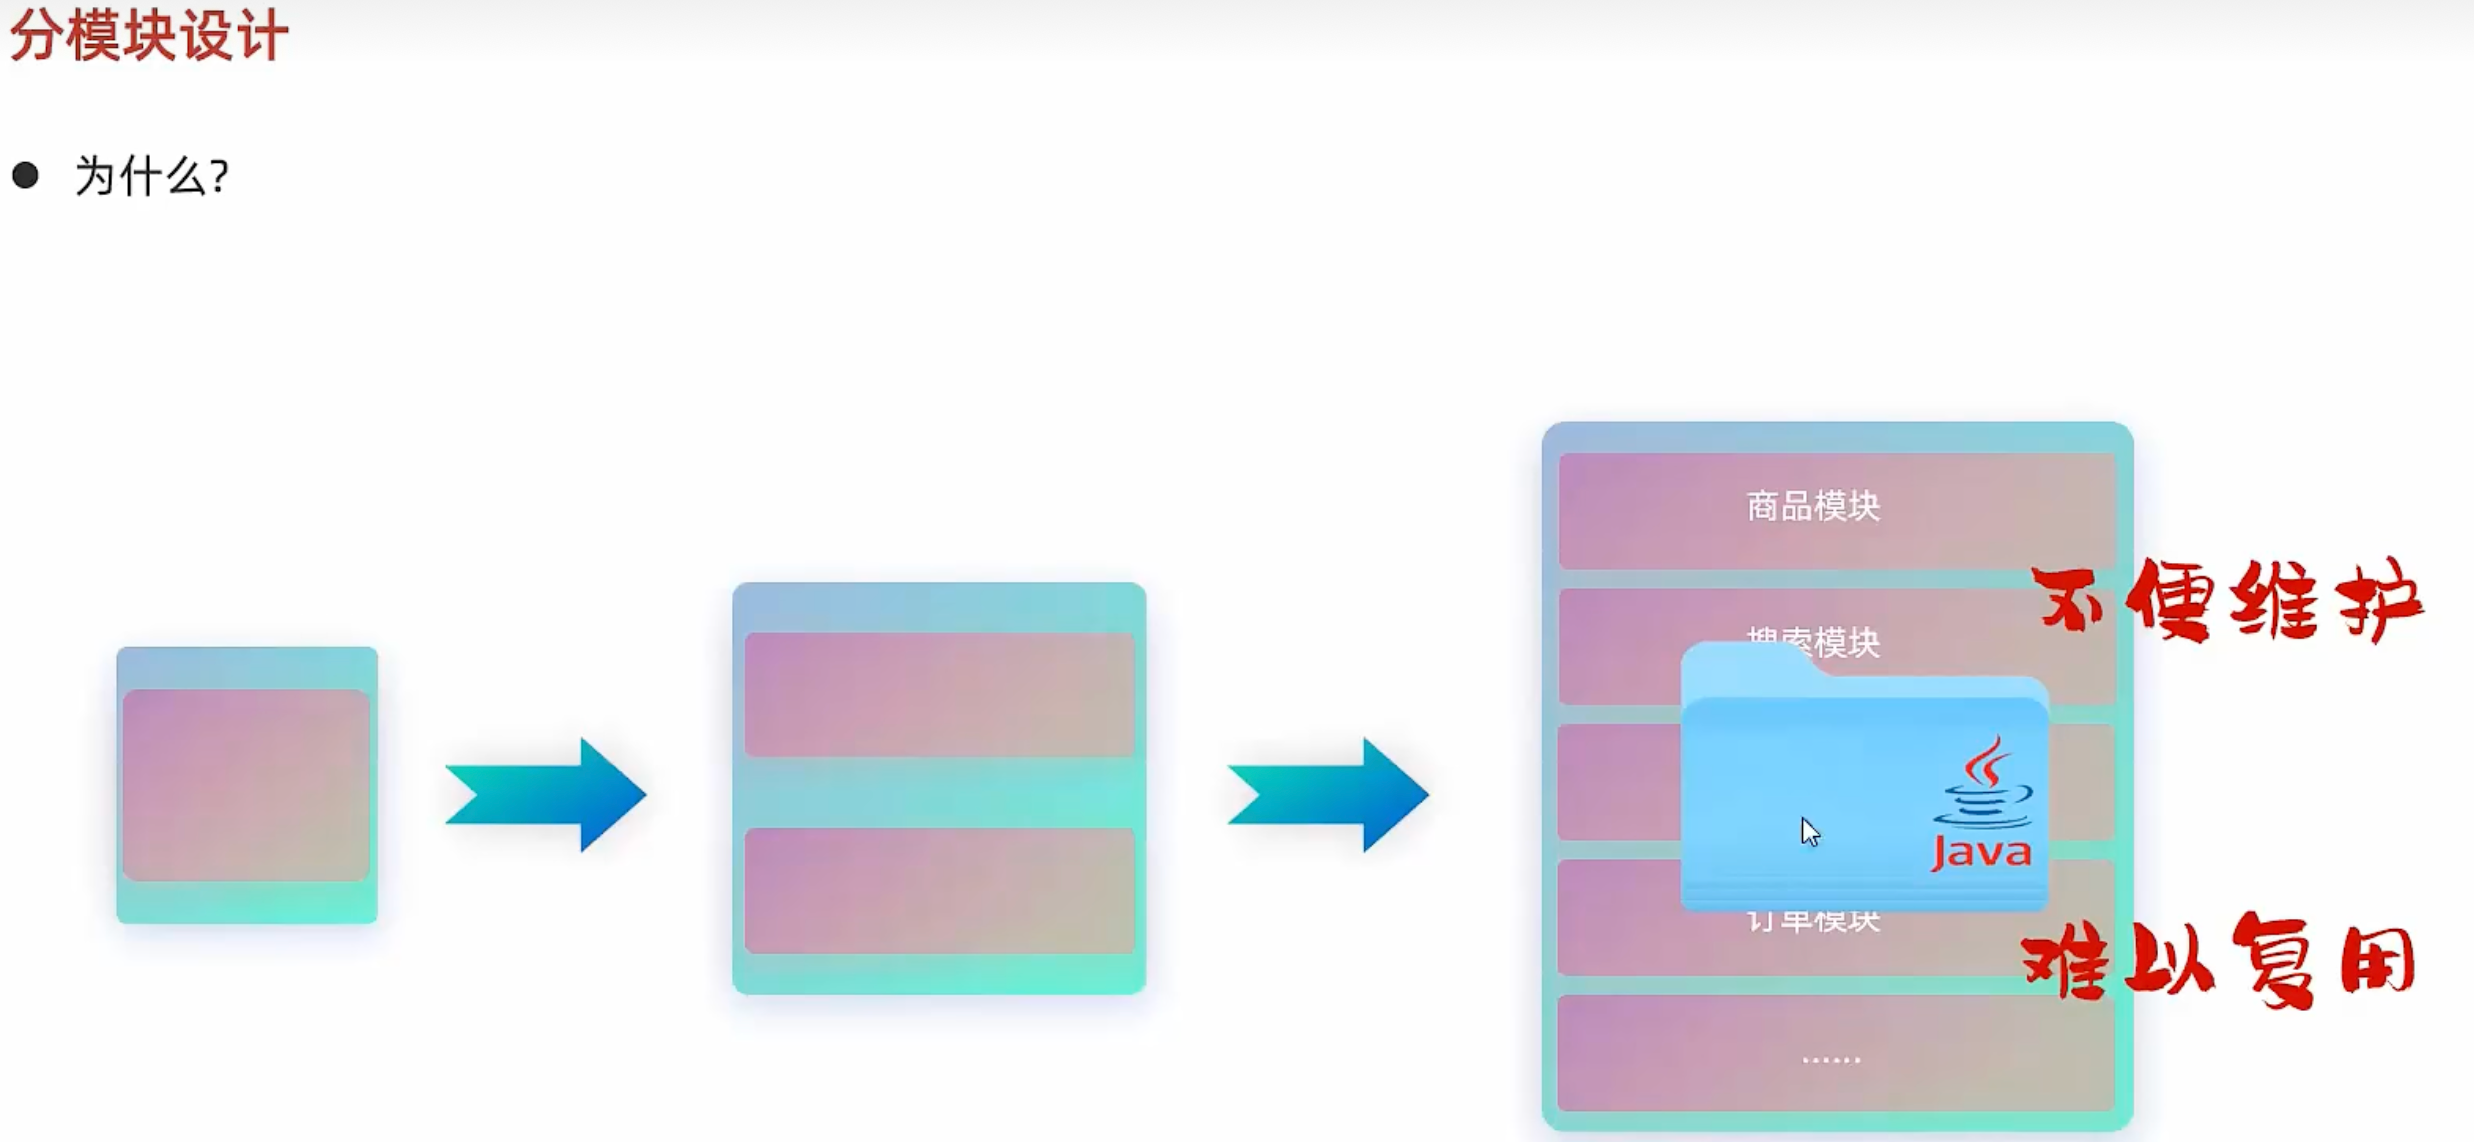
一、分模块设计与开发
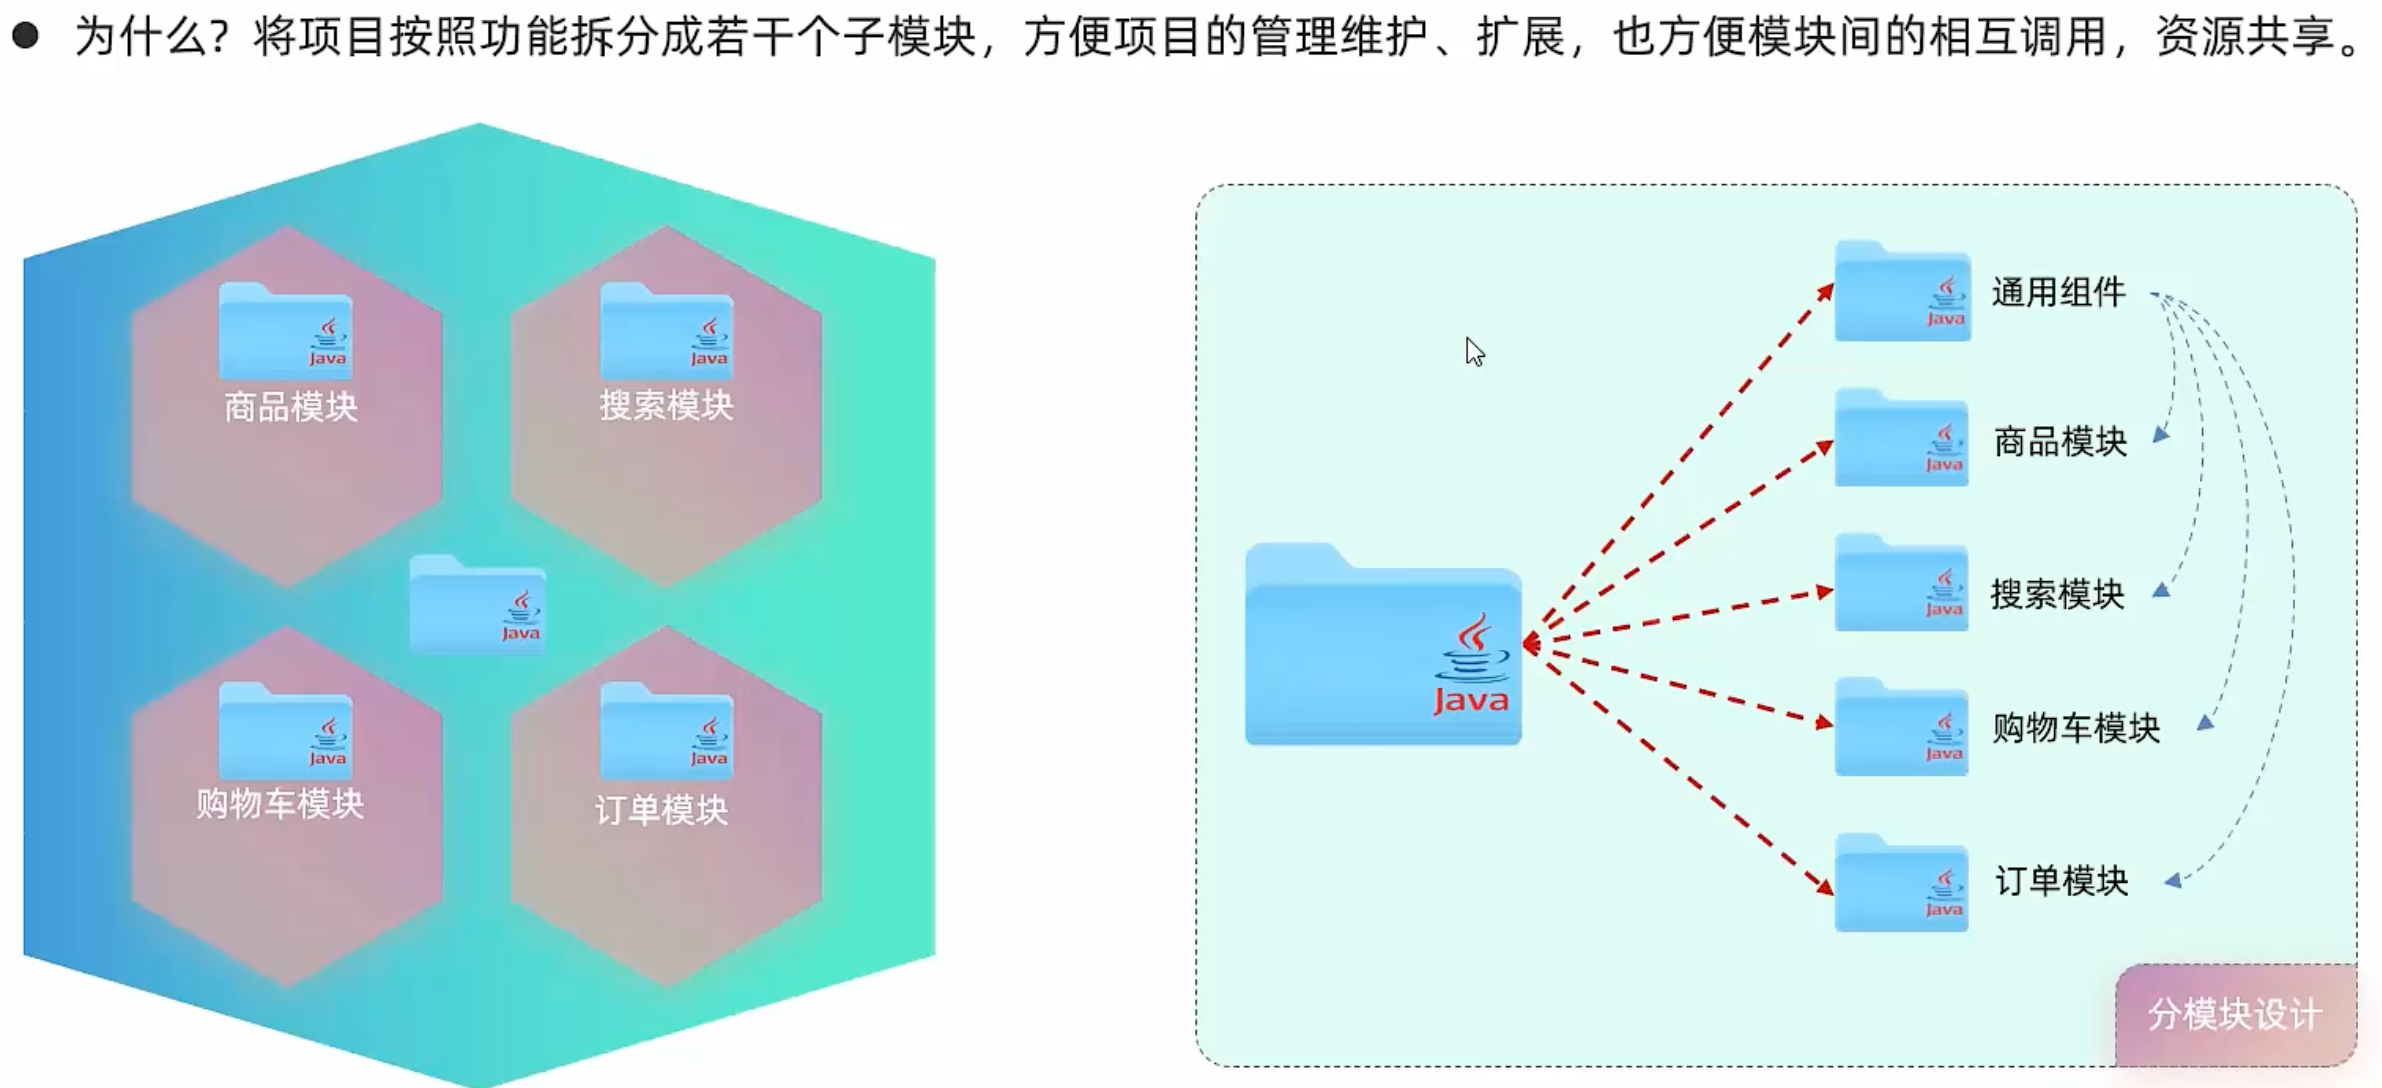
1、介绍
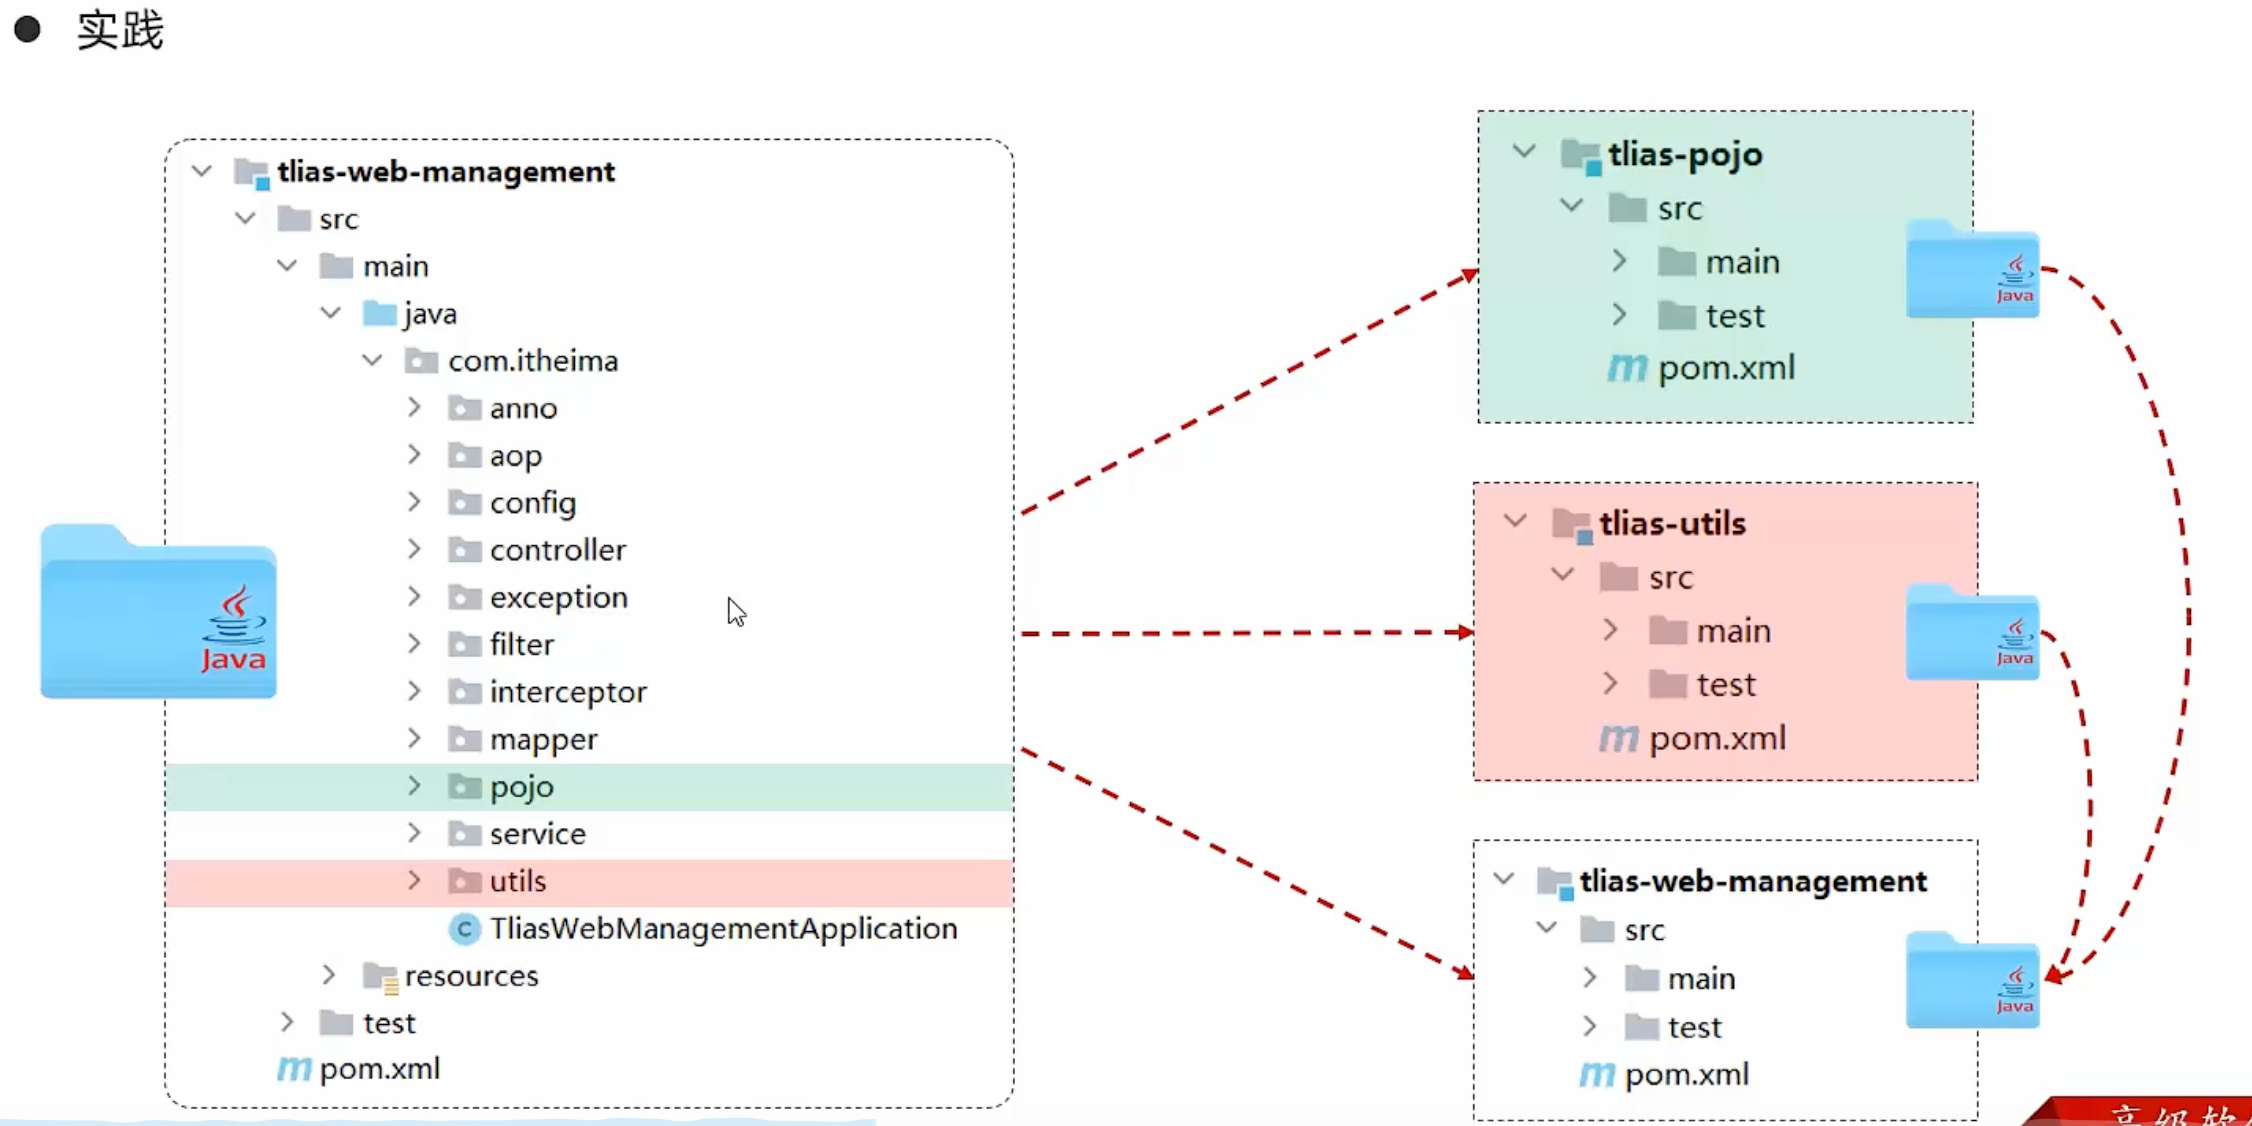
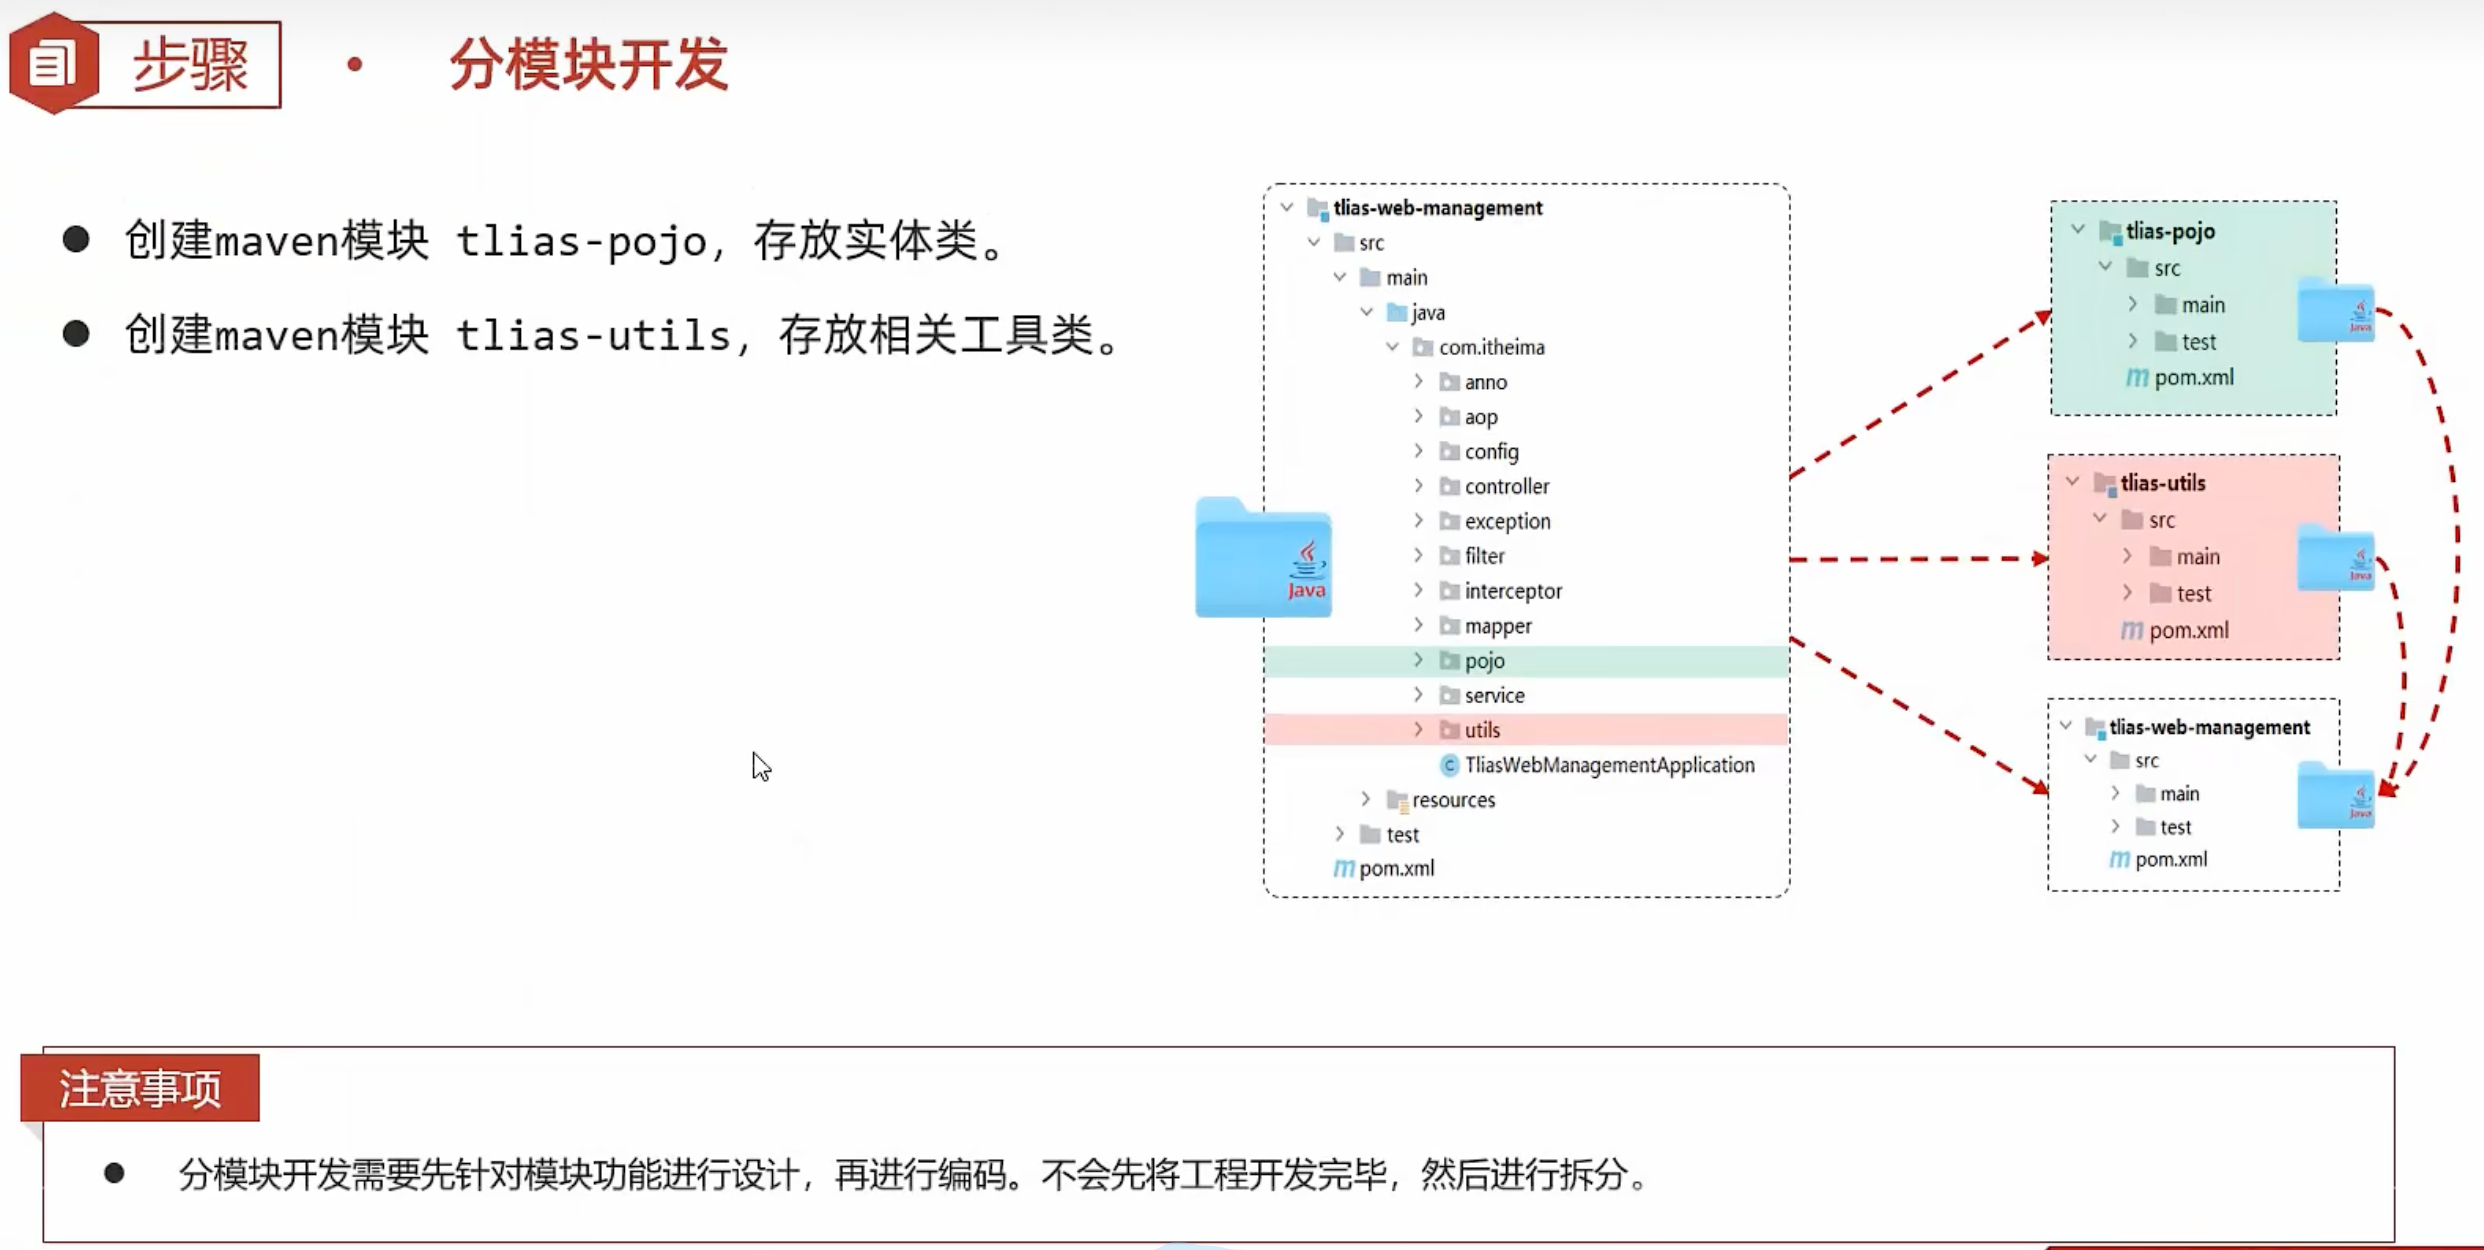
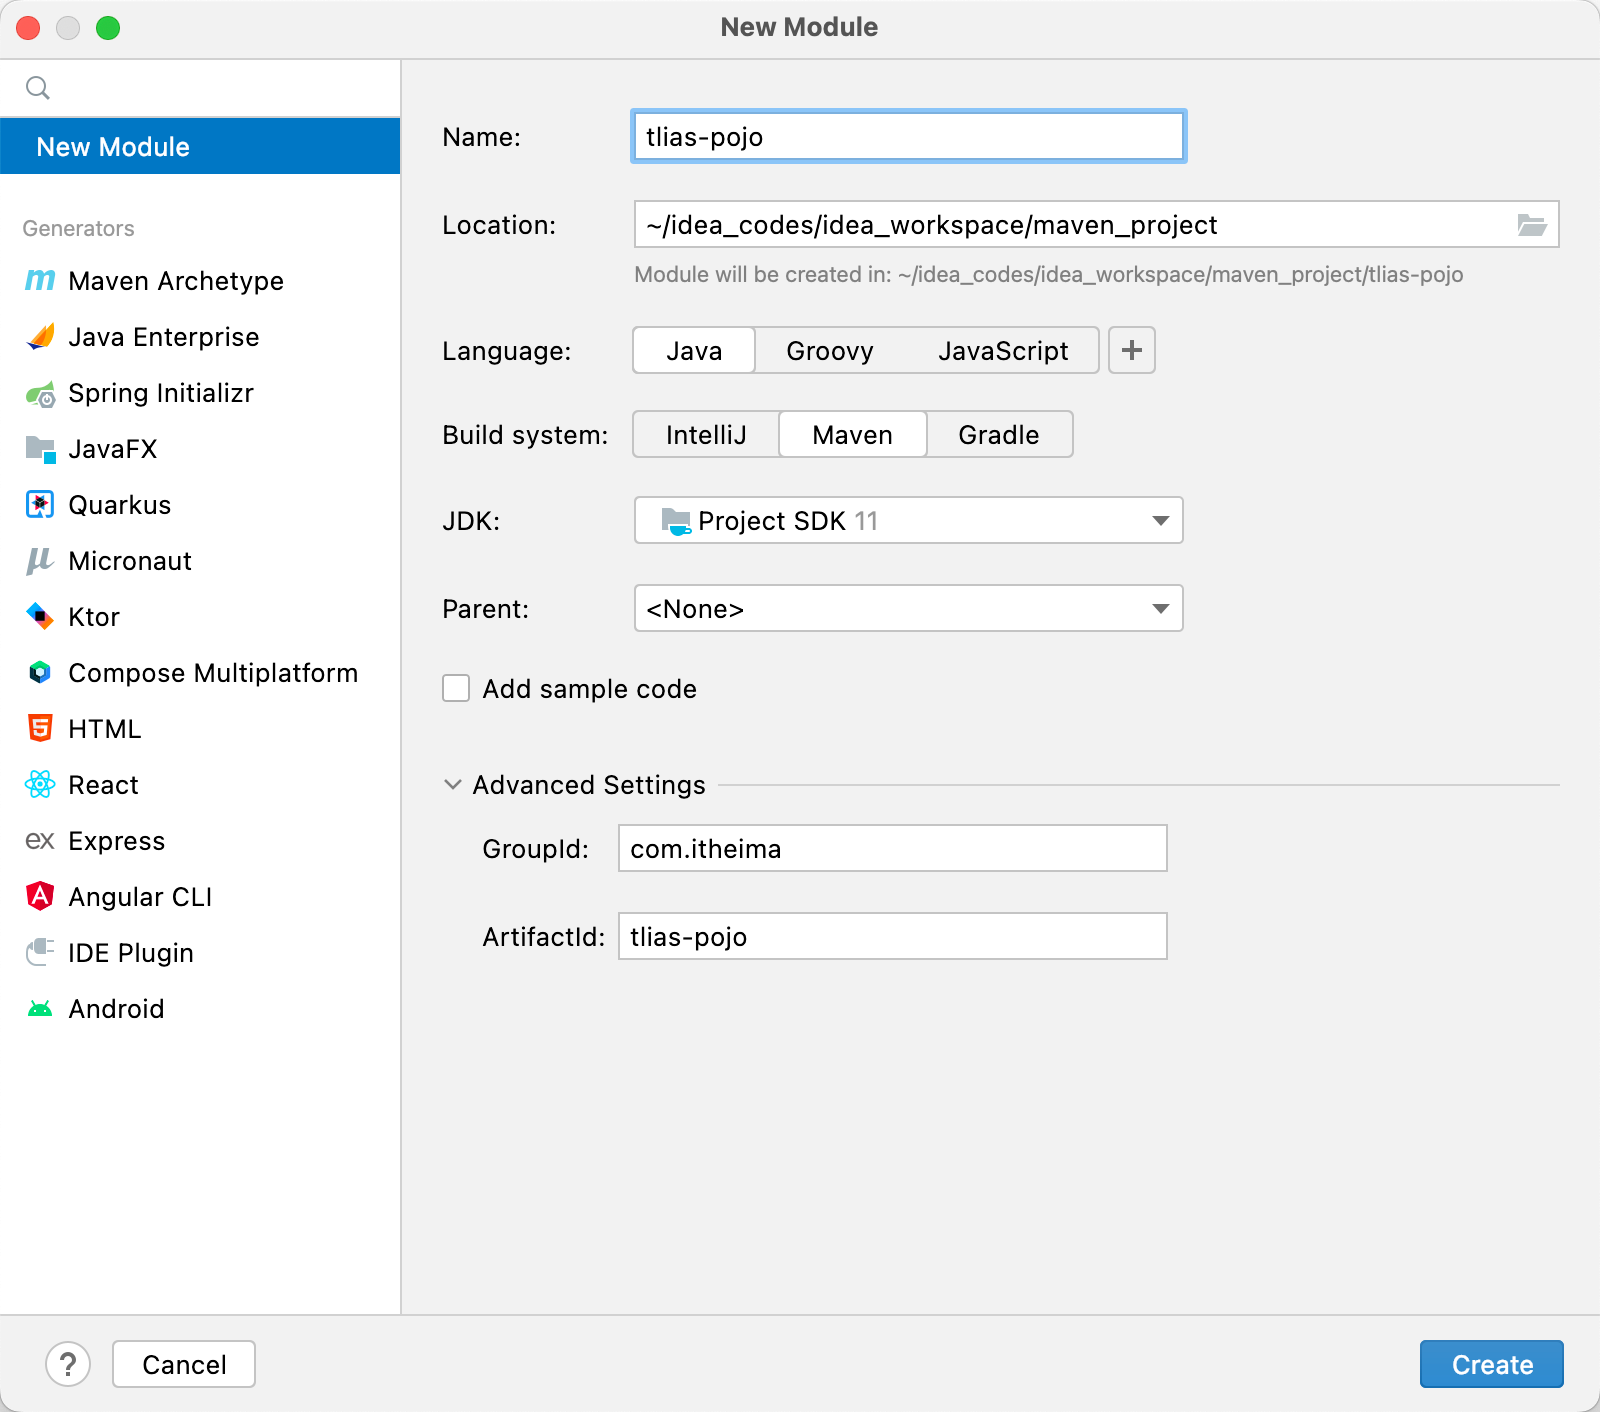
2、tlias-pojo模块
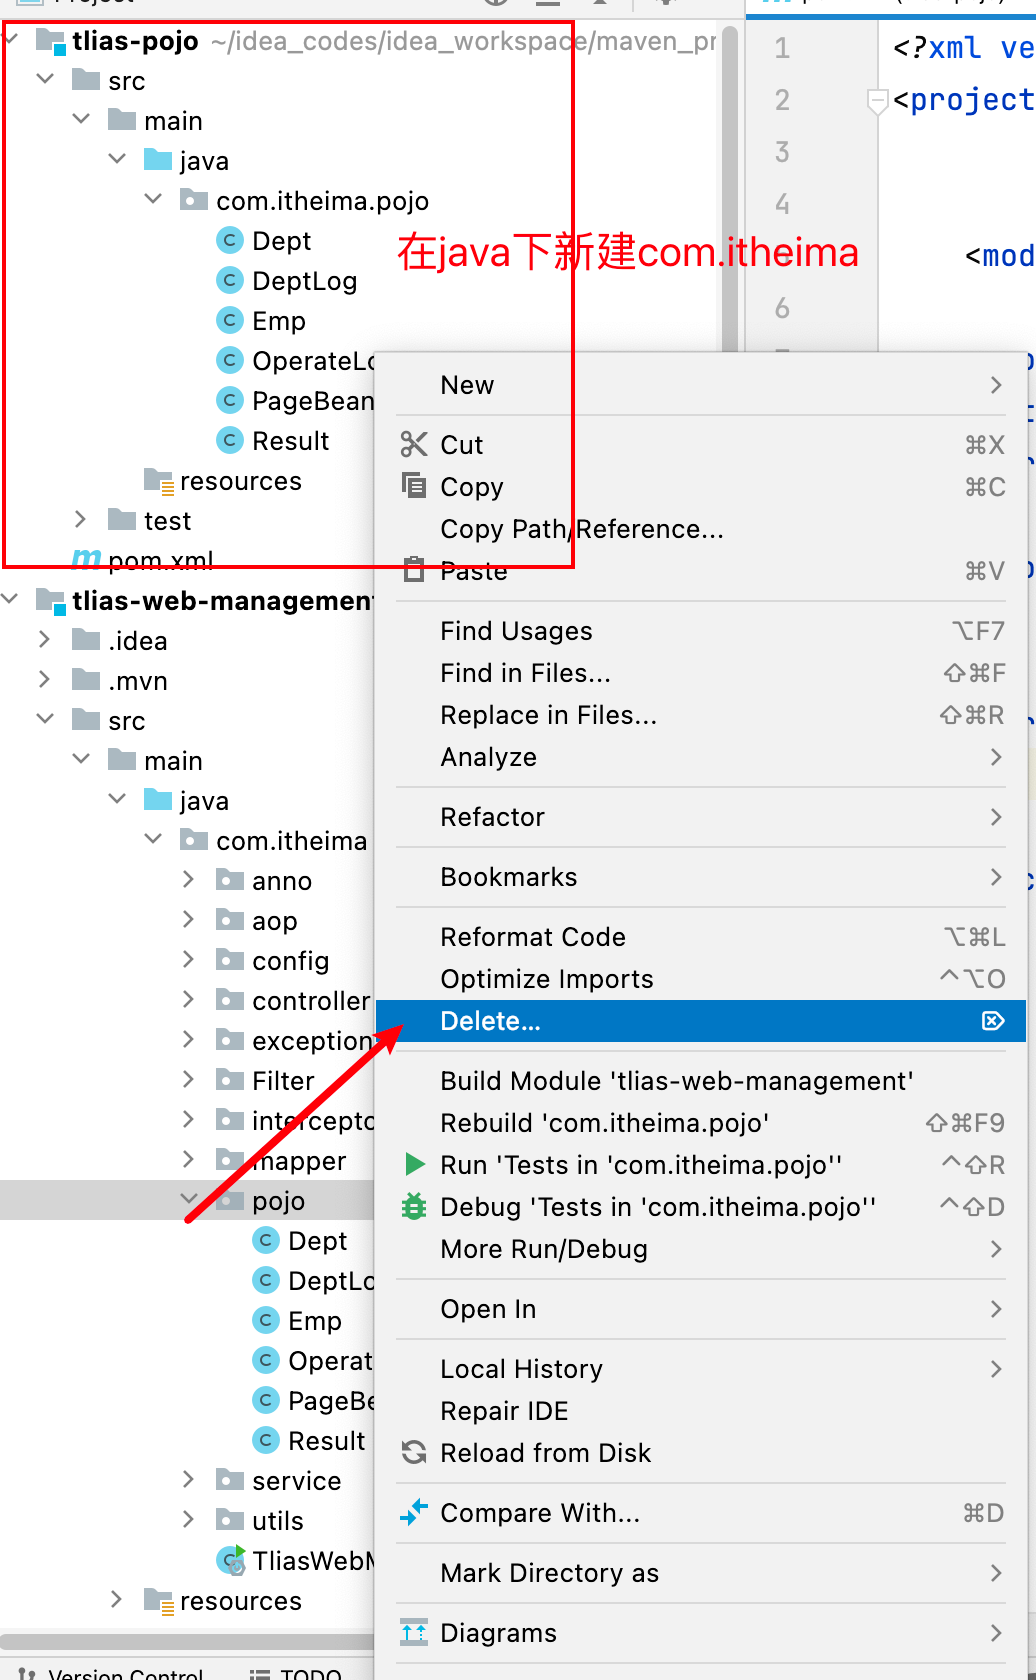
然后把pojo复制过去。pom中加入lombok依赖
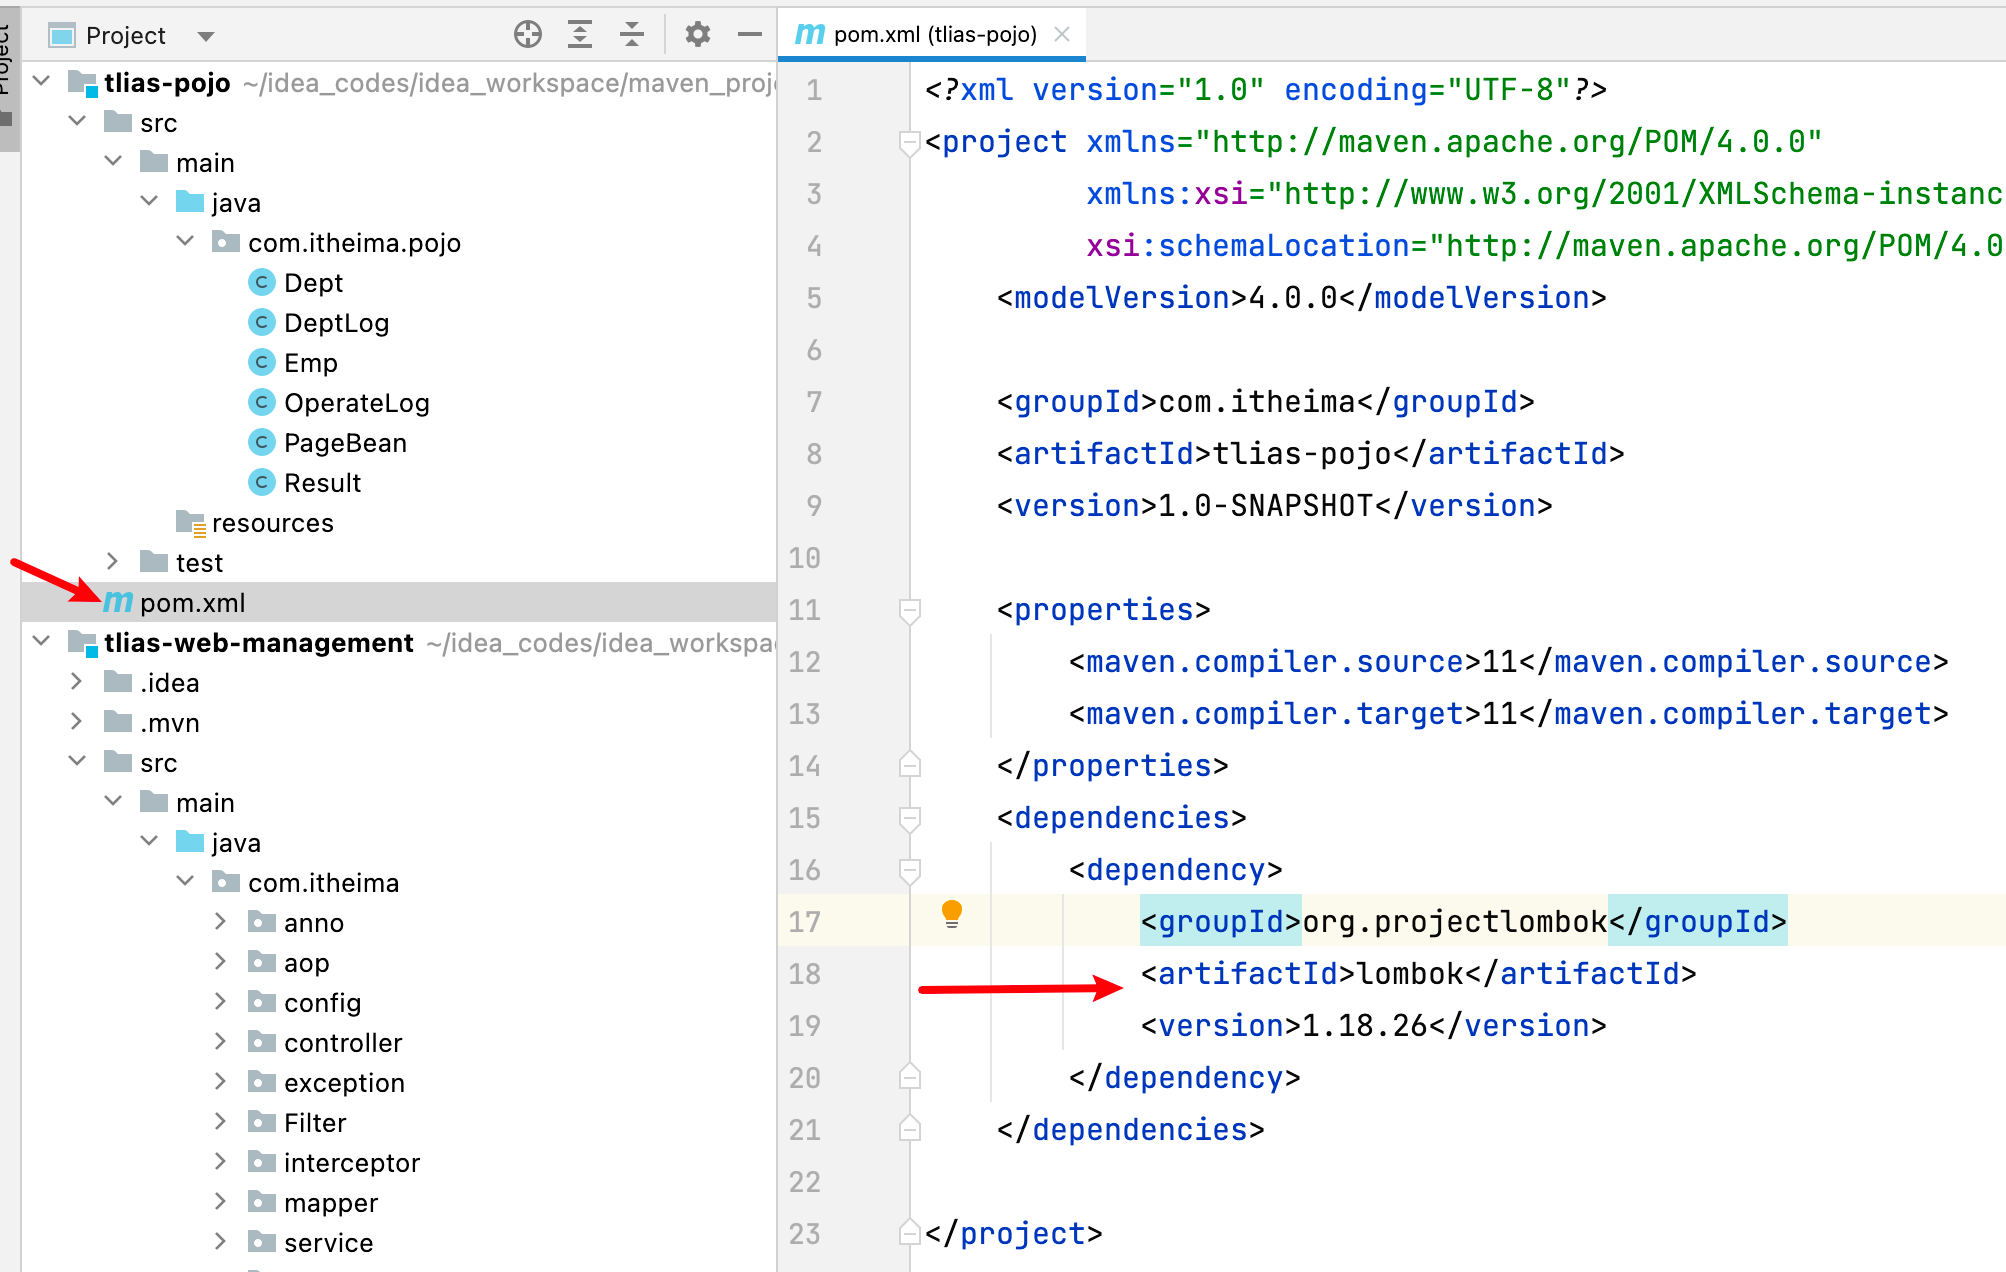
引入tlias-pojo依赖
3、tlias-utils模块
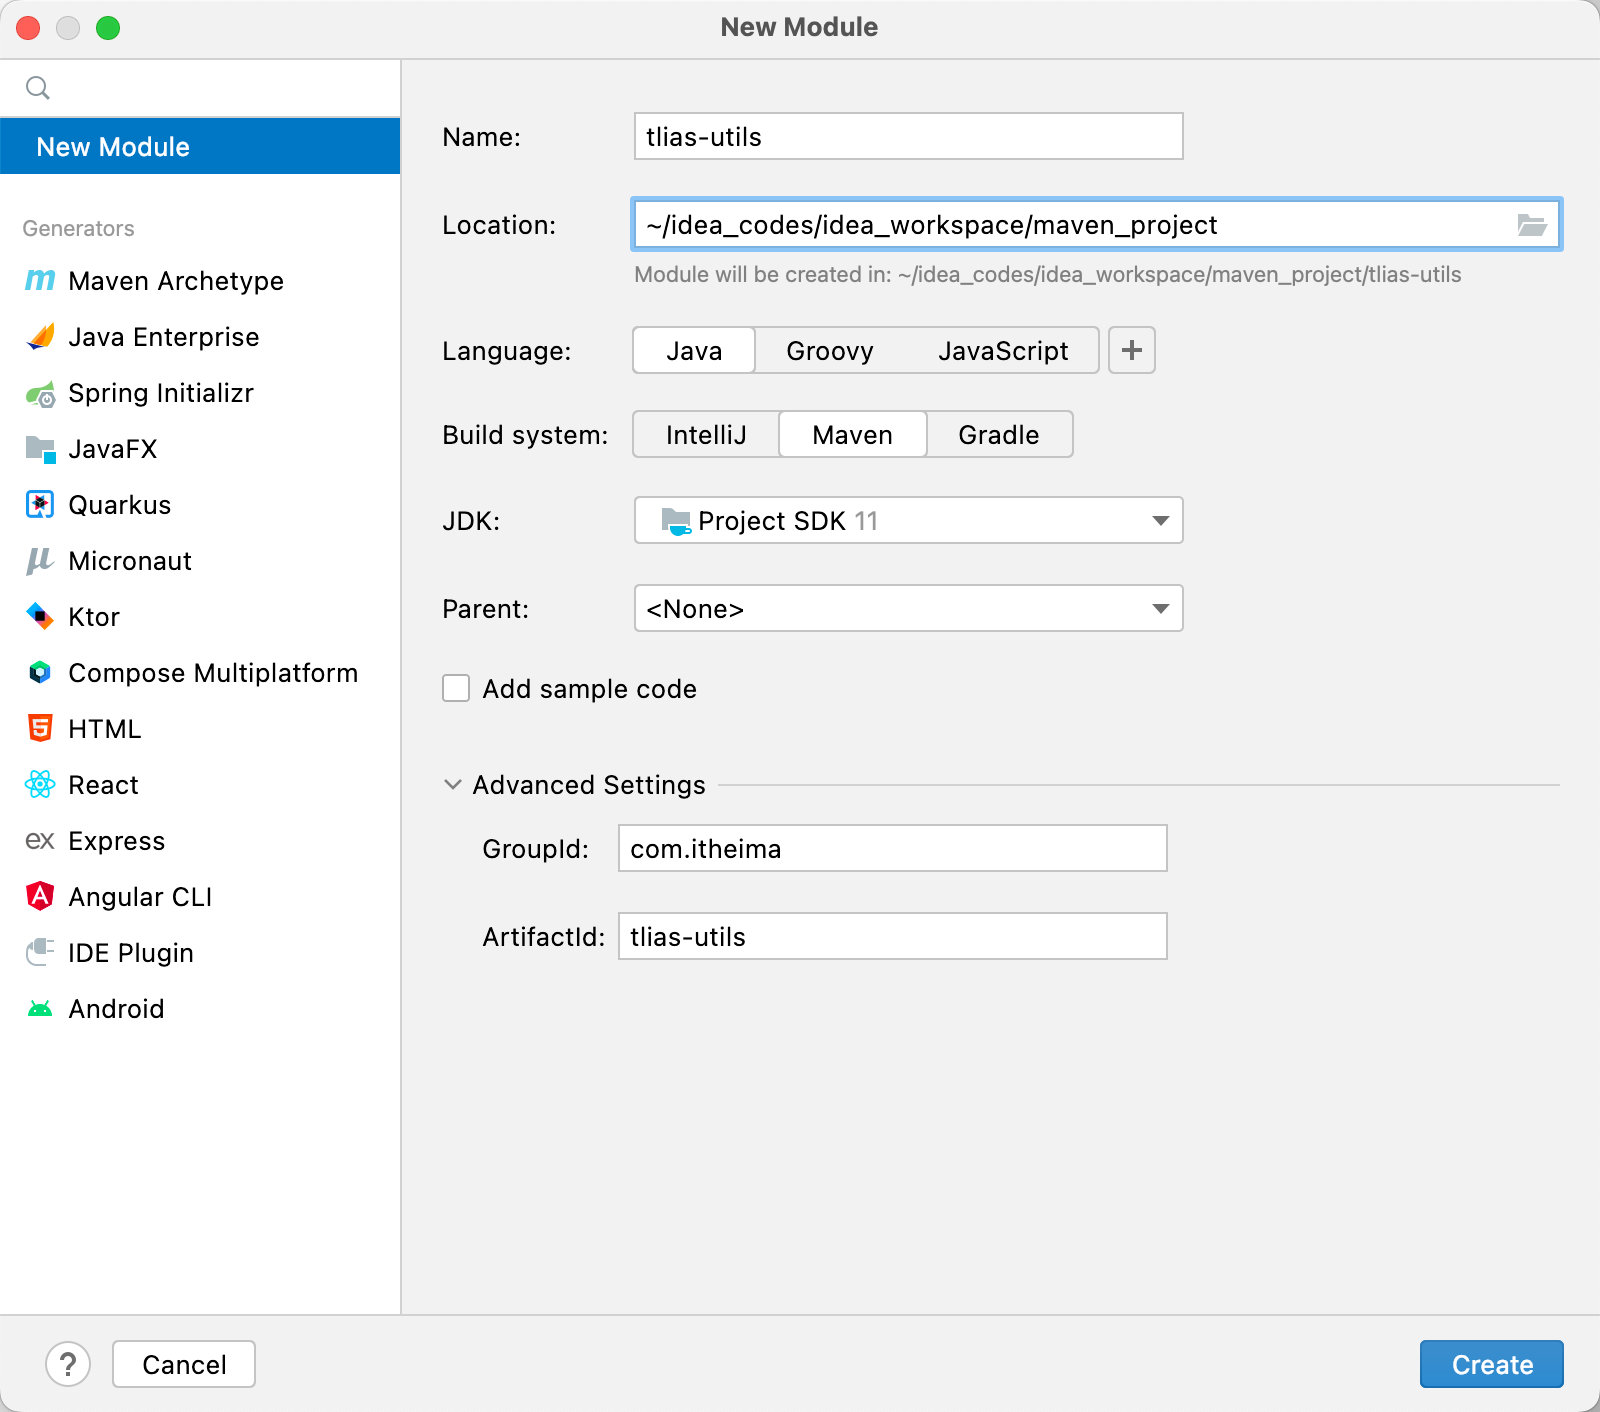
tlias-utils的pom.xml
<?xml version="1.0" encoding="UTF-8"?>
<project xmlns="http://maven.apache.org/POM/4.0.0"
         xmlns:xsi="http://www.w3.org/2001/XMLSchema-instance"
         xsi:schemaLocation="http://maven.apache.org/POM/4.0.0 http://maven.apache.org/xsd/maven-4.0.0.xsd">
    <modelVersion>4.0.0</modelVersion>

    <groupId>com.itheima</groupId>
    <artifactId>tlias-utils</artifactId>
    <version>1.0-SNAPSHOT</version>

    <properties>
        <maven.compiler.source>11</maven.compiler.source>
        <maven.compiler.target>11</maven.compiler.target>
    </properties>

    <dependencies>
        <!--WEB开发起步依赖-->
        <dependency>
            <groupId>org.springframework.boot </groupId>
            <artifactId>spring-boot-starter-web</artifactId>
            <version>2.7.5</version>
        </dependency>
        <!--        阿里云oss依赖-->
        <dependency>
            <groupId>com.aliyun.oss</groupId>
            <artifactId>aliyun-sdk-oss</artifactId>
            <version>3.15.1</version>
        </dependency>
        <dependency>
            <groupId>javax.xml.bind</groupId>
            <artifactId>jaxb-api</artifactId>
            <version>2.3.1</version>
        </dependency>
        <dependency>
            <groupId>javax.activation</groupId>
            <artifactId>activation</artifactId>
            <version>1.1.1</version>
        </dependency>
        <!-- no more than 2.3.3-->
        <dependency>
            <groupId>org.glassfish.jaxb</groupId>
            <artifactId>jaxb-runtime</artifactId>
            <version>2.3.3</version>
        </dependency>
        <!--        jwt令牌依赖-->
        <dependency>
            <groupId>io.jsonwebtoken</groupId>
            <artifactId>jjwt</artifactId>
            <version>0.9.1</version>
        </dependency>
        <dependency>
            <groupId>org.projectlombok</groupId>
            <artifactId>lombok</artifactId>
            <version>1.18.26</version>
        </dependency>
    </dependencies>

</project>
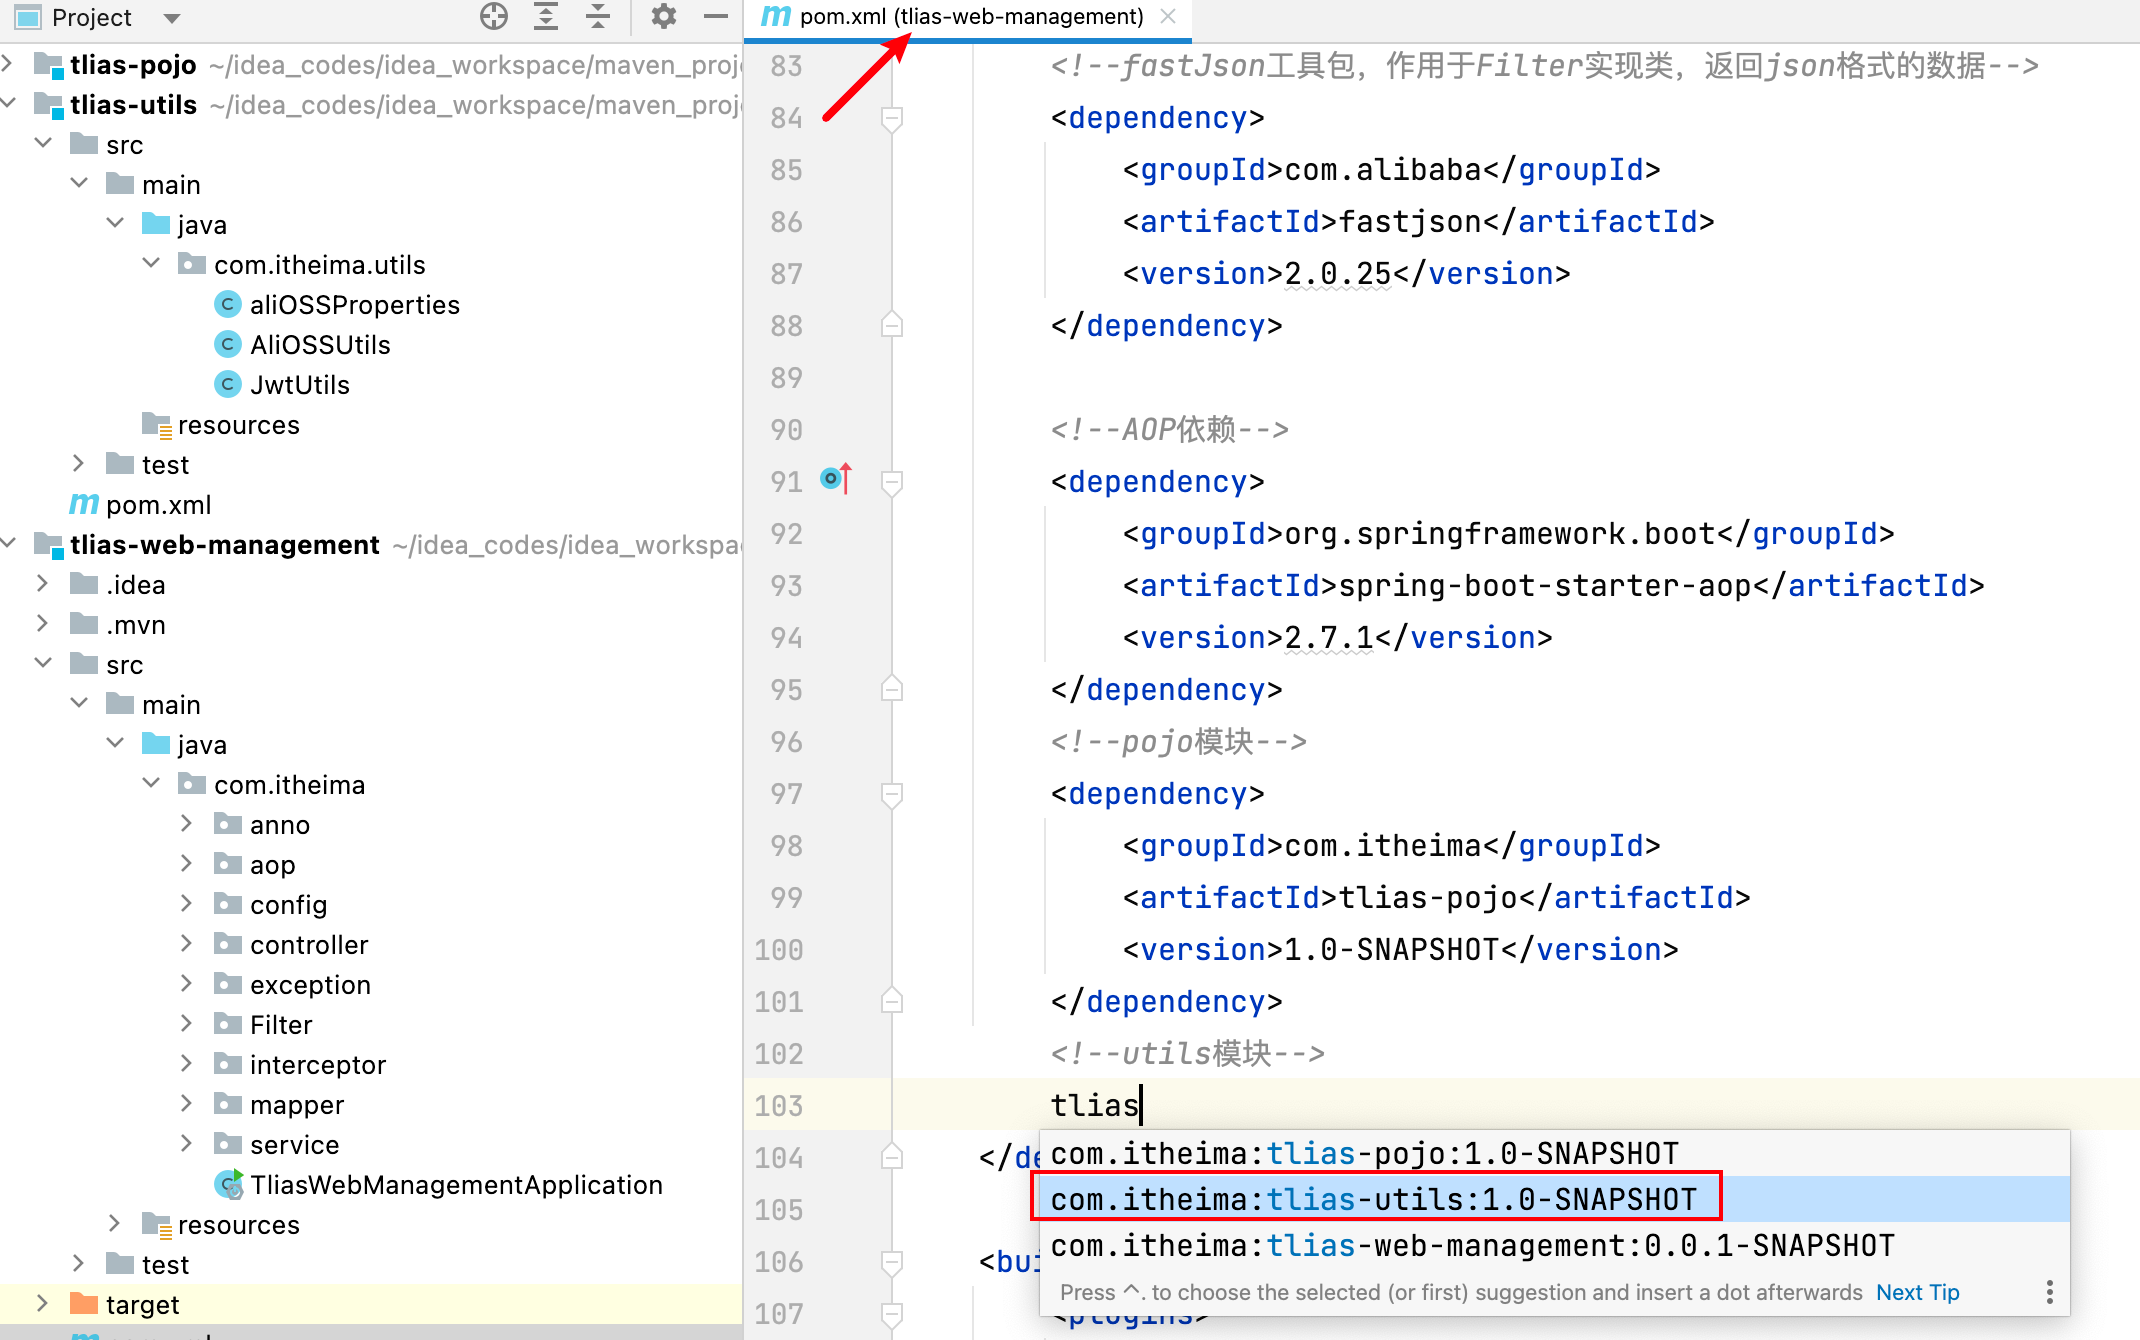
web-management中导入tlias-utils依赖
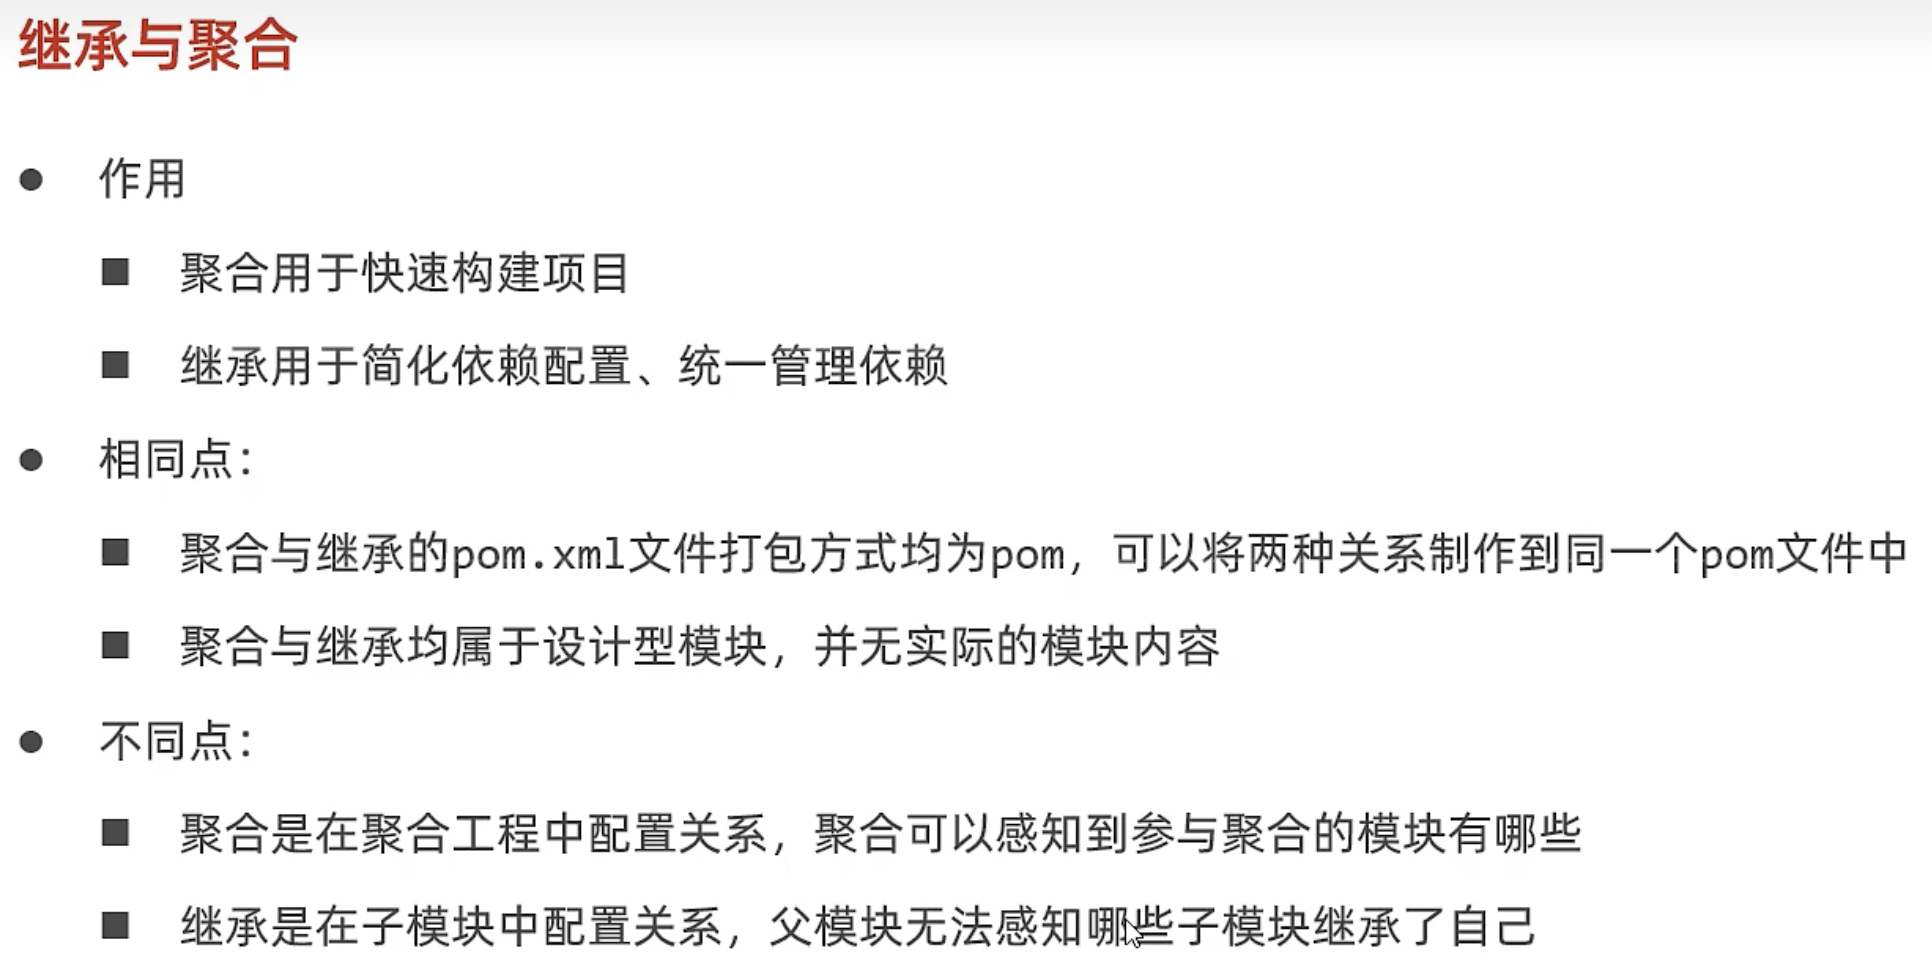
小结

二、继承与聚合
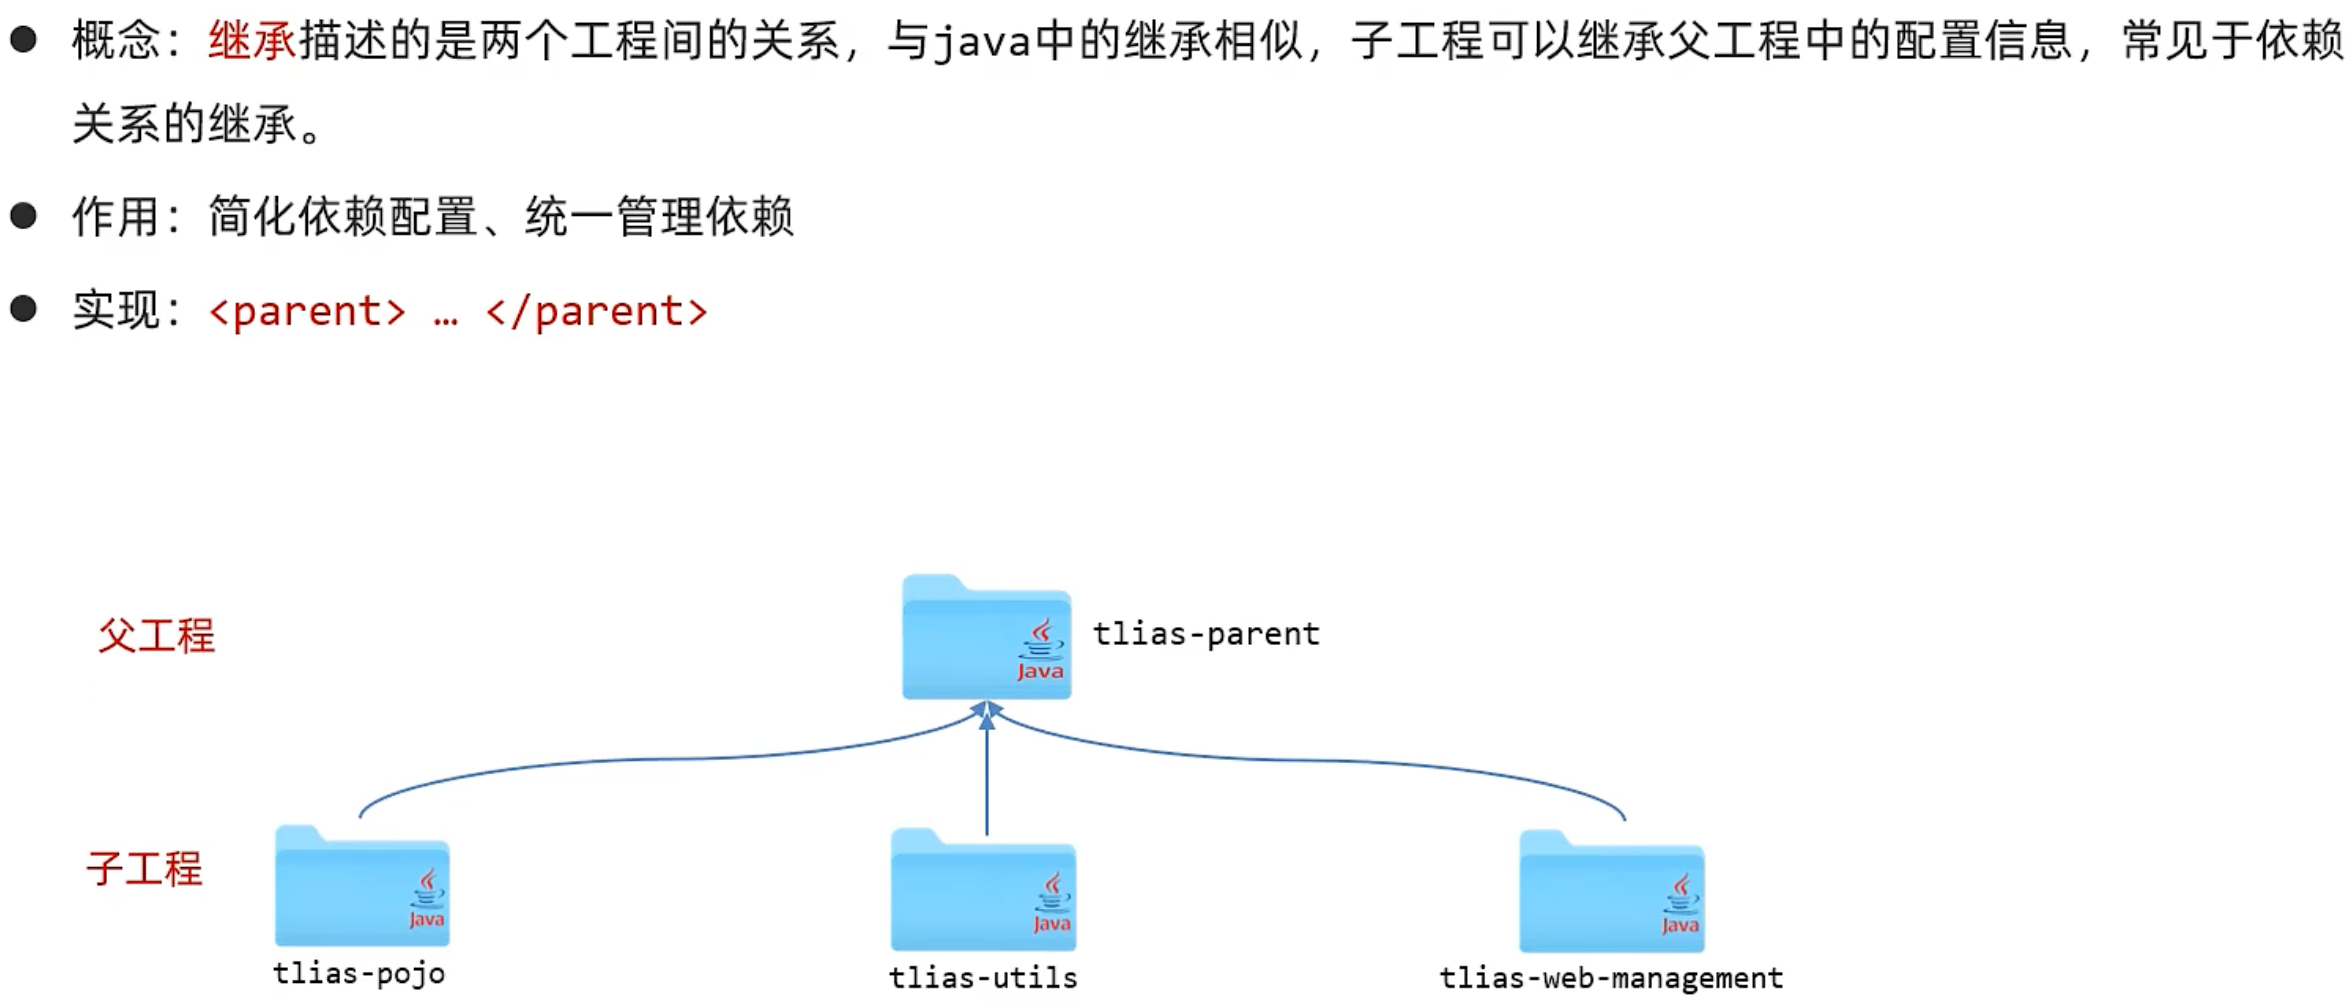
1、继承
我们可以再创建一个父工程 tlias-parent ,然后让上述的三个模块 tlias-pojo、tlias-utils、tlias-web-management 都来继承这个父工程 。 然后再将各个模块中都共有的依赖,都提取到父工程 tlias-parent中进行配置,只要子工程继承了父工程,依赖它也会继承下来,这样就无需在各个子工程中进行配置了。

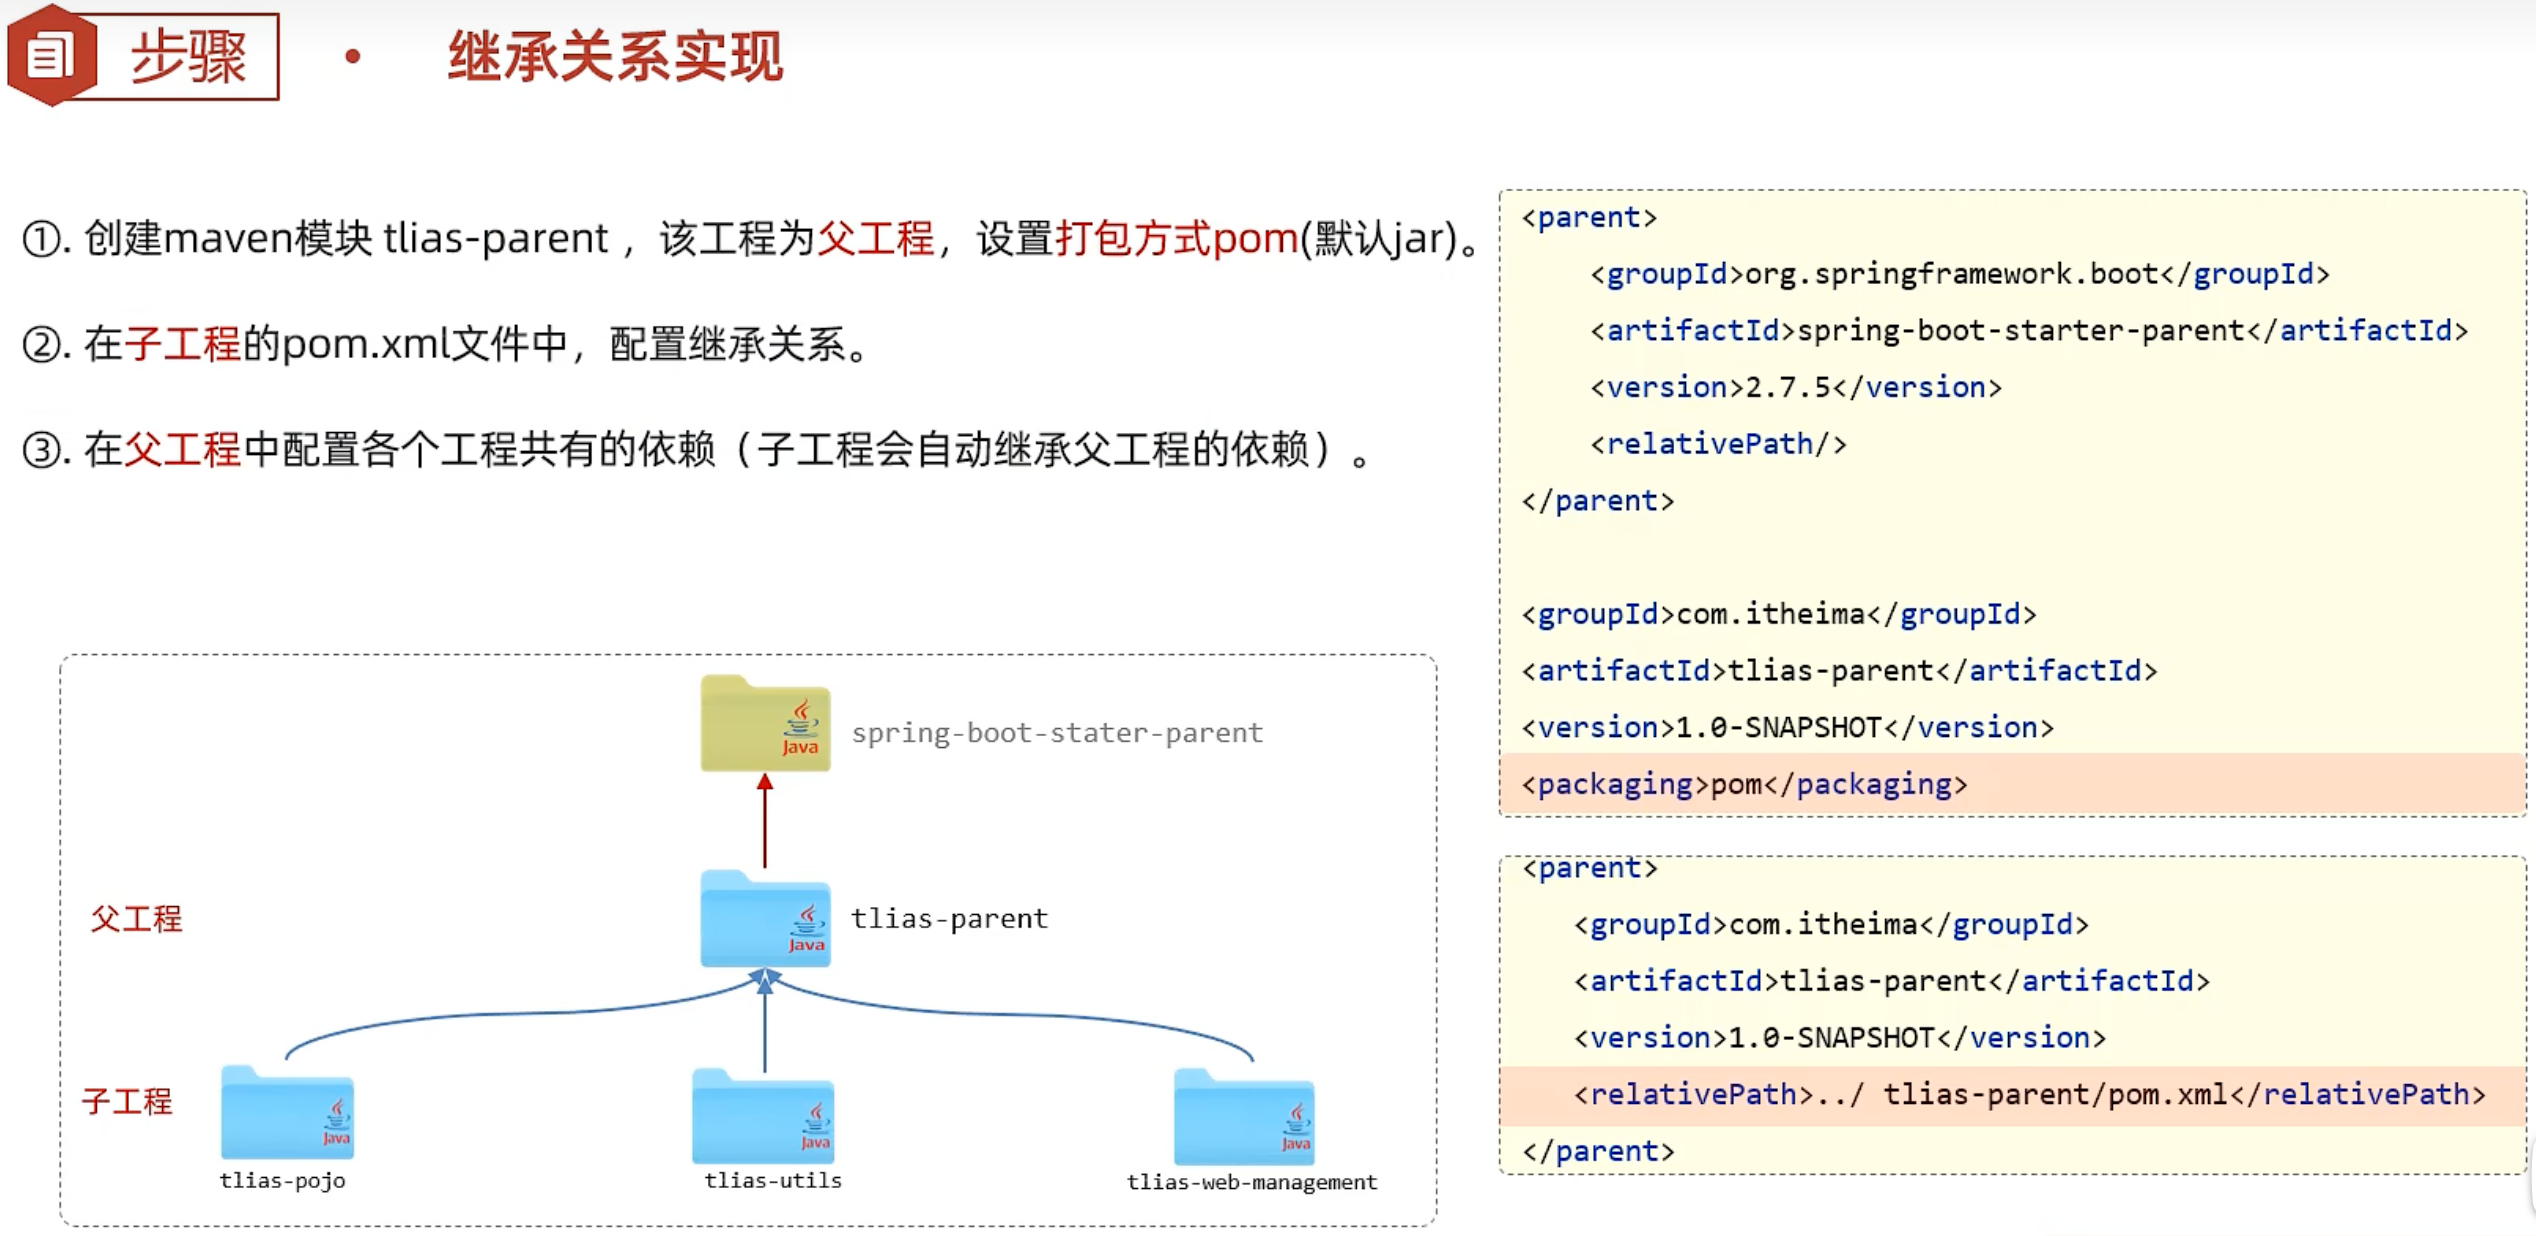
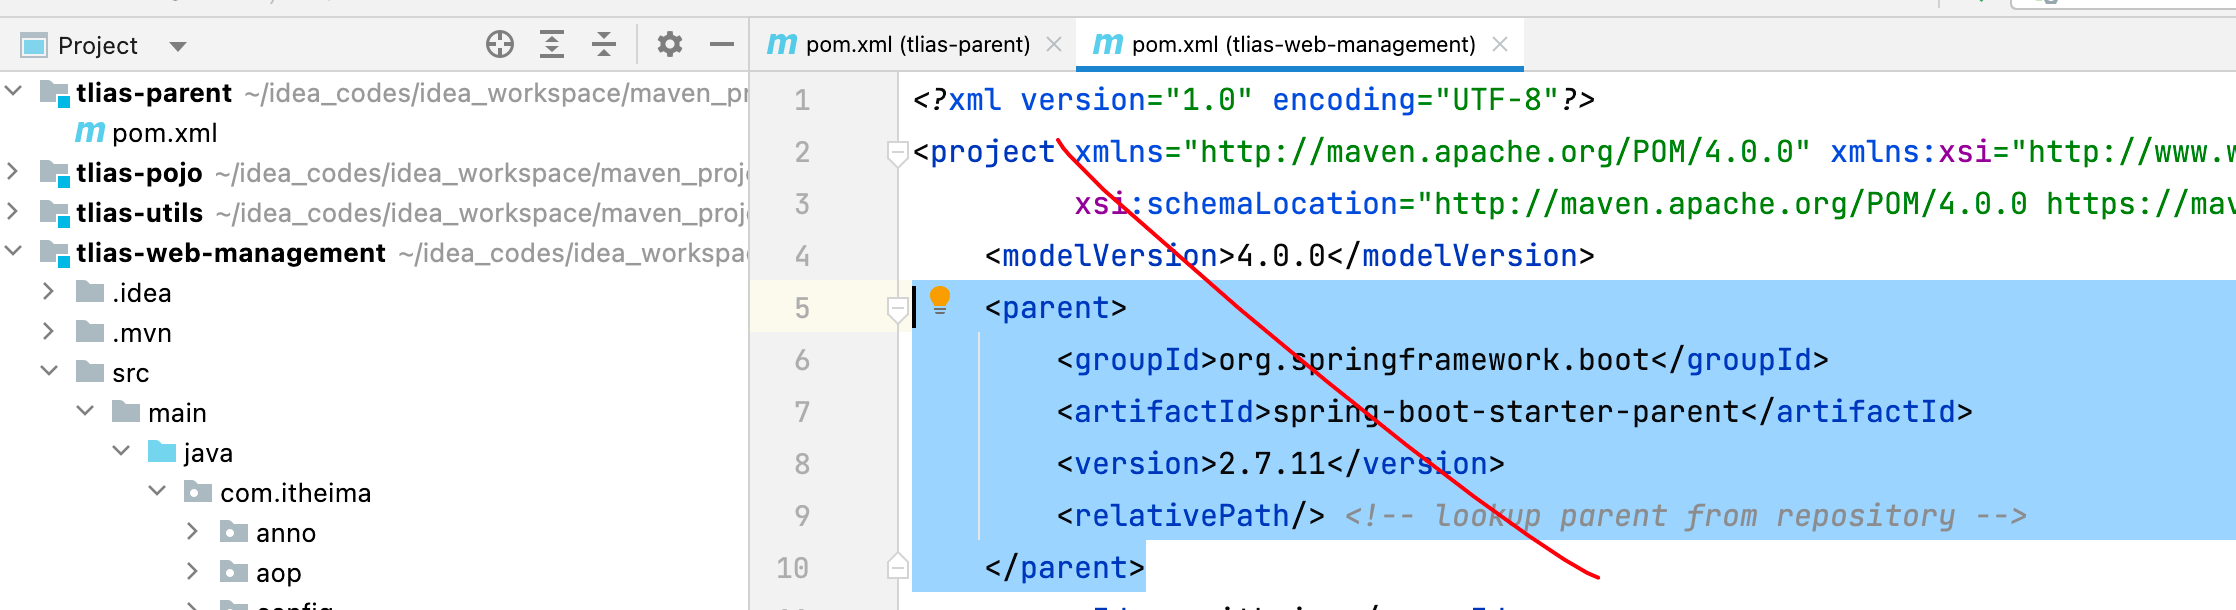
我们当前的项目 tlias-web-management,还稍微有一点特殊,因为是一个springboot项目,而所有的springboot项目都有一个统一的父工程,就是spring-boot-starter-parent。 与java语言类似,Maven不支持多继承,一个maven项目只能继承一个父工程,如果继承了spring-boot-starter-parent,就没法继承我们自己定义的父工程 tlias-parent了。
那我们怎么来解决这个问题呢?
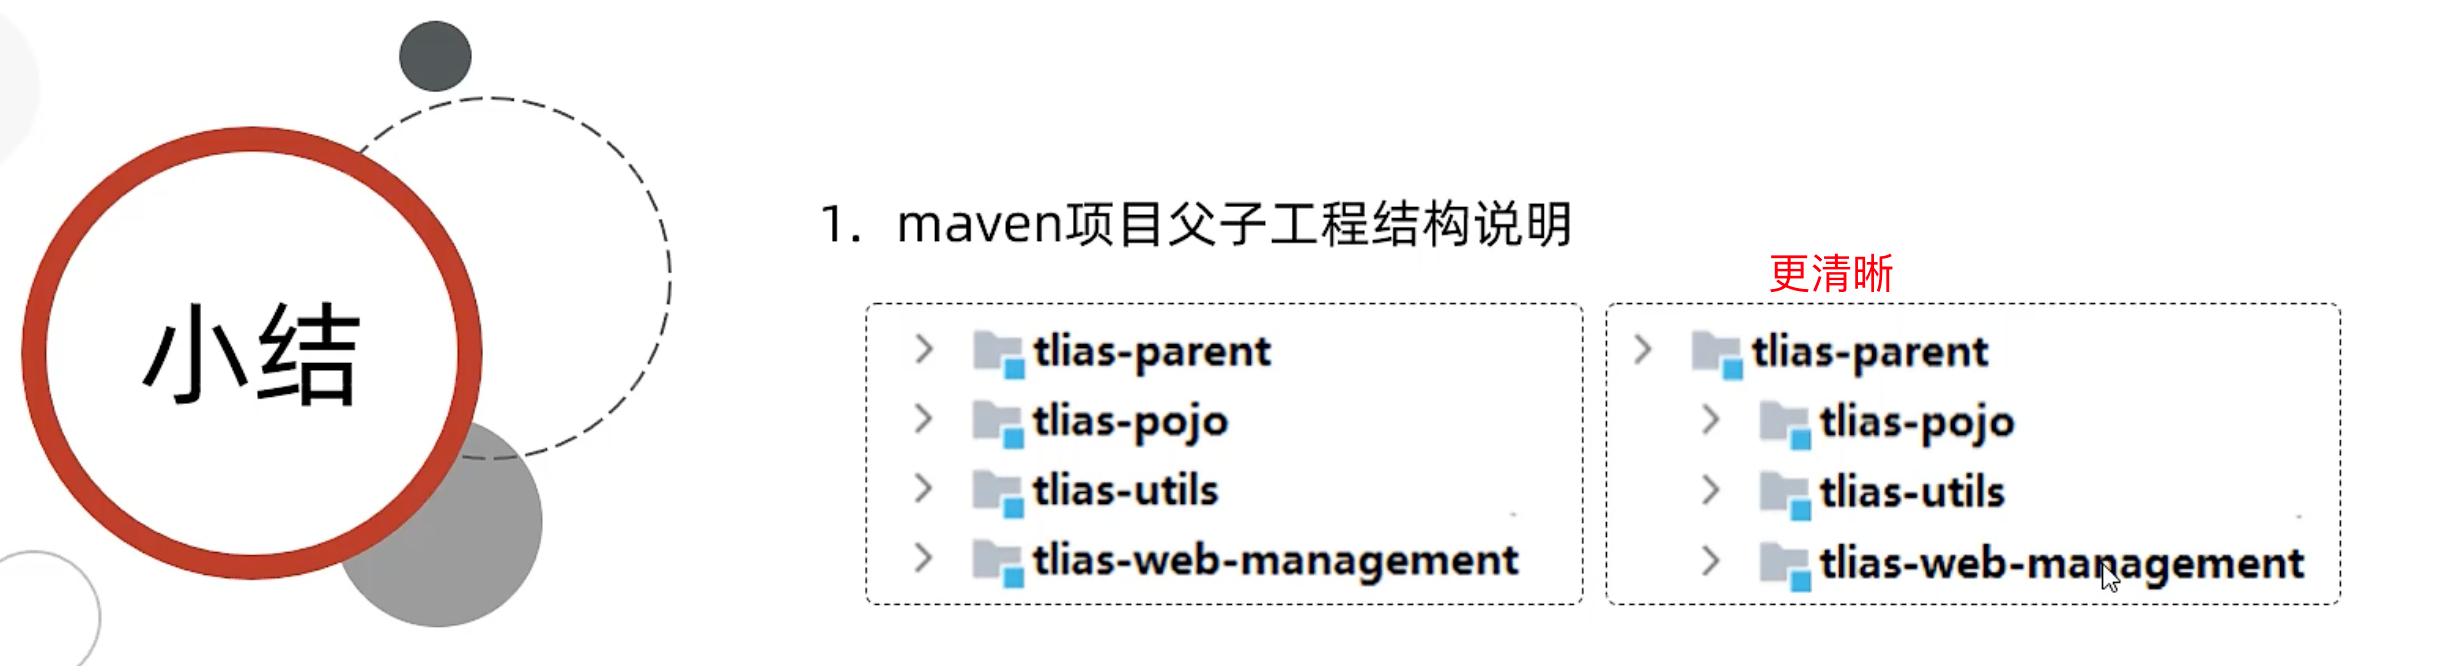
那此时,大家可以想一下,Java虽然不支持多继承,但是可以支持多重继承,比如:A 继承 B, B 继承C。 那在Maven中也是支持多重继承的,所以呢,我们就可以让 我们自己创建的三个模块,都继承tlias-parent,而tlias-parent 再继承 spring-boot-starter-parent,就可以了。 具体结构如下:
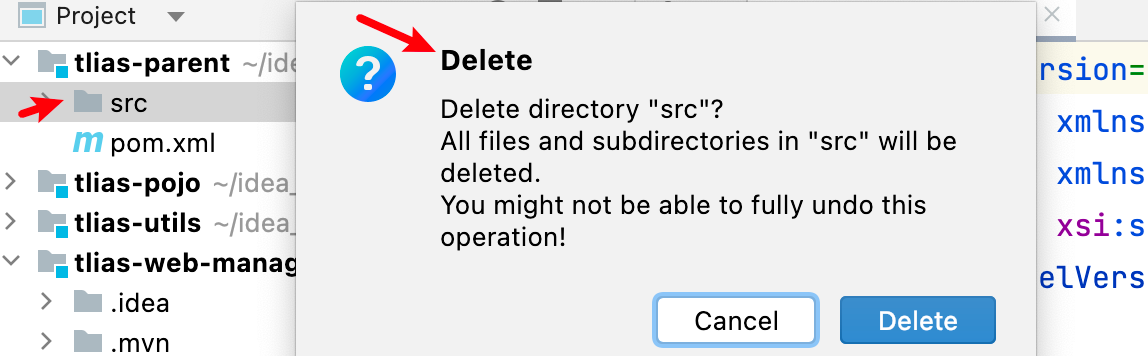
父工程的src全删掉,不需要代码,只提供依赖
父工程tlias-parent的pom.xml文件配置如下:
<parent>
    <groupId>org.springframework.boot</groupId>
    <artifactId>spring-boot-starter-parent</artifactId>
    <version>2.7.5</version>
    <relativePath/> <!-- lookup parent from repository -->
</parent>

<groupId>com.itheima</groupId>
<artifactId>tlias-parent</artifactId>
<version>1.0-SNAPSHOT</version>
<packaging>pom</packaging>
Maven打包方式:
- jar:普通模块打包,springboot项目基本都是jar包(内嵌tomcat运行)
- war:普通web程序打包,需要部署在外部的tomcat服务器中运行
- pom:父工程或聚合工程,该模块不写代码,仅进行依赖管理
子工程配置tlias-web-management
添加: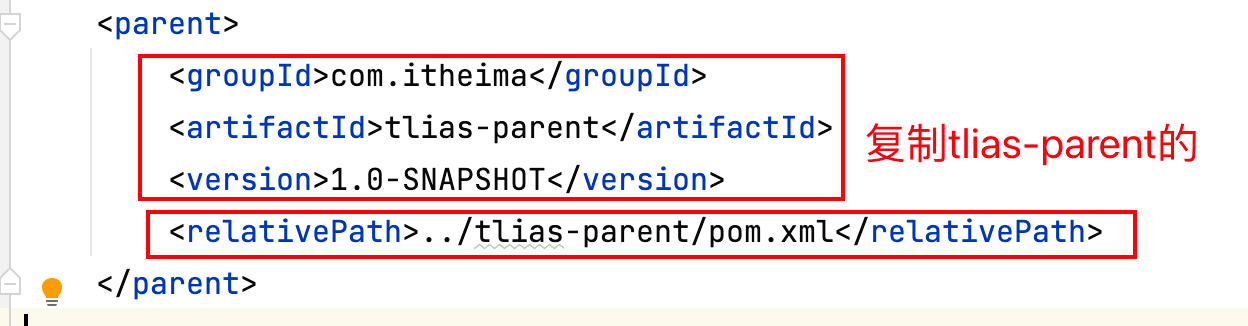
代码如下:
<!--父工程依赖-->
<parent>
    <groupId>com.itheima</groupId>
    <artifactId>tlias-parent</artifactId>
    <version>1.0-SNAPSHOT</version>
    <relativePath>../tlias-parent/pom.xml</relativePath>
</parent>
<artifactId>tlias-pojo</artifactId>
<version>1.0-SNAPSHOT</version>
其余的子工程:tlias-pojo、tlias-utils配置和上面一样。
然后再配置父工程:子工程共同依赖的只有lombok

小结
版本锁定
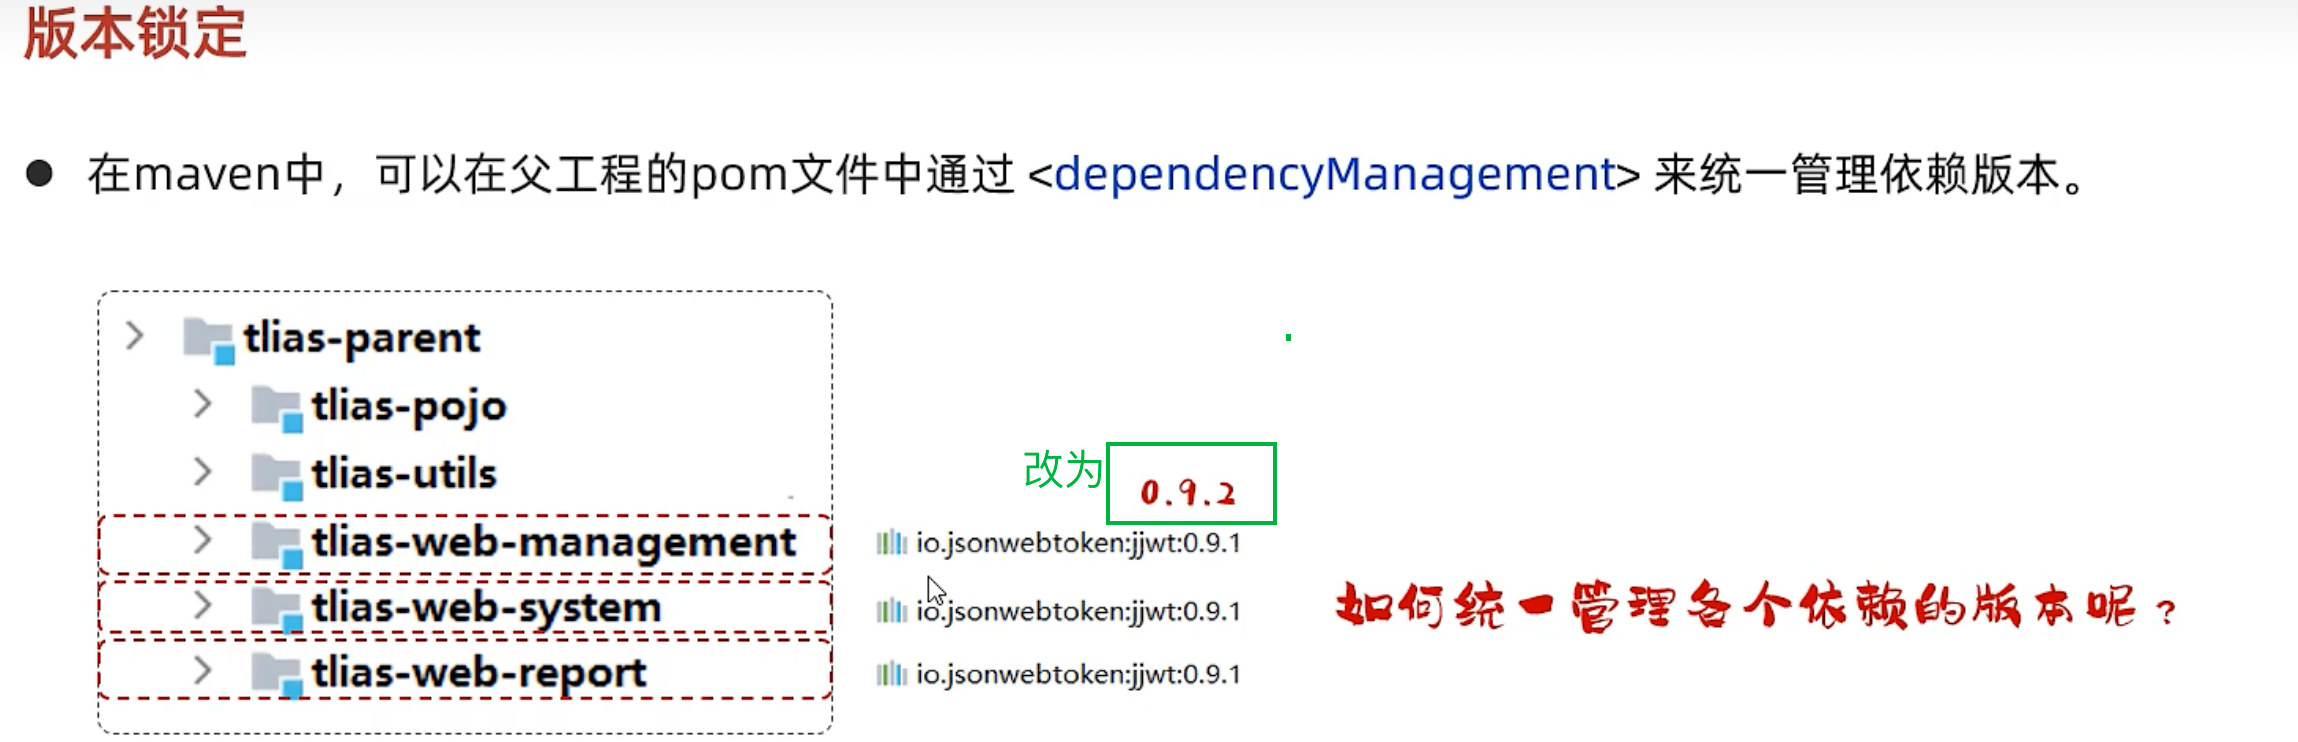
父工程tlias-parent中,加入
<!--统一管理依赖版本号-->
<dependencyManagement>
    <dependencies>
        <!--WEB开发起步依赖-->
        <dependency>
            <groupId>org.springframework.boot </groupId>
            <artifactId>spring-boot-starter-web</artifactId>
            <version>2.7.5</version>
        </dependency>
        <!--        阿里云oss依赖-->
        <dependency>
            <groupId>com.aliyun.oss</groupId>
            <artifactId>aliyun-sdk-oss</artifactId>
            <version>3.15.1</version>
        </dependency>
        <dependency>
            <groupId>javax.xml.bind</groupId>
            <artifactId>jaxb-api</artifactId>
            <version>2.3.1</version>
        </dependency>
        <dependency>
            <groupId>javax.activation</groupId>
            <artifactId>activation</artifactId>
            <version>1.1.1</version>
        </dependency>
        <!-- no more than 2.3.3-->
        <dependency>
            <groupId>org.glassfish.jaxb</groupId>
            <artifactId>jaxb-runtime</artifactId>
            <version>2.3.3</version>
        </dependency>
        <!--        jwt令牌依赖-->
        <dependency>
            <groupId>io.jsonwebtoken</groupId>
            <artifactId>jjwt</artifactId>
            <version>0.9.1</version>
        </dependency>
    </dependencies>
</dependencyManagement>
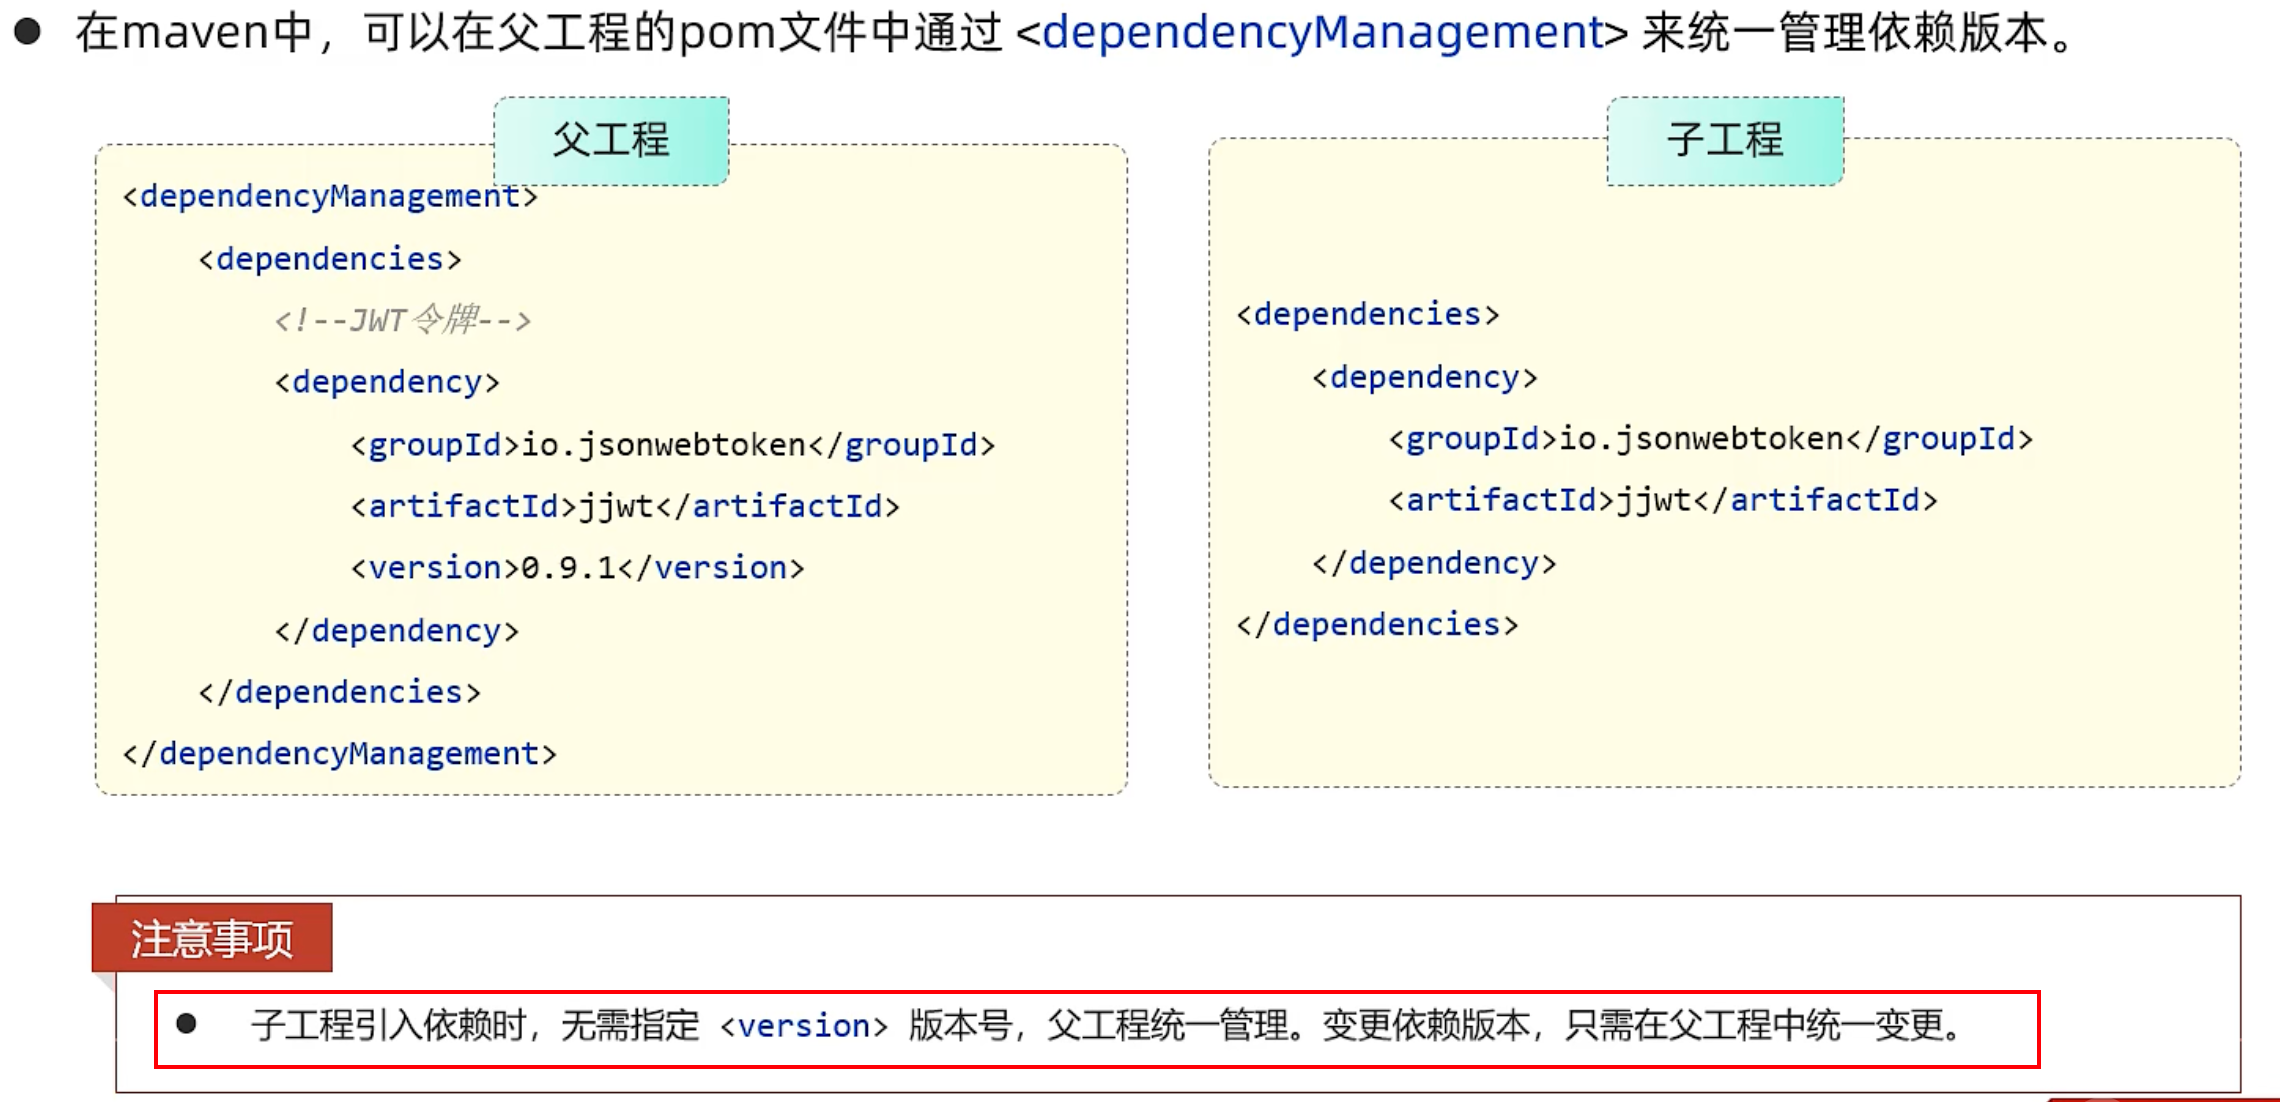
子工程删除版本号<version>,如下:
对版本号再进行统一的管理如下:
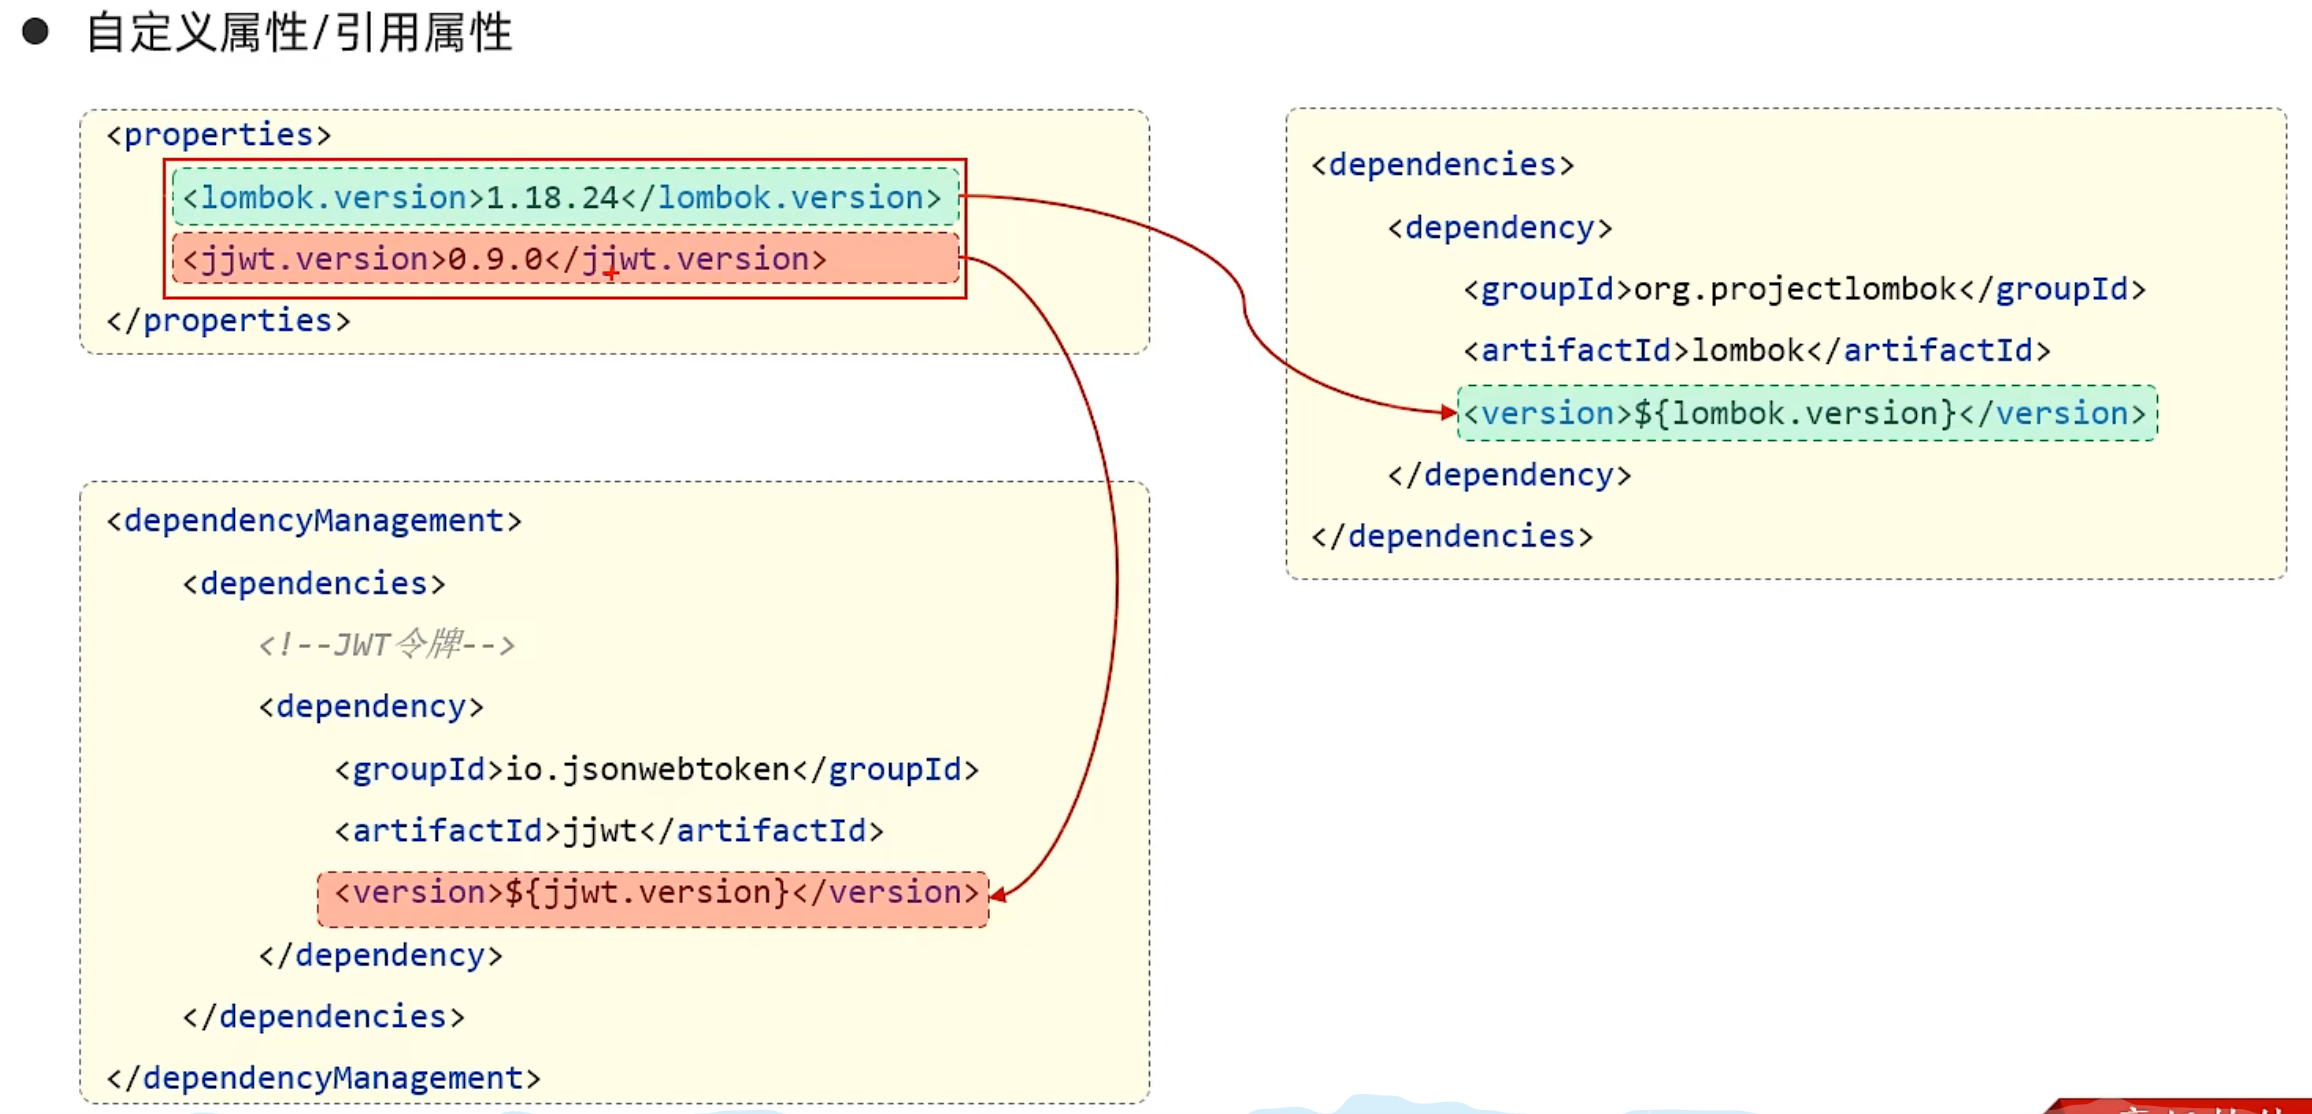
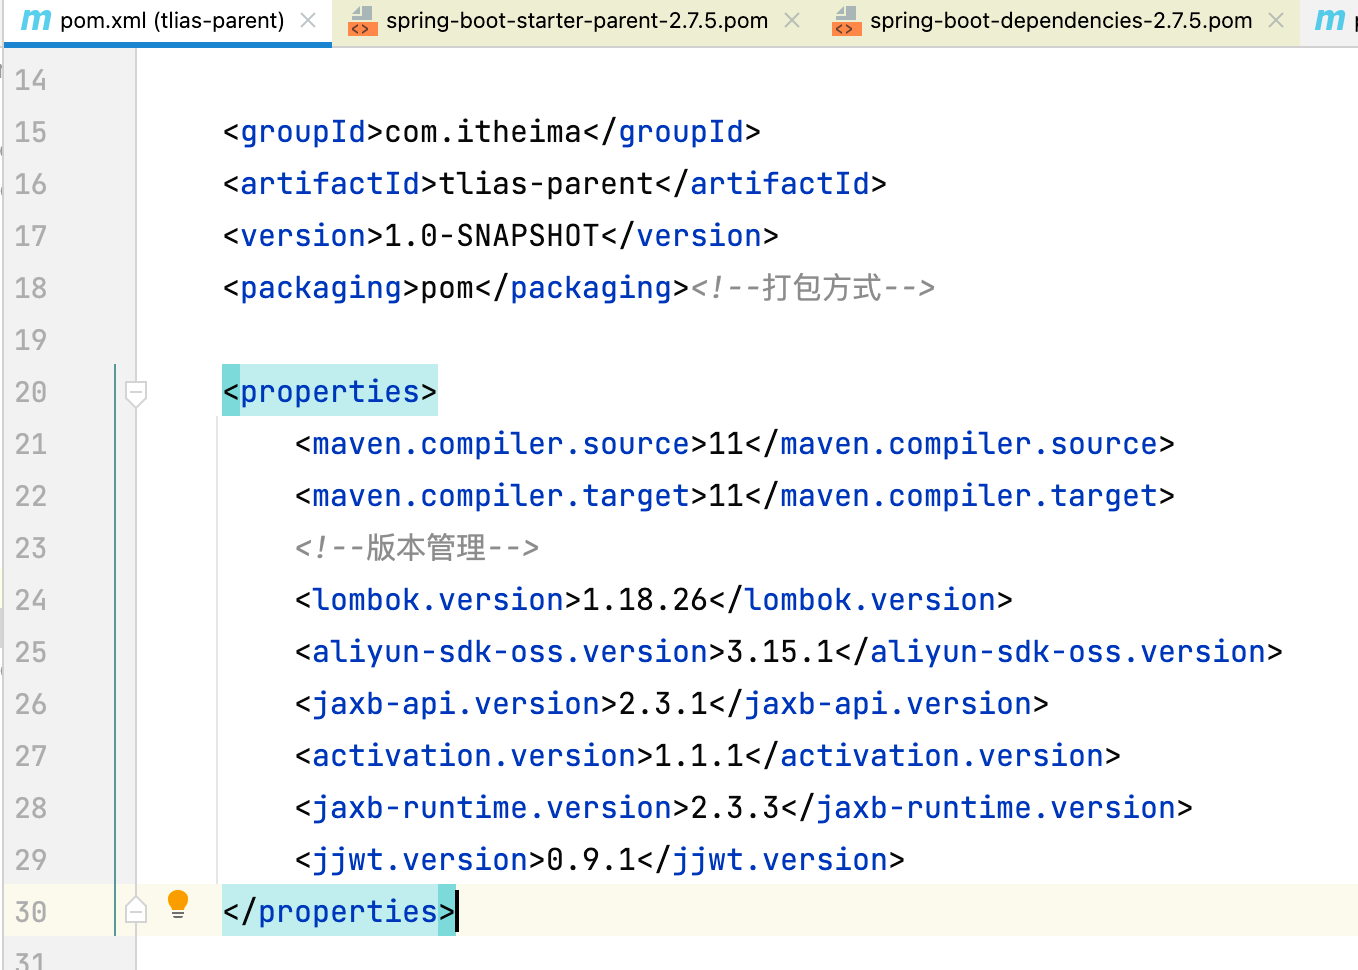

tlias-parent模块的pom.xml:lombok直接在此父工程导入依赖,真实存在。
    <properties>
        <maven.compiler.source>11</maven.compiler.source>
        <maven.compiler.target>11</maven.compiler.target>
        <!--版本管理-->
        <lombok.version>1.18.26</lombok.version>
        <aliyun-sdk-oss.version>3.15.1</aliyun-sdk-oss.version>
        <jaxb-api.version>2.3.1</jaxb-api.version>
        <activation.version>1.1.1</activation.version>
        <jaxb-runtime.version>2.3.3</jaxb-runtime.version>
        <jjwt.version>0.9.1</jjwt.version>
    </properties>

    <dependencies>
        <!--lombok-->
        <dependency>
            <groupId>org.projectlombok</groupId>
            <artifactId>lombok</artifactId>
            <version>${lombok.version}</version>
        </dependency>
    </dependencies>

    <!--统一管理依赖版本号-->
    <dependencyManagement>
        <dependencies>
            <!--        阿里云oss依赖-->
            <dependency>
                <groupId>com.aliyun.oss</groupId>
                <artifactId>aliyun-sdk-oss</artifactId>
                <version>${aliyun-sdk-oss.version}</version>
            </dependency>
            <dependency>
                <groupId>javax.xml.bind</groupId>
                <artifactId>jaxb-api</artifactId>
                <version>${jaxb-api.version}</version>
            </dependency>
            <dependency>
                <groupId>javax.activation</groupId>
                <artifactId>activation</artifactId>
                <version>${activation.version}</version>
            </dependency>
            <!-- no more than 2.3.3-->
            <dependency>
                <groupId>org.glassfish.jaxb</groupId>
                <artifactId>jaxb-runtime</artifactId>
                <version>${jaxb-runtime.version}</version>
            </dependency>
            <!--        jwt令牌依赖-->
            <dependency>
                <groupId>io.jsonwebtoken</groupId>
                <artifactId>jjwt</artifactId>
                <version>${jjwt.version}</version>
            </dependency>
        </dependencies>
    </dependencyManagement>
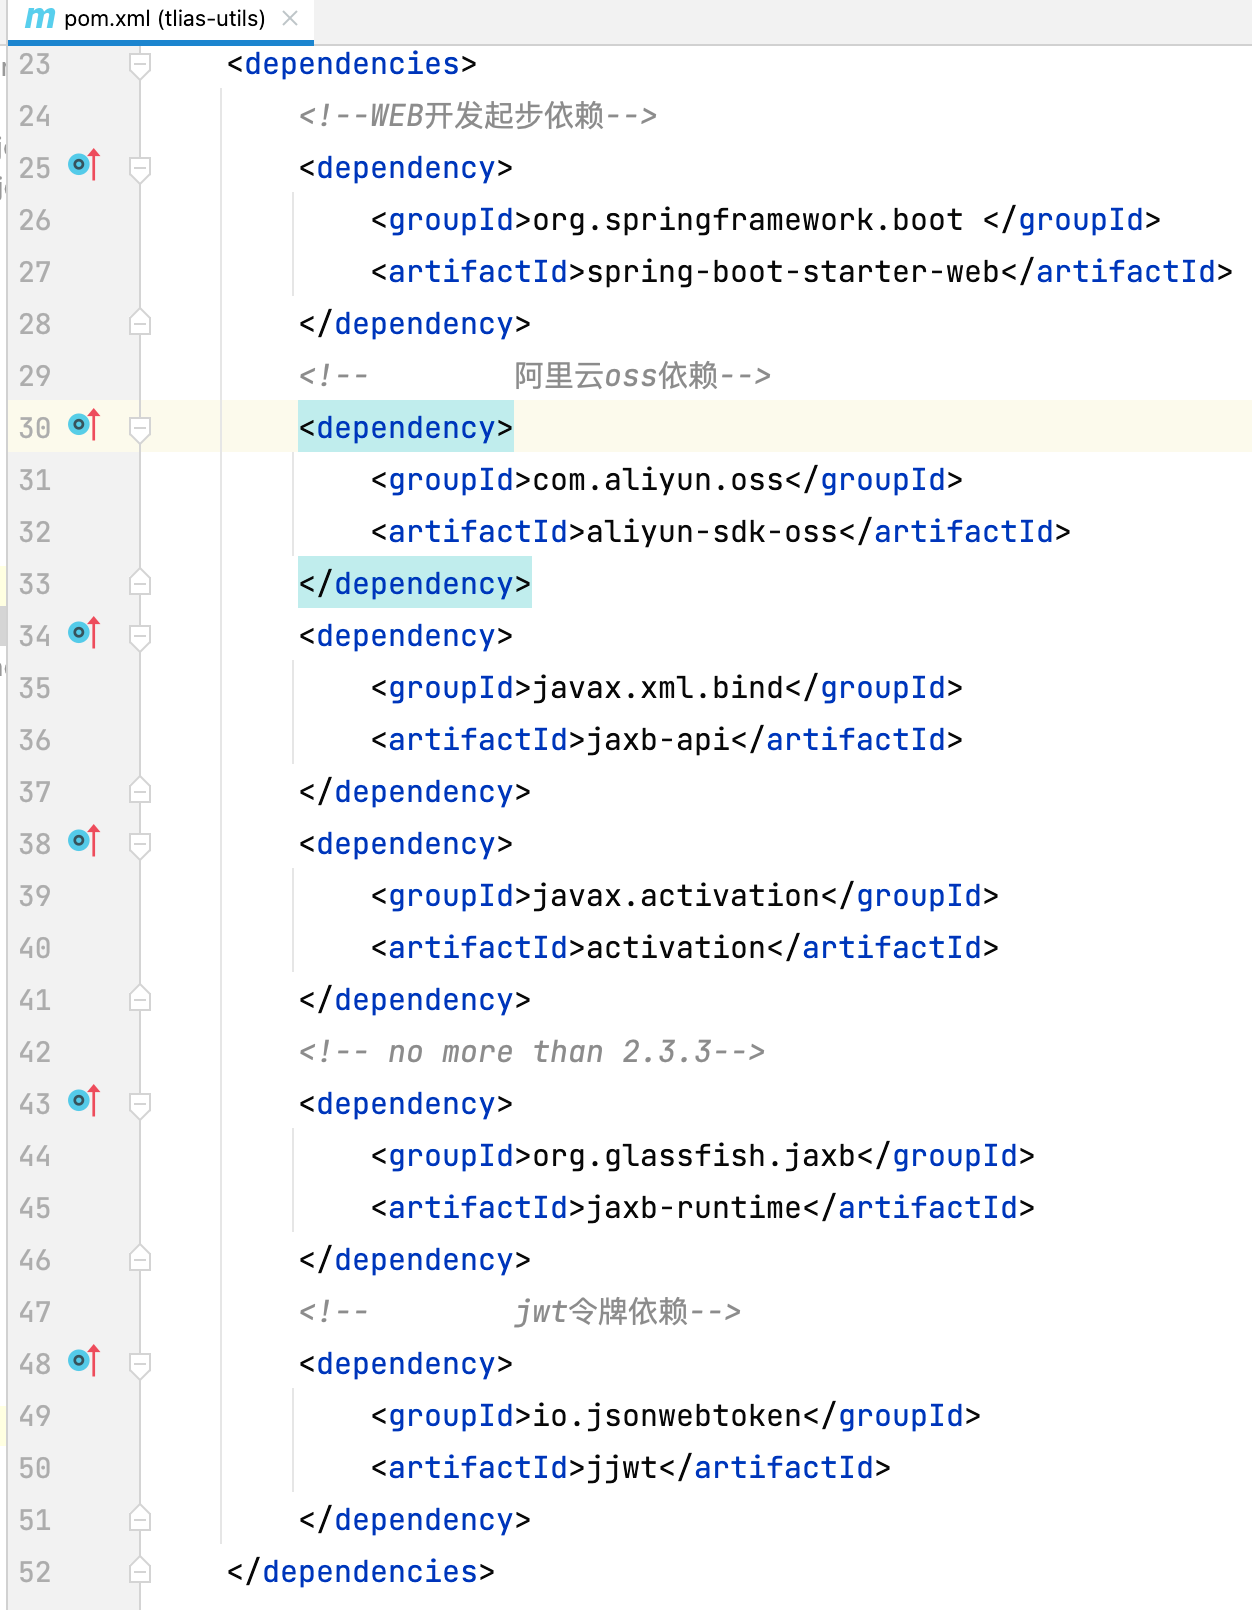
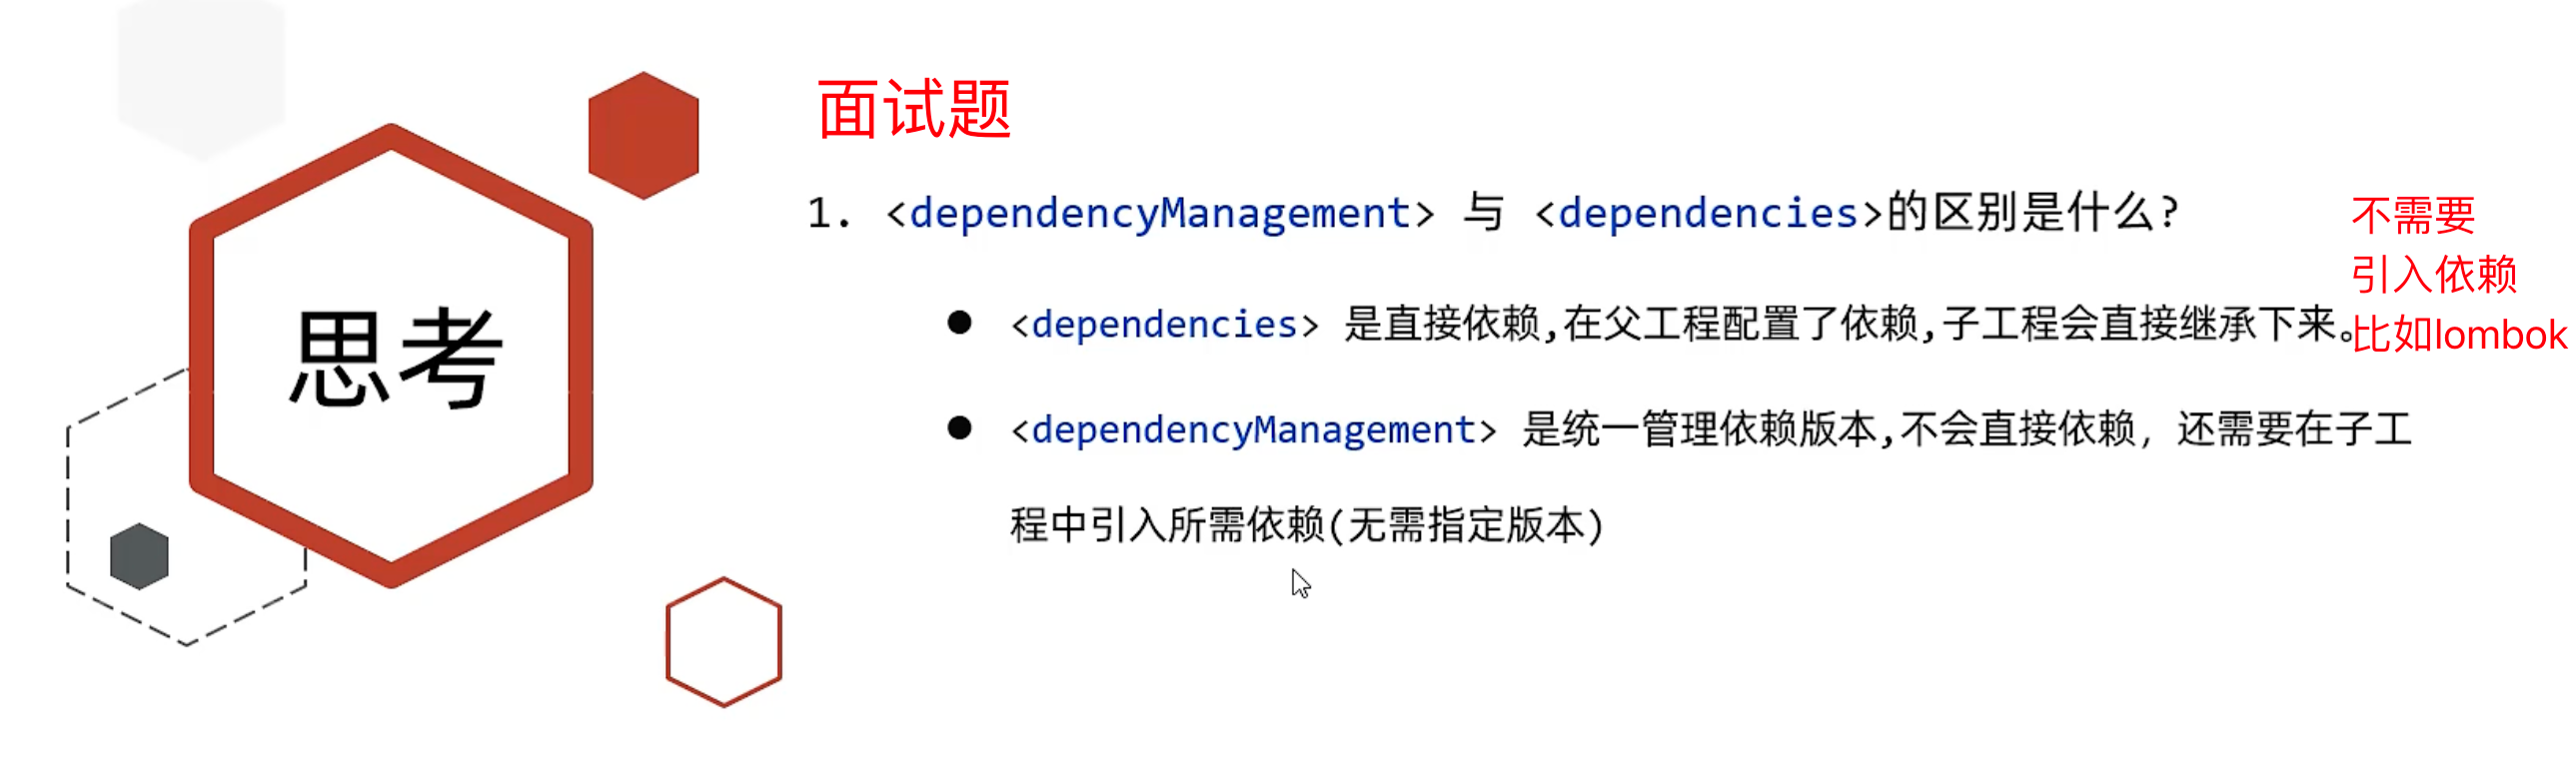
tlias-utils模块的pom.xml的依赖,继承了tlias-parent,就不需要引入lombok依赖了,写都不用写
如果依赖的版本已经在父工程进行了统一管理,所以在子工程中就无需再配置依赖的版本了。
<dependencies>
    <!--WEB开发起步依赖-->
    <dependency>
        <groupId>org.springframework.boot </groupId>
        <artifactId>spring-boot-starter-web</artifactId>
    </dependency>
    <!--        阿里云oss依赖-->
    <dependency>
        <groupId>com.aliyun.oss</groupId>
        <artifactId>aliyun-sdk-oss</artifactId>
    </dependency>
    <dependency>
        <groupId>javax.xml.bind</groupId>
        <artifactId>jaxb-api</artifactId>
    </dependency>
    <dependency>
        <groupId>javax.activation</groupId>
        <artifactId>activation</artifactId>
    </dependency>
    <!-- no more than 2.3.3-->
    <dependency>
        <groupId>org.glassfish.jaxb</groupId>
        <artifactId>jaxb-runtime</artifactId>
    </dependency>
    <!--        jwt令牌依赖-->
    <dependency>
        <groupId>io.jsonwebtoken</groupId>
        <artifactId>jjwt</artifactId>
    </dependency>
</dependencies>
我们之所以,在springboot项目中很多时候,引入依赖坐标,都不需要指定依赖的版本 <version> ,是因为在父工程 spring-boot-starter-parent中已经通过 <dependencyManagement>对依赖的版本进行了统一的管理维护。
面试题
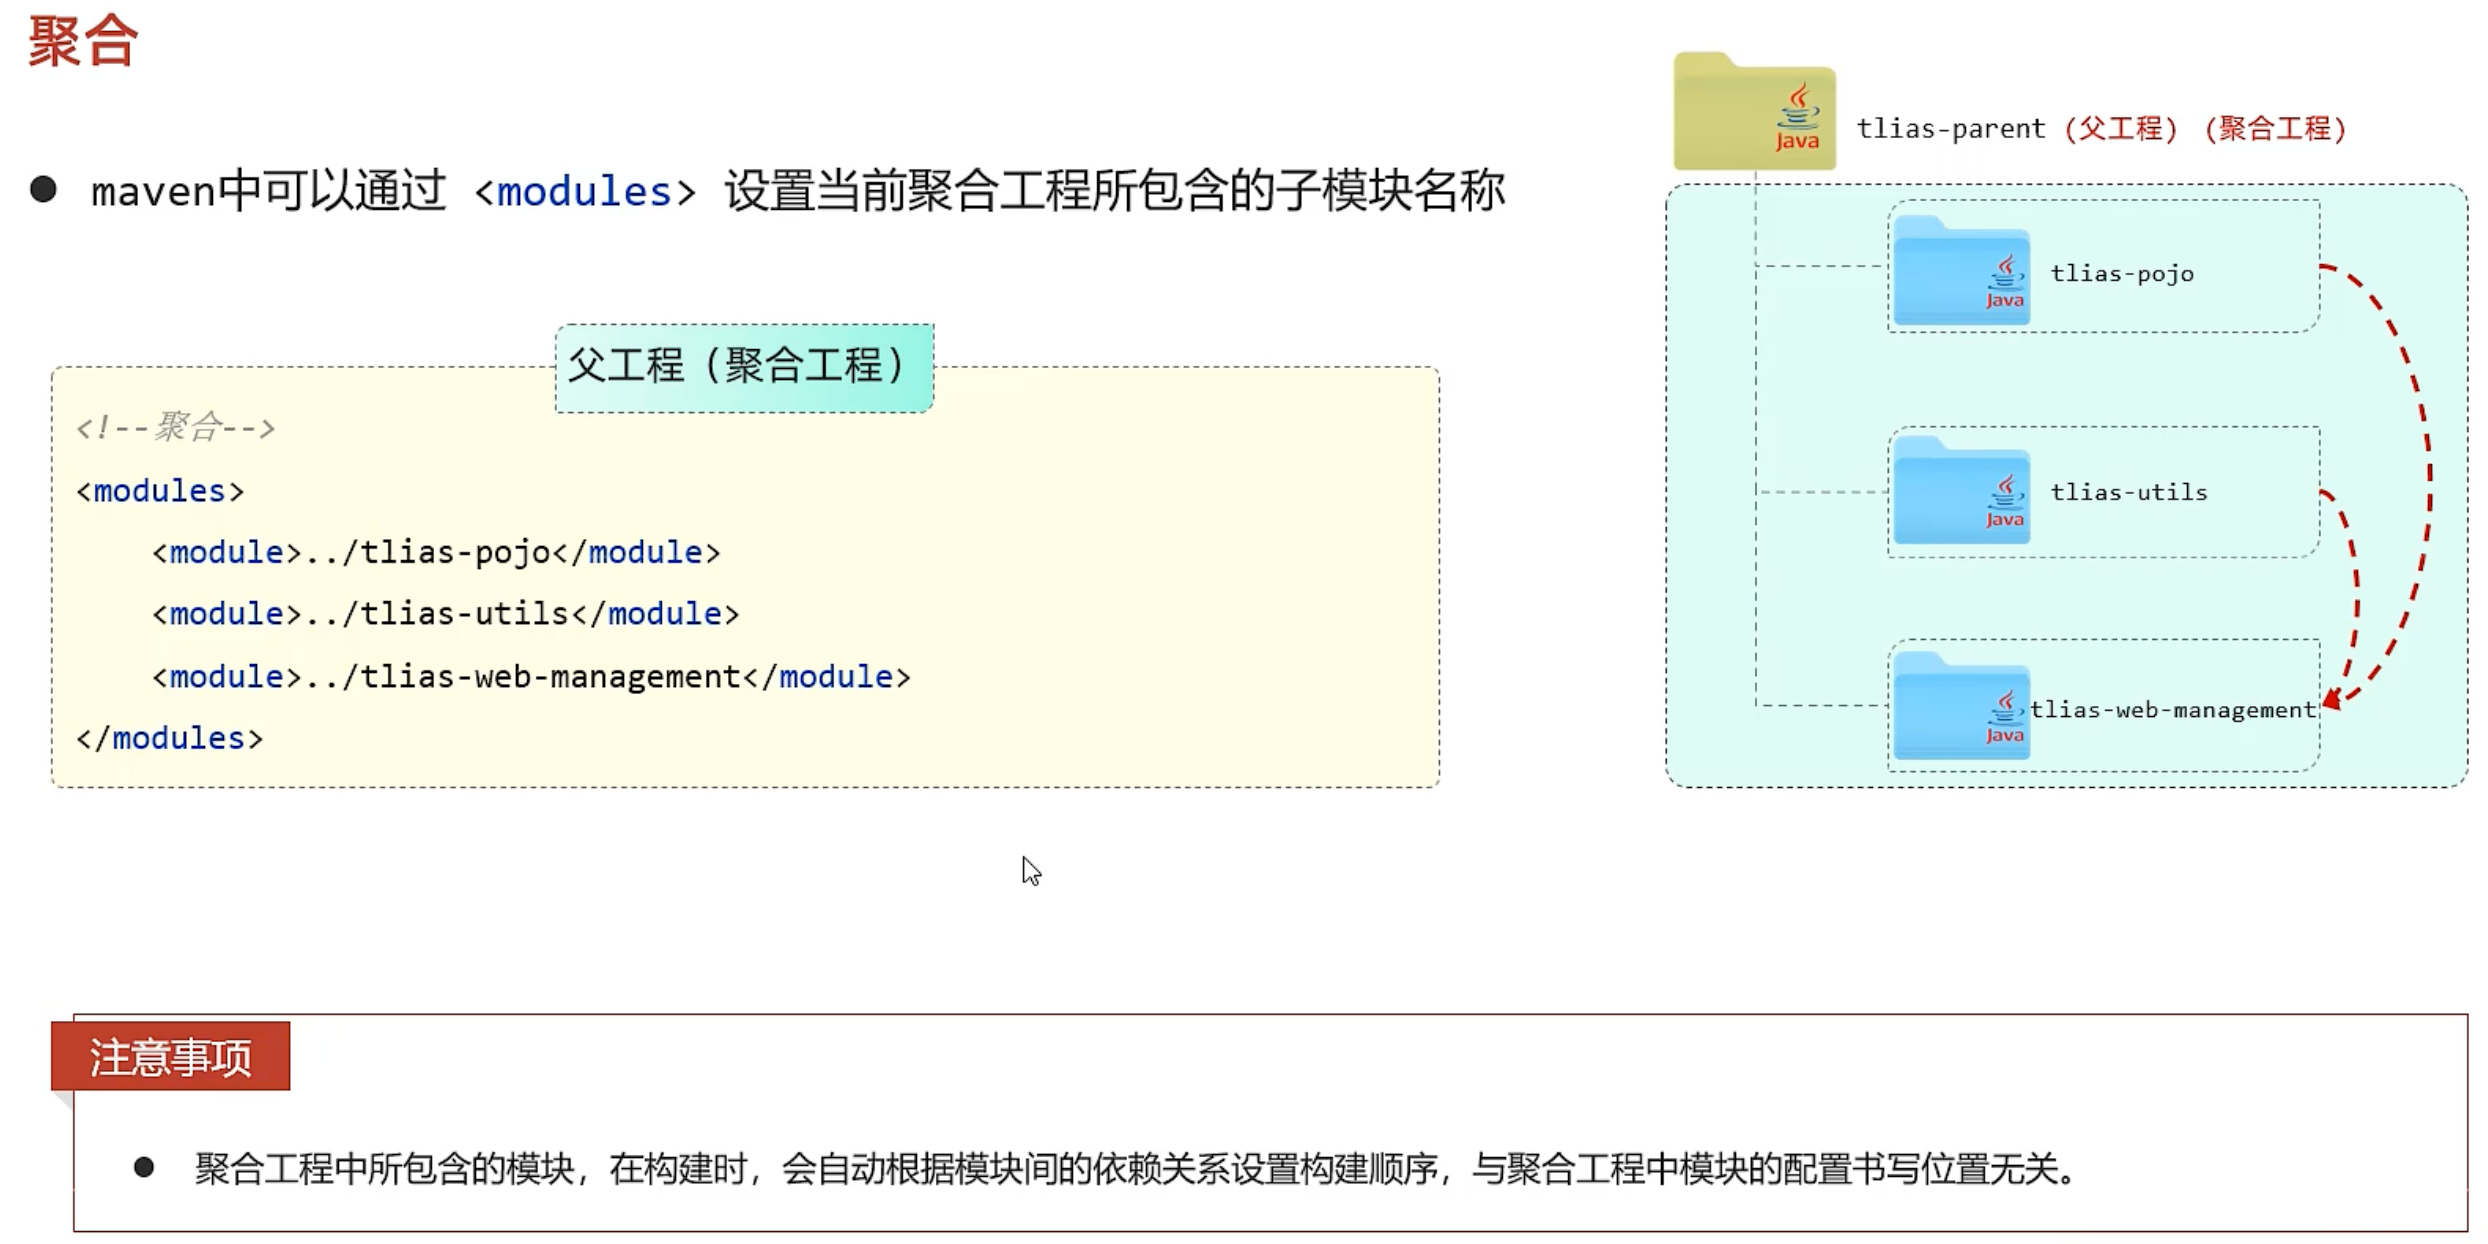
2、聚合
分模块设计与开发之后啊,我们的项目被拆分为多个模块,而模块之间的关系,可能错综复杂。 那就比如我们当前的案例项目,结构如下(相对还是比较简单的):
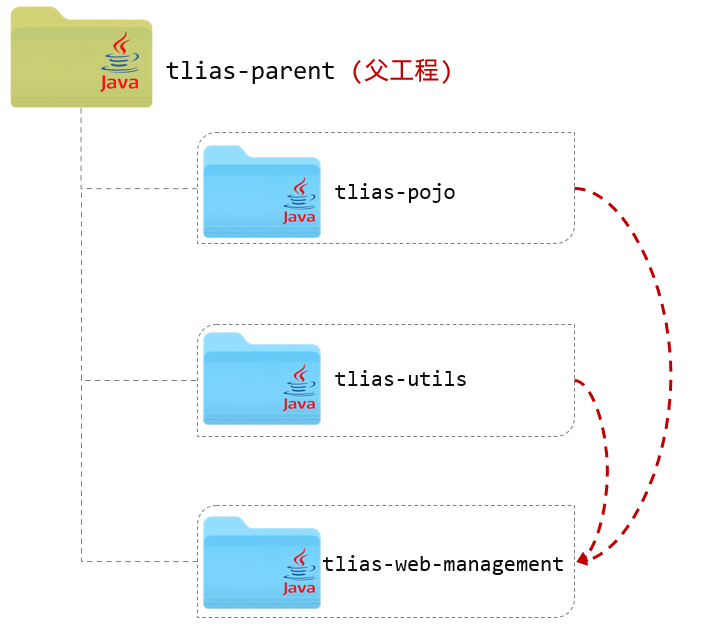
此时,tlias-web-management 模块的父工程是 tlias-parent,该模块又依赖了tlias-pojo、tlias-utils模块。 那此时,我们要想将 tlias-web-management 模块打包,是比较繁琐的。因为在进行项目打包时,maven会从本地仓库中来查找tlias-parent父工程,以及它所依赖的模块tlias-pojo、tlias-utils,而本地仓库目前是没有这几个依赖的。
所以,我们再打包tlias-web-management 模块前,需要将 tlias-parent、tlias-pojo、tlias-utils分别执行install生命周期安装到maven的本地仓库,然后再针对于 tlias-web-management 模块执行package进行打包操作。
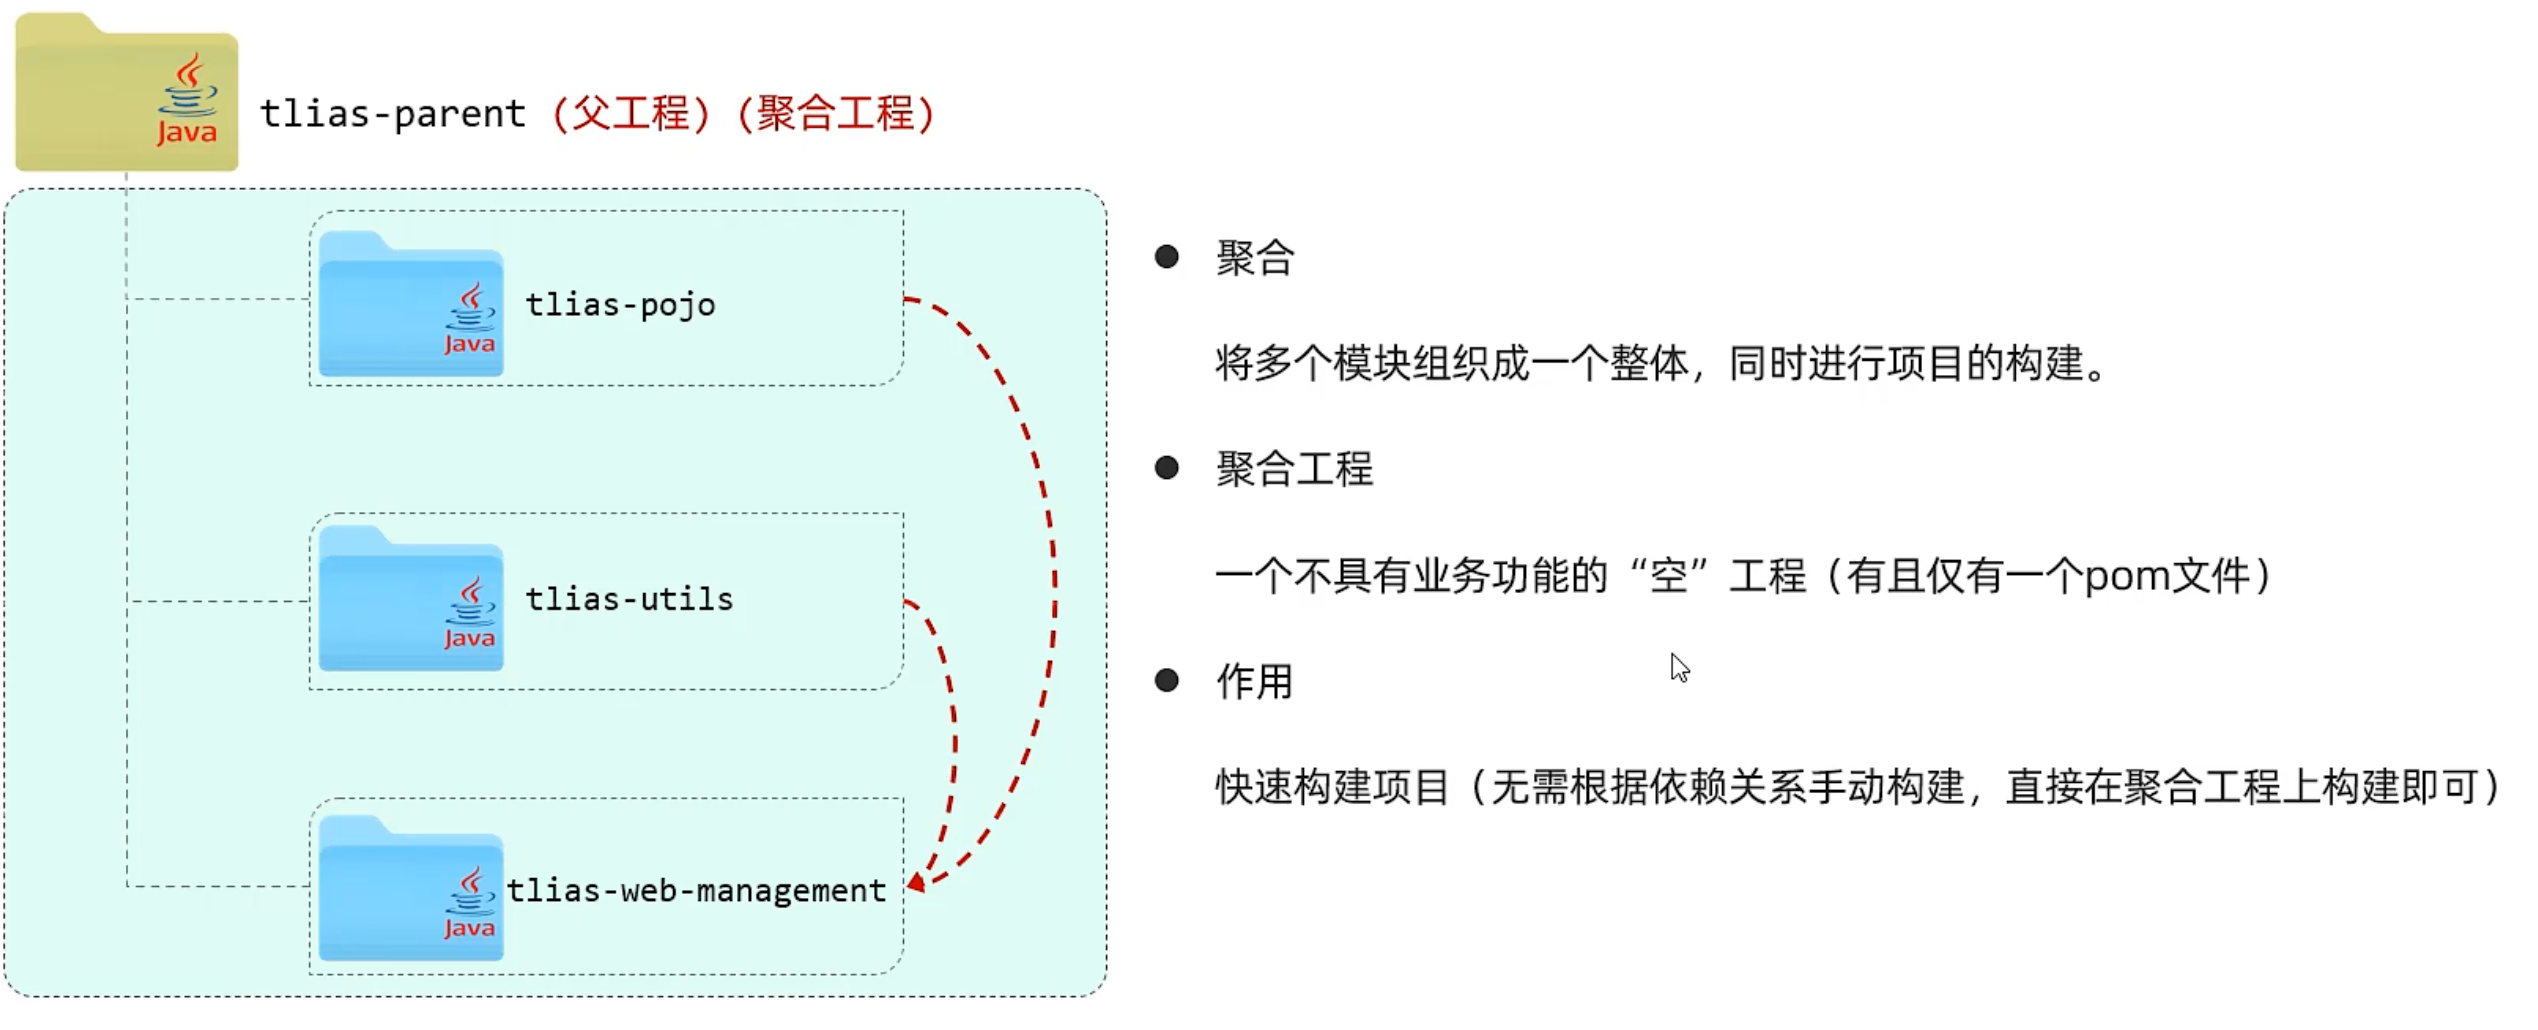
那此时,大家试想一下,如果开发一个大型项目,拆分的模块很多,模块之间的依赖关系错综复杂,那此时要进行项目的打包、安装操作,是非常繁琐的。 而我们接下来,要讲解的maven的聚合就是来解决这个问题的,通过maven的聚合就可以轻松实现项目的一键构建(清理、编译、测试、打包、安装等)。
2.1介绍
2.2实现
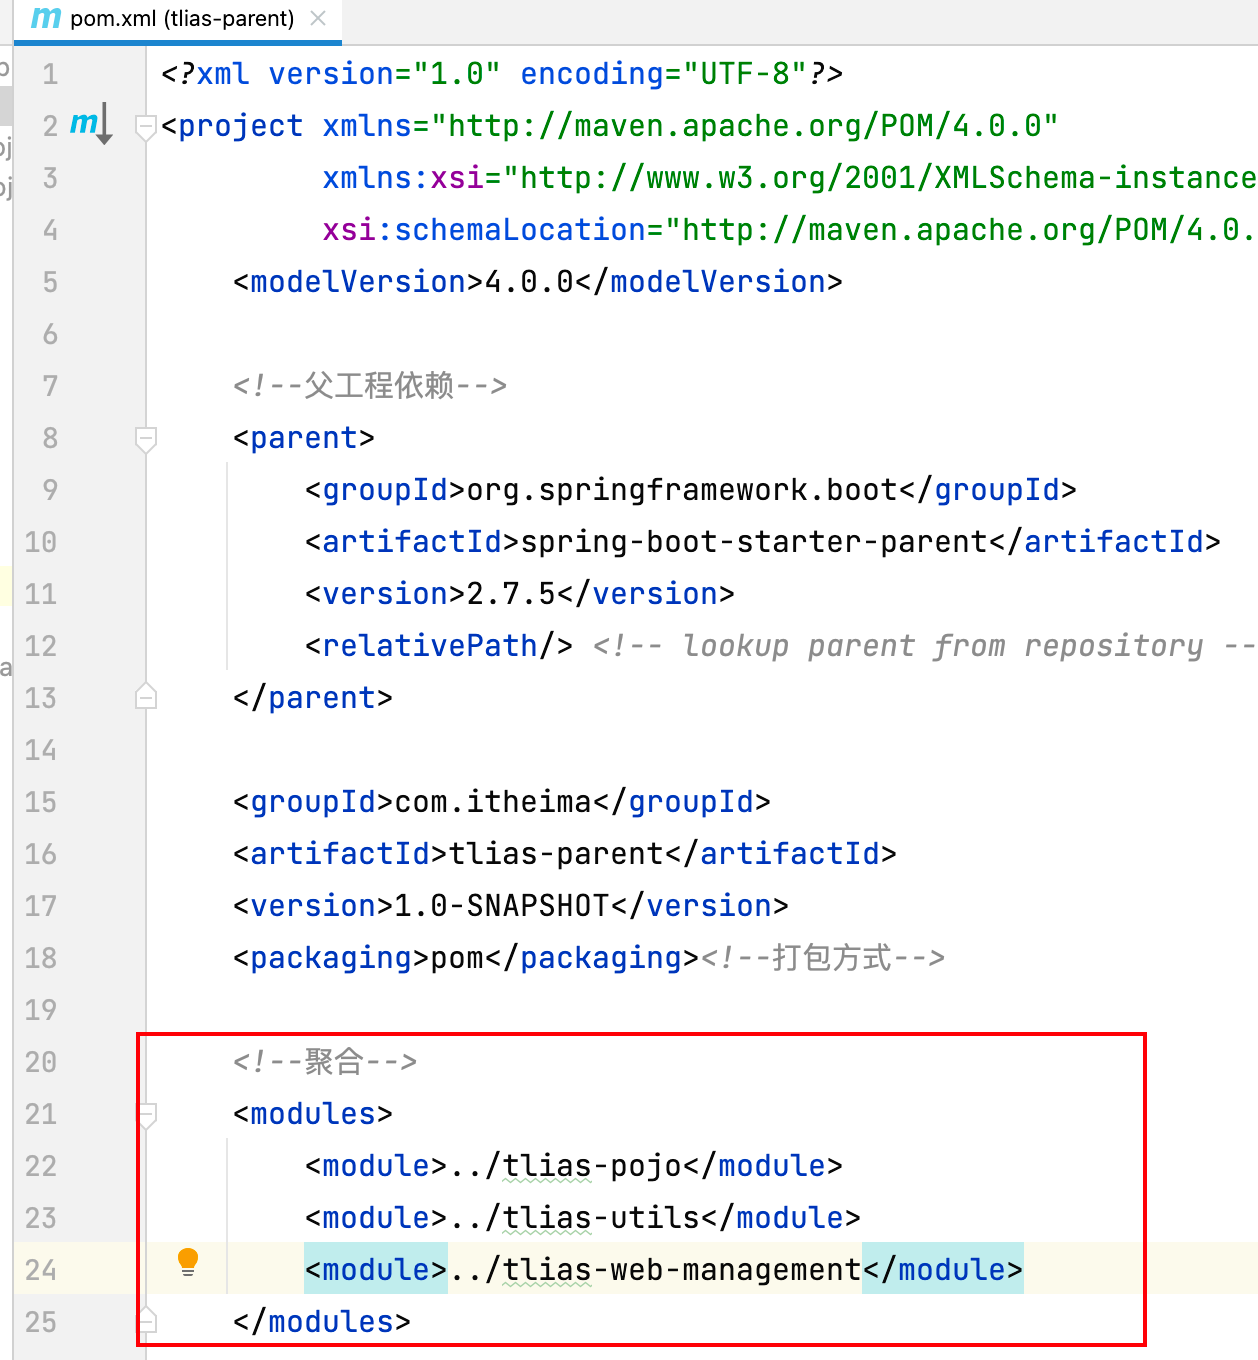
父工程添加
三、私服
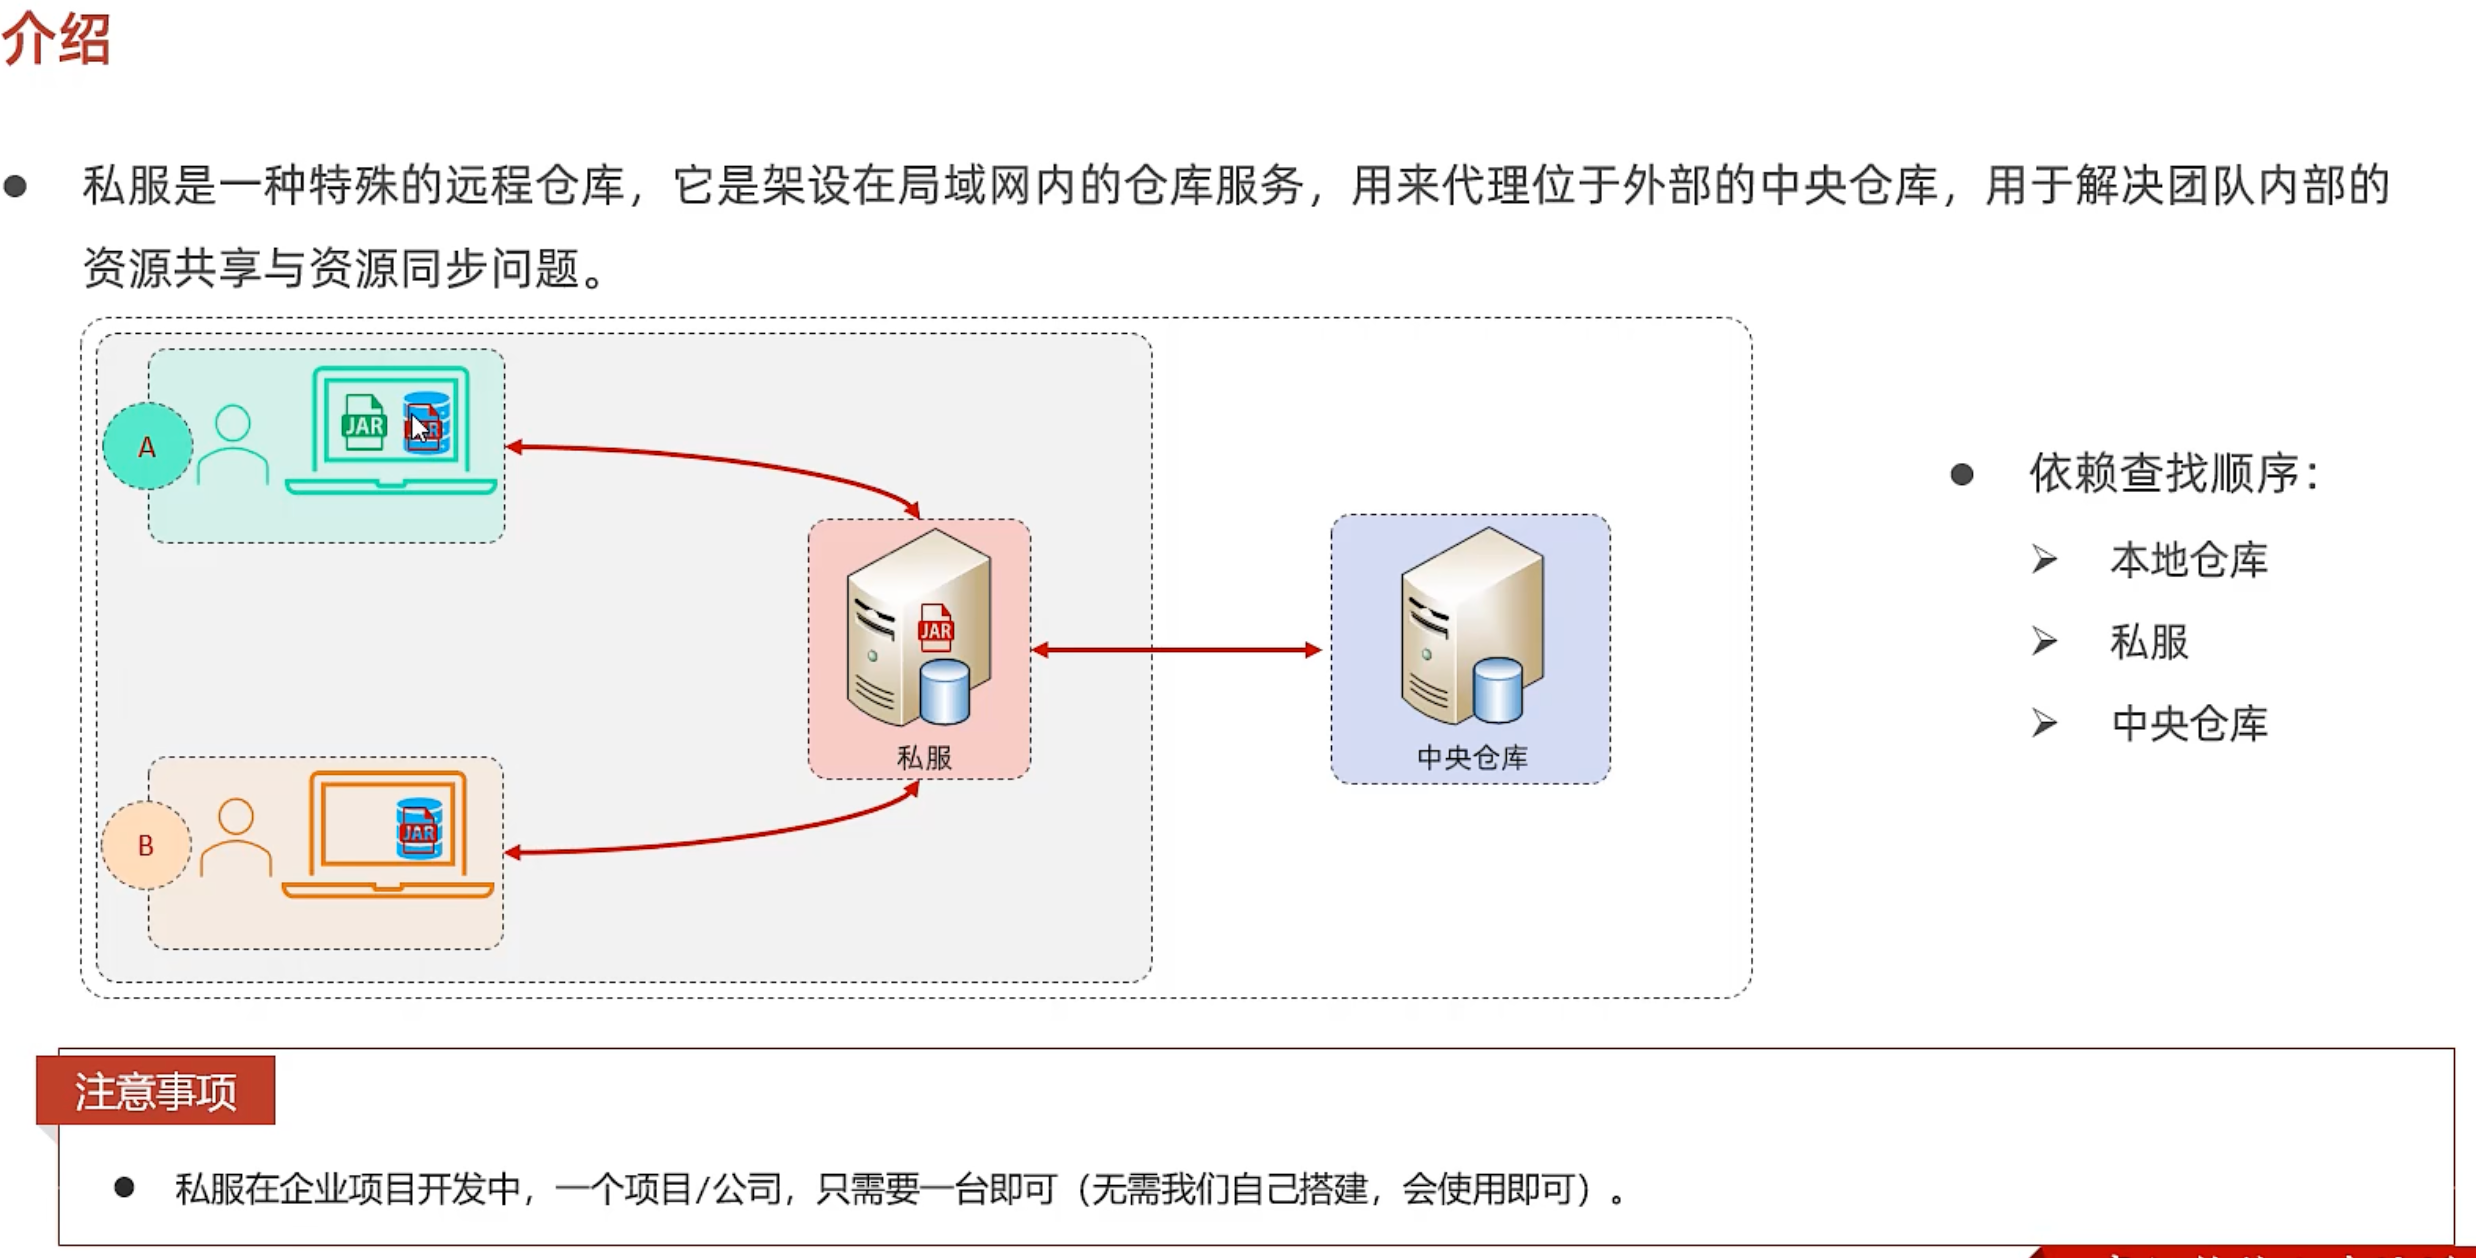
1、介绍
2、资源上传与下载
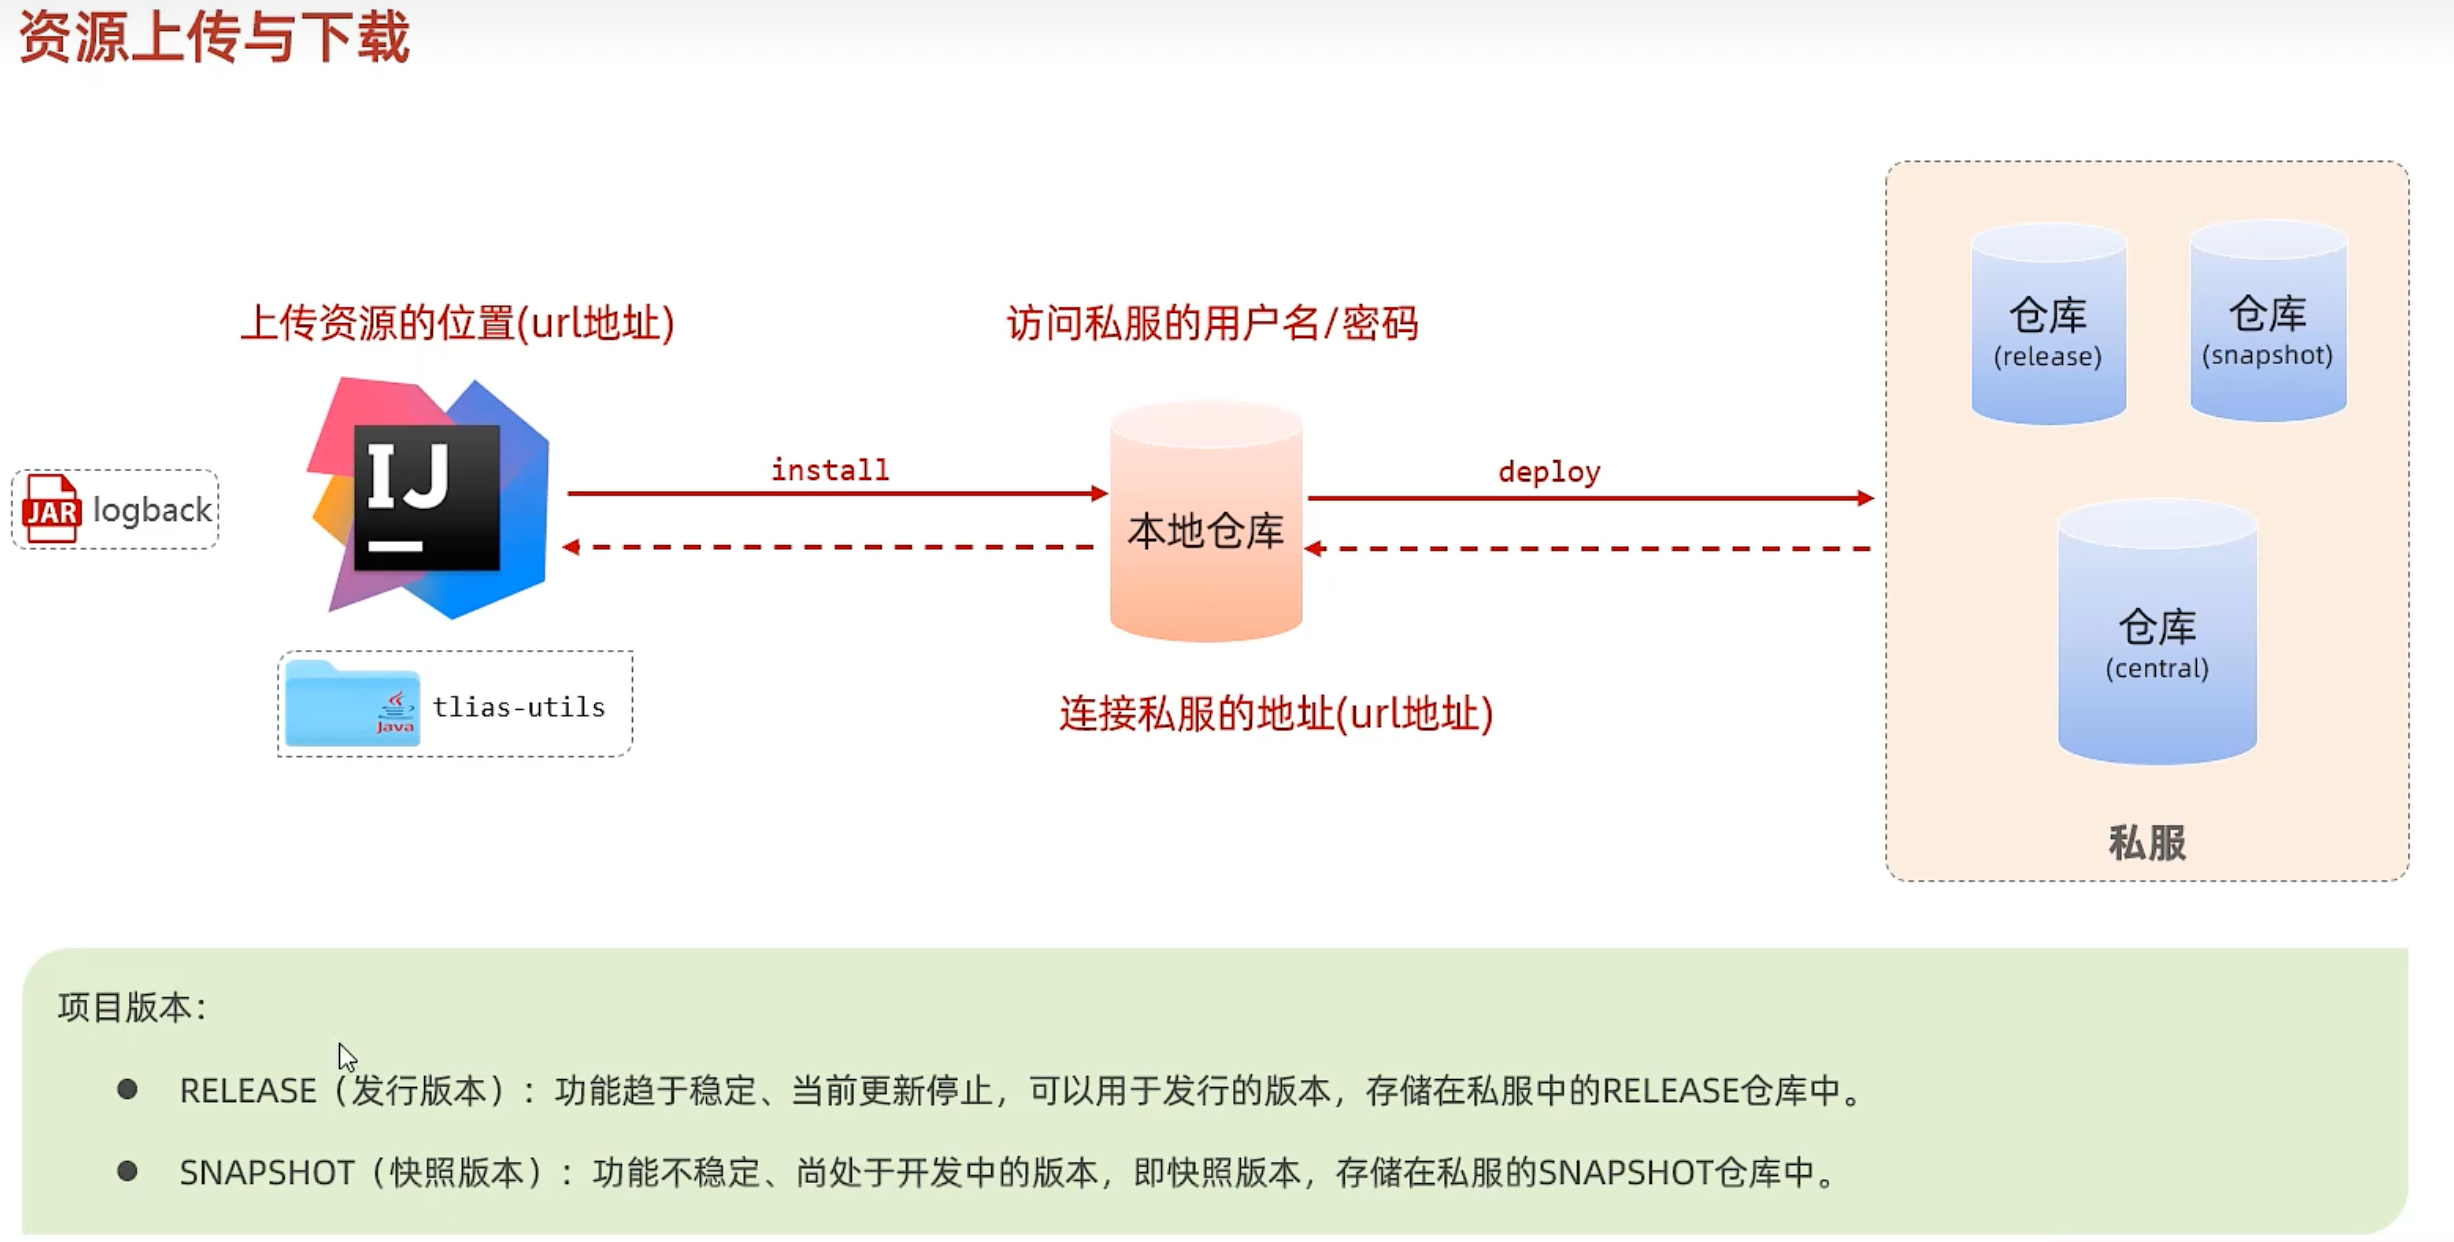

私服准备好了之后,我们要做如下几步配置:
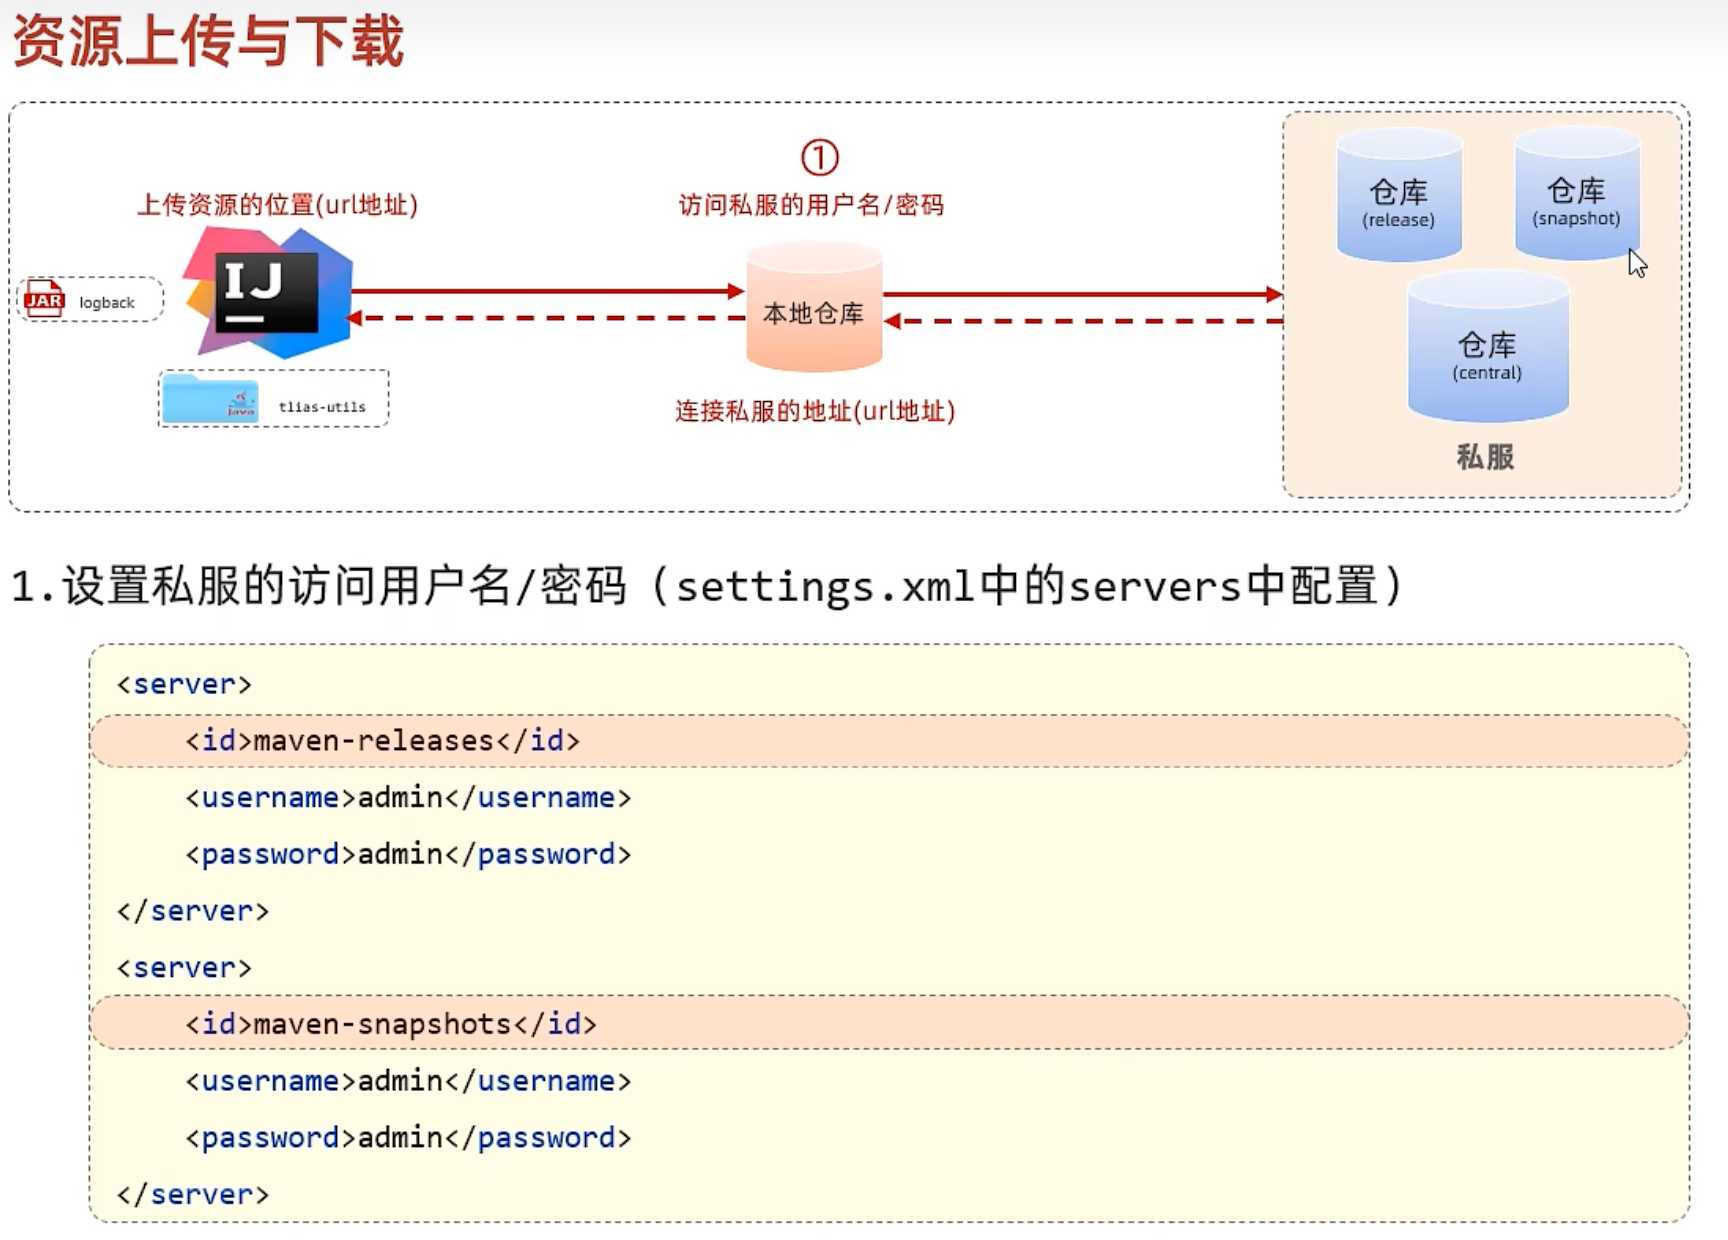
1.设置私服的访问用户名/密码(在自己maven安装目录下的conf/settings.xml中的servers中配置)
<server>
    <id>maven-releases</id>
    <username>admin</username>
    <password>admin</password>
</server>

<server>
    <id>maven-snapshots</id>
    <username>admin</username>
    <password>admin</password>
</server>
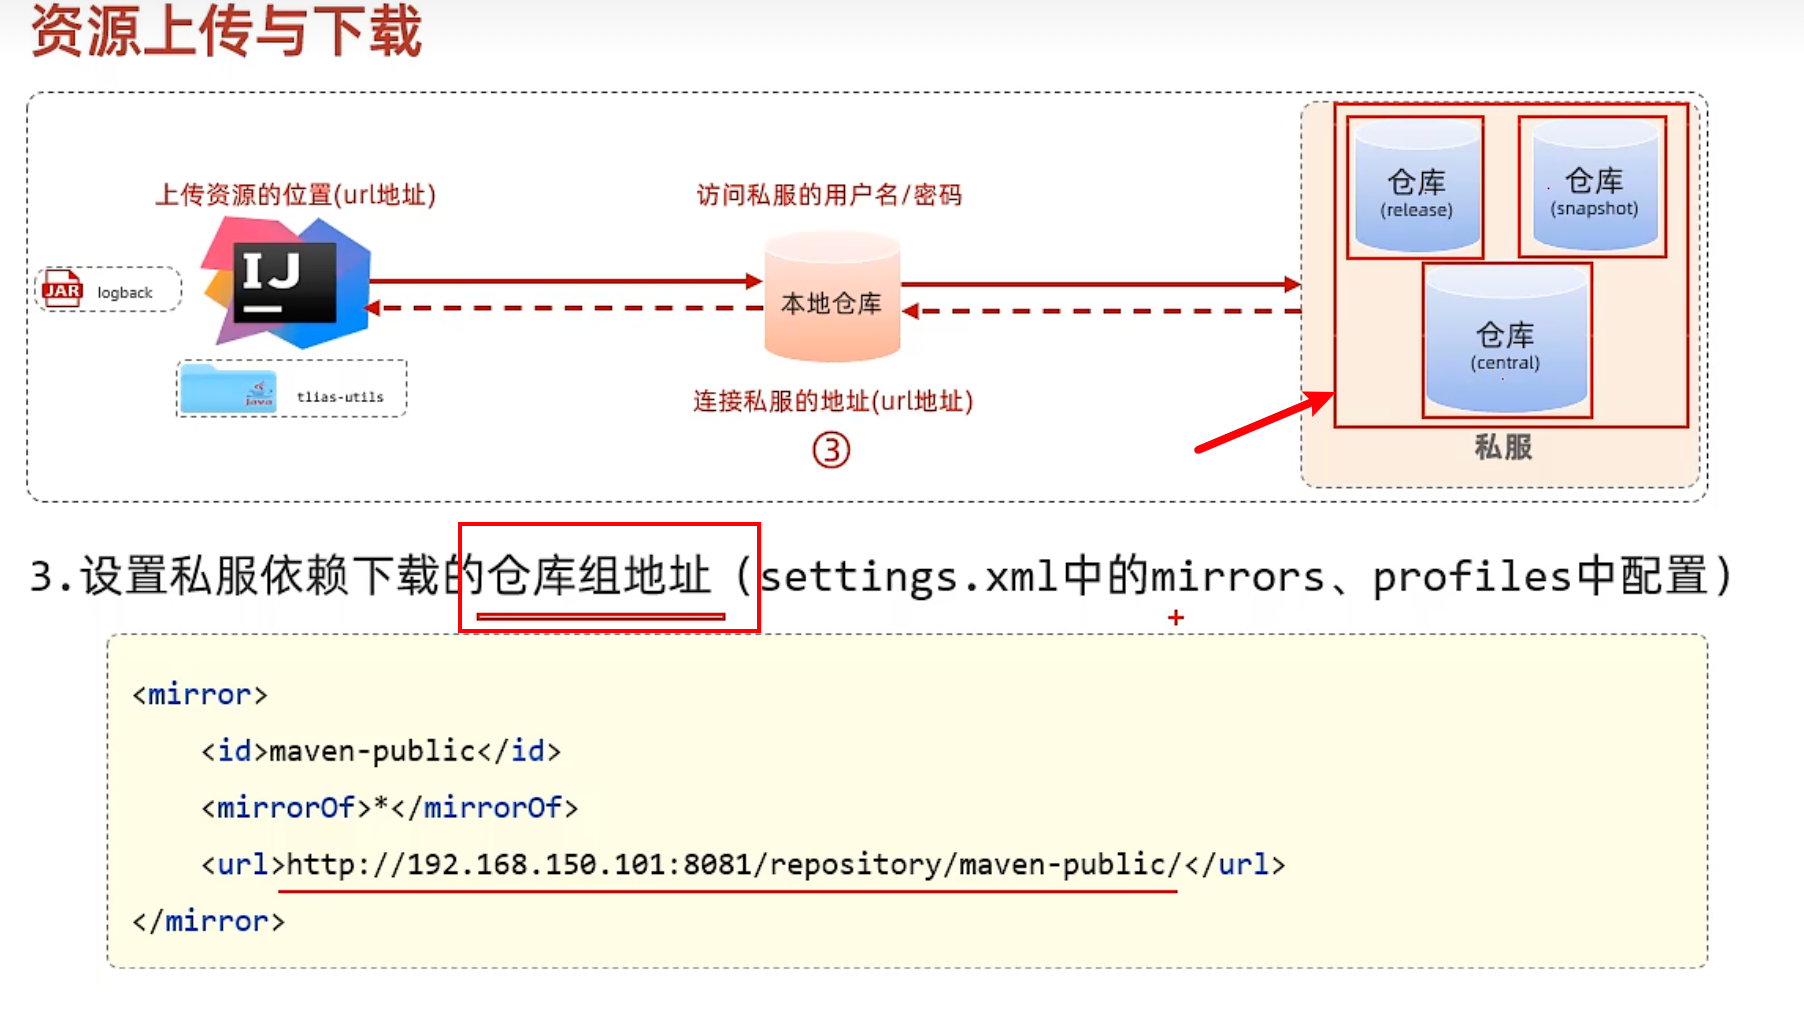
2.设置私服依赖下载的仓库组地址(在自己maven安装目录下的conf/settings.xml中的mirrors、profiles中配置)
<mirror>
    <id>maven-public</id>
    <mirrorOf>*</mirrorOf>
    <url>http://192.168.150.101:8081/repository/maven-public/</url>
</mirror>
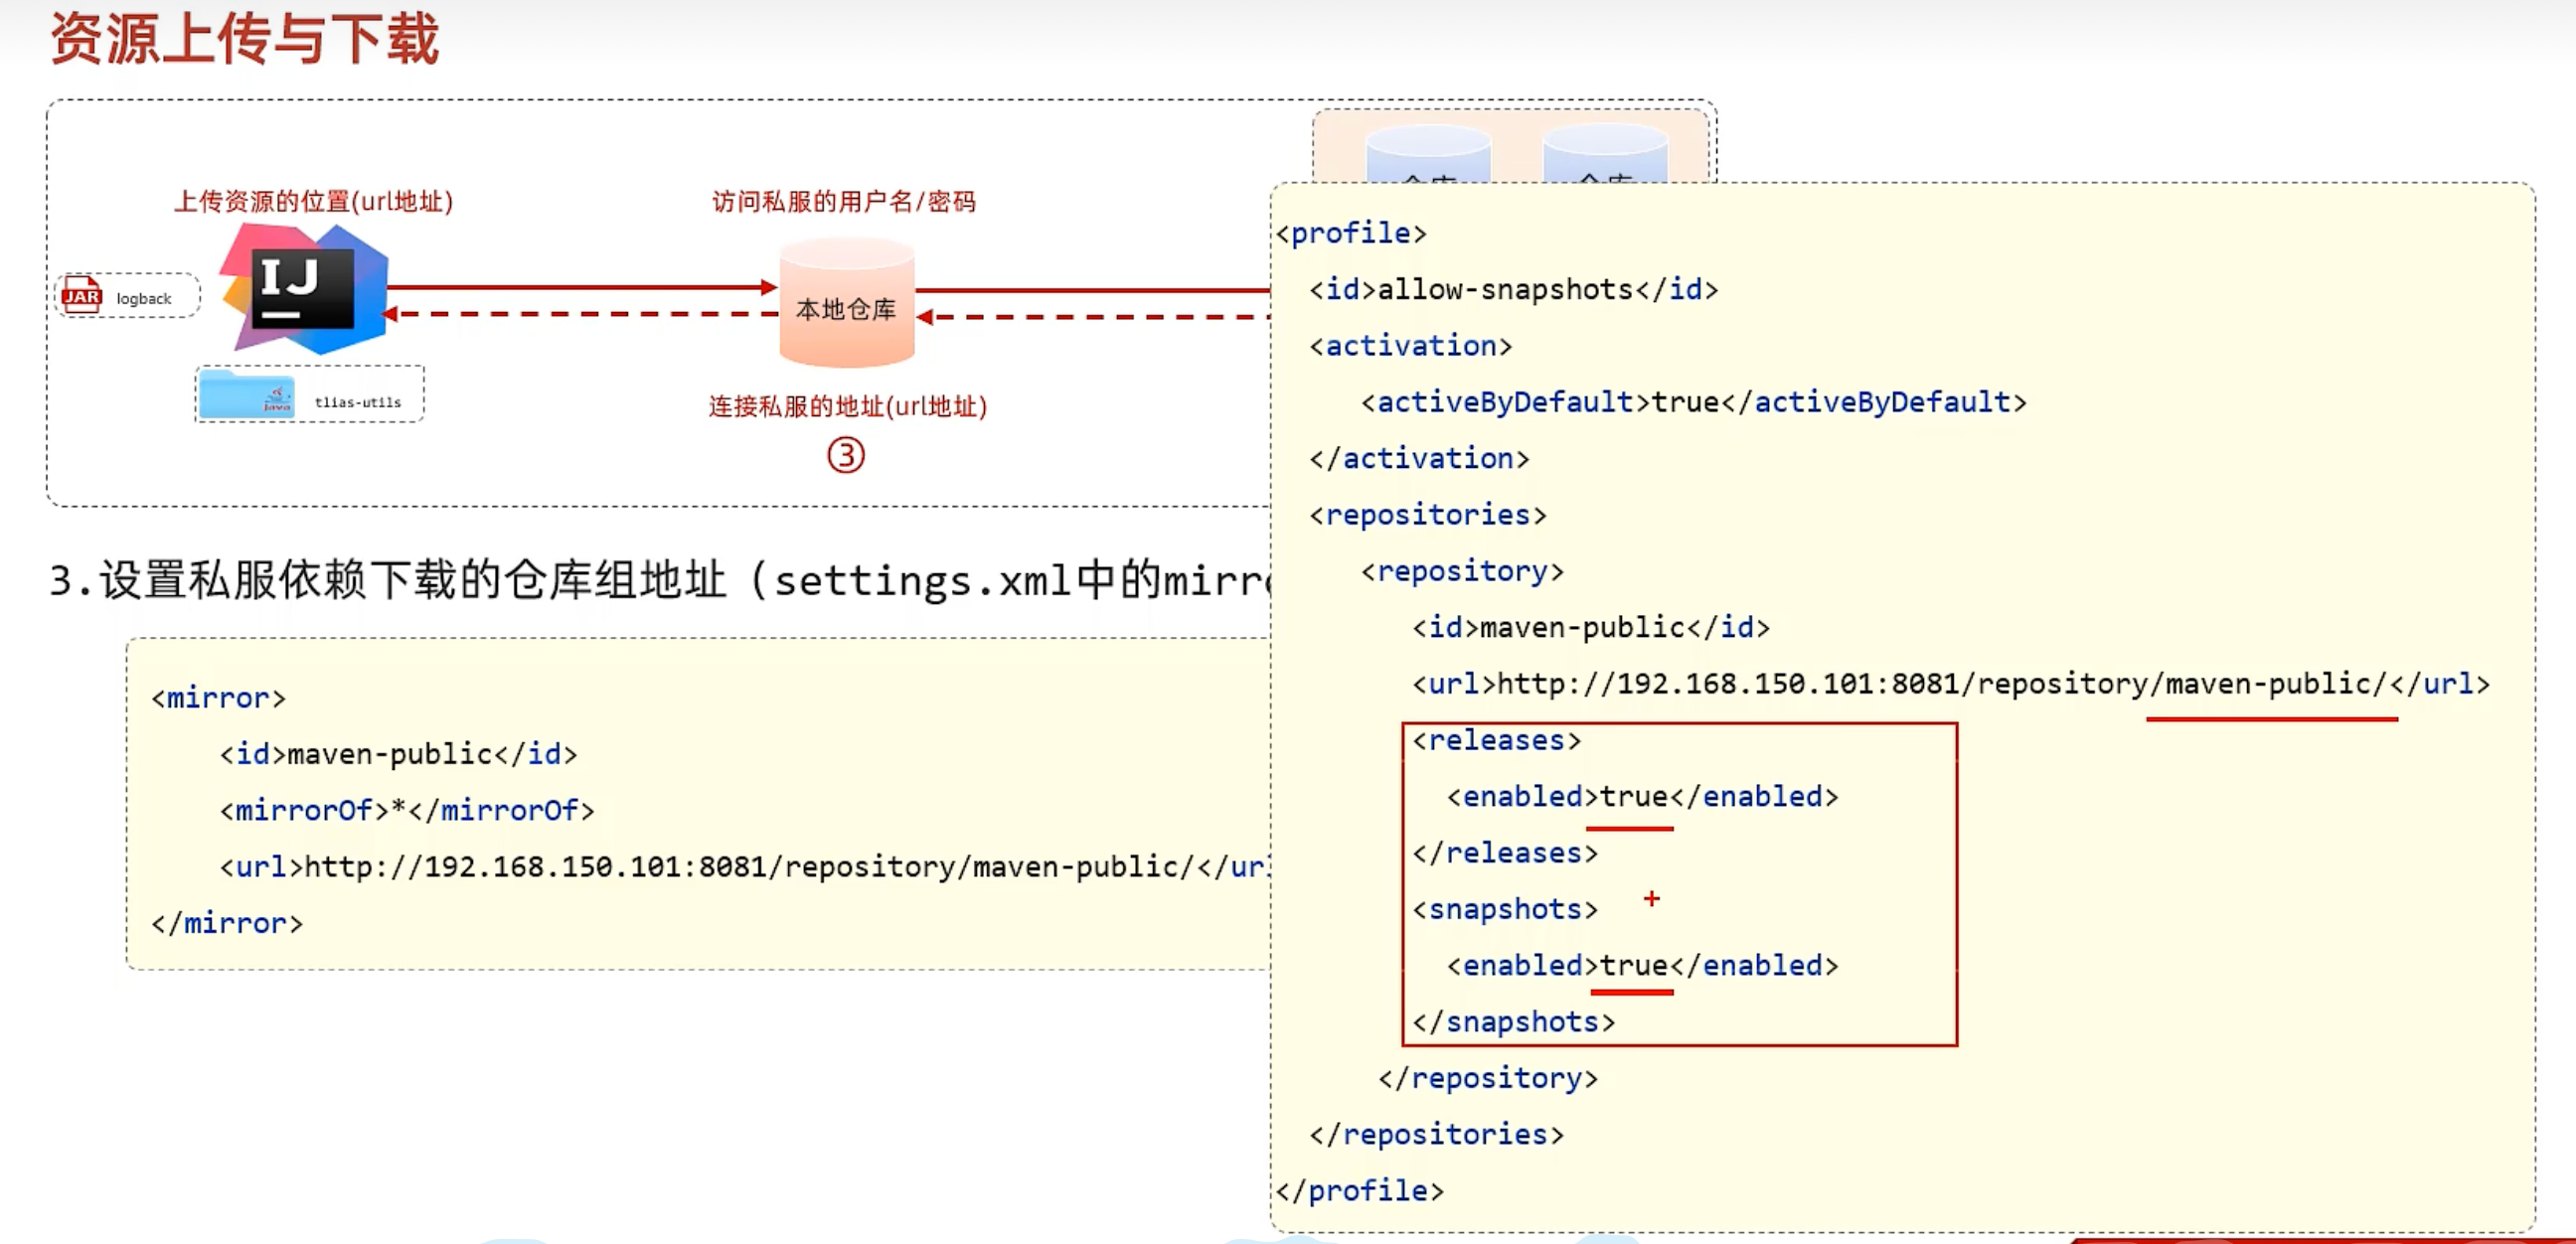
这一步是为了表明从私服中下载的依赖,无论是release版本还是snapshot版本,我们都可以使用
<profile>
    <id>allow-snapshots</id>
        <activation>
        	<activeByDefault>true</activeByDefault>
        </activation>
    <repositories>
        <repository>
            <id>maven-public</id>
            <url>http://192.168.150.101:8081/repository/maven-public/</url>
            <releases>
            	<enabled>true</enabled>
            </releases>
            <snapshots>
            	<enabled>true</enabled>
            </snapshots>
        </repository>
    </repositories>
</profile>
3.IDEA的maven工程的pom文件中配置上传(发布)地址(直接在tlias-parent中配置发布地址)
<distributionManagement>
    <!-- release版本的发布地址 -->
    <repository>
        <id>maven-releases</id>
        <url>http://192.168.150.101:8081/repository/maven-releases/</url>
    </repository>

    <!-- snapshot版本的发布地址 -->
    <snapshotRepository>
        <id>maven-snapshots</id>
        <url>http://192.168.150.101:8081/repository/maven-snapshots/</url>
    </snapshotRepository>
</distributionManagement>
配置完成之后,我们就可以在tlias-parent中执行deploy生命周期,将项目发布到私服仓库中。
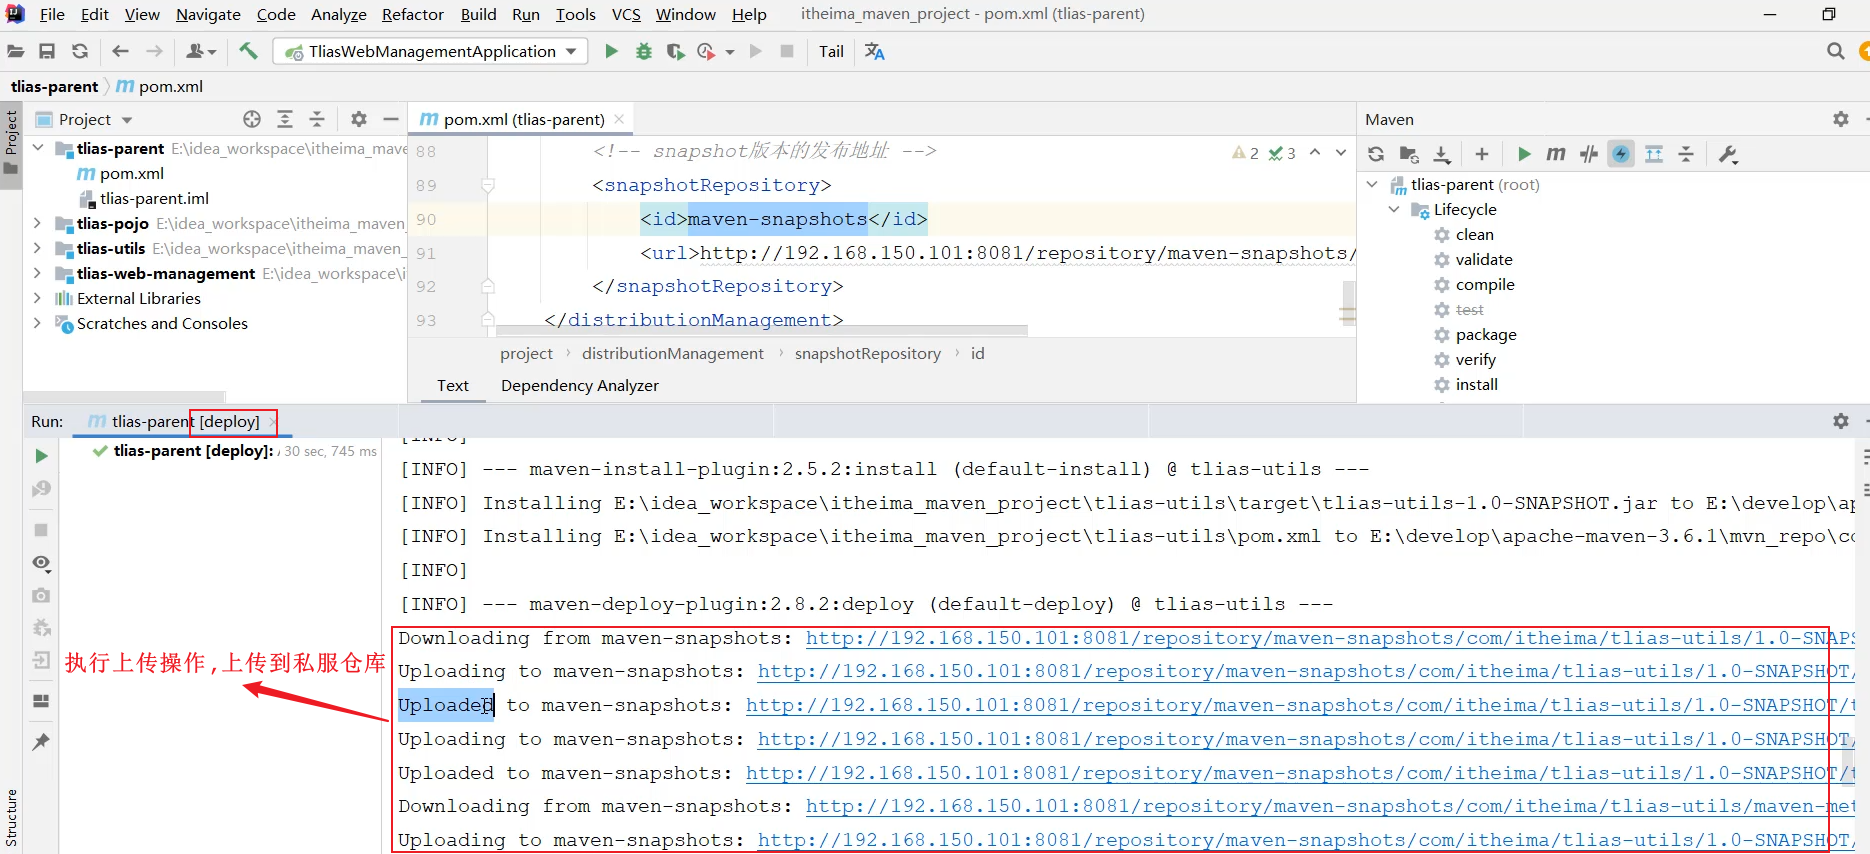
通过日志,我们可以看到,这几个模块打的jar包确实已经上传到了私服仓库中(由于当前我们的项目是SNAPSHOT版本,所以jar包是上传到了snapshot仓库中)。
那接下来,我们再来打开私服来看一下:
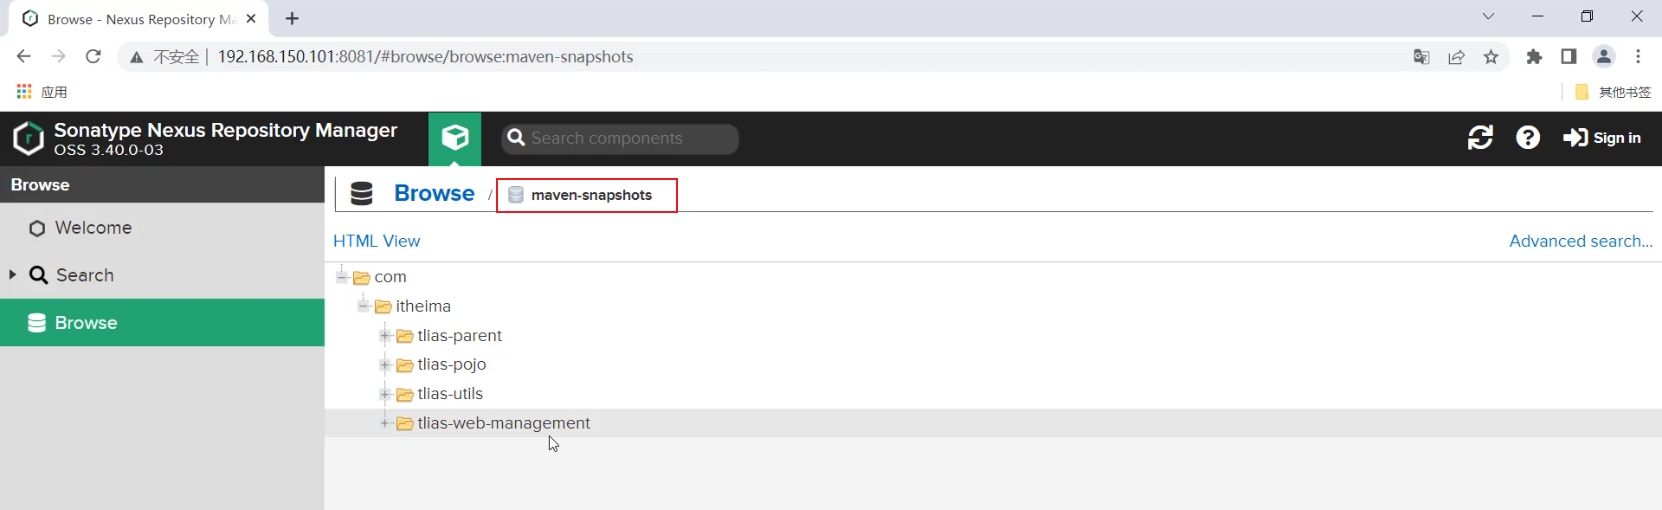
我们看到,我们项目中的这几个模块,在私服中都有了。 那接下来,当其他项目组的开发人员在项目中,就可以直接通过依赖的坐标,就可以完成引入对应的依赖,此时本地仓库没有,就会自动从私服仓库中下载。
备注说明:
课上演示的时候,为了模拟真实的线上环境,老师使用了一台服务器192.168.150.101,并在服务器上安装了maven的私服。 而这台服务器大家并不能直接访问。
同学们如果要测试使用私服进行资源的上传和下载。可以参照如下步骤,启动给大家准备的本地私服操作:
解压: 资料中提供的压缩包 apache-maven-nexus.zip
进入目录: apache-maven-nexus\nexus-3.39.0-01\bin
启动服务:双击 start.bat
访问服务:localhost:8081
私服配置说明:将上述配置私服信息的 192.168.150.101 改为 localhost