参考资料:
《Tomcat源码解析系列(十一)ProtocolHandler》
《Tomcat源码解析系列(十二)NioEndpoint》
前文:
《Tomcat源码:启动类Bootstrap与Catalina的加载》
《Tomcat源码:容器的生命周期管理与事件监听》
《Tomcat源码:StandardServer与StandardService》
《Tomcat源码:Container接口》
《Tomcat源码:StandardEngine、StandardHost、StandardContext、StandardWrapper》
《Tomcat源码:Pipeline与Valve》
《Tomcat源码:连接器与Executor、Connector》
《Tomcat源码:ProtocolHandler与Endpoint》
前言
前文中我们介绍到NioEndpoint的start方法启动了Acceptor与Poller这两个异步线程来处理连接请求,本文我们就来接着介绍这两个组件。
目录
前言
一、Acceptor
1、构造方法
2、run方法
countUpOrAwaitConnection
LimitLatch
serverSocketAccept
setSocketOptions
SocketBufferHandler
NioChannel
NioSocketWrapper
二、Poller与PollerEvent
1、PollerEvent
2、poller
register
createPollerEvent、addEvent
run
events
processKey
一、Acceptor
在前文的Endpoint的startAcceptorThread方法中,创建了Acceptor对象,并使用异步线程调用了其run方法,下面我们就来介绍下Acceptor对象。
1、构造方法
Acceptor的构造方法传入了一个endpoint对象,看过前文的我们知道这里是一个NioEndpoint对象。
public abstract class AbstractEndpoint<S,U> {
   protected void startAcceptorThread() {
        acceptor = new Acceptor<>(this);
        String threadName = getName() + "-Acceptor";
        acceptor.setThreadName(threadName);
        Thread t = new Thread(acceptor, threadName);
        t.setPriority(getAcceptorThreadPriority());
        t.setDaemon(getDaemon());
        t.start();
    }
}

public class Acceptor<U> implements Runnable {
    private final AbstractEndpoint<?,U> endpoint;
    public Acceptor(AbstractEndpoint<?,U> endpoint) {
        this.endpoint = endpoint;
    }
}
2、run方法
由于run方法较长,这里只展示下核心步骤,首先是接收到请求后判断是否已达最大连接数,如果允许则分配SocketChannel,最后进行连接的配置以及处理器的分配。
    @Override
    public void run() {
        int errorDelay = 0;
        long pauseStart = 0;
        try {
            // Loop until we receive a shutdown command
            while (!stopCalled) {
				// ...
                try {
                    //if we have reached max connections, wait
                    endpoint.countUpOrAwaitConnection();
                    U socket = null;
                    try {
                        // Accept the next incoming connection from the server
                        // socket
                        socket = endpoint.serverSocketAccept();
                    } catch (Exception ioe) {
                        // We didn't get a socket
						// ...
                    }
                    // Configure the socket
                    if (!stopCalled && !endpoint.isPaused()) {
                        // setSocketOptions() will hand the socket off to
                        // an appropriate processor if successful
                        if (!endpoint.setSocketOptions(socket)) {
                            endpoint.closeSocket(socket);
                        }
                    } else {
                        endpoint.destroySocket(socket);
                    }
                } catch (Throwable t) {
                    // ...
                }
            }
        } finally {
            stopLatch.countDown();
        }
        state = AcceptorState.ENDED;
    }
countUpOrAwaitConnection
countUpOrAwaitConnection是endpoint中的方法,用于判断连接数是否已达最大,这里会获取我们在前文中介绍的endpoint时提及的connectionLimitLatch。
public abstract class AbstractEndpoint<S,U> {
   private int maxConnections = 8*1024;
   protected void countUpOrAwaitConnection() throws InterruptedException {
        if (maxConnections==-1) {
            return;
        }
        LimitLatch latch = connectionLimitLatch;
        if (latch!=null) {
            latch.countUpOrAwait();
        }
    }
}
LimitLatch
connectionLimitLatch的实现类为LimitLatch,通过其源码可以发现其定义了三个成员变量sync、count、limit分别用来管理并发锁、记录请求数与最大连接限制。
public abstract class AbstractEndpoint<S,U> {
   protected LimitLatch initializeConnectionLatch() {
        if (maxConnections==-1) {
            return null;
        }
        if (connectionLimitLatch==null) {
            connectionLimitLatch = new LimitLatch(getMaxConnections());
        }
        return connectionLimitLatch;
    }
}

public class LimitLatch {
    private final Sync sync;
    private final AtomicLong count;
    private volatile long limit;

    public LimitLatch(long limit) {
        this.limit = limit;
        this.count = new AtomicLong(0);
        this.sync = new Sync();
    }
}
tryAcquireShared
回到上文中判断最大连接数的步骤latch.countUpOrAwait,我们进入到LimitLatch 中来看下。这里最终会进入tryAcquireShared方法,将count加1后判断是否已超出限制,然后再做进一步判断与处理。
public class LimitLatch {
    public void countUpOrAwait() throws InterruptedException {
        sync.acquireSharedInterruptibly(1);
    }

    private class Sync extends AbstractQueuedSynchronizer {
        @Override
        protected int tryAcquireShared(int ignored) {
            long newCount = count.incrementAndGet();
            if (!released && newCount > limit) {
                // Limit exceeded
                count.decrementAndGet();
                return -1;
            } else {
                return 1;
            }
        }
}

public abstract class AbstractQueuedSynchronizer extends AbstractOwnableSynchronizer
    implements java.io.Serializable {
    public final void acquireSharedInterruptibly(int arg)
            throws InterruptedException {
        if (Thread.interrupted())
            throw new InterruptedException();
        if (tryAcquireShared(arg) < 0)
            doAcquireSharedInterruptibly(arg);
    }
}
serverSocketAccept
这一步也是调用的endpoint中的方法,从下文的源码中可以看出这里是从endpoint执行init方法时创建的ServerSocketChannel中获取SocketChannel 连接。在nio中,可以认为一个 SocketChannel 对象代表一个服务端与客户端的连接。
public class NioEndpoint extends AbstractJsseEndpoint<NioChannel,SocketChannel> {
    @Override
    protected SocketChannel serverSocketAccept() throws Exception {
        SocketChannel result = serverSock.accept();
        // ...
        return result;
    }
}
setSocketOptions
setSocketOptions也是endpoint中的方法,这里会执行以下几步:
(1)尝试从SynchronizedStack<NioChannel> nioChannels 中获取信道
(2)如果上一步未获取到则创建SocketBufferHandler对象
(3)使用SocketBufferHandler对象创建NioChannel对象
(4)使用NioChannel与NioEndpoint对象创建NioSocketWrapper对象
(5)为NioChannel对象设置SocketChannel与NioSocketWrapper对象作为属性
(6)为NioSocketWrapper对象设置属性并注册入poller中
public class NioEndpoint extends AbstractJsseEndpoint<NioChannel,SocketChannel> {
   @Override
    protected boolean setSocketOptions(SocketChannel socket) {
        NioSocketWrapper socketWrapper = null;
        try {
            // Allocate channel and wrapper
            NioChannel channel = null;
            if (nioChannels != null) {
                channel = nioChannels.pop();
            }
            if (channel == null) {
                SocketBufferHandler bufhandler = new SocketBufferHandler(
                        socketProperties.getAppReadBufSize(),
                        socketProperties.getAppWriteBufSize(),
                        socketProperties.getDirectBuffer());
                if (isSSLEnabled()) {
                    channel = new SecureNioChannel(bufhandler, this);
                } else {
                    channel = new NioChannel(bufhandler);
                }
            }
            NioSocketWrapper newWrapper = new NioSocketWrapper(channel, this);
            channel.reset(socket, newWrapper);
            connections.put(socket, newWrapper);
            socketWrapper = newWrapper;

            // Set socket properties
            // Disable blocking, polling will be used
            socket.configureBlocking(false);
            socketProperties.setProperties(socket.socket());

            socketWrapper.setReadTimeout(getConnectionTimeout());
            socketWrapper.setWriteTimeout(getConnectionTimeout());
            socketWrapper.setKeepAliveLeft(NioEndpoint.this.getMaxKeepAliveRequests());
            poller.register(socketWrapper);
            return true;
        } catch (Throwable t) {
            ExceptionUtils.handleThrowable(t);
            try {
                log.error(sm.getString("endpoint.socketOptionsError"), t);
            } catch (Throwable tt) {
                ExceptionUtils.handleThrowable(tt);
            }
            if (socketWrapper == null) {
                destroySocket(socket);
            }
        }
        // Tell to close the socket if needed
        return false;
    }
}
SocketBufferHandler
SocketBufferHandler对象里包含了两个 ByteBuffer 对象,一个读一个写。
    public SocketBufferHandler(int readBufferSize, int writeBufferSize,
            boolean direct) {
        this.direct = direct;
        if (direct) {
            readBuffer = ByteBuffer.allocateDirect(readBufferSize);
            writeBuffer = ByteBuffer.allocateDirect(writeBufferSize);
        } else {
            readBuffer = ByteBuffer.allocate(readBufferSize);
            writeBuffer = ByteBuffer.allocate(writeBufferSize);
        }
    }
NioChannel
NioChannel 中将SocketBufferHandler 与SocketChannel 、NioSocketWrapper 作为成员变量,初始化时只设置了一个SocketBufferHandler,而另外两个成员会在rest时设置。
public class NioChannel implements ByteChannel, ScatteringByteChannel, GatheringByteChannel {
    protected final SocketBufferHandler bufHandler;
    protected SocketChannel sc = null;
    protected NioSocketWrapper socketWrapper = null;

    public NioChannel(SocketBufferHandler bufHandler) {
        this.bufHandler = bufHandler;
    }

    // Reset the channel
    public void reset(SocketChannel channel, NioSocketWrapper socketWrapper) throws IOException {
        this.sc = channel;
        this.socketWrapper = socketWrapper;
        bufHandler.reset();
    }
}
NioSocketWrapper
NioSocketWrapper是更多组件的封装,可以看到这里从NioEndpoint中获取了nioChannels 与poller,又从niochannel中获取了socketBufferHandler,而其父类中则保存了作为参数传入的SocketChannel 与当前的endpoint对象。
   public static class NioSocketWrapper extends SocketWrapperBase<NioChannel> {
       public NioSocketWrapper(NioChannel channel, NioEndpoint endpoint) {
            super(channel, endpoint);
            nioChannels = endpoint.getNioChannels();
            poller = endpoint.getPoller();
            socketBufferHandler = channel.getBufHandler();
            readLock = (readPending == null) ? new Object() : readPending;
            writeLock = (writePending == null) ? new Object() : writePending;
        }
    }

    public abstract class SocketWrapperBase<E> {
      public SocketWrapperBase(E socket, AbstractEndpoint<E,?> endpoint) {
            this.socket = socket;
            this.endpoint = endpoint;
            if (endpoint.getUseAsyncIO() || needSemaphores()) {
                readPending = new Semaphore(1);
                writePending = new Semaphore(1);
            } else {
                readPending = null;
                writePending = null;
            }
        }
    }
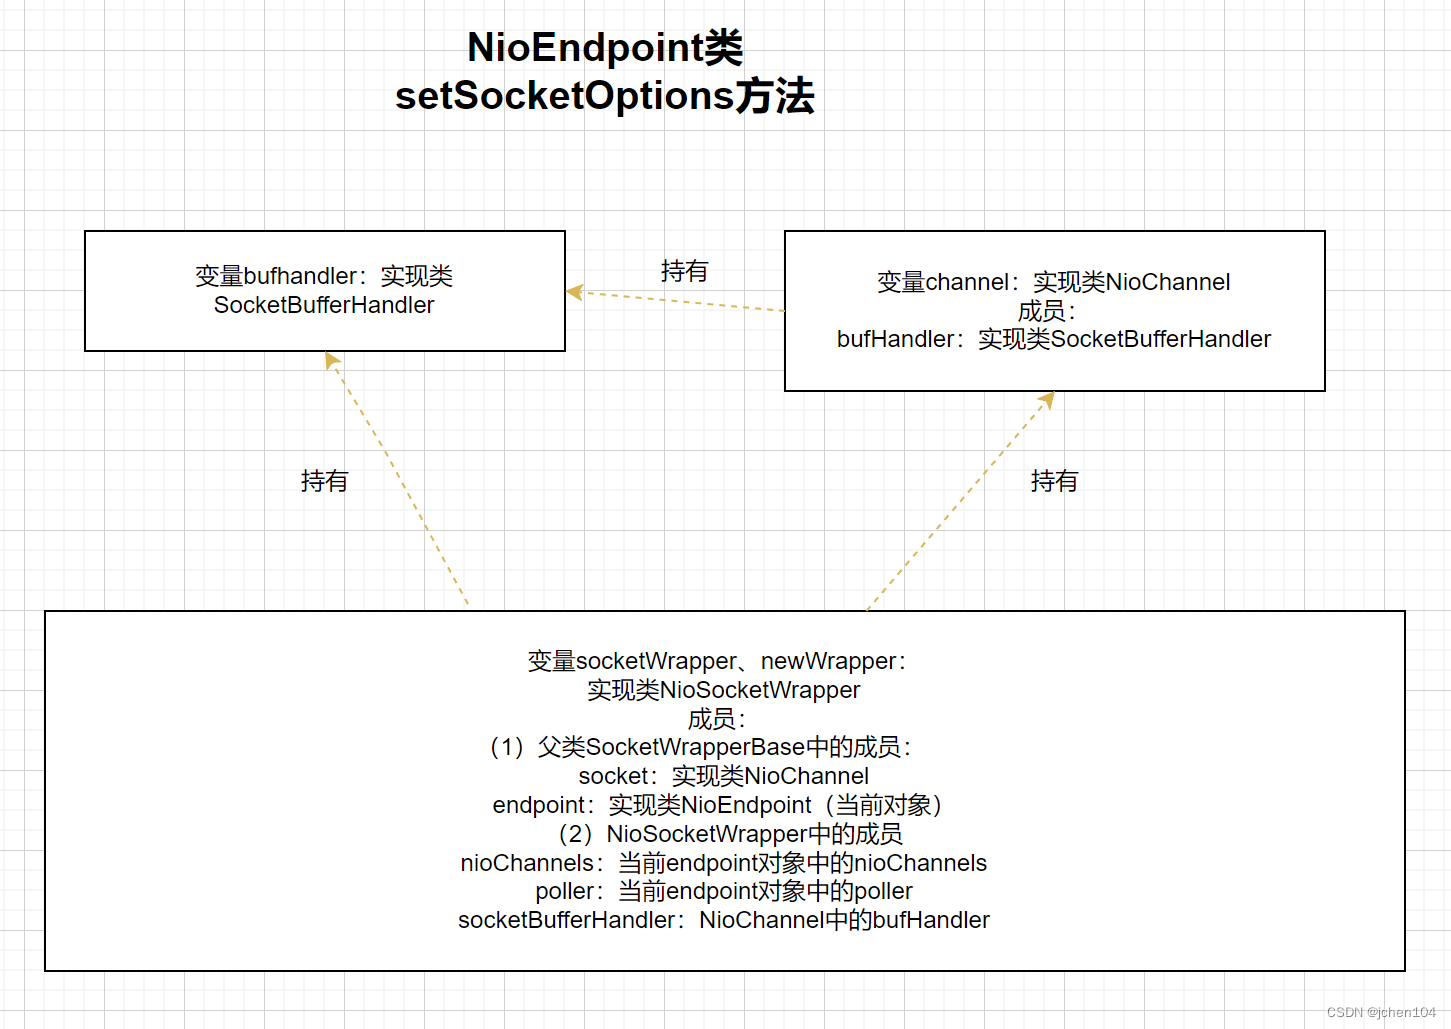
方法的最后将封装好的NioSocketWrapper对象注册到了poller对象中,由此将连接请求转发了过去。
大致梳理下Acceptor的作用就是使线程在一个循环里一直接受客户端连接,生成 SocketChannel 对象,并把这个 SocketChannel 对象封装成 NioChannel 和 NioSocketWrapper 对象,并注册到 Poller 对象中等待进一步处理。
二、Poller与PollerEvent
1、PollerEvent
PollerEvent是向Poller对象的事件队列插入的待处理的事件的抽象,可以被Poller缓存循环回收利用以避免GC。
可以看到构造方法内部实际是调用了rest方法将设置传入的两个参数,即我们上一节中介绍的NioSocketWrapper 与intOps(请求关注的事件类型,是连接、读还是写)。
    /**
     * PollerEvent, cacheable object for poller events to avoid GC
     */
    public static class PollerEvent {

        private NioSocketWrapper socketWrapper;
        private int interestOps;

        public PollerEvent(NioSocketWrapper socketWrapper, int intOps) {
            reset(socketWrapper, intOps);
        }

        public void reset(NioSocketWrapper socketWrapper, int intOps) {
            this.socketWrapper = socketWrapper;
            interestOps = intOps;
        }

        public NioSocketWrapper getSocketWrapper() {
            return socketWrapper;
        }

        public int getInterestOps() {
            return interestOps;
        }

        public void reset() {
            reset(null, 0);
        }
}
2、poller
Poller类在构造方法中会获取一个选择器,这是NIO中的关键组件,用于获取就绪事件。
    public class Poller implements Runnable {
        private Selector selector;
        public Poller() throws IOException {
            this.selector = Selector.open();
    }
register
先来看下上文中涉及的register方法,这个方法是将新连接的套接字创建为PollerEvent对象并缓存起来。这里的第一步是向NioSocketWrapper 中注册关注事件,这里默认是读事件,然后调用createPollerEvent方法创建PollerEvent对象最后调用addEvent对象进行缓存。
        /**
         * Registers a newly created socket with the poller.
         *
         * @param socketWrapper The socket wrapper
         */
        public void register(final NioSocketWrapper socketWrapper) {
            socketWrapper.interestOps(SelectionKey.OP_READ);//this is what OP_REGISTER turns into.
            PollerEvent pollerEvent = createPollerEvent(socketWrapper, OP_REGISTER);
            addEvent(pollerEvent);
        }
createPollerEvent、addEvent
createPollerEvent方法尝试从缓存中获取现有的PollerEvent,如果没有则新建一个,有的话则调用rest方法重置其套接字等设置。
addEvent则是将上一步获取到的PollerEvent加入到events事件缓存中,等待分配线程处理。
public class Poller implements Runnable {
       private final SynchronizedQueue<PollerEvent> events =
                new SynchronizedQueue<>();

        private PollerEvent createPollerEvent(NioSocketWrapper socketWrapper, int interestOps) {
            PollerEvent r = null;
            if (eventCache != null) {
                r = eventCache.pop();
            }
            if (r == null) {
                r = new PollerEvent(socketWrapper, interestOps);
            } else {
                r.reset(socketWrapper, interestOps);
            }
            return r;
        }

        private void addEvent(PollerEvent event) {
            events.offer(event);
            if (wakeupCounter.incrementAndGet() == 0) {
                selector.wakeup();
            }
        }
}
run
然后来看poller的run方法,首先调用了events()方法,获取就绪事件数量keyCount ,遍历这些就绪事件并调用processKey方法处理,传入的参数为连接的SelectionKey与NioSocketWrapper。
PS:selectionKey表示channel在Selector中注册的标识,每个Channel向Selector注册时,都将会创建一个selectionKey
    public class Poller implements Runnable {
        public void run() {
            // Loop until destroy() is called
            while (true) {
                boolean hasEvents = false;
                try {
                    if (!close) {
                        hasEvents = events();
                        if (wakeupCounter.getAndSet(-1) > 0) {
                            // If we are here, means we have other stuff to do
                            // Do a non blocking select
                            keyCount = selector.selectNow();
                        } else {
                            keyCount = selector.select(selectorTimeout);
                        }
                        wakeupCounter.set(0);
                    }
                    if (close) {
                        // ...
                    }
                    // Either we timed out or we woke up, process events first
                    if (keyCount == 0) {
                        hasEvents = (hasEvents | events());
                    }
                } catch (Throwable x) {
                    ExceptionUtils.handleThrowable(x);
                    log.error(sm.getString("endpoint.nio.selectorLoopError"), x);
                    continue;
                }

                Iterator<SelectionKey> iterator =
                    keyCount > 0 ? selector.selectedKeys().iterator() : null;
                // Walk through the collection of ready keys and dispatch
                // any active event.
                while (iterator != null && iterator.hasNext()) {
                    SelectionKey sk = iterator.next();
                    iterator.remove();
                    NioSocketWrapper socketWrapper = (NioSocketWrapper) sk.attachment();
                    // Attachment may be null if another thread has called
                    // cancelledKey()
                    if (socketWrapper != null) {
                        processKey(sk, socketWrapper);
                    }
                }
                // Process timeouts
                timeout(keyCount,hasEvents);
            }
            getStopLatch().countDown();
        }
    }
events
来看events方法,内部会遍历PollerEvent 缓存集合events,获取其中的NioSocketWrapper 、SocketChannel 以及关注的事件interestOps 。如果是注册事件则将当前通道的OP_READ事件注册到selector上,同时添加附件NioSocketWrapper 对象,如果是别的事件则将其附加到 SocketChannel 关联的 SelectionKey 。
        public boolean events() {
            boolean result = false;

            PollerEvent pe = null;
            for (int i = 0, size = events.size(); i < size && (pe = events.poll()) != null; i++ ) {
                result = true;
                NioSocketWrapper socketWrapper = pe.getSocketWrapper();
                SocketChannel sc = socketWrapper.getSocket().getIOChannel();
                int interestOps = pe.getInterestOps();
                if (sc == null) {
                    log.warn(sm.getString("endpoint.nio.nullSocketChannel"));
                    socketWrapper.close();
                } else if (interestOps == OP_REGISTER) {
                    try {
                        sc.register(getSelector(), SelectionKey.OP_READ, socketWrapper);
                    } catch (Exception x) {
                        log.error(sm.getString("endpoint.nio.registerFail"), x);
                    }
                } else {
                    final SelectionKey key = sc.keyFor(getSelector());
                    if (key == null) {
                        socketWrapper.close();
                    } else {
                        final NioSocketWrapper attachment = (NioSocketWrapper) key.attachment();
                        if (attachment != null) {
                            try {
                                int ops = key.interestOps() | interestOps;
                                attachment.interestOps(ops);
                                key.interestOps(ops);
                            } catch (CancelledKeyException ckx) {
                                cancelledKey(key, socketWrapper);
                            }
                        } else {
                            cancelledKey(key, socketWrapper);
                        }
                    }
                }
                if (running && eventCache != null) {
                    pe.reset();
                    eventCache.push(pe);
                }
            }

            return result;
        }
processKey
run方法中调用processKey方法来处理请求,首先是判断socketWrapper.getSendfileData() 不为 null 的话就调用 processSendfile 方法处理。
然后判断是读还是写事件,NioSocketWrapper 是在上文中的setSocketOptions方法创建的,这里的readOperation、writeOperation 为空,readBlocking、writeBlocking为false,因此最终实际上会调用processSocket方法,该方法由AbstractEndpoint类实现,我们会在以后介绍。
        protected void processKey(SelectionKey sk, NioSocketWrapper socketWrapper) {
            try {
                if (close) {
                    cancelledKey(sk, socketWrapper);
                } else if (sk.isValid()) {
                    if (sk.isReadable() || sk.isWritable()) {
                        if (socketWrapper.getSendfileData() != null) {
                            processSendfile(sk, socketWrapper, false);
                        } else {
                            unreg(sk, socketWrapper, sk.readyOps());
                            boolean closeSocket = false;
                            // Read goes before write
                            if (sk.isReadable()) {
                                if (socketWrapper.readOperation != null) {
                                    if (!socketWrapper.readOperation.process()) {
                                        closeSocket = true;
                                    }
                                } else if (socketWrapper.readBlocking) {
                                    synchronized (socketWrapper.readLock
                                    ) {
                                        socketWrapper.readBlocking = false;
                                        socketWrapper.readLock.notify();
                                    }
                                } else if (!processSocket(socketWrapper, SocketEvent.OPEN_READ, true)) {
                                    closeSocket = true;
                                }
                            }
                            if (!closeSocket && sk.isWritable()) {
                                if (socketWrapper.writeOperation != null) {
                                    if (!socketWrapper.writeOperation.process()) {
                                        closeSocket = true;
                                    }
                                } else if (socketWrapper.writeBlocking) {
                                    synchronized (socketWrapper.writeLock) {
                                        socketWrapper.writeBlocking = false;
                                        socketWrapper.writeLock.notify();
                                    }
                                } else if (!processSocket(socketWrapper, SocketEvent.OPEN_WRITE, true)) {
                                    closeSocket = true;
                                }
                            }
                            if (closeSocket) {
                                cancelledKey(sk, socketWrapper);
                            }
                        }
                    }
                } else {
                    // Invalid key
                    cancelledKey(sk, socketWrapper);
                }
            } catch (CancelledKeyException ckx) {
                cancelledKey(sk, socketWrapper);
            } catch (Throwable t) {
                ExceptionUtils.handleThrowable(t);
                log.error(sm.getString("endpoint.nio.keyProcessingError"), t);
            }
        }
到这里我们基本介绍完了请求是如何从Acceptor流转到Poller中的,异步线程Acceptor在接收到请求后会创建了SocketChannel 对象,接着先封装为NioSocketWrapper,再封装为PollerEvent,然后转交给Poller线程处理。Poller线程在拿到PollerEvent后会取出其中的SocketChannel对象并注册相关事件,最后调用processKey来进行下一步处理。
