从零开始 Spring Boot 32:AOP II

图源:简书 (jianshu.com)
之前写过一篇文章从零开始 Spring Boot 26:AOP - 红茶的个人站点 (icexmoon.cn),讨论了AOP的基本用法,但那篇文章相当粗疏,对Spring中的AOP技术讨论并不全面,所以这里在本篇文章中,将基于Spring官方文档的内容,全面讨论Spring中的AOP技术运用。
基本概念
老规矩,先看一个示例,来说明什么是AOP以及为什么要使用AOP。
假设我们有这么一个简单示例:
@AllArgsConstructor
public class User {
    private Integer id;
    private String name;
    private String password;
}

@RestController
@RequestMapping("/user")
public class UserController {
    @Autowired
    private UserService userService;

    @GetMapping("/get/{id}")
    public String getUser(@Min(1) @PathVariable("id") Integer id) {
        userService.getUserById(id);
        userService.addUser(new User(id, "icexmoon", "123"));
        return Result.success().toString();
    }

    @GetMapping("")
    public String home(){
        return Result.success().toString();
    }
}

@Service
public class UserServiceImpl implements UserService{
    @Autowired
    private TestUtil testUtil;

    @Override
    public void addUser(User user) {
        testUtil.doSomething();
    }

    @Override
    public User getUserById(int id) {
        testUtil.doSomething();
        return new User(id, "icexmoon", "123");
    }
}
这里只给出关键代码,完整代码见文末的代码仓库链接。
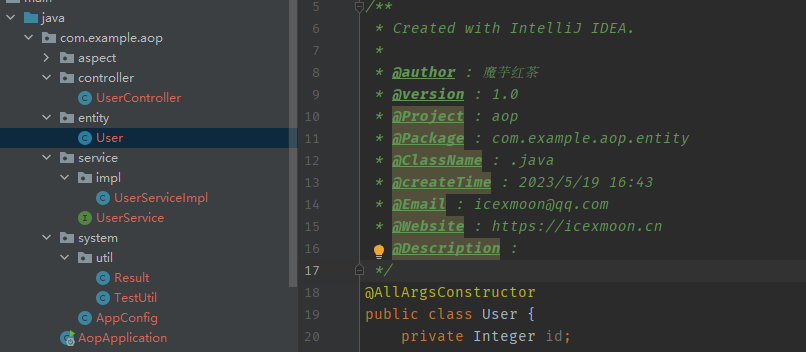
代码结构如下:
假设我们需要统计Service层的方法执行效率,要怎么做?
最简单的方式无疑是:
- 在每个要统计的方法内部增加计时功能,进行统计和输出结果。
- 在每个方法调用的地方增加计时功能,进行统计。
当然,在具体实现层面我们可以使用代理模式对接口进行包装,在原始接口基础上添加计时功能。但这样依然很繁琐,我们可能要修改所有涉及调用的相关代码。
那有没有一种可能,我们只要编写具体的计时功能,然后告诉Spring框架,让Spring框架在执行相应调用的时候去自动实现对目标调用的代理,以附加上我们的计时功能?
答案显而易见——使用 AOP(Aspect Oriented Programming,面向切面编程)。
在Spring Boot中使用AOP很简单,先添加相关依赖:
        <dependency>
            <groupId>org.springframework.boot</groupId>
            <artifactId>spring-boot-starter-aop</artifactId>
        </dependency>
实际上Spring使用的都是AspectJ的依赖,所以引入
aspectjweaver依赖也是可行的,但使用Spring封装好的Starter应该更好。
创建一个类实现我们想要让Spring框架自动代理来实现的逻辑:
@Aspect
@Component
public class AnalysisAspect {
    @Around("execution(* com.example.aop.service.*.*(..))")
    public Object analysisTimes(ProceedingJoinPoint pjp) throws Throwable {
        LocalDateTime time1 = LocalDateTime.now();
        Object retVal = pjp.proceed();
        LocalDateTime time2 = LocalDateTime.now();
        long seconds = Duration.between(time1, time2).toMillis();
        String methodName = pjp.getSignature().getName();
        String clsName = pjp.getSignature().getDeclaringType().getName();
        System.out.println("%s.%s() is called, use %d mills.".formatted(clsName, methodName, seconds));
        return retVal;
    }
}
这样的类在AOP中被称作切面(Aspect),而具体被代理的目标方法调用,被称作切入点(Pointcut),切面中用于处理切入点的,被称作通知(Advice)。
在上面这个示例中,切面就是AnalysisAspect类,切入点就是@Around注解中的表达式execution(* com.example.aop.service.*.*(..)),Advice就是@Around标注的analysisTimes方法。
- 在这个示例中,Advice使用了内嵌的切入点,实际上切入点可以在切面中单独定义,之后会有介绍。
- 切面可以看做是若干切入点和Advice组成的集合。
简单介绍这些概念后,我们来看详细用法。
启用
Spring Boot是默认启用AOP的,所以不需要有任何特殊操作。
有很多教程说需要在配置类中添加
@EnableAspectJAutoProxy注解,比如:@Configuration @EnableAspectJAutoProxy public class AppConfig { }实际上这是没必要的,那是Spring的写法,实际上Spring Boot已经做了封装,在
AopAutoConfiguration这个类中进行了自动配置,默认就会自动添加上@EnableAspectJAutoProxy注解。
如果要变更Spring Boot的AOP相关设置,可以通过修改相关属性:
spring.aop.auto=true
spring.aop.proxy-target-class=true
属性的行为:
spring.aop.auto,是否自动开启AOP功能。spring.aop.proxy-target-class,是否使用CGLIB实现AOP代理,false将使用JDK动态代理来实现。
代理
就像spring.aop.proxy-target-class属性隐含的那样,AOP的自动代理实际上是通过两种方式实现的:CGLIB和JDK动态代理。所以AOP的实现也因为具体代理实现的方式不同而存在不同的限制:
- CGLIB,对类进行代理(以继承的方式实现),可以代理其中的
public和protected方法调用,但不能代理final方法,因为子类不能继承父类的final方法。 - JDK动态代理,对接口进行代理,目标类必须实现至少一个接口以进行代理,且只能代理目标类的
public方法。
通过spring.aop.proxy-target-class=true属性的设置,我们可以强制AOP使用CGLIB代理。
切面
作为切面的类要用@Aspect标记,并且要被定义为bean。
注意:
@Aspect注解并不能将类定义为bean。
所以在上边的示例中,同时使用了@Aspect和@Component注解来标记AnalysisAspect。当然,通过配置类来添加bean定义同样是可行的:
@Aspect
public class AnalysisAspect {
    // ...
}

@Configuration
public class AppConfig {
    @Bean
    AnalysisAspect analysisAspect(){
        return new AnalysisAspect();
    }
}
切点
切点是可以单独定义在切面中的,对于前面的例子,也可以用下面的写法:
@Aspect
public class AnalysisAspect {
    @Around("anyServicePublicCalls()")
    public Object analysisTimes(ProceedingJoinPoint pjp) throws Throwable {
        // ...
    }

    @Pointcut("execution(* com.example.aop.service.*.*(..))")
    public void anyServicePublicCalls(){}
}
这里用@Pointcut注解定义了一个切点(标记的方法要返回void),并且Advice的@Around注解直接使用了这个定义好的切点。
切面中的Advice也可以使用其他切面的切点:
@Component
@Aspect
public class OtherAspect {
    @Pointcut("execution(* com.example.aop.controller.UserController.getUser(..))")
    public void getUserCall(){}
}

@Aspect
public class AnalysisAspect {
    @Around("anyServicePublicCalls() || com.example.aop.aspect.OtherAspect.getUserCall()")
    public Object analysisTimes(ProceedingJoinPoint pjp) throws Throwable {
        // ...
    }

    @Pointcut("execution(* com.example.aop.service.*.*(..))")
    public void anyServicePublicCalls(){}
}
为了引入OtherAspect中的切点getUserCall(),在@Around属性中使用了完整包名:com.example.aop.aspect.OtherAspect.getUserCall()。
就像示例中展示的,Advice的相关注解中可以使用逻辑操作符,这点会在后面详细说明。
@Pointcut中的是AspectJ pointcut表达式,完整的相关介绍可以阅读The AspectJTM Programming Guide (eclipse.org)。下面介绍一些核心概念:
切入点标识符
每个表达式都有一个(或多个)切入点标识符(Pointcut Designator,PCD),我们可以通过这些标识符来指定匹配范围。
Spring AOP技术并没有实现所有AspectJ定义的标识符,仅包含以下部分:
execution,用于匹配方法的连接点(被代理的方法调用),这是最常用于定义切入点的标识符。within,将匹配限制在某个类型内的连接点(比如某个包或类内),可以与execution标识符结合使用以缩小匹配范围。this,将匹配限制在当前连接点,主要用于在Advice中获取当前代理对象的引用。target,将匹配限制在当前连接点,主要用于在Advice中获取被代理对象的应用。args,将匹配限制在连接点,主要用于获取连接点执行调用时的方法参数,以及用参数类型限制匹配。@target,可以通过指定一个被代理类型会使用的注解来限制匹配。@args,可以通过指定被代理方法参数上会使用的注解来限制匹配。@within,将匹配限制在指定注解标记的类内中。@annotation,将匹配限制在指定注解标记的方法上。bean,将匹配限制在指定命名的spring bean(一个或多个)上,这是Spring AOP独有的PCD。
这里的连接点(Join Point)的意思是切入点连接的被代理的方法调用。
这些标识符可以分为三种类型:
- 种类标识符选择了一个特定种类的连接点:
execution、get、set、call和handler。 - 范围标识符选择了一组感兴趣的连接点(可能有许多种):
within和withincode。 - 上下文标识符根据上下文进行匹配(并可选择绑定):
this、target和@annotation。
注意,这里所列的标识符是AspectJ包含的可用标识符,其中很多Spring AOP并不支持,比如
get。
execution 表达式
我们看怎么编写一个execution标识符的表达式:
execution(modifiers-pattern?
			ret-type-pattern
			declaring-type-pattern?name-pattern(param-pattern)
			throws-pattern?)
execution表达式中有一些是必须要有的:
ret-type-pattern,方法返回类型。name-pattern,方法名(包含包名的完整名称)。param-pattern,参数(类型)列表。
也有一些是可选的:
modifiers-pattern,访问修饰符(比如public)declaring-type-pattern,包名throws-pattern,异常类型
可以使用通配符*和..,前者表示任意内容,后者表示0个或多个。像之前示例中的:
execution(* com.example.aop.service.*.*(..))
实际上指的是com.example.aop.service包(不包含子包)下边任何类(或接口)的任何方法,且不限制方法的返回类型,同时可以有0个或多个参数。
如果要包含子包,可以用
execution(* com.example.aop.service..*.*(..))表示。
下面展示一些常见的execution表达式:
-
任何 public 方法
execution(public * *(..)) -
任何名称以
set开头的方法execution(* set*(..)) -
AccountService接口所定义的任何方法execution(* com.xyz.service.AccountService.*(..)) -
在
service包中定义的任何方法execution(* com.xyz.service.*.*(..)) -
在
service包或其子包中定义的任何方法execution(* com.xyz.service..*.*(..))
组合表达式
可以用布尔操作符||、&&和!来组合切点表达式(或切点名称):
@Aspect
public class AnalysisAspect {
    @Pointcut("execution(public * *(..))")
    public void allPublicMethods(){}

    @Pointcut("within(com.example.aop.controller..*)")
    public void allControllerCls(){}

    @Pointcut("allPublicMethods() && allControllerCls()")
    public void allControllerPublicMethods(){}

    @Around("allControllerPublicMethods()")
    public Object analysisControllerPublicMethods(ProceedingJoinPoint pjp) throws Throwable {
        return this.analysisExecutionTime(pjp);
    }
    //...
}
这里的within(com.example.aop.controller..*)表示匹配的范围被限制在com.example.aop.controller包(含子包)下边的类(或接口)中。execution(public * *(..))表示任意的public方法。因此组合表达式allPublicMethods() && allControllerCls()表示com.example.aop.controller包(含子包)中所有的类和接口的public方法。
当然,这里只是为了用于演示如何组合表达式,实际上用一个表达式
execution(public * com.example.aop.controller..*.*(..))就可以起到同样的作用。
定义通用切入点
按照当前项目结构定义一些通用切入点是个不错的编程实践,比如对于我们这个示例项目:
@Aspect
public class CommonPointcuts {
    @Pointcut("within(com.example.aop.controller..*)")
    public void inControllerLayer(){}

    @Pointcut("within(com.example.aop.service..*)")
    public void inServiceLayer(){}

    @Pointcut("execution(public * *(..))")
    public void publicMethods(){}

    @Pointcut("inControllerLayer() && publicMethods()")
    public void publicControllerMethods(){}

    @Pointcut("inServiceLayer() && publicMethods()")
    public void publicServiceMethods(){}
}
利用这些切入点,我们可以很容易地添加Advice。
这里的
CommonPointcuts仅包含切入点,并不包含Advice,因此可以不用定义为bean。
通知
通知(Advice)直接关联一个切入点,就像之前展示的,可以在@Around注解中直接使用切入点表达式或者引用一个已经定义好的切入点:
一些文章将Advice翻译为拦截器,但拦截器在Spring中特指一类封装好的功能(Interceptor),虽然两者的作用类似,但AOP在技术层次上更底层一些。所以这里使用另一种不太好理解的翻译——通知。
@Around("com.example.aop.aspect.CommonPointcuts.publicControllerMethods()")
public Object analysisControllerPublicMethods(ProceedingJoinPoint pjp) throws Throwable {
    return this.analysisExecutionTime(pjp);
}
我们使用AOP的目的就是为了实现一个或多个通知,以编写相应的逻辑在被代理的目标代码运行前后执行。
可以使用以下注解来定义通知:
@Before@AfterReturning@AfterThrowing@After@Around
@Before
利用@Before可以定义一个在匹配的方法被执行前执行的通知:
@Aspect
@Component
public class PrinterAspect {
    @Before("com.example.aop.aspect.CommonPointcuts.publicControllerMethods()")
    public void beforeControllerMethodsCall(JoinPoint jp) {
        String clsName = jp.getSignature().getDeclaringTypeName();
        String methodName = jp.getSignature().getName();
        System.out.println("before %s.%s() is call.".formatted(clsName, methodName));
    }
}
这里利用注入的JoinPoint对象来获取连接点的相关信息,JoinPoint主要有以下方法:
getArgs(): 返回方法的参数。getThis(): 返回代理对象。getTarget(): 返回目标(被代理)对象。getSignature(): 返回(被代理的)方法签名。toString(): 打印(被代理的)方法的有用描述。
@AfterReturning
@AfterReturning标记的通知会在匹配的方法执行结束,并正常返回后运行:
@AfterReturning("com.example.aop.aspect.CommonPointcuts.publicControllerMethods()")
public void afterControllerMethodsCall(JoinPoint jp){
    String clsName = jp.getSignature().getDeclaringTypeName();
    String methodName = jp.getSignature().getName();
    System.out.println("after %s.%s() is call and get a return.".formatted(clsName, methodName));
}
这里的正常返回包括有返回值以及没有返回值的
void情况,但并不包含抛出异常的情况。
如果我们需要在此时获取被匹配的方法执行后的返回值,可以利用@AfterReturning的returning属性:
@AfterReturning(value = "com.example.aop.aspect.CommonPointcuts.publicControllerMethods()",
returning = "retVal")
public void afterControllerMethodsCall(JoinPoint jp, String retVal){
    String clsName = jp.getSignature().getDeclaringTypeName();
    String methodName = jp.getSignature().getName();
    System.out.println("after %s.%s() is call and get a return: %s.".formatted(clsName, methodName, retVal));
}
returning属性可以指定一个通知方法的参数名,这样在代理对象执行调用时,就会将被代理对象方法的返回值填充到相应的通知方法的参数中。
同时需要注意的是,因为这里returning属性指定的参数retVal类型是String,所以也会改变匹配结果,只会匹配所有返回String类型的Controller层的public方法。
如果你想匹配所有的返回值类型(包括void)且获取返回值,可以使用Object:
    @AfterReturning(value = "com.example.aop.aspect.CommonPointcuts.publicControllerMethods()",
    returning = "retVal")
    public void afterControllerMethodsCall(JoinPoint jp, Object retVal){
        // ...
    }
@AfterThrowing
使用@AfterThrowing可以创建一个匹配方法抛出异常后会执行的通知:
@AfterThrowing(
    value = "com.example.aop.aspect.CommonPointcuts.publicControllerMethods()",
    throwing = "exp")
public void afterControllerMethodsCall(JoinPoint jp, Throwable exp) {
    String clsName = jp.getSignature().getDeclaringTypeName();
    String methodName = jp.getSignature().getName();
    System.out.println("after %s.%s() is call and get a return: %s.".formatted(clsName, methodName, exp));
}
示例中的通知afterControllerMethodsCall会在Controller层的方法调用抛出异常后执行,比如:
@GetMapping("")
public String home() {
    int i = 1 / 0;
    return Result.success().toString();
}
home方法调用会产生一个除零异常,所以相应的通知方法会被执行。
同样的,@AfterThrowing的throwing属性在指定参数并获取抛出的异常的同时,也会用参数具体的异常类型来限制匹配,如果需要匹配任意类型的异常,可以像示例中那样,使用所有异常的基类Throwable。
@AfterThrowing标记的通知仅应当处理匹配方法执行产生的异常,不包括其它通知可能产生的异常。
@After
用@After注解创建的通知,会在匹配方法调用完毕后执行(无论是正常返回还是抛出异常)。这种行为与异常捕获时的try...finally语句相似:
@After("com.example.aop.aspect.CommonPointcuts.publicControllerMethods()")
public void afterControllerMethodsCall(JoinPoint jp){
    String clsName = jp.getSignature().getDeclaringTypeName();
    String methodName = jp.getSignature().getName();
    System.out.println("after %s.%s() is call end finally.".formatted(clsName, methodName));
}
无论Controller的方法调用是否会产生异常,这个通知都会被执行。
@Around
@Around注解标记的通知像字面意思那样,会包裹(覆盖)匹配方法的执行:
@Around("com.example.aop.aspect.CommonPointcuts.publicControllerMethods()")
public Object aroundControllerMethodsCall(ProceedingJoinPoint pjp) throws Throwable {
    System.out.println("around before");
    Object result = pjp.proceed();
    System.out.println("around end.");
    return result;
}
要注意的是,这里通知参数是ProceedingJoinPoint类型而非JoinPoint类型,前者是后者的一个子类。因为@Around通知和其它通知不一样,需要在方法体中明确通过pjp.proceed()去执行匹配方法。如果没有执行,匹配方法就不会被调用(好像被屏蔽了一样)。此外,@Around通知同样要在匹配方法被调用后将可能的返回值返回(如果是非void方法的话),因此@Around通知总是返回一个Object类型的返回值是一个不错的编程实践。
如果匹配方法是
void方法,pjp.proceed()方法会返回null,@Around通知也会返回null。
参数
有时候你可能想在同种中获取匹配方法执行时的参数,除了通过参数中的JoinPoint对象以外,还可以利用args标识符:
@Around("com.example.aop.aspect.CommonPointcuts.publicControllerMethods() && args(id,..))")
public Object aroundControllerMethodsCall(ProceedingJoinPoint pjp, Integer id) throws Throwable {
    System.out.println("around before");
    System.out.println("id is %d".formatted(id));
    Object result = pjp.proceed();
    System.out.println("around end.");
    return result;
}
与@AfterThrowing的throwing属性类似,使用args表示符获取传参的同时,也会限制匹配结果。比如示例中的&& args(id, ..)就会将匹配限定为至少有一个Integer类型的参数的方法。
类似的,还可以用@annotation标识符获取(并限定)方法注解:
@Retention(RetentionPolicy.RUNTIME)
@Target(ElementType.METHOD)
public @interface Auditable {
    int value();
}

@RestController
@RequestMapping("/user")
public class UserController {
	// ...
    @Auditable(1)
    @GetMapping("/get/{id}")
    public String getUser(@Min(1) @PathVariable("id") Integer id) {
        // ...
    }
	// ...
}

@Aspect
@Component
public class PrinterAspect {
	// ...
    @Around("com.example.aop.aspect.CommonPointcuts.publicControllerMethods() && @annotation(annotation))")
    public Object aroundControllerMethodsCall(ProceedingJoinPoint pjp,  Auditable annotation) throws Throwable {
        // ...
        System.out.println("annotation's value is %d".formatted(annotation.value()));
        // ...
    }
}
在上面这个示例中,aroundControllerMethodsCall通知被限制在使用@Auditable注解标记的Controller方法上,并且其annotation参数就是匹配方法被调用时附加在其上的@Auditable注解实例,可以通过这个注解实例进一步获取其注解属性。
参数和泛型
匹配方法中包含泛型参数时,也可以通过args标识符正确获取参数和限制匹配,比如下面这个例子:
public interface SampleService<T> {
    void sampleGenericMethod(T param);
    void sampleGenericCollectionMethod(Collection<T> param);
}

@Service
public class SampleServiceImpl implements SampleService<Integer> {
    @Override
    public void sampleGenericMethod(Integer param) {
        System.out.println("SampleServiceImpl.sampleGenericMethod(%d) is called.".formatted(param));
    }

    @Override
    public void sampleGenericCollectionMethod(Collection<Integer> param) {
        System.out.println("SampleServiceImpl.sampleGenericCollectionMethod(%s) is called".formatted(param));
    }
}

@RestController
@RequestMapping("/user")
public class UserController {
	// ...
    @GetMapping("/sample")
    public String sample() {
        sampleService.sampleGenericMethod(1);
        sampleService.sampleGenericCollectionMethod(List.of(1, 2, 3));
        return Result.success().toString();
    }
}
假如我们要匹配SampleService.sampleGenericMethod方法,并且希望其调用时的泛型参数T实际应当是Integer类型,可以这样:
@Before("execution(* com.example.aop.service.SampleService.*(..)) && args(arg)")
public void beforeSampleMethodsCall(Integer arg){
	System.out.println("get arg %d".formatted(arg));
}
确定参数名称
就像上面例子中展示的,在通知方法中,可以通过指示符来绑定实际调用中的传参,这种绑定是通过参数名称来匹配的,比如args(id,..),就会将一个Integer传参绑定到通知方法的Integer id形参上。换言之,这种机制的实现很依赖反射,具体来说是java.lang.reflect.Parameter相关的API。
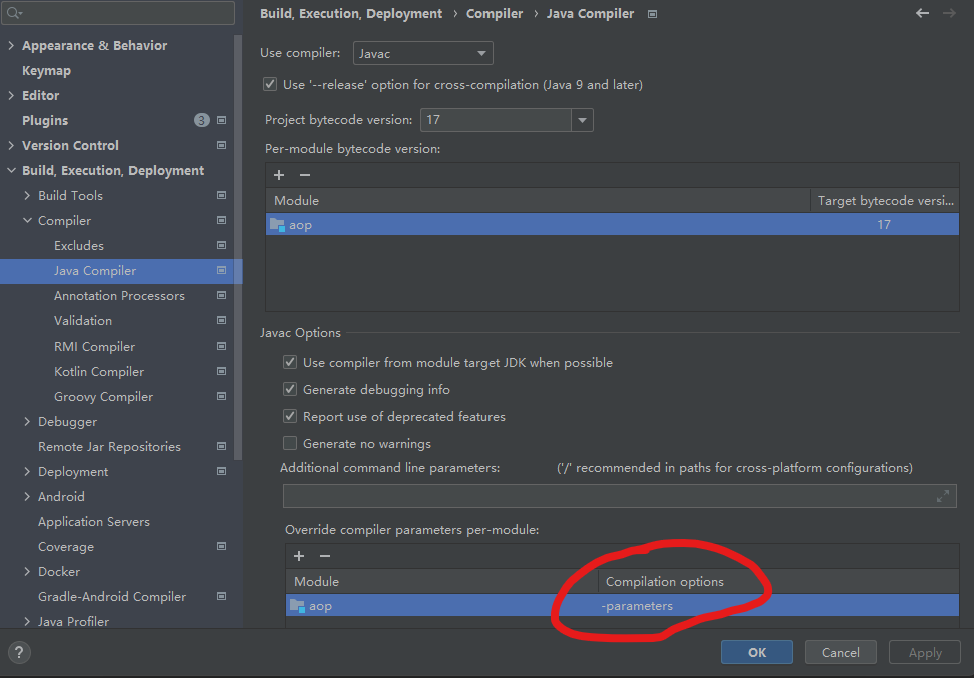
我们知道的是,Java代码编译成class文件的时候,一般情况下会丢弃一些信息,比如参数名称。所以有时候你通过反射获取到的参数名称会是arg1、arg2这样的,而非代码中的参数名称。因此,在使用AOP的时候,应当确保编译时保留参数名,具体来说就是在运行javac进行编译时,应当带上参数-parameters以确保字节码保留参数名称信息。
- 实际上MyBatis等框架同样依赖于参数名称的反射获取。
- 是否启用
-parameters可以查看IDE相关设置:
显式指定参数名称
如果因为某些原因,字节码中无法保留参数名称,就需要在使用AOP时显式地指定通知方法中的参数名称:
@Before(value = "execution(* com.example.aop.service.SampleService.*(..)) && args(arg)",
argNames = "arg")
public void beforeSampleMethodsCall(Integer arg) {
	System.out.println("get arg %d".formatted(arg));
}
如果第一个参数是
JoinPoint、ProceedingJoinPoint或JoinPoint.StaticPart类型,你可以在argNames属性的值中省略参数的名称。
使用参数进行调用
在之前的示例代码中,@Around通知方法都是简单地通过一个空参数的ProceedingJoinPoint.proceed()方法完成匹配方法的调用。我们并不需要将实际运行时匹配方法的传参进行处理,这些工作都由Spring AOP完成。
当然我们也可以手动介入,比如:
@Around("com.example.aop.aspect.CommonPointcuts.publicControllerMethods() && args(uid))")
public Object aroundControllerMethodsCall(ProceedingJoinPoint pjp, Integer uid) throws Throwable {
    System.out.println("around before");
    System.out.println("id is %d".formatted(uid));
    uid = uid + 1;
    Object result = pjp.proceed(new Object[]{uid});
    System.out.println("around end.");
    return result;
}
示例中以pjp.proceed(new Object[]{uid})的方式向匹配方法传递了参数,并且这里实际上修改了原始参数,假设原始从客户端传过来的id是1,这里通过uid=uid+1的方式将其修改为2。也就是所有客户端调用传递的Integer参数都会+1。需要注意的是,这种通过ProceedingJoinPoint.proceed()直接传递参数的方式,必须要保证作为参数的Object数组中的参数顺序与实际匹配到的方法的参数定义顺序一致。
个人觉得这样做会让通知的实现与匹配方法的参数定义强关联,降低代码的可扩展性,匹配的方法一旦修改参数定义,就可能导致通知匹配失效。
Advice顺序
如果多个通知关联同一个匹配方法,那么执行时的顺序是怎样的?
这个问题可以分层级讨论,我们先看同一个匹配方法在同一个切面上不同类型的通知方法的执行顺序:
around before
before com.example.aop.controller.UserController.getUser() is call.
UserController.getUser(2) is called.
after com.example.aop.controller.UserController.getUser() is call and get a return: {"success":true,"msg":"success"}.
after com.example.aop.controller.UserController.getUser() is call end finally.
around end.
这是相关的示例代码输出的内容,可以很容易得出如下结论:
- 先执行
@Around通知方法中proceed()方法执行前的代码。 - 执行
@Before通知。 - 执行匹配方法。
- 如果正常执行完毕,执行
@AfterReturning通知。如果抛出异常,执行@AfterThrowing通知。 - 执行
@After通知。 - 执行
@Around通知方法中proceed()方法执行后的代码。
同一个切面中针对同一个匹配方法的同一类型的通知,是无法确认其执行的先后顺序的,比如:
@Aspect
@Component
public class PrinterAspect {
	// ...
    @Before("execution(* com.example.aop.service.UserService.getUserById(..))")
    public void beforeGetUserCall1(){
        System.out.println("beforeGetUserCall1() is called.");
    }

    @Before("execution(* com.example.aop.service.UserService.getUserById(..))")
    public void beforeGetUserCall2(){
        System.out.println("beforeGetUserCall2() is called.");
    }
}
虽然实际测试中beforeGetUserCall1()总是在beforeGetUserCall2()之前执行,但严格意义上你并不能确保在任何地方执行这段代码都会得到同样的结果,以为Java代码在编译成Class文件时会丢弃同一个类中的方法定义顺序,所以你不能靠方法的定义先后顺序来确保某个结果。
那个结果很可能是某个机器的某个Java编译器恰好得出的结论。
如果你一定要对诸如上边示例中的两个通知做出先后执行顺序的安排,可以将其放置到不同的切面中:
@Aspect
@Component
@Order(1)
public class ExampleAspect1 {
    @Before("execution(* com.example.aop.service.UserService.getUserById(..))")
    public void beforeGetUserCall1(){
        System.out.println("beforeGetUserCall1() is called.");
    }
}

@Aspect
@Component
@Order(-1)
public class ExampleAspect2 {
    @Before("execution(* com.example.aop.service.UserService.getUserById(..))")
    public void beforeGetUserCall2(){
        System.out.println("beforeGetUserCall2() is called.");
    }
}
每次运行会得到如下结果:
beforeGetUserCall2() is called.
beforeGetUserCall1() is called.
示例中我们通过@Order指定了两个切面bean的优先级,因此beforeGetUserCall2()总是先执行。
@Order的value属性越小优先级越高,且支持负数。
通过Spring的Ordered接口定义优先级同样是适用的:
@Aspect
@Component
public class ExampleAspect1 implements Ordered {
	// ...
    @Override
    public int getOrder() {
        return 1;
    }
}

@Aspect
@Component
public class ExampleAspect2 implements Ordered {
	// ...
	@Override
    public int getOrder() {
        return -1;
    }
}
这和之前的示例是等效的。
需要说明的是,这种定义优先级的方式对于不同类型的通知是有着不同的效果的,比如:
@Aspect
@Component
public class ExampleAspect1 implements Ordered {
    @Before("execution(* com.example.aop.service.UserService.getUserById(..))")
    public void beforeGetUserCall1(){
        System.out.println("beforeGetUserCall1() is called.");
    }

    @Override
    public int getOrder() {
        return 1;
    }

    @After("execution(* com.example.aop.service.UserService.getUserById(..))")
    public void afterGetUserCall1(){
        System.out.println("afterGetUserCall1() is called.");
    }
}

@Aspect
@Component
public class ExampleAspect2 implements Ordered {
    @Before("execution(* com.example.aop.service.UserService.getUserById(..))")
    public void beforeGetUserCall2(){
        System.out.println("beforeGetUserCall2() is called.");
    }

    @Override
    public int getOrder() {
        return -1;
    }

    @After("execution(* com.example.aop.service.UserService.getUserById(..))")
    public void afterGetUserCall2(){
        System.out.println("afterGetUserCall2() is called.");
    }
}
执行结果:
beforeGetUserCall2() is called.
beforeGetUserCall1() is called.
afterGetUserCall1() is called.
afterGetUserCall2() is called.
很有意思,beforeGetUserCall2()优先级比beforeGetUserCall1()高,所以限制性,但afterGetUserCall2()比afterGetUserCall1()的优先级低,却后执行。
这种优先级执行规则是AspectJ定义的,其实也可以理解,对于@Before通知来说,优先级越高的通知可以尽早执行,获取到的参数也更接近原始参数。而对于@After通知来说,优先级越高的通知可以越晚执行,处理后的结果可能影响到最终结果。
总的来说,优先级越高的通知,越接近客户端。优先级越低的通知,越接近服务端。
示例
异常重调
在日常工作中,很容易遇到类似这样的问题:我们的应用依赖于某个远程服务,但远程服务调用不够问题,一定概率会出现调用出错的问题。这时候我们需要考虑出错后可以“自动”重新调用相应的服务,以尽可能提高服务的可用性。
用AOP可以很容易实现这一点,比如下面这个示例:
public interface RemoteConnect {
    Object getInformationFromRemoteServer(Object[] params);
}

@Service
public class RemoteConnectImpl implements RemoteConnect {
    @Override
    public Object getInformationFromRemoteServer(Object[] params) {
        //用随机数模拟可能出现的远程调用出错
        Random random = new Random();
        int i = random.nextInt(10) + 1;
        if (i <= 5) {
            System.out.println("remote call is fail.");
            throw new RuntimeException("远程调用出现问题");
        }
        System.out.println("remote call is success.");
        return null;
    }
}

@RestController
@RequestMapping("/remote")
public class RemoteController {
    @Autowired
    RemoteConnect remoteConnect;

    @GetMapping("")
    public String home() {
        remoteConnect.getInformationFromRemoteServer(new Object[]{1});
        return Result.success().toString();
    }
}
服务层的RemoteConnectImpl代表一个包含远程调用的服务,该服务有一定概率会出错,错误以抛出异常的方式体现。
这里简单用一个50%的概率模拟容易出错的远程调用。
下面用Spring AOP实现出错后重新调用的逻辑:
@Retention(RetentionPolicy.RUNTIME)
@Target(ElementType.METHOD)
public @interface ThrowingRecall {
    int Value() default 3; //重试次数
}

@Aspect
@Component
public class RemoteConnectAspect {
    @Around("com.example.aop.aspect.CommonPointcuts.publicServiceMethods() && @annotation(recallAnnotation)")
    public Object remoteConnectRecall(ProceedingJoinPoint pjp, ThrowingRecall recallAnnotation) throws Throwable {
        final int MAX_RECALL_TIMES = recallAnnotation.Value();
        return this.methodRecallAfterThrowing(MAX_RECALL_TIMES, pjp);
    }

    private Object methodRecallAfterThrowing(final int MAX_RECALL_TIMES, ProceedingJoinPoint pjp) throws Throwable {
        int alreadyCallTimes = 0;
        Object result = null;
        while (true) {
            try {
                alreadyCallTimes++;
                result = pjp.proceed();
                break;
            } catch (Throwable e) {
                //尝试重新调用
                if (alreadyCallTimes - 1 >= MAX_RECALL_TIMES) {
                    //超过最大重试次数,抛出原始调用产生的异常
                    throw e;
                }
            }
        }
        return result;
    }
}

@Service
public class RemoteConnectImpl implements RemoteConnect {
    @Override
    @ThrowingRecall
    public Object getInformationFromRemoteServer(Object[] params) {
    	// ...
    }
}
为了让代码更灵活,这里引入了一个自定义注解@ThrowingRecall,我们创建的通知remoteConnectRecall()将识别Service层用@ThrowingRecall标记的public方法,如果该方法调用中抛出异常,我们会根据设置好的最大重试次数尝试重新调用。
注意,在超过最大尝试次数后,要抛出原始异常,否则会出现尝试重调的代码将原始异常“吞掉”的现象。
测试这段代码就会发现,只有getInformationFromRemoteServer()调用连续4次出错,才会抛出异常,其它情况都会得到一个正确调用的最终结果。
之前在工作中我编写过类似的代码,是通过给远程调用的业务代码编写重试逻辑实现的,非常容易出错,且代码的可读性变得非常差,代码也无法复用。对比之下不难看出AOP在这方面的优势。
日志
通常来说我们不需要用AOP来实现日志,因为Spring框架提供完备的日志解决方案,但是某些时候我们需要以快捷简单的方式记录一些信息,这时候可以考虑通过AOP实现。
关于如何快速使用Spring Boot的日志功能,可以参考从零开始 Spring Boot 10:日志 - 红茶的个人站点 (icexmoon.cn)。
示例如下:
@Retention(RetentionPolicy.RUNTIME)
@Target(ElementType.METHOD)
public @interface SimpleLog {
}

@Component
@Aspect
public class LogAspect {
    @Around("com.example.aop.aspect.CommonPointcuts.publicControllerMethods() && @annotation(simpleLogAnnotation)")
    public Object controllerLogMethodsCall(ProceedingJoinPoint pjp, SimpleLog simpleLogAnnotation) throws Throwable {
        return this.doLog(pjp);
    }

    private Object doLog(ProceedingJoinPoint pjp) throws Throwable {
        String clsName = pjp.getSignature().getDeclaringTypeName();
        String methodName = pjp.getSignature().getName();
        Object[] args = pjp.getArgs();
        LocalDateTime now = LocalDateTime.now();
        Object result = pjp.proceed();
        System.out.println("###%s### %s.%s(%s) is called, result is %s.".formatted(now, clsName, methodName, Arrays.toString(args), result));
        return result;
    }
}

@RestController
@RequestMapping("/user")
public class UserController {
	// ...
    @Auditable(1)
    @GetMapping("/get/{id}")
    @SimpleLog
    public String getUser(@Min(1) @PathVariable("id") Integer id) {
		// ...
	}
}
这里仅记录一些最简单的信息:
###2023-05-21T12:02:27.512788100### com.example.aop.controller.UserController.getUser([2]) is called, result is {"success":true,"msg":"success"}.
实际工作中我就遇到过用log4j等日志框架输出的日志没有调用记录的诡异问题,这时候通过类似AOP实现的简单日志也可以进行简单地的侧面印证。
最后,我们还可以做一点完善。通常这样的临时性日志措施,我们仅希望在开发环境生效,所以可以利用@Profile注解来确保这一点:
@Profile("dev")
@Component()
@Aspect
public class LogAspect {
	// ...
}
这样,在测试环境或生产环境中,LogAspect这个切面就不会被添加为bean定义,也就不会生效。
关于
@Profile注解的相关使用说明,可以阅读使用@Profile (springdoc.cn)。
缓存
缓存也是日常工作中会经常遇到的,对于一些高频查询,如果比较费时且消耗系统资源,且时间敏感性不高,我们可以考虑借助缓存来进行优化。
在从零开始 Spring Boot 19:Redis - 红茶的个人站点 (icexmoon.cn)一文中,我介绍了通过在Spring项目中整合Redis来缓存一些Web请求。
但那种方式依然要编写很多代码来实现对目标方法的缓存,我们可以更进一步,借助AOP让缓存实现更加简单:
@Retention(RetentionPolicy.RUNTIME)
@Target(ElementType.METHOD)
public @interface MethodCache {
    String value() default "";

    long cacheLong() default 5;//缓存时间长度

    TimeUnit unit() default TimeUnit.MINUTES; //时间单位
}

@Component
@Aspect
public class CacheAspect {
    @Resource
    private RedisTemplate<String, Object> redisTemplate;

    @Around("com.example.aop.aspect.CommonPointcuts.publicMethods() && @annotation(methodCacheAnnotation)")
    public Object anyPublicMethodsCalls(ProceedingJoinPoint pjp, MethodCache methodCacheAnnotation) throws Throwable {
        final String CACHE_PREFIX = "my.method.cache";
        String clsName = pjp.getTarget().getClass().getName();
        String methodName = pjp.getSignature().getName();
        Object[] args = pjp.getArgs();
        String callSignature = "%s.%s(%s)".formatted(clsName, methodName, JSON.toJSON(args));
        String redisKey = CACHE_PREFIX + "." + MyStringUtil.md5(callSignature);
        Object cachedResult = redisTemplate.opsForValue().get(redisKey);
        Object result;
        if (cachedResult != null) {
            result = cachedResult;
            return result;
        }
        result = pjp.proceed();
        redisTemplate.opsForValue().set(redisKey, result, methodCacheAnnotation.cacheLong(), methodCacheAnnotation.unit());
        return result;
    }
}
现在,要想对某个方法调用使用缓存进行优化,我们只需要简单地添加上自定义注解即可:
@RestController
@RequestMapping("/user")
public class UserController {
	// ...
    @Auditable(1)
    @GetMapping("/get/{id}")
    @SimpleLog
    @MethodCache()
    public String getUser(@Min(1) @PathVariable("id") Integer id) {
    	//...
    }
	// ...
}
更方便的是,这里用@MethodCache注解来保存方法调用的结果在Redis中的缓存时间(默认5分钟),如果要修改缓存时间,只要很简单地修改@MethodCache的相关属性即可。
- 示例中的实现方式比较粗疏,具体利用对传参进行JSON后再md5的方式区分每次请求参数是否一致,对于绝大多数情况这样是可行的,但并没有考虑可能存在的参数中的系统bean注入对其的影响,比如
HttpServeletRequest等。- 示例使用Redis作为缓存存储方案,没有使用最简单的内存容器,这是因为缓存需要考虑垃圾回收等问题,简陋的内存容器保存缓存并不能作为真正的商业实现方案。
- 关于如何像示例中那样在Spring中整合Redis,可以阅读从零开始 Spring Boot 19:Redis - 红茶的个人站点 (icexmoon.cn)。
基于Schema的AOP支持
如果你使用的Spring项目使用的不是基于注解的配置,而是基于XML的配置,那你也可以用XML的方式使用AOP,具体方式我不打算探讨和举例,感兴趣的可以阅读官方文档基于Schemal的AOP支持 (springdoc.cn)。
代理机制
Spring AOP使用JDK动态代理或CGLIB来为特定的目标对象创建代理。JDK动态代理是内置于JDK中的,而CGLIB是一个普通的开源类定义库(重新打包到 spring-core 中)。
如果要代理的目标对象至少实现了一个接口,就会使用JDK动态代理。目标类型实现的所有接口都被代理了。如果目标对象没有实现任何接口,就会创建一个CGLIB代理。
关于CGLIB和JDK动态代理的区别,本文前边的
启动>代理一节中有所讨论。
关于AOP的代理实现,有个细节值得讨论:被代理对象的“自调用”是否会被AOP的通知代理?
看一个示例:
@RestController
@RequestMapping("/self")
public class SelfController {
    @GetMapping("")
    @SimpleLog
    public String home(){
        System.out.println("SelfController.home() is call.");
        this.anotherMethod();
        return Result.success().toString();
    }

    @SimpleLog
    public void anotherMethod(){
        System.out.println("SelfController.anotherMethod() is call.");
    }
}
这个示例使用了前面示例一节中的日志AOP,对于SelfController的home和anotherMethod方法,我们都希望输出调用日志。这其中比较特殊的是home()方法内部调用了anotherMethod()方法,也就是前边所谓的“子调用”(一个实例自己调用自己的方法)。
实际测试就会发现,触发home()调用只会输出home()相关的日志,并不会输出anotherMethod()的相关日志,也就是说这种“自调用”的行为并不会触发AOP的通知方法的执行。
从代理机制的实现原理上也不难理解,代理类本身就是一个包含被代理对象的子类,当有对代理目标的请求出现时,代理类会代替代理目标进行响应,并且之后通过调用包含的代理对象真正处理请求。但一旦处理行为到被代理对象内部时,这种代理行为就会失效。代理对象并不能察觉到被代理对象内部的自调用行为。
大概意思可以用图表示为:
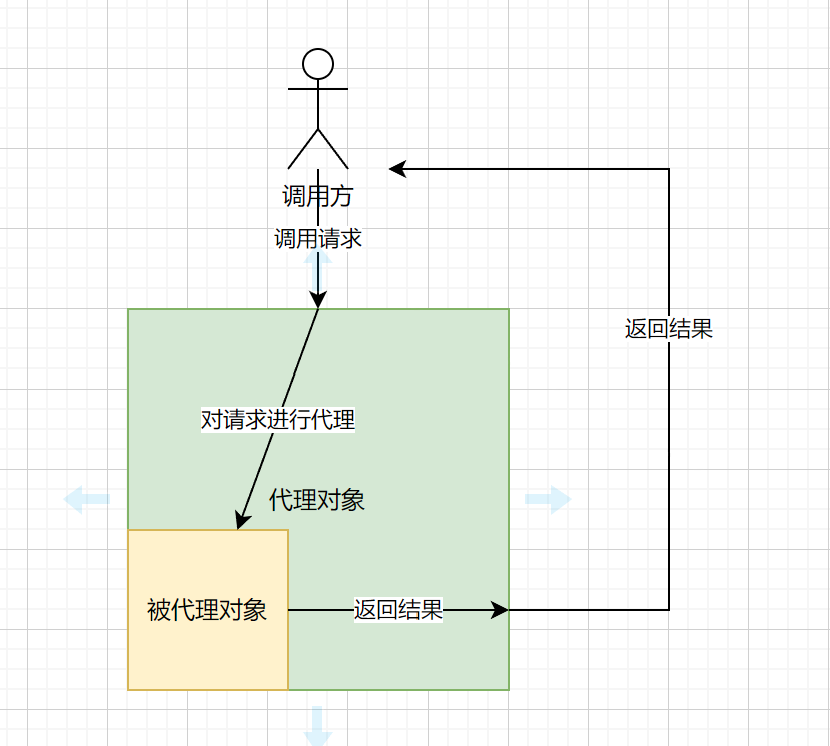
我自己随便画了一个,比较简陋,请见谅。
通常来说,上述问题可以通过重构代码来解决,将anotherMethod()方法移入另一个类中,这样就不存在“自调用”的问题了。通常来说这样做是很有效的,但有时候可能因为各种各样的原因(比如代码的复杂度过高,重构的成本很高),就可能需要找到其它解决方案。
实际上在Spring中,可以通过在业务代码中主动调用代理对象的方式来解决这类问题:
@RestController
@RequestMapping("/self")
public class SelfController {
    @GetMapping("")
    @SimpleLog
    public String home() {
        System.out.println("SelfController.home() is call.");
//        this.anotherMethod();
        SelfController aopProxy = (SelfController) AopContext.currentProxy();
        aopProxy.anotherMethod();
        return Result.success().toString();
    }

    @SimpleLog
    public void anotherMethod() {
        System.out.println("SelfController.anotherMethod() is call.");
    }
}
AopContext.currentProxy()可以获取到当前线程的代理对象,然后我们就可以调用代理对象的相应方法,这样自然可以让相应的通知生效。
除此以外,还需要修改配置:
@Configuration
public class AppConfig {
	// ...
    @Bean
    static BeanFactoryPostProcessor forceAutoProxyCreatorToExposeProxy() {
        return (beanFactory) -> {
            if (beanFactory instanceof BeanDefinitionRegistry) {
                BeanDefinitionRegistry registry = (BeanDefinitionRegistry) beanFactory;
                AopConfigUtils.forceAutoProxyCreatorToExposeProxy(registry);
            }
        };
    }
}
这里实际上是为了IoC容器初始化时能调用AopConfigUtils.forceAutoProxyCreatorToExposeProxy方法,让internalAutoProxyCreator类型的bean的exposeProxy属性设置为true。
如果是Spring而非Spring Boot,就不用这么麻烦,可以通过注解来简单设置:
@EnableAspectJAutoProxy(exposeProxy = true)
@Configuration
public class AppConfig {
	// ...
}
在前边的
启用章节有说明过Spring 和Spring Boot在相关设置上的区别,不过其实Spring Boot使用注解覆盖设置也是可行的,但我个人觉得还是遵循Spring Boot的风格比较好。
这样做虽然可行,但不符合Spring提倡的非侵入的遵旨,显然业务代码与框架代码进行了强绑定。
还是那句话,编程是取舍的艺术,如果你觉得这么做是利大于弊,那就去做。
最后,必须指出的是,AspectJ不存在这种自我调用的问题,因为它不是一个基于代理的AOP框架。
在Spring应用程序中使用AspectJ
前面所讨论的所有AOP应用都是基于Spring AOP的,而Spring AOP是借鉴自AspectJ的(所以它们使用相同的一组注解,都来自AspectJ),后者是一个更强大更完整的AOP框架。Spring也是支持在项目中使用AspectJ作为AOP方案的,不过使用起来不如Spring AOP那么方便,具体可以参考官方文档在Spring应用程序中使用AspectJ (springdoc.cn)。本人精力有限,就不在本篇文章中进行解读说明了。
The End,谢谢阅读。
本文的所有示例代码都可以从ch32/aop · 魔芋红茶/learn_spring_boot - 码云 - 开源中国 (gitee.com)获取。
参考资料
- 用Spring进行面向切面的编程 (springdoc.cn)
- @Async分析exposeProxy=true不生效原因_lw_yang的博客-CSDN博客
- 从零开始 Sping Boot 20:多环境部署_springboot 多环境部署_魔芋红茶的博客-CSDN博客
- Spring Boot AOP 扫盲,实现接口访问的统一日志记录 - 掘金 (juejin.cn)
- 从零开始 Spring Boot 19:Redis - 红茶的个人站点 (icexmoon.cn)
