【SpringBoot整合Email发送邮件】_ζั͡ ั͡空 ั͡ ั͡白�的博客-CSDN博客
https://www.cnblogs.com/erlou96/p/16878192.html#_label1_5
1. 准备工作
1.1 qq邮箱设置
- 本文默认使用qq邮箱来发送邮件,然后使用一个在线临时邮箱来接收邮件。
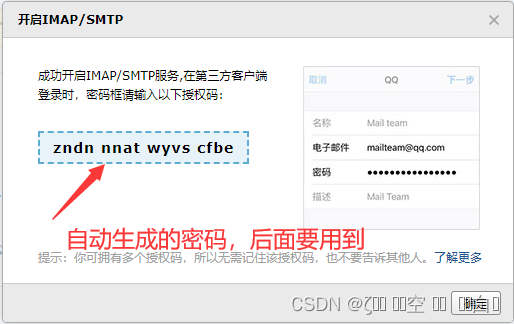
- 为了让程序能够通过qq邮箱来发送邮件,必须在qq邮箱中配置一下打开IMAP/SMTP服务

开启的时候,需要通过手机发送一条信息作为验证,验证成功后,会给你一个授权码,这个后面我们要用到

2. SpringBoot项目配置
2.1 springboot项目中引入email依赖
<?xml version="1.0" encoding="UTF-8"?>
<project xmlns="http://maven.apache.org/POM/4.0.0"
         xmlns:xsi="http://www.w3.org/2001/XMLSchema-instance"
         xsi:schemaLocation="http://maven.apache.org/POM/4.0.0 http://maven.apache.org/xsd/maven-4.0.0.xsd">
    <modelVersion>4.0.0</modelVersion>

    <parent>
        <groupId>org.springframework.boot</groupId>
        <artifactId>spring-boot-starter-parent</artifactId>
        <!--<version>2.7.11</version>-->
        <version>2.5.5</version>
        <relativePath/> <!-- lookup parent from repository -->
    </parent>
    <properties>
        <project.build.sourceEncoding>UTF-8</project.build.sourceEncoding>
        <project.reporting.outputEncoding>UTF-8</project.reporting.outputEncoding>
        <java.version>1.8</java.version>
        <project-name>spring-boot-email</project-name>

        <maven.compiler.source>8</maven.compiler.source>
        <maven.compiler.target>8</maven.compiler.target>
    </properties>

    <groupId>org.example</groupId>
    <artifactId>${project-name}</artifactId>
    <version>1.0-SNAPSHOT</version>
    <name>${project-name}</name>
    <description>${project-name}</description>

    <dependencies>
        <!--发送邮件的依赖-->
        <dependency>
            <groupId>org.springframework.boot</groupId>
            <artifactId>spring-boot-starter-mail</artifactId>
        </dependency>

        <dependency>
            <groupId>org.springframework.boot</groupId>
            <artifactId>spring-boot-starter-test</artifactId>
            <scope>test</scope>
        </dependency>

        <!--web依赖-->
        <dependency>
            <groupId>org.springframework.boot</groupId>
            <artifactId>spring-boot-starter-web</artifactId>
        </dependency>

        <!-- ================= 应用 ================== -->
        <dependency>
            <groupId>com.alibaba.fastjson2</groupId>
            <artifactId>fastjson2</artifactId>
            <version>2.0.25</version>
        </dependency>

        <dependency>
            <groupId>org.apache.commons</groupId>
            <artifactId>commons-lang3</artifactId>
        </dependency>

        <dependency>
            <groupId>com.google.guava</groupId>
            <artifactId>guava</artifactId>
            <version>31.1-android</version>
        </dependency>
    </dependencies>

    <build>
        <plugins>
            <plugin>
                <groupId>org.springframework.boot</groupId>
                <artifactId>spring-boot-maven-plugin</artifactId>
                <version>2.7.1</version>
                <configuration>
                    <excludes>
                        <exclude>
                            <groupId>org.projectlombok</groupId>
                            <artifactId>lombok</artifactId>
                        </exclude>
                    </excludes>
                </configuration>
            </plugin>
        </plugins>
    </build>
</project>
2.2 application.yml配置信息
server:
  port: 8000
  max-http-header-size: 8192
  servlet:
    encoding:
      charset: UTF-8
      force: true
      enabled: true

#配置日志
logging:
  level:
    root: info
spring:
  application:
    name: spring-boot-email
  mvc.async.request-timeout: 20000

  mail:
    #    host: "smtp.163.com" # 发件服务器地址
    #    port: 25 # 常用邮件端口25、109、110、143、465、995、993、994 如果开启了SSL安全则使用对应的端口号,25为非加密端口号
    #    username: admin@163.com # 发送邮件的账号
    #    password: 123456 # 配置密码,注意,不是真正的密码,而是刚刚申请到的授权码
    #    default-encoding: utf-8 # 设置编码
    host: smtp.exmail.qq.com
    port: 465
    username: test@xxx.cn
    password: 123123
    default-encoding: utf-8 # 设置编码
    protocol: smtp
    properties: # 设置邮件超时时间防止服务器阻塞
      timeout: 5000
      connection-timeout: 5000
      write-timeout: 5000
      mail:
        debug: true # 表示开启 DEBUG 模式,这样,邮件发送过程的日志会在控制台打印出来,方便排查错误
        # 官方建议使用 465 端口,而 465 端口是 SSL 协议的,所以不仅要换端口,
        # 还需要进行 SSL 协议替换。下面是在 application.properties 进行的邮件发送相关配置,
        smtp:
          socketFactory:
            port: 465
          #socketFactoryClass: javax.net.ssl.SSLSocketFactory #配饰 SSL 加密工厂
          ssl:
            enable: true
  thymeleaf:
    cache: false
    mode: LEGACYHTML5 # 类型
    prefix: classpath:/templates/ # 模板存放的位置
    suffix: .html # 模板的后缀
2.3 创建EmailModel
用于封装邮件中需要包含的信息
package org.example.entity;

import java.io.Serializable;
import java.util.Map;

/**
 * @author test 2023-05-08 10:52:59
 */
public class EmailModel implements Serializable {
    /**
     * 收件人邮箱
     */
    private String[] recipientMailbox;

    /**
     * 邮件正文内容
     */
    private String content;

    /**
     * 邮件主题
     */
    private String title;

    /**
     * 抄送人邮箱
     */
    private String[] ccMailbox;

    /**
     * 加密抄送人邮箱
     */
    private String[] bccMailbox;

    /**
     * 真实名称/附件路径
     * enclosures: {“fileNmae”: "filePath+fileNmae"}
     */
    private Map<String, String> enclosures;

    //    附件是否添加的到正文,默认false不添加
    //    private Boolean is_;


    public String getContent() {
        return content;
    }

    public void setContent(String content) {
        this.content = content;
    }

    public String getTitle() {
        return title;
    }

    public void setTitle(String title) {
        this.title = title;
    }

    public String[] getRecipientMailbox() {
        return recipientMailbox;
    }

    public void setRecipientMailbox(String[] recipientMailbox) {
        this.recipientMailbox = recipientMailbox;
    }

    public String[] getCcMailbox() {
        return ccMailbox;
    }

    public void setCcMailbox(String[] ccMailbox) {
        this.ccMailbox = ccMailbox;
    }

    public String[] getBccMailbox() {
        return bccMailbox;
    }

    public void setBccMailbox(String[] bccMailbox) {
        this.bccMailbox = bccMailbox;
    }

    public Map<String, String> getEnclosures() {
        return enclosures;
    }

    public void setEnclosures(Map<String, String> enclosures) {
        this.enclosures = enclosures;
    }
}
2.4 创建EmailService
package org.example.service;

import org.example.entity.EmailModel;
import org.slf4j.Logger;
import org.slf4j.LoggerFactory;
import org.springframework.beans.factory.annotation.Value;
import org.springframework.mail.SimpleMailMessage;
import org.springframework.mail.javamail.JavaMailSender;
import org.springframework.mail.javamail.MimeMessageHelper;
import org.springframework.scheduling.annotation.EnableAsync;
import org.springframework.stereotype.Service;
import org.springframework.util.CollectionUtils;

import javax.annotation.Resource;
import javax.mail.MessagingException;
import javax.mail.internet.MimeMessage;
import java.io.File;
import java.util.Date;
import java.util.Map;

/**
 * @author Administrator
 */
@Service
@EnableAsync
public class EmailService {
    Logger log = LoggerFactory.getLogger(getClass());

    /**
     * 将配置文件中的username注入到MAIL_USERNAME中, 这是发送人的邮箱地址
     */
    @Value("${spring.mail.username}")
    public String MAIL_USERNAME;

    /**
     * JavaMailSender类的对象, 是springboot自动装配的
     */
    @Resource
    private JavaMailSender javaMailSender;

    public void sendModleMail(EmailModel model) throws MessagingException {
        MimeMessage mimeMessage = javaMailSender.createMimeMessage();
        MimeMessageHelper helper = new MimeMessageHelper(mimeMessage, true);
        helper.setSubject(model.getTitle()); // 邮件标题
        helper.setFrom(MAIL_USERNAME); // 发送者邮箱
        helper.setTo(model.getRecipientMailbox()); // 收件人邮箱
        if (model.getCcMailbox() != null && model.getCcMailbox().length != 0) {
            helper.setCc(model.getCcMailbox()); // 抄送人
        }
        if (model.getBccMailbox() != null && model.getBccMailbox().length != 0) {
            helper.setBcc(model.getBccMailbox()); // 加密抄送
        }
        helper.setSentDate(new Date()); // 发送日期
        helper.setText(model.getContent()); // 发送内容
        if (!model.getEnclosures().isEmpty()) {
            log.info("-------[Iterator循环遍历]通过keySet取出map数据---------");
            for (String key : model.getEnclosures().keySet()) {
                helper.addAttachment(key, new File(model.getEnclosures().get(key)));// 预览文件
                // System.out.println("key值:"+key+" value值:"+model.getEnclosures().get(key));
            }

        }
        // helper.addAttachment("2.jpg", new File("E:\\pic\\2.jpg"));//预览文件
        //        helper.addInline("p01",new FileSystemResource(new File("E:\\pic\\2.jpg")));//配合前端可以直接预览图片
        //        helper.addInline("p02",new FileSystemResource(new File("E:\\pic\\2.jpg")));
        javaMailSender.send(mimeMessage);
    }

    /**
     * 发送简单的邮件(内容为纯文本邮件)
     * @param model
     * @return
     */
    public boolean sendSimpleEmail(EmailModel model) {
        // 发一个简单邮件,
        // 使用SimpleMessage对象, 调用setText方法, 里面的字符串是带有html标签的字符串, 在发送邮件的时候会自动解析正文中的html标签
        SimpleMailMessage simpleMailMessage = new SimpleMailMessage();

        // 设置发件人账号
        simpleMailMessage.setFrom(MAIL_USERNAME);

        // 设置接收人账号
        simpleMailMessage.setTo(model.getRecipientMailbox());

        // 设置邮件标题
        simpleMailMessage.setSubject(model.getTitle());

        // 设置邮件正文内容
        simpleMailMessage.setText(model.getContent());

        // 发送邮件
        javaMailSender.send(simpleMailMessage);
        log.info("send simple email success!");
        return true;
    }

    /**
     * 使用MimeMessage来作为对象发送,
     * 但是邮件内容需要通过 MimeMessageHelper 对象来进行封装进MimeMessage 里
     * 注意:
     * 如果发送的内容包括html标签, 则需要 helper.setText(email.getContent(),true);
     * 第二个参数要为true,表示开启识别html标签.默认是false,也就是不识别.
     * @param model
     * @return
     */
    public boolean sendMimeEmail(EmailModel model) {
        // 发一个复杂一点的邮件
        MimeMessage mimeMessage = javaMailSender.createMimeMessage();
        MimeMessageHelper helper = new MimeMessageHelper(mimeMessage);

        try {
            // 设置发件人账号
            helper.setFrom(MAIL_USERNAME);

            // 设置接收人账号
            helper.setTo(model.getRecipientMailbox());

            // 设置邮件标题
            helper.setSubject(model.getTitle());

            // 设置邮件正文内容 ,第二个参数开启html识别
            helper.setText(model.getContent(), true);

            // 发送邮件
            javaMailSender.send(mimeMessage);
            log.info("send mime email success!");
            return true;
        } catch (MessagingException e) {
            e.printStackTrace();
            return false;
        }
    }

    /**
     * 使用 MimeMessage 发送复杂邮件
     * @param model
     * @return
     */
    public boolean sendAttachMimeEmail(EmailModel model) {
        // 发一个复杂一点的邮件
        MimeMessage mimeMessage = javaMailSender.createMimeMessage();

        try {
            MimeMessageHelper helper = new MimeMessageHelper(mimeMessage, true);

            // 设置发件人账号
            helper.setFrom(MAIL_USERNAME + "(昵称123)");

            // 设置接收人账号
            helper.setTo(model.getRecipientMailbox());

            // 设置邮件标题
            helper.setSubject(model.getTitle());

            // 设置邮件正文内容 ,第二个参数开启html识别
            helper.setText(model.getContent(), true);

            Map<String, String> enclosures = model.getEnclosures();

            // 创建要传递的附件对象
            // import org.springframework.util.CollectionUtils;
            if (!CollectionUtils.isEmpty(enclosures)) {
                for (String key : enclosures.keySet()) {
                    // File file = new File(“D:\mybatis.doc”);
                    File file = new File(enclosures.get(key));
                    // 通过MimeMessageHelper对象的addAttachment方法来传递附件, 第一个参数为附件名, 第二个参数为FIle对象
                    helper.addAttachment(key, file);
                }
            }

            // 发送邮件
            javaMailSender.send(mimeMessage);
            log.info("send mime email success!");
            return true;
        } catch (MessagingException e) {
            e.printStackTrace();
            return false;
        }
    }
}
2.5 创建EmailController
package org.example.controller;

import org.example.entity.EmailModel;
import org.example.service.EmailService;
import org.slf4j.Logger;
import org.slf4j.LoggerFactory;
import org.springframework.beans.factory.annotation.Autowired;
import org.springframework.web.bind.annotation.PostMapping;
import org.springframework.web.bind.annotation.RequestBody;
import org.springframework.web.bind.annotation.RequestMapping;
import org.springframework.web.bind.annotation.RestController;

import javax.mail.MessagingException;

/**
 * @description:
 */
@RestController
public class EmailController {
    Logger log = LoggerFactory.getLogger(getClass());

    @Autowired
    EmailService emailService;

    @RequestMapping("test")
    public String test() {
        log.info("ok");
        return "ok";
    }

    /**
     * {
     *     "title": "测试主题",
     *     "content": "测试邮件测试人test",
     *     "recipientMailbox": [
     *         "2222222@qq.com",
     *         "test@xxx.cn"
     *     ],
     *     "ccMailbox": ["test@163.com"],
     *     "bccMailbox": [],
     *     "enclosures": {
     *         "dog2.jpg": "E:\\img\\dog2.png"
     *     }
     * }
     * @param model
     * @return
     * @throws MessagingException
     */
    @PostMapping("sendModleMail")
    public String sendModleMail(@RequestBody EmailModel model) throws MessagingException {
        emailService.sendModleMail(model);
        return "success!";
    }

    /**
     * {
     *     "recipientMailbox": [
     *         "test@xxx.cn"
     *     ],
     *     "title": "简单测试主题",
     *     "content": "测试邮件测试人test"
     * }
     * @param model
     * @return
     * @throws MessagingException
     */
    @RequestMapping("sendSimpleEmail")
    public String sendSimpleEmail(@RequestBody EmailModel model) {
        emailService.sendSimpleEmail(model);
        return "success!";
    }

    /**
     * {
     *     "recipientMailbox": [
     *         "test@xxx.cn"
     *     ],
     *     "title": "html测试主题",
     *     "content": "<h1>测试邮件测试人test</h1>
     *        <a href=\"https://www.baidu.com/\">点击跳转百度</a>
     *        <img src=\"https://img-blog.csdnimg.cn/2092623a09ed4d19ac4b9ab5301462cf.png\"></img>"
     * }
     * @param model
     * @return
     * @throws MessagingException
     */
    @RequestMapping("sendMimeEmail")
    public String sendMimeEmail(@RequestBody EmailModel model) {
        emailService.sendMimeEmail(model);
        return "success!";
    }

    /**
     * {
     *     "recipientMailbox": [
     *         "test@xxx.cn"
     *     ],
     *     "title": "附件测试主题",
     *     "content": "<img src=\"https://img-blog.csdnimg.cn/2092623a09ed4d19ac4b9ab5301462cf.png\"></img>",
     *     "enclosures": {
     *         "dog2.jpg": "E:\\img\\dog2.png"
     *     }
     * }
     * @param model
     * @return
     */
    @RequestMapping("sendAttachMimeEmail")
    public String sendAttachMimeEmail(@RequestBody EmailModel model) {
        emailService.sendAttachMimeEmail(model);
        return "success!";
    }
}
3. 邮件发送类型讲解
下文中所有的实现都是写在 EmailService 类中。
3.1 发送简单的邮件(内容为纯文本邮件)
通过SimpleMailMessage对象来发送简单邮件,邮件的内容只能是纯文本,将内容封装到该对象中,再通过javaMailSender对象来发送邮件
/**
 * 发送简单的邮件(内容为纯文本邮件)
 * @param model
 * @return
 */
public boolean sendSimpleEmail(EmailModel model) {
	// 发一个简单邮件,
	// 使用SimpleMessage对象, 调用setText方法, 里面的字符串是带有html标签的字符串, 在发送邮件的时候会自动解析正文中的html标签
	SimpleMailMessage simpleMailMessage = new SimpleMailMessage();

	// 设置发件人账号
	simpleMailMessage.setFrom(MAIL_USERNAME);

	// 设置接收人账号
	simpleMailMessage.setTo(model.getRecipientMailbox());

	// 设置邮件标题
	simpleMailMessage.setSubject(model.getTitle());

	// 设置邮件正文内容
	simpleMailMessage.setText(model.getContent());

	// 发送邮件
	javaMailSender.send(simpleMailMessage);
	log.info("send simple email success!");
	return true;
}
postman脚本
{
    "recipientMailbox": [
        "test@xxxx.cn"
    ],
    "title": "简单测试主题",
    "content": "<h1>测试邮件测试人test</h1>"
}
发送请求,将email对象中的数据初始化
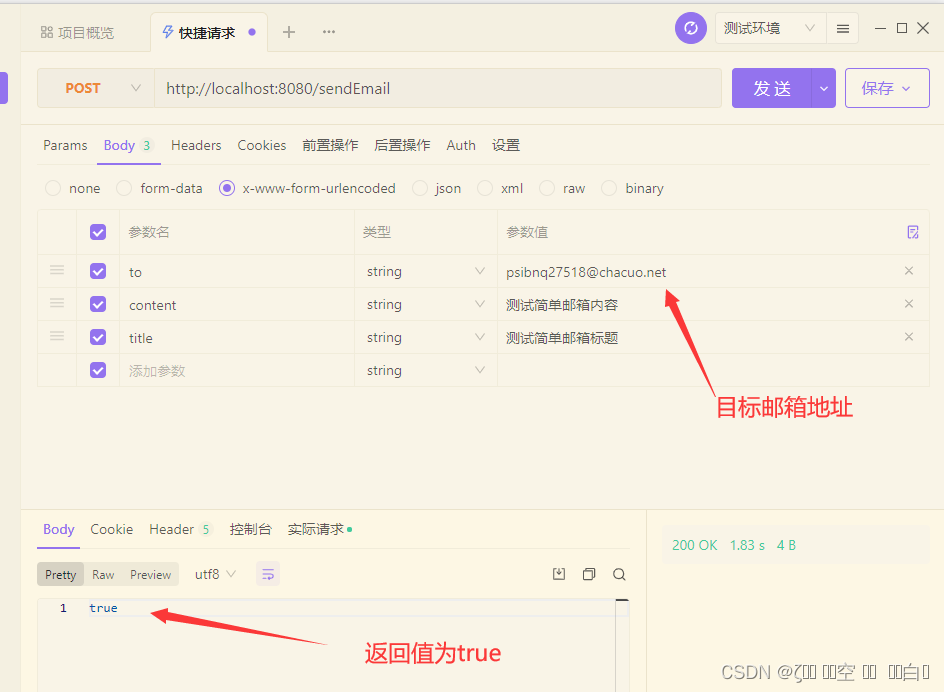
查看是否收到邮件,内容和我们发送的一样

3.2 发送简单的邮件(内容可以识别html标签)
3.2.1 方法1
- 直接和上面一样,使用SimpleMessage对象,调用setText方法,里面的字符串是带有html标签的字符串,在发送邮件的时候会自动解析正文中的html标签
- 代码和上面一样,只需要修改发送email的内容即可


3.2.2 方法2
使用MimeMessage来作为对象发送,但是邮件内容需要通过MimeMessageHelper对象来进行封装进MimeMessage里
注意:如果发送的内容包括html标签,则需要 helper.setText(email.getContent(),true);第二个参数要为true,表示开启识别html标签.默认是false,也就是不识别.

/**
 * 使用MimeMessage来作为对象发送,
 * 但是邮件内容需要通过 MimeMessageHelper 对象来进行封装进MimeMessage 里
 * 注意:
 * 如果发送的内容包括html标签, 则需要 helper.setText(email.getContent(),true);
 * 第二个参数要为true,表示开启识别html标签.默认是false,也就是不识别.
 * @param model
 * @return
 */
public boolean sendMimeEmail(EmailModel model) {
	// 发一个复杂一点的邮件
	MimeMessage mimeMessage = javaMailSender.createMimeMessage();
	MimeMessageHelper helper = new MimeMessageHelper(mimeMessage);

	try {
		// 设置发件人账号
		helper.setFrom(MAIL_USERNAME);

		// 设置接收人账号
		helper.setTo(model.getRecipientMailbox());

		// 设置邮件标题
		helper.setSubject(model.getTitle());

		// 设置邮件正文内容 ,第二个参数开启html识别
		helper.setText(model.getContent(), true);

		// 发送邮件
		javaMailSender.send(mimeMessage);
		log.info("send mime email success!");
		return true;
	} catch (MessagingException e) {
		e.printStackTrace();
		return false;
	}
}
postman脚本
{
    "recipientMailbox": [
        "test@xxxx.cn"
    ],
    "title": "链接地址测试主题",
    "content": "<a href=\"https://www.baidu.com/\">点击跳转百度</a>"
}

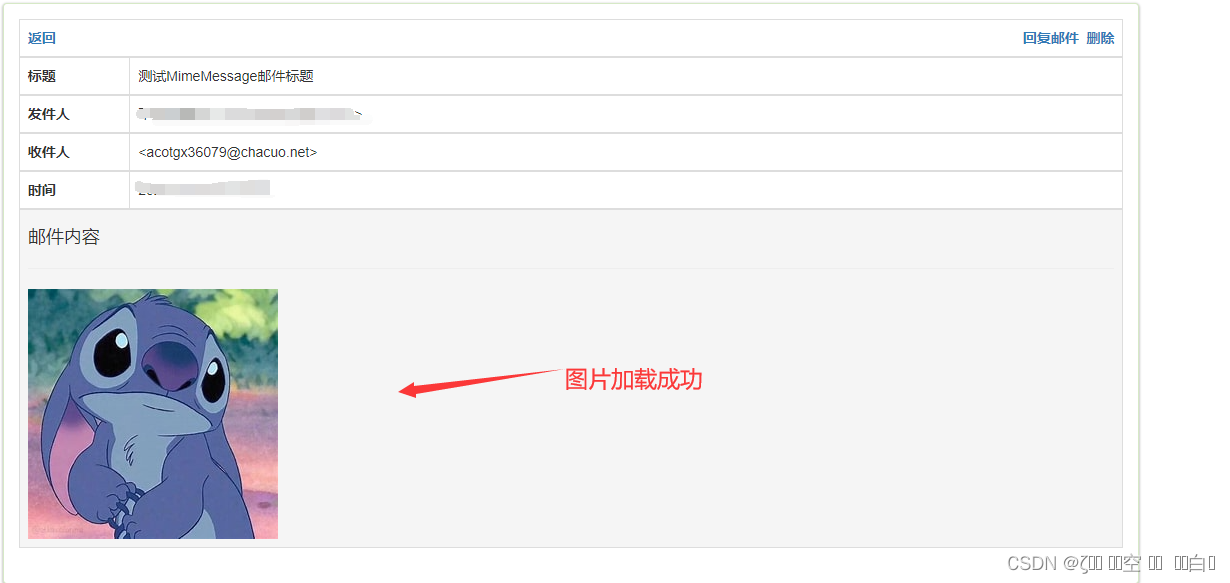
3.3 发送带静态资源(图片)的邮件中
方法和上面方法2中的代码是一致的,只相当于邮件内容还是html标签,现在就是使用的
<img>标签
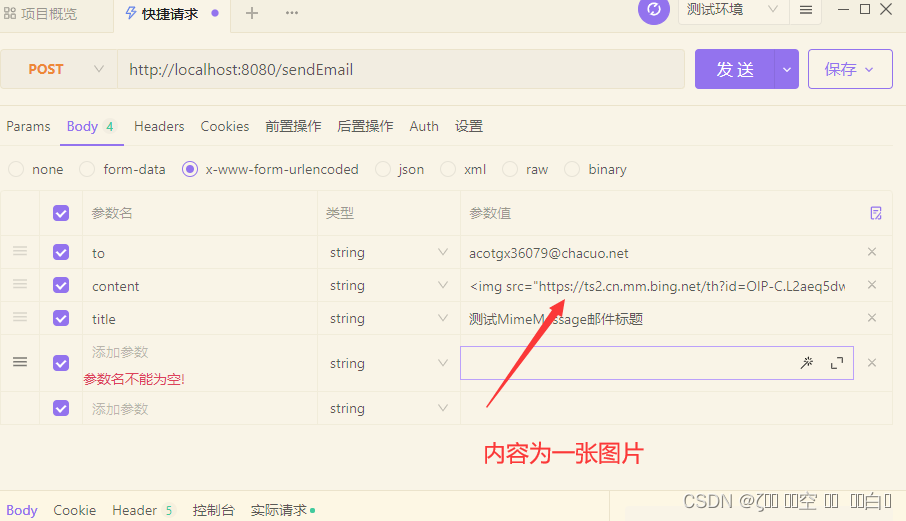
postman脚本
{
    "recipientMailbox": [
        "test@xxxx.cn"
    ],
    "title": "图片测试主题",
    "content": "<img src=\"https://img-blog.csdnimg.cn/2092623a09ed4d19ac4b9ab5301462cf.png\"></img>"
}
效果图:
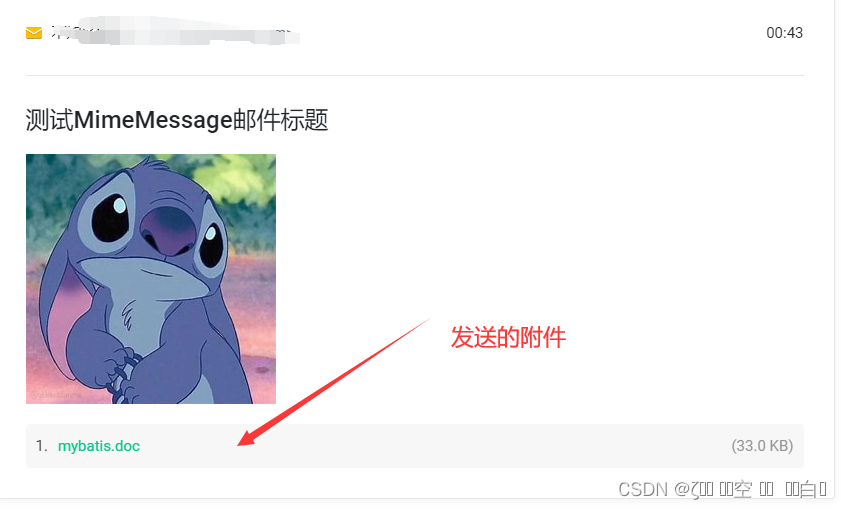
3.5 发送带附件的邮件
- 我们的邮件中可能还需要附带一些附件,比如文件,或者jar包等等,如何发送附件呢?
- 也是使用MimeMessage对象和MimeMessageHelper对象,但是在创建MimeMessageHelper对象的时候需要加一个参数为true.

/**
 * 使用 MimeMessage 发送复杂邮件
 * @param model
 * @return
 */
public boolean sendAttachMimeEmail(EmailModel model) {
	// 发一个复杂一点的邮件
	MimeMessage mimeMessage = javaMailSender.createMimeMessage();

	try {
		MimeMessageHelper helper = new MimeMessageHelper(mimeMessage, true);

		// 设置发件人账号
		helper.setFrom(MAIL_USERNAME + "(昵称123)");

		// 设置接收人账号
		helper.setTo(model.getRecipientMailbox());

		// 设置邮件标题
		helper.setSubject(model.getTitle());

		// 设置邮件正文内容 ,第二个参数开启html识别
		helper.setText(model.getContent(), true);

		Map<String, String> enclosures = model.getEnclosures();

		// 创建要传递的附件对象
		// import org.springframework.util.CollectionUtils;
		if (!CollectionUtils.isEmpty(enclosures)) {
			for (String key : enclosures.keySet()) {
				// File file = new File(“D:\mybatis.doc”);
				File file = new File(enclosures.get(key));
				// 通过MimeMessageHelper对象的addAttachment方法来传递附件, 第一个参数为附件名, 第二个参数为FIle对象
				helper.addAttachment(key, file);
			}
		}

		// 发送邮件
		javaMailSender.send(mimeMessage);
		log.info("send mime email success!");
		return true;
	} catch (MessagingException e) {
		e.printStackTrace();
		return false;
	}
}
postman脚本
{
    "recipientMailbox": [
        "test@xxx.cn"
    ],
    "title": "附件测试主题",
    "content": "<img src=\"https://img-blog.csdnimg.cn/2092623a09ed4d19ac4b9ab5301462cf.png\"></img>",
    "enclosures": {
        "dog2.jpg": "E:\\2.新员工\\img\\dog2.png"
    }
}
重点:
- 第二个参数为true
MimeMessageHelper helper = new MimeMessageHelper(mimeMessage,true);
File file = new File(“D:\Users\Administrator\Desktop\picture\mybatis.doc”);- /调用helper的addAttachment来添加附件
helper.addAttachment(file.getName(),file);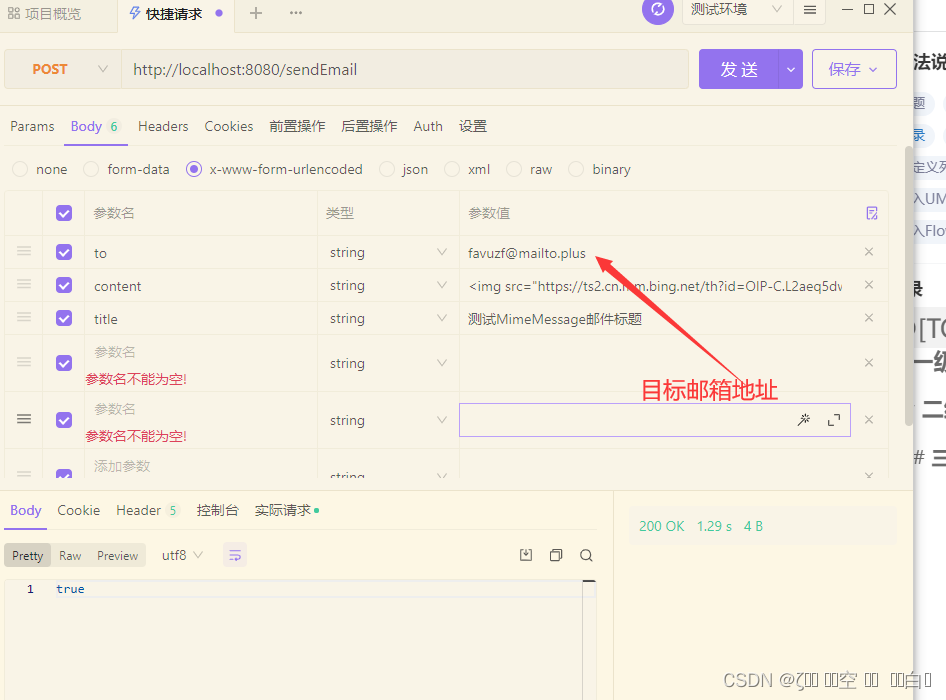
附件上传成功!