ansible安装
ansible的安装有很多种方式
官方文档:https://docs.ansible.com/ansible/latest/installation_guide/intro_installation.ht
ml
https://docs.ansible.com/ansible/latest/installation_guide/index.html
下载
https://releases.ansible.com/ansible/
pip下载
https://pypi.org/project/ansible/
包安装方式
#Centos 的 EPEL源rpm包安装
yum -y install ansible

#ubuntu安装
apt -y install ansible
查看ansible 版本
#centos 查看
yum info ansible

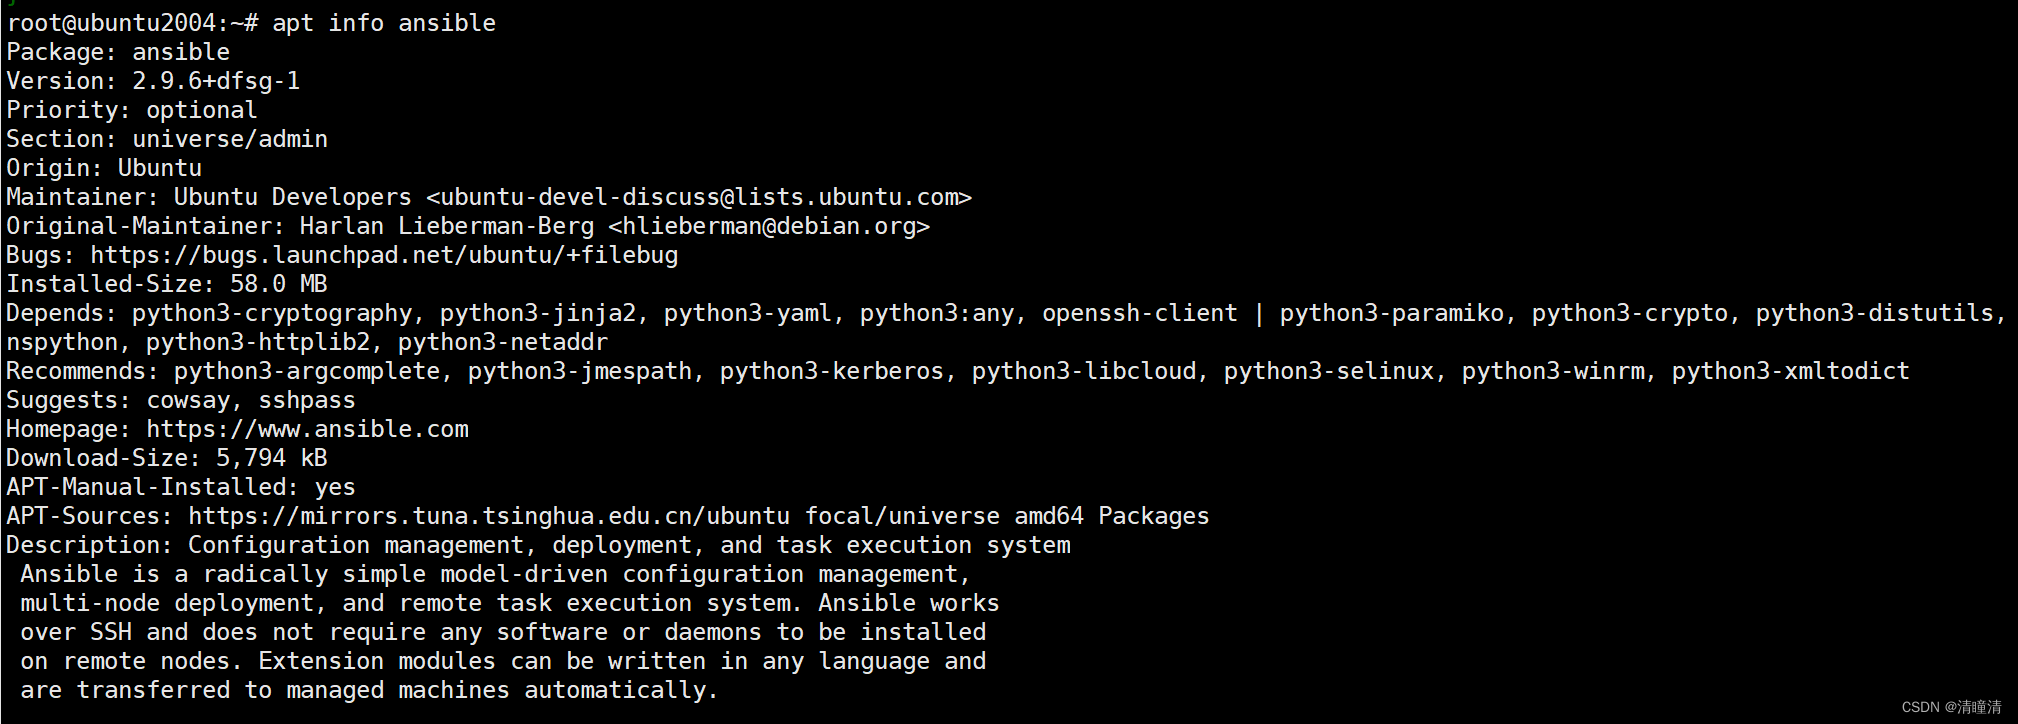
#ubuntu 查看
apt info ansible
PIP安装
pip 是安装python包的管理器,类似于 yum
在rocky8 上通过 pip3安装ansible
yum -y install python39 rust
pip3 install ansible
ansible --version
Inventory 主机清单
ansible的主要功用在于批量主机操作,为了便捷地使用其中的部分主机,可以在inventory 主机清单文件中将其分组组织
默认的inventory file为 /etc/ansible/hosts
inventory file可以有多个,且也可以通过Dynamic Inventory来动态生成
注意:
- 生产建议在每个项目目录下创建项目独立的hosts文件
- 通过项目目录下的ansible.cfg文件中的 inventory = ./hosts实现
官方文档:https://docs.ansible.com/ansible/latest/user_guide/intro_inventory.html
主机清单文件格式:
inventory文件遵循INI文件风格,中括号中的字符为组名。可以将同一个主机同时归并到多个不同的组中
此外,当如若目标主机使用了非默认的SSH端口,还可以在主机名称之后使用冒号加端口号来标明
如果主机名称遵循相似的命名模式,还可以使用列表的方式标识各主机
Inventory 参数说明
ansible_ssh_host #将要连接的远程主机名.与你想要设定的主机的别名不同的话,可通过此变量设置.
ansible_ssh_port #ssh端口号.如果不是默认的端口号,通过此变量设置.这种可以使用 ip:端口
192.168.1.100:2222
ansible_ssh_user #默认的 ssh 用户名
ansible_ssh_pass #ssh 密码(这种方式并不安全,我们强烈建议使用 --ask-pass 或 SSH 密钥)
ansible_sudo_pass #sudo 密码(这种方式并不安全,我们强烈建议使用 --ask-sudo-pass)
ansible_sudo_exe (new in version 1.8) #sudo 命令路径(适用于1.8及以上版本)
ansible_connection #与主机的连接类型.比如:local, ssh 或者 paramiko. Ansible 1.2 以前
默认使用 paramiko.1.2 以后默认使用 'smart','smart' 方式会根据是否支持 ControlPersist,
来判断'ssh' 方式是否可行.
ansible_ssh_private_key_file #ssh 使用的私钥文件.适用于有多个密钥,而你不想使用 SSH 代理
的情况.
ansible_shell_type #目标系统的shell类型.默认情况下,命令的执行使用 'sh' 语法,可设置为
'csh' 或 'fish'.
ansible_python_interpreter #目标主机的 python 路径.适用于的情况: 系统中有多个 Python,
或者命令路径不是"/usr/bin/python",比如 \*BSD, 或者 /usr/bin/python 不是 2.X 版本的
Python.之所以不使用 "/usr/bin/env" 机制,因为这要求远程用户的路径设置正确,且要求 "python"
可执行程序名不可为 python以外的名字(实际有可能名为python26).与
ansible_python_interpreter 的工作方式相同,可设定如 ruby 或 perl 的路径....
范例:
ntp.qingtongqingc.org
[webservers]
www1.qingtongqingc.org:2222
www2.qingtongqingc.org
[dbservers]
db1.qingtongqingc.org
db2.qingtongqingc.org
db3.qingtongqingc.org
#或者
db[1:3].qingtongqingc.org

#定义testsrvs组中包括两个其它分组,实现组嵌套
[testsrvs:children]
webservers
dbservers
Ansible 相关工具
- /usr/bin/ansible 主程序,临时命令执行工具
- /usr/bin/ansible-doc 查看配置文档,模块功能查看工具,相当于man
- /usr/bin/ansible-playbook 定制自动化任务,编排剧本工具,相当于脚本
- /usr/bin/ansible-pull 远程执行命令的工具
- /usr/bin/ansible-vault 文件加密工具
- /usr/bin/ansible-console 基于Console界面与用户交互的执行工具
- /usr/bin/ansible-galaxy 下载/上传优秀代码或Roles模块的官网平台
利用ansible实现管理的主要方式:
- Ansible Ad-Hoc 即利用ansible命令,主要用于临时命令使用场景
- Ansible playbook 主要用于长期规划好的,大型项目的场景,需要有前期的规划过程
ansible 使用前准备
ansible 相关工具大多数是通过ssh协议,实现对远程主机的配置管理、应用部署、任务执行等功能
建议:使用此工具前,先配置ansible主控端能基于密钥认证的方式联系各个被管理节点
先配置ssh免密
ssh-keygen
Generating public/private rsa key pair.
Enter file in which to save the key (/root/.ssh/id_rsa): #回车
Created directory '/root/.ssh'.
Enter passphrase (empty for no passphrase): #回车
Enter same passphrase again: #回车
Your identification has been saved in /root/.ssh/id_rsa
Your public key has been saved in /root/.ssh/id_rsa.pub
The key fingerprint is: #回车
SHA256:hX+PEeHicKfimp2qPB0s74aY165TT5bHQukdfuqZFCE root@ubuntu2004
The key's randomart image is: #回车
+---[RSA 3072]----+
|            .    |
|         . . .   |
|        E.= +    |
|        oB.= .   |
|     . oS==.o    |
|    . +.*.=o.+   |
|   o B =.o.o. .  |
|  o.= =+.o.o     |
|   .+O*.o.+      |
+----[SHA256]-----+
将密钥发送到服务端
ssh-copy-id IP地址
ansible-doc
此工具用来显示模块帮助,相当于man
格式:
ansible-doc [options] [module...]
-l, --list       #列出可用模块
-s, --snippet #显示指定模块的playbook片段
范例:
#列出所有模块
ansible-doc -l
#查看指定模块帮助用法
ansible-doc ping
#查看指定模块帮助用法
ansible-doc -s  ping
anisble 命令用法
格式:
ansible <host-pattern> [-m module_name] [-a args]
选项说明:
--version #显示版本
-m module   #指定模块,默认为command
-v #详细过程 -vv -vvv更详细
--list-hosts #显示主机列表,可简写 --list
-C, --check   #检查,并不执行
-T, --timeout=TIMEOUT #执行命令的超时时间,默认10s
-k, --ask-pass     #提示输入ssh连接密码,默认Key验证
-u, --user=REMOTE_USER #执行远程执行的用户,默认root
-b, --become    #代替旧版的sudo实现通过sudo机制实现提升权限
--become-user=USERNAME  #指定sudo的runas用户,默认为root
-K, --ask-become-pass  #提示输入sudo时的口令
-f FORKS, --forks FORKS #指定并发同时执行ansible任务的主机数
-i INVENTORY, --inventory INVENTORY  #指定主机清单文件
范例:
#以qingtong用户执行ping存活检测
ansible all -m ping -u qingtong  -k
#以qingtong sudo至root执行ping存活检测
ansible all -m ping -u qingtong -k -b
#以qingtong sudo至test用户执行ping存活检测
ansible all -m ping -u qingtong -k -b --become-user=test
#以wang sudo至root用户执行ls
ansible all -m command  -u qingtong -a 'ls /root' -b --become-user=root -k -K
使用普通用户进行远程管理
在所有控制端和被控制端创建用户和密码
useradd qingtong
echo qingtong:123456 | chpasswd
在所有被控制端对用户sudo 授权
[root@localhost ~]# visudo
qingtong ALL=(ALL) NOPASSWD: ALL

[root@localhost ~]# visudo -c
/etc/sudoers: parsed OK

#使用普通用户通过-b选项连接实现sudo提权后连接成功
ansible 192.168.31.111 -m shell -a 'ls -a /root' -b --become-user root
ansible的Host-pattern
用于匹配被控制的主机列表
ALL:表示所有Inventory中的所有主机
范例:
ansible all -m ping
*:通配符
ansible "*" -m ping
ansible 192.168.31.* -m ping
ansible "srvs" -m ping
ansible "10.0.0.6 10.0.0.7" -m ping
或关系
ansible "websrvs:appsrvs" -m ping
ansible "192.168.1.10:192.168.1.20" -m ping
逻辑与
#在websrvs组并且在dbsrvs组中的主机
ansible "websrvs:&dbsrvs" -m ping
逻辑非
#在所有主机,但不在websrvs组和dbsrvs组中的主机
#注意:此处为单引号
ansible 'all:!dbsrvs:!websrvs' -m ping
综合逻辑
ansible 'websrvs:dbsrvs:&appsrvs:!ftpsrvs' -m ping
ansible 命令执行过程
- 加载自己的配置文件,默认/etc/ansible/ansible.cfg
- 查找主机清单中对应的主机或主机组
- 加载自己对应的模块文件,如:command
- 通过ansible将模块或命令生成对应的临时py文件,并将该文件传输至远程服务器的对应执行用户
$HOME/.ansible/tmp/ansible-tmp-数字/XXX.PY文件 - 给文件+x执行
- 执行并返回结果
- 删除临时py文件,退出
ansible 命令的执行状态
root@ubuntu2004:~# grep -A 14  '\[colors\]' /etc/ansible/ansible.cfg
[colors]
#highlight = white
#verbose = blue
#warn = bright purple
#error = red
#debug = dark gray
#deprecate = purple
#skip = cyan
#unreachable = red
#ok = green
#changed = yellow
#diff_add = green
#diff_remove = red
#diff_lines = cyan
- 绿色:执行成功并且对目标主机不需要做改变的操作
- 黄色:执行成功并且对目标主机做变更
- 红色:执行失败
Ansible 常用模块
虽然模块众多,但最常用的模块也就2,30个而已,针对特定业务只需要熟悉10几个模块即可
常用模块帮助文档参考:
https://docs.ansible.com/ansible/2.9/modules/modules_by_category.html
https://docs.ansible.com/ansible/2.9/modules/list_of_all_modules.html
https://docs.ansible.com/ansible/latest/modules/list_of_all_modules.html
https://docs.ansible.com/ansible/latest/modules/modules_by_category.html
Command 模块
功能:在远程主机执行命令,此为默认模块,可忽略 -m 选项
注意:此命令不支持 $VARNAME < > | ; & 等,可能用shell模块实现
注意:此模块不具有幂等性
常见选项:
chdir=dir    #执行命令前,先切换至目录dir
creates=file #当file不存在时才会执行
removes=file #当file存在时才会执行
范例:
root@ubuntu2004:~# ansible all -m command -a 'chdir=/etc cat centos-release'
192.168.31.110 | CHANGED | rc=0 >>
CentOS Linux release 7.9.2009 (Core)
192.168.31.111 | CHANGED | rc=0 >>
CentOS Linux release 7.9.2009 (Core)
shell 模块
功能:和command相似,用shell执行命令,支持各种符号,比如:*,$, > , 相当于增强版的command模块
注意:此模块不具有幂等性,建议能不能就用此模块,最好使用专用模块
常见选项
chdir=dir    #执行命令前,先切换至目录dir
creates=file #当file不存在时才会执行
removes=file #当file存在时才会执行
范例:
root@ubuntu2004:~# ansible all -m shell -a 'echo $HOSTNAME'
192.168.31.111 | CHANGED | rc=0 >>
localhost.localdomain
192.168.31.110 | CHANGED | rc=0 >>
localhost.localdomain

root@ubuntu2004:~# ansible all -m shell -a 'echo hello > /data/hello.log'
192.168.31.110 | CHANGED | rc=0 >>

192.168.31.111 | CHANGED | rc=0 >>

root@ubuntu2004:~# ansible all -m shell -a 'cat /data/hello.log'
192.168.31.111 | CHANGED | rc=0 >>
hello
192.168.31.110 | CHANGED | rc=0 >>
hello
注意:调用bash执行命令 类似 cat /tmp/test.md | awk -F’|’ ‘{print $1,$2}’ &> /tmp/example.txt 这些复杂命令,即使使用shell也可能会失败,解决办法:写到脚本时,copy到远程,执行,再把需要的结果拉回执行命令的机器
范例:将shell模块代替command,设为模块
root@ubuntu2004:~#vim /etc/ansible/ansible.cfg
#修改下面一行
module_name = shell
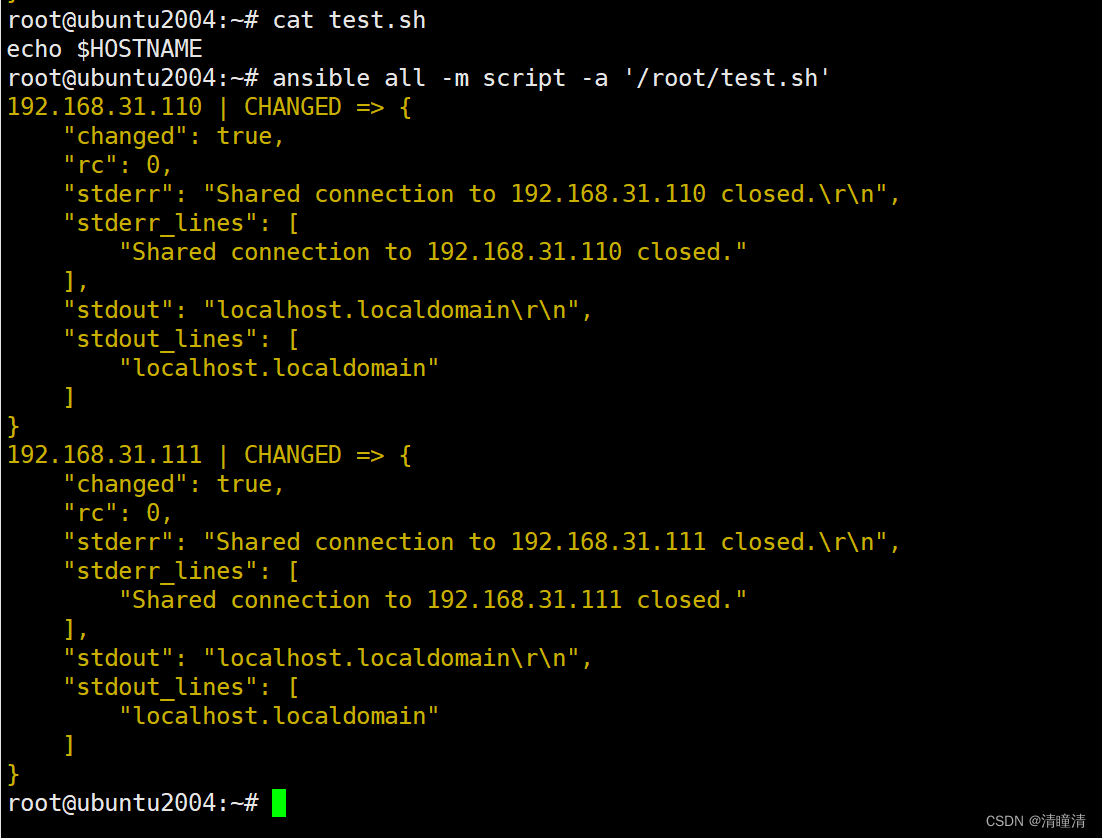
Scripts 模块
功能:在远程主机上运行ansible服务器上的脚本(无需执行权限)
注意:此模块不具有幂等性
常见选项
chdir=dir    #执行命令前,先切换至目录dir
cmd          #指定ansible主机的命令
creates=file #当file不存在时才会执行
removes=file #当file存在时才会执行
范例:
ansible all -m script -a '/root/test.sh'
Copy 模块
功能:复制ansible服务器主控端或远程的本机的文件到远程主机
注意: src=file 如果是没指明路径,则为当前目录或当前目录下的files目录下的file文件
常见选项
src      #控制端的源文件路径
dest     #被控端的文件路径
owner    #属主
group    #属组
mode     #权限
backup   #是否备份
validate #验证成功才会执行copy
remote_src  #no是默认值,表示src文件在ansible主机,yes表示src文件在远程主机
范例:
root@ubuntu2004:~# ansible all -m copy -a "src=/root/test.sh dest=/opt"

#验证文件是否复制成功
root@ubuntu2004:~# ansible all -m command -a "ls /opt"
192.168.31.111 | CHANGED | rc=0 >>
test.sh
192.168.31.110 | CHANGED | rc=0 >>
test.sh
File 模块
功能:设置文件属性,创建文件,目录和软链接等
常见选项
path #在被控端创建的路径
owner #属主
group #属组
mode #权限
state #状态
  =touch    #创建文件
  =directory #创建目录
  =link #软链接
  =hard     #硬链接
recurse     #yes表示递归授权
范例:
#创建空文件
ansible all -m file  -a 'path=/data/test.txt state=touch'
ansible all -m file  -a 'path=/data/test.txt state=absent'
ansible all -m file -a "path=/root/test.sh owner=wang mode=755"
#创建目录
ansible all -m file -a "path=/data/mysql state=directory owner=mysql
group=mysql"
#创建软链接
ansible all -m file -a 'src=/data/testfile path|dest|name=/data/testfile-link
state=link'
#创建目录
ansible all -m file  -a 'path=/data/testdir state=directory'
#递归修改目录属性,但不递归至子目录
ansible all -m file -a "path=/data/mysql state=directory owner=mysql
group=mysql"
#递归修改目录及子目录的属性
ansible all -m file -a "path=/data/mysql state=directory owner=mysql group=mysql
recurse=yes"
stat 模块
功能:检查文件或文件系统的状态
注意:对于Windows目标,请改用win_stat模块
常见选项
path #文件/对象的完整路径(必须)
常用的返回值判断:
exists: 判断是否存在
isuid: 调用用户的ID与所有者ID是否匹配
root@ubuntu2004:~# ansible 127.0.0.1 -m stat -a 'path=/etc/passwd'
127.0.0.1 | SUCCESS => {
    "changed": false,
    "stat": {
        "atime": 1683610546.334582,
        "attr_flags": "e",
        "attributes": [
            "extents"
        ],
        "block_size": 4096,
        "blocks": 8,
        "charset": "us-ascii",
        "checksum": "e644c90df8a6b47b5ff04270caed35ff35931421",
        "ctime": 1683610546.326582,
        "dev": 2053,
        "device_type": 0,
        "executable": false,
        "exists": true,
        "gid": 0,
        "gr_name": "root",
        "inode": 275434,
        "isblk": false,
        "ischr": false,
        "isdir": false,
        "isfifo": false,
        "isgid": false,
        "islnk": false,
        "isreg": true,
        "issock": false,
        "isuid": false,
        "mimetype": "text/plain",
        "mode": "0644",
        "mtime": 1683610546.326582,
        "nlink": 1,
        "path": "/etc/passwd",
        "pw_name": "root",
        "readable": true,
        "rgrp": true,
        "roth": true,
        "rusr": true,
        "size": 2975,
        "uid": 0,
        "version": "1563825316",
        "wgrp": false,
        "woth": false,
        "writeable": true,
        "wusr": true,
        "xgrp": false,
        "xoth": false,
        "xusr": false
    }
}
unarchive 模块
功能:解包解压缩
实现有两种用法:
- 将ansible主机上的压缩包传到远程主机后解压缩至特定目录,设置remote_src=no,此为默认值,可省略
- 将远程本主机上或非ansible的其它主机的某个压缩包解压缩到远程主机本机的指定路径下,需要设置remote_src=yes
常见参数:
remote_src #和copy功能一样且选项互斥,yes表示源文件在远程被控主机或其它非ansible的其它主机
上,no表示文件在ansible主机上,默认值为no, 此选项代替copy选项
copy #默认为yes,当copy=yes,拷贝的文件是从ansible主机复制到远程主机上,如果设置为
copy=no,会在远程主机上寻找src源文件,此选项已废弃
src #源路径,可以是ansible主机上的路径,也可以是远程主机(被管理端或者第三方主机)上的路径,如果
是远程主机上的路径,则需要设置remote_src=yes
dest #远程主机上的目标路径
mode #设置解压缩后的文件权限
creates=/path/file #当绝对路径/path/file不存在时才会执行
范例:
ansible all -m unarchive -a 'src=/data/foo.tgz dest=/var/lib/foo owner=wang
group=bin'
ansible all -m unarchive -a 'src=/tmp/foo.zip dest=/data copy=no mode=0777'
ansible all -m unarchive -a 'src=https://example.com/example.zip dest=/data
copy=no'
ansible websrvs -m unarchive -a
'src=https://releases.ansible.com/ansible/ansible-2.1.6.0-0.1.rc1.tar.gz
dest=/data/   owner=root remote_src=yes'
ansible websrvs -m unarchive -a 'src=http://nginx.org/download/nginx-
1.18.0.tar.gz dest=/usr/local/src/ copy=no'
Archive 模块
功能:打包压缩保存在被管理节点
常见选项
path   #压缩的文件或目录
dest   #压缩后的文件
format #压缩格式,支持gz,bz2,xz,tar,zip
范例:
ansible websrvs -m archive  -a 'path=/var/log/ dest=/data/log.tar.bz2 format=bz2
owner=wang mode=0600'
Hostname 模块
功能:管理主机名
常见选项
name #修改后的主机名称
范例:
ansible node1 -m hostname -a "name=websrv"
ansible 192.168.31.111 -m hostname -a 'name=node2.qingtong.org'
Cron 模块
功能:计划任务
支持时间:minute,hour,day,month,weekday
常见选项
name #描述脚本的作用
minute    #分钟
hour #小时
weekday    #周
user #任务由哪个用户运行;默认root
job #任务
范例:
#备份数据库脚本
[root@centos8 ~]#cat /root/mysql_backup.sh
#!/bin/bash
mysqldump -A -F --single-transaction --master-data=2 -q -uroot |gzip >
/data/mysql_`date +%F_%T`.sql.gz

#创建任务
ansible 192.168.31.111 -m cron -a 'hour=2 minute=30 weekday=1-5 name="backup mysql"
job=/root/mysql_backup.sh'
ansible websrvs   -m cron -a "minute=*/5 job='/usr/sbin/ntpdate ntp.aliyun.com
&>/dev/null' name=Synctime"

#禁用计划任务
ansible websrvs   -m cron -a "minute=*/5 job='/usr/sbin/ntpdate 172.20.0.1
&>/dev/null' name=Synctime disabled=yes"

#启用计划任务
ansible websrvs   -m cron -a "minute=*/5 job='/usr/sbin/ntpdate 172.20.0.1
&>/dev/null' name=Synctime disabled=no"

#删除任务
ansible websrvs -m cron -a "name='backup mysql' state=absent"
ansible websrvs -m cron -a 'state=absent name=Synctime'
Yum 和 Apt 模块
功能:管理软件包
yum 管理软件包,只支持RHEL,CentOS,fedora,不支持Ubuntu其它版本
apt 模块管理 Debian 相关版本的软件包
yum常见选项
name #软件包名称
state #状态
  =present #安装,此为默认值
  =absent #删除
  =latest #最新版
list            #列出指定包
enablerepo #启用哪个仓库安装
disablerepo #不使用哪些仓库的包
exclude #排除指定的包
validate        #是否检验,默认为yes
范例:
#安装
[root@ansible ~]#ansible websrvs -m yum -a 'name=httpd state=present'
#安装zabbix agent rpm包
[root@ansible ~]#ansible websrvs -m yum -a
'name=https://mirrors.tuna.tsinghua.edu.cn/zabbix/zabbix/5.0/rhel/8/x86_64/zabbi
x-agent2-5.0.24-1.el8.x86_64.rpm state=present validate_certs=no'
#启用epel源进行安装
[root@ansible ~]#ansible websrvs -m yum -a 'name=nginx state=present
enablerepo=epel'
#升级除kernel和foo开头以外的所有包
[root@ansible ~]#ansible websrvs -m yum -a 'name=* state=lastest
exclude=kernel*,foo*'
#删除
[root@ansible ~]#ansible websrvs -m yum -a 'name=httpd state=absent'
[root@ansible ~]#ansible websrvs -m yum -a 'name=sl,cowsay'
yum_repository 模块
功能: 此模块实现yum的仓库配置管理
常见选项
name #仓库id
description #仓库描述名称,对应配置文件中的name=
baseurl #仓库的地址
gpgcheck #验证开启
gpgkey              #仓库公钥路径
范例:
ansible websrvs -m yum_repository -a 'name=ansible_nginx description="nginx
repo" baseurl="http://nginx.org/packages/centos/$releasever/$basearch/"
gpgcheck=yes gpgkey="https://nginx.org/keys/nginx_signing.key"'
[root@rocky8 ~]#cat /etc/yum.repos.d/ansible_nginx.repo
[ansible_nginx]
baseurl = http://nginx.org/packages/centos/$releasever/$basearch/
gpgcheck = 1
gpgkey = https://nginx.org/keys/nginx_signing.key
name = nginx repo
Service 模块
此模块和sytemd功能相似,选项很多相同
功能:管理服务
常见服务
name #服务名称
state #服务状态
=started #启动
=stopped #停止
=restarted    #重启
=reloaded    #重载
enabled #开启自启动
daemon_reload   #加载新的配置文件,适用于systemd模块
范例:
ansible all -m service -a 'name=httpd state=started enabled=yes'
ansible all -m service -a 'name=httpd state=stopped'
ansible all -m service -a 'name=httpd state=reloaded'
ansible all -m shell -a "sed -i 's/^Listen 80/Listen 8080/'
/etc/httpd/conf/httpd.conf"
ansible all -m service -a 'name=httpd state=restarted'
#重启动指定网卡服务
ansible all -m service -a 'name=network state=absent args=eth0'
User 模块
功能:管理用户
常见选项
name #创建的名称
uid #指定uid
group #指定基本组
shell #登录shell类型默认/bin/bash
create_home #是否创建家目录
password #设定对应的密码,必须是加密后的字符串才行,否则不生效
system #yes表示系统用户
groups          #附加组
append #追加附加组使用,yes表示增加新的附加组
state    #absen删除
remove #yes表示删除用户时将家目录一起删除
generate_ssh_key #创建私钥
ssh_keyu_bits    #私钥位数
ssh_key_file     #私钥文件路径
范例:
#创建用户
ansible all -m user -a 'name=user1 comment="test user" uid=2048 home=/app/user1
group=root'
ansible all -m user -a 'name=nginx comment=nginx uid=88 group=nginx
groups="root,daemon" shell=/sbin/nologin system=yes create_home=no
home=/data/nginx non_unique=yes'
#remove=yes表示删除用户及家目录等数据,默认remove=no
ansible all -m user -a 'name=nginx state=absent remove=yes'
#生成123456加密的密码
ansible localhost -m debug -a "msg={{ '123456'|
password_hash('sha512','salt')}}"
localhost | SUCCESS => {
    "msg": "$6$salt$MktMKPZJ6t59GfxcJU20DwcwQzfMvOlHFVZiOVD71w."
}
#用上面创建的密码创建用户
ansible websrvs -m user -a 'name=www group=www system=yes shell=/sbin/nlogin
password="$6$salt$MktMKPZJ6t59GfxcJU20DwcwQzfMvOlHFVZiOVD71w."'
#创建用户test,并生成4096bit的私钥
ansible websrvs -m user -a 'name=test generate_ssh_key=yes ssh_key_bits=4096
ssh_key_file=.ssh/id_rsa'
Replace 模块
该模块有点类似于sed命令,主要也是基于正则进行匹配和替换,建议使用
功能: 多行修改替换
常见选项
path #被控端文件的路径
regexp #正则匹配语法格式,表示被替换的内容
replace #替换为的内容
after           #插入到替换内容前面,
before          #插入到替换内容后面
backup          #修改前先备份
mode            #指定权限
owner           #指定用户
group           #指定组
范例:
ansible all -m replace -a "path=/etc/fstab regexp='^(UUID.*)' replace='#\1'"
ansible all -m replace -a "path=/etc/fstab regexp='^#(UUID.*)' replace='\1'"
SElinux 模块
功能: 该模块管理 SELInux 策略
常见选项
policy     #指定SELINUXTYPE=targeted
state      #指定SELINUX=disabled
范例:
root@ubuntu2004:~# ansible all -m selinux -a 'state=disabled'
[WARNING]: SELinux state temporarily changed from 'enforcing' to 'permissive'. State change will take effect next reboot.
192.168.31.110 | CHANGED => {
    "ansible_facts": {
        "discovered_interpreter_python": "/usr/bin/python"
    },
    "changed": true,
    "configfile": "/etc/selinux/config",
    "msg": "",
    "policy": "targeted",
    "reboot_required": true,
    "state": "disabled"
}
192.168.31.111 | CHANGED => {
    "ansible_facts": {
        "discovered_interpreter_python": "/usr/bin/python"
    },
    "changed": true,
    "configfile": "/etc/selinux/config",
    "msg": "Config SELinux state changed from 'enforcing' to 'disabled'",
    "policy": "targeted",
    "reboot_required": true,
    "state": "disabled"
}


[root@localhost ~]# grep -v '#' /etc/selinux/config

SELINUX=disabled
SELINUXTYPE=targeted


[root@localhost ~]# getenforce
Permissive
reboot 模块
功能:重启
常见选项
msg               #重启提示
pre_reboot_delay  #重启前延迟时间的秒数
post_reboot_delay #重启后延迟时间的秒数后,再验证系统正常启动
reboot_timeout    #重启后延迟时间再执行测试成功与否的命令
test_command      #执行测试成功与否的命令
范例:
root@ubuntu2004:~#ansible websrvs -m reboot -a 'msg="host will be reboot"'
mount 模块
功能:挂载和卸载文件系统
常见选项
src    #源设备路径,或网络地址
path   #挂载至本地哪个路径下
fstype #设备类型; nfs
opts   #挂载的选项
state  #挂载还是卸载
  =present #永久挂载,但没有立即生效
  =absent #卸载临时挂载,并删除永久挂载
  =mounted #临时挂载
  =unmounted #临时卸载
范例:
#修改fstab文件永久挂载,但不立即生效
mount websrvs -m mount -a 'src="UUID=b3e48f45-f933-4c8e-a700-22a159ec9077"
path=/home fstype=xfs opts=noatime state=present'
#临时取消挂载
mount websrvs -m mount -a 'path=/home fstype=xfs opts=noatime state=unmounted'
#永久挂载,并立即生效
ansible websrvs -m mount -a 'src=10.0.0.8:/data/wordpress path=/var/www/html/wpcontent/uploads opts="_netdev" state=mounted'
#永久卸载,并立即生效
ansible websrvs -m mount -a 'src=10.0.0.8:/data/wordpress path=/var/www/html/wpcontent/uploads state=absent'
debug 模块
功能: 此模块可以用于输出信息,并且通过 msg 定制输出的信息内容,功能类似于echo命令
注意: msg后面的变量有时需要加 " " 引起来
常见选项
msg       #指定命令输出的信息
var       #指定变量名,和msg互斥
verbosity #详细度
范例:debug 模块默认输出 hello world
root@ubuntu2004:~# ansible all -m debug
192.168.31.110 | SUCCESS => {
    "msg": "Hello world!"
}
192.168.31.111 | SUCCESS => {
    "msg": "Hello world!"
}
#默认没有指定msg,默认输出"Hello world!"
