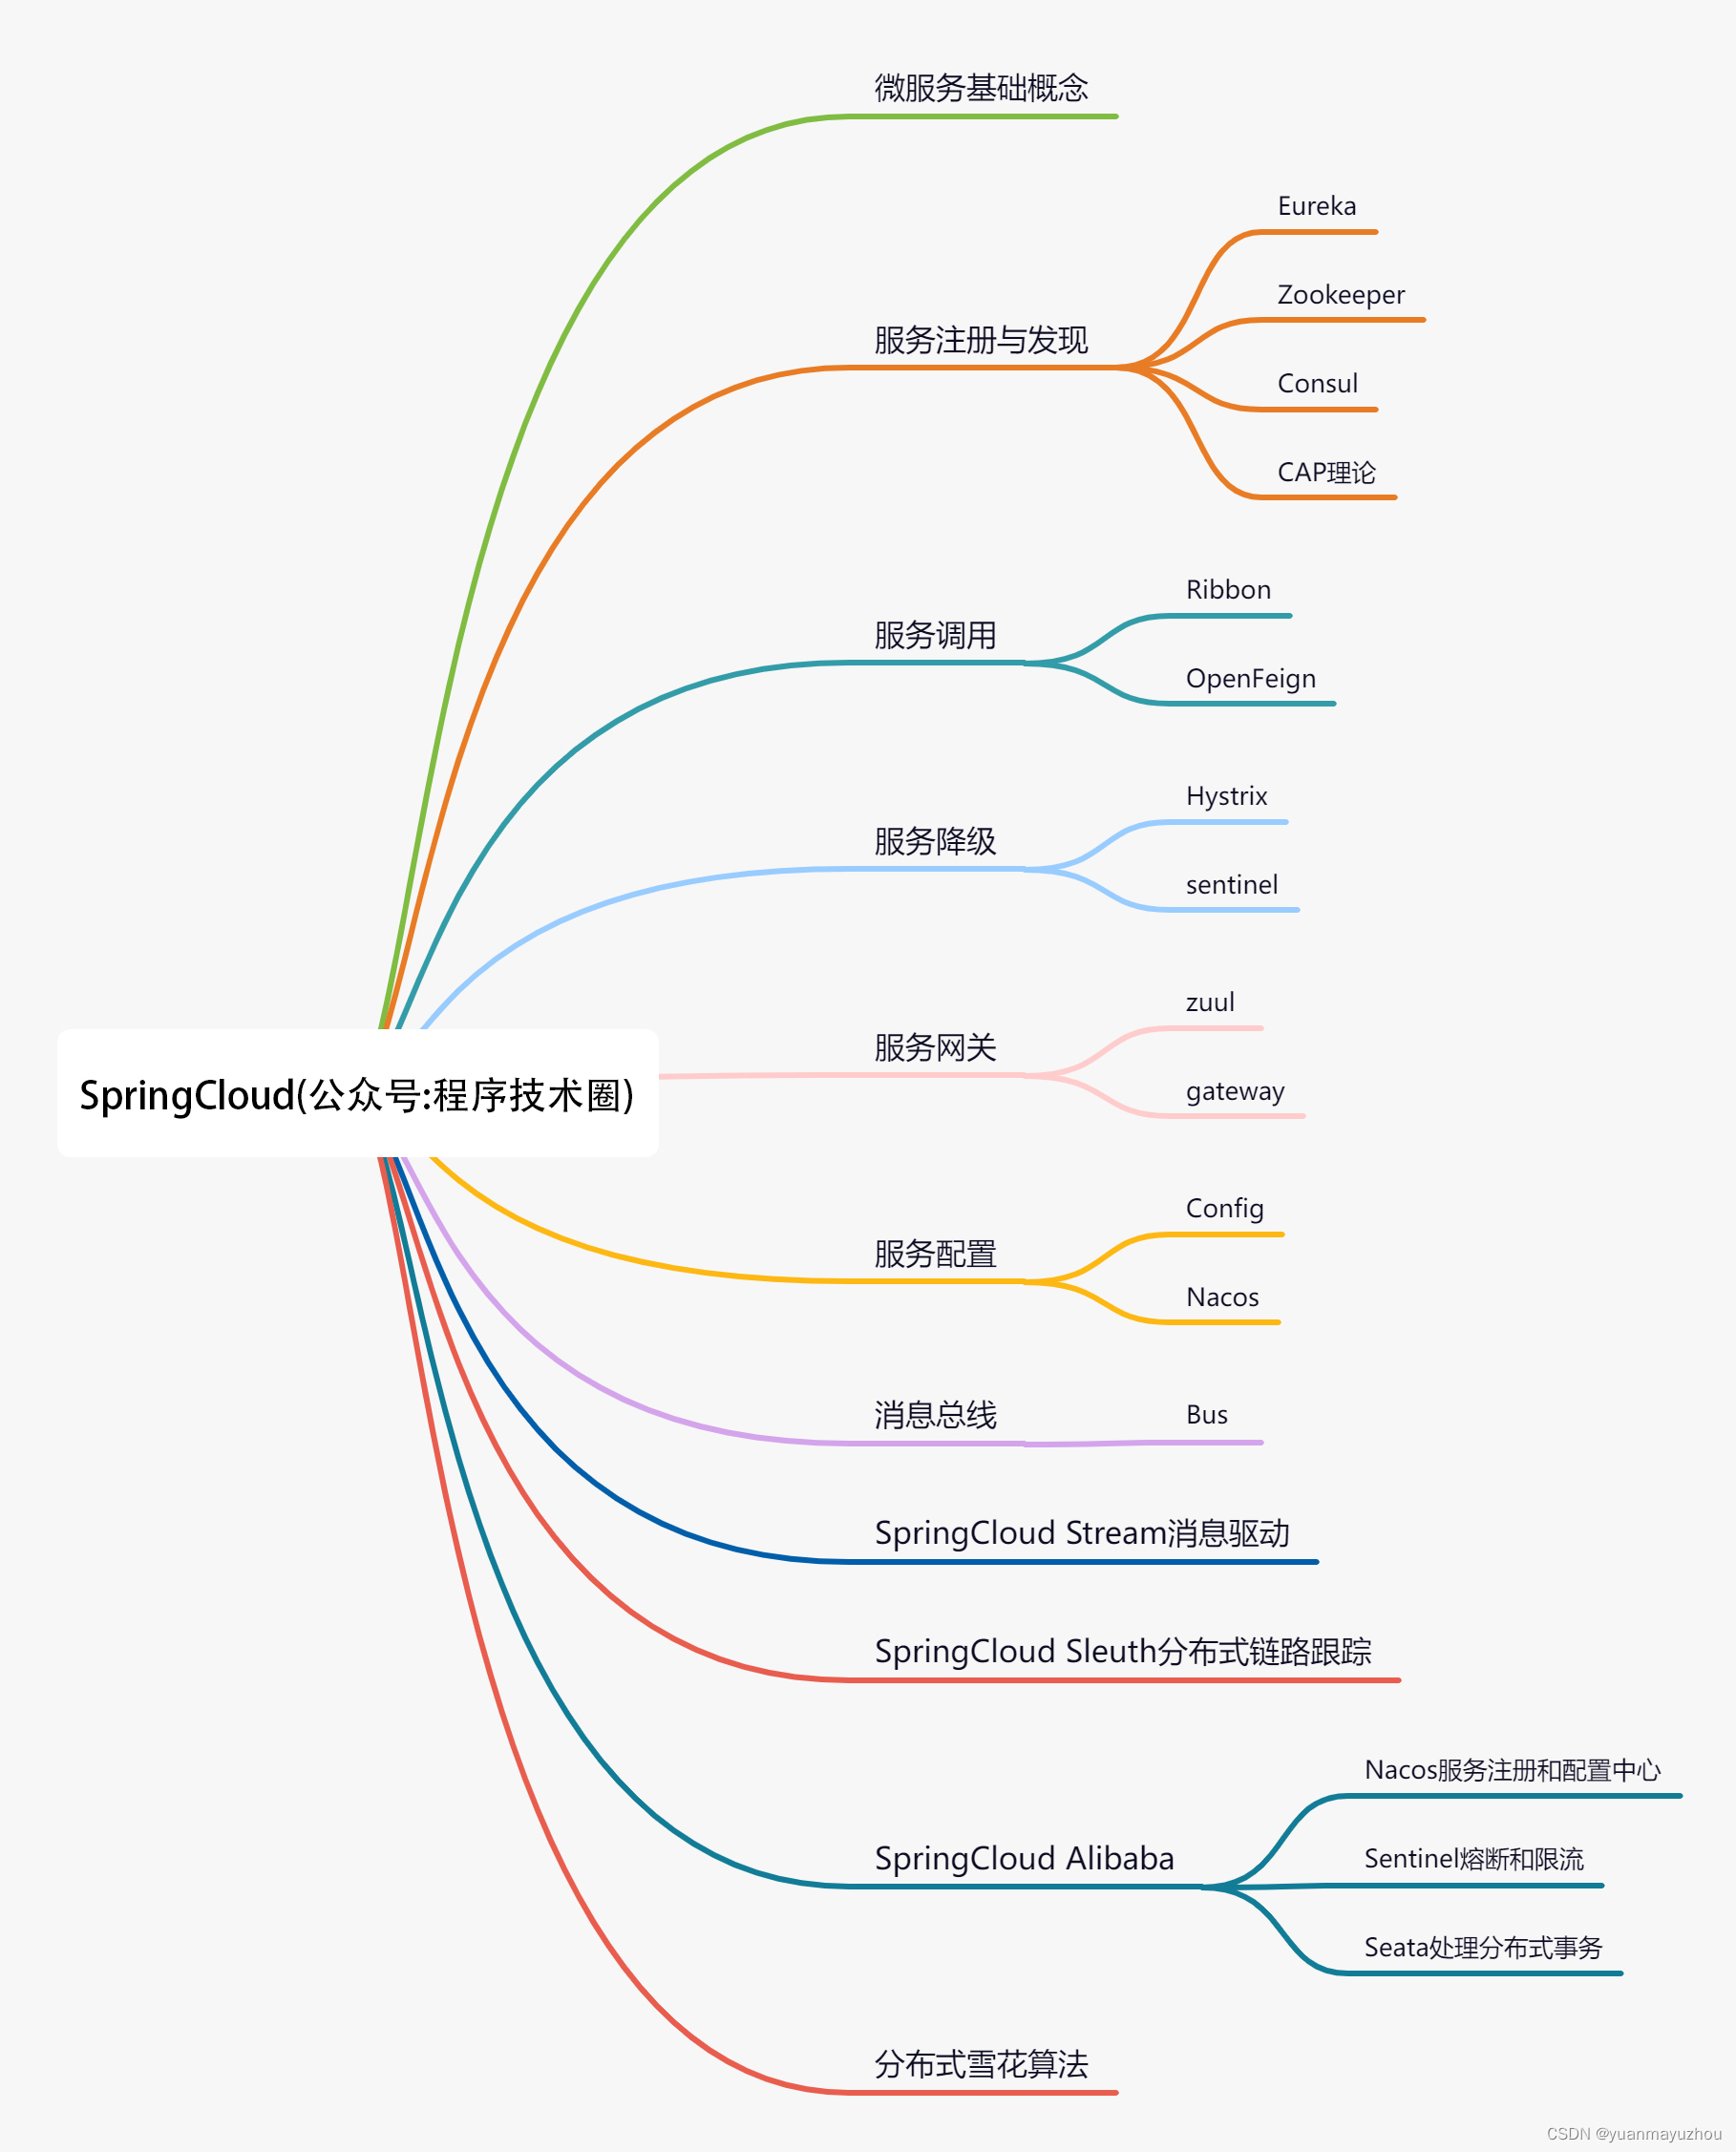
目录
阈值
腐蚀与膨胀
开运算与闭运算
连通区域分析
轮廓
一、阈值
按照颜色对图像进行分类,可以分为彩色图像、灰度图像和二值图像。灰度图像是只含亮度信息,不含色彩信息的图像。灰度化处理是把彩色图像转换为灰度图像的过程,是图像处理中的基本操作。OpenCV 中彩色图像使用 BGR 格式。灰度图像中用 8bit 数字 0~255 表示灰度,如:0 表示纯黑,255 表示纯白。彩色图像进行灰度化处理,可以在读取图像文件时直接读取为灰度图像,也可以通过函数 cv.cvtColor() 将彩色图像转换为灰度图像。一下是简答的图像灰度化处理代码:
import cv2 as cv
if __name__ == '__main__':
    img = cv.imread("GrayscaleLena.tif")
    imgGray = cv.cvtColor(img, cv.COLOR_BGR2GRAY)
    cv.imshow("ImgGray", imgGray)
    key = cv.waitKey(0)
二、腐蚀与膨胀
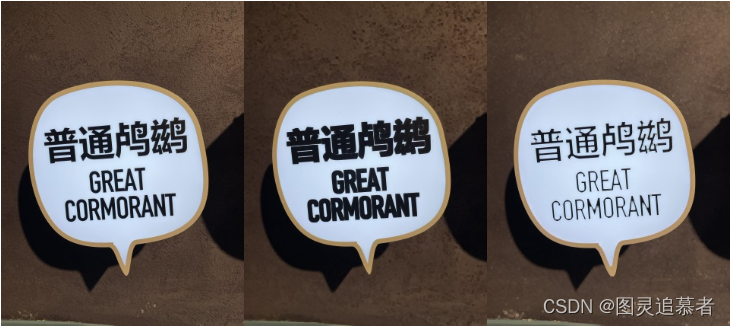
OpenCV的膨胀与腐蚀,让“普通鸬鹚”不普通,下图从左到右分别是:
- 原图
- 原图经过腐蚀得到的图
- 原图经过膨胀得到的图
参考代码如下:
import numpy as np
import cv2

if __name__ == '__main__':
    img_origin = cv2.imread('bird.jpeg', cv2.COLOR_BGR2LAB)

    kernel = np.ones((3, 3), np.uint8)
    img_erosion = cv2.erode(img_origin, kernel, iterations=1)
    img_dilation = cv2.dilate(img_origin, kernel, iterations=1)

    img_all = np.concatenate((img_origin, img_erosion, img_dilation), axis=1)
    cv2.imshow('img: origin, erosion and dilation', img_all)

    cv2.waitKey(0)
cv2.destroyAllWindows()三、开运算与闭运算
OpenCV 里先腐蚀再膨胀操作叫做“开运算”。小鸊鷉(pi ti)的名片被小朋友画了几笔,尝试通过先腐蚀再膨胀修复,效果不明显,效果及实现代码如下:

import numpy as np
import cv2

def open_op(img):
    kernel = np.ones((3, 3), np.uint8)
    img1 = cv2.erode(img, kernel, iterations=1)
    img2 = cv2.dilate(img1, kernel, iterations=1)
    return img2

if __name__ == '__main__':
    img_origin = cv2.imread('bird.png', cv2.COLOR_BGR2LAB)

    img_opened = open_op(img_origin)

    img_all = np.concatenate((img_origin, img_opened), axis=1)
    cv2.imwrite('img_opened.jpeg', img_all)
    cv2.imshow('img: origin, erosion and dilation', img_all)

    cv2.waitKey(0)
    cv2.destroyAllWindows()
OpenCV 里先膨胀再腐蚀操作叫做“闭运算”。小鸊鷉(pi ti)的名片被小朋友画了几笔,尝试通过先膨胀再腐蚀修复,完成任务。效果图及代码如下:

import numpy as np
import cv2

def close_op(img):
    kernel = np.ones((3, 3), np.uint8)
    img1 = cv2.dilate(img, kernel, iterations=1)
    img2 = cv2.erode(img1, kernel, iterations=1)
    return img2

if __name__ == '__main__':
    img_origin = cv2.imread('bird.png', cv2.COLOR_BGR2LAB)

    img_opened = open_op(img_origin)

    img_all = np.concatenate((img_origin, img_opened), axis=1)
    cv2.imwrite('img_opened.jpeg', img_all)
    cv2.imshow('img: origin, erosion and dilation', img_all)

    cv2.waitKey(0)
    cv2.destroyAllWindows()
四、连通区域分析
OpenCV 里的连通区域分析可以将具有相同像素值且位置相邻的前景像素点组成的图像区域识别出来。有两种像素相邻的定义:
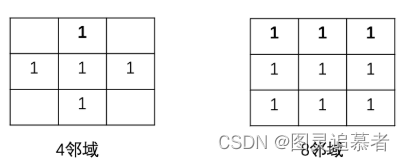
通过OpenCV的连通区域分析算法,我们可以将下图的水鸭子的外框框出来:
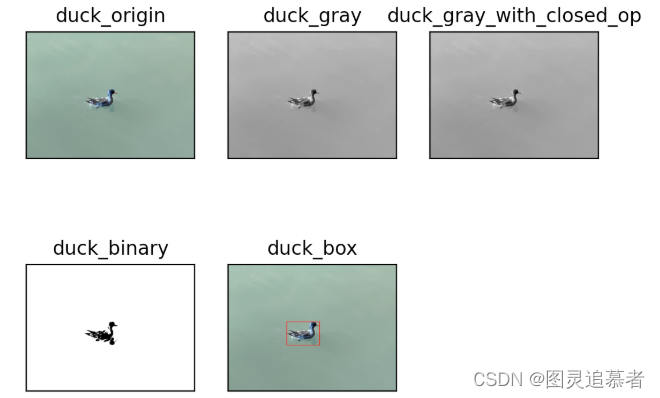
实现代码如下:
import cv2
import numpy as np
import matplotlib.pyplot as plt

def close_op(img):
    kernel = np.ones((3, 3), np.uint8)
    img1 = cv2.dilate(img, kernel, iterations=1)
    img2 = cv2.erode(img1, kernel, iterations=1)
    return img2

def show_images(images):
    i = 0
    for title in images:
        plt.subplot(2, 3, i+1), plt.imshow(images[title], 'gray')
        plt.title(title)
        plt.xticks([]), plt.yticks([])
        i += 1
    plt.show()

if __name__ == '__main__':
    duck_origin = cv2.imread('duck.jpeg', -1)

    duck_box = duck_origin.copy()
    duck_gray = cv2.cvtColor(duck_box, cv2.COLOR_BGR2GRAY)
    duck_gray_with_closed = close_op(duck_gray)
    ret, duck_binary = cv2.threshold(duck_gray_with_closed, 127, 255, cv2.THRESH_BINARY)

    ret, labels, stats, centroid = cv2.connectedComponentsWithStats(duck_binary)

    duck_area = sorted(stats, key=lambda s: s[-1], reverse=False)[-2]
    cv2.rectangle(
    duck_box,
    (duck_area[0], duck_area[1]),
    (duck_area[0] + duck_area[2], duck_area[1] + duck_area[3]),
    (255, 0, 0),
    3)

    images = {
        'duck_origin': duck_origin,
        'duck_gray': duck_gray,
        'duck_gray_with_closed_op': duck_gray_with_closed,
        'duck_binary': duck_binary,
        'duck_box': duck_box
    }
    show_images(images)
五、连通区域分析
轮廓是由连续的点组成的曲线。轮廓与边缘很相似,但轮廓是连续的,边缘不一定都连续。
轮廓反映了物体的基本外形,常用于形状分析和物体的检测和识别。
OpenCV 提供函数 cv.findContours() 对二值图像寻找轮廓,函数 cv2.drawContours() 绘制轮廓。
函数说明:
cv.findContours(image, mode, method[, contours[, hierarchy[, offset]]] ) → contours, hierarchy我们从康熙御笔书法中提取轮廓,据说这是一种经典的书画复制技法。下图从上到下分别是: * 康熙御笔原图 * 康熙御笔碑帖图 * 康熙御笔轮廓图。
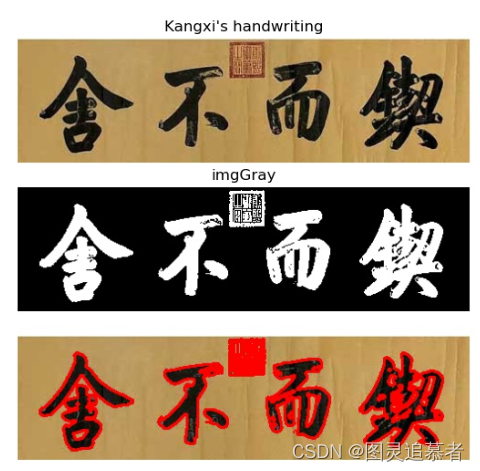
实现代码如下:
import cv2 as cv

if __name__ == '__main__':
    img = cv.imread("Contours.jpg", flags=1)
    imgGray = cv.cvtColor(img, cv.COLOR_BGR2GRAY)

    ret, thresh = cv.threshold(imgGray, 127, 255, cv.THRESH_BINARY_INV)

    image, contours, hierarchy = cv.findContours(thresh, cv.RETR_TREE, cv.CHAIN_APPROX_SIMPLE)
    contourPic = cv.drawContours(img, contours, -1, (0, 0, 255), 2)

    cv.imshow("ContourPicture", contourPic)
    cv.waitKey(0)

