前言:在上一期的线程章节中,我们的线程输出貌似有大问题,今天我们便要来学习同步锁来解决这个问题,同时再次基础上拿下键盘输入,实现操作系统的输入和输出。从今天开始我们的操作系统不在是一块“看板”了!!!
一,上期线程输出的不足
其实13 Day的线程输出并不完美,有很大的问题。但是这个问题经过我多天的观察其实有两种。
1,我们会发现有的线程输出的内容,并没有输出完成,而是被很大的一片空白取代
2,触发global exception 异常
至于为什么会导致这样子,相信聪明的小伙伴已经知道了,如果有学过并发编程相关的知识肯定会对该情况十分熟悉。
首先我们知道,屏幕输出的操作由多个指令组成,且需要操作显存,那么就会出现以下问题
- 显存作为公共空间,也就是临界区(不过多介绍),所有的线程进行输出都需要操作这块空间,就会导致线程安全问题
- 屏幕输出操作有多个指令组成,这就说明屏幕输出并不是原子性的,也就是说线程的切换可能导致另一个线程屏幕输出只执行了一半,就被别人踹下台去了,就会出现原本要输出Hello,可是只输出了Hell
那我们要怎么解决这种问题呢?没错就是关闭中断,这样操作就变成原子性的,线程无阻碍的往下执行。我们可以在原本main函数的两个线程方法while的上下加上一个 关中断与开中断,当大家再次进行输出就会发现输出正常了。
但这大家仔细想想整个while模块里面有些操作并不需要都是原子性的,我们只有某些关键操作是原子性,把整个线程的函数都进行关中断那不就变成以前的串行操作了吗?这就涉及到一个关键性问题,关中断与开中断之间的粒度,也就是JUC中经常讨论到的一点:锁的粒度,他锁定的范围越小,那么线程切换工作的效率就越高。在这里我们显然只要对输出函数进行加锁处理,那么如何让一个方法加锁请接着往下看
① 信号量
有学过操作系统大学课程的同学肯定知道信号量,其中P,V代表信号量的操作,这是一个荷兰语。P代表减少,V代表上升。那么对应锁的话就是如下几个操作:
- up:
(1) 信号量的值+1
(2) 唤醒在此信号量上等待的线程
- down:
(1)判断信号量是否>1
(2)信号量大于0,信号量-1
(3)信号量等于0,线程阻塞,在此信号量上等待
② 同步锁的实现
知道以上操作之后,我们便可以来实现一个锁了,在此之前我们还需要完善线程的两个操作:阻塞与唤醒
thread/thread.c
void thread_block(enum task_status stat) {
	ASSERT(((stat == TASK_BLOCKED) || (stat == TASK_WAITING) || (stat == TASK_HANGINH)));
	enum intr_status old_status = intr_disable();

	struct task_struct* cur_thread = running_thread();
	cur_thread->status = stat;
	schedule();
	intr_set_status(old_status);
}

void thread_unblock(struct task_struct* pthread) {
	enum intr_status old_status = intr_disable();
	ASSERT((pthread->status == TASK_BLOCKED) || (pthread->status == TASK_WAITING) || (pthread->status == TASK_HANGINH));

	if (pthread->status != TASK_READY) {
		ASSERT(!find(&thread_ready_list, &pthread->general_tag));
		if (find(&thread_ready_list, &pthread->general_tag)) {
			PANIC("thread_unblock");
		}
		push(&thread_ready_list, &pthread->general_tag);

		pthread->status = TASK_READY;
	}
	intr_set_status(old_status);
}
接下来我们来实现同步锁
/thread/sync.h
#ifndef  _THREAD_SYNC_H
#define	 _THREAD_SYNC_H
#include "list.h"
#include "stdint.h"
#include "thread.h"


struct semaphore {
	uint8_t value;        //信号量值
	struct list waiters;   //等待队列
};

struct lock {
	struct task_struct* holder;    //持有锁的线程
	struct semaphore semaphore;
	uint32_t holder_repeat_nr;    //锁重入次数
};
void lock_init(struct lock* plock);
void try_lock(struct lock* plock);
void try_release(struct lock* plock);
#endif // ! _THREAD_SYNC_H
/thread/sync.c
#include "sync.h"
#include "stdint.h"
#include "list.h"
#include "thread.h"
#include "interrupt.h"
#include "debug.h"
void sema_init(struct semaphore* psema, uint8_t value) {
	psema->value = value;
	list_init(&psema->waiters);
}

void lock_init(struct lock* plock) {
	plock->holder = NULL;
	plock->holder_repeat_nr = 0;
	sema_init(&plock->semaphore,1);
}

void sema_down(struct semaphore* psema) {
	enum intr_status old_status = intr_disable();
	while (psema->value == 0) {
		//检测当前线程是否在等待队列中,在的话则报错
		if (find(&psema->waiters, &running_thread()->general_tag)) {
			PANIC("sema_down: thread blocked has been in waiter");
		}
		append(&psema->waiters, &running_thread()->general_tag);
		thread_block(TASK_BLOCKED);
	}
	--psema->value;
	ASSERT(psema->value == 0);
	intr_set_status(old_status);
}

void sema_up(struct semaphore* psema) {
	enum intr_status old_status = intr_disable();
	//从waiter队列中唤醒第一个线程
	if (!empty(&psema->waiters)) {
		struct task_struct* thread_blocked = elem2entry(struct task_struct, general_tag, pop(&psema->waiters));
		thread_unblock(thread_blocked);
	}
	++psema->value;
	ASSERT(psema->value == 1);
	intr_set_status(old_status);
}

void try_lock(struct lock* plock) {

	if (plock->holder != running_thread()) {
		sema_down(&plock->semaphore);

		plock->holder = running_thread();
		ASSERT(plock->holder_repeat_nr == 0);
		plock->holder_repeat_nr = 1;

	}
	else {
		++plock->holder_repeat_nr;
	}
}

void try_release(struct lock* plock) {
	ASSERT(plock->holder == running_thread());

	if (plock->holder_repeat_nr > 1) {
		--plock->holder_repeat_nr;
		return;
	}

	ASSERT(plock->holder_repeat_nr == 1);
    //注意这里不允许调换sema_up的位置,如果调换位置,就会导致中断开启,但是plock->hodler还没设为空就进行线程切换了
	plock->holder = NULL;
	plock->holder_repeat_nr = 0;
	sema_up(&plock->semaphore);
}
② 实现终端输出
这样子信号量我们就完成了,接下来我们用锁来实现一个终端输出,在此之前我们先来了解了解
什么是虚拟终端。
虚拟终端(tty):为了能让更多的人同时使用计算机,必须在一个显示器下实现多个用户,为每个用户虚拟出一个显示器
原理:不同的用户使用不同显存区域,让显存分快显示,就达到了虚拟终端的效果

device/console.h
#include "stdint.h"

void console_init();
void console_acquire();
void console_release();
void console_put_str(char* str);
void console_put_char(uint8_t ch);
void console_put_int(uint32_t num);
device/console.c
#include "console.h"
#include "stdint.h"
#include "sync.h"
#include "print.h"
static struct lock console_lock;

void console_init() {
	lock_init(&console_lock);
	put_str("\nconsole init done!\n");
}

void console_acquire() {
	try_lock(&console_lock);
}

void console_release() {
	try_release(&console_lock);
}

void console_put_str(char* str) {
	console_acquire();
	put_str(str);
	console_release();
}

void console_put_char(uint8_t ch) {
	console_acquire();
	put_char(ch);
	console_release();
}

void console_put_int(uint32_t num) {
	console_acquire();
	put_int(num);
	console_release();
}
将main函数中的普通put_str,改为console_put_str,接下来修改一下makefile文件,运行结果是密密麻麻的输出字符即代表我们锁编写成功(时代太过久远,忘记截图了)
三,键盘键入的原理
1,两个芯片
键盘嘛,相信大家都见过的哈,没见过的同学我相信你也肯定看不到我的文章捏。在计算机这个系统中,键盘作为一个外部设备,他并不是完完全全独立于操作系统存在的,他的功能实现涉及到了两个功能独立的芯片
- Intel 8048(或兼容芯片):位于键盘内部,称作键盘编码器,负责监听键盘按键事件并向键盘控制器报告哪个按键按下,哪个按键弹起
- Intel 8042(或兼容芯片):位于计算机主板,称作键盘控制器,负责接受键盘编码起的按键消息,并将其解码保存,然后向中断代码发送中断,之后处理器读取8042处理过并保存的数据

当然为了知道键盘到底安乐哪个键,8042与8048之间必须保持一个协议,那就是所有按键与对应竖直组成一个类似于hash映射的键盘扫描码
2,键的编码
键的编码
一个键通常对应两个码,按下的通码与松开的断码,当你一直按着键不松开,会产生练习相同的码,当你松开的时候才会终止这个就叫做断码
键盘扫描码
键盘的扫描码有三套:scan code set 1,scan code set 2,scan code set 3,下图分别是三套扫描码的附图


 在此我们使用第一套键盘扫描码:


- 当今键盘内部芯片默认使用第二套编码,但是我们使用第一套编码,所以说8048将编码信息发送给8042的时候会进行一次转换
- 8042每次接受到一个字节的扫描码后就会向中断代理发送信号,一个按键操作至少触发两次中断(通码和断码各一次)
- 一般中断处理程序不会处理断码信息
- 当按下a键时,8048向8042发出a键的第二套扫描码0x1c,8042将其转换为第一套编码0x1e并保存到自己的缓冲区,当保存完毕后向中断代理发送中断,中断处理程序开始执行并从8042缓冲区读取0x1e,当松开后重复上述操作。
3,8042简介
8048是键盘的控制者(键盘监控,键盘设置,灯光),8042是键盘的IO接口,因此8042是8048的代理,8048通过PS/2,USB接口 与8042通信,处理器通过端口与8042通信。
8042有4个8位寄存器

- 8042作为8048的中转站,8048通过out 0x60,将自己的数据写入8042中,让自己的数据通过8042被操作系统读入
- 8042作为8048的输入缓冲区,将8048的信息暂存在8042缓冲区,操作系统通过 in 0x60读入数据

要注意一点的是,当8042缓冲区已经有数据时,就不会再次读入数据,要等到数据被中断程序读取后才会再次读入8048的数据,他是根据一个状态寄存器的第0位来判断的。
8042有3个寄存器,状态寄存器,输入缓冲区寄存器,控制寄存器,由于我们只需要用到部分功能我也就贴出图大家稍微参考一下即可


三,编写键盘驱动
#include "interrupt.h"
#include "stdint.h"
#include "keyboard.h"
#include "io.h"
#include "print.h"


#define KB_BUF_PORT 0x60

#define esc '\033'
#define backspace '\b'
#define tab '\t'
#define enter '\r'
#define delete '\177'

#define char_invisible 0
#define ctrl_l_char char_invisible
#define ctrl_r_char char_invisible
#define shift_l_char char_invisible
#define shift_r_char char_invisible
#define alt_l_char char_invisible
#define alt_r_char char_invisible
#define caps_lock_char char_invisible

#define shift_l_make 0x2a
#define shift_r_make 0x36
#define alt_l_make 0x38
#define alt_r_make 0xe038
#define alt_r_break 0xe0b8
#define ctrl_l_make 0x1d
#define ctrl_r_make 0xe01d
#define ctrl_r_break 0xe09d
#define caps_lock_make 0x3a

static bool ctrl_status, alt_status, caps_status, shift_status, ext_scancode;

char keymap[][2] = {
	/* 0x00 */	{0,	0},
	/* 0x01 */	{esc,	esc},
	/* 0x02 */	{'1',	'!'},
	/* 0x03 */	{'2',	'@'},
	/* 0x04 */	{'3',	'#'},
	/* 0x05 */	{'4',	'$'},
	/* 0x06 */	{'5',	'%'},
	/* 0x07 */	{'6',	'^'},
	/* 0x08 */	{'7',	'&'},
	/* 0x09 */	{'8',	'*'},
	/* 0x0A */	{'9',	'('},
	/* 0x0B */	{'0',	')'},
	/* 0x0C */	{'-',	'_'},
	/* 0x0D */	{'=',	'+'},
	/* 0x0E */	{backspace, backspace},
	/* 0x0F */	{tab,	tab},
	/* 0x10 */	{'q',	'Q'},
	/* 0x11 */	{'w',	'W'},
	/* 0x12 */	{'e',	'E'},
	/* 0x13 */	{'r',	'R'},
	/* 0x14 */	{'t',	'T'},
	/* 0x15 */	{'y',	'Y'},
	/* 0x16 */	{'u',	'U'},
	/* 0x17 */	{'i',	'I'},
	/* 0x18 */	{'o',	'O'},
	/* 0x19 */	{'p',	'P'},
	/* 0x1A */	{'[',	'{'},
	/* 0x1B */	{']',	'}'},
	/* 0x1C */	{enter,  enter},
	/* 0x1D */	{ctrl_l_char, ctrl_l_char},
	/* 0x1E */	{'a',	'A'},
	/* 0x1F */	{'s',	'S'},
	/* 0x20 */	{'d',	'D'},
	/* 0x21 */	{'f',	'F'},
	/* 0x22 */	{'g',	'G'},
	/* 0x23 */	{'h',	'H'},
	/* 0x24 */	{'j',	'J'},
	/* 0x25 */	{'k',	'K'},
	/* 0x26 */	{'l',	'L'},
	/* 0x27 */	{';',	':'},
	/* 0x28 */	{'\'',	'"'},
	/* 0x29 */	{'`',	'~'},
	/* 0x2A */	{shift_l_char, shift_l_char},
	/* 0x2B */	{'\\',	'|'},
	/* 0x2C */	{'z',	'Z'},
	/* 0x2D */	{'x',	'X'},
	/* 0x2E */	{'c',	'C'},
	/* 0x2F */	{'v',	'V'},
	/* 0x30 */	{'b',	'B'},
	/* 0x31 */	{'n',	'N'},
	/* 0x32 */	{'m',	'M'},
	/* 0x33 */	{',',	'<'},
	/* 0x34 */	{'.',	'>'},
	/* 0x35 */	{'/',	'?'},
	/* 0x36	*/	{shift_r_char, shift_r_char},
	/* 0x37 */	{'*',	'*'},
	/* 0x38 */	{alt_l_char, alt_l_char},
	/* 0x39 */	{' ',	' '},
	/* 0x3A */	{caps_lock_char, caps_lock_char}
};

static void intr_keyboard_handler(void) {
	bool ctrl_down_last = ctrl_status;
	bool shift_down_last = shift_status;
	bool caps_lock_last = casps_lock_status;

	bool break_code;
	uint16_t scancode = inb(KB_BUF_PORT);

	//判断是不是为多余字符,是的话马上退出处理下一个
	if (scancode == 0xe0) {
		ext_scancode = true;
		return;
	}

	//如果上次以0xee0开头,则合并通码,并去除ext_scancode标志
	if (ext_scancode) {
		scancode |= 0xe000;
		ext_scancode = false;
	}

	//获取break code
	break_code = ((scancode & 0x0080) != 0);

	//如果是断码,对ctrl和shift和alt进行状态判断
	if (break_code) {
		uint16_t make_code = (scancode &= 0xff7f);
		if (make_code == ctrl_l_make || make_code == ctrl_r_make) {
			ctrl_status = false;
		}
		else if (make_code == shift_l_make || make_code == shift_r_make) {
			shift_status = false;
		}
		else if (make_code == alt_l_char || make code == alt_r_make) {
			alt_status = false;
		}
		return;

	}
	//如果为通码
	else if ((scancode > 0x00 && scancode < 0x3b) ||
		scancode == alt_r_make || scancode == ctrl_r_make) {
		bool shift = false;

		if ((scancode < 0x0e)  || (scancode == 0x29) ||
			(scancode == 0x1a) || (scancode == 0x1b)||
			(scancode == 0x2b) || (scancode == 0x27)||
			(scancode == 0x28) || (scancode == 0x33)||
			(scancode == 0x34) || (scancode == 0x35)) {
			if (shift_down_last) {
				shift = true;
			}
		}else {
			if (shift_down_last && caps_lock_last) {
				shift = false;
			}
			else if (shift_down_last || caps_lock_last) {
				shift = true;
			}
			else {
				shift = false;
			}
		}
		uint8_t index = (scancode &= 0x00ff);

		char cur_char = keymap[index][shift];

		if (cur_char) {
			put_char(cur_char);
			return;
		}

		if (scancode == ctrl_l_make || scancode == ctrl_r_make) {
			ctrl_status = true;
		}
		else if (scancode == shift_l_make || scancode == shift_r_make) {
			shift_status = true;
		}
		else if (scancode == alt_l_char || scancode == alt_r_make) {
			alt_status = true;
		}
		else if (scancode == caps_lock_make) {
			caps_lock_status = !caps_lock_status;
		}
	} else {
		put_str("unknown key\n");
	}

}

void keyboard_init() {
	put_str("keyboard_init start\n");
	register_intr(0x21, intr_keyboard_handler, "keyboard");
	put_str("keyboard_init done\n");
}
四,环形输入缓冲区
我们知道,操作键盘通常是为了和系统交互,而和系统交互一般都是写入某些shell指令,而这些shell指令需要用一个缓冲区存入起来,当形成一个完整的命令时,再一并由其他模块处理。
① 生产者消费者模型
对于缓冲区我们要有以下几个认识:
- 缓存数据
- 公共区域,多个线程同时使用该空间,需要对存取操作进行上锁
- 数据可能存在存满和取空两种状态
线程之间要相互合作,存在资源共享问题。对此我们便使用由Dijkstra提出的生产者消费者模型

生产者消费者模型是什么,我不太想用学术的语言来介绍,我在此来举个例子:
以前去吃过KFC的同学应该都了解,吃KFC的时候是需要排队的,那么此时我们把服务员当作生产者(就当作他又做饭又服务吧),备餐口就是缓冲区,而顾客则是消费者
① 当客流量比较少时,供大于求,服务员做好一大堆汉堡放在备餐区,当餐做满时便停下来休息并告诉顾客:”新鲜的汉堡做好了,来取餐嘞“(唤醒消费者),休息的顾客听到了便来到备餐区取餐
② 当客流量中等时,供等于求,只要服务员看到备餐口有空位,马上开始忙活起来。
③ 当客流量很大时,供不应求,餐取完的时候,顾客便会在等待队列中等待,并催促服务员:“搞快点咯,肚子饿了“(唤醒生产者),摸鱼的服务员便会快马加鞭的做汉堡。
总结:对于有限大小的公共缓冲区,同步生产者和消费者的运行,对共享缓冲区互斥访问,并不会过度消费和过度生产,这便是生产者消费者模型,
以及疯狂星期四KFCV50😋
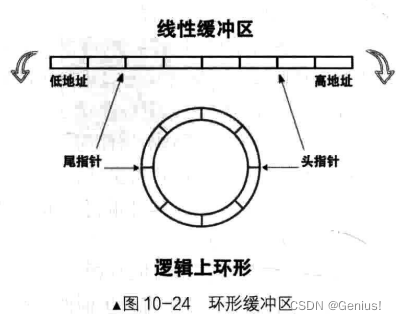
② 环形缓冲区实现
其实线形的缓冲区也是OK的,怎么设计因人而异,我这里用队列来实现一个环形缓冲区,环形缓冲区的本质就是没有起始地址,没有终止地址,很简单我们直接开始吧。
device/ioqueue.h
#ifndef  _DEVICE_IOQUEUE_H
#define  _DEVICE_IOQUEUE_H
#include "stdint.h"
#include "thread.h"
#include "sync.h"

#define bufsize 64 //一个缓冲区的大小

struct ioqueue {
	struct lock lock;
	struct task_struct* producer;
	struct task_struct* consumer;
	char buf[bufsize];
	int32_t head;	//生产是头指针移动
	int32_t tail;	//消费时尾指针移动
};

void ioqueue_init(struct ioqueue* ioq);
int32_t next_pos(int32_t pos);
bool ioq_full(struct ioqueue* ioq);
bool ioq_empty(struct ioqueue* ioq);
void ioq_wait(struct task_struct** waiter);
void ioq_wakeup(struct task_struct** waiter);
char ioq_getchar(struct ioqueue* ioq);
void ioq_setchar(struct ioqueue* ioq, char byte);
#endif // ! _DEVICE_IOQUEUE_H
device/ioqueue.c
#include "debug.h"
#include "ioqueue.h"
#include "interrupt.h"

void ioqueue_init(struct ioqueue* ioq) {
	lock_init(&ioq->lock);
	ioq->producer = ioq->consumer = NULL;
	ioq->head = ioq->tail = 0;
}

int32_t next_pos(int32_t pos) {
	return (pos + 1) % bufsize;
}

bool ioq_full(struct ioqueue* ioq) {
	ASSERT(intr_get_status() == INTR_OFF);
	return (ioq->tail - ioq->head) == 1;
}

bool ioq_empty(struct ioqueue* ioq) {
	ASSERT(intr_get_status() == INTR_OFF);
	return ioq->head == ioq->tail;
}

//使当前的生产者或消费之在缓冲区上等待
void ioq_wait(struct task_struct** waiter) {
	ASSERT(*waiter == NULL && waiter != NULL);
	*waiter == running_thread();
	thread_block(TASK_BLOCKED);
}

//唤醒生产者或消费者
void ioq_wakeup(struct task_struct** waiter) {
	ASSERT(*waiter != NULL);
	thread_unblock(*waiter);
	*waiter = NULL;
}

char ioq_getchar(struct ioqueue* ioq) {
	//先判断是否关闭中断
	ASSERT(intr_get_status() == INTR_OFF);

	//判断是否为空,如果为空消费者需要休眠等待
	while (ioq_empty(ioq)) {
		try_lock(&ioq->lock);
		ioq_wait(&ioq->consumer);
		try_release(&ioq->lock);
	}

	//获取buf中的数据
	char ch = ioq->buf[ioq->tail];
	ioq->tail = next_pos(ioq->tail);

	if (ioq->producer != NULL) {
		ioq_wakeup(&ioq->producer);
	}

	return ch;
}

void ioq_setchar(struct ioqueue* ioq, char byte) {
	//先判断是否关闭中断
	ASSERT(intr_get_status() == INTR_OFF);

	//判断是否满缓冲区,如果满了生产需要休眠等待
	while (ioq_full(ioq)) {
		try_lock(&ioq->lock);
		ioq_wait(&ioq->producer);
		try_release(&ioq->lock);
	}

	//获取buf中的数据
	ioq->buf[ioq->head]=byte;
	ioq->head = next_pos(ioq->head);

	if (ioq->consumer != NULL) {
		ioq_wakeup(&ioq->consumer);
	}

	return byte;
}
然后我们完善一下键盘操作
device/keyboard.c
struct ioqueue ioqueue;

void keyboard_init()
{
	put_str("keyboard init start\n");
	register_handler(0x21, intr_keyboard_handler);
	init_ioqueue(&ioqueue);
	put_str("keyboard init done\n");
}
void intr_keyboard_handler(void)
{
//......
        if (cur_char)
		{
			if (!ioq_full(&ioqueue))
				ioq_putchar(&ioqueue, cur_char);
			return;
		}
//......
}
接下来我们让两个内核线程变成消费者
kernel/main.c
#include "print.h"
#include "init.h"
#include "debug.h"
#include "thread.h"
#include "console.h"
#include "keyboard.h"
#include "ioqueue.h"
#include "interrupt.h"

void g_thread(void* arg);
void g_thread2(void* arg);
void main(void) {


	put_str("Hello GeniusOS\n");
	put_int(2023);
	put_str("\n");
	init_all();
	thread_start("genius", 5, g_thread, "A_");
	thread_start("genius2", 31, g_thread2, "B_");

	intr_enable();
	while (1) {
		//console_put_str("Main ");
	}
}

void g_thread(void* arg) {
	while (1) {
		enum intr_status old_status = intr_disable();
		if (!ioq_empty(&kbd_buf)) {
			console_put_str(arg);
			char byte = ioq_getchar(&kbd_buf);
			console_put_char(byte);
			console_put_char(' ');
		}
		intr_set_status(old_status);
	}
}

void g_thread2(void* arg) {
	while (1) {
		enum intr_status old_status = intr_disable();
		if (!ioq_empty(&kbd_buf)) {
			console_put_str(arg);
			char byte = ioq_getchar(&kbd_buf);
			console_put_char(byte);
			console_put_char(' ');
		}
		intr_set_status(old_status);
	}
}
改一下makefile,运行一下,当你敲下键盘,且字符在屏幕上显示,这就代表你成功了,恭喜你!!!完成本章任务!!!


