为同一个
@ApiOperation生成多份不同Swagger API文档。
0. 目录
- 1. 背景
- 2. 效果展示
- 3. 实现
- 3.1 关键逻辑 - 让接口自解释
- 3.2 关键逻辑 - 如何生成相应的ApiDescription
- 3.3 关键逻辑 - 如何为生成的ApiDescription 赋值
- 3.4 关键逻辑 - 如何动态生成Docket
- 4. 继续优化
- 5. 参考
1. 背景
正规的软件开发流程里,要求都是先做设计,再进行开发;先写文档,再写实现。只是面对现实的时候,往往都是代码先行,文档则是之后有需要再说。
这个背景下,Swagger这类根据代码生成文档的工具也就有了连绵不绝的生命力。
而同样是在实际场景里,我们往往会因为某些原因,例如"遵循业内的既有标准",亦或是"降低接口使用者的使用门槛,减少心智负担"等等,让同一个接口实现多种功能。举个具体的例子就是,对于一些发布服务,发起流程类的接口,往往都是提供同一个URL入口地址,然后通过参数的不同来进行发起不同服务或流程的操作。
但世界上没有完美的事情,Swagger默认是一个@ApiOperation生成一个对应的API文档说明,但上面所举例的"发布服务,发起流程"中又是需要通过不同的传参来进行区分,这样矛盾就产生了 —— Swagger的默认实现里无法在不进行额外说明的情况下,让使用者自行分辨出不同的服务/流程需要传递哪些参数,以及哪些参数的基本校验规则。(当然你可以强行将所有的参数放在一个参数实体类里面,然后为不同的服务/流程类型创建不同的类型作为前面参数实体类的字段,组成这样的层级结构确实也可以减缓上面这个矛盾,但相信这个实现之下,Swagger前端展示时,浏览器的滚动条一定相当深)。
以上矛盾之下,这导致对于这类接口的使用时,使用者需要消耗大量的成本在反复的沟通确认上。人员更迭或时间长久之后,同样程度的沟通又得从头开始再来一次。使用者和提供者对此都是心力憔悴。
过往我们尝试通过编写文档来缓解上面的问题,但代码和文档分离的结果就是缺乏及时性,也缺乏快速验证的途径。
本文中我们尝试大幅缓解这个问题。借助Swagger扩展,实现同一个接口下,不同的服务/流程能够生成不同的swagger文档,以期提升接口文档的及时性和可验证性,从而大幅降低沟通成本。
2. 效果展示
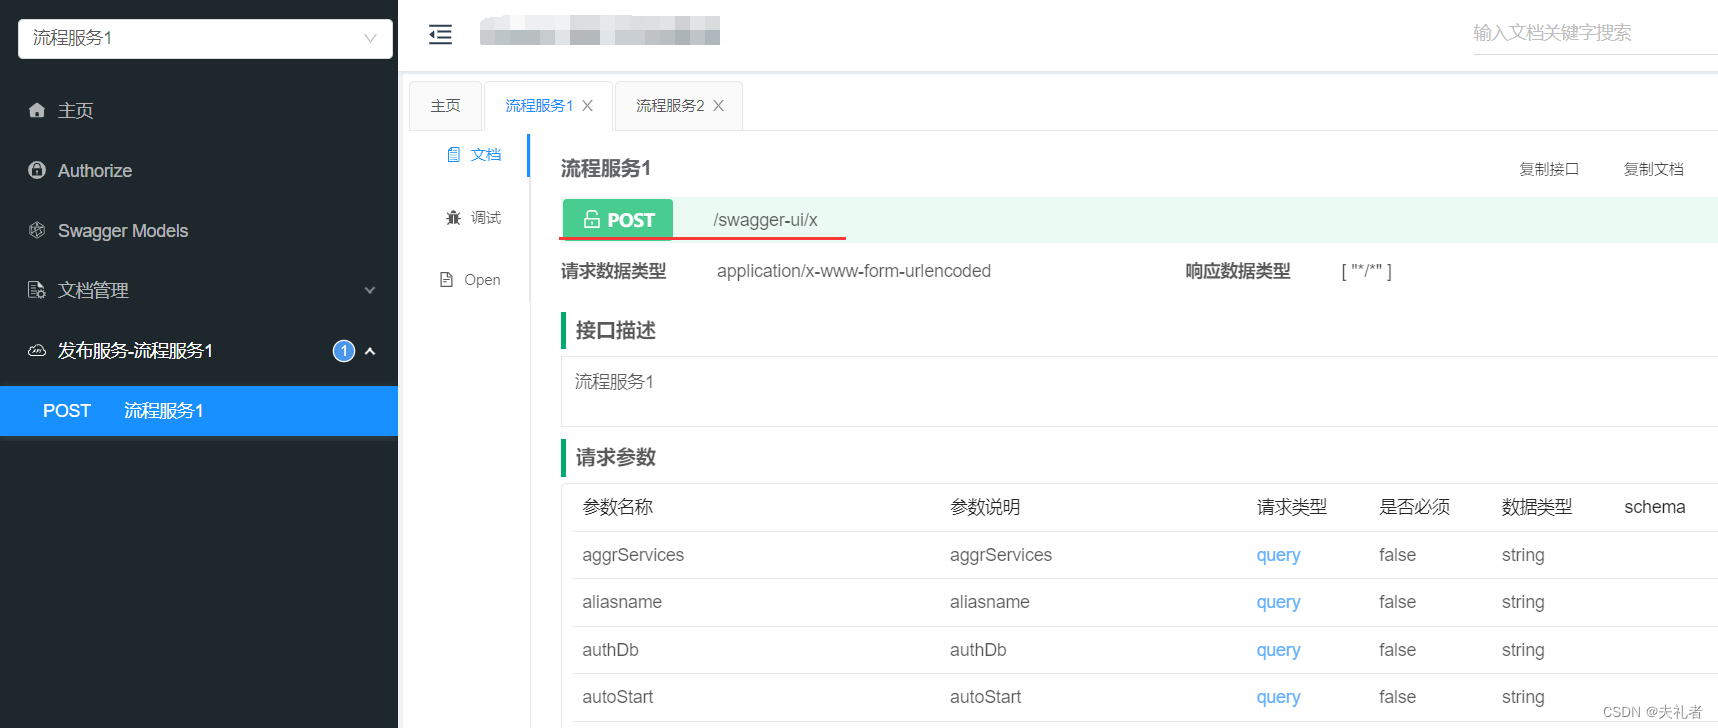
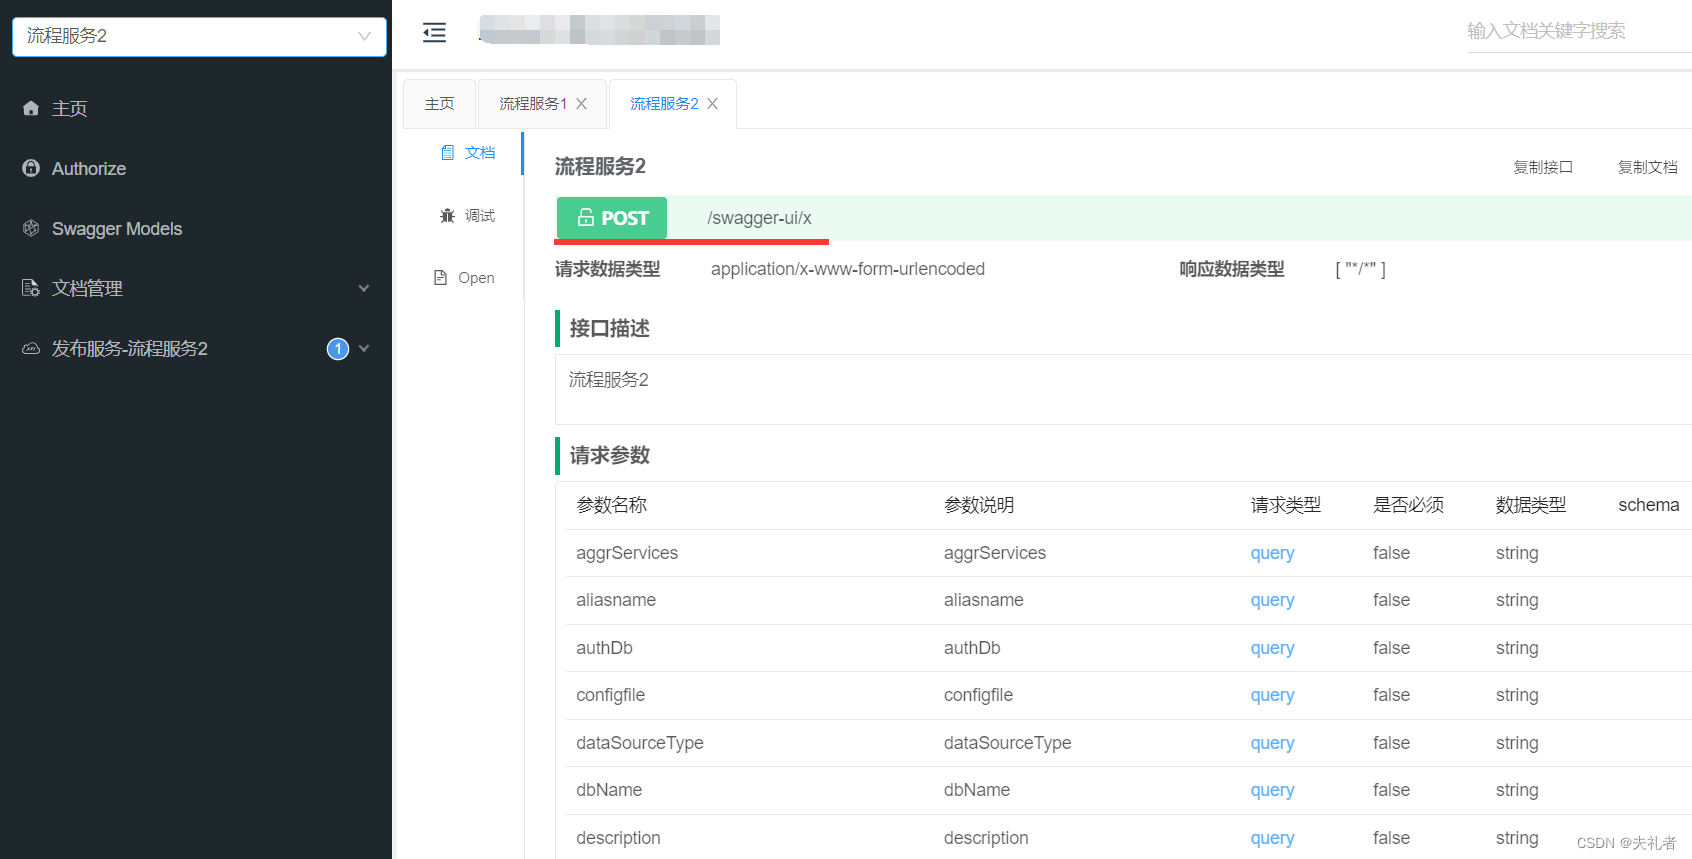
以下为同一个接口所生成的两个Swagger API文档(可以看到它们是同一个url地址, 不同的请求参数):
- 流程服务1
- 流程服务2
3. 实现
首先让我们列举下实现这个需求过程中可能遇到的一些难点,然后针对性地进行解决方案介绍。
- 如何让目标接口拥有自解释"自己这个接口需要被生成多个API文档"的能力。
- 在第一步基础上,如何生成相应的API文档所对应的Swagger内部数据结构,参与到Swagger生命周期中,最小化我们的工作量。
- 如何为第二步生成的Swagger内部数据结构赋值。注意这里的赋值分为了入参和出参的解析赋值,以及其它诸如http method等的赋值。这一部分我们放在下面专门的小节里进行介绍。
- 如何让最终生成并且填充完毕的Swagger内部数据结构在前端页面正常展示。在Swagger的 restful接口返回值(准确说是openapi返回值规范)中,接口的唯一性是由uri所实现的,但本文我们的需求里恰恰就是要求生成的多个接口文档拥有相同的uri,这个矛盾应该如何缓解?
针对以上几个问题,有以下让我们分别进行解决。
3.1 关键逻辑 - 让接口自解释
这里我们采用的是自定义注解的方式。然后通过在某个接口上标注相应个数的注解,来声明该接口需要生成相应个数的API文档,同时通过声明相应的注解属性来兼顾个性化需求和通用性处理之间的平衡。
相关代码如下:
// ============================================================ 自定义注解
// 使用Java8的"重复性注解"特性, 优化使用体验.
@Retention(RetentionPolicy.RUNTIME)
@Target(ElementType.METHOD)
@Documented
public @interface FlowTypes {
	FlowType[] value();
}

// 代表一个被支持的流程类型
@Repeatable(FlowTypes.class)
@Target({ ElementType.METHOD })
@Retention(RetentionPolicy.RUNTIME)
@Documented
public @interface FlowType {
	// 流程类型的名称
	String name();
	// 发起该流程时候, 需要传递的参数类型. 很明显, 我们建议使用自定义类型封装所有的请求参数
	Class<?> paramType();
}

// ============================================================
// 为了后面解析的方便, 这里我们还是使用了java8以前的使用方式.
// 以下就是代表该接口支持发送两类流程服务
@FlowTypes({ //
		@FlowType(name = "流程服务1", paramType = FlowServiceParams1.class), //
		@FlowType(name = "流程服务2", paramType = FlowServiceParams2.class) //
})
@ApiOperation(value="createFlowService")
@ResponseBody
@PostMapping("/createFlowService")
public Result createFlowService() {
	return new Result();
}
3.2 关键逻辑 - 如何生成相应的ApiDescription
这里我们采取的是实现Swagger提供的对外扩展接口ApiListingScannerPlugin。
直接上代码。
@Component
public class SwaggerAddApiDescriptionPlugin implements ApiListingScannerPlugin {

	private final TypeResolver typeResolver;

  /**
   * 参考 ApiDescriptionLookup.java
   */
	private Map<RequestHandler, GeneratedApis> needDealed = new HashMap<>();

	public Map<RequestHandler, GeneratedApis> getNeedDealed() {
		return Collections.unmodifiableMap(needDealed);
	}

	@Autowired
	public SwaggerAddApiDescriptionPlugin(TypeResolver typeResolver) {
		this.typeResolver = typeResolver;
	}

	@Override
	public List<ApiDescription> apply(DocumentationContext documentationContext) {
		return generateApiDesc(documentationContext);
	}

	private List<ApiDescription> generateApiDesc(final DocumentationContext documentationContext) {
		List<RequestHandler> requestHandlers = documentationContext.getRequestHandlers();
		List<ApiDescription> newArrayList = new ArrayList<>();
		requestHandlers.stream().filter(s -> s.findAnnotation(FlowTypes.class).isPresent())
				.forEach(handler -> {
					List<ApiDescription> apiDescriptions = addApiDescriptions(documentationContext, handler);
					newArrayList.addAll(apiDescriptions);
					if (!apiDescriptions.isEmpty()) {
						needDealed.put(handler, GeneratedApis.builder().ads(apiDescriptions).build());
					}
				});

		return newArrayList;
	}

	private List<ApiDescription> addApiDescriptions(DocumentationContext documentationContext,
			RequestHandler handler) {
		Optional<FlowTypes> annotation = handler.findAnnotation(FlowTypes.class);
		List<ApiDescription> apiDescriptionList = new ArrayList<>();
		if (annotation.isPresent()) {
			FlowTypes FlowTypes = annotation.get();
			String tagName = FlowTypes.name();
			// 确保归类在不同的group下, 以实现相同path的共存
			Arrays.stream(FlowTypes.value()).filter(FlowType -> FlowType.name()
					.equalsIgnoreCase(documentationContext.getGroupName()))
					.forEach(FlowType -> apiDescriptionList
							.addAll(addApiDescription(handler, documentationContext, FlowType, tagName)));
		}
		return apiDescriptionList;
	}

	private List<ApiDescription> addApiDescription(RequestHandler handler,
			DocumentationContext documentationContext,
			FlowType FlowType, String tagName) {
		RequestHandlerKey requestHandlerKey = handler.key();
		final String value = FlowType.value();
		OperationBuilder operationBuilder = new OperationBuilder(new CachingOperationNameGenerator())
				.summary(value)
				.notes(value)
				.tags(CollUtil.newHashSet(tagName + "-" + value));

		final ApiDescriptionBuilder builder = new ApiDescriptionBuilder(
				documentationContext.operationOrdering());
		builder.description(value)
				.groupName(documentationContext.getGroupName())
				.hidden(false);
		List<ApiDescription> apiDescriptionList = new ArrayList<>();
		Iterator<RequestMethod> methodIterator = requestHandlerKey.getSupportedMethods().iterator();
		Iterator<String> pathIterator = requestHandlerKey.getPathMappings().iterator();
		while (methodIterator.hasNext()) {
			List<Parameter> parameters = createParameter(FlowType,
					requestHandlerKey.getSupportedMediaTypes(), operationBuilder.build().getMethod());
			// 设置参数
			operationBuilder.parameters(parameters);
      operationBuilder.uniqueId(value + IdUtil.fastUUID());
			while (pathIterator.hasNext()) {
				// 设置请求路径
				builder.path(pathIterator.next());
				List<Operation> operations = Arrays.asList(operationBuilder.build());
				apiDescriptionList.add(builder.operations(operations).build());
			}
		}
		return apiDescriptionList;
	}


	/**
	 * 解析参数
	 * @param FlowType
	 * @param consumes
	 * @param method
	 * @return
	 */
	private List<Parameter> createParameter(FlowType FlowType,
			Set<? extends MediaType> consumes, HttpMethod method) {
		final Class<?> paramType = FlowType.dataTypeClass();
		final Map<String, Field> fieldMap = ReflectUtil.getFieldMap(paramType);
		return fieldMap.entrySet().stream().map(kv -> {
			Field field = kv.getValue();
			ApiModelProperty annotation = field.getAnnotation(ApiModelProperty.class);
			ParameterBuilder parameterBuilder = new ParameterBuilder();
			ResolvedType resolve = typeResolver.resolve(field.getType());
			return parameterBuilder.description(annotation.value())
					//参数数据类型
					.type(resolve)
					//参数名称
					.name(field.getName())
					//参数默认值
					.defaultValue(annotation.name())
					//参数类型 query、form、formdata
					.parameterType(findParameterType(resolve, consumes, method))
					.parameterAccess(annotation.access())
					//是否必填
					.required(annotation.required())
					//参数数据类型
					.modelRef(modelReference(resolve)).build();
		}).collect(Collectors.toList());
	}

	/**
	 * 设置返回值model
	 * @param type
	 * @return
	 */
	private ModelReference modelReference(ResolvedType type) {
		if (Void.class.equals(type.getErasedType()) || Void.TYPE.equals(type.getErasedType())) {
			return new ModelRef("void");
		}
		if (MultipartFile.class.isAssignableFrom(type.getErasedType())|| isListOfFiles(type)) {
			return new ModelRef("__file");
		}
		return new ModelRef(
				type.getTypeName(),
				type.getBriefDescription(),
				null,
				allowableValues(type),
				type.getBriefDescription());
	}

	private static String findParameterType(ResolvedType resolvedType,
			Set<? extends MediaType> consumes, HttpMethod method) {
		//Multi-part file trumps any other annotations
		if (isFileType(resolvedType) || isListOfFiles(resolvedType)) {
			return "form";
		} else {
			return determineScalarParameterType(consumes, method);
		}
	}

	private static String determineScalarParameterType(Set<? extends MediaType> consumes,
			HttpMethod method) {
		String parameterType = "query";
		if (consumes.contains(MediaType.APPLICATION_FORM_URLENCODED)
				&& method == HttpMethod.POST) {
			parameterType = "form";
		} else if (consumes.contains(MediaType.MULTIPART_FORM_DATA)
				&& method == HttpMethod.POST) {
			parameterType = "formData";
		}
		return parameterType;
	}

	private static boolean isListOfFiles(ResolvedType parameterType) {
		return isContainerType(parameterType) && isFileType(collectionElementType(parameterType));
	}

	private static boolean isFileType(ResolvedType parameterType) {
		return MultipartFile.class.isAssignableFrom(parameterType.getErasedType());
	}

	@Override
	public boolean supports(DocumentationType documentationType) {
		return DocumentationType.SWAGGER_2.equals(documentationType);
	}

	@Builder(toBuilder = true)
	@Data
	public static class GeneratedApis {
		List<ApiDescription> ads;
		// 来源于哪个group
		//String groupNameOfSource;
	}
3.3 关键逻辑 - 如何为生成的ApiDescription 赋值
关于这一步,细分之下,其实有三个维度:
- 诸如请求方式,请求数据类型等等。
- 请求入参。 这一步在上面的步骤二中已经完成了,不够完美,但先凑活用。
- 请求返回值。
继续上代码。解决上面三个维度中的第一和第三两个。
/**
 * <p> 搭配 {@code SwaggerAddApiDescriptionPlugin } 实现新增的 ApiDescription属性填充
 * <p> 需要确保执行时机低于 {@code DocumentationPluginsBootstrapper}
 * <p> 但{@code DocumentationPluginsBootstrapper} 这个玩意的执行时机为最低
 * <p> 所以我们转而实现 ApplicationListener<ContextRefreshedEvent>
 * @author fulizhe
 *
 */
@Component
@Order(Ordered.LOWEST_PRECEDENCE)
public class SwaggerAddAddtionApiDescriptionWithDeferPushValue implements ApplicationListener<ContextRefreshedEvent> {

	private AtomicBoolean initialized = new AtomicBoolean(false);

	private final ApiDescriptionLookup lookup;

	private final SwaggerAddApiDescriptionPlugin swaggerAddApiDescriptionPlugin;

	@Autowired
	private DocumentationCache cocumentationCache;

	public SwaggerAddAddtionApiDescriptionWithDeferPushValue(ApiDescriptionLookup lookup,
			SwaggerAddApiDescriptionPlugin swaggerAddApiDescriptionPlugin) {
		super();
		this.lookup = lookup;
		this.swaggerAddApiDescriptionPlugin = swaggerAddApiDescriptionPlugin;
	}

	void start() {
		if (initialized.compareAndSet(false, true)) {
			if (swaggerAddApiDescriptionPlugin.getNeedDealed().isEmpty()) {
				initialized.compareAndSet(true, false);
				return;
			}
			swaggerAddApiDescriptionPlugin.getNeedDealed().forEach((k, v) -> {
				if (v.ads.isEmpty()) {
					return;
				}

				ApiDescription sourceDescription = lookup.description(k);
				if (!Objects.isNull(sourceDescription)) { // 如果将 OneInterfaceMultiApiDescriptionController.createFlowService() 设置为hidden, 则这里判断失败
					List<ApiDescription> ads = v.ads;
					ApiDescription first = ads.get(0);

					// 这里所复制的就是请求方式,请求数据类型等等这些信息
					copyProperties(sourceDescription.getOperations().get(0), first.getOperations().get(0));

					// ============================== 设置返回值
					// 这里的思路是这样的:
					// 1. swagger中对于自定义类型的返回值显示采取的是 ref 引用的方式. (这一点可以随便找个swagger文档F12看一下), 同时将ref所引用的model定义放在整个接口最外层的definitions字段中
					// 2. 在上面的copyProperties(...)中我们已经复制response相关信息, 接下来我们就只需要将definitions相关信息拷贝到当前document之下就大功告成了
					Documentation matchedSourceDocumentationByGroup = matchedSourceDocumentationByGroup(
							sourceDescription);

					Documentation targetDocumentationByGroup = cocumentationCache
							.documentationByGroup(first.getGroupName().get());

					Map<String, List<ApiListing>> tartgetApiListings = targetDocumentationByGroup.getApiListings();

					String srouceGroupName = sourceDescription.getGroupName().get();
					List<ApiListing> list = matchedSourceDocumentationByGroup.getApiListings().get(srouceGroupName);

					// 确保返回值正常显示
					list.forEach(xv -> {
						tartgetApiListings.forEach((yk, yv) -> {
							yv.forEach(m -> ReflectUtil.setFieldValue(m, "models", xv.getModels()));
						});
					});
				}

			});
		}

	}

	private Documentation matchedSourceDocumentationByGroup(ApiDescription sourceDescription) {
		String srouceGroupName = sourceDescription.getGroupName().get();

		Optional<Documentation> findFirst = cocumentationCache.all().values().stream()
				.filter(v -> v.getApiListings().keySet().contains(srouceGroupName)).findFirst();

		return findFirst.get();
	}

	private void copyProperties(Operation src, Operation dest) {
		final HttpMethod method = src.getMethod();
		ReflectUtil.setFieldValue(dest, "method", method);

		final ModelReference responseModelOfSource = src.getResponseModel();
		ReflectUtil.setFieldValue(dest, "responseModel", responseModelOfSource);

		final int position = src.getPosition();
		ReflectUtil.setFieldValue(dest, "position", position);

		final Set<String> produces = src.getProduces();
		ReflectUtil.setFieldValue(dest, "produces", produces);

		final Set<String> consumes = src.getConsumes();
		ReflectUtil.setFieldValue(dest, "consumes", consumes);

		final Set<String> protocol = src.getProtocol();
		ReflectUtil.setFieldValue(dest, "protocol", protocol);

		ReflectUtil.setFieldValue(dest, "isHidden", src.isHidden());

		ReflectUtil.setFieldValue(dest, "securityReferences", src.getSecurityReferences());

		ReflectUtil.setFieldValue(dest, "responseMessages", src.getResponseMessages());

		ReflectUtil.setFieldValue(dest, "deprecated", src.getDeprecated());

		ReflectUtil.setFieldValue(dest, "vendorExtensions", src.getVendorExtensions());

		// 不拷貝以下屬性
		//	summary, notes, uniqueId, tags, parameters

		// 無效, 这个拷贝需要目标属性有setXX方法
		//	BeanUtil.copyProperties(src, dest, "parameters", "uniqueId", "summary", "notes", "tags");
	}

	@Override
	public void onApplicationEvent(ContextRefreshedEvent event) {
		start();
	}
}
3.4 关键逻辑 - 如何动态生成Docket
在Swagger内部数据类型实例填充完毕之后,就只剩下最后的一个问题:如何让最终生成并且填充完毕的Swagger内部数据结构在前端页面正常展示?
在Swagger的 restful接口返回值(准确说是openapi返回值规范)中,接口的唯一性是由uri所实现的,但本文我们的需求里恰恰就是要求生成的多个接口文档拥有相同的uri。
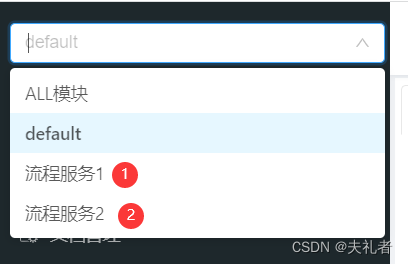
当下我们采取的让不同的流程服务出现在不同的group之下。
相关代码如下:
@Configuration
@EnableKnife4j
@EnableSwagger2WebMvc
public class SwaggerConfig {

  private DefaultListableBeanFactory context;
  private RequestMappingHandlerMapping handlerMapping;

  public SwaggerConfig(DefaultListableBeanFactory context,
      RequestMappingHandlerMapping handlerMapping) {
    this.context = context;
    this.handlerMapping = handlerMapping;
    dynamicCreate();
  }

  private void dynamicCreate() {
    // 分组
    Set<String> groupNames = getGroupName();
    // 根据分好的组,循环创建配置类并添加到容器中
    groupNames.forEach(item -> {
      Docket docket = new Docket(DocumentationType.SWAGGER_2)
          .groupName(item)
          .select()
          .apis(RequestHandlerSelectors.basePackage("cn.com.kanq.dynamic")) // 确保生成的Docket扫不到任何可以生成API文档的注解
          .paths(PathSelectors.any())
          .build();
      // 手动将配置类注入到spring bean容器中
      context.registerSingleton("dynamicDocket" + item, docket);
    });
  }

  private Set<String> getGroupName() {
    HashSet<String> set = new HashSet<>();
    Map<RequestMappingInfo, HandlerMethod> mappingHandlerMethods = handlerMapping
        .getHandlerMethods();
    for (Map.Entry<RequestMappingInfo, HandlerMethod> map : mappingHandlerMethods.entrySet()) {
      HandlerMethod method = map.getValue();
      GisServiceTypes gisServiceTypes = method.getMethod().getAnnotation(GisServiceTypes.class);
      if (null != gisServiceTypes) {
        GisServiceType[] value = gisServiceTypes.value();
        for (GisServiceType gisServiceType : value) {
          set.add(gisServiceType.name());
        }
      }
    }
    return set;
  }
}
4. 继续优化
- 关于请求参数的解析,最好复用swagger的解析。
- 让不同的服务出现在同一个页面之下。
5. 参考
- Gitee - easyopen。本文介绍的方法是基于swagger扩展实现,主要目的是站在巨人的肩膀上,最大化复用前辈们的成果。你说我从零开始写一个不就不需要这么多细节扣来扣去了,那么你可以参考下这个库。
- SWAGGER除了注解方式之外自定义添加接口,额外定义接口

