0. 前言
有人问到:“通过TouchEvent,你可以获得到当前的触点,它更新的频率和屏幕刷新的频率一样吗?”。听到这个问题的时候我感到很诧异,我们知道Android是事件驱动机制的设计,可以从多种服务中通过IPC通信获取通知,许多功能并不能混为一谈。
所以我今天想跟踪一下Input系统是怎么一个逻辑。结合多个优秀博客与源码跟踪分析,记录分享。
本文基于 Android 8.0 源码,高版本可能会有不同,仅供参考。本文的图片均来自参考博客,他们已经画的很完善了。
Window相关的知识点欢迎参考:
Android从屏幕刷新到View的绘制(一)之 Window、WindowManager和WindowManagerService之间的关系
1. InputChannel输入事件的消息通道——Socket
1.1 Window与Input输入事件的关系
我们猜想也知道,一个输入系统想要分发触摸事件,首先就要知道触摸在哪个Window上,而APP进程中与Window紧密关联的就是ViewRootImpl与WindowManagerGlobal。果然我们发现,在ViewRootImpl的setView()中有输入事件的注册,我们来看看:
//ViewRootImpl
public void setView(View view, WindowManager.LayoutParams attrs, View panelParentView) {
    //1.实例化一个InputChannel
    if ((mWindowAttributes.inputFeatures
         & WindowManager.LayoutParams.INPUT_FEATURE_NO_INPUT_CHANNEL) == 0) {
        //实例化一个InputChannel
        mInputChannel = new InputChannel();
    }
    //2.向WMS添加window,同时交出自己的InputChannel
    res = mWindowSession.addToDisplay(...,mInputChanel);//向WMS添加window
    //...
    //3.创建WindowInputEventReceiver接受Input事件
    if (mInputChannel != null) {
        if (mInputQueueCallback != null) {
            mInputQueue = new InputQueue();
            mInputQueueCallback.onInputQueueCreated(mInputQueue);
        }
        //创建了一个WindowInputEventReceiver对象,看名字就才到这是输入事件的监听者,我们着重关注它是如何监听输入事件的。
        mInputEventReceiver = new WindowInputEventReceiver(mInputChannel,
                                                           Looper.myLooper());
    }

}
正如我们分析所知,输入事件与Window是紧密联系的,我们接下来做两件事:
- 添加window的时候,为Input系统做了哪些铺垫?
- 注册了Input事件的监听者,它如何接受Input事件的?
解决第一个问题,我们先来看向WMS添加windows的方法 mWindowSession.addToDisplay(),它最终回来到WMS的addWindow():
//WindowManagerService
public int addWindow(Session session,IWindow client,...,InputChannel outInputChannel) {
    //...
    //1. 创建WindowState与Window一一对应,进行管理
    WIndowState win = new WindowState(this,session,client,...);
    //...
    //2. 开启输入通道
    final boolean openInputChannels = (outInputChannel != null
                                       && (attrs.inputFeatures & INPUT_FEATURE_NO_INPUT_CHANNEL) == 0);
    if  (openInputChannels) {
        win.openInputChannel(outInputChannel);
    }

}
接下来就进入到WindowState.openInputChannel(outInputChannel):
//WindowState
// Input channel and input window handle used by the input dispatcher.
//没错,这里的handle就是binder通信中的handle引用
final InputWindowHandle mInputWindowHandle;
InputChannel mInputChannel;
private InputChannel mClientChannel;

void openInputChannel(InputChannel outInputChannel){
    //1. 开启一个channel
    InputChannel[] inputChannels = InputChannel.openInputChannelPair(name);
    //2.返回channel引用
    //服务端的socket
    mInputChannel = inputChannels[0];
    //客户端的socket
    mClientChannel = inputChannels[1];
    //将服务端的socket引用交给客户端
    mInputWindowHandle.inputChannel = inputChannels[0];
    //3. 让WMS中的InputManager注册这个InputChannel
    mService.mInputManager.registerInputChannel(mInputChannel, mInputWindowHandle);
}
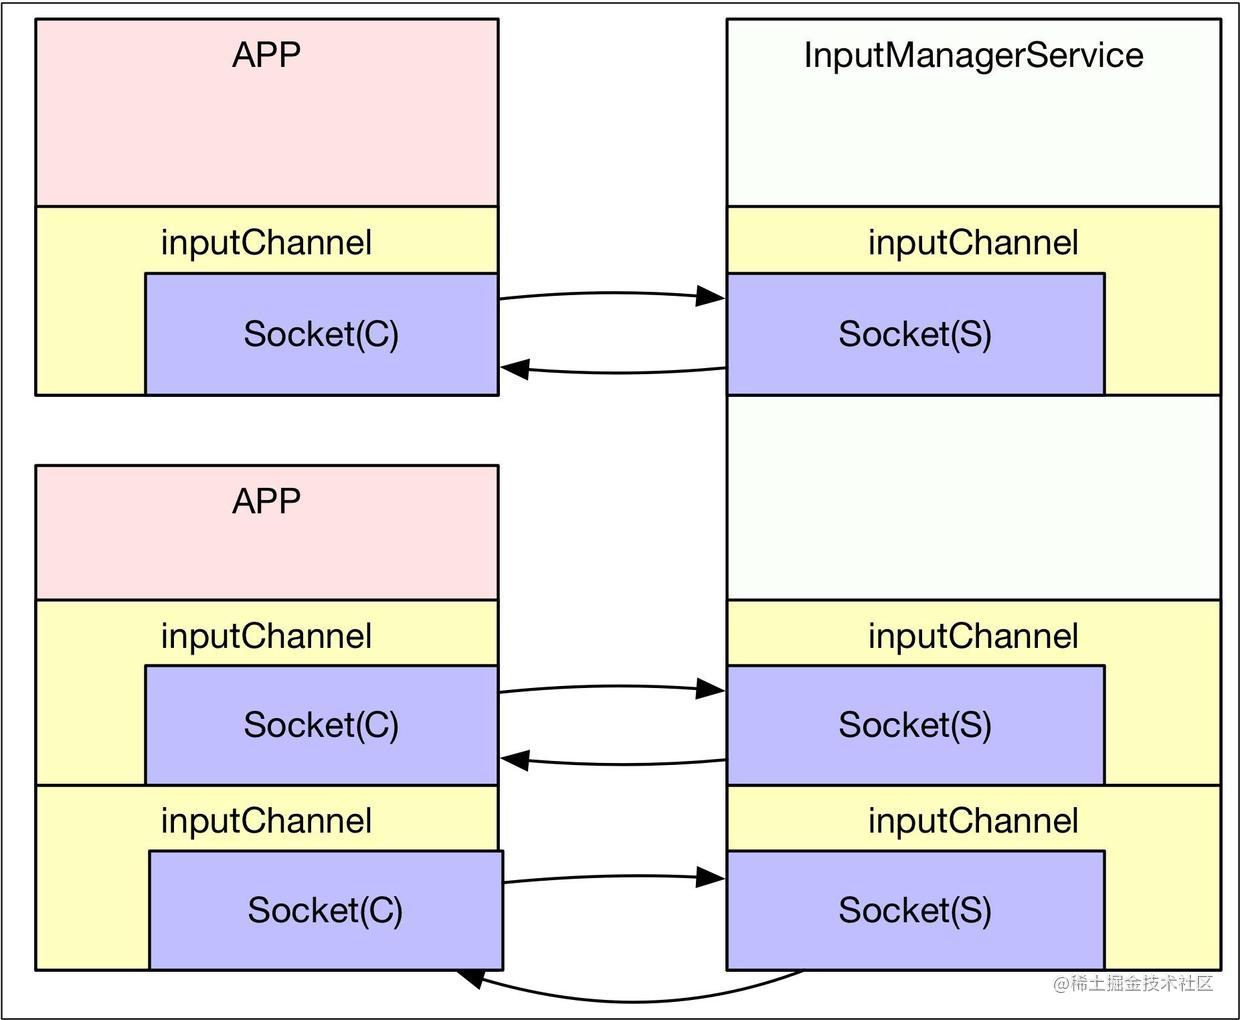
这是在WindowState类中的操作,mInputWindowHandle是对与WindowState对应的Window的handle引用,WindowState又持有WMS,可以告知WMS让IMS注册这个InputChannel输入通道。其实到这里,我们按InputChannel的名字就能猜测到,这里的IPC通信用的不是Binder,而是其他的,如管道或者socket,我们再往后看看。
InputManagerService与WMS、AMS类似的,都是系统服务,都将自己的binder引用交给了ServiceManager的svclist中。服务中相互调用方法也是常见的。这里WMS持有IMS的引用,调用了它的registerInputChannel方法。这个引用,在SystemServer启动服务,实例化WMS的时候就传入了,我们简单看一下就略过:
//SystemServer
private void startOtherServices(){
    inputManager = new InputManagerService(context);
    //这里将IMS交给了WMS
    wm = WindowManagerService.main(context, inputManager,
                                   mFactoryTestMode != FactoryTest.FACTORY_TEST_LOW_LEVEL,
                                   !mFirstBoot, mOnlyCore, new PhoneWindowManager());
    //向ServiceManager注册服务
    ServiceManager.addService(Context.WINDOW_SERVICE, wm);
    ServiceManager.addService(Context.INPUT_SERVICE, inputManager);
}

//InputManagerService
public InputManagerService(Context context) {
    this.mContext = context;
    //也是有一个looper在跑
    this.mHandler = new InputManagerHandler(DisplayThread.get().getLooper());
	//这里需要注意,看后文解释
    LocalServices.addService(InputManagerInternal.class, new LocalService());
}
LocalService这个类和ServiceManager的功能类似,可以用于注册服务与获取服务,只不过这里注册的服务不是Binder实体,只能在同一个进程中使用(不用跨进程通信,例如WMS与IMS都在SystemServer进程之下)。顾名思义,LocalService为本地服务,与远程服务的区别就是,远程服务在不同的进程,例如AMS对于APP进程来说就是远程服务,而WMS对于AMS来说就是本地服务,都在SystemServer进程之下。但它们又都开了Binder线程池,所以也同时都注册到了ServiceManager的svclist之中。这里就点到为止,本文主要目的还是探讨输入事件。
1.2 InputChannel的创建与注册
我们接下来关注两个点:
- InputChannel是如何打开的?
- 如何向InputManagerService注册这个inputChannel
先来看到InputChannel:
//InputChannel
public static InputChannel[] openInputChannelPair(String name) {
    //走了native方法
    return nativeOpenInputChannelPair(name);
}
来到native层:
//android_view_InputChannel
static jobjectArray android_view_InputChannel_nativeOpenInputChannelPair(JNIEnv* env,jclass clazz, jstring nameObj) {
    //1. 服务端channel和客户端channel
    sp<InputChannel> serverChannel;
    sp<InputChannel> clientChannel;
    //2.openInputChannelPair()来开启两个channel
    status_t result = InputChannel::openInputChannelPair(name, serverChannel, clientChannel);
	//...
    jobjectArray channelPair = env->NewObjectArray(2, gInputChannelClassInfo.clazz, NULL);
    //...
    //将两个channel放到channelPair中
    //...
    return channelPair;
}
来到InputTransport.cpp:
//InputTransport.cpp
status_t InputChannel::openInputChannelPair(const String8& name,sp<InputChannel>& outServerChannel, sp<InputChannel>& outClientChannel) {
    int sockets[2];
    //从名字就可以看出来,使用的是socket了
    if (socketpair(AF_UNIX, SOCK_SEQPACKET, 0, sockets)) {
        //error
        return result;
    }
	//2.处理两个socket
    int bufferSize = SOCKET_BUFFER_SIZE;
    setsockopt(sockets[0], SOL_SOCKET, SO_SNDBUF, &bufferSize, sizeof(bufferSize));
    setsockopt(sockets[0], SOL_SOCKET, SO_RCVBUF, &bufferSize, sizeof(bufferSize));
    setsockopt(sockets[1], SOL_SOCKET, SO_SNDBUF, &bufferSize, sizeof(bufferSize));
    setsockopt(sockets[1], SOL_SOCKET, SO_RCVBUF, &bufferSize, sizeof(bufferSize));
	//给两个socket命名,放到InputChannel之中
    String8 serverChannelName = name;
    serverChannelName.append(" (server)");
    //实例化一个InputChannel引用回传
    outServerChannel = new InputChannel(serverChannelName, sockets[0]);

    String8 clientChannelName = name;
    clientChannelName.append(" (client)");
    outClientChannel = new InputChannel(clientChannelName, sockets[1]);
    return OK;
}
跟到这里我们发现,这个InputChannel使用的是socket,构建InputChannel对象时,传入的第一个参数是name,第二个参数是fd,文件描述符。源码注释是这样解释的:InputChannel输入通道是由本地Unix的socket组成的,用于跨进程发送、接收消息。每个通道都有一个用于调试的描述性名称,也就是第一个参数name。
这下就清楚了,创建InputChannel,就是给客户端、服务端都开启了一个socket,用于进行IPC通信。换句话说,openInputChannelPair生成了两个socket的fd(文件描述符),代表一个双向通道的两端。初始化了两端的包括Native层和Java层的InputChannel对象,native层的InputChannel封装了name和fd。
解决完InputChannel是如何打开的问题后,我们来看IMS如何注册这个InputChannel的:
来到InputManagerService的registerInputChannel():
//InputManagerService
public void registerInputChannel(InputChannel inputChannel,
                                 InputWindowHandle inputWindowHandle) {
    nativeRegisterInputChannel(mPtr, inputChannel, inputWindowHandle, false);
}
private static native void nativeRegisterInputChannel(long ptr, InputChannel inputChannel,
                                                      InputWindowHandle inputWindowHandle, boolean monitor);
它调用到了native方法:
//com_android_server_input_InputManagerService.cpp
static void nativeRegisterInputChannel(JNIEnv* env, jclass /* clazz */,
        jlong ptr, jobject inputChannelObj, jobject inputWindowHandleObj, jboolean monitor) {
    //1. NativeInputManager
    NativeInputManager* im = reinterpret_cast<NativeInputManager*>(ptr);
	//2. 传入参数可以看到
    //inputChannelObj是服务端channel
    //inputWindowHandleObj是客户端channel
   	//...
    //3. 来到NativeInputManager的registerInputChannel
    status_t status = im->registerInputChannel(
            env, inputChannel, inputWindowHandle, monitor);
    //...
}
注册InputChannel输入通道的任务又交给了native层来做,来到乐NativeInputManagerService.registerInputChannel():
//com_android_server_input_InputManagerService.cpp
status_t NativeInputManager::registerInputChannel(JNIEnv* /* env */,
        const sp<InputChannel>& inputChannel,
        const sp<InputWindowHandle>& inputWindowHandle, bool monitor) {
    return mInputManager->getDispatcher()->registerInputChannel(
            inputChannel, inputWindowHandle, monitor);
}
其中mInputManager是在初始化NativeInputManager的时候初始化的:
//com_android_server_input_InputManagerService.cpp
NativeInputManager::NativeInputManager(jobject contextObj,
                                       jobject serviceObj, const sp<Looper>& looper) :
mLooper(looper), mInteractive(true) {
    JNIEnv* env = jniEnv();
	//...
    sp<EventHub> eventHub = new EventHub();
    mInputManager = new InputManager(eventHub, this, this);
}
这里的EventHub叫做事件集线器,时间总线。顾名思义可以获取到各种事件。我们后面再讨论,先来看一下mInputManager->getDispatcher()->registerInputChannel()
//InputDispatcher.cpp
status_t InputDispatcher::registerInputChannel(const sp<InputChannel>& inputChannel,
                                               const sp<InputWindowHandle>& inputWindowHandle, bool monitor) {

    // acquire lock
    AutoMutex _l(mLock);
	//1.判断,这个连接connection是否已经建立过了
    if (getConnectionIndexLocked(inputChannel) >= 0) {
        ALOGW("Attempted to register already registered input channel '%s'",
              inputChannel->getName().string());
        return BAD_VALUE;
    }
	//2. 建立连接
    sp<Connection> connection = new Connection(inputChannel, inputWindowHandle, monitor);
	//3. 服务端的socket的fd
    int fd = inputChannel->getFd();
    //将这个connection保存在mConnectionsByFd中,索引为socket的fd
    mConnectionsByFd.add(fd, connection);
	//分发器的looper中添加这个fd
    mLooper->addFd(fd, 0, ALOOPER_EVENT_INPUT, handleReceiveCallback, this);
    //唤醒looper,因为连接状态变化了
    mLooper->wake();
    return OK;
}
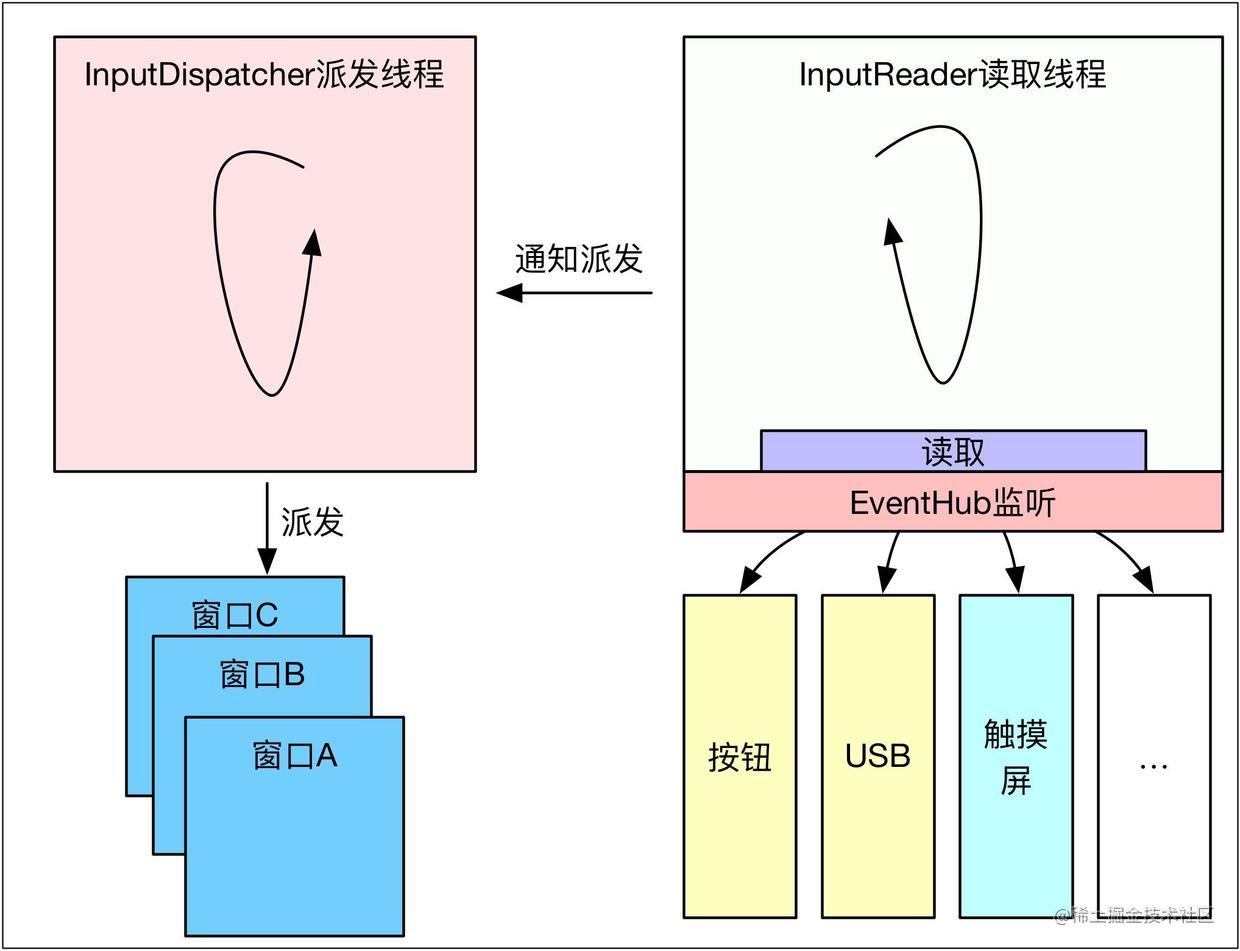
一个connection对象被创建出来,这个connection表示客户端和服务端之间的一个连接通道,用于传输数据。每个Connection都对应一个服务端的InputChannel,通过这个InputChannel的fd索引,InputDispatcher将所有的connection都保存在mConnectionsByFd中。再将这个fd注册到Looper的监控列表里,这样一旦对socket写入数据,Looper就会被唤醒,接着就会调用回调函数的handleReceiveCallback。由于一个屏幕上可能会有多个Window正在显示,所以一个Dispatcher可能会有多个Connection同时存在。
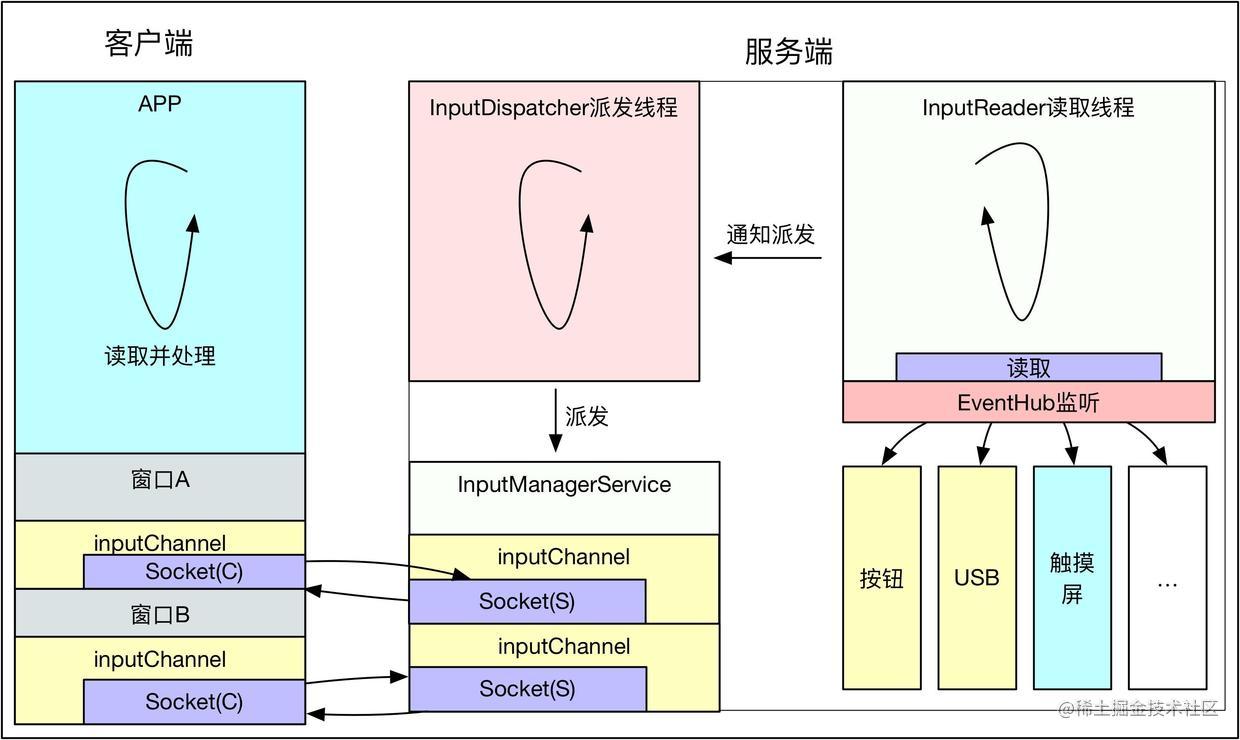
至此,InputChannel被创建出来,InputChannel两端的socket的fd分别被注册在了所在的Looper中。最后模型大致如下:
2. InputManagerService 服务端从设备中捕获输入事件并派发
我们看完了InputManagerService到APP进程的通信方式,接下来就需要探索:
- 如何捕获事件
- 如何派发事件
回到在SystemServer中启动InputManagerService的时候,我们提到了一个EventHub但是没有深入探究么?它主要利用Linux的inotify和epoll机制,监听设备事件,例如设备插拔、各种触摸、物理按钮等事件。
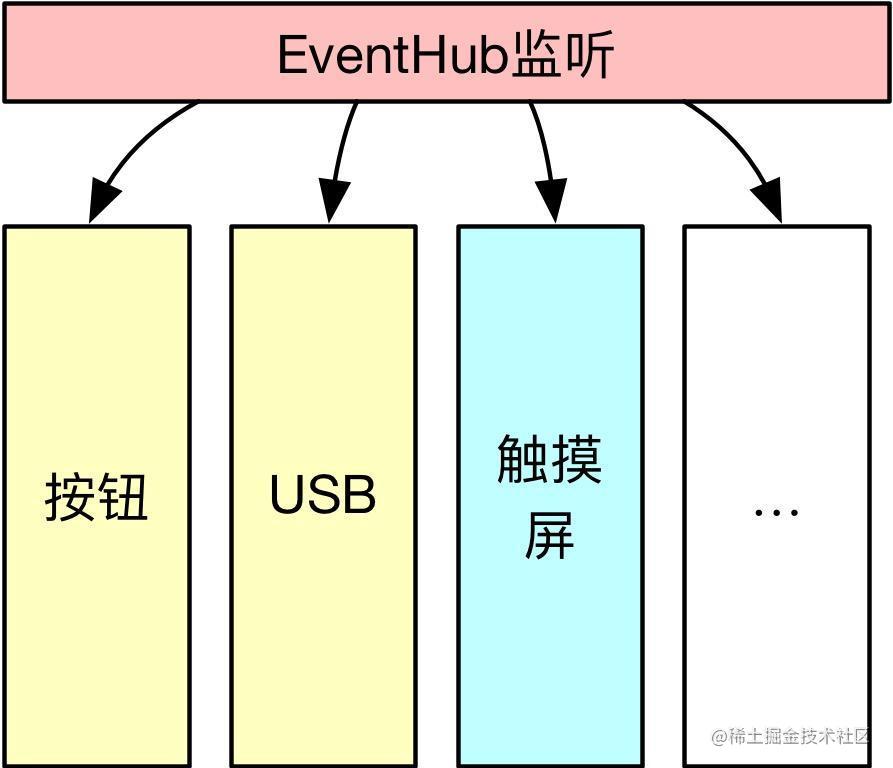
顾名思义,EventHub就是一个不同设备事件的集线器,它主要面向的是 /dev/input目录下的设备节点,比如 /dev/input/event0 上的事件就是输入事件:
//com_android_server_input_InputManagerService.cpp
NativeInputManager::NativeInputManager(jobject contextObj,
                                       jobject serviceObj, const sp<Looper>& looper) :
mLooper(looper), mInteractive(true) {
    JNIEnv* env = jniEnv();
	//...
    sp<EventHub> eventHub = new EventHub();
    mInputManager = new InputManager(eventHub, this, this);
}
初始化InputManager时,将eventHub作为参数传入:
//InputManager.cpp
InputManager::InputManager(
        const sp<EventHubInterface>& eventHub,
        const sp<InputReaderPolicyInterface>& readerPolicy,
        const sp<InputDispatcherPolicyInterface>& dispatcherPolicy) {
    //1. InputDispatcher在这里初始化的
    mDispatcher = new InputDispatcher(dispatcherPolicy);
    //2. 同时还初始化了一个InputReader,它用于事件读取!
    mReader = new InputReader(eventHub, readerPolicy, mDispatcher);
    initialize();
}

//initialize()开启了两个线程,一个接受输入的线程,一个派发线程
void InputManager::initialize() {
    mReaderThread = new InputReaderThread(mReader);
    mDispatcherThread = new InputDispatcherThread(mDispatcher);
}
源码的注释给了我们InputReaderThread和InputDispatcherThread的定义:
- InputReaderThread:用于读取并预处理原始输入事件,最后发送消息到dispatcherThread中
- InputDispatcherThread:阻塞等待新的事件到来,并异步地将他们派发给APP进程。两者之间只有单向通知,即从InputReaderThread将消息发送给InputDispatcherThread,仅此单程。
InputReader:
//InputReader.cpp
bool InputReaderThread::threadLoop() {
    //开启循环
    mReader->loopOnce();
    return true;
}

void InputReader::loopOnce() {
    //...
    //1.从eventhub中获取设备传来的输入事件
    size_t count = mEventHub->getEvents(timeoutMillis, mEventBuffer, EVENT_BUFFER_SIZE);

    if (count) {
        //2. 如果读取到了事件,处理该事件
        processEventsLocked(mEventBuffer, count);
    }

    if (inputDevicesChanged) {
        //输入域设备变化了
        mPolicy->notifyInputDevicesChanged(inputDevices);
    }
    //3. 通知派发
    mQueuedListener->flush();
}
从eventhub中读取事件是阻塞的,在eventhub.getEvents()中:
size_t EventHub::getEvents(int timeoutMillis, RawEvent* buffer, size_t bufferSize) {
	//...
    RawEvent* event = buffer;

    //1.从设备中读取数据到readBuffer[]
    //循环读取,从不同的设备device中read()数据到readBuffer[]中
    Device* device = mDevices.valueAt(deviceIndex);
    read(device->fd,readBuffer,sizeof(struct input_event)*capacity);
    //2.将readbuffer中的输入事件input_event放到buffer中,回传回去
    //for循环,从readbuffer中拿到iev,填入event,也就是返回的buffer中
    struct input_event& iev = readBuffer[i];
    event->deviceId = deviceId;
    event->type = iev.type;
    event->code = iev.code;
    event->value = iev.value;
    event += 1;
    //...
    return event-buffer;//返回count,数量。实际数据已经在buffer中了
}
这就简单了,IMS通过其InputReader阻塞地从设备中读取输入信息,并进行数据处理,然后进行事件派发。
我们知道InputReader通过EventHub阻塞从设备中读取输入信息,接下来就进行数据处理:
//InputReader.cpp
void InputReader::processEventsLocked(const RawEvent* rawEvents, size_t count) {
    //传入的是之前EventHub从设备中读来的原始输入数据,count为数据个数,因为可能有多个设备
    for (const RawEvent* rawEvent = rawEvents; count;) {
        int32_t type = rawEvent->type;
        size_t batchSize = 1;
        if (type < EventHubInterface::FIRST_SYNTHETIC_EVENT) {
            int32_t deviceId = rawEvent->deviceId;
            while (batchSize < count) {
                if (rawEvent[batchSize].type >= EventHubInterface::FIRST_SYNTHETIC_EVENT
                        || rawEvent[batchSize].deviceId != deviceId) {
                    break;
                }
                batchSize += 1;
            }
            //批处理设备信息
            processEventsForDeviceLocked(deviceId, rawEvent, batchSize);
        } else {
            //物理设备变化的处理
            switch (rawEvent->type) {
            case EventHubInterface::DEVICE_ADDED:
                addDeviceLocked(rawEvent->when, rawEvent->deviceId);
                break;
            case EventHubInterface::DEVICE_REMOVED:
                removeDeviceLocked(rawEvent->when, rawEvent->deviceId);
                break;
            case EventHubInterface::FINISHED_DEVICE_SCAN:
                handleConfigurationChangedLocked(rawEvent->when);
                break;
            default:
                ALOG_ASSERT(false); // can't happen
                break;
            }
        }
        count -= batchSize;
        rawEvent += batchSize;
    }
}
可以看到InputManager管理的不仅仅是触摸输入,各种输入设备的信息他都可以获取到。我们不细看如何处理消息的了,直接到派发消息的过程。
InputReader读取到数据之后,通过mQueuedListener(这其实是InputDispatcher对象)来唤醒InputDispatcher来派发事件。InputDispatcherThread是一个Looper线程,基于native的Looper实现了Handler消息处理模型,如果有input事件到来就被唤醒,去处理事件,处理完毕后继续睡眠放弃CPU使用权,等待唤醒。我们来看看InputDispactherThread:
//InputDispatcher.cpp
bool InputDispatcherThread::threadLoop() {
    mDispatcher->dispatchOnce();
    return true;
}


void InputDispatcher::dispatchOnce() {
    nsecs_t nextWakeupTime = LONG_LONG_MAX;
    { // acquire lock
        AutoMutex _l(mLock);
        //被唤醒,来处理Input消息
        if (!haveCommandsLocked()) {
            dispatchOnceInnerLocked(&nextWakeupTime);
        }
        //...
    } // release lock

    nsecs_t currentTime = now();
    int timeoutMillis = toMillisecondTimeoutDelay(currentTime, nextWakeupTime);
    //进入睡眠,等待input事件。
    mLooper->pollOnce(timeoutMillis);
}
InputDispatcherThread的派发逻辑在dispatchOnceInnerLocked(),里面有很多事件分支,我们关注到TYPE_MOTION,也就是触摸事件分支:
//InputDispatcher.cpp
void InputDispatcher::dispatchOnceInnerLocked(nsecs_t* nextWakeupTime) {
    switch(mPendingEvent->type){
        case EventEntry::TYPE_CONFIGURATION_CHANGED:
        case ...:
        case EventEntry::TYPE_MOTION:{
            done = dispatchMotionLocked(currentTime, typedEntry,
                &dropReason, nextWakeupTime);
            break;
        }
        //...
    }
}
通过dispatchMotionLocked()来处理触摸事件:
//InputDispatcher.cpp
bool InputDispatcher::dispatchMotionLocked(
    nsecs_t currentTime, MotionEntry* entry, DropReason* dropReason, nsecs_t* nextWakeupTime) {
   	//...
    // Identify targets.
    Vector<InputTarget> inputTargets;
    bool conflictingPointerActions = false;
    int32_t injectionResult;
    if (isPointerEvent) {
        //1. 找到目标window
        injectionResult = findTouchedWindowTargetsLocked(currentTime,
                                                         entry, inputTargets, nextWakeupTime, &conflictingPointerActions);
    } else {
        injectionResult = findFocusedWindowTargetsLocked(currentTime,
                                                         entry, inputTargets, nextWakeupTime);
    }
    setInjectionResultLocked(entry, injectionResult);
    //2. 派发事件
    dispatchEventLocked(currentTime, entry, inputTargets);
    return true;
}
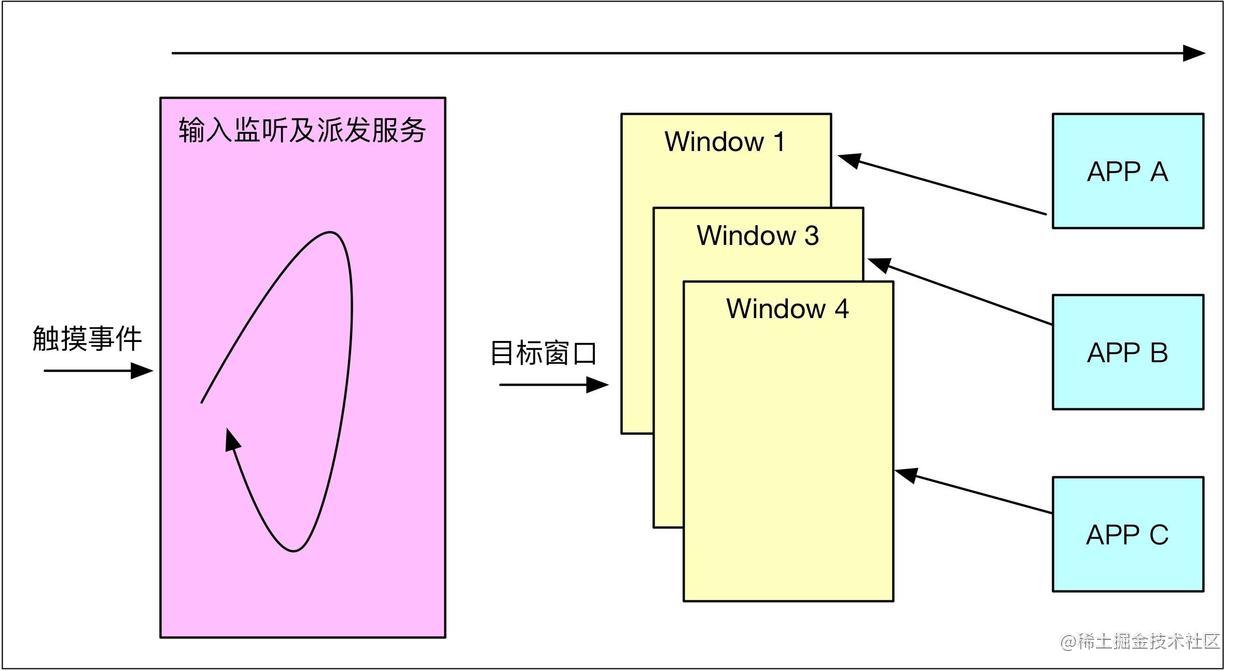
可以看到,触摸事件首先会通过 findTOuchedWindowTargetsLocked 找到目标 Window,然后再通过 dispatchEventLocked进行消息派发。这下就和WindowManangerService注册Window的功能挂钩了,可以通过判断触摸事件的位置以及窗口属性来确定将事件发送到哪个窗口Window。
我们来看到这个寻找窗口的方法findTOuchedWindowTargetsLocked():
//InputDispatcher.cpp
//如果是触摸事件,有pointer_event,进入这里派发
int32_t InputDispatcher::findTouchedWindowTargetsLocked(nsecs_t currentTime,
                                                        const MotionEntry* entry, Vector<InputTarget>& inputTargets, nsecs_t* nextWakeupTime,
                                                        bool* outConflictingPointerActions) {
    //...
    sp<InputWindowHandle> newTouchedWindowHandle;
    bool isTouchModal = false;
    // Traverse windows from front to back to find touched window and outside targets.
    //1. 遍历windows,找到目标
    size_t numWindows = mWindowHandles.size();
    for (size_t i = 0; i < numWindows; i++) {
        sp<InputWindowHandle> windowHandle = mWindowHandles.itemAt(i);
        const InputWindowInfo* windowInfo = windowHandle->getInfo();
        if (windowInfo->displayId != displayId) {
            continue; // wrong display
        }
        int32_t flags = windowInfo->layoutParamsFlags;
        if (windowInfo->visible) {
            if (! (flags & InputWindowInfo::FLAG_NOT_TOUCHABLE)) {
                isTouchModal = (flags & (InputWindowInfo::FLAG_NOT_FOCUSABLE
                                         | InputWindowInfo::FLAG_NOT_TOUCH_MODAL)) == 0;
                //2. 如果触摸的点在这个窗口上,记录一下
                if (isTouchModal || windowInfo->touchableRegionContainsPoint(x, y)) {
                    newTouchedWindowHandle = windowHandle;
                    break; // found touched window, exit window loop
                }
            }
        }
    }
}
mWindowHandles表示着所有窗口,根据点击位置与Z轴特性等进行具体确定。这个mWindowHandles是在WMS.addWindow()的时候,通过InputMonitor间接地调用InputDispatcher::setInputWindows来设置的。所以每次窗口变化,InputDispatcher都能获知最新的状态,找到窗口后,InputDispatcher::dispatchMotionLocked()最后通过dispatchEventLocked()进行了事件派发:
//InputDispatcher.cpp
void InputDispatcher::dispatchEventLocked(nsecs_t currentTime,
        EventEntry* eventEntry, const Vector<InputTarget>& inputTargets) {

    pokeUserActivityLocked(eventEntry);

    for (size_t i = 0; i < inputTargets.size(); i++) {
        const InputTarget& inputTarget = inputTargets.itemAt(i);
		//拿到InputChannel连接
        ssize_t connectionIndex = getConnectionIndexLocked(inputTarget.inputChannel);
        if (connectionIndex >= 0) {
            //Connection中包含了双方的socket的fd
            sp<Connection> connection = mConnectionsByFd.valueAt(connectionIndex);
            //进入派发
            prepareDispatchCycleLocked(currentTime, connection, eventEntry, &inputTarget);
        }
    }
}
最后,通过prepareDispatchCycleLocked()进入了消息入队处理:
//InputDispatcher.cpp
void InputDispatcher::prepareDispatchCycleLocked(nsecs_t currentTime,
        const sp<Connection>& connection, EventEntry* eventEntry, const InputTarget* inputTarget) {
	//...
    //把消息入队
    enqueueDispatchEntriesLocked(currentTime, connection, eventEntry, inputTarget);
}


void InputDispatcher::enqueueDispatchEntriesLocked(nsecs_t currentTime,
        const sp<Connection>& connection, EventEntry* eventEntry, const InputTarget* inputTarget) {
    bool wasEmpty = connection->outboundQueue.isEmpty();

    // Enqueue dispatch entries for the requested modes.
    //根据不同的情况进行入队
    enqueueDispatchEntryLocked(connection, eventEntry, inputTarget,
            InputTarget::FLAG_DISPATCH_AS_HOVER_EXIT);
    enqueueDispatchEntryLocked(connection, eventEntry, inputTarget,
            InputTarget::FLAG_DISPATCH_AS_OUTSIDE);
    enqueueDispatchEntryLocked(connection, eventEntry, inputTarget,
            InputTarget::FLAG_DISPATCH_AS_HOVER_ENTER);
    enqueueDispatchEntryLocked(connection, eventEntry, inputTarget,
            InputTarget::FLAG_DISPATCH_AS_IS);
    enqueueDispatchEntryLocked(connection, eventEntry, inputTarget,
            InputTarget::FLAG_DISPATCH_AS_SLIPPERY_EXIT);
    enqueueDispatchEntryLocked(connection, eventEntry, inputTarget,
            InputTarget::FLAG_DISPATCH_AS_SLIPPERY_ENTER);

    // If the outbound queue was previously empty, start the dispatch cycle going.
    //全部事件都入队完成后,派发任务,通知更新
    if (wasEmpty && !connection->outboundQueue.isEmpty()) {
        startDispatchCycleLocked(currentTime, connection);
    }
}
消息入队:
//InputDispatcher.cpp
void InputDispatcher::enqueueDispatchEntryLocked(
    const sp<Connection>& connection, EventEntry* eventEntry, const InputTarget* inputTarget,
    int32_t dispatchMode) {
    //1. new 一个新的派发事件
    DispatchEntry* dispatchEntry = new DispatchEntry(eventEntry, // increments ref
                                                     inputTargetFlags, inputTarget->xOffset, inputTarget->yOffset,
                                                     inputTarget->scaleFactor);
    //2.根据event的不同进行处理
    //最后入队
    connection->outboudQueue.enqueueAtTail(dispatchEntry);
}
所有消息入队之后,InputDispatcher通过startDispatchCycleLocked()启动connection的事件发送,将队列中的任务逐个发送:
//InputDispatcher.cpp
void InputDispatcher::startDispatchCycleLocked(nsecs_t currentTime,
        const sp<Connection>& connection) {
    //如果是按键:
    status = connection->inputPublisher.publishKeyEvent();
    //如果是触摸
    status = connection->inputPublisher.publishMotionEvent();
}
InputDispatcher->Connection->inputPublisher->InputChannel.sendMessage()->socket.send()
接下来就到了我们之前跟踪到的InputChannel的socket通信了。输入事件从服务端,通过socket发送给了客户端。需要注意的是,APP进程也可能会有多个Socket,因为一个Activity或者Dialog等都会拥有一个Window,而这个Window最终都会通过WMS进行注册,同时在WMS中生成一个WindowState,以及用于输入事件传递的InputChannel。一个APP进程会有多个Window,自然就会有多个InputChannel。每个InputChannel为一个Window服务。
3. 客户端Window的InputChannel接收从服务端传来的输入事件
3.1 注册输入事件的监听器
我们回顾到ViewRootImpl的setView()中,除了让WMS.addToDisplay()添加window并建立inputchannel,接着还注册了一个WindowInputEventReceiver:
//ViewRootImpl
public void setView(...){
    res = mWindowSession.addToDisplay();
    if (mInputChannel != null) {
        if (mInputQueueCallback != null) {
            mInputQueue = new InputQueue();
            mInputQueueCallback.onInputQueueCreated(mInputQueue);
        }
        //建立了一个输入事件监听器。
        mInputEventReceiver = new WindowInputEventReceiver(mInputChannel,
                                                           Looper.myLooper());
    }
}
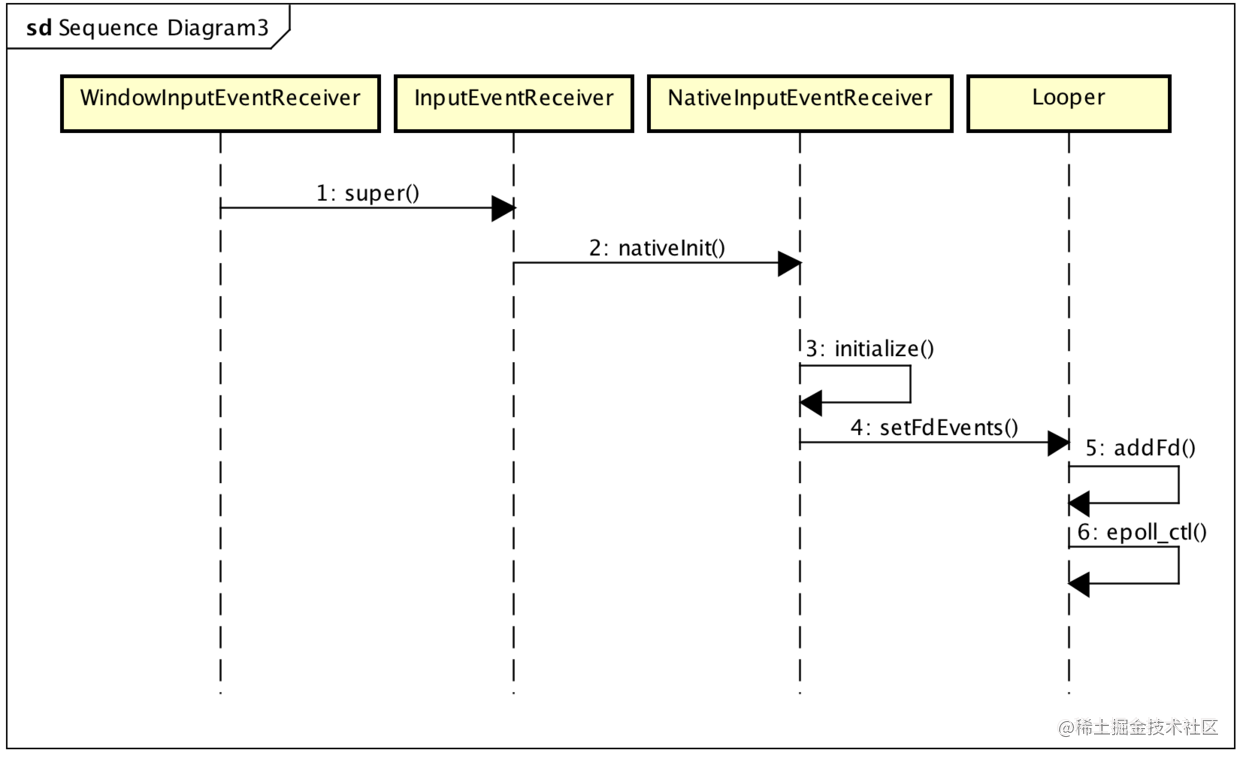
我们看到这个WindowInputEventReceiver的初始化,它的父类是InputEventReceiver:
//InputEventReceiver
public InputEventReceiver(InputChannel inputChannel, Looper looper) {
	//传入的是这个window添加时创立好的InputChannel
    mInputChannel = inputChannel;
    mMessageQueue = looper.getQueue();
    //调用了native方法
    mReceiverPtr = nativeInit(new WeakReference<InputEventReceiver>(this),
                              inputChannel, mMessageQueue);

    mCloseGuard.open("dispose");
}

private static native long nativeInit(WeakReference<InputEventReceiver> receiver,
                                      InputChannel inputChannel, MessageQueue messageQueue);
在这里,我们就可以注意到,将APP进程主线程的Looper的消息队列MessageQueue的引用往下传递了,可以猜到,后续有消息,会加入到MessageQueue中去。到了native层进行初始化:
//android_view_InputEventReceiver.cpp
static jlong nativeInit(JNIEnv* env, jclass clazz, jobject receiverWeak,jobject inputChannelObj, jobject messageQueueObj) {
    sp<NativeInputEventReceiver> receiver = new NativeInputEventReceiver(env, receiverWeak, inputChannel, messageQueue);
    //1. NativeInputEventReceiver::initialize();
    status_t status = receiver->initialize();
    return reinterpret_cast<jlong>(receiver.get());
}

status_t NativeInputEventReceiver::initialize() {
    //2. setFdEvent()
    setFdEvents(ALOOPER_EVENT_INPUT);
    return OK;
}

void NativeInputEventReceiver::setFdEvents(int events) {
    if (mFdEvents != events) {
        mFdEvents = events;
        int fd = mInputConsumer.getChannel()->getFd();
        if (events) {
            //将socket客户端的fd添加到主线程的消息池
            mMessageQueue->getLooper()->addFd(fd, 0, events, this, NULL);
        } else {
            mMessageQueue->getLooper()->removeFd(fd);
        }
    }
}
我们还记得一开始添加window的时候创建了客户端和服务端的InputChannel。他们都是在system_server进程中创建的。socket服务端fd保存到了WMS的WindowState的mInputChannel。而socket客户端fd则通过binder通信,传回给了APP进程的ViewRootImpl的mInputChannel。两端都通过格子的Looper监听对端的写操作,一旦对端写入数据,我端收到数据,马上回调响应。例如屏幕有输入,通过socket传到了APP进程,立刻将消息发送到主线程Looper,进行后续的InputEvent分发。
3.2 回调处理InputEvent
关于回调:
-
服务端socket收到客户端的消息后,回调的是inputDispatcher.handleReceiveCallback()
-
客户端socket收到服务端的消息后,回调的是NativeInputEventReceiver.handleEvent()
我们主要关注APP进程如何接受消息。首先在注册监听器的时候,native层通过mMessageQueue->getLooper()->addFd()添加了socket的fd,这部分做了什么呢?如何让looper可以接收到socket消息呢?我们看到Looper的addFd()方法,这是native层的:
//Looper.cpp
int Looper::addFd(int fd, int ident, int events, Looper_callbackFunc callback, void* data) {
    return addFd(fd, ident, events, callback ? new SimpleLooperCallback(callback) : NULL, data);
}

int Looper::addFd(int fd, int ident, int events, const sp<LooperCallback>& callback, void* data) {

    // acquire lock
    AutoMutex _l(mLock);

    Request request;
    request.fd = fd;
    request.ident = ident;
    request.events = events;
    request.seq = mNextRequestSeq++;
    request.callback = callback;
    request.data = data;
    if (mNextRequestSeq == -1) mNextRequestSeq = 0; // reserve sequence number -1

    struct epoll_event eventItem;
    request.initEventItem(&eventItem);

    //epoll机制
    int epollResult = epoll_ctl(mEpollFd, EPOLL_CTL_ADD, fd, & eventItem);
    //...
    return 1;
}
当接收到消息之后,会通过LooperCallback回调。Looper根据fd来找到对应的监听器,一个APP进程可能有多个Window,就会有多个InputEventReceiver,所以需要查找。最后调用到其handleEvent来处理对应事件:
//android_view_InputEventReceiver.cpp
int NativeInputEventReceiver::handleEvent(int receiveFd, int events, void* data) {

    if (events & ALOOPER_EVENT_INPUT) {
        JNIEnv* env = AndroidRuntime::getJNIEnv();
        //消费事件
        status_t status = consumeEvents(env, false /*consumeBatches*/, -1, NULL);
        mMessageQueue->raiseAndClearException(env, "handleReceiveCallback");
        return status == OK || status == NO_MEMORY ? 1 : 0;
    }
	//如果是输出事件
    if (events & ALOOPER_EVENT_OUTPUT) {
        //...
    }
    return 1;
}
consumeEvents()中进行消费事件,就是进一步读取事件,封装成java层的对象,传递给java层,进行相应的回调处理:
//android_view_InputEventReceiver.cpp
status_t NativeInputEventReceiver::consumeEvents(JNIEnv* env,
                                                 bool consumeBatches, nsecs_t frameTime, bool* outConsumedBatch) {
    //...
    for (;;) {
        uint32_t seq;
        InputEvent* inputEvent;
        //1. 获取事件
        status_t status = mInputConsumer.consume(&mInputEventFactory,consumeBatches, frameTime, &seq, &inputEvent, &displayId);
        //...
        //根据事件类型,包装在
        switch (inputEvent->getType()) {
            case AINPUT_EVENT_TYPE_KEY:
                //如果是按键类型:
                inputEventObj = android_view_KeyEvent_fromNative(env,static_cast<KeyEvent*>(inputEvent));
                break;
            case AINPUT_EVENT_TYPE_MOTION: {
                //如果是触摸类型
                MotionEvent* motionEvent = static_cast<MotionEvent*>(inputEvent);
                inputEventObj = android_view_MotionEvent_obtainAsCopy(env, motionEvent);
                break;
            }
                //...
        }
        //回调处理,通过反射来调用Java层的方法,进行回调
        if (inputEventObj) {
            env->CallVoidMethod(receiverObj.get(),
                                gInputEventReceiverClassInfo.dispatchInputEvent, seq, inputEventObj,
                                displayId);
            env->DeleteLocalRef(inputEventObj);
        }
    }
}
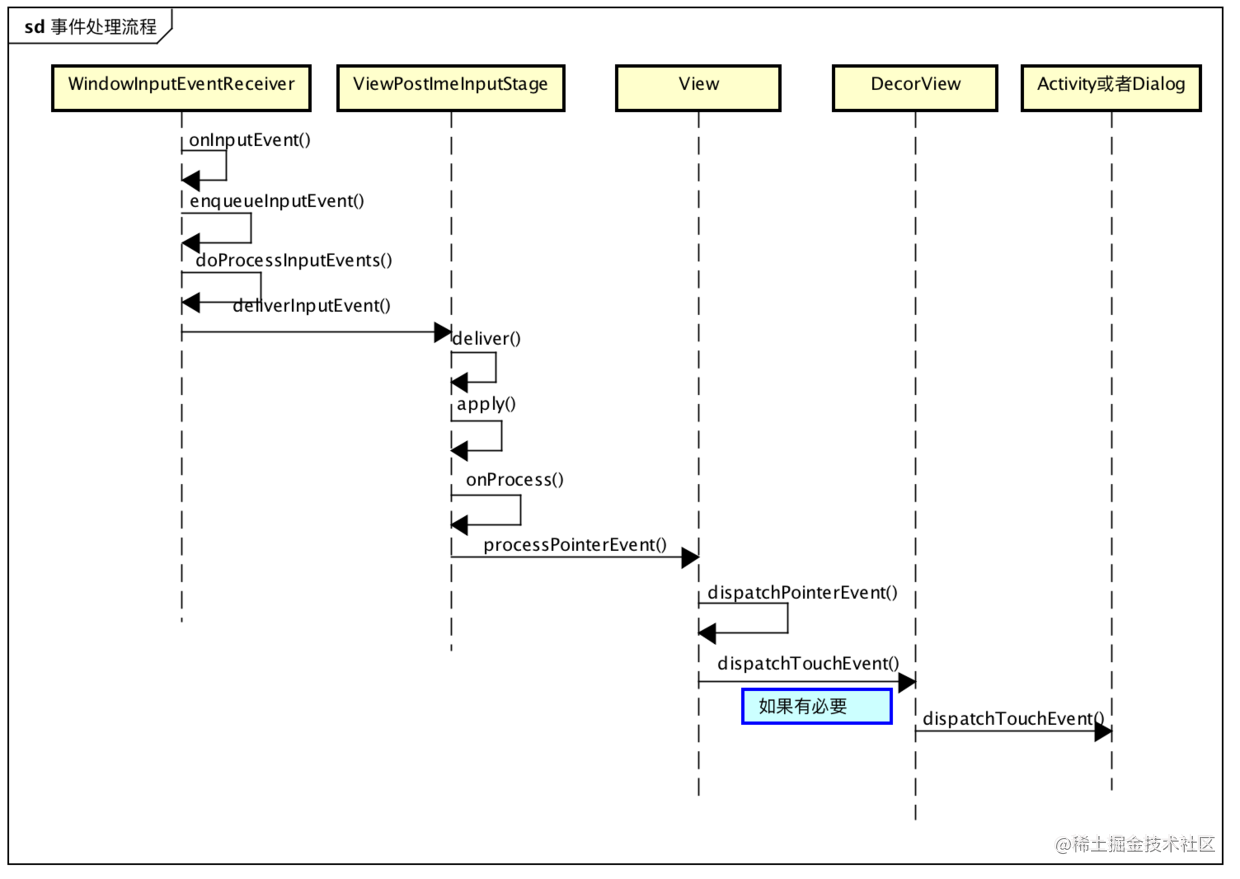
最后,触摸事件也就被封装成了InputEvent,通过反射回调到InputEventReceiver的dispatchInputEvent进行处理。最后,也就通过ViewPostImeInputState来到了View,进行触摸事件分发。
4. 总结
4.1 触摸事件分发流程
我们知道InputManagerService不仅能捕获触摸InputEvent,还可以捕获各种输入设备的事件,我们这里以触摸事件为例,梳理流程
- 点击屏幕
- InputManagerService的InputReader线程通过EventHub捕获输入事件
- 经过处理后将消息发给InputDispatcher线程
- InputDispatcher找到触摸的目标窗口,通过InputChannel的 socket将事件发送给客户端的主线程Looper
- 主线程Looper通过socket的fd,找到对应的窗口,将事件交给这个window
- 具体window处理具体事件。例如Activity中的某个Button被按下了。
4.2 Socket 与 binder 的区别
我认为有几点:
- 假设使用binder通信,一个APP进程有多个window,为每个window都开启一个binder线程进行监听,binder的内存映射空间可能很快就会到达4M,使得其他必须要binder通信的功能受到影响
- binder虽然是“一次拷贝”但还是在内核态、用户态切换了多次,binder的优势在于减少了一次数据拷贝.但触摸事件传递的数据很小,并不需要考虑对减少数据拷贝次数的优化,而且减少了切换内核态的次数,更高效。
- Socket可以实现异步通知,只需要客户端服务端各一个线程即可,是全双工,而binder是单工通信,如果要实现异步,服务端和客户端各要两个线程。如此看来,为了满足全双工异步通知,socket需要的线程明显少于binder,所以socket更为高效.
- 此外,socket基于tcp,还保证了消息的有序性、可靠性。
- 像AMS这种与APP进程就用的是binder通信,因为中间可能要通过Intent来传递parcel数据,这个数据虽然不超过1M,但相对于触摸消息来说已经非常大了,如果也用socket,将会进行两次的数据拷贝,所以它选择用binder通信,通过内存映射来完成只需要一次的”数据拷贝“
5. 参考文章
-
十分钟了解Android触摸事件原理(InputManagerService)
-
Android Input(五)-InputChannel通信
-
Android Input子系统为什么要使用socket,而不是binder?