SpringMvc+Spring+JPA+Hibernate实现的增删改查
基于SSJ
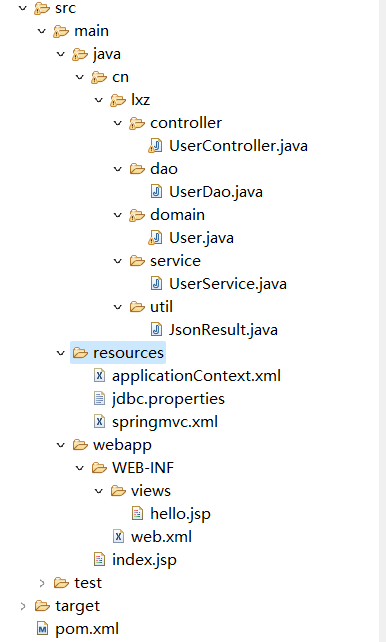
12.1目录图
完整项目目录
12.2创建步骤
1.选择目录
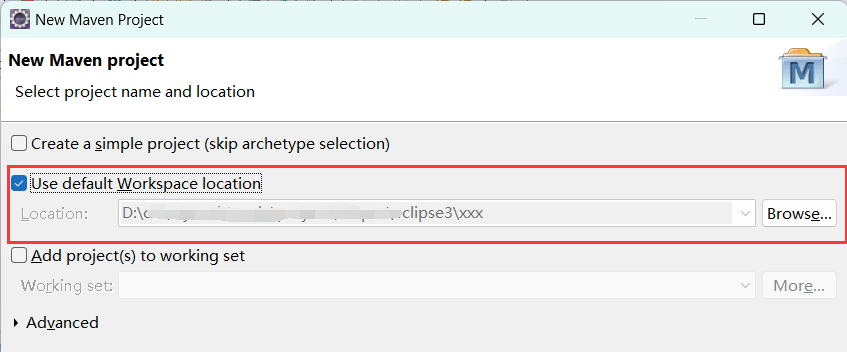
2.选择基于的包结构
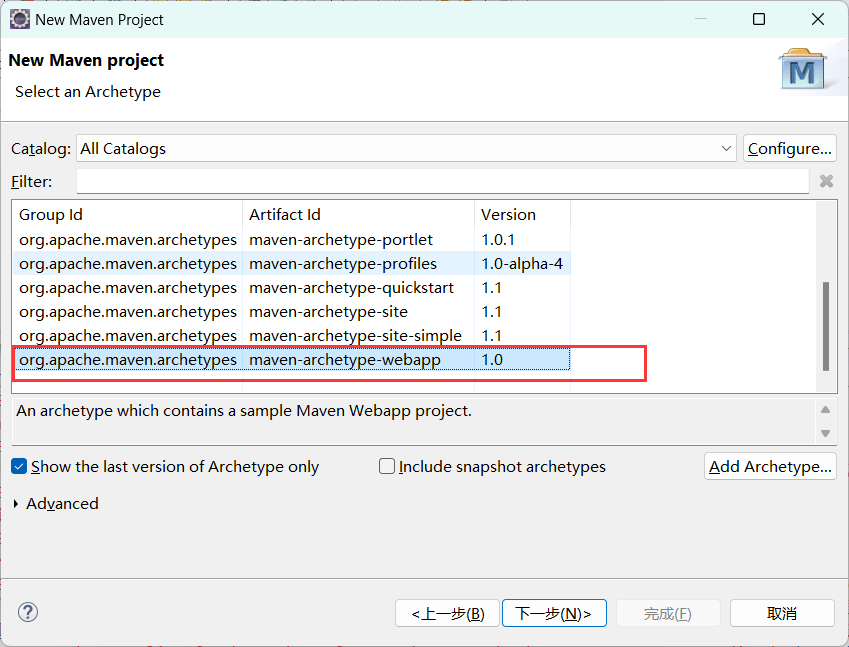
3.设置坐标。不能和已有的重复。

4.创建出来的包结构

5.自己配置tomcat,设置构建路径

下面进行依赖坐标导入。
12.3pom依赖
可以全设置5.3.24版本的spring-xxx
 <properties>
    <project.build.sourceEncoding>UTF-8</project.build.sourceEncoding>
    <maven.compiler.source>1.7</maven.compiler.source>
    <maven.compiler.target>1.7</maven.compiler.target>
  </properties>

  <dependencies>
  <!--    servlet依赖-->
    <dependency>
      <groupId>javax.servlet</groupId>
      <artifactId>servlet-api</artifactId>
      <version>2.5</version>
    </dependency>
       <!-- spring和springmvc整合包  Spring 对于web的支持 -->
    <dependency>
      <groupId>org.springframework</groupId>
      <artifactId>spring-web</artifactId>
      <version>4.2.5.RELEASE</version>
    </dependency>


    <!-- 引入SpringMvc的支持 -->
    <dependency>
      <groupId>org.springframework</groupId>
      <artifactId>spring-webmvc</artifactId>
      <version>4.2.5.RELEASE</version>
    </dependency>
    <!-- springjdbc的包-->
    <dependency>
      <groupId>org.springframework</groupId>
      <artifactId>spring-jdbc</artifactId>
      <version>4.2.5.RELEASE</version>
    </dependency>


    <!--
     Spring和ORM(JPA)整合的包
     集成ORM[对象,关系,映射]框架需要引入这个包
     -->
    <dependency>
      <groupId>org.springframework</groupId>
      <artifactId>spring-orm</artifactId>
      <version>4.2.5.RELEASE</version>
    </dependency>

    <!-- hibernate核心包 -->
    <dependency>
      <groupId>org.hibernate</groupId>
      <artifactId>hibernate-core</artifactId>
      <version>4.3.8.Final</version>
    </dependency>

    <!--hiberante对象jpa的支持包-->
    <dependency>
      <groupId>org.hibernate</groupId>
      <artifactId>hibernate-entitymanager</artifactId>
      <version>4.3.8.Final</version>
    </dependency>
    <!-- mysql数据库驱动包-->
    <dependency>
      <groupId>mysql</groupId>
      <artifactId>mysql-connector-java</artifactId>
      <version>8.0.12</version>
    </dependency>
    <!-- 连接池引入包-->
    <dependency>
      <groupId>commons-dbcp</groupId>
      <artifactId>commons-dbcp</artifactId>
      <version>1.2.2</version>
    </dependency>


    <!-- Spring测试的支持-->
    <dependency>
      <groupId>org.springframework</groupId>
      <artifactId>spring-test</artifactId>
      <version>4.2.5.RELEASE</version>
    </dependency>
    <!-- Springaop  引入Aop的织入包-->
    <dependency>
      <groupId>org.aspectj</groupId>
      <artifactId>aspectjweaver</artifactId>
      <version>1.8.9</version>
    </dependency>
    <!-- 处理json的包  返回json的格式包-->
    <dependency>
      <groupId>com.fasterxml.jackson.core</groupId>
      <artifactId>jackson-databind</artifactId>
      <version>2.6.5</version>
    </dependency>
    <!-- junit测试包-->
    <dependency>
      <groupId>junit</groupId>
      <artifactId>junit</artifactId>
      <version>4.11</version>
      <scope>test</scope>
    </dependency>
  </dependencies>
12.4配置文件搭建
本实例采用的是xml配置的方式并非Java的配置方式
- spring配置
- springmvc配置
- 数据源配置
- web.xml配置
1.配置文件目录

2.jdbc.properties配置
jdbc.driverClassName=com.mysql.cj.jdbc.Driver
jdbc.url=jdbc:mysql://localhost:3306/xxx?useUnicode=true&characterEncoding=utf-8&useSSL=false&serverTimezone=Asia/Shanghai
jdbc.username=root
jdbc.password=root
3.springmvc.xml配置
<?xml version="1.0" encoding="UTF-8"?>
<beans xmlns="http://www.springframework.org/schema/beans"
       xmlns:context="http://www.springframework.org/schema/context"
       xmlns:mvc="http://www.springframework.org/schema/mvc"
       xmlns:xsi="http://www.w3.org/2001/XMLSchema-instance"
       xsi:schemaLocation="http://www.springframework.org/schema/beans
       http://www.springframework.org/schema/beans/spring-beans.xsd
       http://www.springframework.org/schema/context
       http://www.springframework.org/schema/context/spring-context.xsd
        http://www.springframework.org/schema/mvc
       http://www.springframework.org/schema/mvc/spring-mvc.xsd">

    <!-- 扫描controller  扫包才能使用注解-->
    <context:component-scan base-package="cn.lxz.controller"></context:component-scan>
    <!-- 静态资源放行-->
    <mvc:default-servlet-handler/>
    <!-- 扫描RequestMapping-->
    <mvc:annotation-driven/>
    <!-- 视图解析器-->
    <bean id="viewResolver" class="org.springframework.web.servlet.view.InternalResourceViewResolver">
        <property name="prefix" value="/WEB-INF/views/"></property>
        <property name="suffix" value=".jsp"></property>
    </bean>
</beans>
4.applicationContext.xml配置
<?xml version="1.0" encoding="UTF-8"?>
<beans xmlns="http://www.springframework.org/schema/beans" xmlns:xsi="http://www.w3.org/2001/XMLSchema-instance"
       xmlns:context="http://www.springframework.org/schema/context"
       xmlns:tx="http://www.springframework.org/schema/tx"
       xsi:schemaLocation="http://www.springframework.org/schema/beans
http://www.springframework.org/schema/beans/spring-beans.xsd
http://www.springframework.org/schema/context
http://www.springframework.org/schema/context/spring-context.xsd
http://www.springframework.org/schema/tx
http://www.springframework.org/schema/tx/spring-tx.xsd">

    <!-- 扫描包的注解-->
    <context:component-scan base-package="cn.lxz.dao,cn.lxz.service"></context:component-scan>
    <!-- 指定位置去加载 jdbc.properties文件    classpath*  加上这一句才能找到(血的教训)   -->
    <context:property-placeholder location="classpath*:jdbc.properties"></context:property-placeholder>
    <!-- 配置连接池dataSource bean生命周期方法 销毁方法close 用来连接之后 还给链接池-->
    <bean id="dataSource" class="org.apache.commons.dbcp.BasicDataSource" destroy-method="close">
        <!--导入数据库核心包-->
        <!--导入数据库驱动-->
        <property name="driverClassName" value="${jdbc.driverClassName}"></property>
        <!--配置数据库地址-->
        <property name="url" value="${jdbc.url}"></property>
        <!--配置数据库用户名-->
        <property name="username" value="${jdbc.username}"></property>
        <!--配置数据库密码-->
        <property name="password" value="${jdbc.password}"></property>
    </bean>

    <!-- 得到EntityManagerFactory 方言 链接池-->
    <!-- 得到EntityManagerFactory-->

    <bean id="entityManagerFactory"
          class="org.springframework.orm.jpa.LocalContainerEntityManagerFactoryBean">
        <!-- 配置属性 setDataSource   数据是从数据库来的,与数据库建立连接-->
        <property name="dataSource" ref="dataSource"></property>
        <!-- 扫描实体类的配置 entity-->
        <property name="packagesToScan" value="cn.lxz.domain"></property>
        <!--
         配置一个JPA的适配器:hibernate  Adapter:适配器
         jpaVendorAdapter:JPA是用哪一个框架来实现的
         配置JPA
      -->
        <property name="jpaVendorAdapter">
            <bean class="org.springframework.orm.jpa.vendor.HibernateJpaVendorAdapter">
                <!-- 是否显示sql-->
                <property name="showSql" value="true"></property>
                <!-- 是否创建表-->
                <property name="generateDdl" value="true"></property>
                <!--数据库方言-->
                <property name="databasePlatform" value="org.hibernate.dialect.MySQLDialect"></property>
            </bean>
        </property>
    </bean>
    <!-- 准备JPA的事务管理器,事务管理器需要工厂对象的支持 -->
    <!--id名称固定 transactionManager-->
    <bean id="transactionManager" class="org.springframework.orm.jpa.JpaTransactionManager">
        <property name="entityManagerFactory" ref="entityManagerFactory"></property>
    </bean>
    <!-- 开启事务 扫描@Transaction这种注解  spring支持的注解-->
    <tx:annotation-driven/>
</beans>
12.5主包内容编写
1.主包目录
结构不存在就自己编写出来

1.实体类
@Table(name = "user")
@Entity
public class User implements Serializable {
    @Id
    @GeneratedValue(strategy = GenerationType.AUTO)
    private Integer Id;
    private String name;
    //省略get和set以及构造函数等方法
    ...
    }
2.数据访问层
@Repository
public class UserDao {
    @Autowired
    private EntityManagerFactory entityManagerFactory;
    public boolean  addUser(User user){
        try {
      EntityManager em= entityManagerFactory.createEntityManager();
        em.getTransaction().begin();
        em.persist(user);
        em.getTransaction().commit();
        em.close();
        }
        catch (Exception e){
            return false;
        }
        return true;
    }
}
3.服务类
@Service
public class UserService {
    @Autowired
    private UserDao userDao;
    public boolean  addUser(User user){
        System.out.println("addUser执行...");
        if (userDao.addUser(user)){
            return true;
        }
        else {
            return false;
        }
    }

}
4.控制器
@Controller
@RequestMapping(path = "/user")
public class UserController {

    @Autowired
    private UserService userService;
    @RequestMapping(path = "/add",method = RequestMethod.GET)
    @ResponseBody
    /**
     @RequestParam用来处理 Content-Type 为 application/x-www-form-urlencoded 编码的内容
     @RequestBody接收application/json数据类型
     multipart/form-data,例如(@RequestParam MultipartFile file)接收文件的
     前三种都是form表单,数据都携带在body中。啥都不写可以接收地址栏中的参数 ?name=张三
     */
    public JsonResult addUser(User user){
        JsonResult jsonResult=new JsonResult();
        jsonResult.setData(null);
        if (userService.addUser(user)){
            jsonResult.setCode(200);
            jsonResult.setMsg("add success");
        }else {
            jsonResult.setCode(5001);
            jsonResult.setMsg("add fail");
        }
        return jsonResult;
    }
    //返回的是jsp
    @RequestMapping(path = "/hello")
    public String hello(HttpServletRequest request ){
        request.setAttribute("name","张三");
        return "hello";
    }
}
12.6效果图
1.添加数据

2.返回视图
张三是传入进入的数据


