UOS系统搭建openVPN
- 一、环境说明
- 二、服务端配置
- 1、软件安装
- 2、创建目录用来存放生成证书中要用到的各种文件
- 3、准备证书生成相关文件
- 4 、准备生成证书用的CSR相关配置
- 5、生成CA证书
- 6、生成服务端证书
- 7、使用CA给服务端证书签名
- 8、生成DH证书
- 9、生成ta密钥
- 10、生成客户端证书,然后将它们复制到客户机上。为client1创建证书和密钥
- 11、将server端证书和密钥都统一放到/etc/openvpn/目录下,方便管理和配
- 12、主配文件:/etc/openvpn/server.conf
- 13、启动openvpn服务器
- 14、检查服务与查看虚拟接口
- 三、客户端配置
- 1、安装openvpn
- 2、服务器端证书与秘钥拷贝到本机
- 3、在设置里创建vpn连接,根据实际情况更改网关(服务器ip),证书位置以及私钥密码
- 4、第二种方法
- 1)创建配置文件client.conf
- 2)执行查看
- 四、报错以及解决方案
- 1、openvpn客户端连接失败,服务端服务报错
- 2、openvpn@server.service启动报错
- 3、客户端连接断开,连接VPN失败,原因未知
- 4、客户端使用图形化连接无反应,或者如下连接失败报错
一、环境说明
| IP地址 | 说明 |
|---|---|
| 10.200.152.67 | 服务端 |
| 10.200.152.68 | 客户端 |
测试环境保证时间的同步,不然会存在客户端拨号报错情况
二、服务端配置
1、软件安装
sudo apt install openvpn easy-rsa -y
说明:easy-rsa主要用来给OpenVPN Server启动要用到的相关证书的生成
2、创建目录用来存放生成证书中要用到的各种文件
mkdir /etc/openvpn/easy-rsa
3、准备证书生成相关文件
cp -ra /usr/share/easy-rsa/* /etc/openvpn/easy-rsa/
4 、准备生成证书用的CSR相关配置
创建/etc/openvpn/easy-rsa/vars配置文件
cat <<EOF > /etc/openvpn/easy-rsa/vars
set_var EASYRSA_REQ_COUNTRY "CN"
set_vEASYRSA_REQ_PROVINCE "BeiJing"
set_var EASYRSA_REQ_CITY "Bei Jing"
set_var EASYRSA_REQ_ORG "TEST Co"
set_var EASYRSA_REQ_EMAIL "it@test.com"
set_var EASYRSA_REQ_OU "Test Organizational Unit"
#证书有效期
set_var EASYRSA_CA_EXPIRE 3650
set_var EASYRSA_CERT_EXPIRE 3650
EOF
5、生成CA证书
cd /etc/openvpn/easy-rsa/
./easyrsa init-pki

Note: using Easy-RSA configuration from: /etc/openvpn/easy-rsa/vars
init-pki complete; you may now create a CA or requests.
Your newly created PKI dir is: /etc/openvpn/easy-rsa/pki
./easyrsa build-ca

Note: using Easy-RSA configuration from: /etc/openvpn/easy-rsa/vars
Using SSL: openssl OpenSSL 1.0.2k-fips 26 Jan 2017
Enter New CA Key Passphrase: 需要设置一个密码,我这里设为"123456"
Re-Enter New CA Key Passphrase:
Generating RSA private key, 2048 bit long modulus
……………………………+++
……………………………….+++
e is 65537 (0x10001)
You are about to be asked to enter information that will be incorporated
into your certificate request.
What you are about to enter is what is called a Distinguished Name or a DN.
There are quite a few fields but you can leave some blank
For some fields there will be a default value,
If you enter '.', the field will be left blank.
- - - - -
Common Name (eg: your user, host, or server name) [Easy-RSA CA]: 输入"CN"后直接回车
CA creation complete and you may now import and sign cert requests.
Your new CA certificate file for publishing is at:
/etc/openvpn/easy-rsa/pki/ca.crt
6、生成服务端证书
./easyrsa gen-req server nopass

Note: using Easy-RSA configuration from: /etc/openvpn/easy-rsa/vars
Using SSL: openssl OpenSSL 1.0.2k-fips 26 Jan 2017
Generating a 2048 bit RSA private key
.……………………………………………………….+++
.+++
writing new private key to '/etc/openvpn/easy-rsa/pki/easy-rsa-982.cJcd0X/tmp.RiZw8A'
-——
You are about to be asked to enter information that will be incorporated
into your certificate request.
What you are about to enter is what is called a Distinguished Name or a DN.
There are quite a few fields but you can leave some blank
For some fields there will be a default value,
If you enter '.', the field will be left blank.
-——
Common Name (eg: your user, host, or server name) [server]: 输入"CN",直接回车
Keypair and certificate request completed. Your files are:
req: /etc/openvpn/easy-rsa/pki/reqs/server.req
key: /etc/openvpn/easy-rsa/pki/private/server.key
7、使用CA给服务端证书签名
./easyrsa sign server server


Note: using Easy-RSA configuration from: /etc/openvpn/easy-rsa/vars
Using SSL: openssl OpenSSL 1.0.2k-fips 26 Jan 2017
You are about to sign the following certificate.
Please check over the details shown below for accuracy. Note that this request
has not been cryptographically verified. Please be sure it came from a trusted
source or that you have verified the request checksum with the sender.
Request subject, to be signed as a server certificate for 3650 days:
subject=
commonName = CN
Type the word 'yes' to continue, or any other input to abort.
Confirm request details: yes,这里输入yes
Using configuration from /etc/openvpn/easy-rsa/pki/easy-rsa-1033.vfaQKy/tmp.CHstGn
Enter pass phrase for /etc/openvpn/easy-rsa/pki/private/ca.key: 这里输入步骤4中设置的密码"123456"
Check that the request matches the signature
Signature ok
The Subject's Distinguished Name is as follows
commonName :ASN.1 12:'CN'
Certificate is to be certified until Aug 17 08:36:18 2031 GMT (3650 days)
Write out database with 1 new entries
Data Base Updated
Certificate created at: /etc/openvpn/easy-rsa/pki/issued/server.crt
8、生成DH证书
./easyrsa gen-dh

Note: using Easy-RSA configuration from: /etc/openvpn/easy-rsa/vars
Using SSL: openssl OpenSSL 1.0.2k-fips 26 Jan 2017
Generating DH parameters, 2048 bit long safe prime, generator 2
This is going to take a long time
…………………………………………………………………………………………….++++
DH parameters of size 2048 created at /etc/openvpn/easy-rsa/pki/dh.pem
9、生成ta密钥
openvpn --genkey --secret /etc/openvpn/ta.key #输入配置的密码
10、生成客户端证书,然后将它们复制到客户机上。为client1创建证书和密钥
./easyrsa build-client-full client1
11、将server端证书和密钥都统一放到/etc/openvpn/目录下,方便管理和配
cp /etc/openvpn/easy-rsa/pki/ca.crt /etc/openvpn/
cp /etc/openvpn/easy-rsa/pki/private/server.key /etc/openvpn/
cp /etc/openvpn/easy-rsa/pki/issued/server.crt /etc/openvpn/
cp /etc/openvpn/easy-rsa/pki/dh.pem /etc/openvpn/
12、主配文件:/etc/openvpn/server.conf
cd /etc/openvpn/
cp /usr/share/doc/openvpn/examples/sample-config-files/server.conf.gz ./
gunzip server.conf.gz
vim server.conf
打开如下注释:
topology subnet
push “redirect-gateway def1 bypass-dhcp”
push “dhcp-option DNS 208.67.222.222”
push “dhcp-option DNS 208.67.220.220”
tls-auth ta.key 0
user nobody
group nogroup
client-to-client
修改如下信息:
修改前:
dh dh2048.pem
cipher AES-256-CBC
修改后:
dh dh.pem
cipher BF-CBC
注释如下信息:
;tls-auth ta.key 0
备注:server 10.8.0.0 255.255.255.0可根据需求填写,这里使用默认
13、启动openvpn服务器
    systemctl start openvpn@server.service
    systemctl enable openvpn@server.service
    或者
    cd /etc/openvpn
    sudo openvpn --config server.conf
14、检查服务与查看虚拟接口
    netstat -lntup |grep openvpn
    udp        0      0 0.0.0.0:1194         0.0.0.0:*      24443/openvpn
    ifconfig
    可以看到一个tun0网络接口,IP地址是10.8.0.1

三、客户端配置
1、安装openvpn
apt install openvpn -y
2、服务器端证书与秘钥拷贝到本机
    客户端操作:
    scp 10.200.152.67:/etc/openvpn/easy-rsa/pki/ca.crt  /etc/openvpn
    scp 10.200.152.67:/etc/openvpn/easy-rsa/pki/private/client1.key  /etc/openvpn
    scp 10.200.152.67:/etc/openvpn/easy-rsa/pki/issued/client1.crt  /etc/openvpn
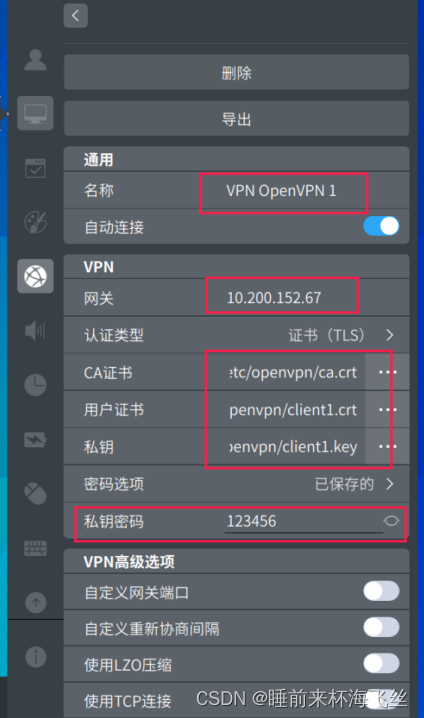
3、在设置里创建vpn连接,根据实际情况更改网关(服务器ip),证书位置以及私钥密码
4、第二种方法
1)创建配置文件client.conf
vi /etc/openvpn/client.conf
client
dev tun
proto udp
remote 10.200.152.67 1194 #根据实际情况改为服务器的ip地址
ca ca.crt
cert client1.crt
key client1.key
user nobody
group nogroup
verb 3
##终端运行测试
cd /etc/openvpn
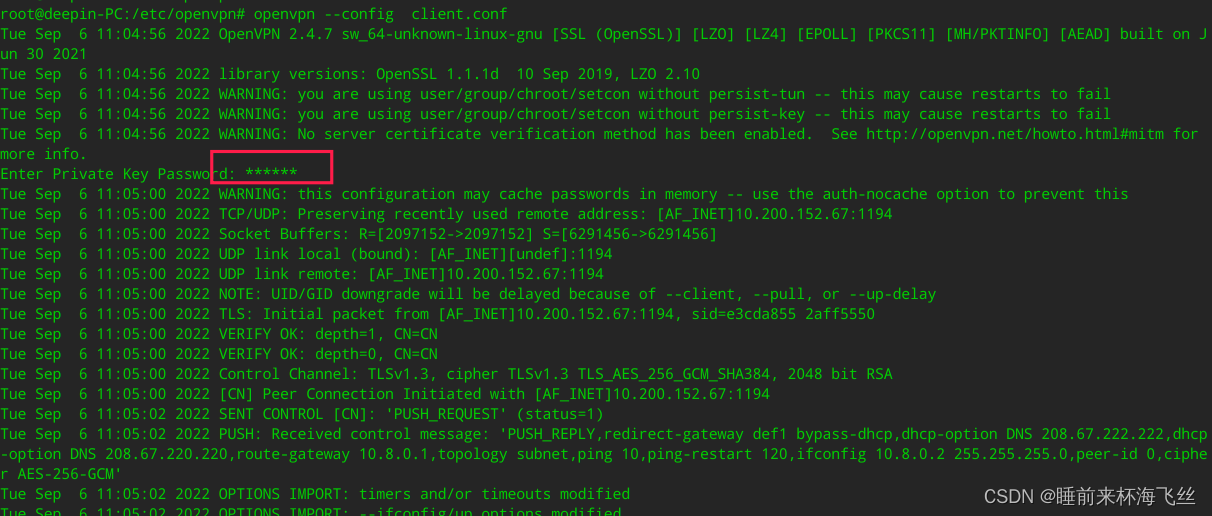
openvpn --config client.conf
备注:执行该命令的窗口不能关闭,可以在后台执行(至少openvpn进程不能结束)
输出“Initialization Sequence Completed”字样,说明OpenVPN成功连接
 ##后台运行测试
  echo 123456 |tee  /etc/openvpn/passwd
  openvpn --config /etc/openvpn/client.conf --cd /etc/openvpn --daemon --askpass /etc/openvpn/passwd
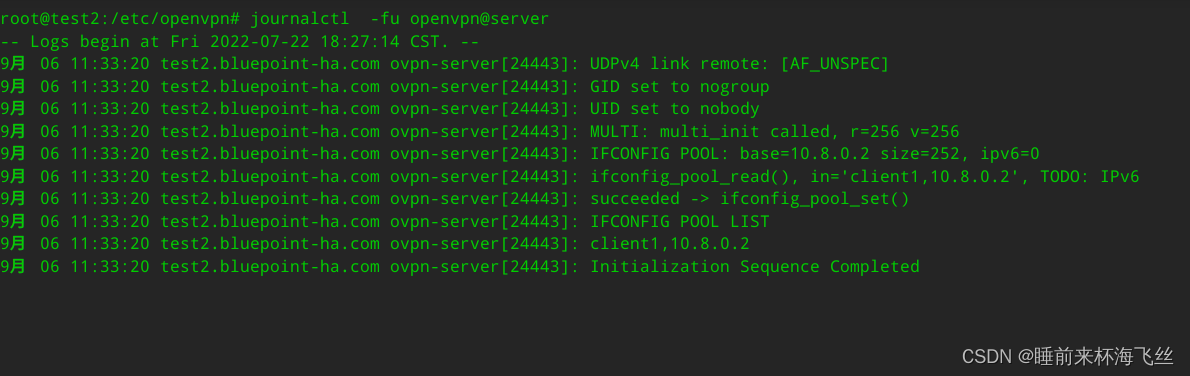
拨号成功服务端日志参考

2)执行查看
# ifconfig
##可以看到一个tun0网络接口,IP地址是10.8.0.x, ping 10.8.0.1 ping通ssh可以连接,测试openvpn连接成功

四、报错以及解决方案
1、openvpn客户端连接失败,服务端服务报错
journalctl -fu openvpn@server.service
…
WARNING: ‘link-mtu’ is used inconsistently, local='link-mtu 1557, remote='link-mtu 1541
WARNING: ‘tun-mtu’ is used inconsistently, local=‘tun-mtu 1400’, remote=‘tun-mtu 1500’
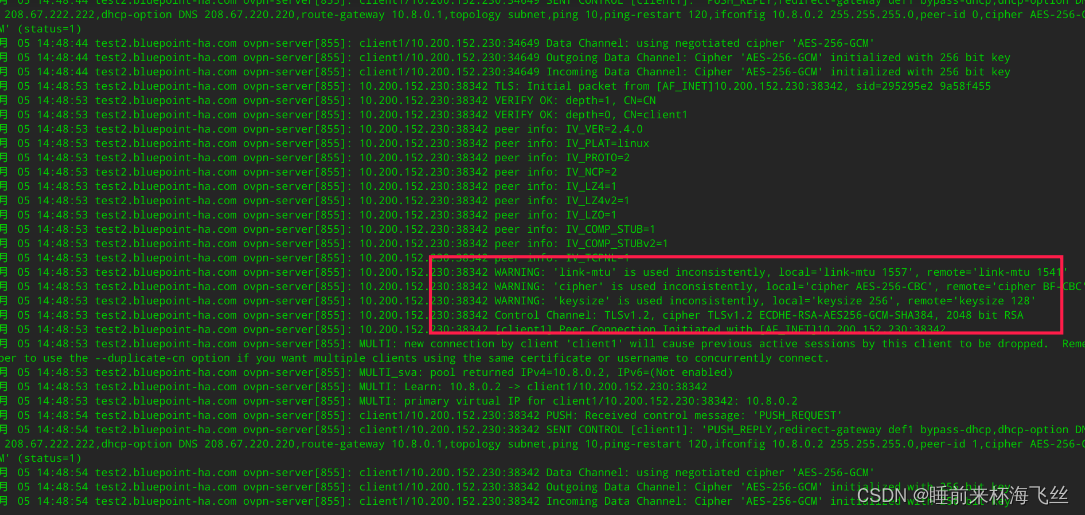
解决方案
查看服务端server.conf配置文件
添加如下信息:
link-mtu 1541
tun-mtu 1500
keysize 128
cipher BF-CBC
2、openvpn@server.service启动报错
TLS Eerror cannot locate HMAC in incoming packet from [AF_INET]10.200.152.230:56765

解决方案
修改/etc/openvpnserver.conf
#注释如下信息:
;tls-auth ta.key 0
3、客户端连接断开,连接VPN失败,原因未知
分析:查看日志未发现报错,使用命令行启动后报错如下:
Mon Sep  5 15:46:49 2022 ERROR: Cannot open TUN/TAP dev /dev/net/tun: No such file or directory (errno=2)
Mon Sep  5 15:46:49 2022 Exiting due to fatal error
解决方案
内核选项缺失
zcat /proc/config.gz  |grep -i CONFIG_TUN
# CONFIG_TUN is not set
# CONFIG_TUN_VNET_CROSS_LE is not set
#内核开启TUN模块选项即可
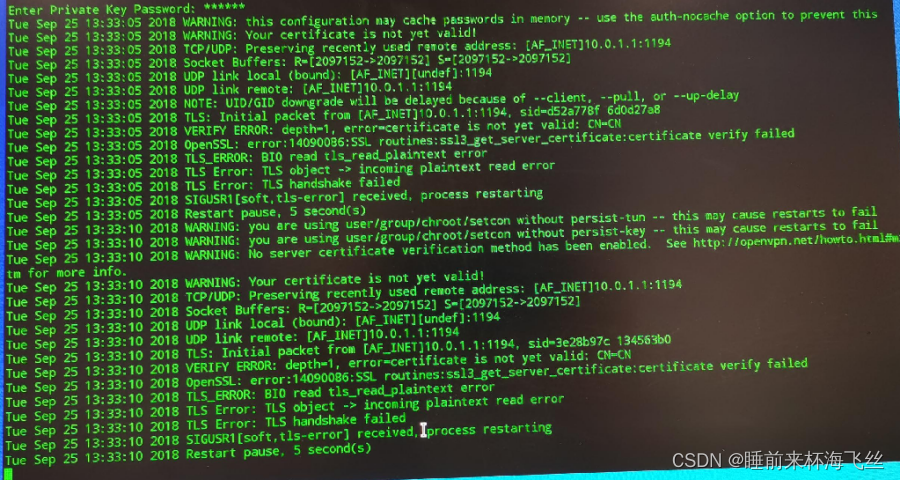
4、客户端使用图形化连接无反应,或者如下连接失败报错
解决方案
查看客户端与服务端时间是否同步