目录
需要安装
Python部分
Java部分
需要安装
HanLP官网Api教程 https://bbs.hanlp.com/t/hanlp2-1-restful-api/53
首先需要电脑安装Python环境并配置环境变量(网上搜就可以一大堆教程),建议Python版本3+
然后根据HanLP官网教程安装hanlp包(配完python环境变量后cmd执行会自动下载到你配的磁盘位置)
hanlp restful安装客户端
pip install hanlp_restfulhanlp
pip install hanlp -U上面两个我没用restful,因为restful的写法要在脚本代码里引入api url,不要这种的,所以我安的下面那个,两种写法官网都有样例,可以照扒


Python部分
然后开始编写脚本文件,我们要实现从前台传给后台(Java部分),然后后台去执行py脚本(python部分),返回结果。
编写脚本

import hanlp
import sys

hanlp.pretrained.mtl.ALL  # 语种见名称最后一个字段或相应语料库
HanLP = hanlp.load(hanlp.pretrained.mtl.CLOSE_TOK_POS_NER_SRL_DEP_SDP_CON_ELECTRA_BASE_ZH)
print(HanLP(sys.argv[1], tasks='tok*'))
这里说一下,编辑器推荐使用JetBrains公司的PyCharm,因为这个编辑器可以初始自动加载环境,不需要额外配什么,包括运行需要哪些包也可以自动去下载

首次需要执行下脚本,会自动下载脚本里写的语料库到本地,不执行的话没有语料库解析不了。
代码里tasks后的参数,/前是任务,/后是细分标准,tok就是分词任务,后面*等于全部,执行会显示全部结果

如果想要实现具体的细粒度,单改tasks

前面sys.argv[1]是java那边传过来的参数
Java部分
package org.jeecg.common.util;

import java.io.BufferedReader;
import java.io.InputStreamReader;


/**
 * @Description: 调用制定Python方法的工具类
 * @Date: 2023/2/11
 * @author: TCZ
 */
public class RunPyUtils {
    /**
     * @param path python文件路径
     * @return
     * @throws Exception
     */
    public static String runCmd1(String path) throws Exception {
        BufferedReader br = null;
        try {
            String[] args = new String[]{"python", path};//第二个为python脚本所在位置
            Process proc = Runtime.getRuntime().exec(args);
            br = new BufferedReader(new InputStreamReader(proc.getInputStream(), "gb2312"));
            String line = null;
            StringBuffer sb = new StringBuffer();
            while ((line = br.readLine()) != null) {
                sb.append(line + "\n");
            }
            return sb.toString();
        } finally {
            if (br != null) {
                try {
                    br.close();
                } catch (Exception e) {
                    e.printStackTrace();
                }
            }
        }
    }

    /**
     * @param path  python文件路径
     * @param value python脚本参数
     * @return
     * @throws Exception
     */
    public static String runCmd2(String path, String value) throws Exception {
        BufferedReader br = null;
        try {

            String[] args = new String[]{"python", path, value};//第二个为python脚本所在位置,后面的为所传参数(得是字符串类型)
            Process proc = Runtime.getRuntime().exec(args);
            br = new BufferedReader(new InputStreamReader(proc.getInputStream(), "gb2312"));
            String line = null;
            StringBuffer sb = new StringBuffer();
            while ((line = br.readLine()) != null) {
                sb.append(line + "\n");
            }
            return sb.toString();
        } finally {
            if (br != null) {
                try {
                    br.close();
                } catch (Exception e) {
                    e.printStackTrace();
                }
            }
        }
    }

    /**
     * @param path   python文件路径
     * @param value1 python脚本参数
     * @param value2 python脚本参数
     * @return
     * @throws Exception
     */
    public static String runCmd3(String path, String value1, String value2) throws Exception {
        BufferedReader br = null;
        try {

            String[] args = new String[]{"python", path, value1, value2};//第二个为python脚本所在位置,后面的为所传参数(得是字符串类型)
            Process proc = Runtime.getRuntime().exec(args);
            br = new BufferedReader(new InputStreamReader(proc.getInputStream(), "gb2312"));
            String line = null;
            StringBuffer sb = new StringBuffer();
            while ((line = br.readLine()) != null) {
                sb.append(line + "\n");
            }
            return sb.toString();
        } finally {
            if (br != null) {
                try {
                    br.close();
                } catch (Exception e) {
                    e.printStackTrace();
                }
            }
        }
    }

    public static void main(String[] args) {
        try {
//            String content = runCmd1("D:\\python_demo\\fenci.py");
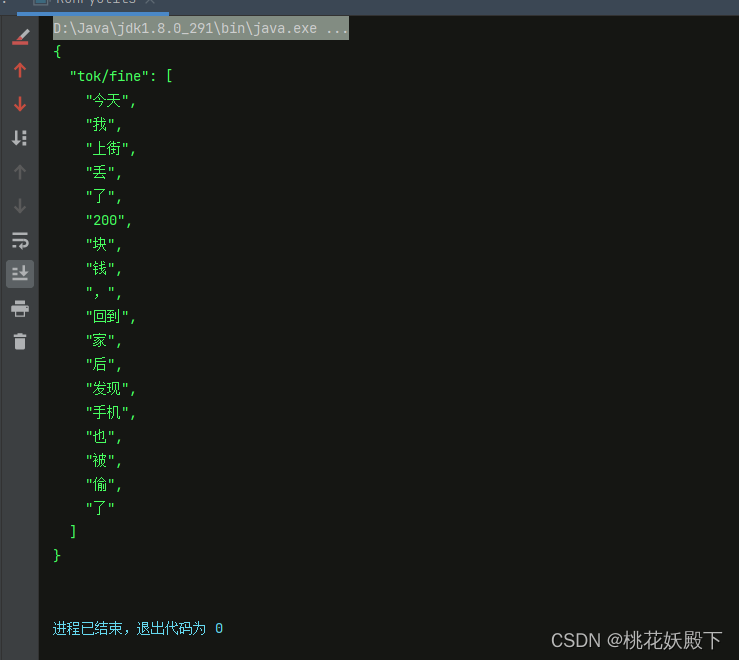
            String content = runCmd2("D:\\python_demo\\demo.py", "今天我上街丢了200块钱,回到家后发现手机也被偷了");
            System.out.println(content);
        } catch (Exception e) {
            e.printStackTrace();
        }

    }
}
java部分全部照扒,需要jeecg包,maven刷新下载就行,main执行里面参数可看方法解释
执行结果








![剑指 Offer 10- I. 斐波那契数列[c语言]](https://img-blog.csdnimg.cn/3c7b7485e07343e3b924653d1109d8ce.png)

