20230210使AIO-3568J开发板在Android12下调通3个USB
2023/2/10 10:00
0、默认编译RK3568的Andorid12的rk3568-evb2-lp4x-v10.dts,2个USB2.0接口的鼠标可以用。
并列USB3.0接口的上面的鼠标不能用。USB3.0接口下面可以连接ADB。
vcc5v0_host: vcc5v0-host-regulator {
compatible = "regulator-fixed";
regulator-name = "vcc5v0_host";
regulator-boot-on;
regulator-always-on;
regulator-min-microvolt = <5000000>;
regulator-max-microvolt = <5000000>;
enable-active-high;
gpio = <&gpio0 RK_PA6 GPIO_ACTIVE_HIGH>;
vin-supply = <&vcc5v0_usb>;
pinctrl-names = "default";
pinctrl-0 = <&vcc5v0_host_en>;
};
vcc5v0_otg: vcc5v0-otg-regulator {
compatible = "regulator-fixed";
regulator-name = "vcc5v0_otg";
regulator-min-microvolt = <5000000>;
regulator-max-microvolt = <5000000>;
enable-active-high;
gpio = <&gpio0 RK_PA5 GPIO_ACTIVE_HIGH>;
vin-supply = <&vcc5v0_usb>;
pinctrl-names = "default";
pinctrl-0 = <&vcc5v0_otg_en>;
};
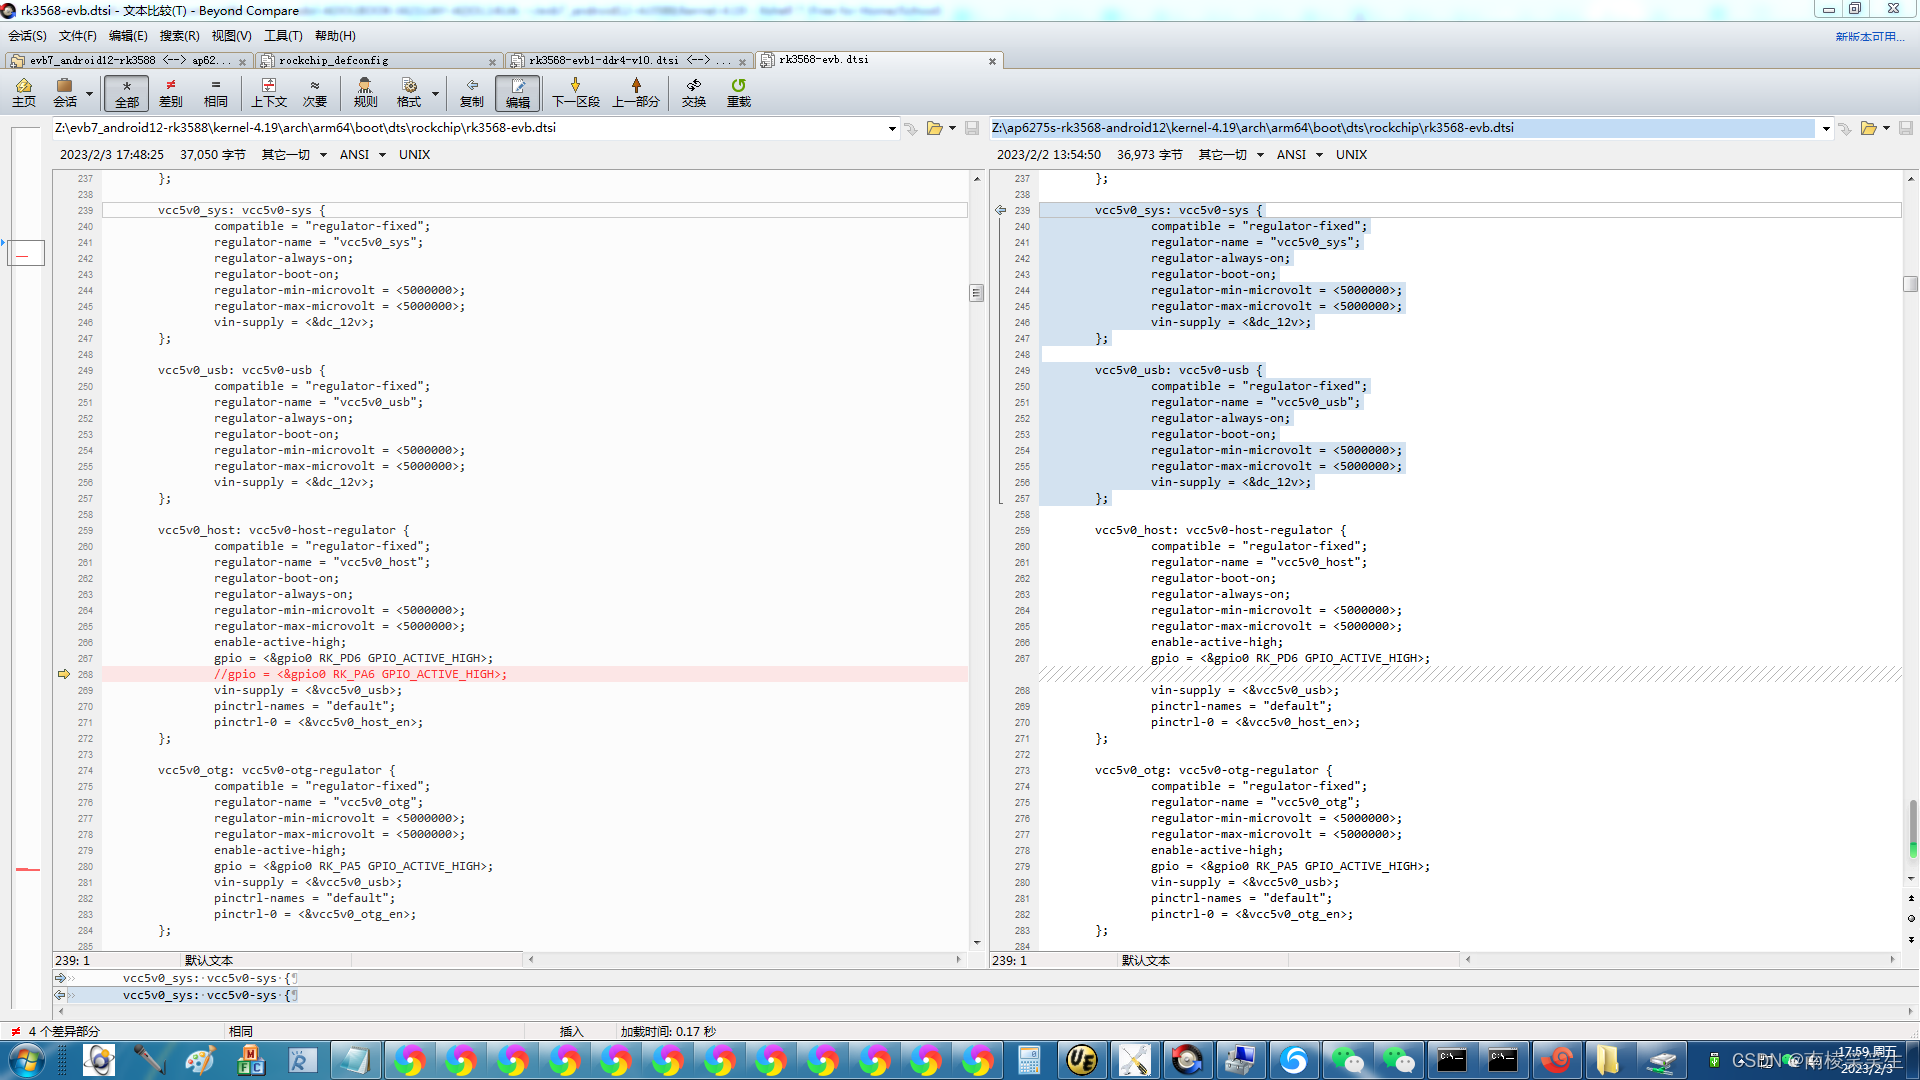
1、配置USB3.0接口
Z:\ap6275s-rk3568-android12\kernel-4.19\arch\arm64\boot\dts\rockchip\rk3568-evb.dtsi
vcc5v0_host: vcc5v0-host-regulator {
compatible = "regulator-fixed";
regulator-name = "vcc5v0_host";
regulator-boot-on;
regulator-always-on;
regulator-min-microvolt = <5000000>;
regulator-max-microvolt = <5000000>;
enable-active-high;
gpio = <&gpio0 RK_PA6 GPIO_ACTIVE_HIGH>;
vin-supply = <&vcc5v0_usb>;
pinctrl-names = "default";
pinctrl-0 = <&vcc5v0_host_en>;
};
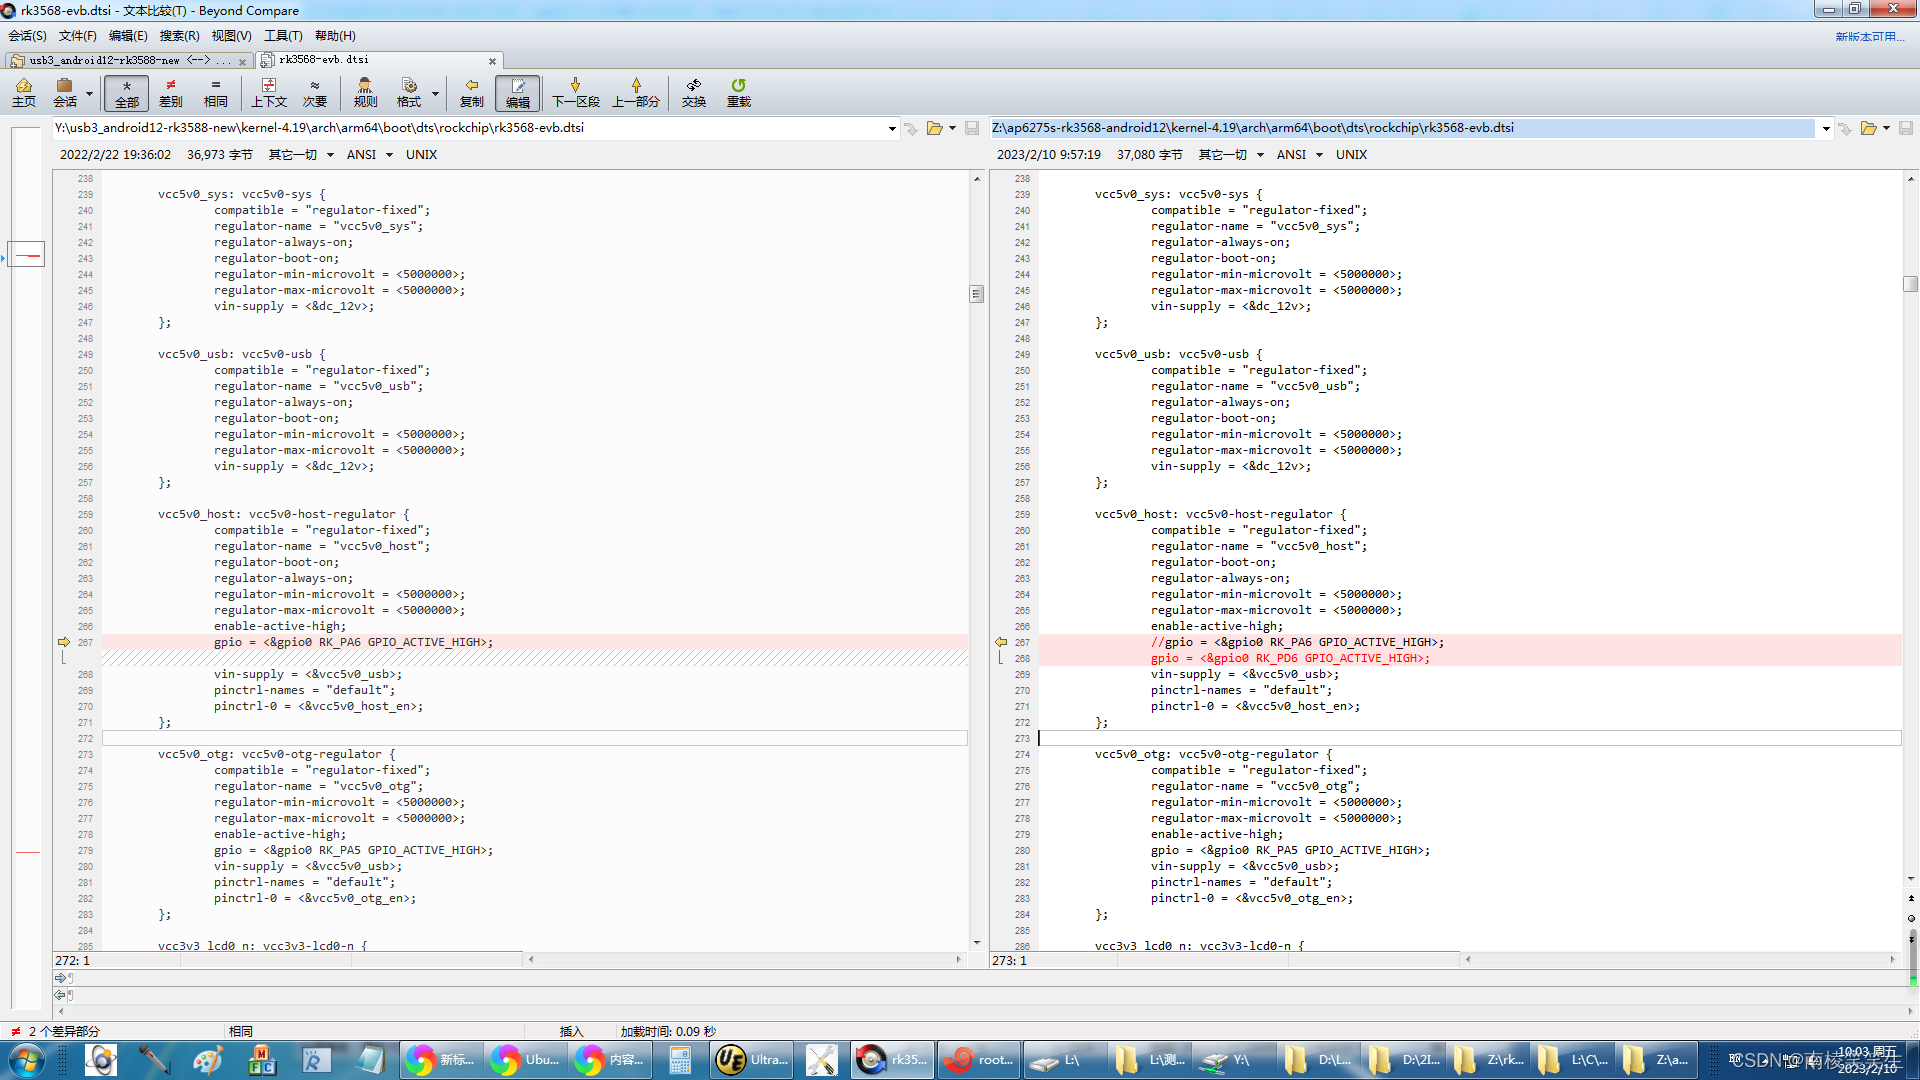
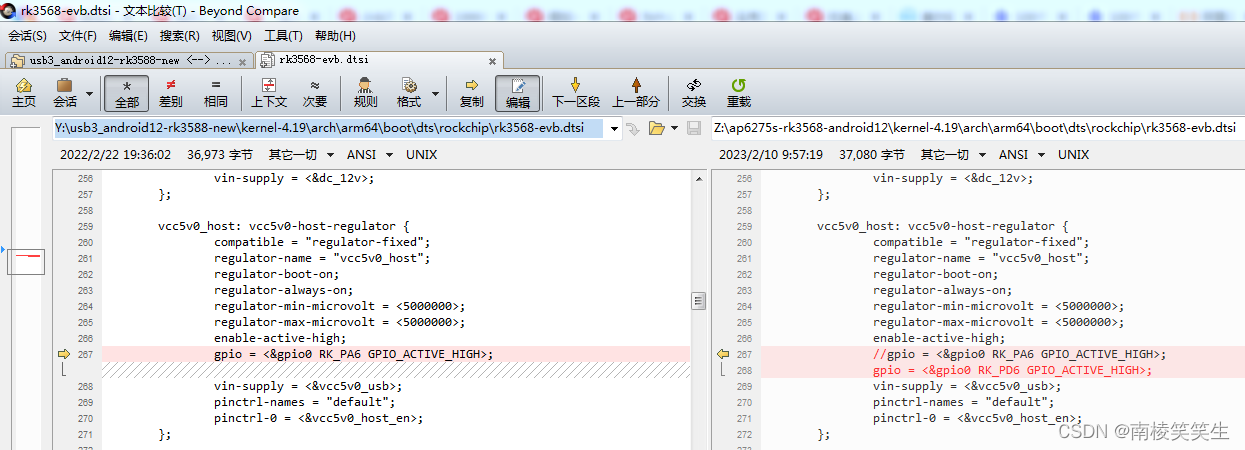
修改为:
vcc5v0_host: vcc5v0-host-regulator {
compatible = "regulator-fixed";
regulator-name = "vcc5v0_host";
regulator-boot-on;
regulator-always-on;
regulator-min-microvolt = <5000000>;
regulator-max-microvolt = <5000000>;
enable-active-high;
//gpio = <&gpio0 RK_PA6 GPIO_ACTIVE_HIGH>;
gpio = <&gpio0 RK_PD6 GPIO_ACTIVE_HIGH>;
vin-supply = <&vcc5v0_usb>;
pinctrl-names = "default";
pinctrl-0 = <&vcc5v0_host_en>;
};
&pinctrl {
mxc6655xa {
mxc6655xa_irq_gpio: mxc6655xa_irq_gpio {
rockchip,pins = <3 RK_PC1 RK_FUNC_GPIO &pcfg_pull_none>;
};
};
pmic {
pmic_int: pmic_int {
rockchip,pins =
<0 RK_PA3 RK_FUNC_GPIO &pcfg_pull_up>;
};
soc_slppin_gpio: soc_slppin_gpio {
rockchip,pins =
<0 RK_PA2 RK_FUNC_GPIO &pcfg_output_low_pull_down>;
};
soc_slppin_slp: soc_slppin_slp {
rockchip,pins =
<0 RK_PA2 RK_FUNC_1 &pcfg_pull_up>;
};
soc_slppin_rst: soc_slppin_rst {
rockchip,pins =
<0 RK_PA2 RK_FUNC_2 &pcfg_pull_none>;
};
};
touch {
touch_gpio: touch-gpio {
rockchip,pins =
<0 RK_PB5 RK_FUNC_GPIO &pcfg_pull_up>,
<0 RK_PB6 RK_FUNC_GPIO &pcfg_pull_none>;
};
};
sdio-pwrseq {
wifi_enable_h: wifi-enable-h {
rockchip,pins = <3 RK_PD5 RK_FUNC_GPIO &pcfg_pull_none>;
};
};
usb {
vcc5v0_host_en: vcc5v0-host-en {
rockchip,pins = <0 RK_PD6 RK_FUNC_GPIO &pcfg_pull_none>;
};
vcc5v0_otg_en: vcc5v0-otg-en {
rockchip,pins = <0 RK_PA5 RK_FUNC_GPIO &pcfg_pull_none>;
};
};
wireless-bluetooth {
uart8_gpios: uart8-gpios {
rockchip,pins = <2 RK_PB1 RK_FUNC_GPIO &pcfg_pull_none>;
};
};
};
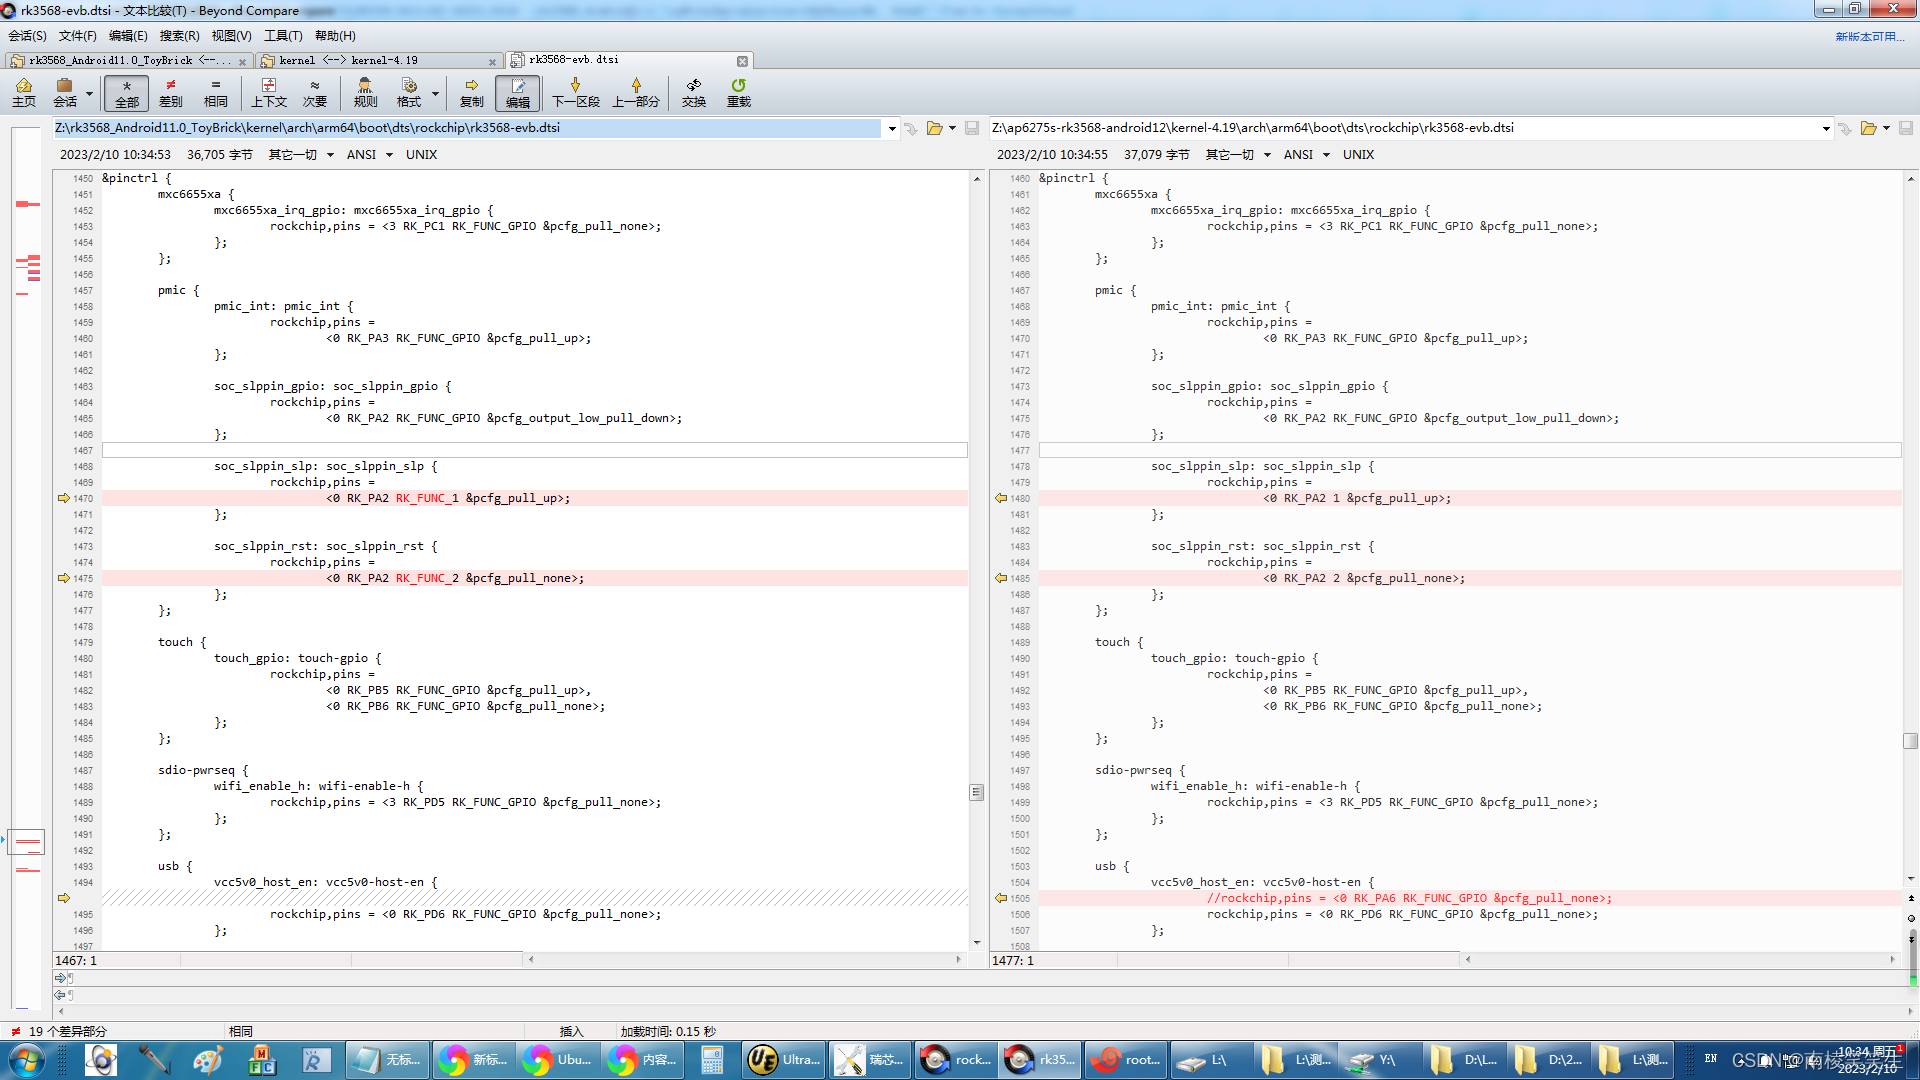
修改为:
&pinctrl {
mxc6655xa {
mxc6655xa_irq_gpio: mxc6655xa_irq_gpio {
rockchip,pins = <3 RK_PC1 RK_FUNC_GPIO &pcfg_pull_none>;
};
};
pmic {
pmic_int: pmic_int {
rockchip,pins =
<0 RK_PA3 RK_FUNC_GPIO &pcfg_pull_up>;
};
soc_slppin_gpio: soc_slppin_gpio {
rockchip,pins =
<0 RK_PA2 RK_FUNC_GPIO &pcfg_output_low_pull_down>;
};
soc_slppin_slp: soc_slppin_slp {
rockchip,pins =
<0 RK_PA2 1 &pcfg_pull_up>;
};
soc_slppin_rst: soc_slppin_rst {
rockchip,pins =
<0 RK_PA2 2 &pcfg_pull_none>;
};
};
touch {
touch_gpio: touch-gpio {
rockchip,pins =
<0 RK_PB5 RK_FUNC_GPIO &pcfg_pull_up>,
<0 RK_PB6 RK_FUNC_GPIO &pcfg_pull_none>;
};
};
sdio-pwrseq {
wifi_enable_h: wifi-enable-h {
rockchip,pins = <3 RK_PD5 RK_FUNC_GPIO &pcfg_pull_none>;
};
};
usb {
vcc5v0_host_en: vcc5v0-host-en {
//rockchip,pins = <0 RK_PA6 RK_FUNC_GPIO &pcfg_pull_none>;
rockchip,pins = <0 RK_PD6 RK_FUNC_GPIO &pcfg_pull_none>;
};
vcc5v0_otg_en: vcc5v0-otg-en {
rockchip,pins = <0 RK_PA5 RK_FUNC_GPIO &pcfg_pull_none>;
};
};
wireless-bluetooth {
uart8_gpios: uart8-gpios {
rockchip,pins = <2 RK_PB1 RK_FUNC_GPIO &pcfg_pull_none>;
};
};
};
编译内核之后,并列USB3.0接口的上面的鼠标可以用了,但是2个USB2.0接口都不能用了!
编译 kernel:
make ARCH=arm64 rockchip_defconfig android-11.config
make ARCH=arm64 BOOT_IMG=../rockdev/Image-rk3568_s/boot.img rk3568-evb2-lp4x-v10.img -j16

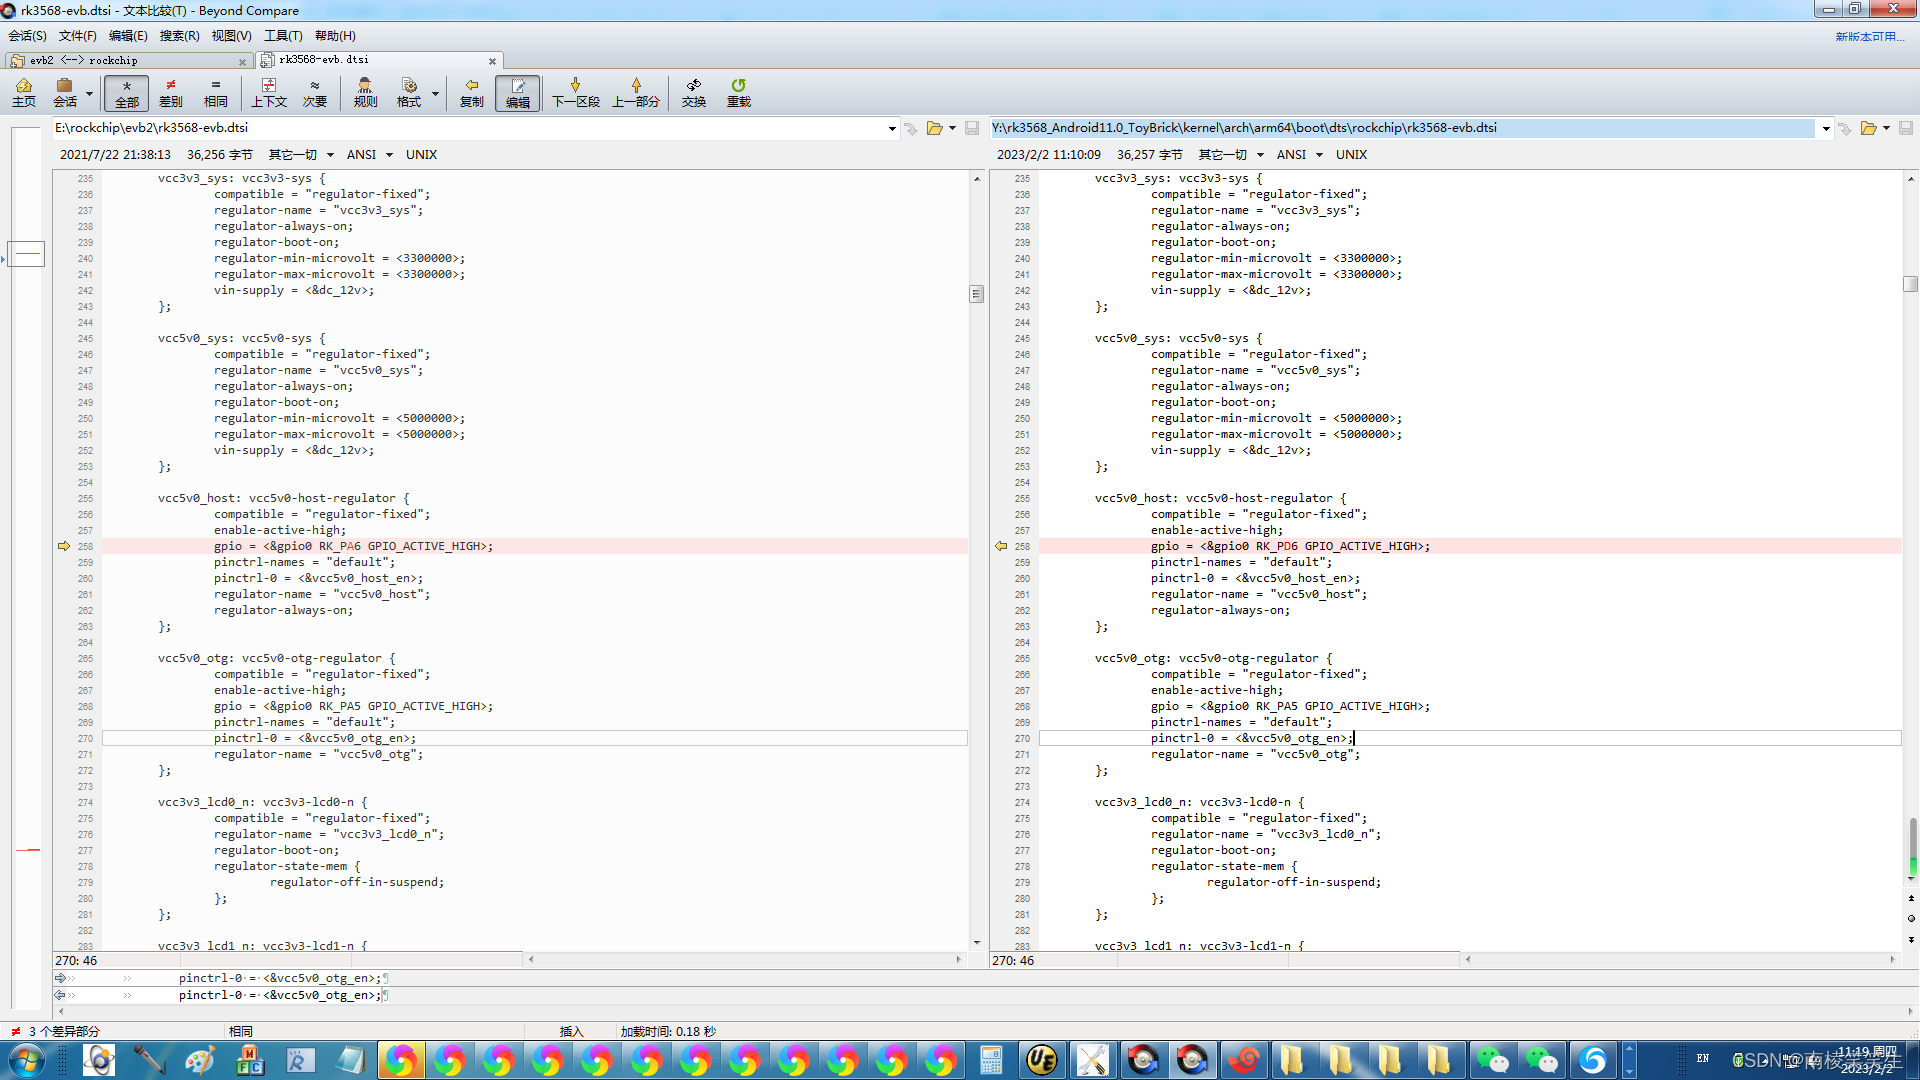
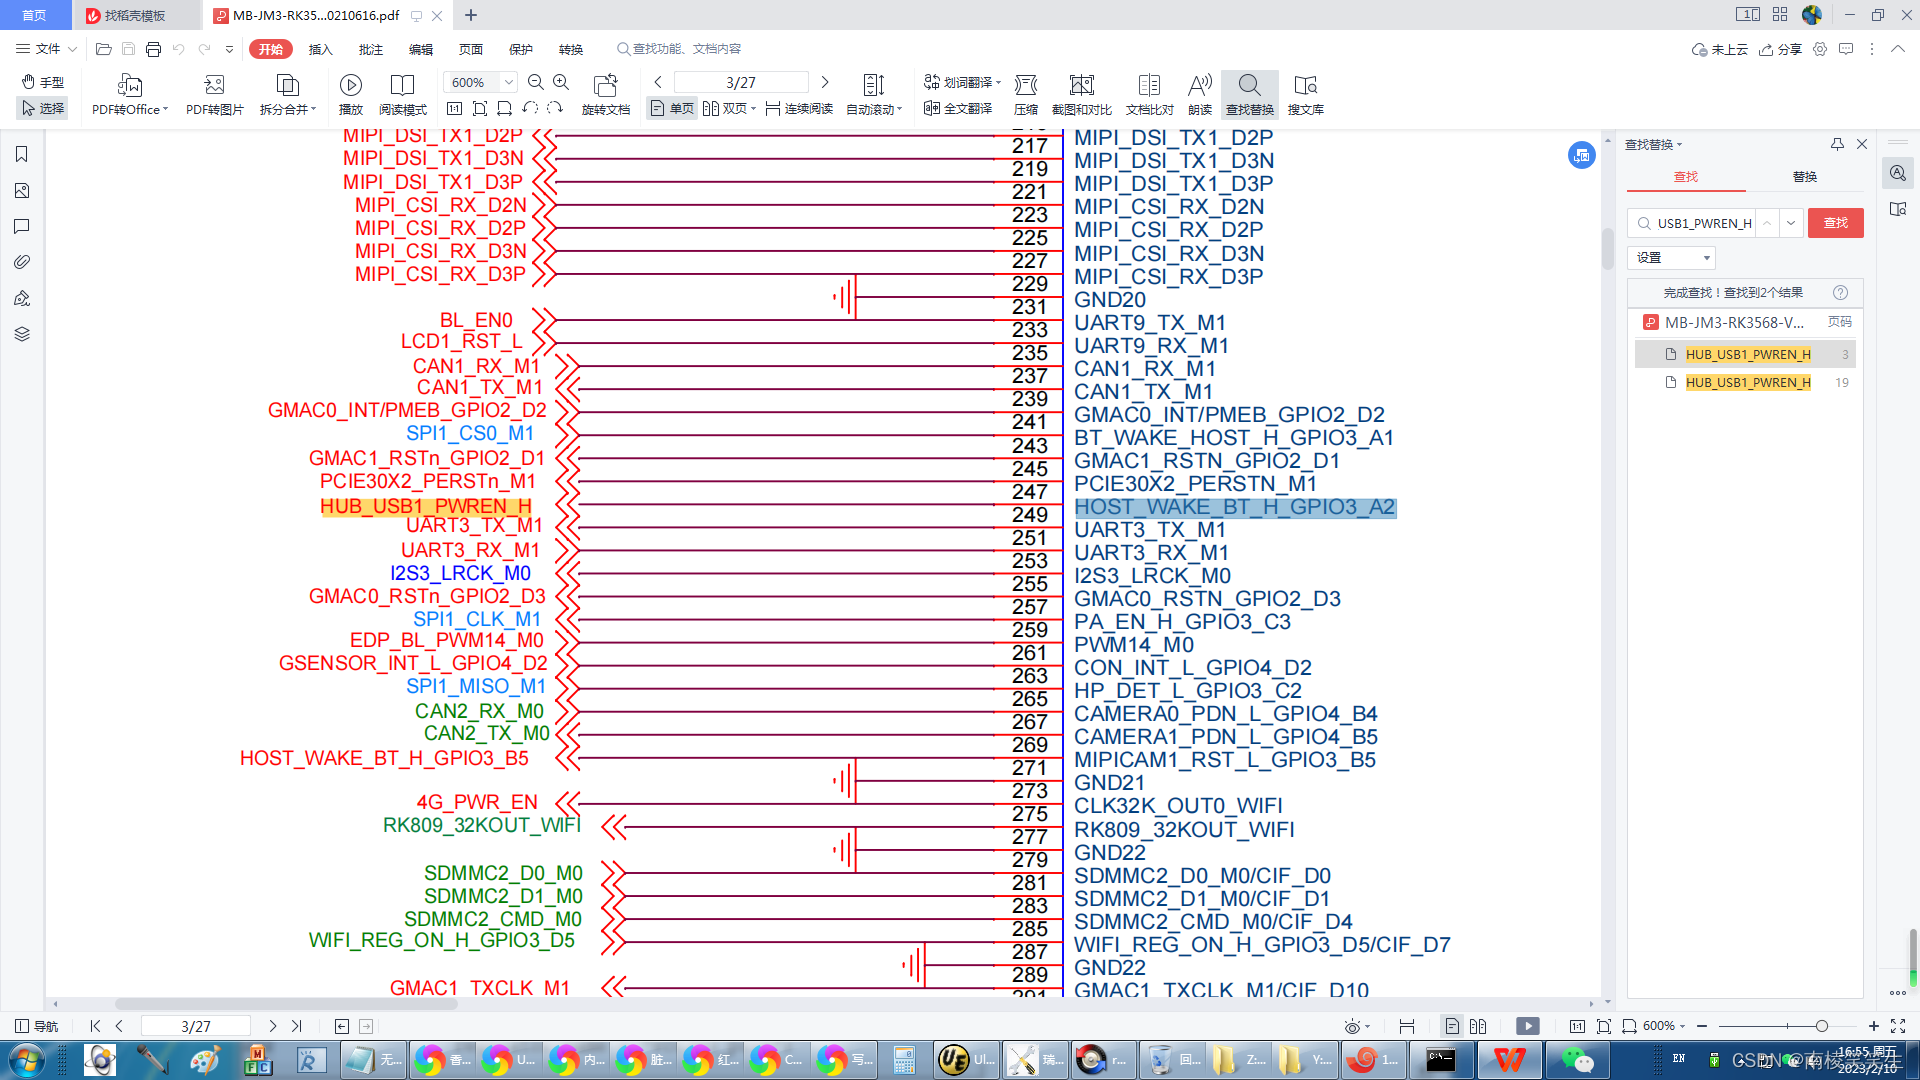
USB3的原理图:
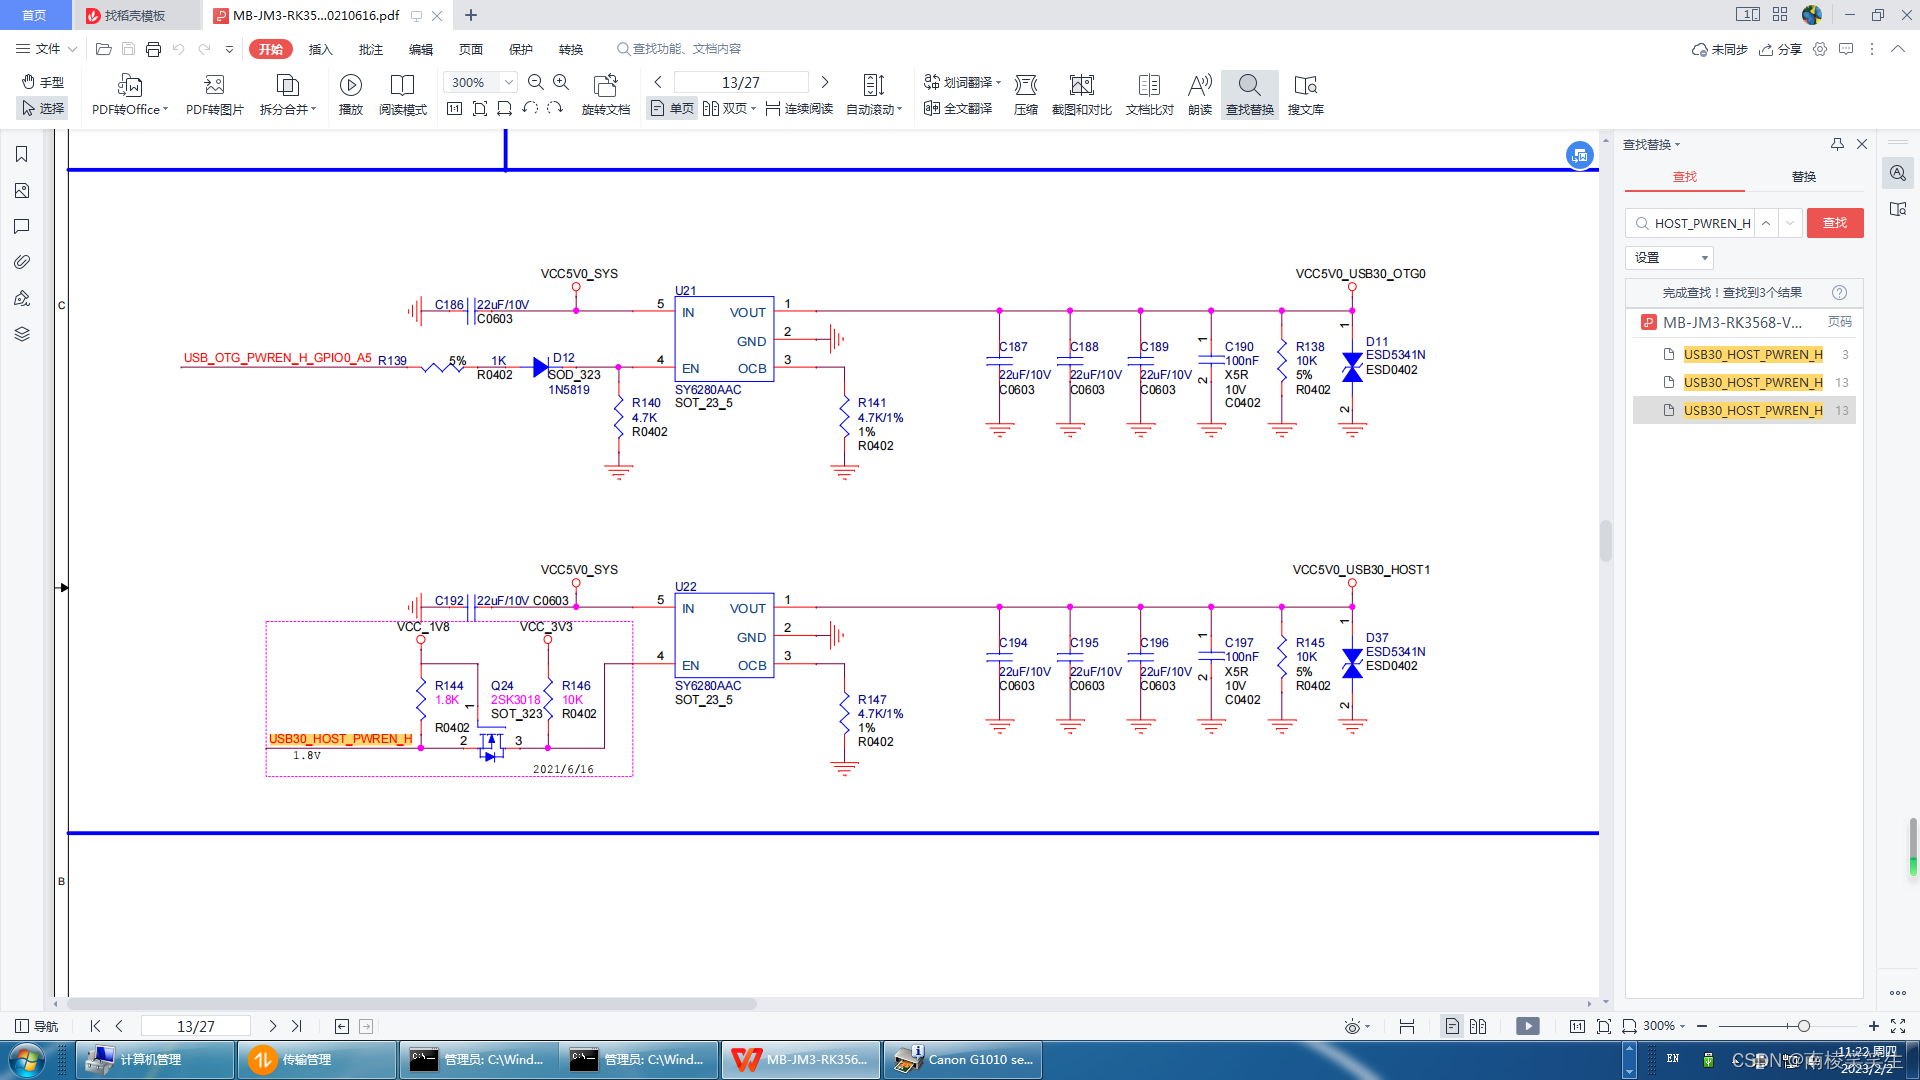
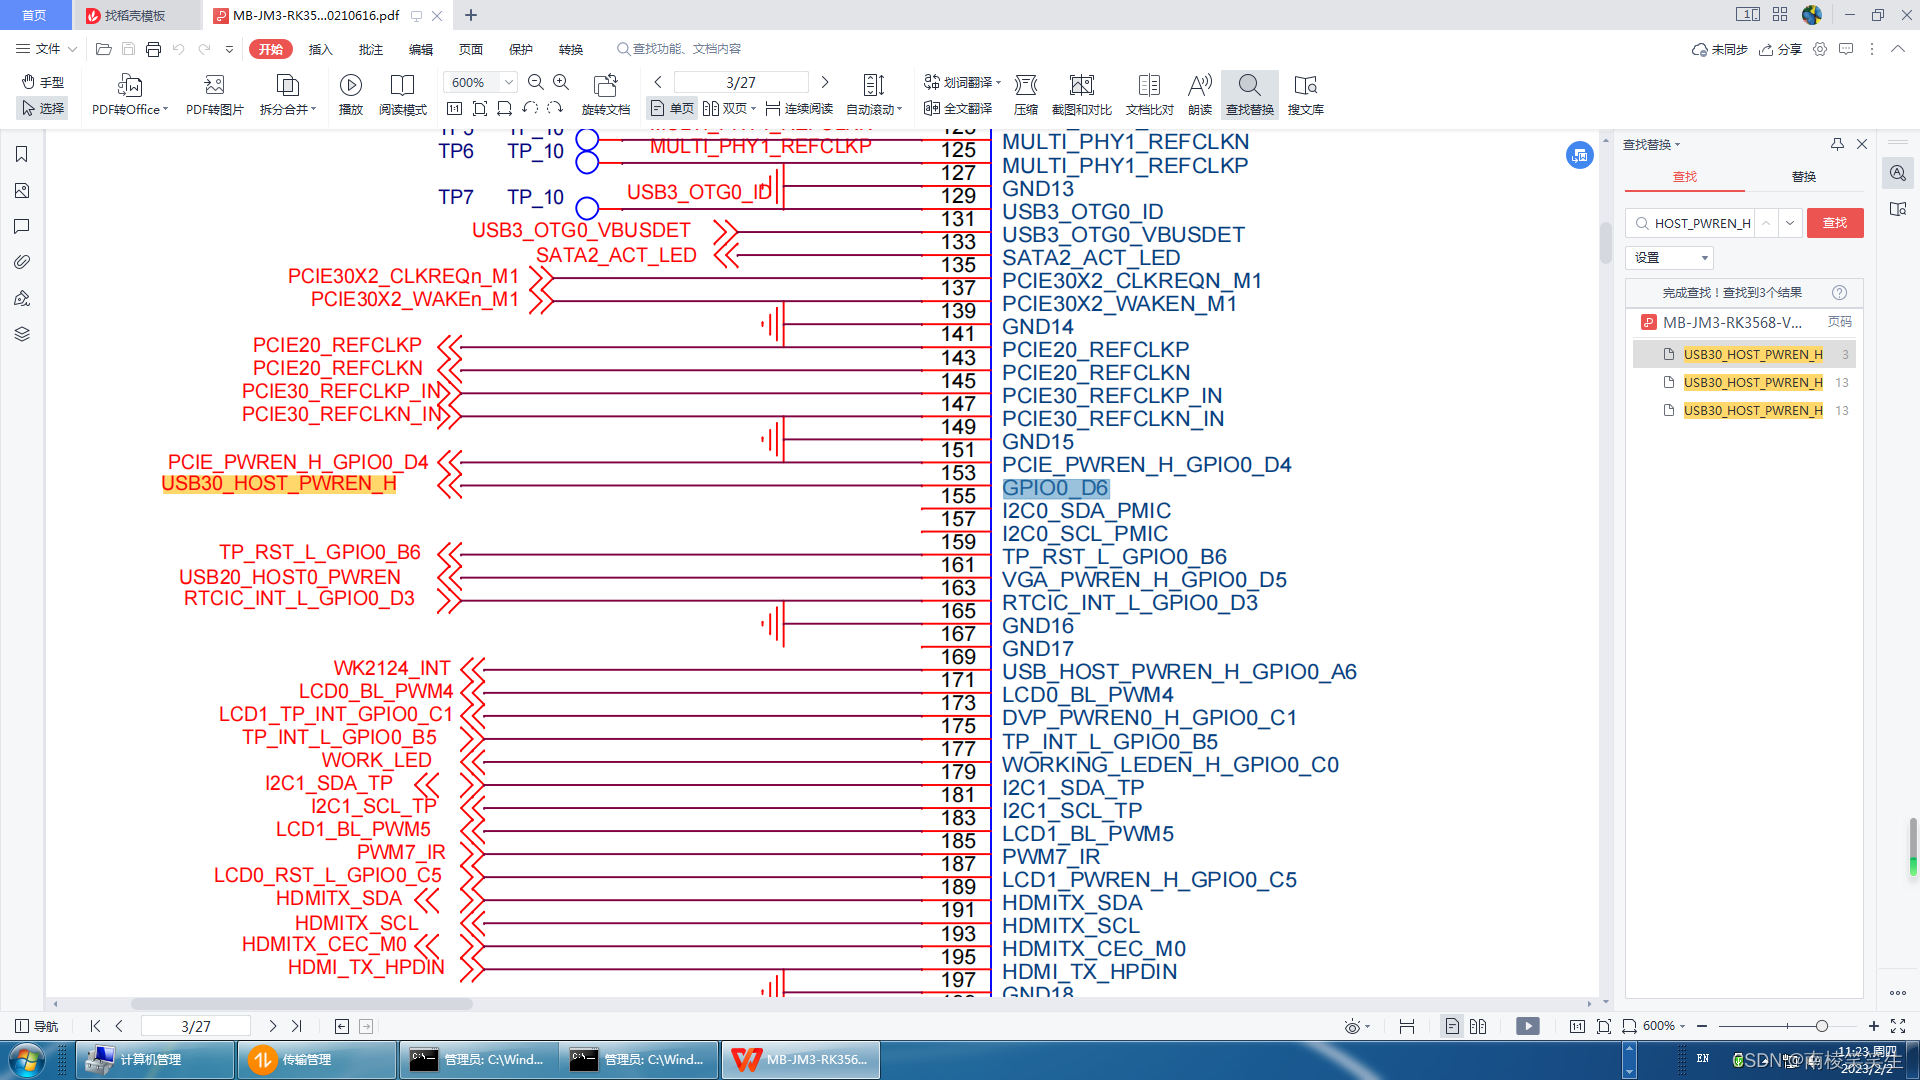
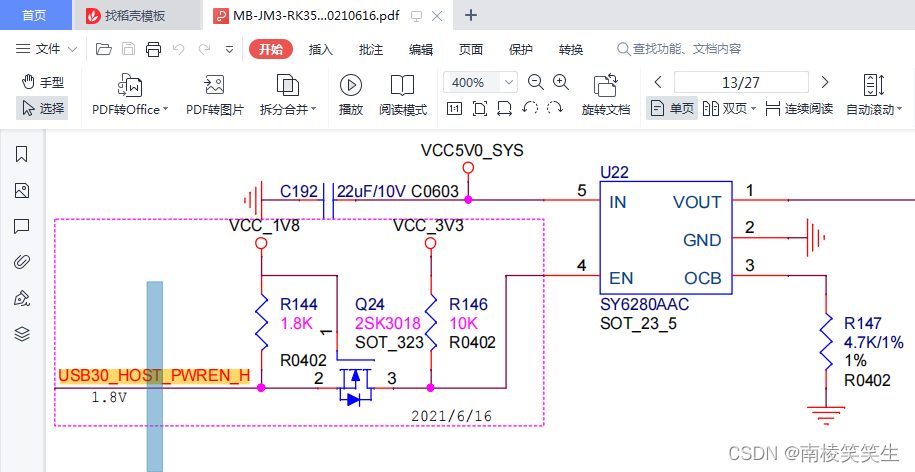
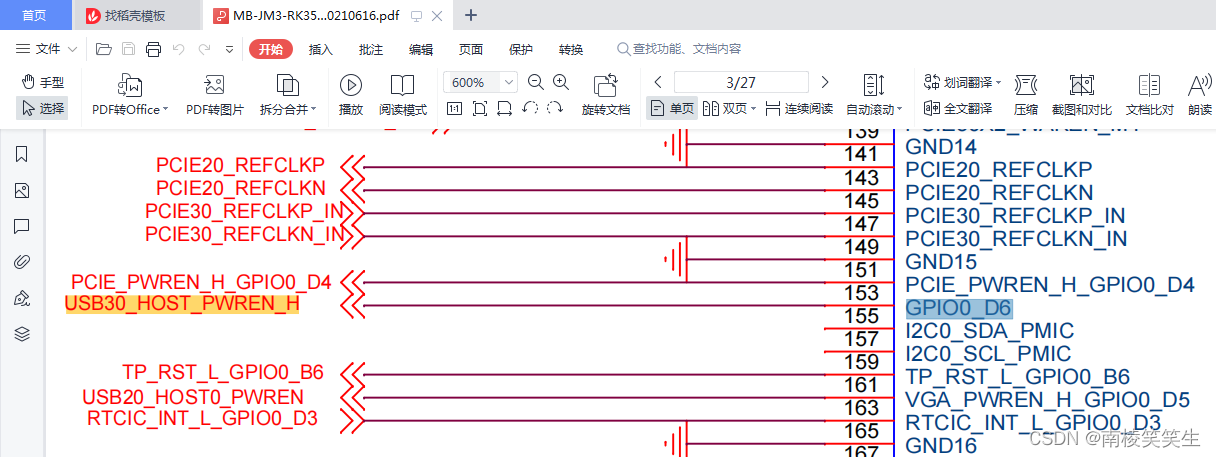
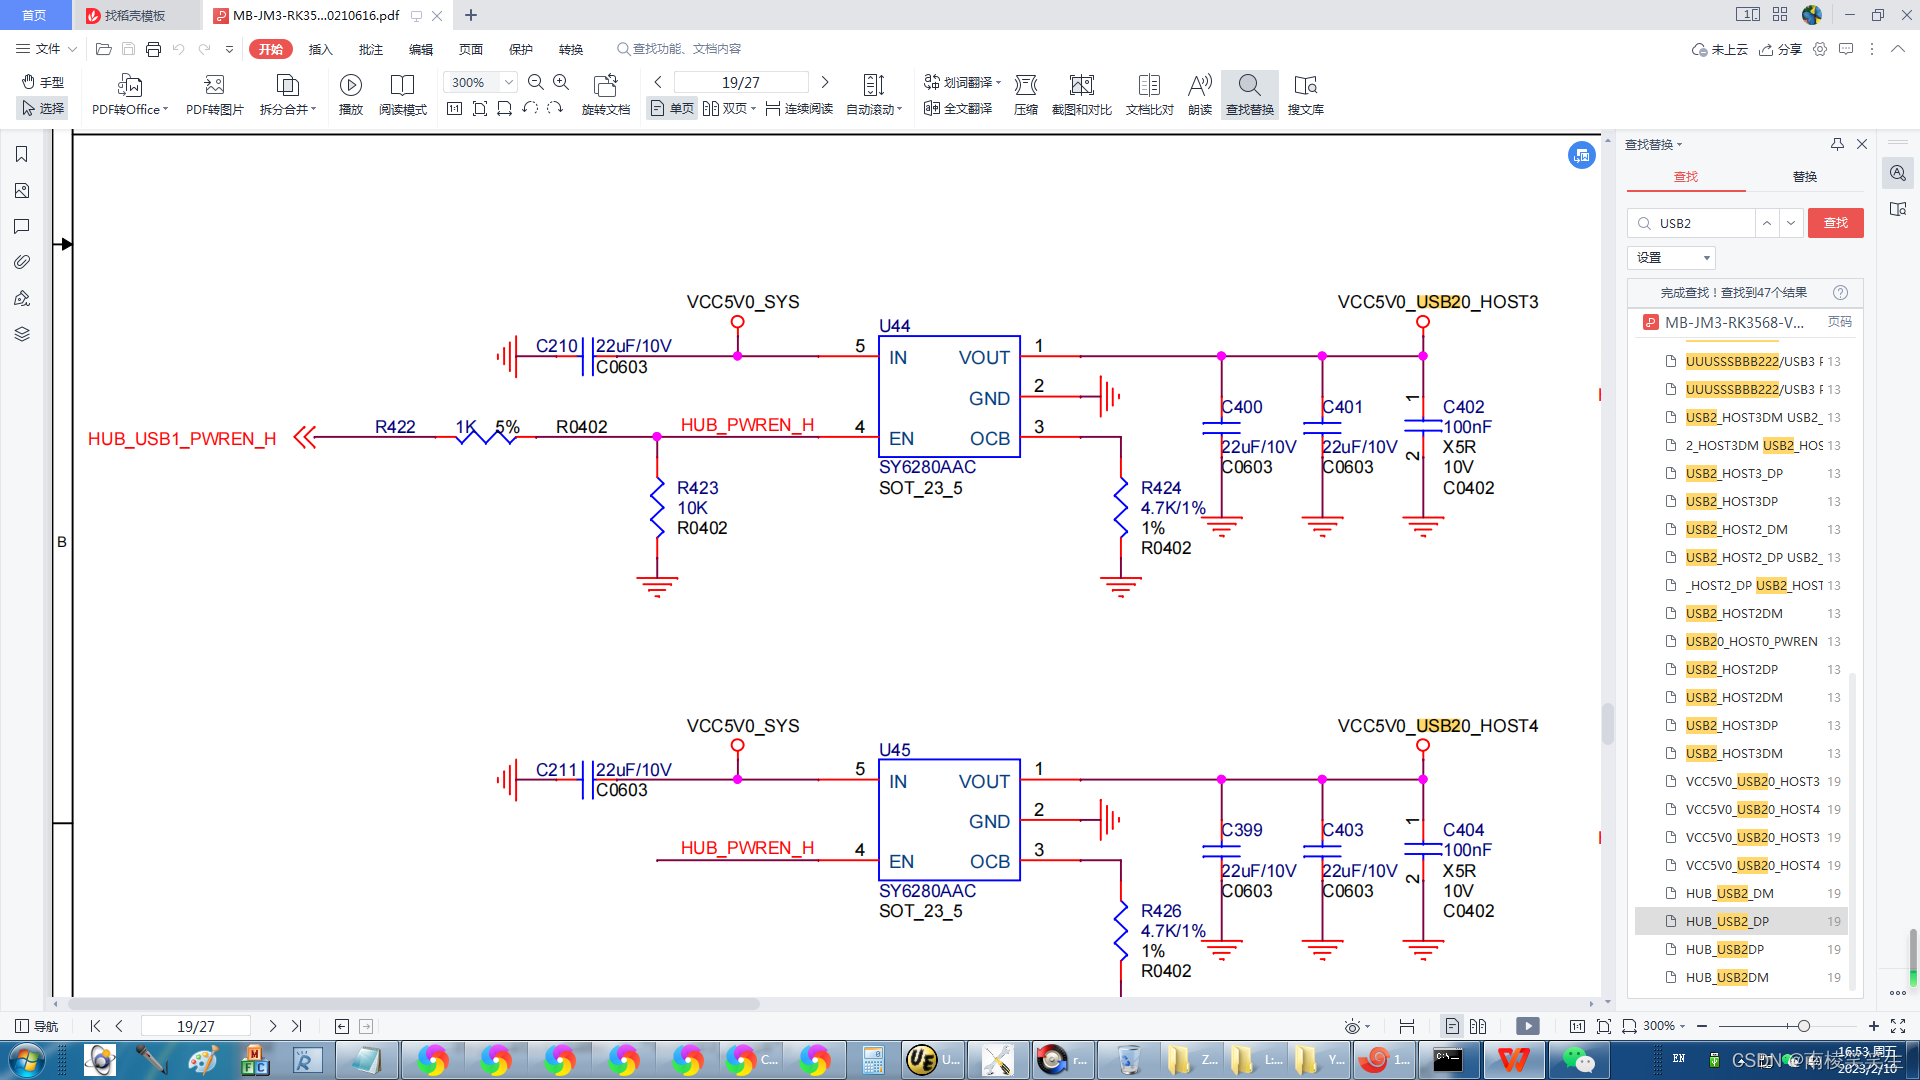
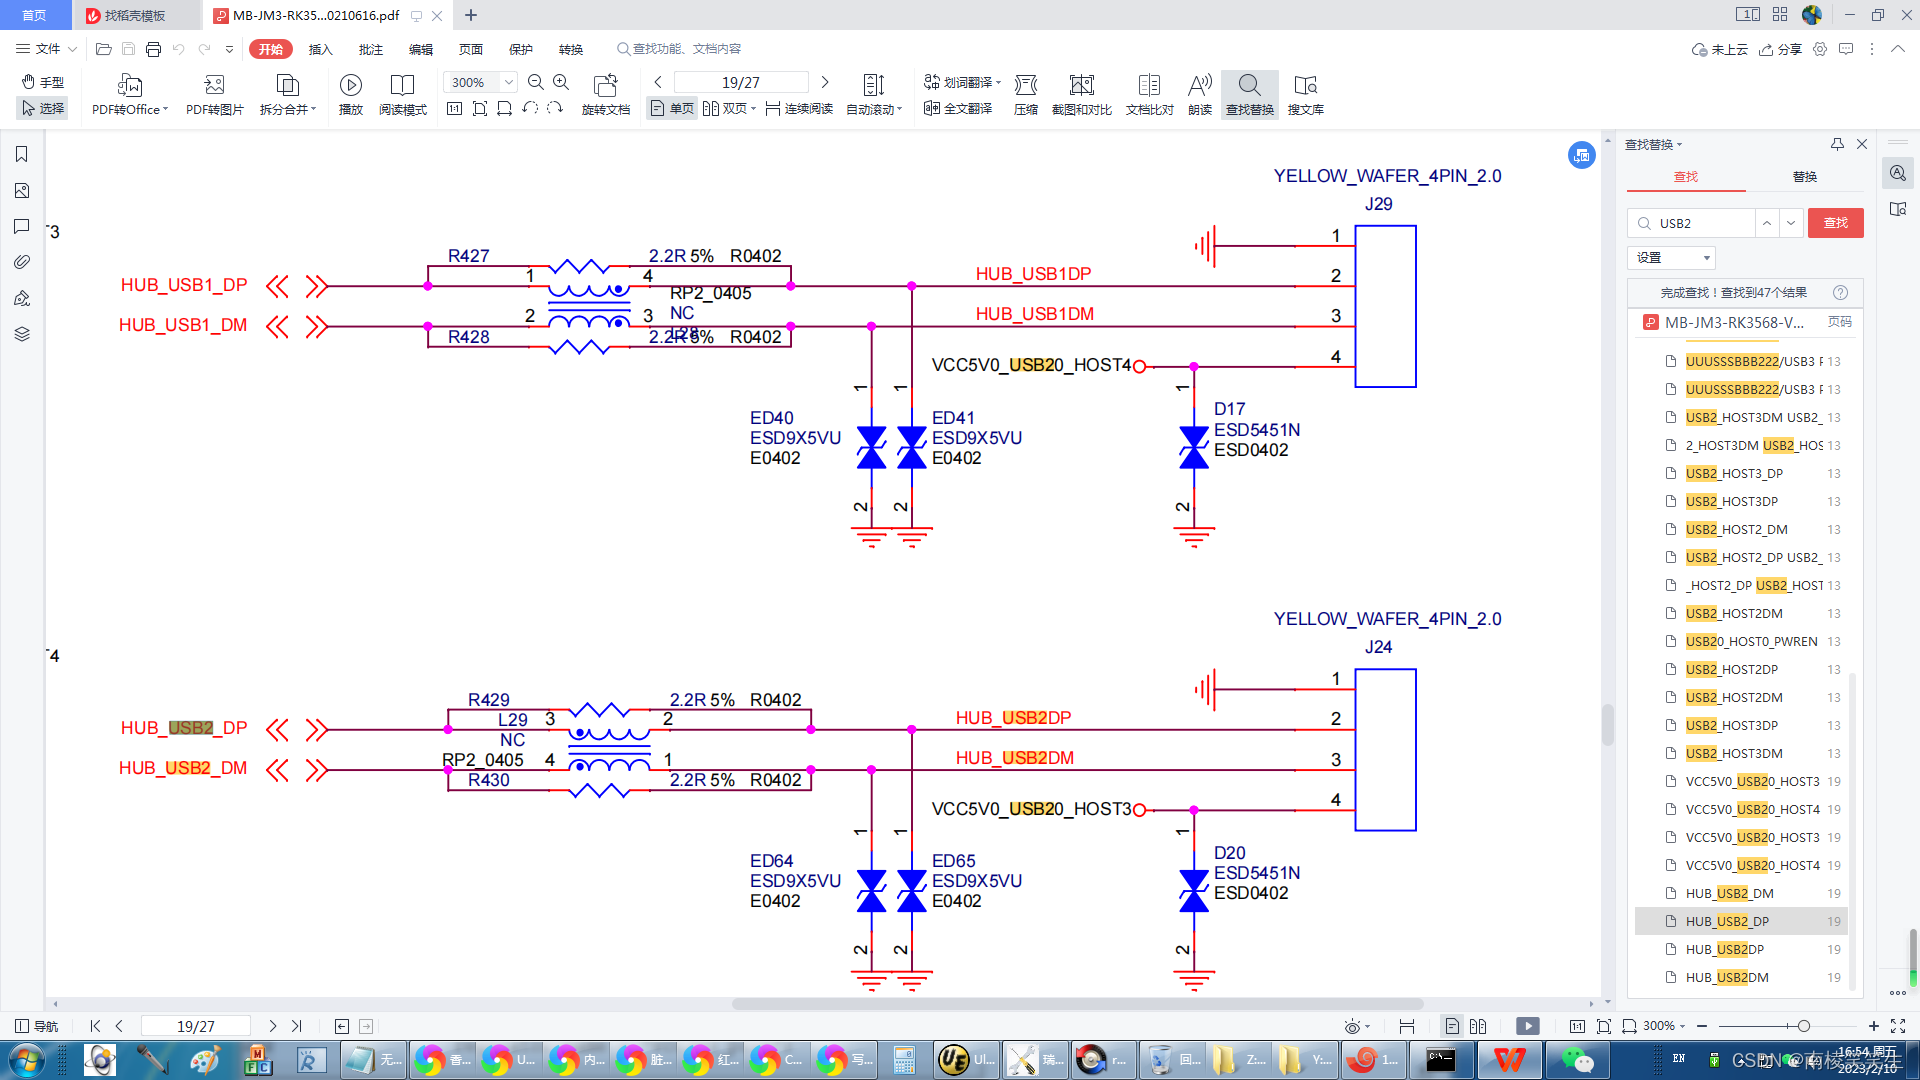
USB2原理图:

2、配置USB2.0接口
由于根据rk3568-firefly-aioj.dts配置rk3568-evb2-lp4x-v10.dts,配置全部3个USB接口老是异常。
于是将firefly修改的rk3568-firefly-aioj.dts收拾/还原成为rk3568-evb2-lp4x-v10.dts
很容易/艰难地知道控制2个USB2.0接口的代码块!
rk3568-firefly-aioj.dts修改为:rk3568-evb2-lp4x-v10.dts
rk3568-firefly-aioj.dtsi修改为:rk3568-evb2-lp4x-v10.dtsi
rk3568-firefly-port.dtsi和rk3568-firefly-core.dtsi修改为:rk3568-evb2-lp4x-v10.dtsi
rk3568-firefly-aioj.dts
#include "rk3568-firefly-aioj.dtsi"
rk3568-firefly-port.dtsi
#include "rk3568-firefly-core.dtsi"
#include "rk356x-firefly-demo.dtsi"(这里不需要)
rk3568-firefly-core.dtsi
firefly_defconfig和firefly_wifi.config修改为:rockchip_defconfig
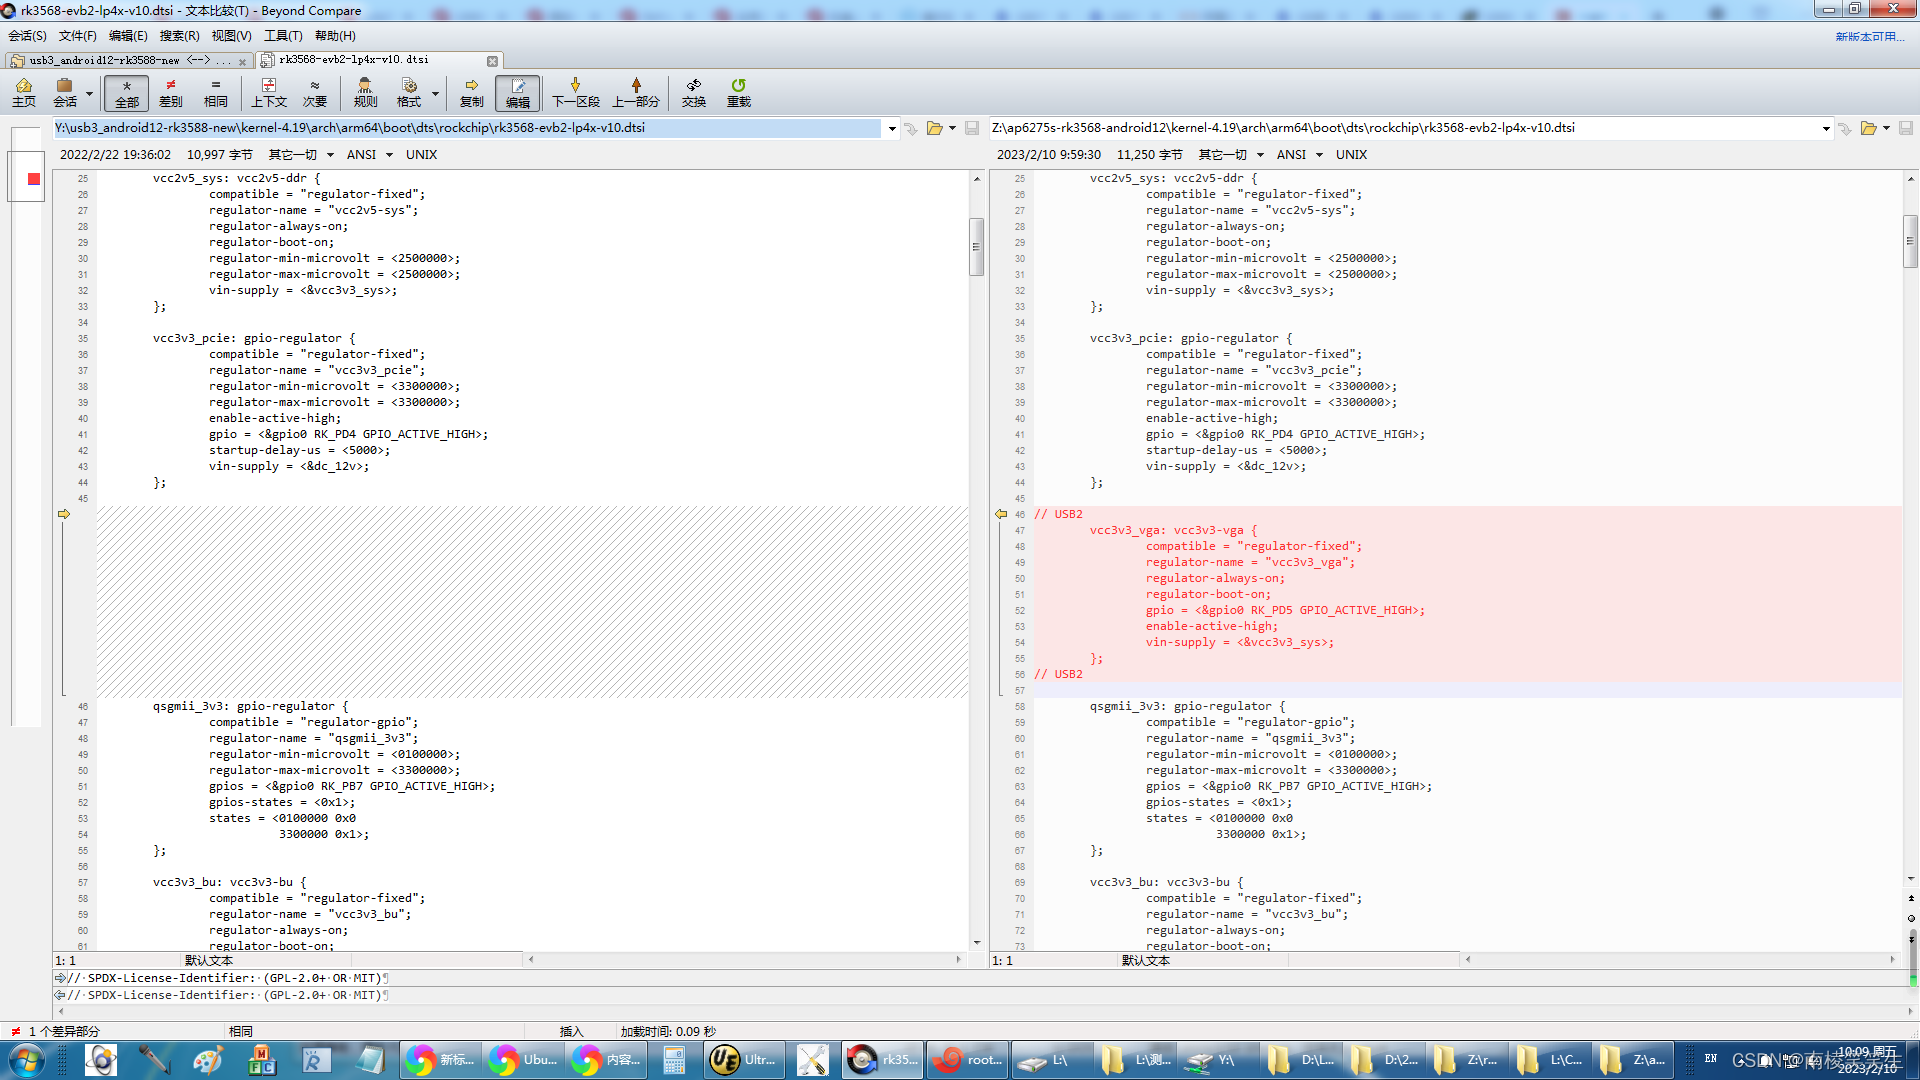
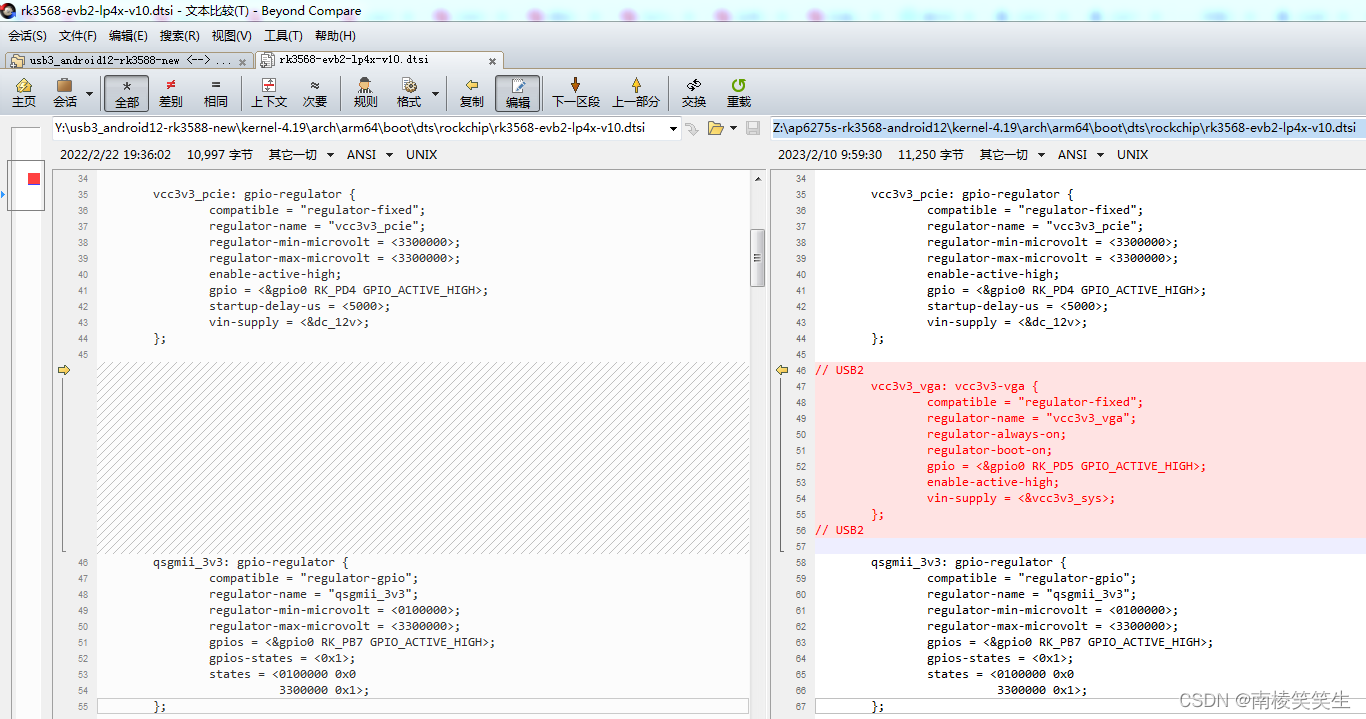
Z:\ap6275s-rk3568-android12\kernel-4.19\arch\arm64\boot\dts\rockchip\rk3568-evb2-lp4x-v10.dtsi
vcc3v3_pcie: gpio-regulator {
compatible = "regulator-fixed";
regulator-name = "vcc3v3_pcie";
regulator-min-microvolt = <3300000>;
regulator-max-microvolt = <3300000>;
enable-active-high;
gpio = <&gpio0 RK_PD4 GPIO_ACTIVE_HIGH>;
startup-delay-us = <5000>;
vin-supply = <&dc_12v>;
};
// USB2
vcc3v3_vga: vcc3v3-vga {
compatible = "regulator-fixed";
regulator-name = "vcc3v3_vga";
regulator-always-on;
regulator-boot-on;
gpio = <&gpio0 RK_PD5 GPIO_ACTIVE_HIGH>;
enable-active-high;
vin-supply = <&vcc3v3_sys>;
};
// USB2
qsgmii_3v3: gpio-regulator {
compatible = "regulator-gpio";
regulator-name = "qsgmii_3v3";
regulator-min-microvolt = <0100000>;
regulator-max-microvolt = <3300000>;
gpios = <&gpio0 RK_PB7 GPIO_ACTIVE_HIGH>;
gpios-states = <0x1>;
states = <0100000 0x0
3300000 0x1>;
};





![Python之FileNotFoundError: [Errno 2] No such file or directory问题处理](https://img-blog.csdnimg.cn/img_convert/5e96d62a80771794b2a1621eadbabb2a.png)

