在计算机视觉领域,目标检测是一个至关重要的任务。它不仅要求识别图像中的目标物体,还需要精确定位这些物体的位置。近年来,随着深度学习技术的飞速发展,各种高效的目标检测算法层出不穷。SSD(Single Shot MultiBox Detector)作为其中的一种,因其高效、实时的检测能力而备受关注。本文将深入解析SSD算法的理论基础、模型结构、数据处理方法,并通过MindSpore框架详细展示其实现过程。
模型简介
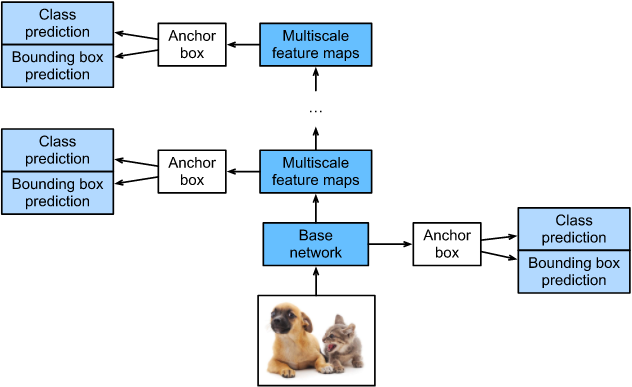
SSD,全称Single Shot MultiBox Detector,是Wei Liu在ECCV 2016上提出的一种目标检测算法。SSD的核心思想是通过单阶段的卷积神经网络直接预测目标的类别和位置,而无需像two-stage方法(如RCNN系列)那样生成候选框。SSD在多个特征层上进行检测,能够实现多尺度的目标检测,具体如图所示:
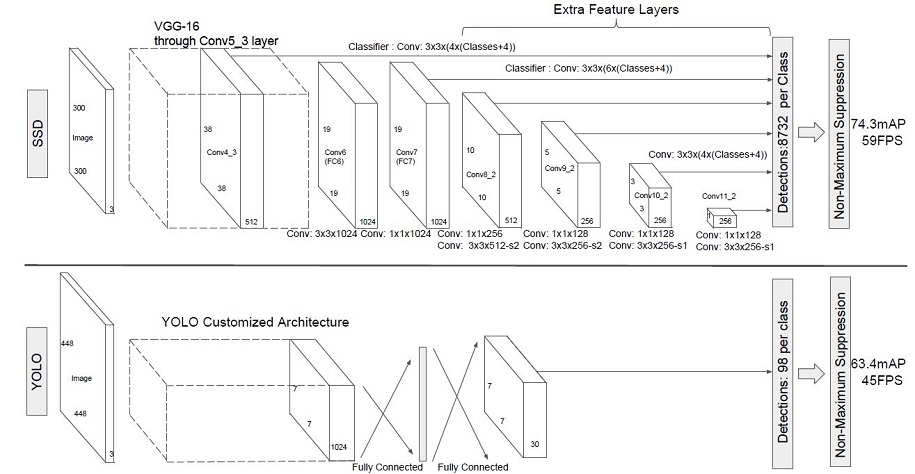
SSD采用VGG16作为基础模型,并在其之上新增了卷积层来获得更多的特征图用于检测。相比于YOLO,SSD利用了多尺度特征图进行检测,检测效果更加全面。
模型特点
多尺度检测
多尺度检测:
- 原因:在实际应用中,目标物体的大小可能有很大差异。单一尺度的特征图可能无法同时检测到大目标和小目标。
- 重要性:多尺度特征图使得SSD能够在不同尺度上检测目标,增加了检测的鲁棒性和准确性。例如,38×38的特征图可以更好地检测小物体,而1×1的特征图适用于检测大物体。
采用卷积进行检测
SSD直接采用卷积对不同的特征图进行提取检测结果,而不是像YOLO那样使用全连接层。这种方式不仅减少了参数量,还提高了检测速度。
预设anchor
SSD采用了anchor策略,预设不同长宽比例的anchor,每一个输出特征层基于anchor预测多个检测框。这样可以有效地指导预测框的尺寸和长宽比。
预设anchor:
- 原因:预设不同长宽比例的anchor,可以为每一个输出特征层提供多个候选框,用于预测目标的位置和大小。
- 重要性:anchor策略使得模型可以在训练过程中学习不同长宽比的目标,从而提高检测精度。例如,一个3:1的anchor可以用于检测高而窄的物体,而一个1:1的anchor可以用于检测接近正方形的物体。
环境准备
在开始实验前,请确保本地已经安装了MindSpore、download、pycocotools、opencv-python。以下是安装MindSpore的代码:
!pip install -i https://pypi.mirrors.ustc.edu.cn/simple mindspore==2.2.14
!pip install -i https://pypi.mirrors.ustc.edu.cn/simple pycocotools==2.0.7
数据准备与处理
数据处理:
- 原因:数据处理包括图像解码、归一化、数据增强等步骤,目的是将原始数据转换为适合模型输入的格式。
- 重要性:数据处理是模型训练的重要环节,良好的数据处理可以提高模型的训练效率和效果。例如,图像归一化可以加快模型的收敛速度,数据增强可以提高模型的泛化能力。
本案例使用的数据集为COCO 2017。为了更方便地保存和加载数据,我们首先将COCO数据集转换成MindRecord格式。以下是下载和解压数据集的代码:
from download import download

dataset_url = "https://mindspore-website.obs.cn-north-4.myhuaweicloud.com/notebook/datasets/ssd_datasets.zip"
path = "./"
path = download(dataset_url, path, kind="zip", replace=True)
定义数据处理的输入:
coco_root = "./datasets/"
anno_json = "./datasets/annotations/instances_val2017.json"

train_cls = ['background', 'person', 'bicycle', 'car', 'motorcycle', 'airplane', 'bus',
             'train', 'truck', 'boat', 'traffic light', 'fire hydrant',
             'stop sign', 'parking meter', 'bench', 'bird', 'cat', 'dog',
             'horse', 'sheep', 'cow', 'elephant', 'bear', 'zebra',
             'giraffe', 'backpack', 'umbrella', 'handbag', 'tie',
             'suitcase', 'frisbee', 'skis', 'snowboard', 'sports ball',
             'kite', 'baseball bat', 'baseball glove', 'skateboard',
             'surfboard', 'tennis racket', 'bottle', 'wine glass', 'cup',
             'fork', 'knife', 'spoon', 'bowl', 'banana', 'apple',
             'sandwich', 'orange', 'broccoli', 'carrot', 'hot dog', 'pizza',
             'donut', 'cake', 'chair', 'couch', 'potted plant', 'bed',
             'dining table', 'toilet', 'tv', 'laptop', 'mouse', 'remote',
             'keyboard', 'cell phone', 'microwave', 'oven', 'toaster', 'sink',
             'refrigerator', 'book', 'clock', 'vase', 'scissors',
             'teddy bear', 'hair drier', 'toothbrush']

train_cls_dict = {cls: i for i, cls in enumerate(train_cls)}
数据采样
数据采样:
- 原因:为了使模型对各种输入对象大小和形状更加鲁棒,随机采样不同区域进行数据增强。
- 重要性:数据增强通过随机裁剪、缩放、翻转等操作,增加了训练数据的多样性。这不仅可以防止模型过拟合,还可以提高模型的泛化能力,使其在不同的测试数据上表现更好。
为了使模型对各种输入对象大小和形状更加鲁棒,SSD算法每个训练图像通过以下选项之一随机采样:
- 使用整个原始输入图像
- 采样一个区域,使采样区域和原始图片最小的交并比重叠为0.1,0.3,0.5,0.7或0.9
- 随机采样一个区域
import cv2
import numpy as np

def _rand(a=0., b=1.):
    return np.random.rand() * (b - a) + a

def intersect(box_a, box_b):
    """Compute the intersect of two sets of boxes."""
    max_yx = np.minimum(box_a[:, 2:4], box_b[2:4])
    min_yx = np.maximum(box_a[:, :2], box_b[:2])
    inter = np.clip((max_yx - min_yx), a_min=0, a_max=np.inf)
    return inter[:, 0] * inter[:, 1]

def jaccard_numpy(box_a, box_b):
    """Compute the jaccard overlap of two sets of boxes."""
    inter = intersect(box_a, box_b)
    area_a = ((box_a[:, 2] - box_a[:, 0]) *
              (box_a[:, 3] - box_a[:, 1]))
    area_b = ((box_b[2] - box_b[0]) *
              (box_b[3] - box_b[1]))
    union = area_a + area_b - inter
    return inter / union

def random_sample_crop(image, boxes):
    """Crop images and boxes randomly."""
    height, width, _ = image.shape
    min_iou = np.random.choice([None, 0.1, 0.3, 0.5, 0.7, 0.9])

    if min_iou is None:
        return image, boxes

    for _ in range(50):
        image_t = image
        w = _rand(0.3, 1.0) * width
        h = _rand(0.3, 1.0) * height
        if h / w < 0.5 or h / w > 2:
            continue

        left = _rand() * (width - w)
        top = _rand() * (height - h)
        rect = np.array([int(top), int(left), int(top + h), int(left + w)])
        overlap = jaccard_numpy(boxes, rect)

        drop_mask = overlap > 0
        if not drop_mask.any():
            continue

        if overlap[drop_mask].min() < min_iou and overlap[drop_mask].max() > (min_iou + 0.2):
            continue

        image_t = image_t[rect[0]:rect[2], rect[1]:rect[3], :]
        centers = (boxes[:, :2] + boxes[:, 2:4]) / 2.0
        m1 = (rect[0] < centers[:, 0]) * (rect[1] < centers[:, 1])
        m2 = (rect[2] > centers[:, 0]) * (rect[3] > centers[:, 1])

        mask = m1 * m2 * drop_mask

        if not mask.any():
            continue

        boxes_t = boxes[mask, :].copy()
        boxes_t[:, :2] = np.maximum(boxes_t[:, :2], rect[:2])
        boxes_t[:, :2] -= rect[:2]
        boxes_t[:, 2:4] = np.minimum(boxes_t[:, 2:4], rect[2:4])
        boxes_t[:, 2:4] -= rect[:2]

        return image_t, boxes_t
    return image, boxes

def ssd_bboxes_encode(boxes):
    """Labels anchors with ground truth inputs."""

    def jaccard_with_anchors(bbox):
        """Compute jaccard score a box and the anchors."""
        ymin = np.maximum(y1, bbox[0])
        xmin = np.maximum(x1, bbox[1])
        ymax = np.minimum(y2, bbox[2])
        xmax = np.minimum(x2, bbox[3])
        w = np.maximum(xmax - xmin, 0.)
        h = np.maximum(ymax - ymin, 0.)

        inter_vol = h * w
        union_vol = vol_anchors + (bbox[2] - bbox[0]) * (bbox[3] - bbox[1]) - inter_vol
        jaccard = inter_vol / union_vol
        return np.squeeze(jaccard)

    pre_scores = np.zeros((8732), dtype=np.float32)
    t_boxes = np.zeros((8732, 4), dtype=np.float32)
    t_label = np.zeros((8732), dtype=np.int64)
    for bbox in boxes:
        label = int(bbox[4])
        scores = jaccard_with_anchors(bbox)
        idx = np.argmax(scores)
        scores[idx] = 2.0
        mask = (scores > matching_threshold)
        mask = mask & (scores > pre_scores)
        pre_scores = np.maximum(pre_scores, scores * mask)
        t_label = mask * label + (1 - mask) * t_label
        for i in range(4):
            t_boxes[:, i] = mask * bbox[i] + (1 - mask) * t_boxes[:, i]

    index = np.nonzero(t_label)

    bboxes = np.zeros((8732, 4), dtype=np.float32)
    bboxes[:, [0, 1]] = (t_boxes[:, [0, 1]] + t_boxes[:, [2, 3]]) / 2
    bboxes[:, [2, 3]] = t_boxes[:, [2, 3]] - t_boxes[:, [0, 1]]

    bboxes_t = bboxes[index]
    default_boxes_t = default_boxes[index]
    bboxes_t[:, :2] = (bboxes_t[:, :2] - default_boxes_t[:, :2]) / (default_boxes_t[:, 2:] * 0.1)
    tmp = np.maximum(bboxes_t[:, 2:4] / default_boxes_t[:, 2:4], 0.000001)
    bboxes_t[:, 2:4] = np.log(tmp) / 0.2
    bboxes[index] = bboxes_t

    num_match = np.array([len(np.nonzero(t_label)[0])], dtype=np.int32)
    return bboxes, t_label.astype(np.int32), num_match

def preprocess_fn(img_id, image, box, is_training):
    """Preprocess function for dataset."""
    cv2.setNumThreads(2)

    def _infer_data(image, input_shape):
        img_h, img_w, _ = image.shape
        input_h, input_w = input_shape

        image = cv2.resize(image, (input_w, input_h))

        if len(image.shape) == 2:
            image = np.expand_dims(image, axis=-1)
            image = np.concatenate([image, image, image], axis=-1)

        return img_id, image, np.array((img_h, img_w), np.float32)

    def _data_aug(image, box, is_training, image_size=(300, 300)):
        ih, iw, _ = image.shape
        h, w = image_size
        if not is_training:
            return _infer_data(image, image_size)
        box = box.astype(np.float32)
        image, box = random_sample_crop(image, box)
        ih, iw, _ = image.shape
        image = cv2.resize(image, (w, h))
        flip = _rand() < .5
        if flip:
            image = cv2.flip(image, 1, dst=None)
        if len(image.shape) == 2:
            image = np.expand_dims(image, axis=-1)
            image = np.concatenate([image, image, image], axis=-1)
        box[:, [0, 2]] = box[:, [0, 2]] / ih
        box[:, [1, 3]] = box[:, [1, 3]] / iw
        if flip:
            box[:, [1, 3]] = 1 - box[:, [3, 1]]
        box, label, num_match = ssd_bboxes_encode(box)
        return image, box, label, num_match

    return _data_aug(image, box, is_training, image_size=[300, 300])
数据集创建
from mindspore import Tensor
from mindspore.dataset import MindDataset
from mindspore.dataset.vision import Decode, HWC2CHW, Normalize, RandomColorAdjust

def create_ssd_dataset(mindrecord_file, batch_size=32, device_num=1, rank=0,
                       is_training=True, num_parallel_workers=1, use_multiprocessing=True):
    dataset = MindDataset(mindrecord_file, columns_list=["img_id", "image", "annotation"], num_shards=device_num,
                          shard_id=rank, num_parallel_workers=num_parallel_workers, shuffle=is_training)

    decode = Decode()
    dataset = dataset.map(operations=decode, input_columns=["image"])

    change_swap_op = HWC2CHW()
    normalize_op = Normalize(mean=[0.485 * 255, 0.456 * 255, 0.406 * 255],
                             std=[0.229 * 255, 0.224 * 255, 0.225 * 255])
    color_adjust_op = RandomColorAdjust(brightness=0.4, contrast=0.4, saturation=0.4)
    compose_map_func = (lambda img_id, image, annotation: preprocess_fn(img_id, image, annotation, is_training))

    if is_training:
        output_columns = ["image", "box", "label", "num_match"]
        trans = [color_adjust_op, normalize_op, change_swap_op]
    else:
        output_columns = ["img_id", "image", "image_shape"]
        trans = [normalize_op, change_swap_op]

    dataset = dataset.map(operations=compose_map_func, input_columns=["img_id", "image", "annotation"],
                          output_columns=output_columns, python_multiprocessing=use_multiprocessing,
                          num_parallel_workers=num_parallel_workers)

    dataset = dataset.map(operations=trans, input_columns=["image"], python_multiprocessing=use_multiprocessing,
                          num_parallel_workers=num_parallel_workers)

    dataset = dataset.batch(batch_size, drop_remainder=True)
    return dataset
模型构建
模型构建:
- 原因:模型构建包括定义网络结构、初始化参数等步骤,目的是搭建一个能够进行目标检测的深度学习模型。
- 重要性:合理的网络结构设计和参数初始化可以提高模型的性能和稳定性。例如,SSD采用VGG16作为基础网络,并在其基础上增加了卷积层用于多尺度特征提取,这使得模型能够在不同尺度上进行目标检测。
SSD的网络结构主要分为以下几个部分:
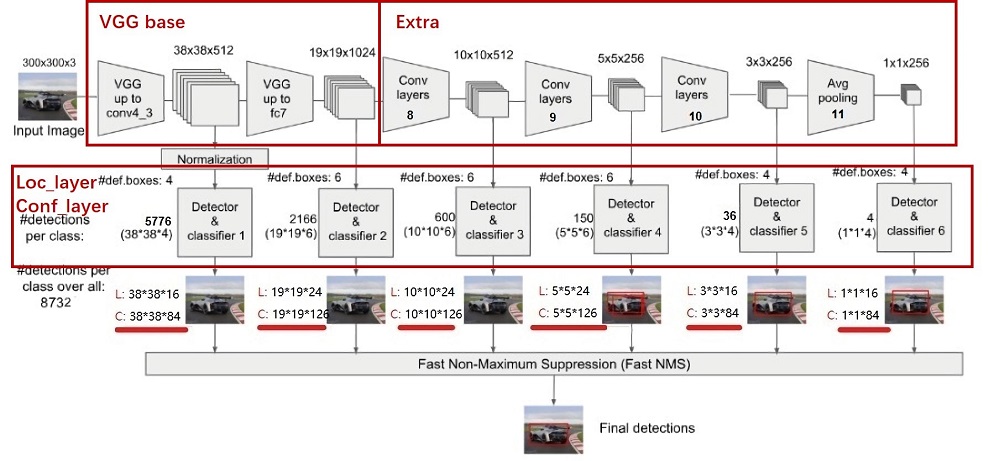
Backbone Layer
SSD采用VGG16作为基础模型,然后在其之上新增了卷积层来获得更多的特征图用于检测。以下是VGG16的实现:
from mindspore import nn

def _make_layer(channels):
    in_channels = channels[0]
    layers = []
    for out_channels in channels[1:]:
        layers.append(nn.Conv2d(in_channels=in_channels, out_channels=out_channels, kernel_size=3))
        layers.append(nn.ReLU())
        in_channels = out_channels
    return nn.SequentialCell(layers)

class Vgg16(nn.Cell):
    """VGG16 module."""

    def __init__(self):
        super(Vgg16, self).__init__()
        self.b1 = _make_layer([3, 64, 64])
        self.b2 = _make_layer([64, 128, 128])
        self.b3 = _make_layer([128, 256, 256, 256])
        self.b4 = _make_layer([256, 512, 512, 512])
        self.b5 = _make_layer([512, 512, 512, 512])

        self.m1 = nn.MaxPool2d(kernel_size=2, stride=2, pad_mode='SAME')
        self.m2 = nn.MaxPool2d(kernel_size=2, stride=2, pad_mode='SAME')
        self.m3 = nn.MaxPool2d(kernel_size=2, stride=2, pad_mode='SAME')
        self.m4 = nn.MaxPool2d(kernel_size=2, stride=2, pad_mode='SAME')
        self.m5 = nn.MaxPool2d(kernel_size=3, stride=1, pad_mode='SAME')

    def construct(self, x):
        # block1
        x = self.b1(x)
        x = self.m1(x)

        # block2
        x = self.b2(x)
        x = self.m2(x)

        # block3
        x = self.b3(x)
        x = self.m3(x)

        # block4
        x = self.b4(x)
        block4 = x
        x = self.m4(x)

        # block5
        x = self.b5(x)
        x = self.m5(x)

        return block4, x
好的,接下来我们继续实现SSD模型的Extra Feature Layers部分。
Extra Feature Layers
在VGG16基础上增加的卷积层用于提取更高层次的特征,这些特征有助于检测不同尺度的目标。以下是实现代码:
class ExtraLayers(nn.Cell):
    """Extra layers for SSD."""

    def __init__(self):
        super(ExtraLayers, self).__init__()
        self.conv6 = nn.Conv2d(512, 1024, kernel_size=3, padding=6, dilation=6)
        self.conv7 = nn.Conv2d(1024, 1024, kernel_size=1)
        self.conv8_1 = nn.Conv2d(1024, 256, kernel_size=1)
        self.conv8_2 = nn.Conv2d(256, 512, kernel_size=3, stride=2, pad_mode='same')
        self.conv9_1 = nn.Conv2d(512, 128, kernel_size=1)
        self.conv9_2 = nn.Conv2d(128, 256, kernel_size=3, stride=2, pad_mode='same')
        self.conv10_1 = nn.Conv2d(256, 128, kernel_size=1)
        self.conv10_2 = nn.Conv2d(128, 256, kernel_size=3)
        self.conv11_1 = nn.Conv2d(256, 128, kernel_size=1)
        self.conv11_2 = nn.Conv2d(128, 256, kernel_size=3)

    def construct(self, x):
        x = self.conv6(x)
        x = self.conv7(x)
        conv8_2 = self.conv8_2(self.conv8_1(x))
        conv9_2 = self.conv9_2(self.conv9_1(conv8_2))
        conv10_2 = self.conv10_2(self.conv10_1(conv9_2))
        conv11_2 = self.conv11_2(self.conv11_1(conv10_2))
        return conv8_2, conv9_2, conv10_2, conv11_2
Prediction Layers
SSD的预测层用于生成类别和位置的预测结果。每个特征层都会生成多个预测框。以下是实现代码:
class PredictionLayers(nn.Cell):
    """Prediction layers for SSD."""

    def __init__(self, num_classes):
        super(PredictionLayers, self).__init__()
        self.num_classes = num_classes

        self.loc_layers = nn.CellList([
            nn.Conv2d(512, 4 * 4, kernel_size=3, pad_mode='same'),
            nn.Conv2d(1024, 6 * 4, kernel_size=3, pad_mode='same'),
            nn.Conv2d(512, 6 * 4, kernel_size=3, pad_mode='same'),
            nn.Conv2d(256, 6 * 4, kernel_size=3, pad_mode='same'),
            nn.Conv2d(256, 4 * 4, kernel_size=3, pad_mode='same'),
            nn.Conv2d(256, 4 * 4, kernel_size=3, pad_mode='same')
        ])

        self.conf_layers = nn.CellList([
            nn.Conv2d(512, 4 * num_classes, kernel_size=3, pad_mode='same'),
            nn.Conv2d(1024, 6 * num_classes, kernel_size=3, pad_mode='same'),
            nn.Conv2d(512, 6 * num_classes, kernel_size=3, pad_mode='same'),
            nn.Conv2d(256, 6 * num_classes, kernel_size=3, pad_mode='same'),
            nn.Conv2d(256, 4 * num_classes, kernel_size=3, pad_mode='same'),
            nn.Conv2d(256, 4 * num_classes, kernel_size=3, pad_mode='same')
        ])

    def construct(self, features):
        loc_preds = []
        conf_preds = []
        for i, feature in enumerate(features):
            loc_pred = self.loc_layers[i](feature)
            conf_pred = self.conf_layers[i](feature)
            loc_pred = loc_pred.permute(0, 2, 3, 1).reshape(loc_pred.shape[0], -1, 4)
            conf_pred = conf_pred.permute(0, 2, 3, 1).reshape(conf_pred.shape[0], -1, self.num_classes)
            loc_preds.append(loc_pred)
            conf_preds.append(conf_pred)
        loc_preds = ops.Concat(axis=1)(loc_preds)
        conf_preds = ops.Concat(axis=1)(conf_preds)
        return loc_preds, conf_preds
SSD模型整合
将上述各个部分整合成完整的SSD模型:
class SSD(nn.Cell):
    """SSD network."""

    def __init__(self, num_classes):
        super(SSD, self).__init__()
        self.num_classes = num_classes
        self.backbone = Vgg16()
        self.extras = ExtraLayers()
        self.prediction = PredictionLayers(num_classes)

    def construct(self, x):
        block4, x = self.backbone(x)
        features = [block4, x] + list(self.extras(x))
        loc_preds, conf_preds = self.prediction(features)
        return loc_preds, conf_preds
损失函数
损失函数:
- 位置损失(Smooth L1 Loss):
- 原因:位置损失用于衡量预测框与真实框的位置偏差,采用平滑L1损失可以减小异常值的影响。
- 重要性:平滑L1损失在误差较小时与L2损失相似,在误差较大时与L1损失相似,这样可以在训练过程中更稳定地收敛,避免因异常值导致的梯度爆炸。
- 分类损失(Cross Entropy Loss):
- 原因:分类损失用于衡量预测类别的准确性,采用交叉熵损失可以有效地处理多分类问题。
- 重要性:交叉熵损失能够计算预测类别与真实类别之间的差异,通过最小化这个差异,模型可以更准确地分类目标物体。
SSD的损失函数包括位置损失和分类损失。位置损失使用平滑L1损失,分类损失使用交叉熵损失。以下是实现代码:
class MultiBoxLoss(nn.Cell):
    """SSD Loss function."""

    def __init__(self, num_classes, neg_pos_ratio=3):
        super(MultiBoxLoss, self).__init__()
        self.num_classes = num_classes
        self.neg_pos_ratio = neg_pos_ratio
        self.cross_entropy = nn.SoftmaxCrossEntropyWithLogits(sparse=True, reduction='none')
        self.smooth_l1_loss = nn.SmoothL1Loss()

    def construct(self, loc_preds, loc_targets, conf_preds, conf_targets):
        pos_mask = conf_targets > 0
        num_pos = pos_mask.sum(axis=1, keepdims=True)

        loc_loss = self.smooth_l1_loss(loc_preds, loc_targets)
        loc_loss = (loc_loss * pos_mask).sum(axis=1)

        conf_loss = self.cross_entropy(conf_preds, conf_targets)
        conf_loss = conf_loss.reshape(-1, conf_preds.shape[1])
        pos_conf_loss = (conf_loss * pos_mask).sum(axis=1)
        neg_conf_loss = (conf_loss * (1 - pos_mask)).sum(axis=1)

        num_neg = ops.minimum(self.neg_pos_ratio * num_pos, conf_preds.shape[1] - num_pos)
        num_neg = num_neg.astype(ms.int32)

        neg_conf_loss, _ = ops.sort(neg_conf_loss, axis=1, descending=True)
        neg_conf_loss = neg_conf_loss[:, :num_neg]

        conf_loss = pos_conf_loss + neg_conf_loss.sum(axis=1)
        total_loss = (loc_loss + conf_loss) / num_pos.sum()
        return total_loss
训练与评估
训练
定义训练过程:
from mindspore import Model, context
from mindspore.nn import Adam

context.set_context(mode=context.GRAPH_MODE, device_target="CPU")

num_classes = len(train_cls)
ssd_net = SSD(num_classes)
loss = MultiBoxLoss(num_classes)
optimizer = Adam(ssd_net.trainable_params(), learning_rate=0.001)

model = Model(ssd_net, loss_fn=loss, optimizer=optimizer)

dataset = create_ssd_dataset(mindrecord_file="./datasets/ssd_mindrecord/train.mindrecord", batch_size=32, is_training=True)

model.train(epoch=10, train_dataset=dataset)
评估
定义评估过程:
def evaluate_model(model, dataset):
    # 评估代码
    pass

val_dataset = create_ssd_dataset(mindrecord_file="./datasets/ssd_mindrecord/val.mindrecord", batch_size=32, is_training=False)
evaluate_model(model, val_dataset)