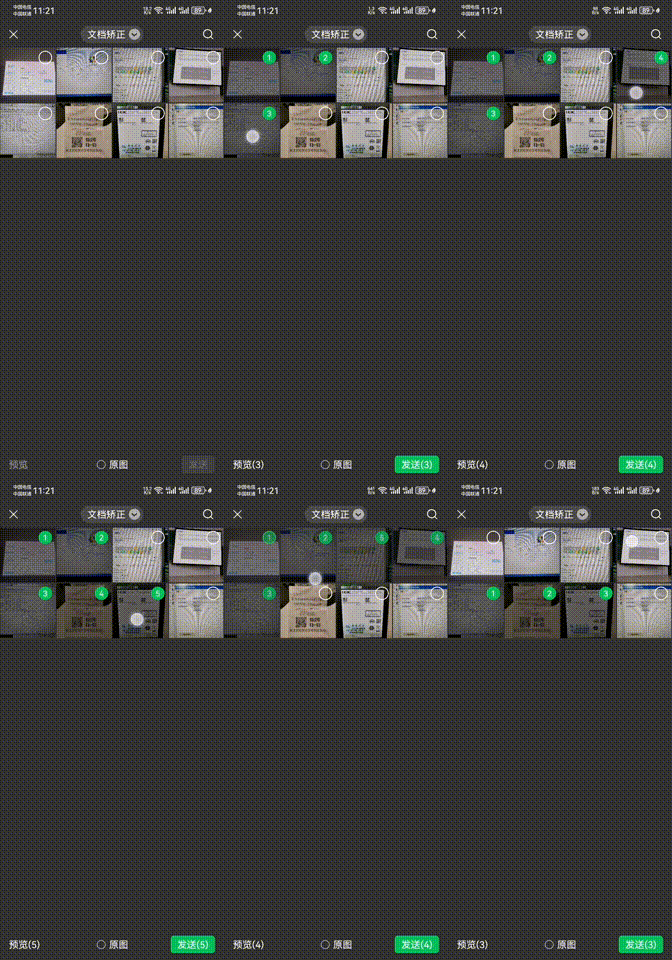
看到微信中,上传图片时的图片查看功能可以通过手指长按并滑动实现多选,于是为解析实现思路,也通过WPF 使用ListBox 实现了一版案例。
参考效果
微信效果如下,支持图片单选和鼠标长按滑动实现批量操作。
WPF模仿效果:
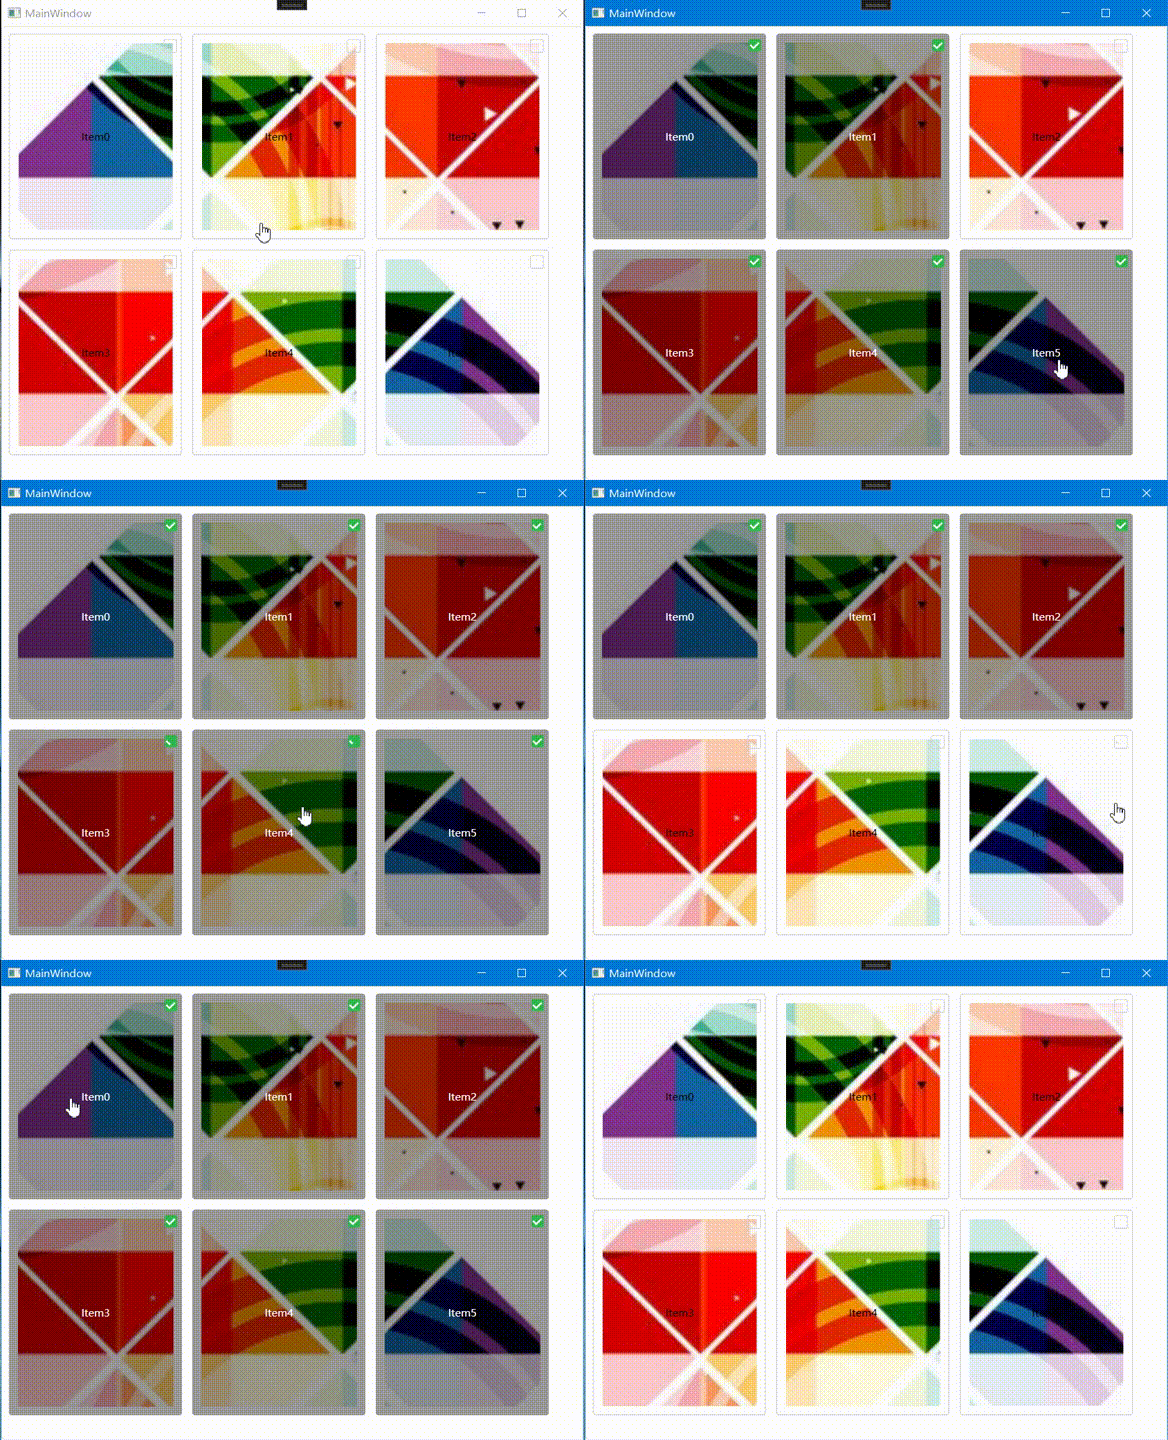
效果分析
手指从第一项按下,向下拖动,拖动过程中手指位置所在项,就被选中或者反选,第一次点击项的状态决定后续所有覆盖项的状态。
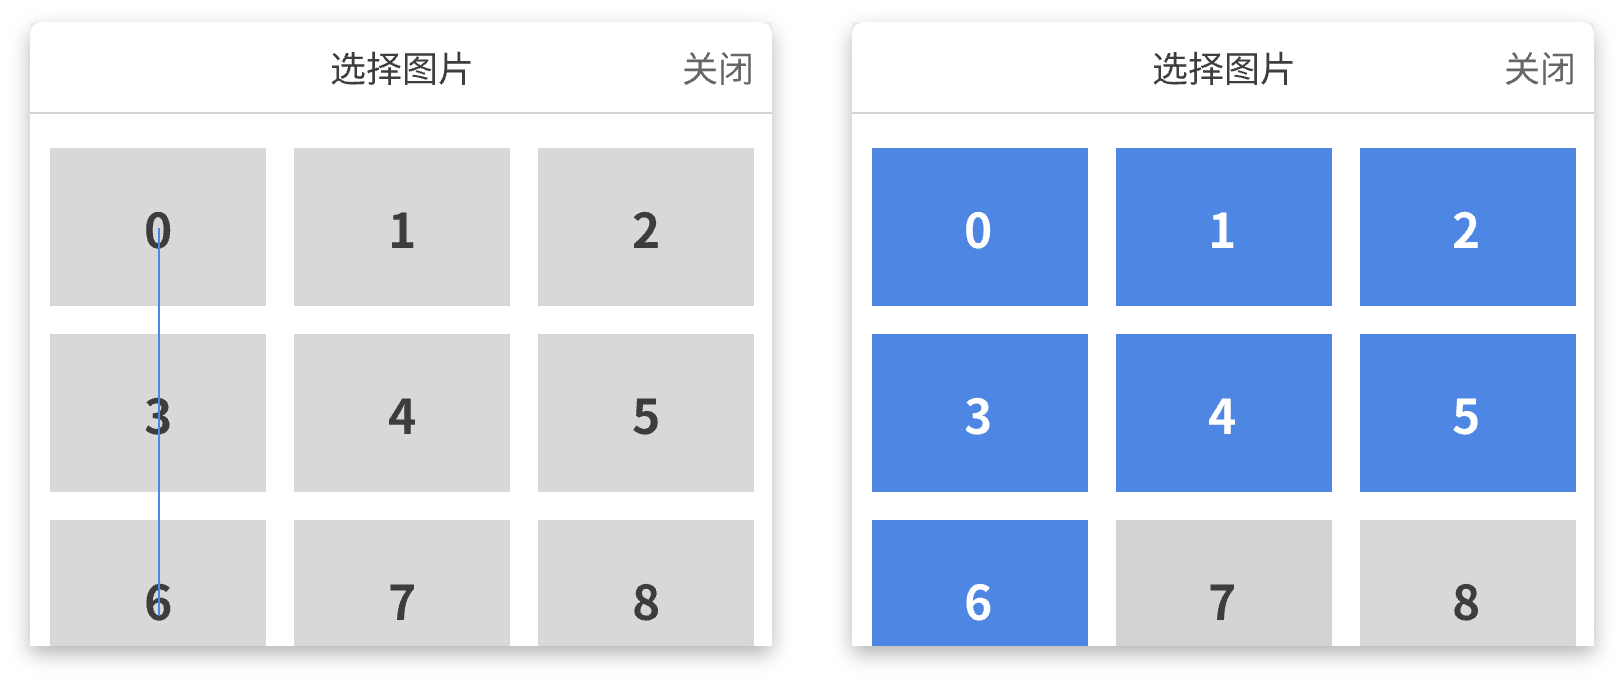
手指相关事件:手指按下、手指移动以及手指放开,对应着鼠标操作为:鼠标键下、鼠标移动以及鼠标键起。
代码实现
为了展示效果,案例项目引入了HandyControl 以及 Prism.Core 对应 nuget 包。
	<ItemGroup>
		<PackageReference Include="HandyControl" Version="3.4.0" />
		<PackageReference Include="Prism.Core" Version="8.1.97" />
	</ItemGroup>
案例目录
│  App.xaml #应用Application资源
│  App.xaml.cs #应用Application实现类
│  AssemblyInfo.cs
│  BoxItemViewModel.cs #选中项视图实体
│  MainWindow.xaml #案例窗体
│  MainWindow.xaml.cs #窗体后台代码
│  MainWindowViewModel.cs #主视图实体
│  WPFSelectedRange.csproj
└─Resources #资源目录
    └─Images  #图片资源
Xaml代码
<Window x:Class="WPFSelectedRange.MainWindow"
        xmlns="http://schemas.microsoft.com/winfx/2006/xaml/presentation"
        xmlns:x="http://schemas.microsoft.com/winfx/2006/xaml"
        xmlns:d="http://schemas.microsoft.com/expression/blend/2008"
        xmlns:mc="http://schemas.openxmlformats.org/markup-compatibility/2006"
        xmlns:local="clr-namespace:WPFSelectedRange"
        mc:Ignorable="d"
        Title="MainWindow" Height="450" Width="800">
    <Window.DataContext>
        <local:MainWindowViewModel></local:MainWindowViewModel>
    </Window.DataContext>
    <!--设置选中模式SelectionMode为多选模式-->
    <ListBox ItemsSource="{Binding BoxItemViewModels}" SelectionMode="Multiple">
        <ListBox.ItemTemplate>
            <DataTemplate DataType="local:BoxItemViewModel">
	            <!--设置项模板-->
                <Border x:Name="Border" Cursor="Hand" Width="200" Height="240" CornerRadius="3" BorderThickness="1" BorderBrush="LightGray" SnapsToDevicePixels="True">
                    <DockPanel Background="Transparent" HorizontalAlignment="Stretch" VerticalAlignment="Stretch">
                        <Grid>
                            <Image Margin="10" Source="{Binding ImagePath}" Stretch="UniformToFill"></Image>
                            <Border x:Name="Mask" Visibility="Collapsed" Background="#66000000" CornerRadius="{Binding ElementName=Border,Path=CornerRadius}"></Border>
                            <CheckBox x:Name="Ck" Margin="0,5,5,0" BorderBrush="LightGray" Background="Transparent" IsChecked="{Binding IsSelected}" DockPanel.Dock="Top" HorizontalAlignment="Right" VerticalAlignment="Top"></CheckBox>
                            <TextBlock Text="{Binding Name}" HorizontalAlignment="Center" VerticalAlignment="Center" Background="Transparent"></TextBlock>
                        </Grid>
                    </DockPanel>
                </Border>
                <!--设置数据触发器,选中时改变样式-->
                <DataTemplate.Triggers>
                    <DataTrigger Binding="{Binding IsSelected}"  Value="True">
                        <Setter Property="TextElement.Foreground" Value="White"></Setter>
                        <Setter TargetName="Border" Property="BorderBrush" Value="LightGray"></Setter>
                        <Setter TargetName="Border" Property="BorderThickness" Value="0"></Setter>
                        <Setter TargetName="Ck" Property="BorderBrush" Value="Transparent"></Setter>
                        <Setter TargetName="Mask" Property="Visibility" Value="Visible"></Setter>
                        <Setter TargetName="Ck" Property="Background" Value="{StaticResource SuccessBrush}"></Setter>
                    </DataTrigger>
                </DataTemplate.Triggers>
            </DataTemplate>
        </ListBox.ItemTemplate>
        <ListBox.ItemsPanel>
            <ItemsPanelTemplate>
            <!--设置布局容器添加鼠标Preview类事件-->
                <WrapPanel   PreviewMouseLeftButtonDown="UniformGrid_PreviewMouseDown"
                             PreviewMouseMove="UniformGrid_PreviewMouseMove"
                             PreviewMouseLeftButtonUp="UniformGrid_PreviewMouseLeftButtonUp"
                             Orientation="Horizontal"></WrapPanel>
            </ItemsPanelTemplate>
        </ListBox.ItemsPanel>
        <ListBox.ItemContainerStyle>
            <Style TargetType="ListBoxItem">
                <Setter Property="Padding" Value="5"/>
                <Setter Property="BorderBrush" Value="LightGray"/>
                <Setter Property="Template">
                    <Setter.Value>
                        <ControlTemplate TargetType="ListBoxItem">
                            <Border x:Name="Border"
                                    CornerRadius="3"
                                    BorderThickness="{TemplateBinding BorderThickness}" Margin="{TemplateBinding Padding}">
                                <ContentPresenter></ContentPresenter>
                            </Border>
                        </ControlTemplate>
                    </Setter.Value>
                </Setter>
            </Style>
        </ListBox.ItemContainerStyle>
    </ListBox>
</Window>
视图实体
主视图实体MainWindowViewModel.cs
   public class MainWindowViewModel
   {
       public MainWindowViewModel()
       {
           BoxItemViewModels = new List<BoxItemViewModel>();
           for (int i = 0; i < 6; i++)
           {
               BoxItemViewModels.Add(new BoxItemViewModel() { Name = "Item" + i,ImagePath=@$"\Resources\Images\{i+1}.png" });
           }
       }

       // BoxItemViewModel集合
       private List<BoxItemViewModel> _boxItemViewModels;
       public List<BoxItemViewModel> BoxItemViewModels
       {
           get { return _boxItemViewModels; }
           set
           {
               if (_boxItemViewModels != value)
               {
                   _boxItemViewModels = value;
               }
           }
       }
   }
选中项视图实体BoxItemViewModel.cs
public class BoxItemViewModel:BindableBase
{
	// 是否选中
    private bool _isSelected;
    public bool IsSelected
    {
        get => _isSelected;
        set => SetProperty(ref _isSelected, value);
    }
	// 显示名称
    private string _name;
    public string Name
    {
        get => _name;
        set => SetProperty(ref _name, value);
    }

    // 图片路径属性
    private string _imagePath;
    public string ImagePath
    {
        get => _imagePath;
        set => SetProperty(ref _imagePath, value);
    }
}
核心代码MainWindow.xaml.cs
注意:仅作为案例主要以思路展示为主,如果需要用于实际项目,建议进行附加属性封装和抽象接口封装。
public partial class MainWindow : Window
{
    private MainWindowViewModel mainWindowViewModel;
    public MainWindow()
    {
        InitializeComponent();
        this.Loaded += Window_Loaded;
    }

    // 当前选中初始状态
    private bool currentState;
    // 选中范围起始索引
    private int startIndex=int.MinValue,endIndex=int.MaxValue;
    // 临时选中项字典
    Dictionary<int,BoxItemViewModel> tempSelectItems = new Dictionary<int, BoxItemViewModel>();
    // 鼠标键下事件
    private void UniformGrid_PreviewMouseDown(object sender, MouseButtonEventArgs e)
    {
        tempSelectItems.Clear();
        // 容器获取ContentPresenter上下文
        if (e.Source is ContentPresenter content)
        {
            if (content.Content is BoxItemViewModel vm)
            {
                vm.IsSelected = !vm.IsSelected;
                currentState = vm.IsSelected;
                Debug.WriteLine($"容器键下,当前所在项:{vm.Name}:{currentState}");
                // 获取当前索引
                startIndex = mainWindowViewModel.BoxItemViewModels.IndexOf(vm);
            }
        }
    }
    // 鼠标键起事件
    private void UniformGrid_PreviewMouseLeftButtonUp(object sender, MouseButtonEventArgs e)
    {
        // 容器获取ContentPresenter上下文
        if (e.Source is ContentPresenter content)
        {
            if (content.Content is BoxItemViewModel vm)
            {
                Debug.WriteLine($"容器键起,当前所在项:{vm.Name}");
                // 获取当前索引
                endIndex = mainWindowViewModel.BoxItemViewModels.IndexOf(vm);
                foreach (var item in tempSelectItems)
                {
                    item.Value.IsSelected = currentState;
                }
            }
        }

        // 选中范围
        Debug.WriteLine($"起始索引:{startIndex}|终止索引:{endIndex}");

    }
    // 鼠标移动事件
    private void UniformGrid_PreviewMouseMove(object sender, MouseEventArgs e)
        {
            // 容器获取ContentPresenter上下文
            if (e.LeftButton == MouseButtonState.Pressed && e.Source is ContentPresenter content)
            {
                if (content.Content is BoxItemViewModel vm)
                {
                    Debug.WriteLine($"容器移动,当前所在项:{vm.Name}");
                    // 获取当前索引
                    endIndex = mainWindowViewModel.BoxItemViewModels.IndexOf(vm);
                    // 移动时,动态缓存临时项
                    // 如果临时项多余目标移动项,则清除多余项
                    if (tempSelectItems.Count() != 0 && Math.Abs(startIndex - endIndex) < tempSelectItems.Count())
                    {
                        // 顺序生成选中项索引集合
                        int[] containerids = Enumerable.Range(Math.Min(startIndex, endIndex), Math.Abs(startIndex - endIndex)).ToArray();
                        // 清除多余项
                        int[] removeids = tempSelectItems.Keys.Except(containerids).ToArray();
                        foreach (var item in removeids)
                        {
                            if (item != startIndex || item != endIndex)
                            {
                                tempSelectItems[item].IsSelected = !currentState;
                                tempSelectItems.Remove(item);
                            }
                        }
                    }
                    // 起始索引与终止索引不相等咋进行选中项操作
                    if (startIndex != endIndex)
                    {
                        int index = startIndex - endIndex;
                        // 选中范围起始索引与终止索引是否顺序操作
                        int start = startIndex < endIndex ? startIndex : endIndex;
                        int end = startIndex < endIndex ? endIndex : startIndex;
                        // 遍历设置选中项状态为当前状态
                        for (int i = start; i <= end; i++)
                        {
                            mainWindowViewModel.BoxItemViewModels[i].IsSelected = currentState;
                            // 并判定项是否临时项中,不在则添加
                            if (!tempSelectItems.ContainsKey(i))
                            {
                                tempSelectItems.Add(i, mainWindowViewModel.BoxItemViewModels[i]);
                            }
                        }
                    }
                }
            }
        }

    private void Window_Loaded(object sender, RoutedEventArgs e)
        {
            mainWindowViewModel = DataContext as MainWindowViewModel;
        }
}
归纳
总的来说,核心代码是在集合控件ListBox 的布局容器中添加鼠标事件,以及通过事件的对象参数,获取到子节点对应的VM,进而实现外部操作内部的展示逻辑。案例地址

