Arduino - Button Arduino - 按钮
参考:
- ezButton-按钮库
- 从按钮开关看上拉pull-up电阻、下拉电阻
- 按键的防抖动处理
The button is also called pushbutton, tactile button or momentary switch. It is a basic component and widely used in many Arduino projects. It is simple to use. However, it may make the beginners confuse, due to mechanical, physical issues and ways to use it as well. This tutorial makes it easy for the beginners.
该按钮也称为按钮、触觉按钮或瞬时开关。它是一个基本组件,广泛用于许多Arduino项目。它使用简单。但是,由于机械、物理问题和使用它的方法,它可能会让初学者感到困惑。
※ NOTE THAT: ※ 注意事项:
There are two common troubles that beginners usually get into:
初学者通常会遇到两个常见的麻烦:
How Motion Sensor Works
运动传感器的工作原理
1. Floating input problem:
1.浮动输入问题:
- *Symptom:* the reading value from the input pin is not matched with the button’s pressing state.
症状:输入引脚的读数值与按钮的按下状态不匹配。 - *Cause:* input pin is NOT used pull-up or pull-down resistor.
原因:输入引脚未使用上拉或下拉电阻。 - *Solution:* Use pull-up or pull-down resistor. It will be described in this tutorial
解决方案:使用上拉或下拉电阻。
2. Chattering phenomenon:
2、颤动现象:
It should be considered in only some application that needs to detect exactly number of the pressing.
仅在某些需要检测冲压次数的应用中才应考虑这一点。
- *Symptom:* Button is pressed one, but Arduino code detects several times.
症状:按下按钮一次,但Arduino代码检测到多次。 - *Cause:* Due to mechanical and physical issues, the state of the button (or switch) is quickly toggled between LOW and HIGH several times
原因:由于机械和物理问题,按钮(或开关)的状态在低电平和高电平之间快速切换多次 - *Solution:* Debounce. It will be described in Arduino - Button - Debounce tutorial.
解决方案:去抖动。Arduino - Button - Debounce 教程中对此进行了描述。
About Button 关于按钮
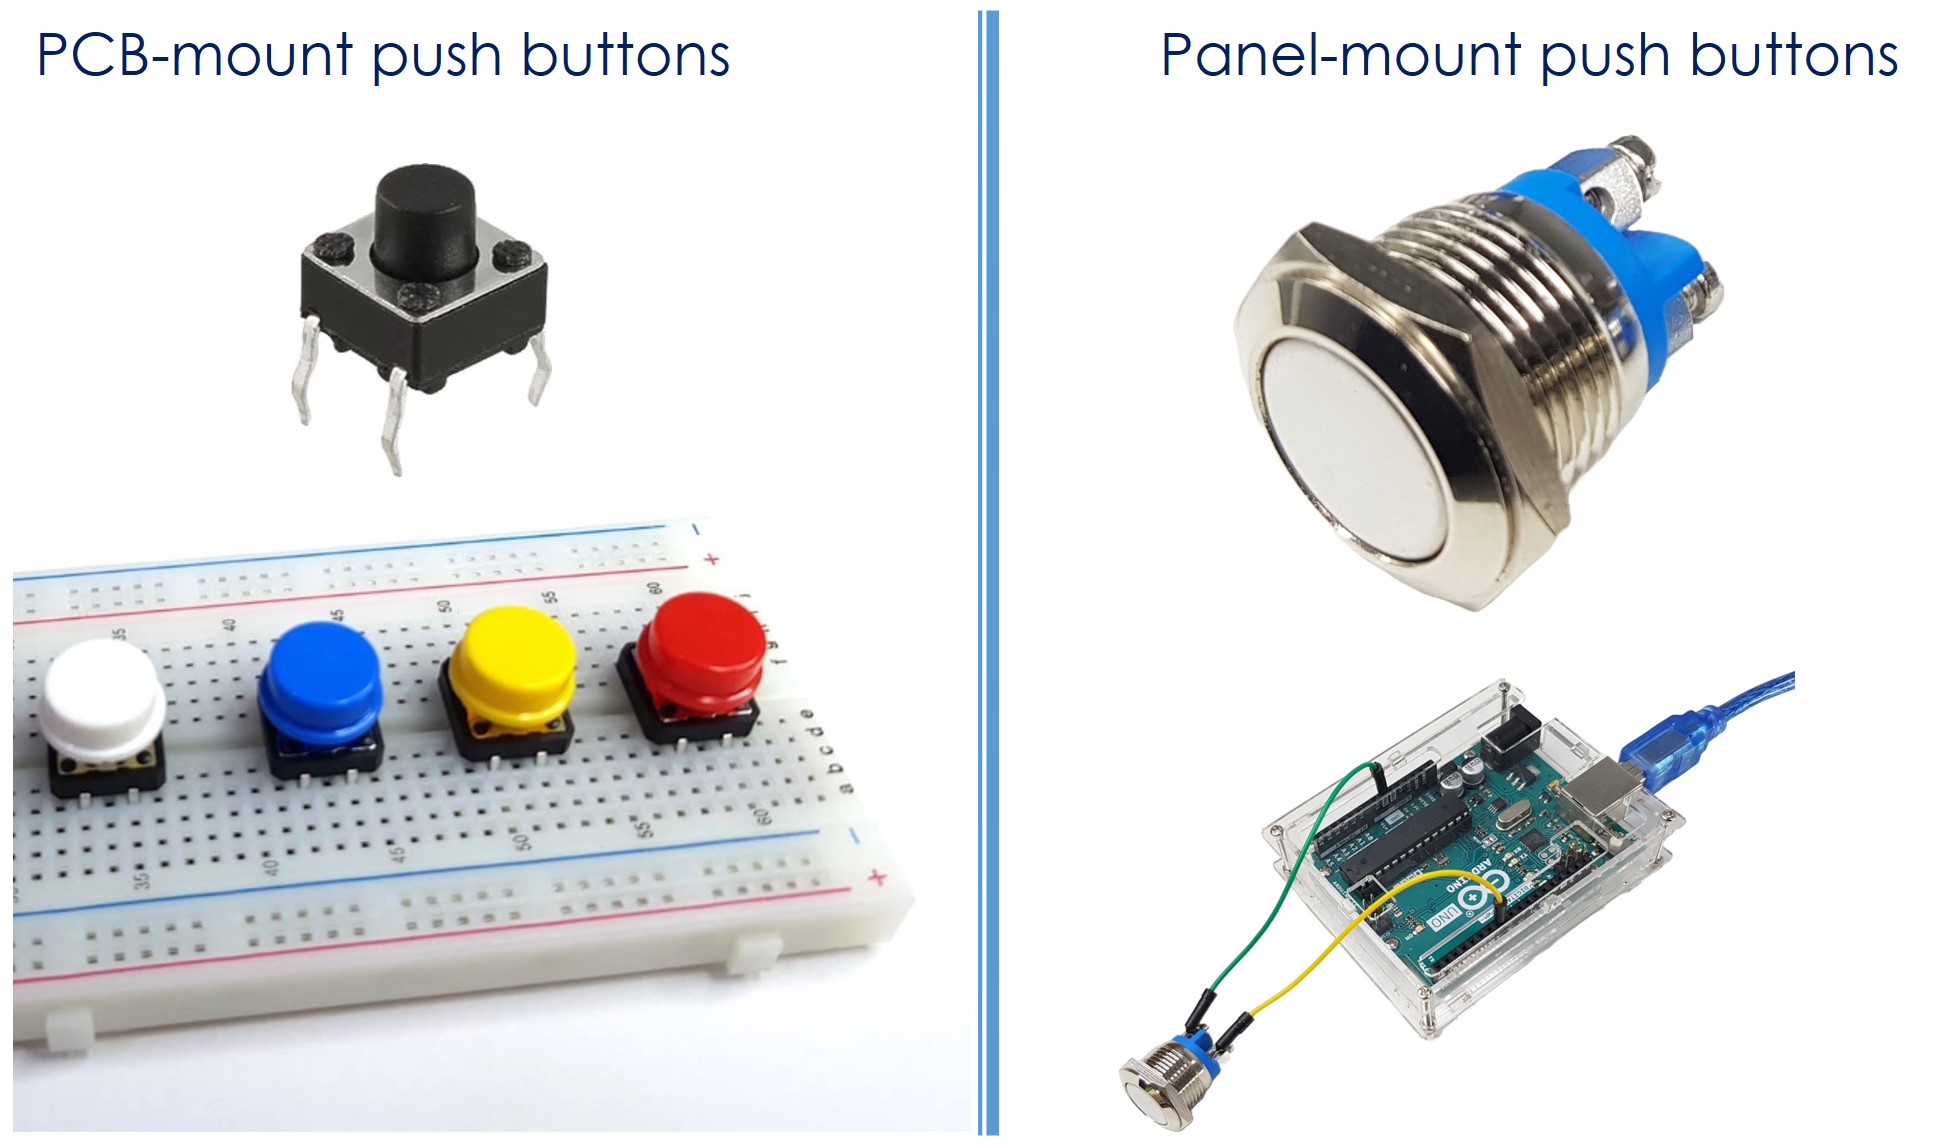
The push button, also referred to as a pushbutton, tactile button, or momentary switch, is a type of switch that closes when the button is pressed and held, and opens when released. There are various types of push buttons, broadly categorized into two groups:
按钮,也称为按钮、触觉按钮或瞬时开关,是一种在按住按钮时关闭,在松开时打开的开关。按钮有多种类型,大致分为两组:
- PCB-mount push buttons (breadboard-mountable)
PCB 安装按钮(可安装在试验板上) - Panel-mount push buttons 面板安装按钮
Pinout 引脚排列
The PCB-mount buttons usually have four pins. PCB 安装按钮通常有四个引脚。

However, these pins are internally connected in pairs. Therefore, we only need to use two of the four pins, which are NOT internally connected.
但是,这些引脚在内部成对连接。因此,我们只需要使用四个引脚中的两个,它们不是内部连接的。
There are four ways (actually two ways because of symmetry) to connect to button (see image)
有四种方式(由于对称性,实际上是两种方式)连接到按钮(见图)

We can use only two pins of a button, why does it have four pins?
一个按钮只能用两个引脚,为什么它有四个引脚?
⇒ To make it stand firmly in PCB (board) to resist the pressing force.
⇒ 使其牢固地站在PCB(板)中,以抵抗压力。
The panel-mount buttons usually have two pins. 面板安装按钮通常有两个引脚。

How It Works 它是如何工作的
- When the button is NOT pressed, pin A is NOT connected to pin B
当未按下按钮时,引脚 A 未连接到引脚 B - When the button is pressed, pin A is connected to pin B
按下按钮时,引脚 A 连接到引脚 B

Arduino - Button Arduino - 按钮
One button’s pin is connected to VCC or GND. The other pin is connected to an Arduino pin.
一个按钮的引脚连接到 VCC 或 GND。另一个引脚连接到Arduino引脚。
By reading the state of Arduino’s pin (configured as input pin), we can detect the button is pressed or NOT.
通过读取Arduino引脚(配置为输入引脚)的状态,我们可以检测按钮是否被按下。
Button State and Pressing State 按钮状态和按下状态
The relation between the button state and the pressing state depends on how we connect the button with Arduino and the setting of the Arduino’s pin.
按钮状态和按压状态之间的关系取决于我们如何将按钮与Arduino连接以及Arduino引脚的设置。
There are two ways to use a button with Arduino:
有两种方法可以将按钮与Arduino一起使用:
- One button’s pin is connected to VCC, the other is connected to an Arduino’s pin with a pull-down resistor
一个按钮的引脚连接到 VCC,另一个通过下拉电阻器连接到 Arduino 的引脚- If the button is pressed, Arduino’s pin state is HIGH. If otherwise, Arduino’s pin state is LOW
如果按下按钮,Arduino的引脚状态为HIGH。否则,Arduino的引脚状态为LOW - We MUST use an external resistor.
我们必须使用外部电阻器。
- If the button is pressed, Arduino’s pin state is HIGH. If otherwise, Arduino’s pin state is LOW
One button’s pin is connected to GND, the other is connected to an Arduino’s pin with a pull-up resistor
一个按钮的引脚连接到 GND,另一个通过上拉电阻连接到 Arduino 的引脚
- If the button is pressed, Arduino’s pin state is LOW. If otherwise, Arduino’s pin state is HIGH
如果按下按钮,Arduino的引脚状态为LOW。否则,Arduino的引脚状态为HIGH - We can use either an internal or external resistor. The internal resistor is built inside Arduino, we just need to set via Arduino code.
我们可以使用内部或外部电阻器。内部电阻器内置在Arduino内部,我们只需要通过Arduino代码进行设置即可。
※ NOTE THAT: ※ 注意事项:
If we do NOT use neither pull-down nor pull-up resistor, the state of the input pin is “floating” when the button is NOT pressed. It means the state can be HIGH or LOW (unstable, unfixed), resulting in the wrong detection.
如果我们既不使用下拉电阻器也不使用上拉电阻器,则在不按下按钮时,输入引脚的状态为“浮动”。这意味着状态可以是 HIGH 或 LOW(不稳定、不固定),从而导致错误的检测。
- The worst practice: initializes the Arduino pin as an input (by using pinMode(BUTTON_PIN, INPUT)) and does NOT use any external pull-down/pull-up resistor.
最糟糕的做法:将Arduino引脚初始化为输入(通过使用pinMode(BUTTON_PIN,INPUT)),并且不使用任何外部下拉/上拉电阻。 - The best practice: initializes the Arduino pin as an internal pull-up input (by using pinMode(BUTTON_PIN, INPUT_PULLUP)). It does NOT need to use any external pull-down/pull-up resistor.
最佳做法:将Arduino引脚初始化为内部上拉输入(通过使用pinMode(BUTTON_PIN,INPUT_PULLUP))。它不需要使用任何外部下拉/上拉电阻器。
To make it easy for beginners, this tutorial uses the simplest method: initializes the Arduino pin as an internal pull-up input without using the external resistor. The beginners do NOT need to care about how to wire the pull-up/pull-down resistor. The beginners just need to use the Arduino code.
为了方便初学者,本教程使用最简单的方法:在不使用外部电阻的情况下将Arduino引脚初始化为内部上拉输入。初学者无需关心如何接线上拉/下拉电阻器。初学者只需要使用Arduino代码即可。
Wiring Diagram 接线图
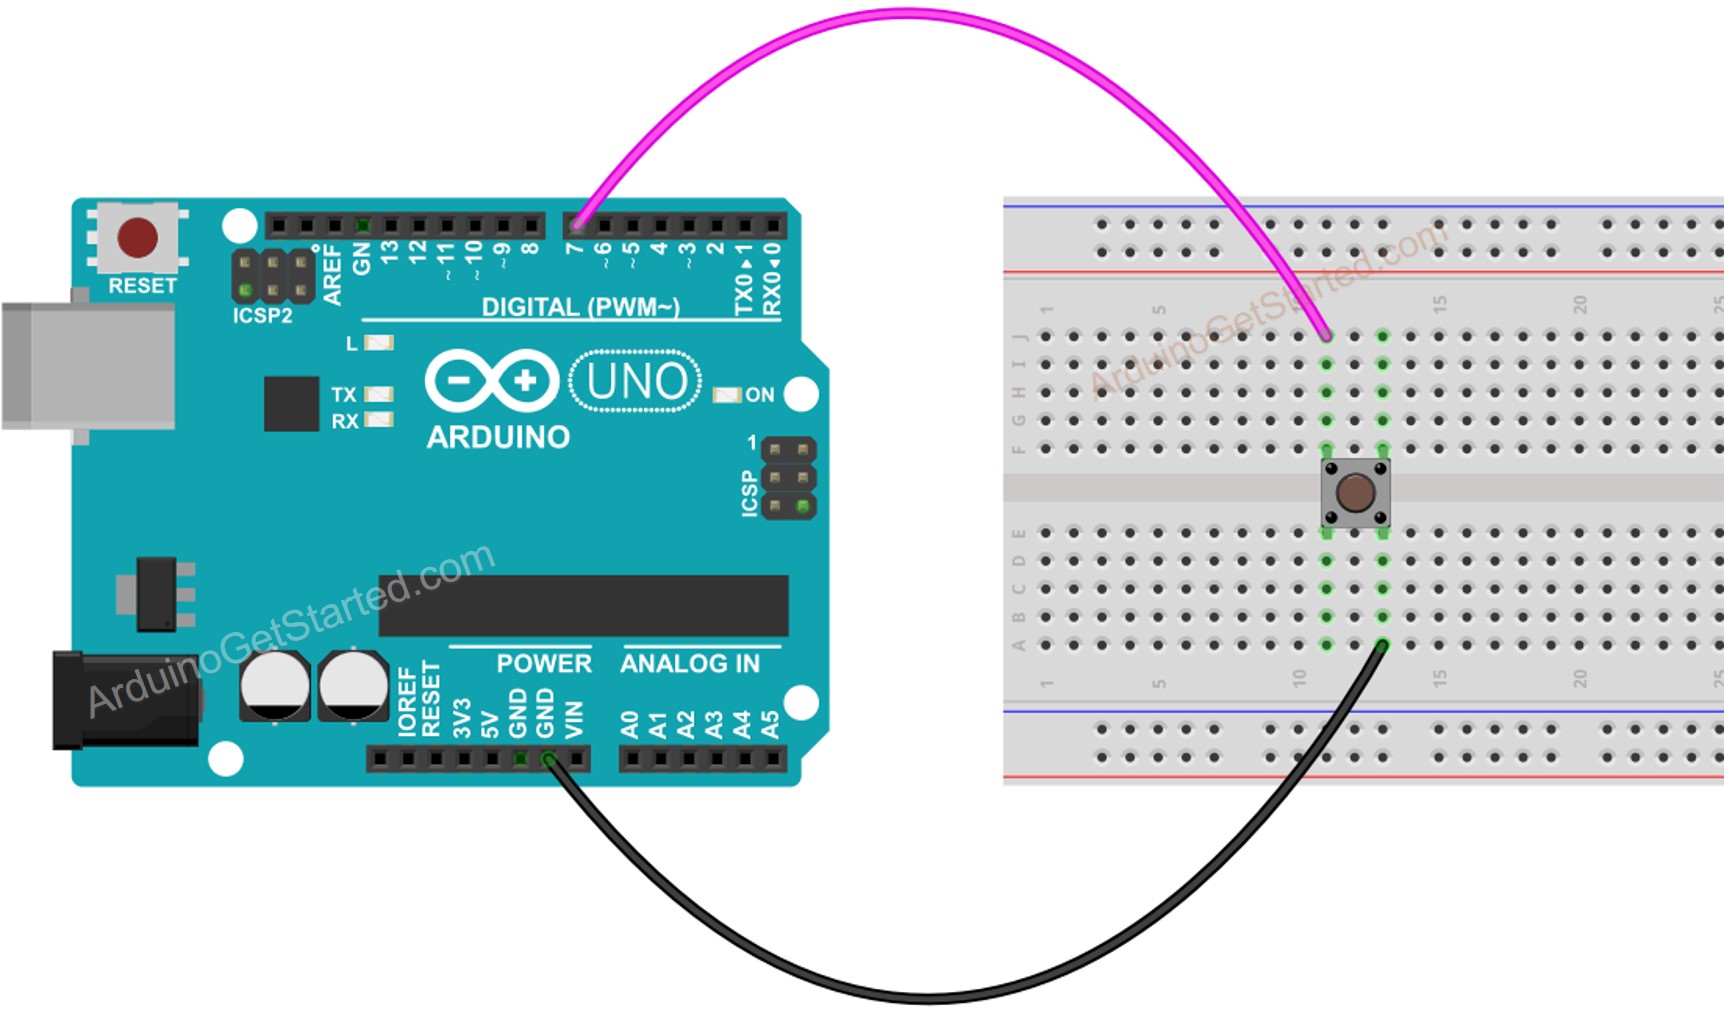
- Wiring Diagram between Arduino and PCB-mount button
Arduino和PCB安装按钮之间的接线图
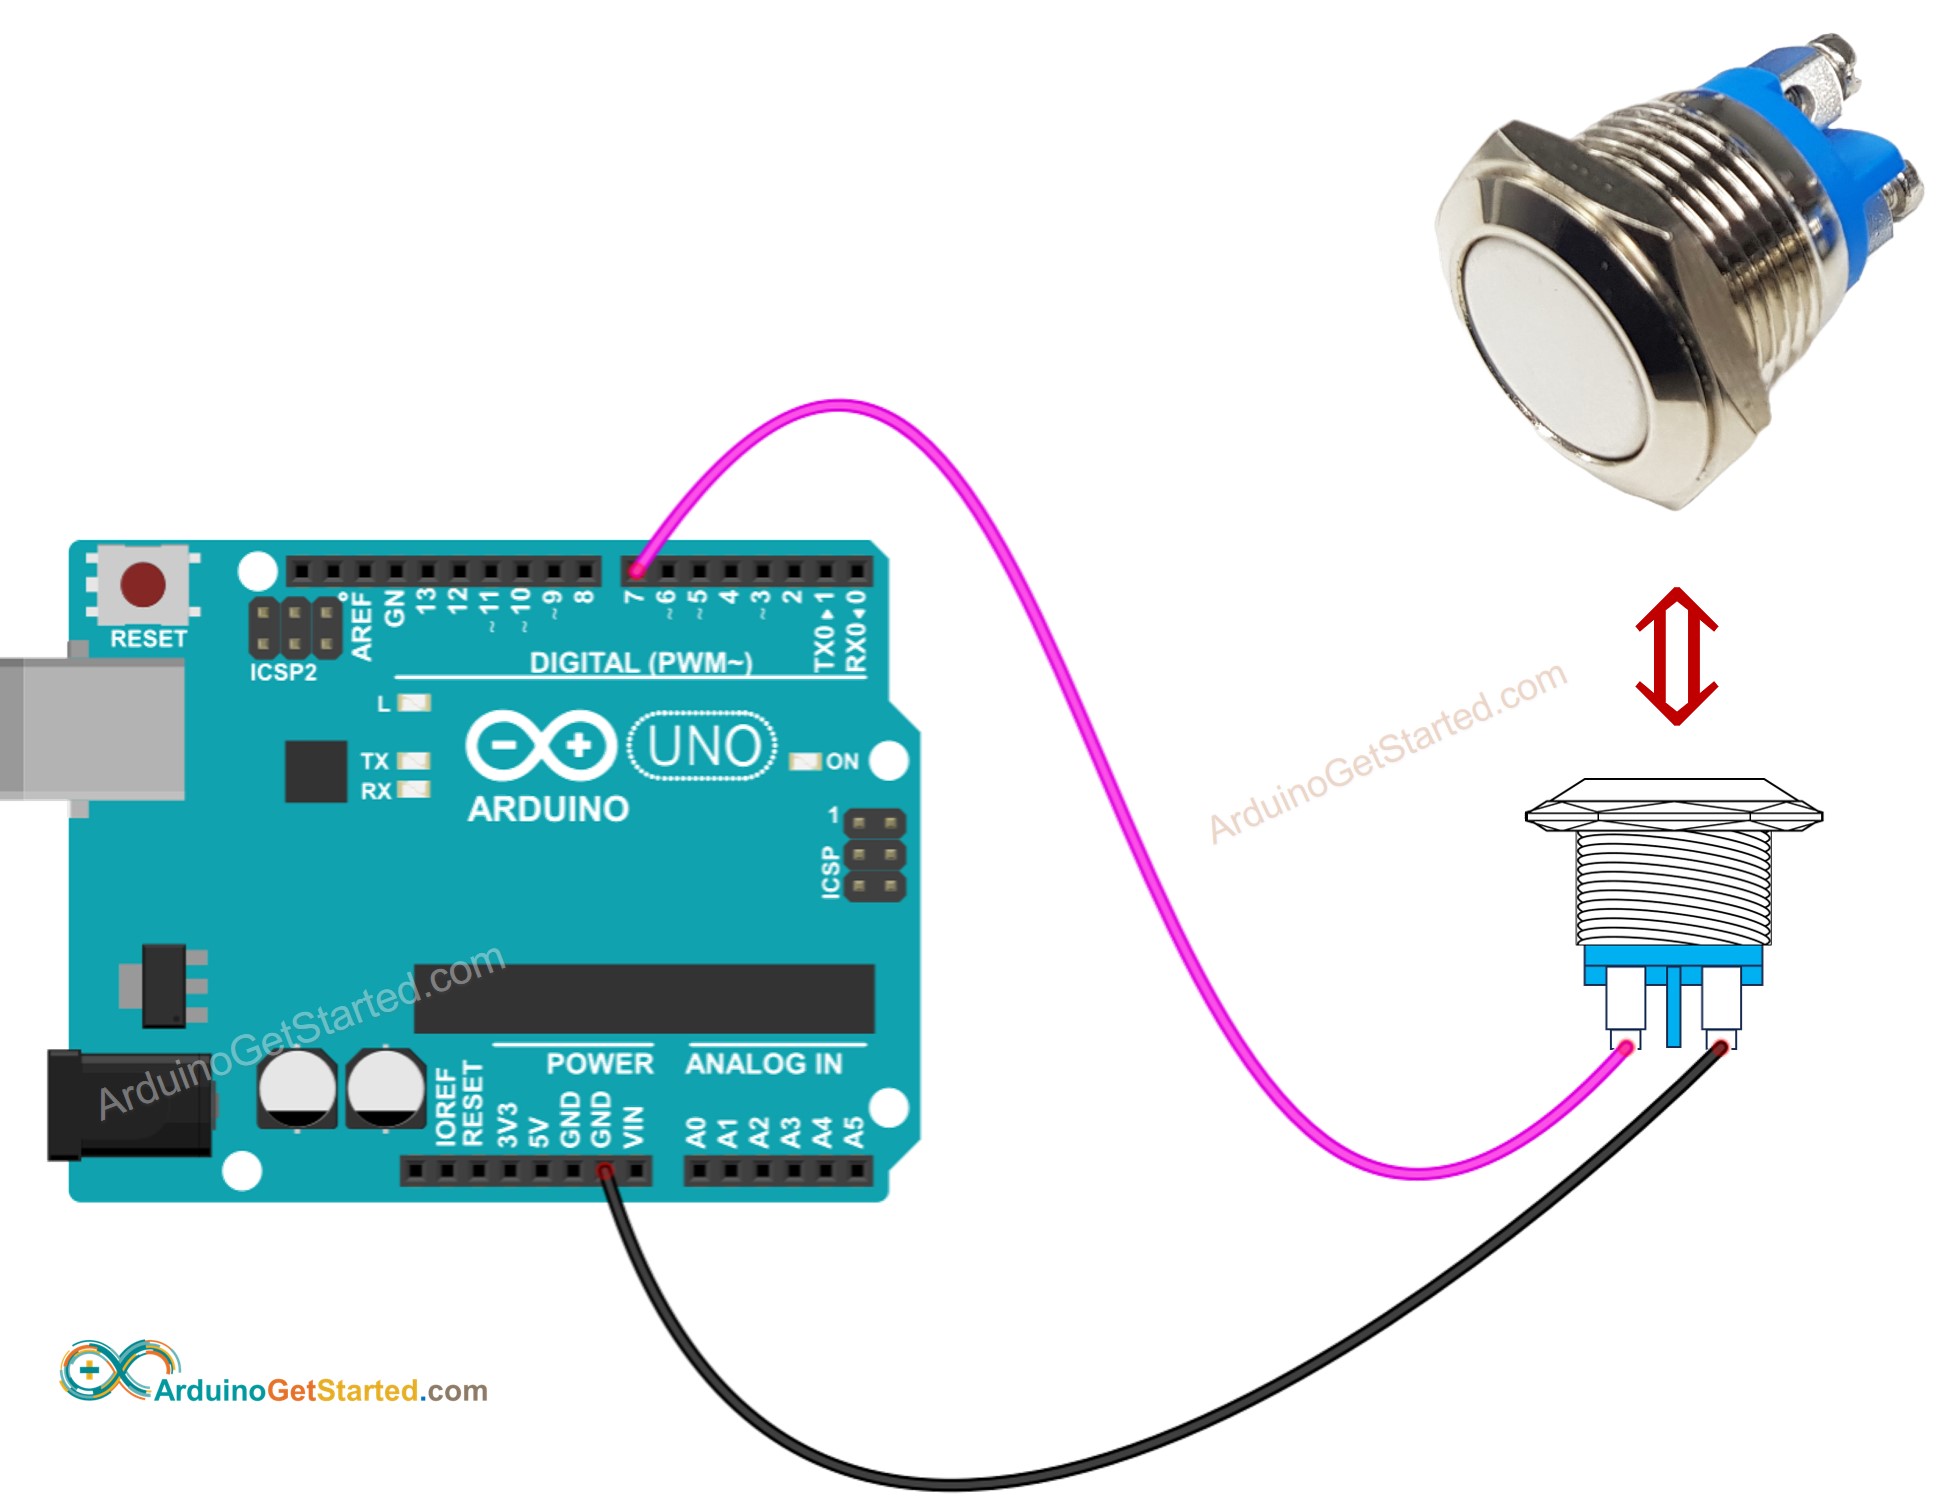
- Wiring Diagram between Arduino and panel-mount button
Arduino和面板安装按钮之间的接线图
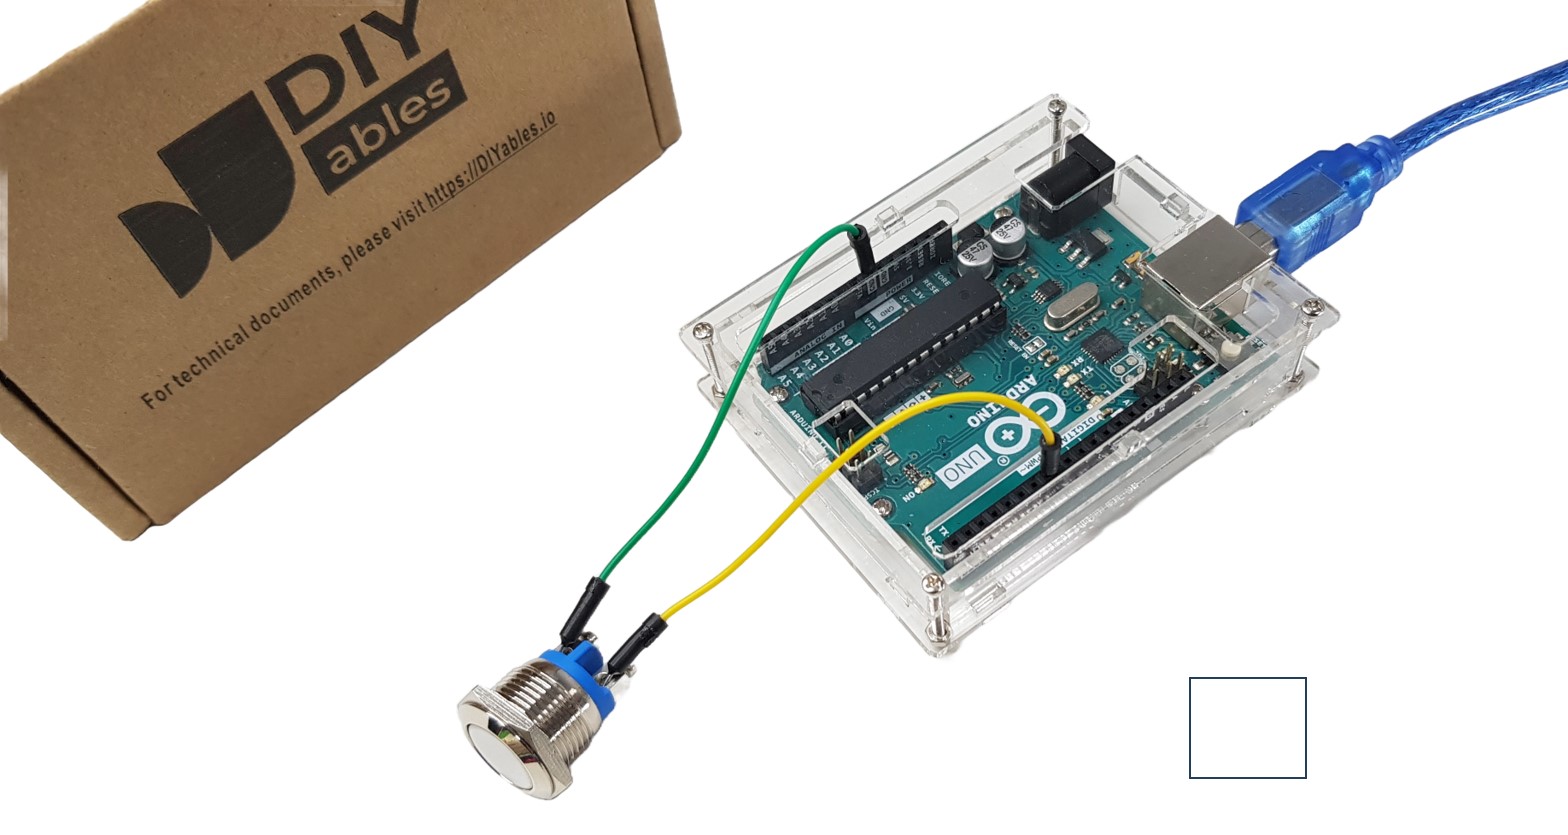
How To Program For Button 如何为按钮编程
- Initializes the Arduino pin as an internal pull-up input by using pinMode() function. For example, pin 7:
使用 pinMode() 函数将 Arduino 引脚初始化为内部上拉输入。例如,引脚 7:
pinMode(7, INPUT_PULLUP);
- Reads the state of the Arduino pin by using digitalRead() function.
使用 digitalRead() 函数读取 Arduino 引脚的状态。
int buttonState = digitalRead(BUTTON_PIN);
※ NOTE THAT: ※ 注意事项:
There are two wide-used use cases:
有两个广泛使用的用例:
- The first: If the input state is HIGH, do something. If the input state is LOW, do another thing in reverse.
第一个:如果输入状态为 HIGH,则执行某些操作。如果输入状态为 LOW,则反向执行另一项操作。 - The second: If the input state is changed from LOW to HIGH (or HIGH to LOW), do something.
第二种:如果输入状态从 LOW 更改为 HIGH(或 HIGH 更改为 LOW),请执行某些操作。
Depending on the application, we choose one of them. For example, in case of using a button to control an LED:
根据应用,我们选择其中之一。例如,在使用按钮控制 LED 的情况下:
- If we want the LED to be ON when the button is pressed and OFF when the button is NOT pressed, we SHOULD use the first use case.
如果我们希望 LED 在按下按钮时亮起,在未按下按钮时熄灭,我们应该使用第一个用例。 - If we want the LED to be toggle between ON and OFF each time we press the button, we SHOULD use the second use case.
如果我们希望每次按下按钮时 LED 在 ON 和 OFF 之间切换,我们应该使用第二个用例。
How to detect the state change from LOW to HIGH 如何检测从低到高的状态变化
// constants won't change. They're used here to set pin numbers:
const int BUTTON_PIN = 7; // the number of the pushbutton pin

// Variables will change:
int lastState = HIGH; // the previous state from the input pin
int currentState;    // the current reading from the input pin

void setup() {
  // initialize serial communication at 9600 bits per second:
  Serial.begin(9600);
  // initialize the pushbutton pin as an pull-up input
  // the pull-up input pin will be HIGH when the switch is open and LOW when the switch is closed.
  pinMode(BUTTON_PIN, INPUT_PULLUP);
}

void loop() {
  // read the state of the switch/button:
  currentState = digitalRead(BUTTON_PIN);

  if(lastState == LOW && currentState == HIGH)
    Serial.println("The state changed from LOW to HIGH");

  // save the last state
  lastState = currentState;
}
Arduino Code Arduino代码
1
// constants won't change. They're used here to set pin numbers:
const int BUTTON_PIN = 7;       // the number of the pushbutton pin

void setup() {
  // initialize serial communication at 9600 bits per second:
  Serial.begin(9600);
  // initialize the pushbutton pin as an pull-up input
  // the pull-up input pin will be HIGH when the switch is open and LOW when the switch is closed.
  pinMode(BUTTON_PIN, INPUT_PULLUP);
}

void loop() {
  // read the state of the switch/button:
  int buttonState = digitalRead(BUTTON_PIN);

  // print out the button's state
  Serial.println(buttonState);
}
Modifying Arduino Code 修改Arduino代码
Let’s modify the code to detect the press and release events
让我们修改代码以检测新闻和发布事件
Quick Steps 快速步骤
- Modify the code as below
修改代码如下
/*

 * Created by ArduinoGetStarted.com
   *
 * This example code is in the public domain
   *
 * Tutorial page: https://arduinogetstarted.com/tutorials/arduino-button
   */

// constants won't change. They're used here to set pin numbers:
const int BUTTON_PIN = 7;       // the number of the pushbutton pin

// Variables will change:
int lastState = LOW;  // the previous state from the input pin
int currentState;                // the current reading from the input pin

void setup() {
  // initialize serial communication at 9600 bits per second:
  Serial.begin(9600);
  // initialize the pushbutton pin as an pull-up input
  // the pull-up input pin will be HIGH when the switch is open and LOW when the switch is closed.
  pinMode(BUTTON_PIN, INPUT_PULLUP);
}

void loop() {
  // read the state of the switch/button:
  currentState = digitalRead(BUTTON_PIN);

  if(lastState == HIGH && currentState == LOW)
    Serial.println("The button is pressed");
  else if(lastState == LOW && currentState == HIGH)
    Serial.println("The button is released");

  // save the the last state
  lastState = currentState;
}
※ NOTE THAT: ※ 注意事项:
Even you pressed and released the button only once, the output in Serial Monitor may show several pressed and release events. This is the normal behavior of the button. This behavior is called the “chattering phenomenon”. You can learn more in Arduino - Button Debounce tutorial.
即使您只按下和松开一次按钮,串行监视器中的输出也可能显示多个按下和松开事件。这是按钮的正常行为。这种行为被称为“颤动现象”。您可以在 Arduino - Button Debounce 教程中了解更多信息。
※ NOTE THAT: ※ 注意事项:
To make it much easier for beginners, especially when using multiple buttons, we created a library, called ezButton. You can learn about ezButton library here.
为了让初学者更容易,尤其是在使用多个按钮时,我们创建了一个名为 ezButton 的库。您可以在此处了解 ezButton 库。
Challenge Yourself 挑战自我
- Turn on LED when button is pressed and turn off LED when button is NOT pressed.
按下按钮时打开 LED,未按下按钮时关闭 LED。 - Toggle LED between ON and OFF each time the button is pressed.
每次按下按钮时,在 ON 和 OFF 之间切换 LED。
Additional Knowledge 其他知识
When should and should NOT we use a pull-down/pull-up resistor for an input pin?
什么时候应该对输入引脚使用下拉/上拉电阻?
-
If the sensor has either closed (connected to VCC or GND) or open (NOT connected to anything) states, you need a pull-up or pull-down resistor to make these states become two states: LOW and HIGH. For example, push-button, switch, magnetic contact switch (door sensor)…
如果传感器处于闭合(连接到 VCC 或 GND)或开路(未连接到任何设备)状态,则需要一个上拉或下拉电阻器才能使这些状态变为两种状态:LOW 和 HIGH。例如,按钮、开关、磁接触开关(门传感器)… -
If the sensor has two defined voltage levels (LOW and HIGH), you do NOT need a pull-up or pull-down resistor. For example, motion sensor, touch sensor …
如果传感器有两个定义的电压电平(低电平和高电平),则不需要上拉或下拉电阻。例如,运动传感器、触摸传感器…
Function References 函数参考
-
pinMode()
-
digitalRead()
-
Serial
-
Arduino - Button - Debounce
Arduino - 按钮 - 去抖动 -
Arduino - Button - Long Press Short Press
Arduino - 按钮 - 长按短按 -
Arduino multiple Button Arduino多按钮
-
Arduino - Switch Arduino - 交换机
-
Arduino - Limit Switch
Arduino - 限位开关 -
Arduino - DIP Switch
Arduino - 拨码开关 -
Arduino - Button - LED
Arduino - 按钮 - LED -
Arduino - Button - Relay
Arduino - 按钮 - 继电器 -
Arduino - Button Toggle LED
Arduino - 按钮切换 LED -
Arduino - Button Toggle Relay
Arduino - 按钮拨动继电器 -
Arduino - Button - Piezo Buzzer
Arduino - 按钮 - 压电蜂鸣器 -
Arduino - Button - Servo Motor
Arduino - 按钮 - 伺服电机 -
Arduino - Button Count - OLED
Arduino - 按钮数 - OLED -
Arduino - Button Count - LCD
Arduino - 按钮数 - LCD -
Arduino - Button Controls Electromagnetic Lock
Arduino - 按钮控制电磁锁
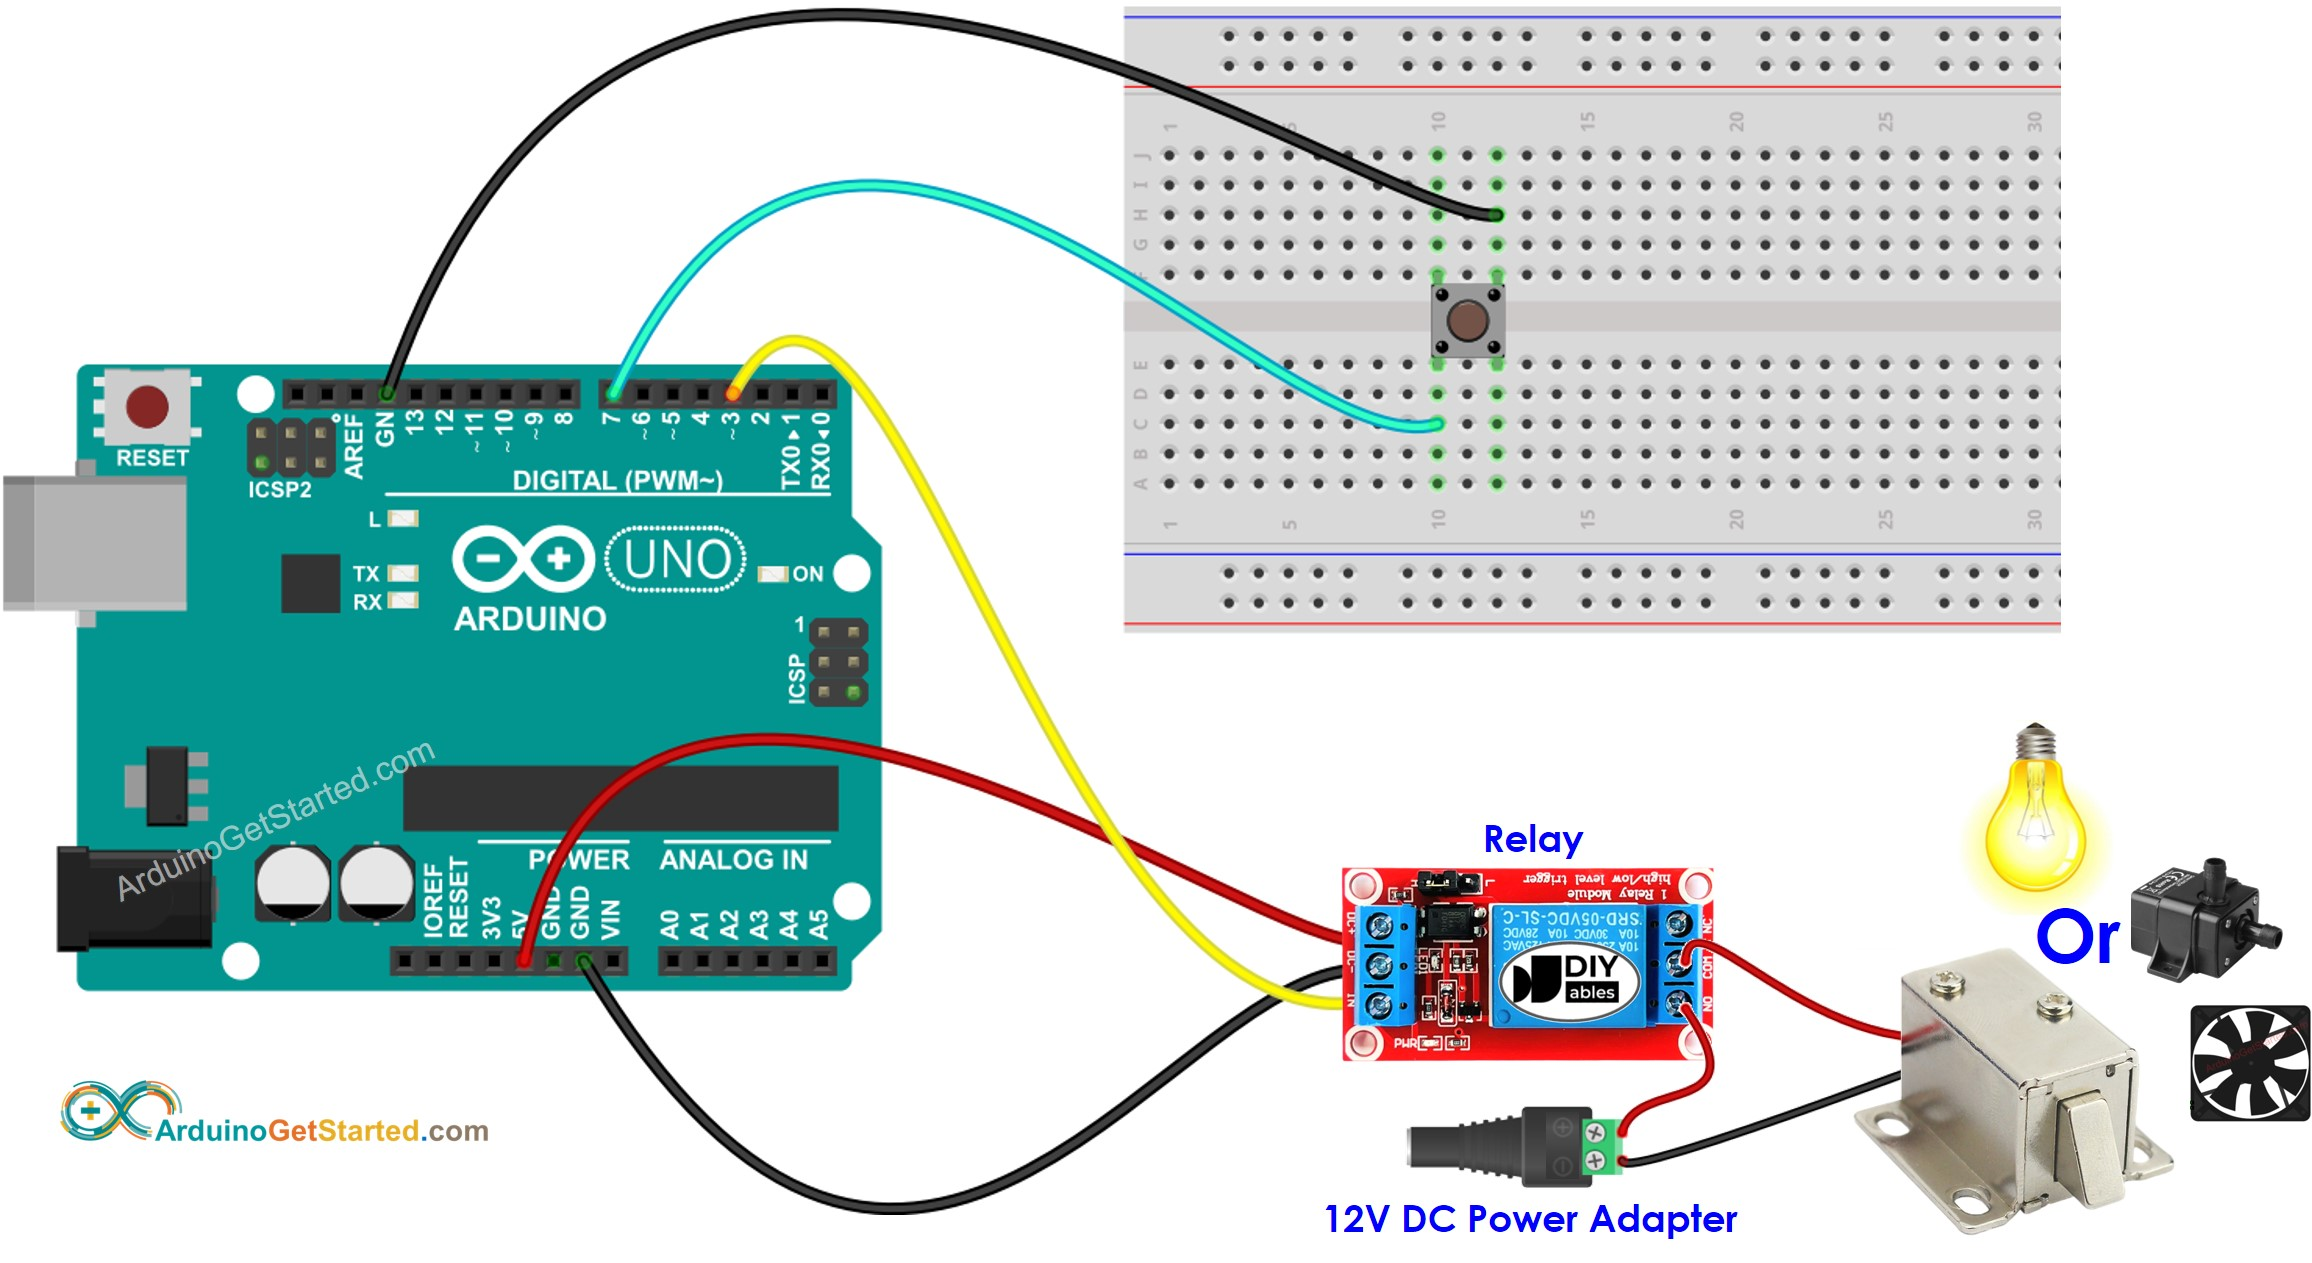
Arduino Code - Button Toggles Relay With Debouncing
Why do we need debouncing? ⇒ see Arduino - Button Debounce tutorial
/*
 * Created by ArduinoGetStarted.com
 *
 * This example code is in the public domain
 *
 * Tutorial page: https://arduinogetstarted.com/tutorials/arduino-button-toggle-relay
 */

#include <ezButton.h>

// constants won't change
const int BUTTON_PIN = 7; // Arduino pin connected to button's pin
const int RELAY_PIN  = 3; // Arduino pin connected to relay's pin

ezButton button(BUTTON_PIN);  // create ezButton object that attach to pin 7;

// variables will change:
int relayState = LOW;   // the current state of relay

void setup() {
  Serial.begin(9600);         // initialize serial
  pinMode(RELAY_PIN, OUTPUT); // set arduino pin to output mode
  button.setDebounceTime(50); // set debounce time to 50 milliseconds
}

void loop() {
  button.loop(); // MUST call the loop() function first

  if(button.isPressed()) {
    Serial.println("The button is pressed");

    // toggle state of relay
    relayState = !relayState;

    // control relay arccoding to the toggled state
    digitalWrite(RELAY_PIN, relayState);
  }
}






![[Angew]:调整单原子 Pt1/CeO2催化剂中铂的局部环境以实现稳定的低温 CO 氧化](https://img-blog.csdnimg.cn/direct/c60bf2764c8d421281155a2b2e817f60.png)

