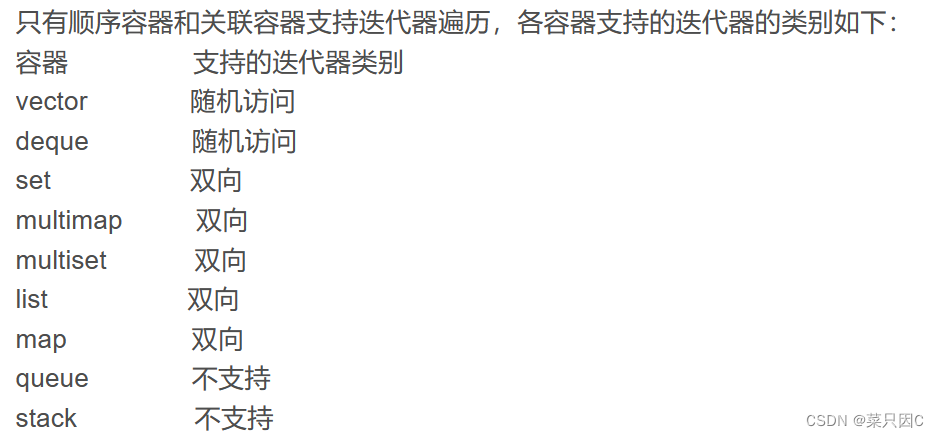
目录:
(1)微信登录-OAuth2介绍
(2)前台用户系统-微信登录-准备工作
(3)微信登录-生成微信二维码-接口开发
(4)微信登录-生成验证码-前端整合
(5)微信登录-获取扫码人信息-实现分析
(6)微信登录-获取联系人扫码信息-接口开发
(7)微信登录-手机号绑定和前端整合
(1)微信登录-OAuth2介绍
微信登录是基于理论知识OAuth2实现的
1、OAuth2
OAuth2解决什么问题
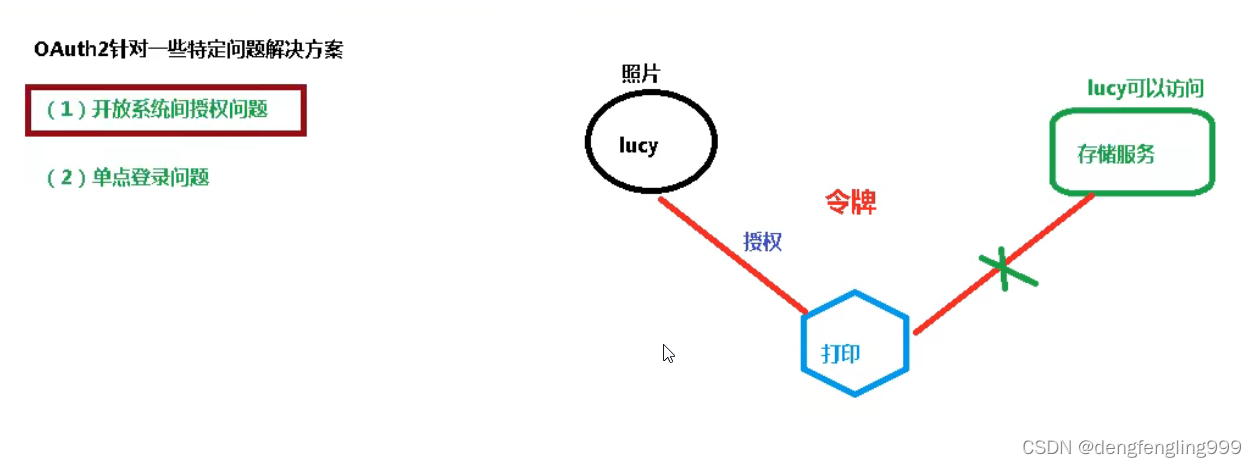
1.1.1 开放系统间授权
照片拥有者想要在云冲印服务上打印照片,云冲印服务需要访问云存储服务上的资源

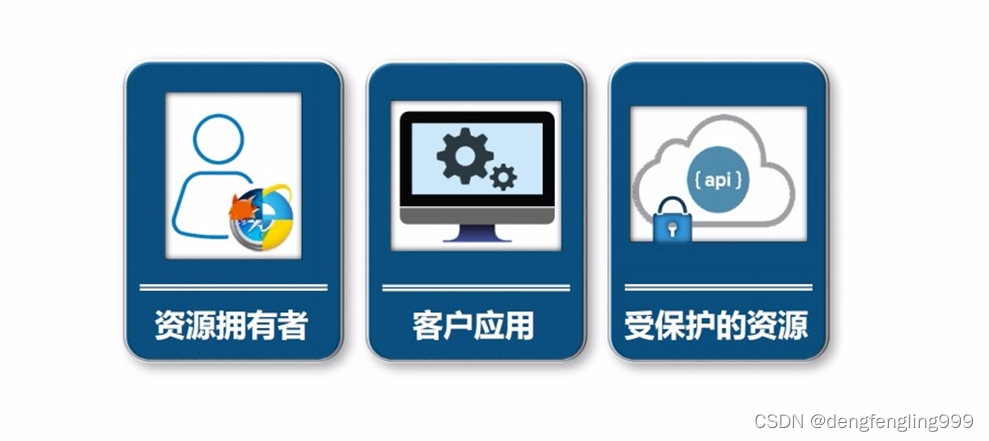
资源拥有者:照片拥有者
客户应用:云冲印
受保护的资源:照片
1.1.3方式一:用户名密码复制
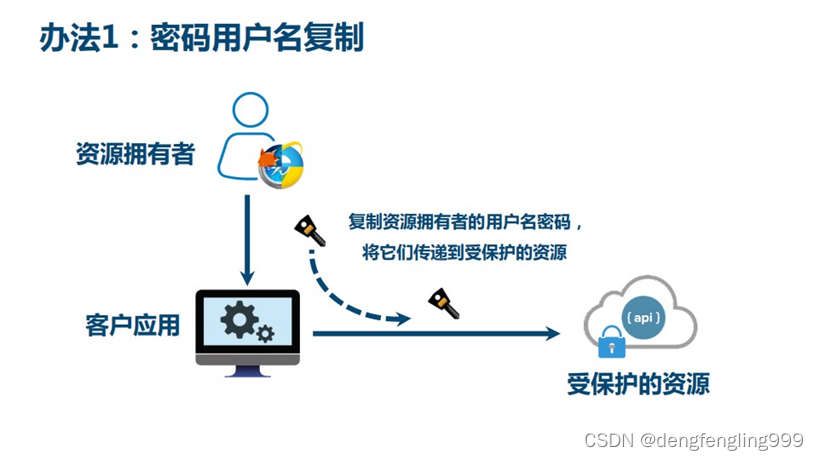
用户将自己的"云存储"服务的用户名和密码,告诉"云冲印",后者就可以读取用户的照片了。这样的做法有以下几个严重的缺点。
(1)"云冲印"为了后续的服务,会保存用户的密码,这样很不安全。
(2)Google不得不部署密码登录,而我们知道,单纯的密码登录并不安全。
(3)"云冲印"拥有了获取用户储存在Google所有资料的权力,用户没法限制"云冲印"获得授权的范围和有效期。
(4)用户只有修改密码,才能收回赋予"云冲印"的权力。但是这样做,会使得其他所有获得用户授权的第三方应用程序全部失效。
(5)只要有一个第三方应用程序被破解,就会导致用户密码泄漏,以及所有被密码保护的数据泄漏。
总结:
将受保护的资源中的用户名和密码存储在客户应用的服务器上,使用时直接使用这个用户名和密码登录
适用于同一公司内部的多个系统,不适用于不受信的第三方应用
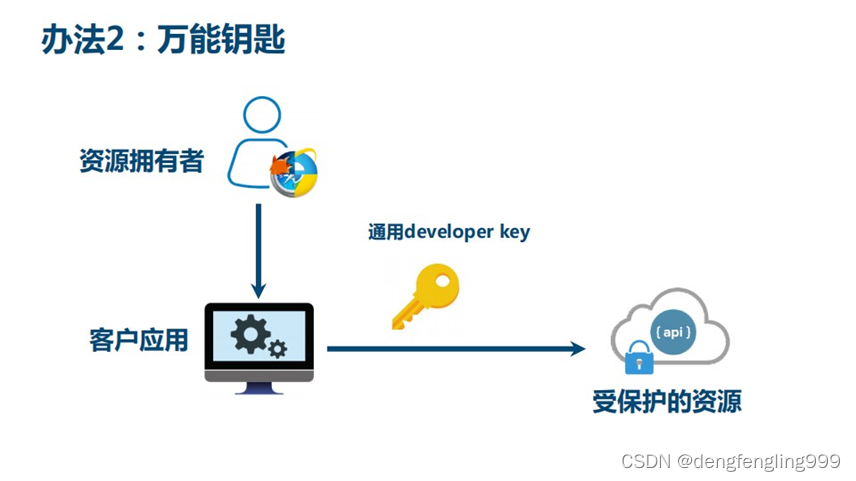
1.1.4方式二:通用开发者key
适用于合作商或者授信的不同业务部门之间
1.1.5方式三:颁发令牌
接近OAuth2方式,需要考虑如何管理令牌、颁发令牌、吊销令牌,需要统一的协议,因此就有了OAuth2协议
使用令牌:字符串
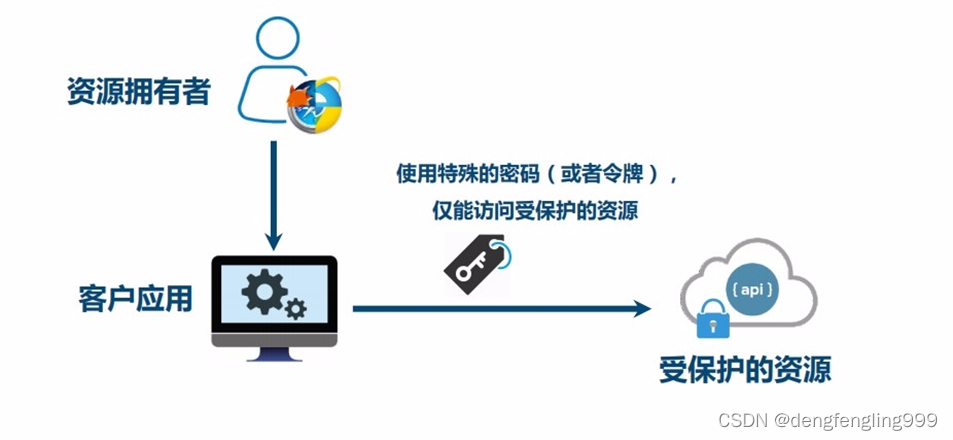
令牌类比仆从钥匙

令牌:就是按照约定的规则,生成字符串,这个字符串颁发给某个服务,它它拿着进行访问,
设置字符串的有效时间,随时去吊销这个字符串,令牌的颁发我们令牌字符串我们需要对它进行加密等等处理
OAth2它只约定我们生成颁发令牌,生成字符串,但是字符串按照什么规则生成,它并没有约定,只告诉你用字符串方式解决,具体可以像之前的一个工具JWT工具生成字符串的的规则
OAth2只约定解决方案,并没有约定怎么去做,它只是颁发令牌、设置令牌的有效时间、包括随时去解除这个令牌
1.3 OAuth2的应用
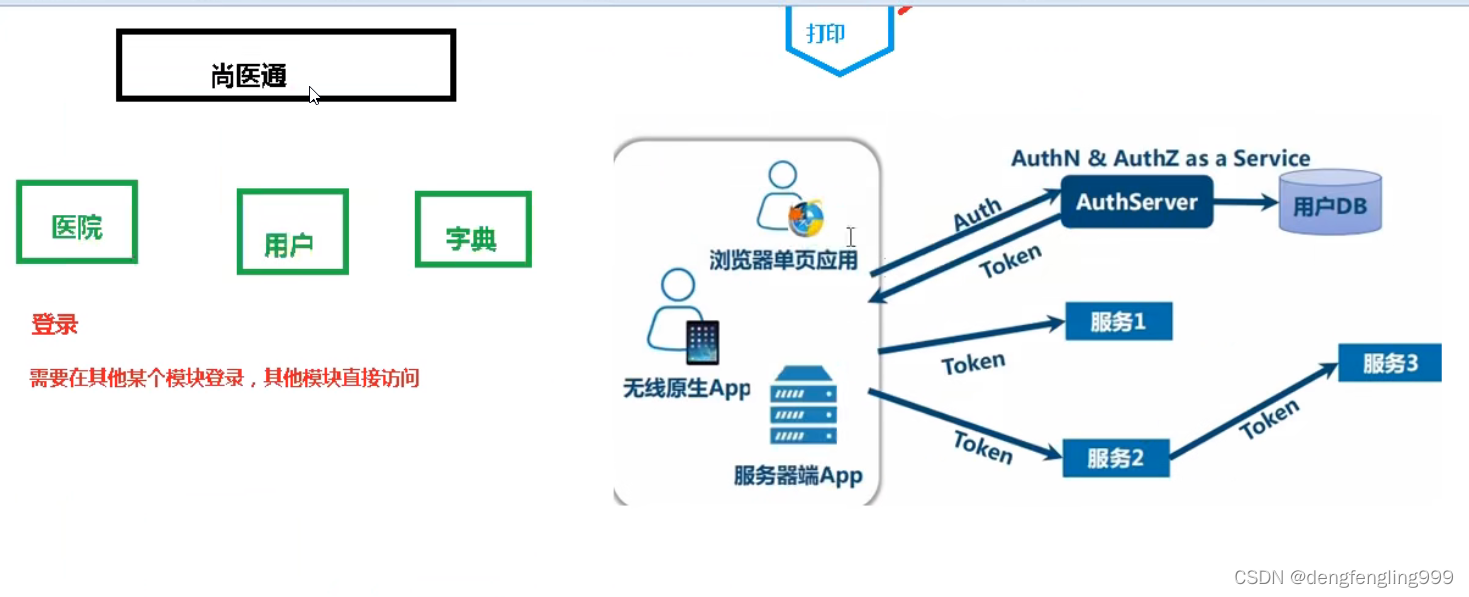
1.3.1 微服务安全
现代微服务中系统微服务化以及应用的形态和设备类型增多,不能用传统的登录方式
核心的技术不是用户名和密码,而是token,由AuthServer颁发token,用户使用token进行登录
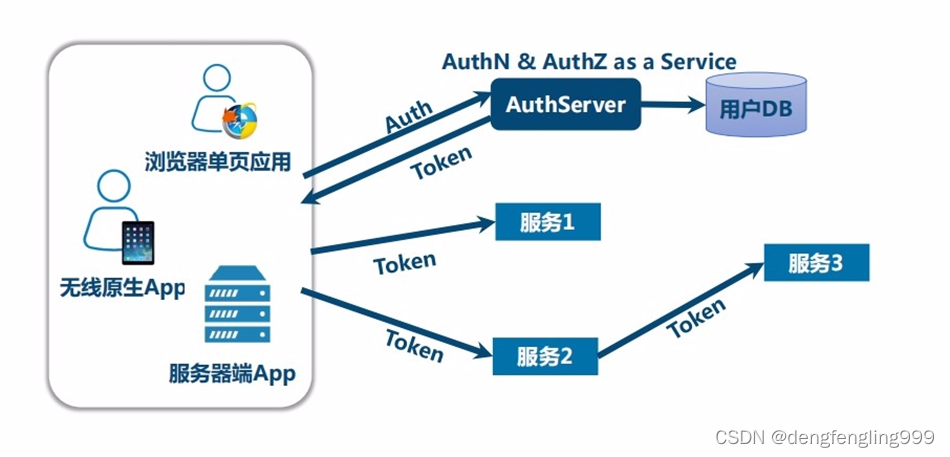
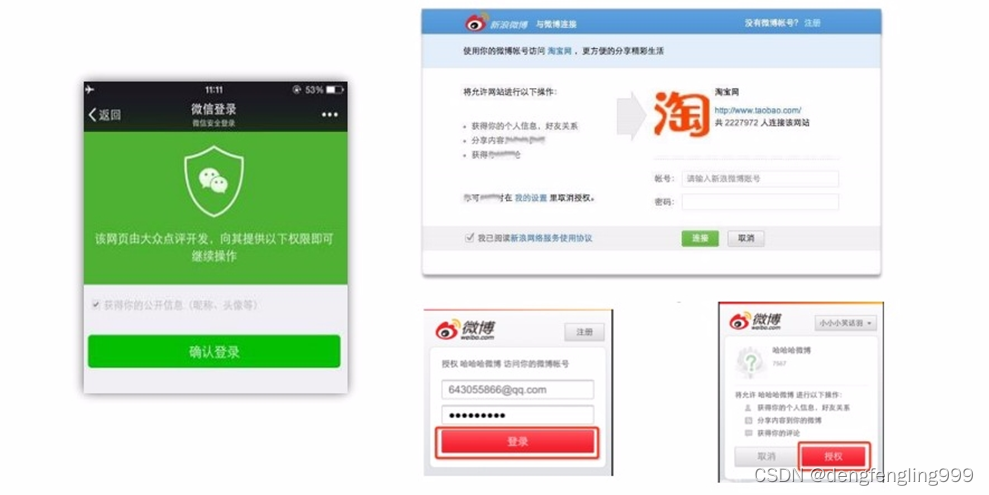
1.3.2 社交登录
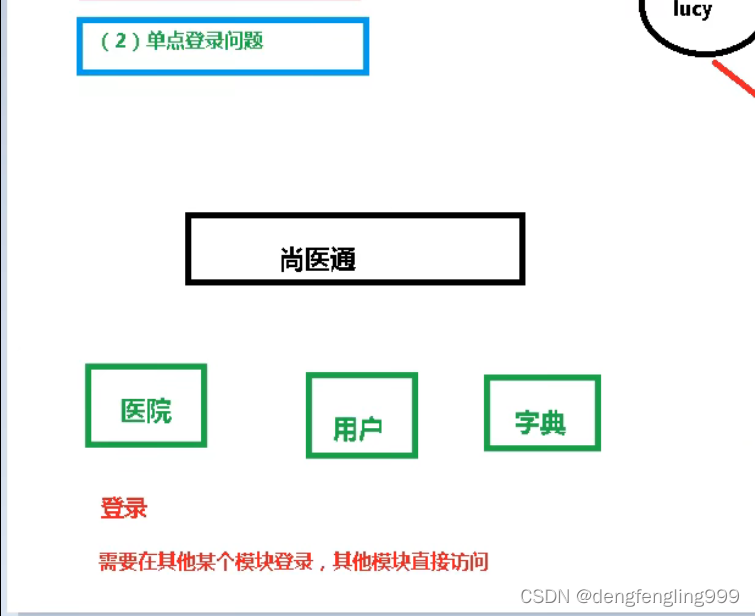
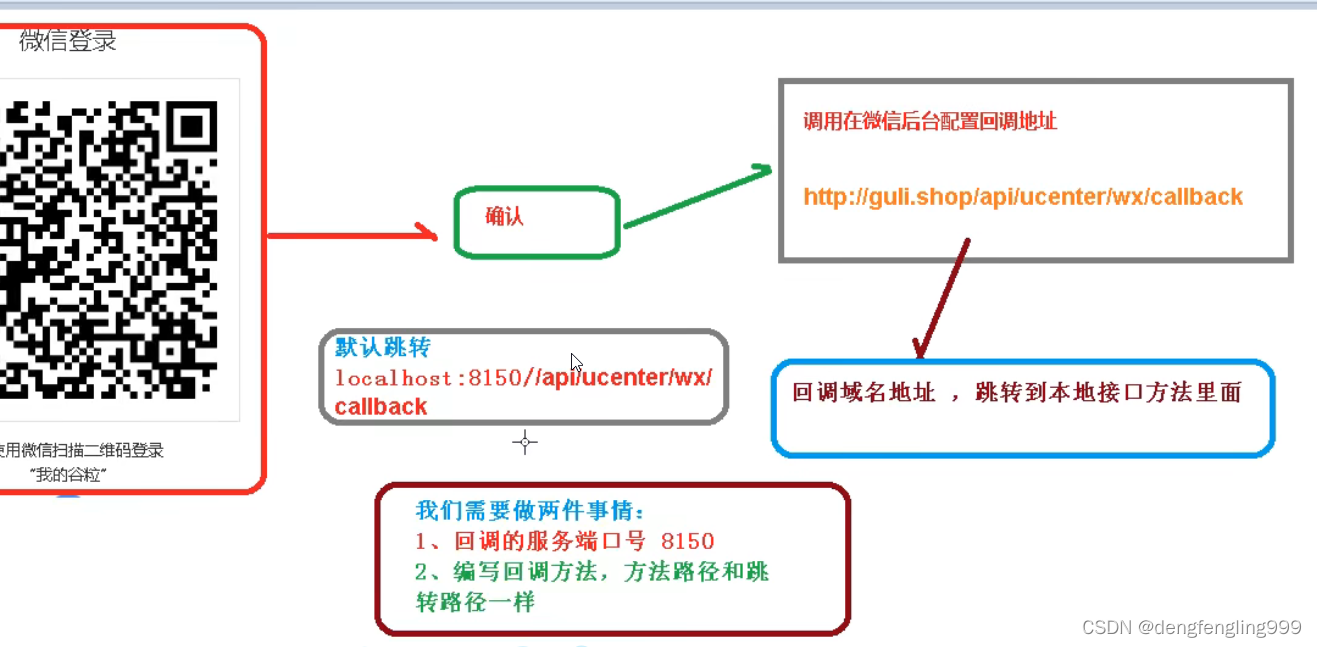
(2)前台用户系统-微信登录-准备工作
点击微信扫码登录按钮,出现二维码,需要进行扫描,扫描二维码,获得扫码的信息,然后再出现绑定手机号,然后数据最后添加到数据库中
我们用到微信的相关操作,微信是腾讯开发的,需要调用腾讯那边的内容进行实现,需要先在微信的开放平台省注册一个用户,注册一个用户的目的就是让你有微信相关接口的权限,让他给你做一个授权,注册目前只支持企业级别的用户,个人用户不支持
2.1 前期准备
1、注册
微信开放平台:https://open.weixin.qq.com
2、邮箱激活
3、完善开发者资料
4、开发者资质认证
准备营业执照,1-2个工作日审批、300元
5、创建网站应用
提交审核,7个工作日审批
6、内网穿透
ngrok的使用
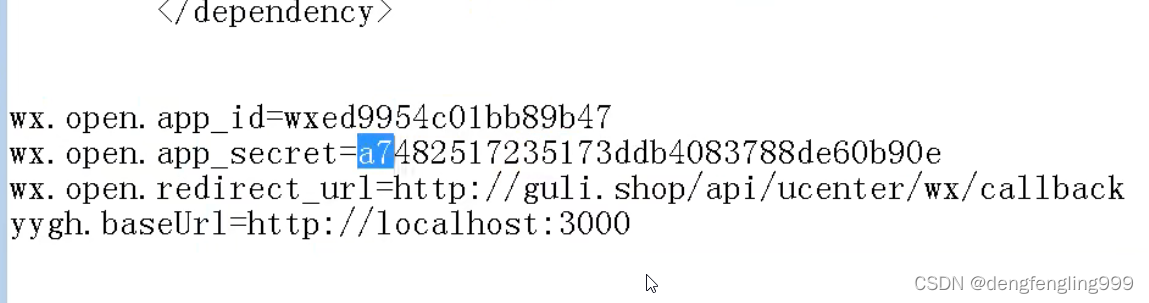
注册之后会提供一个id和秘钥,这里我们使用提供的,自己不在注册
redirect_url: 创建一个网站应用,在二维码下面显示,网站名称,这个名字需要微信那边审核通过
域名:扫码确认之后,完成扫码,完成扫码之后,得到扫码的信息,微信那端给我们做一个回调,扫码之后,会调用指定接口的路径,这个路径我们没有办法调用本地,默认找不到,需要找到一个网络返回的的域名,才能返回,这就需要一个能够返回的域名
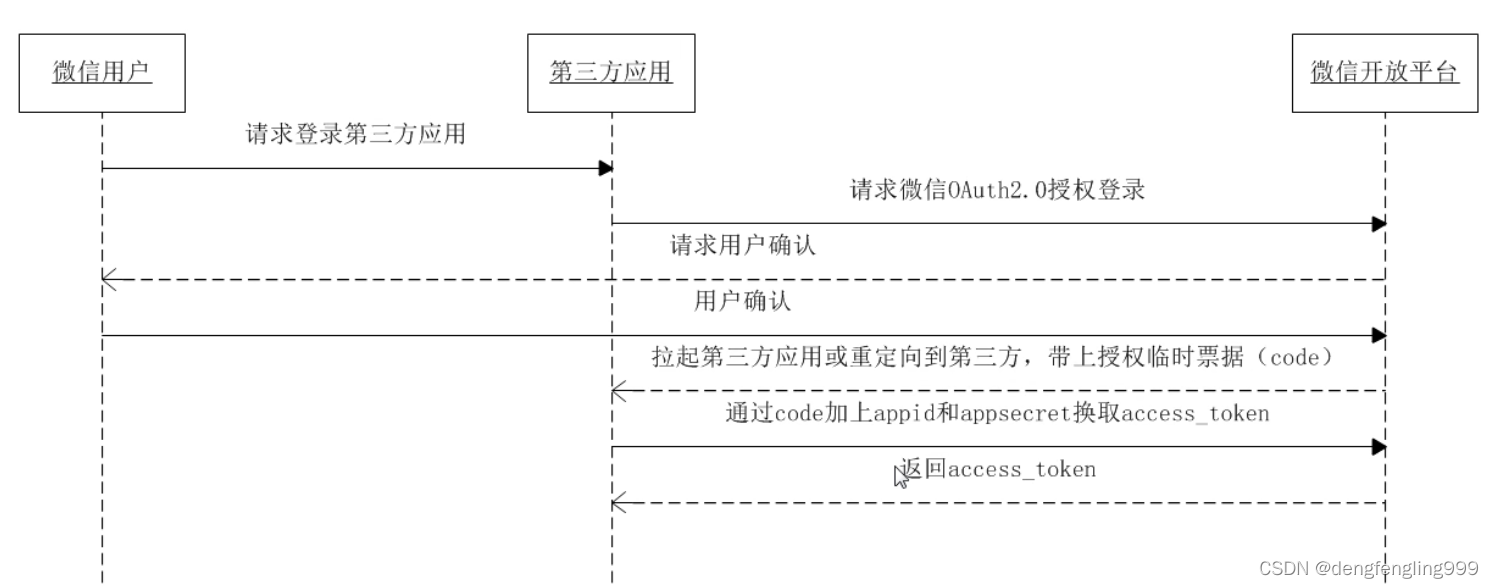
获取access_token时序图
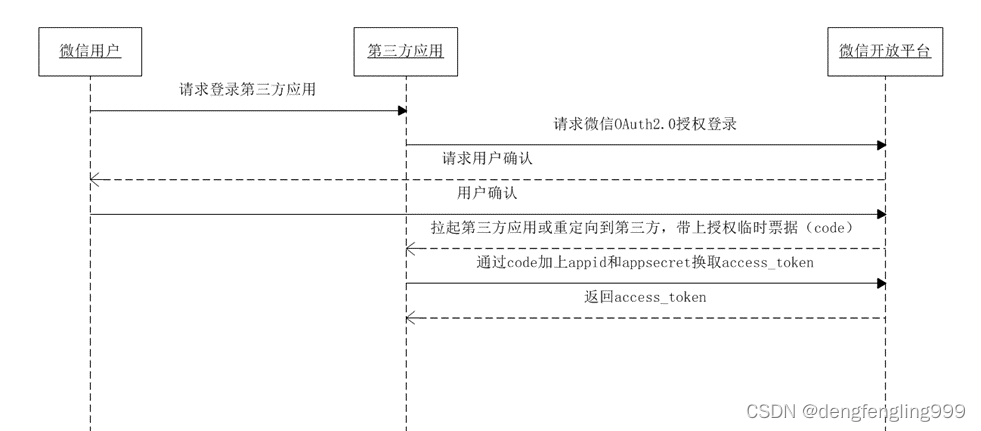
第一步:请求CODE(生成授权URL)
第二步:通过code获取access_token(开发回调URL)
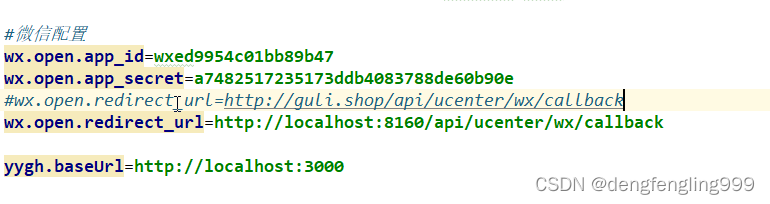
在service_user模块中添加:微信的配置
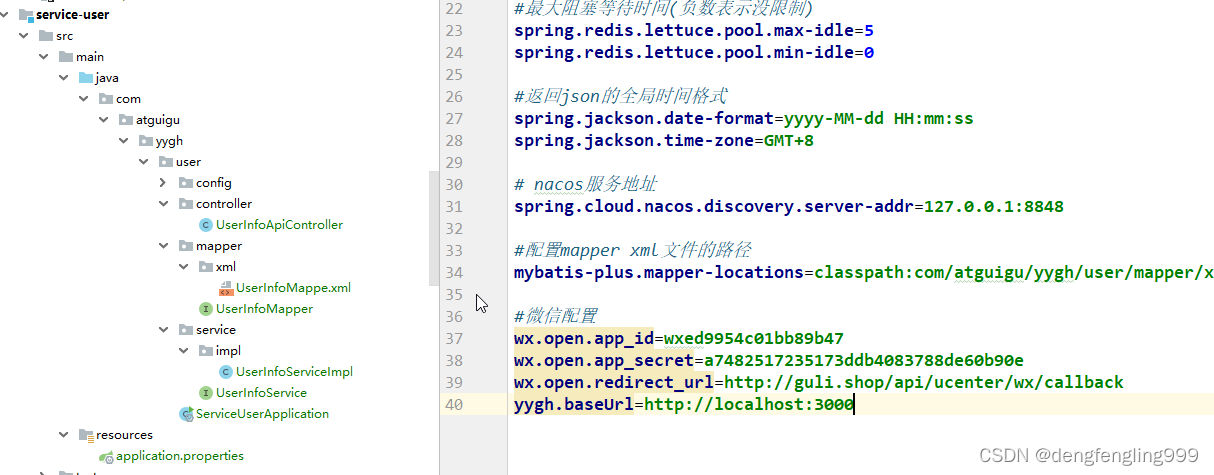
创建一个工具类读取配置文件刚才配置的内容:

package com.atguigu.yygh.user.utils;

import org.springframework.beans.factory.InitializingBean;
import org.springframework.beans.factory.annotation.Value;
import org.springframework.stereotype.Component;

@Component
public class ConstantWxPropertiesUtils implements InitializingBean {

    @Value("${wx.open.app_id}")
    private String appId;

    @Value("${wx.open.app_secret}")
    private String appSecret;

    @Value("${wx.open.redirect_url}")
    private String redirectUrl;

    @Value("${yygh.baseUrl}")
    private String yyghBaseUrl;


    public static String WX_OPEN_APP_ID;
    public static String WX_OPEN_APP_SECRET;
    public static String WX_OPEN_REDIRECT_URL;
    public static String YYGH_BASE_URL;


    @Override
    public void afterPropertiesSet() throws Exception {
        WX_OPEN_APP_ID = appId;
        WX_OPEN_APP_SECRET = appSecret;
        WX_OPEN_REDIRECT_URL = redirectUrl;
        YYGH_BASE_URL = yyghBaseUrl;
    }
}
创建controller:WeixinApiController

package com.atguigu.yygh.user.api;

import org.springframework.stereotype.Controller;
import org.springframework.web.bind.annotation.RequestMapping;

//微信操作的接口
@Controller
@RequestMapping("/api/ucenter/wx")
public class WeixinApiController {


    //1 生成微信扫描的二维码


    //2 回调的方法,得到扫描人的信息
}
(3)微信登录-生成微信二维码-接口开发
操作模块:service-user
说明:微信登录二维码我们是以弹出层的形式打开,不是以页面形式,所以做法是不一样的,参考如下链接,上面有相关弹出层的方式
准备工作 | 微信开放文档微信开发者平台文档https://developers.weixin.qq.com/doc/oplatform/Website_App/WeChat_Login/Wechat_Login.html
如图:
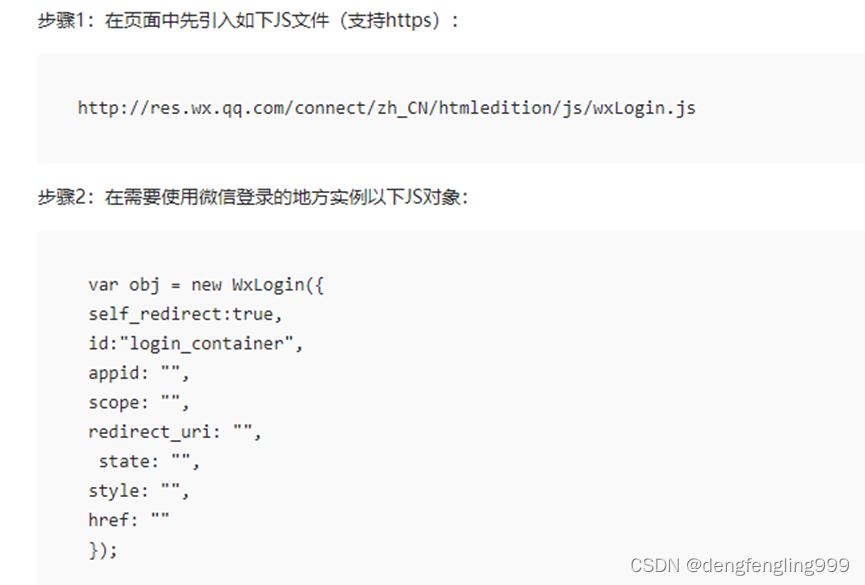
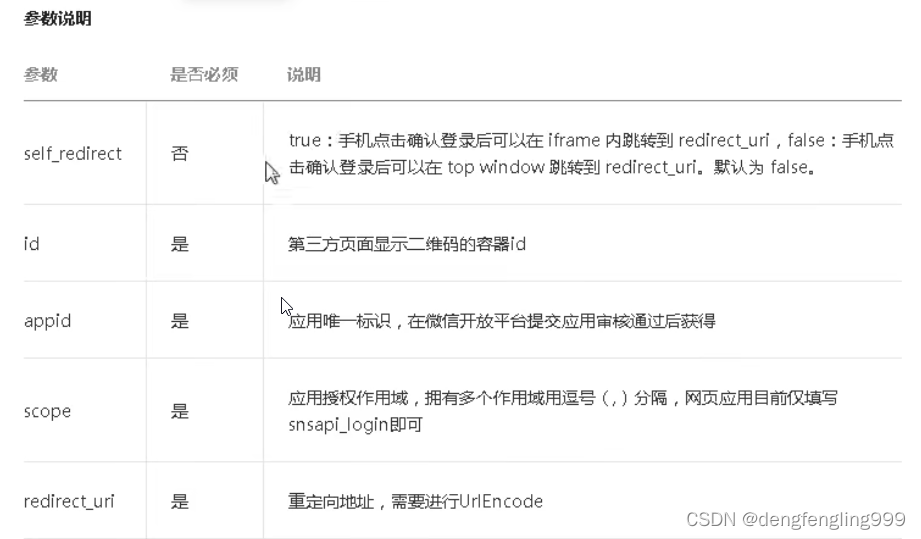
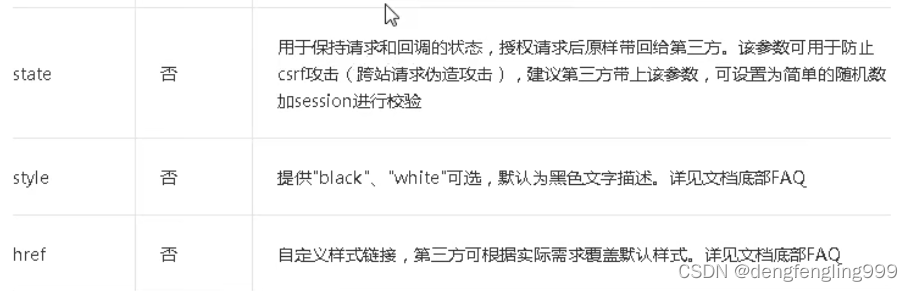
因此我们的操作步骤为:
第一步我们通过接口把对应参数返回页面;
第二步在头部页面启动打开微信登录二维码;
第三步处理登录回调接口;
第四步回调返回页面通知微信登录层回调成功
第五步如果是第一次扫描登录,则绑定手机号码,登录成功
接下来我们根据步骤,一步一步实现
接下来我们写接口返回参数:
在:WeixinApiController :中添加方法:
package com.atguigu.yygh.user.api;

import com.atguigu.yygh.common.result.Result;
import com.atguigu.yygh.user.utils.ConstantWxPropertiesUtils;
import org.springframework.stereotype.Controller;
import org.springframework.web.bind.annotation.GetMapping;
import org.springframework.web.bind.annotation.RequestMapping;
import org.springframework.web.bind.annotation.ResponseBody;

import javax.servlet.http.HttpSession;
import java.io.UnsupportedEncodingException;
import java.net.URLEncoder;
import java.util.HashMap;
import java.util.Map;

//微信操作的接口
@Controller
@RequestMapping("/api/ucenter/wx")
public class WeixinApiController {


    //1 生成微信扫描的二维码
    //返回生成二维码需要的参数
    @GetMapping("getLoginParam")
    @ResponseBody
    public Result genQrConnect(HttpSession session) throws UnsupportedEncodingException {

        Map<String, Object> map = new HashMap<>();
        map.put("appid", ConstantWxPropertiesUtils.WX_OPEN_APP_ID);
        String redirectUri = URLEncoder.encode(ConstantWxPropertiesUtils.WX_OPEN_REDIRECT_URL, "UTF-8");
        map.put("redirectUri", redirectUri);
        map.put("scope", "snsapi_login");
        map.put("state", System.currentTimeMillis()+"");//System.currentTimeMillis()+""
        return Result.ok(map);
    }


    //2 回调的方法,得到扫描人的信息
}
(4)微信登录-生成验证码-前端整合
参数成功返回:
创建weixin.js:
import request from '@/utils/request'

const api_name = `/api/ucenter/wx`

export default {
    getLoginParam() {
        return request({
            url: `${api_name}/getLoginParam`,
            method: `get`
        })
    }
}
在myheader.vue中引入这个js:

在mounted里面添加初始化微信js

书写点击微信Login方法
在网关加上这个访问的路径:
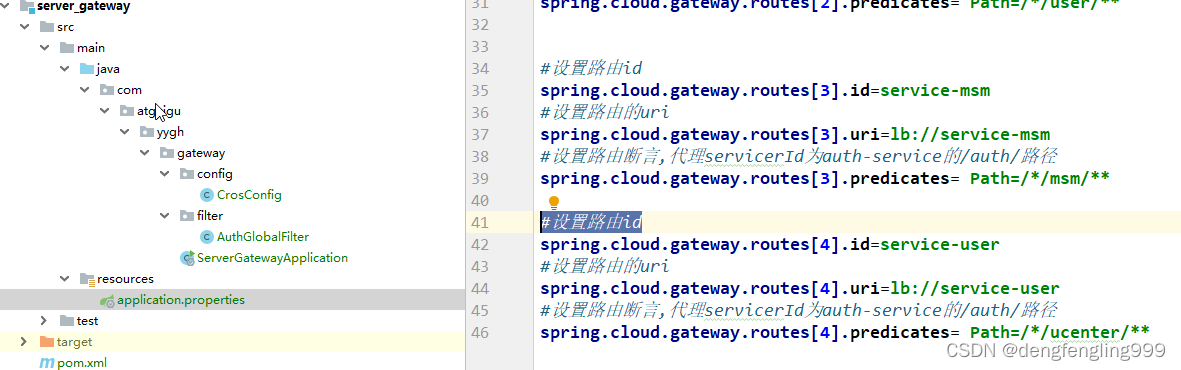
测试点击如果验证码没有出来,修改配置文件:
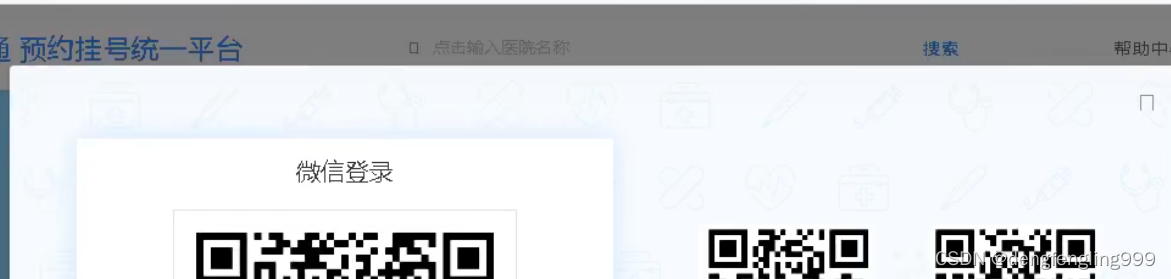
点击下方的微信登录:出现二维码:

微信那段扫描我们的二维码,微信那端会回调咱的方法,咱的方法中会得到扫码人的信息,把信息加到数据库中,在这过程中微信要给它绑定一个手机号最终完成操作
(5)微信登录-获取扫码人信息-实现分析
修改service_user模块的端口号:8106

(6)微信登录-获取联系人扫码信息-接口开发
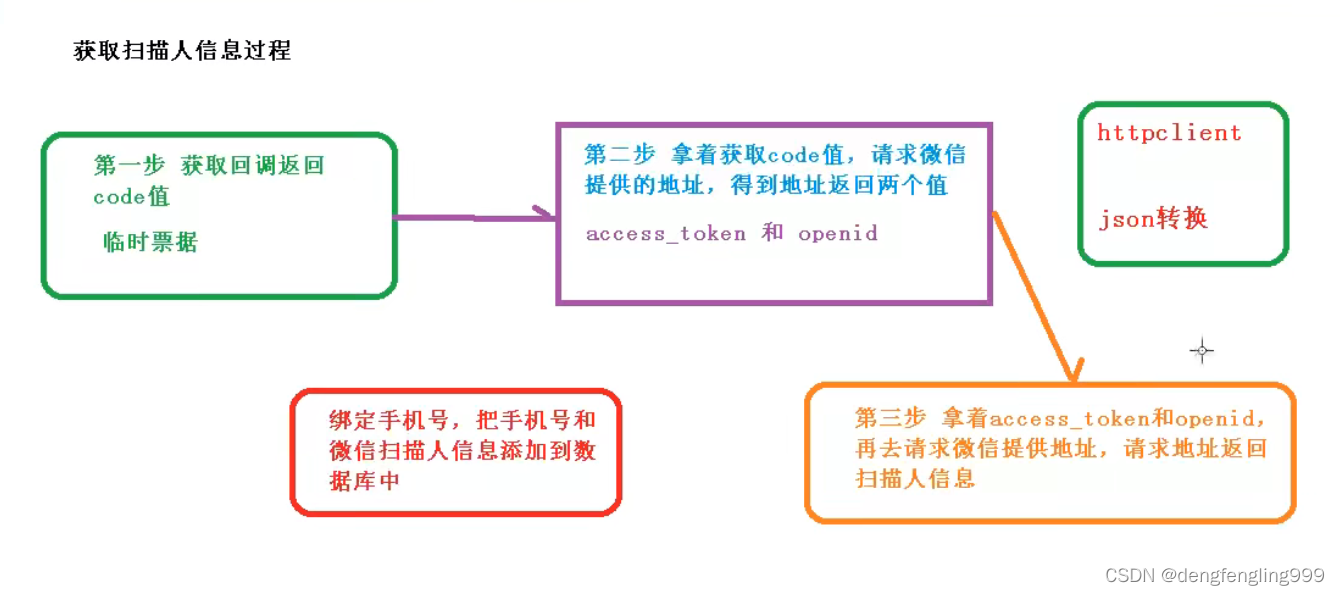 httpclient请求微信提供的地址,原来是在地址栏输入地址回车请求,目前是程序中做到,不是用浏览器请求,所以用到这个技术,可以简单理解为不需要浏览器,帮助我们请求地址,然后得到地址返回的数据,或得到请求接口返回的数据,这就叫httpclient模拟浏览器请求和响应的过程

在common-util中引入依赖:

创建工具类:HttpClientUtils
package com.atguigu.yygh.user.utils;

import org.apache.commons.io.IOUtils;
import org.apache.commons.lang.StringUtils;
import org.apache.http.Consts;
import org.apache.http.HttpEntity;
import org.apache.http.HttpResponse;
import org.apache.http.NameValuePair;
import org.apache.http.client.HttpClient;
import org.apache.http.client.config.RequestConfig;
import org.apache.http.client.config.RequestConfig.Builder;
import org.apache.http.client.entity.UrlEncodedFormEntity;
import org.apache.http.client.methods.HttpGet;
import org.apache.http.client.methods.HttpPost;
import org.apache.http.conn.ConnectTimeoutException;
import org.apache.http.conn.ssl.SSLConnectionSocketFactory;
import org.apache.http.conn.ssl.SSLContextBuilder;
import org.apache.http.conn.ssl.TrustStrategy;
import org.apache.http.conn.ssl.X509HostnameVerifier;
import org.apache.http.entity.ContentType;
import org.apache.http.entity.StringEntity;
import org.apache.http.impl.client.CloseableHttpClient;
import org.apache.http.impl.client.HttpClients;
import org.apache.http.impl.conn.PoolingHttpClientConnectionManager;
import org.apache.http.message.BasicNameValuePair;

import javax.net.ssl.SSLContext;
import javax.net.ssl.SSLException;
import javax.net.ssl.SSLSession;
import javax.net.ssl.SSLSocket;
import java.io.IOException;
import java.net.SocketTimeoutException;
import java.security.GeneralSecurityException;
import java.security.cert.CertificateException;
import java.security.cert.X509Certificate;
import java.util.ArrayList;
import java.util.List;
import java.util.Map;
import java.util.Map.Entry;
import java.util.Set;

public class HttpClientUtils {

    public static final int connTimeout=10000;
    public static final int readTimeout=10000;
    public static final String charset="UTF-8";
    private static HttpClient client = null;

    static {
        PoolingHttpClientConnectionManager cm = new PoolingHttpClientConnectionManager();
        cm.setMaxTotal(128);
        cm.setDefaultMaxPerRoute(128);
        client = HttpClients.custom().setConnectionManager(cm).build();
    }

    public static String postParameters(String url, String parameterStr) throws ConnectTimeoutException, SocketTimeoutException, Exception{
        return post(url,parameterStr,"application/x-www-form-urlencoded",charset,connTimeout,readTimeout);
    }

    public static String postParameters(String url, String parameterStr,String charset, Integer connTimeout, Integer readTimeout) throws ConnectTimeoutException, SocketTimeoutException, Exception{
        return post(url,parameterStr,"application/x-www-form-urlencoded",charset,connTimeout,readTimeout);
    }

    public static String postParameters(String url, Map<String, String> params) throws ConnectTimeoutException,
            SocketTimeoutException, Exception {
        return postForm(url, params, null, connTimeout, readTimeout);
    }

    public static String postParameters(String url, Map<String, String> params, Integer connTimeout,Integer readTimeout) throws ConnectTimeoutException,
            SocketTimeoutException, Exception {
        return postForm(url, params, null, connTimeout, readTimeout);
    }

    public static String get(String url) throws Exception {
        return get(url, charset, null, null);
    }

    public static String get(String url, String charset) throws Exception {
        return get(url, charset, connTimeout, readTimeout);
    }

    /**
     * 发送一个 Post 请求, 使用指定的字符集编码.
     *
     * @param url
     * @param body RequestBody
     * @param mimeType 例如 application/xml "application/x-www-form-urlencoded" a=1&b=2&c=3
     * @param charset 编码
     * @param connTimeout 建立链接超时时间,毫秒.
     * @param readTimeout 响应超时时间,毫秒.
     * @return ResponseBody, 使用指定的字符集编码.
     * @throws ConnectTimeoutException 建立链接超时异常
     * @throws SocketTimeoutException  响应超时
     * @throws Exception
     */
    public static String post(String url, String body, String mimeType,String charset, Integer connTimeout, Integer readTimeout)
            throws ConnectTimeoutException, SocketTimeoutException, Exception {
        HttpClient client = null;
        HttpPost post = new HttpPost(url);
        String result = "";
        try {
            if (StringUtils.isNotBlank(body)) {
                HttpEntity entity = new StringEntity(body, ContentType.create(mimeType, charset));
                post.setEntity(entity);
            }
            // 设置参数
            RequestConfig.Builder customReqConf = RequestConfig.custom();
            if (connTimeout != null) {
                customReqConf.setConnectTimeout(connTimeout);
            }
            if (readTimeout != null) {
                customReqConf.setSocketTimeout(readTimeout);
            }
            post.setConfig(customReqConf.build());

            HttpResponse res;
            if (url.startsWith("https")) {
                // 执行 Https 请求.
                client = createSSLInsecureClient();
                res = client.execute(post);
            } else {
                // 执行 Http 请求.
                client = HttpClientUtils.client;
                res = client.execute(post);
            }
            result = IOUtils.toString(res.getEntity().getContent(), charset);
        } finally {
            post.releaseConnection();
            if (url.startsWith("https") && client != null&& client instanceof CloseableHttpClient) {
                ((CloseableHttpClient) client).close();
            }
        }
        return result;
    }


    /**
     * 提交form表单
     *
     * @param url
     * @param params
     * @param connTimeout
     * @param readTimeout
     * @return
     * @throws ConnectTimeoutException
     * @throws SocketTimeoutException
     * @throws Exception
     */
    public static String postForm(String url, Map<String, String> params, Map<String, String> headers, Integer connTimeout,Integer readTimeout) throws ConnectTimeoutException,
            SocketTimeoutException, Exception {

        HttpClient client = null;
        HttpPost post = new HttpPost(url);
        try {
            if (params != null && !params.isEmpty()) {
                List<NameValuePair> formParams = new ArrayList<NameValuePair>();
                Set<Entry<String, String>> entrySet = params.entrySet();
                for (Entry<String, String> entry : entrySet) {
                    formParams.add(new BasicNameValuePair(entry.getKey(), entry.getValue()));
                }
                UrlEncodedFormEntity entity = new UrlEncodedFormEntity(formParams, Consts.UTF_8);
                post.setEntity(entity);
            }

            if (headers != null && !headers.isEmpty()) {
                for (Entry<String, String> entry : headers.entrySet()) {
                    post.addHeader(entry.getKey(), entry.getValue());
                }
            }
            // 设置参数
            Builder customReqConf = RequestConfig.custom();
            if (connTimeout != null) {
                customReqConf.setConnectTimeout(connTimeout);
            }
            if (readTimeout != null) {
                customReqConf.setSocketTimeout(readTimeout);
            }
            post.setConfig(customReqConf.build());
            HttpResponse res = null;
            if (url.startsWith("https")) {
                // 执行 Https 请求.
                client = createSSLInsecureClient();
                res = client.execute(post);
            } else {
                // 执行 Http 请求.
                client = HttpClientUtils.client;
                res = client.execute(post);
            }
            return IOUtils.toString(res.getEntity().getContent(), "UTF-8");
        } finally {
            post.releaseConnection();
            if (url.startsWith("https") && client != null
                    && client instanceof CloseableHttpClient) {
                ((CloseableHttpClient) client).close();
            }
        }
    }

    /**
     * 发送一个 GET 请求
     */
    public static String get(String url, String charset, Integer connTimeout,Integer readTimeout)
            throws ConnectTimeoutException,SocketTimeoutException, Exception {

        HttpClient client = null;
        HttpGet get = new HttpGet(url);
        String result = "";
        try {
            // 设置参数
            Builder customReqConf = RequestConfig.custom();
            if (connTimeout != null) {
                customReqConf.setConnectTimeout(connTimeout);
            }
            if (readTimeout != null) {
                customReqConf.setSocketTimeout(readTimeout);
            }
            get.setConfig(customReqConf.build());

            HttpResponse res = null;

            if (url.startsWith("https")) {
                // 执行 Https 请求.
                client = createSSLInsecureClient();
                res = client.execute(get);
            } else {
                // 执行 Http 请求.
                client = HttpClientUtils.client;
                res = client.execute(get);
            }

            result = IOUtils.toString(res.getEntity().getContent(), charset);
        } finally {
            get.releaseConnection();
            if (url.startsWith("https") && client != null && client instanceof CloseableHttpClient) {
                ((CloseableHttpClient) client).close();
            }
        }
        return result;
    }

    /**
     * 从 response 里获取 charset
     */
    @SuppressWarnings("unused")
    private static String getCharsetFromResponse(HttpResponse ressponse) {
        // Content-Type:text/html; charset=GBK
        if (ressponse.getEntity() != null  && ressponse.getEntity().getContentType() != null && ressponse.getEntity().getContentType().getValue() != null) {
            String contentType = ressponse.getEntity().getContentType().getValue();
            if (contentType.contains("charset=")) {
                return contentType.substring(contentType.indexOf("charset=") + 8);
            }
        }
        return null;
    }

    /**
     * 创建 SSL连接
     * @return
     * @throws GeneralSecurityException
     */
    private static CloseableHttpClient createSSLInsecureClient() throws GeneralSecurityException {
        try {
            SSLContext sslContext = new SSLContextBuilder().loadTrustMaterial(null, new TrustStrategy() {
                public boolean isTrusted(X509Certificate[] chain,String authType) throws CertificateException {
                    return true;
                }
            }).build();

            SSLConnectionSocketFactory sslsf = new SSLConnectionSocketFactory(sslContext, new X509HostnameVerifier() {

                @Override
                public boolean verify(String arg0, SSLSession arg1) {
                    return true;
                }

                @Override
                public void verify(String host, SSLSocket ssl)
                        throws IOException {
                }

                @Override
                public void verify(String host, X509Certificate cert)
                        throws SSLException {
                }

                @Override
                public void verify(String host, String[] cns,
                                   String[] subjectAlts) throws SSLException {
                }
            });
            return HttpClients.custom().setSSLSocketFactory(sslsf).build();

        } catch (GeneralSecurityException e) {
            throw e;
        }
    }
}
UserInfoService 接口:
package com.atguigu.yygh.user.service;
import com.atguigu.yygh.model.user.UserInfo;
import com.atguigu.yygh.vo.user.LoginVo;
import com.baomidou.mybatisplus.extension.service.IService;
import java.util.Map;
public interface UserInfoService extends IService<UserInfo> {
//用户手机登录接口
Map<String, Object> login(LoginVo loginVo);
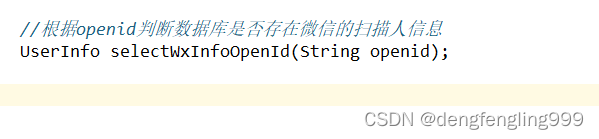
//根据openid判断数据库是否存在微信的扫描人信息
UserInfo selectWxInfoOpenId(String openid);
}
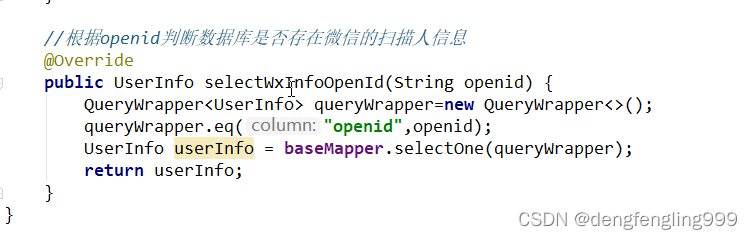
实现类: UserInfoServiceImpl:添加实现方法:
在WexinApiController:微信扫码回调方法
package com.atguigu.yygh.user.api;

import com.alibaba.fastjson.JSONObject;
import com.atguigu.yygh.common.helper.JwtHelper;
import com.atguigu.yygh.common.result.Result;
import com.atguigu.yygh.model.user.UserInfo;
import com.atguigu.yygh.user.service.UserInfoService;
import com.atguigu.yygh.user.utils.ConstantWxPropertiesUtils;
import com.atguigu.yygh.user.utils.HttpClientUtils;
import org.springframework.beans.factory.annotation.Autowired;
import org.springframework.stereotype.Controller;
import org.springframework.util.StringUtils;
import org.springframework.web.bind.annotation.GetMapping;
import org.springframework.web.bind.annotation.RequestMapping;
import org.springframework.web.bind.annotation.ResponseBody;

import javax.servlet.http.HttpSession;
import java.io.UnsupportedEncodingException;
import java.net.URLEncoder;
import java.util.HashMap;
import java.util.Map;

//微信操作的接口
@Controller
@RequestMapping("/api/ucenter/wx")
public class WeixinApiController {
    @Autowired
    private UserInfoService userInfoService;


    //1 生成微信扫描的二维码
    //返回生成二维码需要的参数
    @GetMapping("getLoginParam")
    @ResponseBody
    public Result genQrConnect(HttpSession session) throws UnsupportedEncodingException {

        Map<String, Object> map = new HashMap<>();
        map.put("appid", ConstantWxPropertiesUtils.WX_OPEN_APP_ID);
        String redirect_Uri = URLEncoder.encode(ConstantWxPropertiesUtils.WX_OPEN_REDIRECT_URL, "UTF-8");
        map.put("redirect_Uri", redirect_Uri);
        map.put("scope", "snsapi_login");
        map.put("state", System.currentTimeMillis()+"");//System.currentTimeMillis()+""
        return Result.ok(map);
    }


    //微信扫描后回调的方法
    @GetMapping("callback")  //code和state是回调函数请求过来的时候携带的2个参数
    public String callback(String code,String state) {
        //第一步 获取临时票据 code
        System.out.println("code:"+code);

        //第二步 拿着code和微信id和秘钥,请求微信固定地址 ,得到两个值
        //使用code和appid以及appscrect换取access_token字符串
        //  %s   占位符
        StringBuffer baseAccessTokenUrl = new StringBuffer()
                .append("https://api.weixin.qq.com/sns/oauth2/access_token")
                .append("?appid=%s")
                .append("&secret=%s")
                .append("&code=%s")
                .append("&grant_type=authorization_code");
        String accessTokenUrl = String.format(baseAccessTokenUrl.toString(),
                ConstantWxPropertiesUtils.WX_OPEN_APP_ID,
                ConstantWxPropertiesUtils.WX_OPEN_APP_SECRET,
                code);
        //使用httpclient请求这个地址
        try {
            String accesstokenInfo = HttpClientUtils.get(accessTokenUrl);
            System.out.println("accesstokenInfo:"+accesstokenInfo);
            //从返回字符串获取两个值 openid  和  access_token
            JSONObject jsonObject = JSONObject.parseObject(accesstokenInfo);
            String access_token = jsonObject.getString("access_token");
            String openid = jsonObject.getString("openid");

            //判断数据库是否存在微信的扫描人信息
            //根据openid判断
            UserInfo userInfo = userInfoService.selectWxInfoOpenId(openid);
            if(userInfo == null) { //数据库不存在微信信息

                //第三步 拿着openid  和  access_token请求微信地址,得到扫描人信息
                String baseUserInfoUrl = "https://api.weixin.qq.com/sns/userinfo" +
                        "?access_token=%s" +
                        "&openid=%s";
                String userInfoUrl = String.format(baseUserInfoUrl, access_token, openid);
                String resultInfo = HttpClientUtils.get(userInfoUrl);
                System.out.println("resultInfo:"+resultInfo);
                JSONObject resultUserInfoJson = JSONObject.parseObject(resultInfo);
                //解析用户信息
                //用户昵称
                String nickname = resultUserInfoJson.getString("nickname");
                //用户头像
                String headimgurl = resultUserInfoJson.getString("headimgurl");

                //获取扫描人信息添加数据库
                userInfo = new UserInfo();
                userInfo.setNickName(nickname);
                userInfo.setOpenid(openid);
                userInfo.setStatus(1);
                userInfoService.save(userInfo);
            }
            //返回name和token字符串
            Map<String,String> map = new HashMap<>();
            String name = userInfo.getName();
            if(StringUtils.isEmpty(name)) {
                name = userInfo.getNickName();
            }
            if(StringUtils.isEmpty(name)) {
                name = userInfo.getPhone();
            }
            map.put("name", name);

            //判断userInfo是否有手机号,如果手机号为空,返回openid
            //如果手机号不为空,返回openid值是空字符串
            //前端判断:如果openid不为空,绑定手机号,如果openid为空,不需要绑定手机号
            if(StringUtils.isEmpty(userInfo.getPhone())) {
                map.put("openid", userInfo.getOpenid());
            } else {
                map.put("openid", "");
            }
            //使用jwt生成token字符串
            String token = JwtHelper.createToken(userInfo.getId(), name);
            map.put("token", token);
            //跳转到前端页面
            return "redirect:" + ConstantWxPropertiesUtils.YYGH_BASE_URL + "/weixin/callback?token="+map.get("token")+ "&openid="+map.get("openid")+"&name="+URLEncoder.encode(map.get("name"),"utf-8");
        } catch (Exception e) {
            e.printStackTrace();
            return null;
        }
    }

}
(7)微信登录-手机号绑定和前端整合
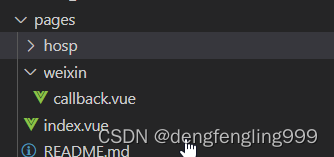
创建weixin callback.vue
<template>
  <!-- header -->
  <div></div>
  <!-- footer -->
</template>
  <script>
export default {
  layout: "empty",
  data() {
    return {};
  },
  mounted() {
    let token = this.$route.query.token;
    let name = this.$route.query.name;
    let openid = this.$route.query.openid;
    // 调用父vue方法
    window.parent["loginCallback"](name, token, openid);
  },
};
</script>
这是一个中转页面,得到参数值,再调用弹框里面的方法,一会在myheader弹框中写上这个回调方法loginCallback,callback做一个中转页面,由页面在跳到弹框里面更加方便
在myheader.vue中添加:
myheader.vue详细代码:
<template>
<div class="header-container">
<div class="wrapper">
<!-- logo -->
<div class="left-wrapper v-link selected">
<img
style="width: 50px"
width="50"
height="50"
src="~assets/images/logo.png"
/>
<span class="text">尚医通 预约挂号统一平台</span>
</div>
<!-- 搜索框 -->
<div class="search-wrapper">
<div class="hospital-search animation-show">
<el-autocomplete
class="search-input small"
prefix-icon="el-icon-search"
v-model="hosname"
:fetch-suggestions="querySearchAsync"
placeholder="点击输入医院名称"
@select="handleSelect"
>
<span
slot="suffix"
class="search-btn v-link highlight clickable selected"
>搜索
</span>
</el-autocomplete>
</div>
</div>
<!-- 右侧 -->
<!-- 右侧 -->
<div class="right-wrapper">
<span class="v-link clickable">帮助中心</span>
<span
v-if="name == ''"
class="v-link clickable"
@click="showLogin()"
id="loginDialog"
>登录/注册</span
>
<el-dropdown v-if="name != ''" @command="loginMenu">
<span class="el-dropdown-link">
{{ name }}<i class="el-icon-arrow-down el-icon--right"></i>
</span>
<el-dropdown-menu class="user-name-wrapper" slot="dropdown">
<el-dropdown-item command="/user">实名认证</el-dropdown-item>
<el-dropdown-item command="/order">挂号订单</el-dropdown-item>
<el-dropdown-item command="/patient">就诊人管理</el-dropdown-item>
<el-dropdown-item command="/logout" divided
>退出登录</el-dropdown-item
>
</el-dropdown-menu>
</el-dropdown>
</div>
</div>
<!-- 登录弹出层 -->
<el-dialog
:visible.sync="dialogUserFormVisible"
style="text-align: left; display: none"
top="50px"
:append-to-body="true"
width="960px"
@close="closeDialog()"
>
<div class="container">
<!-- 手机登录 #start -->
<div class="operate-view" v-if="dialogAtrr.showLoginType === 'phone'">
<div class="wrapper" style="width: 100%">
<div class="mobile-wrapper" style="position: static; width: 70%">
<span class="title">{{ dialogAtrr.labelTips }}</span>
<el-form>
<el-form-item>
<el-input
v-model="dialogAtrr.inputValue"
:placeholder="dialogAtrr.placeholder"
:maxlength="dialogAtrr.maxlength"
class="input v-input"
>
<span
slot="suffix"
class="sendText v-link"
v-if="dialogAtrr.second > 0"
>{{ dialogAtrr.second }}s
</span>
<span
slot="suffix"
class="sendText v-link highlight clickable selected"
v-if="dialogAtrr.second == 0"
@click="getCodeFun()"
>重新发送
</span>
</el-input>
</el-form-item>
</el-form>
<div class="send-button v-button" @click="btnClick()">
{{ dialogAtrr.loginBtn }}
</div>
</div>
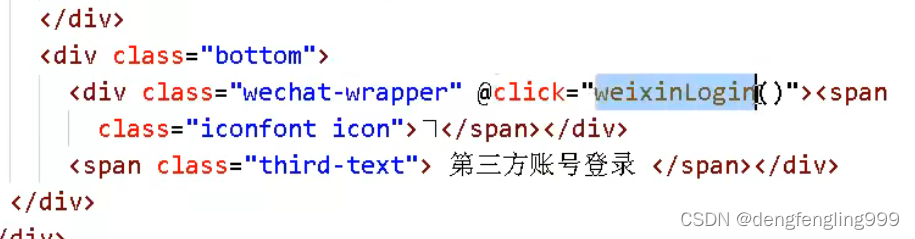
<div class="bottom">
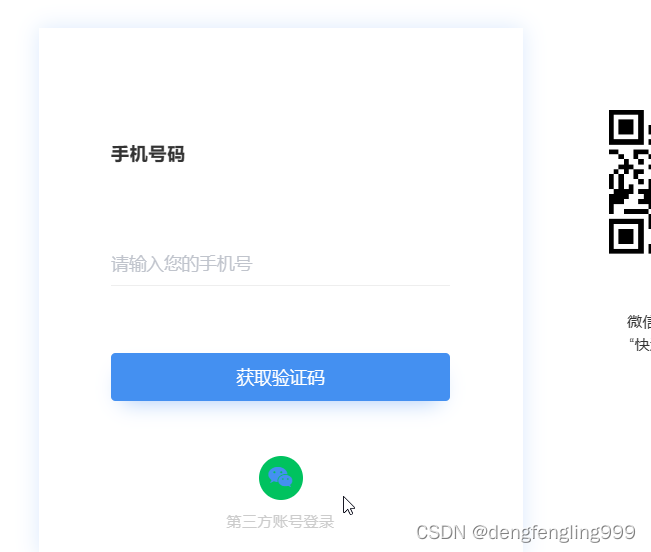
<div class="wechat-wrapper" @click="weixinLogin()">
<span class="iconfont icon"></span>
</div>
<span class="third-text"> 第三方账号登录 </span>
</div>
</div>
</div>
<!-- 手机登录 #end -->
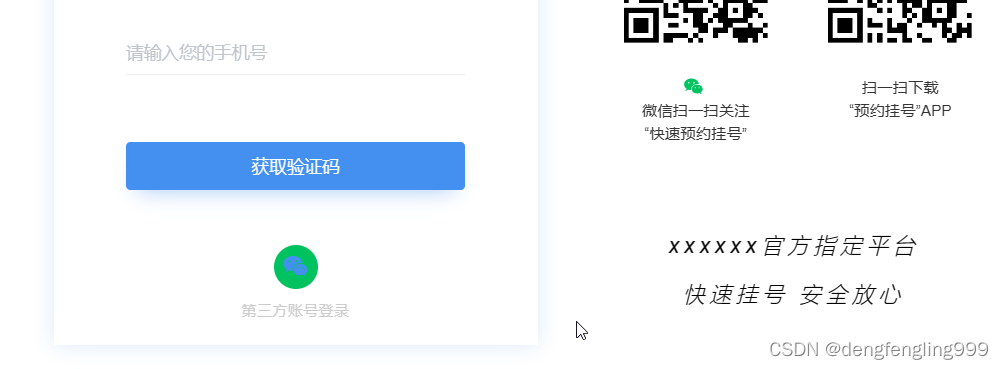
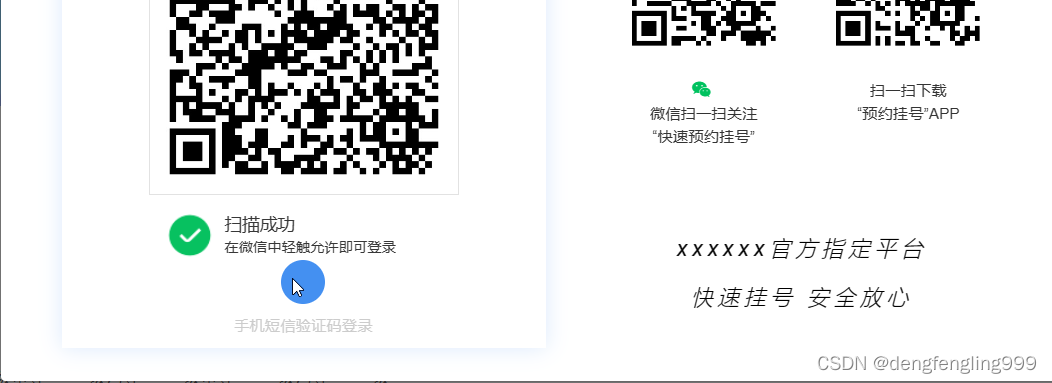
<!-- 微信登录 #start -->
<div class="operate-view" v-if="dialogAtrr.showLoginType === 'weixin'">
<div class="wrapper wechat" style="height: 400px">
<div>
<div id="weixinLogin"></div>
</div>
<div class="bottom wechat" style="margin-top: -80px">
<div class="phone-container">
<div class="phone-wrapper" @click="phoneLogin()">
<span class="iconfont icon"></span>
</div>
<span class="third-text"> 手机短信验证码登录 </span>
</div>
</div>
</div>
</div>
<!-- 微信登录 #end -->
<div class="info-wrapper">
<div class="code-wrapper">
<div>
<img
src="//img.114yygh.com/static/web/code_login_wechat.png"
class="code-img"
/>
<div class="code-text">
<span class="iconfont icon"></span>微信扫一扫关注
</div>
<div class="code-text">“快速预约挂号”</div>
</div>
<div class="wechat-code-wrapper">
<img
src="//img.114yygh.com/static/web/code_app.png"
class="code-img"
/>
<div class="code-text">扫一扫下载</div>
<div class="code-text">“预约挂号”APP</div>
</div>
</div>
<div class="slogan">
<div>xxxxxx官方指定平台</div>
<div>快速挂号 安全放心</div>
</div>
</div>
</div>
</el-dialog>
<div></div>
<!--解决登录框样式不对-->
</div>
</template>
<script>
import cookie from "js-cookie";
import Vue from "vue";
import userInfoApi from "@/api/userInfo";
import smsApi from "@/api/msm";
import hospitalApi from "@/api/hosp";
import weixinApi from "@/api/weixin";
const defaultDialogAtrr = {
showLoginType: "phone", // 控制手机登录与微信登录切换
labelTips: "手机号码", // 输入框提示
inputValue: "", // 输入框绑定对象
placeholder: "请输入您的手机号", // 输入框placeholder
maxlength: 11, // 输入框长度控制
loginBtn: "获取验证码", // 登录按钮或获取验证码按钮文本
sending: true, // 是否可以发送验证码
second: -1, // 倒计时间 second>0 : 显示倒计时 second=0 :重新发送 second=-1 :什么都不显示
clearSmsTime: null, // 倒计时定时任务引用 关闭登录层清除定时任务
};
export default {
data() {
return {
userInfo: {
phone: "",
code: "",
openid: "",
hosname: "",
},
dialogUserFormVisible: false,
// 弹出层相关属性
dialogAtrr: defaultDialogAtrr,
name: "", // 用户登录显示的名称
};
},
created() {
this.showInfo();
},
mounted() {
//在页面渲染之后执行的方法
// 注册全局登录事件对象
window.loginEvent = new Vue();
// 监听登录事件
loginEvent.$on("loginDialogEvent", function () {
document.getElementById("loginDialog").click();
});
// 触发事件,显示登录层:loginEvent.$emit('loginDialogEvent')
//初始化微信js body下面追加一个文件
const script = document.createElement("script");
script.type = "text/javascript";
script.src =
"https://res.wx.qq.com/connect/zh_CN/htmledition/js/wxLogin.js";
document.body.appendChild(script);
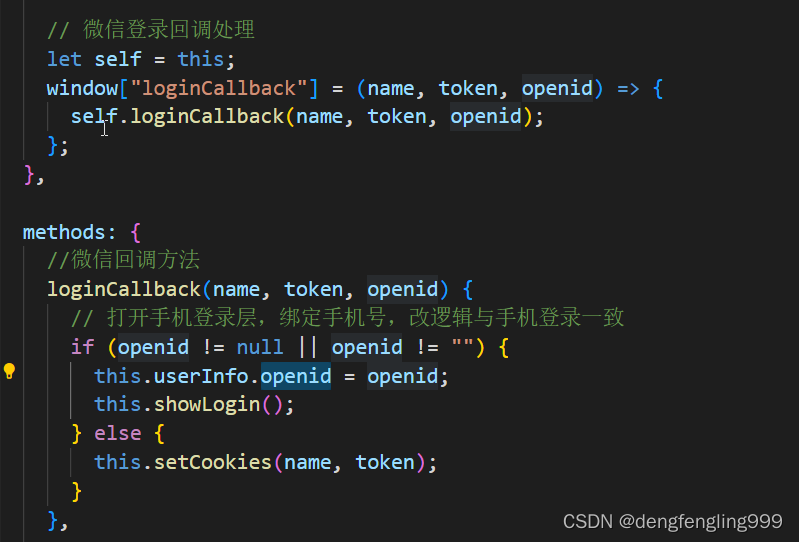
// 微信登录回调处理
let self = this;
window["loginCallback"] = (name, token, openid) => {
self.loginCallback(name, token, openid);
};
},
methods: {
//微信回调方法
loginCallback(name, token, openid) {
// 打开手机登录层,绑定手机号,改逻辑与手机登录一致
if (openid != null || openid != "") {
this.userInfo.openid = openid;
this.showLogin();
} else {
this.setCookies(name, token);
}
},
// 绑定登录或获取验证码按钮
btnClick() {
// 判断是获取验证码还是登录
if (this.dialogAtrr.loginBtn == "获取验证码") {
this.userInfo.phone = this.dialogAtrr.inputValue;
// 获取验证码
this.getCodeFun();
} else {
// 登录
this.login();
}
},
// 绑定登录,点击显示登录层
showLogin() {
this.dialogUserFormVisible = true;
// 初始化登录层相关参数
this.dialogAtrr = { ...defaultDialogAtrr };
},
// 登录
login() {
this.userInfo.code = this.dialogAtrr.inputValue;
if (this.dialogAtrr.loginBtn == "正在提交...") {
this.$message.error("重复提交");
return;
}
if (this.userInfo.code == "") {
this.$message.error("验证码必须输入");
return;
}
if (this.userInfo.code.length != 6) {
this.$message.error("验证码格式不正确");
return;
}
this.dialogAtrr.loginBtn = "正在提交...";
userInfoApi
.login(this.userInfo)
.then((response) => {
console.log(response.data);
// 登录成功 设置cookie
this.setCookies(response.data.name, response.data.token);
})
.catch((e) => {
this.dialogAtrr.loginBtn = "马上登录";
});
},
setCookies(name, token) {
cookie.set("token", token, { domain: "localhost" });
cookie.set("name", name, { domain: "localhost" });
window.location.reload();
},
// 获取验证码
getCodeFun() {
if (!/^1[34578]\d{9}$/.test(this.userInfo.phone)) {
this.$message.error("手机号码不正确");
return;
}
// 初始化验证码相关属性
this.dialogAtrr.inputValue = "";
this.dialogAtrr.placeholder = "请输入验证码";
this.dialogAtrr.maxlength = 6;
this.dialogAtrr.loginBtn = "马上登录";
// 控制重复发送
if (!this.dialogAtrr.sending) return;
// 发送短信验证码
this.timeDown();
this.dialogAtrr.sending = false;
smsApi
.sendCode(this.userInfo.phone)
.then((response) => {
this.timeDown();
})
.catch((e) => {
this.$message.error("发送失败,重新发送");
// 发送失败,回到重新获取验证码界面
this.showLogin();
});
},
// 倒计时
timeDown() {
if (this.clearSmsTime) {
clearInterval(this.clearSmsTime);
}
this.dialogAtrr.second = 60;
this.dialogAtrr.labelTips = "验证码已发送至" + this.userInfo.phone;
this.clearSmsTime = setInterval(() => {
--this.dialogAtrr.second;
if (this.dialogAtrr.second < 1) {
clearInterval(this.clearSmsTime);
this.dialogAtrr.sending = true;
this.dialogAtrr.second = 0;
}
}, 1000);
},
// 关闭登录层
closeDialog() {
if (this.clearSmsTime) {
clearInterval(this.clearSmsTime);
}
},
showInfo() {
let token = cookie.get("token");
if (token) {
this.name = cookie.get("name");
console.log(this.name);
}
},
loginMenu(command) {
if ("/logout" == command) {
cookie.set("name", "", { domain: "localhost" });
cookie.set("token", "", { domain: "localhost" });
//跳转页面
window.location.href = "/";
} else {
window.location.href = command;
}
},
handleSelect(item) {
window.location.href = "/hospital/" + item.hoscode;
},
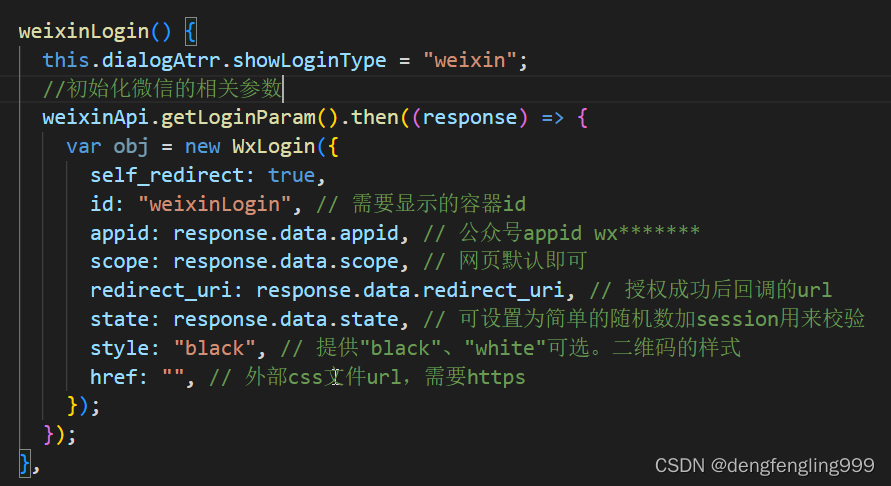
weixinLogin() {
this.dialogAtrr.showLoginType = "weixin";
//初始化微信的相关参数
weixinApi.getLoginParam().then((response) => {
var obj = new WxLogin({
self_redirect: true,
id: "weixinLogin", // 需要显示的容器id
appid: response.data.appid, // 公众号appid wx*******
scope: response.data.scope, // 网页默认即可
redirect_uri: response.data.redirect_Uri, // 授权成功后回调的url
state: response.data.state, // 可设置为简单的随机数加session用来校验
style: "black", // 提供"black"、"white"可选。二维码的样式
href: "", // 外部css文件url,需要https
});
});
},
phoneLogin() {
this.dialogAtrr.showLoginType = "phone";
this.showLogin();
},
},
};
</script>
然后修改一下手机登录的部分,我们把微信登录跟手机号绑定写到一起,微信扫描之后还是进入手机的登录页面
修改UserInfoServiceImpl:的手机登录
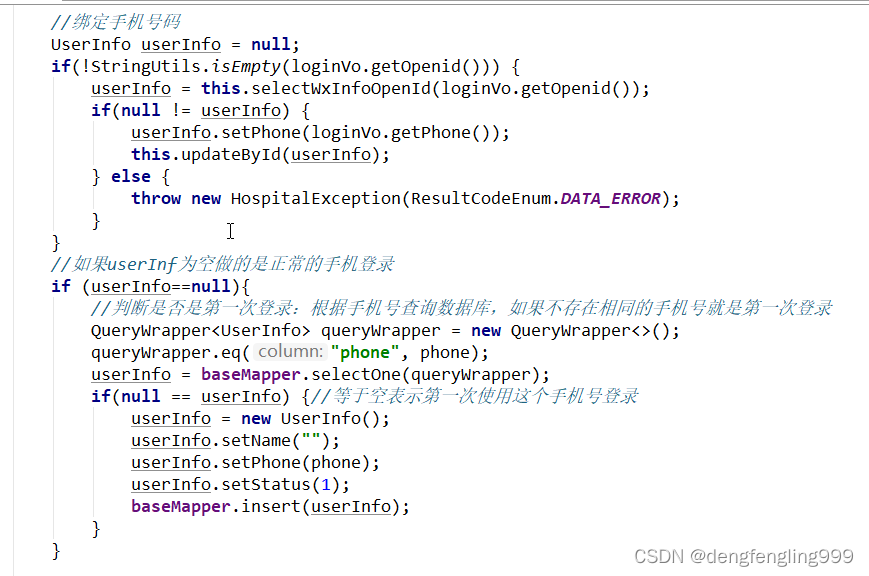
//用户手机登录接口
    @Override
    public Map<String, Object> login(LoginVo loginVo) {
        //从loginVo里面获取输入的手机号和验证码
        String phone = loginVo.getPhone();
        String code = loginVo.getCode();
        //校验参数 判断手机号和验证码是否为空
        if(StringUtils.isEmpty(phone) || StringUtils.isEmpty(code)) {
            throw new HospitalException(ResultCodeEnum.PARAM_ERROR);
        }

        //(整合阿里云短信服务)判断手机验证码和输入的验证码是否一致
        //校验校验验证码
        String mobleCode = redisTemplate.opsForValue().get(phone);
        if(!code.equals(mobleCode)) {
            throw new HospitalException(ResultCodeEnum.CODE_ERROR);
        }

        //绑定手机号码
        UserInfo userInfo = null;
        if(!StringUtils.isEmpty(loginVo.getOpenid())) {
            userInfo = this.selectWxInfoOpenId(loginVo.getOpenid());
            if(null != userInfo) {
                userInfo.setPhone(loginVo.getPhone());
                this.updateById(userInfo);
            } else {
                throw new HospitalException(ResultCodeEnum.DATA_ERROR);
            }
        }
        //如果userInf为空做的是正常的手机登录
        if (userInfo==null){
            //判断是否是第一次登录:根据手机号查询数据库,如果不存在相同的手机号就是第一次登录
            QueryWrapper<UserInfo> queryWrapper = new QueryWrapper<>();
            queryWrapper.eq("phone", phone);
            userInfo = baseMapper.selectOne(queryWrapper);
            if(null == userInfo) {//等于空表示第一次使用这个手机号登录
                userInfo = new UserInfo();
                userInfo.setName("");
                userInfo.setPhone(phone);
                userInfo.setStatus(1);
                baseMapper.insert(userInfo);
            }
        }


        //校验是否被禁用
        if(userInfo.getStatus() == 0) {//判断用户状态是否为0禁用状态
            throw new HospitalException(ResultCodeEnum.LOGIN_DISABLED_ERROR);
        }


        //不是第一次登录,直接登陆

        //返回登录的信息 :返回用户名 返回tocken信息
        Map<String, Object> map = new HashMap<>();
        String name = userInfo.getName();
        if(StringUtils.isEmpty(name)) {
            name = userInfo.getNickName();
        }
        if(StringUtils.isEmpty(name)) {
            name = userInfo.getPhone();
        }
        map.put("name", name);

        //JWT工具类生成token
        String token = JwtHelper.createToken(userInfo.getId(), name);
        map.put("token", token);

        return map;
} 
点击登录:
点击第三方账号登录:

用手机扫描二维码:
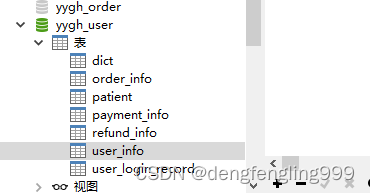
yygh_user数据库表user_nfo成功插入一条数据:

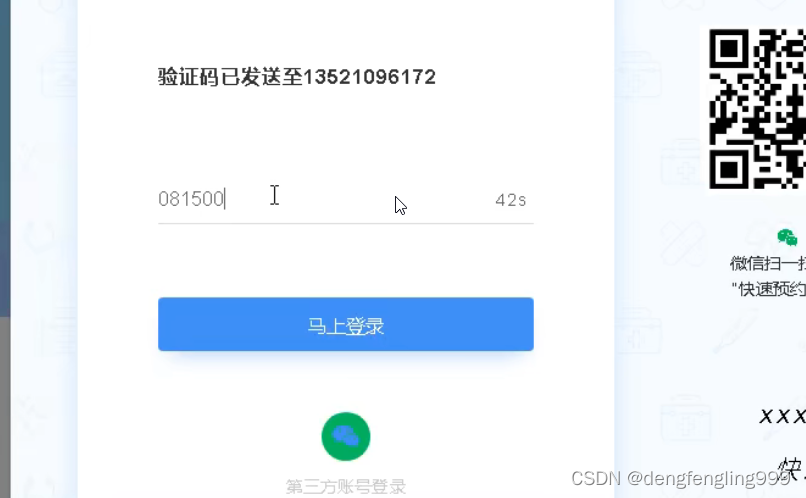
然后显示绑定手机号: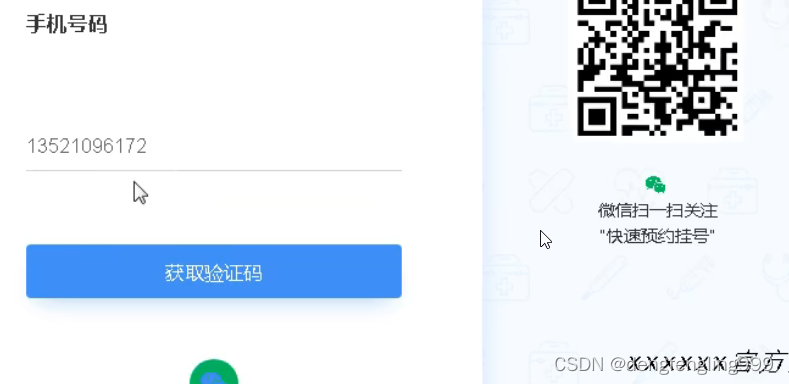
这页面换成了昵称显示登录: