上一章我们回顾了 SpringBoot 的自动装配,以及承载自动装配的核心——自动配置类。自动配置类的定义位置通常在每个场景的 jar 包中,配置 spring.factories 文件中 EnableAutoConfiguration 的位置通常在相应的 autoconfigure jar 包下。本章会着重回顾和分析这些场景启动器 starter 中的设计,并尝试提取一些关键信息。
1. parent中的设计
首先我们观察一下 SpringBoot 项目中需要继承的父依赖,在本小册的项目中,统一继承的父依赖是 2.5.14 版本的 spring-boot-starter-parent 。
<parent>
    <groupId>org.springframework.boot</groupId>
    <artifactId>spring-boot-starter-parent</artifactId>
    <version>2.5.14</version>
</parent>
spring-boot-starter-parent 中定义了 SpringBoot 的应用对应的 Java 编译版本、字符编码集等信息,非常简单。
<properties>
    <java.version>1.8</java.version>
    <resource.delimiter>@</resource.delimiter>
    <maven.compiler.source>${java.version}</maven.compiler.source>
    <maven.compiler.target>${java.version}</maven.compiler.target>
    <project.build.sourceEncoding>UTF-8</project.build.sourceEncoding>
    <project.reporting.outputEncoding>UTF-8</project.reporting.outputEncoding>
</properties>
spring-boot-starter-parent 依赖的父依赖是一个叫 spring-boot-dependencies 的 pom ,它的内部定义了非常多的第三方依赖版本号,如此设计意味着 SpringBoot 官方团队已经帮我们开发者测试了配套可用的第三方框架版本,避免一些不必要的问题发生。
<parent>
    <groupId>org.springframework.boot</groupId>
    <artifactId>spring-boot-dependencies</artifactId>
    <version>2.5.14</version>
</parent>
<properties>
    <activemq.version>5.16.5</activemq.version>
    <antlr2.version>2.7.7</antlr2.version>
    <appengine-sdk.version>1.9.96</appengine-sdk.version>
    <artemis.version>2.17.0</artemis.version>
    <aspectj.version>1.9.7</aspectj.version>
    ......
    <hibernate.version>5.4.33</hibernate.version>
    ......
    <mysql.version>8.0.29</mysql.version>
    ......
    <spring-framework.version>5.3.20</spring-framework.version>
    <spring-security.version>5.5.8</spring-security.version>
    ......
</properties>
此外,spring-boot-dependencies 中还定义了非常多的依赖管理,如此设计后,构建 SpringBoot 工程时只需要导入依赖坐标即可,无需声明具体的版本,大大减少了项目开发过程中可能会走的弯路。
<dependencyManagement>
    <dependencies>
        <dependency>
            <groupId>org.apache.activemq</groupId>
            <artifactId>activemq-amqp</artifactId>
            <version>${activemq.version}</version>
        </dependency>
        <dependency>
            <groupId>org.apache.commons</groupId>
            <artifactId>commons-lang3</artifactId>
            <version>${commons-lang3.version}</version>
        </dependency>
        ......
2. 场景启动器的设计
以 WebMvc 场景为例,导入的核心依赖坐标是 spring-boot-starter-web :
<dependency>
    <groupId>org.springframework.boot</groupId>
    <artifactId>spring-boot-starter-web</artifactId>
</dependency>
该依赖中包含如下的子依赖集合,包含 SpringBoot 的基础启动器 spring-boot-starter ,以及 json 场景的依赖、嵌入式 Tomcat 的依赖,还有 SpringWebMvc 的基础依赖。
<dependencies>
    <dependency>
        <groupId>org.springframework.boot</groupId>
        <artifactId>spring-boot-starter</artifactId>
        <version>2.5.14</version>
        <scope>compile</scope>
    </dependency>
    <dependency>
        <groupId>org.springframework.boot</groupId>
        <artifactId>spring-boot-starter-json</artifactId>
        <version>2.5.14</version>
        <scope>compile</scope>
    </dependency>
    <dependency>
        <groupId>org.springframework.boot</groupId>
        <artifactId>spring-boot-starter-tomcat</artifactId>
        <version>2.5.14</version>
        <scope>compile</scope>
    </dependency>
    <dependency>
        <groupId>org.springframework</groupId>
        <artifactId>spring-web</artifactId>
        <version>5.3.20</version>
        <scope>compile</scope>
    </dependency>
    <dependency>
        <groupId>org.springframework</groupId>
        <artifactId>spring-webmvc</artifactId>
        <version>5.3.20</version>
        <scope>compile</scope>
    </dependency>
</dependencies>
请各位关注最基础的 SpringBoot 场景启动器 spring-boot-starter ,在这个场景启动器中包含了一个极其关键的依赖:spring-boot-autoconfigure ,这个依赖中包含下图的自动配置类定义:
<dependencies>
    <dependency>
        <groupId>org.springframework.boot</groupId>
        <artifactId>spring-boot</artifactId>
        <version>2.5.14</version>
        <scope>compile</scope>
    </dependency>
    <dependency>
        <groupId>org.springframework.boot</groupId>
        <artifactId>spring-boot-autoconfigure</artifactId>
        <version>2.5.14</version>
        <scope>compile</scope>
    </dependency>
    <!-- ······ -->
</dependencies>
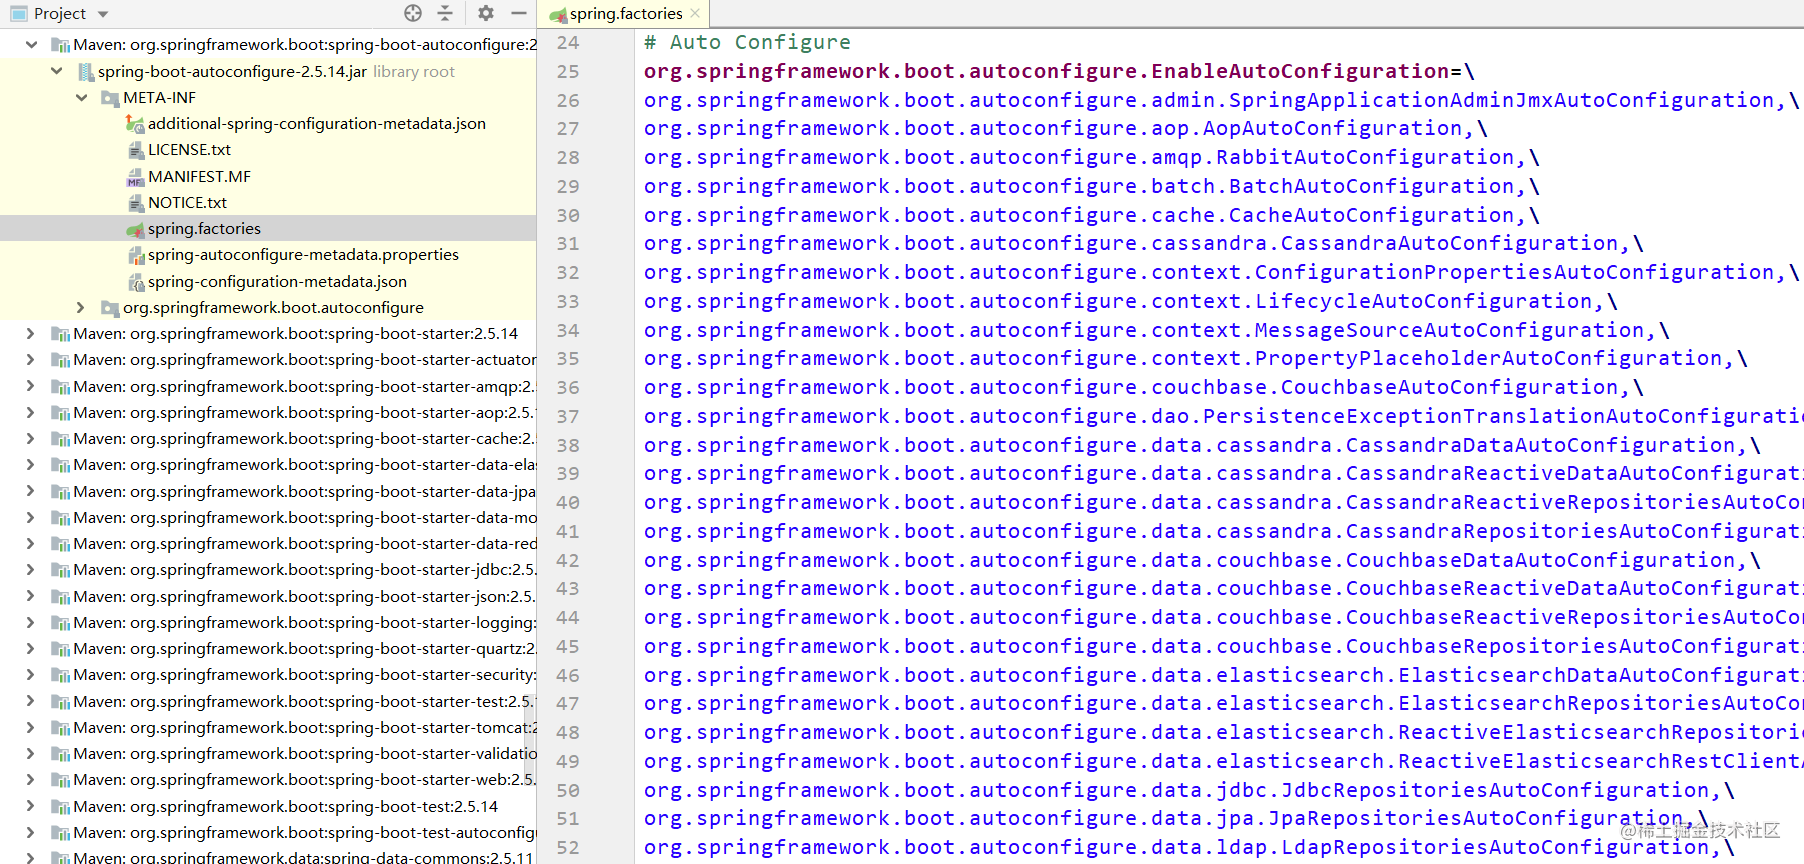
由上图可以得知,当项目被导入 spring-boot-autoconfigure 依赖后,项目中会集成一组自动配置类和相应的 SPI 配置,在 SpringBoot 应用启动时,这些自动配置类会被加载,并根据具体的条件装配筛选出可以被应用的自动配置类并解析和应用。
3. 自定义starter的细节
由 3 、4章的内容讲解,当我们在自定义 starter 场景启动器时,需要考虑以下几个点:
- 这个场景启动器的核心作用是什么?需要整合哪个 / 哪些第三方框架技术?
- 装配场景中需要注册哪些组件?哪些组件是需要在应用启动时初始化的?组件之间是否存在依赖关系?
- 需要对外暴露哪些可自定义的配置属性?这些配置属性会如何影响内部的组件构造 / 行为?
根据上述分析的内容,各位在自定义 starter 场景启动器时,最好思考并遵循上述归纳的细节,从而使自己编写的 starter 更加简单易用且强大。
【简单回顾了 SpringBoot 的核心设计之后,下面我们开始针对经典的模块整合场景进行讲解。】
