博主未授权任何人或组织机构转载博主任何原创文章,感谢各位对原创的支持!
博主链接
本人就职于国际知名终端厂商,负责modem芯片研发。
在5G早期负责终端数据业务层、核心网相关的开发工作,目前牵头6G算力网络技术标准研究。
博客内容主要围绕:
5G/6G协议讲解
算力网络讲解(云计算,边缘计算,端计算)
高级C语言讲解
Rust语言讲解
NVSHMEM 直方图——分布式方法

PE:处理单元(process entity)
我们来了解一下这个问题的另一种解决方法。之前的解决方案有一个特点,所有的直方图计算都在本地完成。然后同步所有线程并对结果做最终的归约。
另一种方法就是分割直方图并把各个部分分配到不同的GPU上。当输入数据中的一个条目不属于该 GPU 上的直方图位置时,我们将自动递增远程 PE 中的相关直方图条目。然后我们必须在最后把直方图的各个部分拼接起来。我们将这种方法称为“分布式”方法。
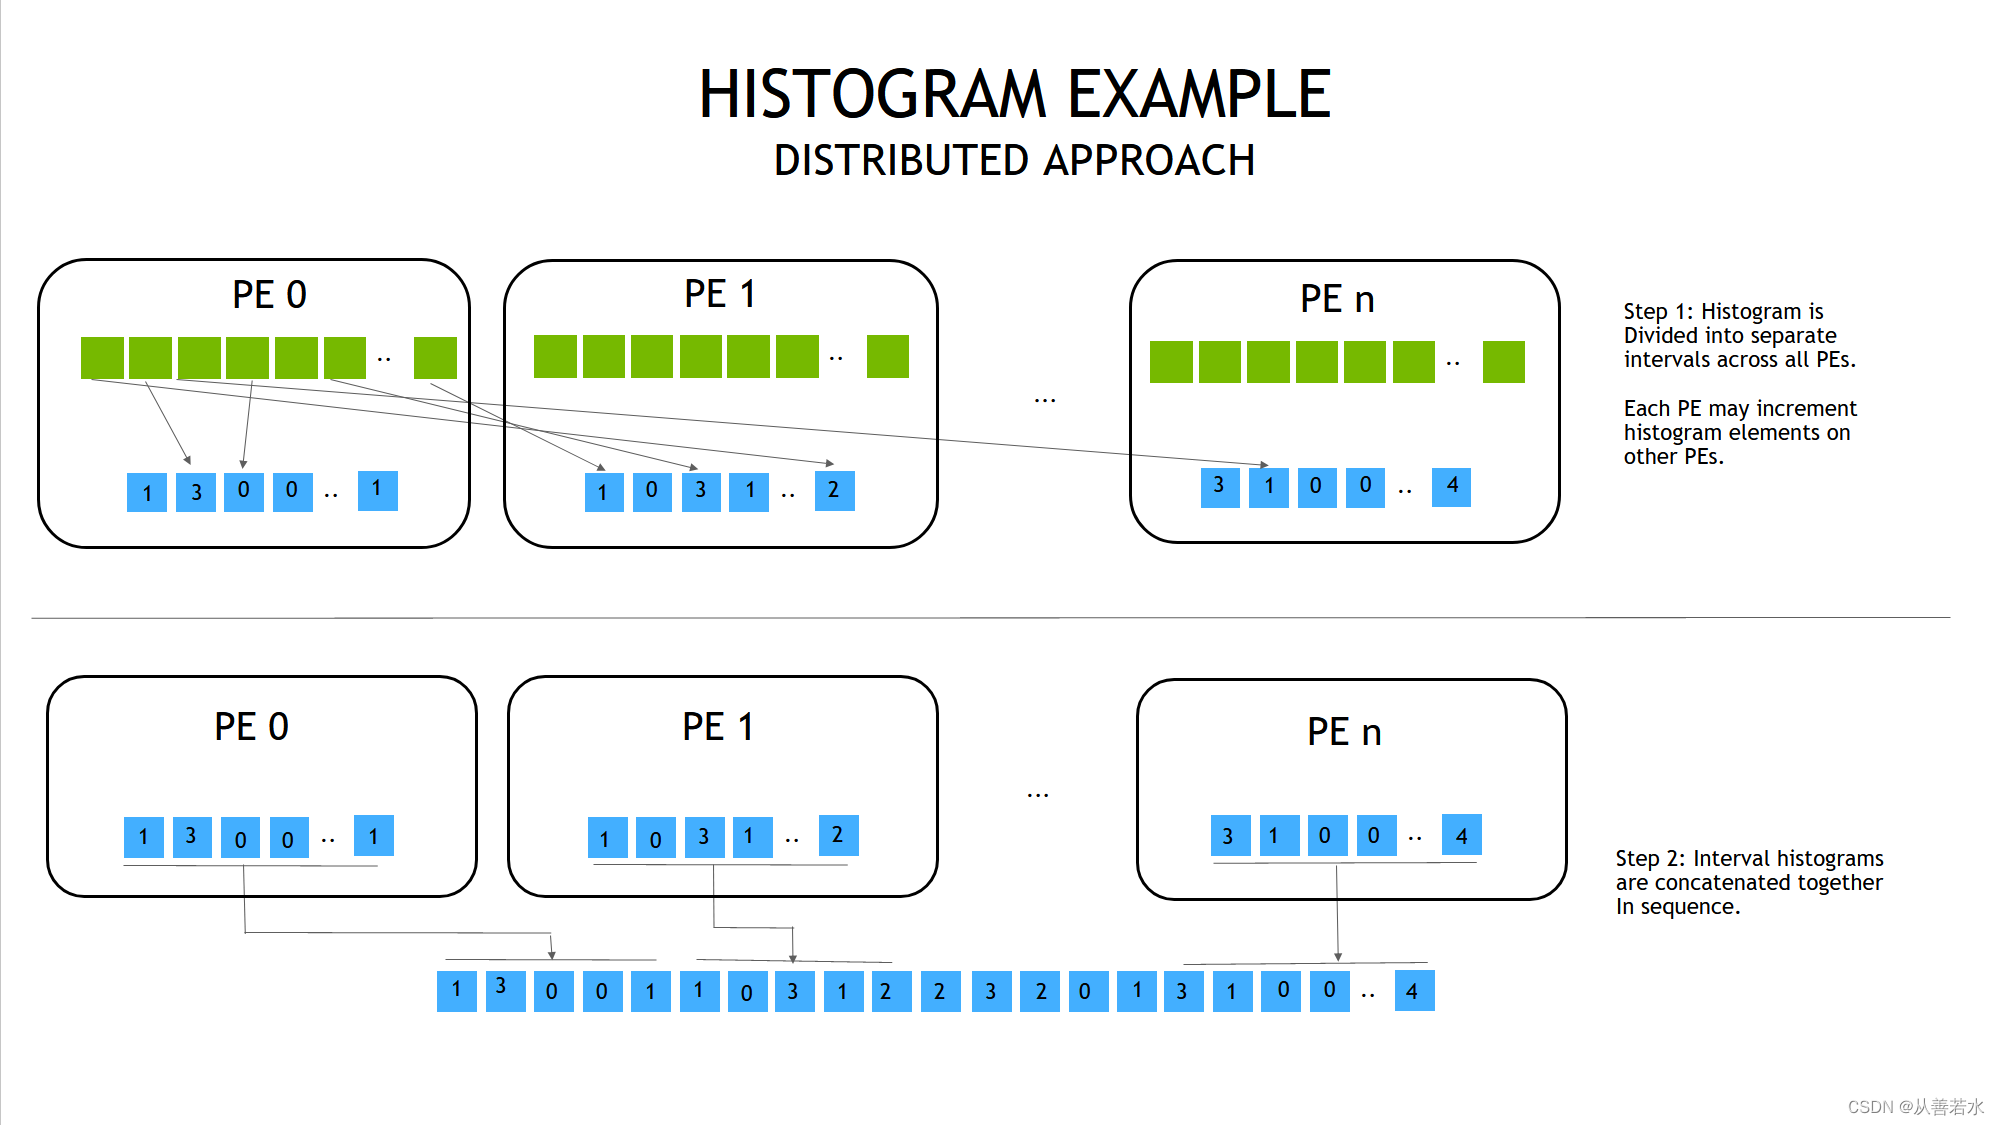
在复制式和分布式方法之间的权衡
与复制方法相比,我们在分布式方法中减少了直方图所需的 GPU 内存数量。我们还降低了直方图上的本地原子操作的压力。但反过来,这增加了消息传递的压力以及远程 GPU 上的原子操作的压力。
练习
我们将直方图任意分割成与GPU的数量相同的段,并把这些段按顺序分配个不同的GPU。我们还将假设直方图的分段是在核函数内部实现的,这样我们就可用算数的方法计算出要将数据发送到哪个 PE(尽管更容易做的是,可将这步变成一般的情况,即该信息并非是事先已知的,仍需作为输入数据提供给核函数)。
为了更新远程 PE 上的直方图,我们希望使用相当于 CUDA 的atomicAdd()的函数。与之相对应的 NVSHMEM 函数是 nvshmem_int_atomic_add()
nvshmem_int_atomic_add(destination, value, target_pe);
其中,
- value:是要增加的数值;
- target_pe:是要被更新的远程 PE;
- destination必须是一个对称地址(如通过nvshmem_malloc()分配的地址);
在拼接直方图的步骤中,我们有一个容易使用的API nvshmem_int_collect() ,它拼接所有 PE 上的数组,比如将来自 PE0 的数组放在第一部分,来自 PE1 的数组放在第二部分,以此类推。
nvshmem_int_collect(team, destination, source, nelems);
其中,
- destination:存放已拼接好的数组(在所有 PE 上都相同);
- source:是长度为nelems的源数组。由于直方图在 PE 之间均匀分布,所以目标数组的长度应为n_pes*nelems,与整个直方图的长度相匹配。
- team:选择PE组。对于全局的集合操作,我们使用工作组
NVSHMEM_TEAM_WORLD,它包含所有的 PE;
相关代码如下(file name:histogram_step2.cpp)
#include <iostream>
#include <cstdlib>
#include <chrono>

#include <nvshmem.h>
#include <nvshmemx.h>

inline void CUDA_CHECK (cudaError_t err) {
    if (err != cudaSuccess) {
        fprintf(stderr, "CUDA error: %s\n", cudaGetErrorString(err));
        exit(-1);
    }
}

#define NUM_BUCKETS   16
#define MAX_VALUE     1048576
#define NUM_INPUTS    65536

__global__ void histogram_kernel(const int* input, int* histogram, int N)
{
    int idx = threadIdx.x + blockIdx.x * blockDim.x;

    int n_pes = nvshmem_n_pes();
    int buckets_per_pe = NUM_BUCKETS / n_pes;

    if (idx < N) {
        int value = input[idx];

        // 计算“全局”直方图索引号
        int global_histogram_index = ((size_t) value * NUM_BUCKETS) / MAX_VALUE;

        // 找出直方图指数对应的 PE。
        // 假设每个 PE 的桶数量相同
        // 我们从包含第一个桶的 PE 0 开始
        // 直到第一个值为 1 / n_pes 的贮体为止
        // 对其他 PE 采用类似方法。我们可在这个阶段采取简单的
        // 整数除法。
        int target_pe = global_histogram_index / buckets_per_pe;

        // 现在求出 PE 的局部直方图索引号。
        // 我们只需要用 PE 的起始桶的偏离值即可。
        int local_histogram_index = global_histogram_index - target_pe * buckets_per_pe;

        nvshmem_int_atomic_add(&histogram[local_histogram_index], 1, target_pe);
    }
}

int main(int argc, char** argv) {
    // 初始化 NVSHMEM
    nvshmem_init();

    // 获取 NVSHMEM 处理元素 ID 和 PE 数量
    int my_pe = nvshmem_my_pe();
    int n_pes = nvshmem_n_pes();

    // 每个 PE(任意)选择与其 ID 对应的 GPU
    int device = my_pe;
    CUDA_CHECK(cudaSetDevice(device));

    // 每台设备处理 1 / n_pes 的部分工作。
    const int N = NUM_INPUTS / n_pes;

    // 在主机上构建直方图输入数据
    int* input = (int*) malloc(N * sizeof(int));

    // 为每个 PE 初始化一个不同的随机数种子。
    srand(my_pe);

    // 输入数据范围从 0 至 MAX_VALUE - 1 不等
    for (int i = 0; i < N; ++i) {
        input[i] = rand() % MAX_VALUE;
    }

    // 复制到设备
    int* d_input;
    d_input = (int*) nvshmem_malloc(N * sizeof(int));
    CUDA_CHECK(cudaMemcpy(d_input, input, N * sizeof(int), cudaMemcpyHostToDevice));

    // 分配直方图数组 - 大小等同于主机上的
    // 完整直方图,且只分配设备上每个 GPU 的相关部分。
    int* histogram = (int*) malloc(NUM_BUCKETS * sizeof(int));
    memset(histogram, 0, NUM_BUCKETS * sizeof(int));

    int buckets_per_pe = NUM_BUCKETS / n_pes;

    int* d_histogram;
    d_histogram = (int*) nvshmem_malloc(buckets_per_pe * sizeof(int));
    CUDA_CHECK(cudaMemset(d_histogram, 0, buckets_per_pe * sizeof(int)));

    // 此外,还要为连接分配完整大小的设备直方图
    int* d_concatenated_histogram = (int*) nvshmem_malloc(NUM_BUCKETS * sizeof(int));
    CUDA_CHECK(cudaMemset(d_concatenated_histogram, 0, NUM_BUCKETS * sizeof(int)));

    // 为合理准确的计时执行一次同步
    nvshmem_barrier_all();

    using namespace std::chrono;

    high_resolution_clock::time_point tabulation_start = high_resolution_clock::now();

    // 执行直方图
    int threads_per_block = 256;
    int blocks = (NUM_INPUTS / n_pes + threads_per_block - 1) / threads_per_block;

    histogram_kernel<<<blocks, threads_per_block>>>(d_input, d_histogram, N);
    CUDA_CHECK(cudaDeviceSynchronize());

    nvshmem_barrier_all();

    high_resolution_clock::time_point tabulation_end = high_resolution_clock::now();

    // 连接所有 PE

    high_resolution_clock::time_point combination_start = high_resolution_clock::now();

    nvshmem_int_collect(NVSHMEM_TEAM_WORLD, d_concatenated_histogram, d_histogram, buckets_per_pe);

    high_resolution_clock::time_point combination_end = high_resolution_clock::now();

    // 打印 PE 0 上的结果
    if (my_pe == 0) {
        duration<double> tabulation_time = duration_cast<duration<double>>(tabulation_end - tabulation_start);
        std::cout << "Tabulation time = " << tabulation_time.count() * 1000 << " ms" << std::endl << std::endl;

        duration<double> combination_time = duration_cast<duration<double>>(combination_end - combination_start);
        std::cout << "Combination time = " << combination_time.count() * 1000 << " ms" << std::endl << std::endl;

        // 将数据复制回主机
        CUDA_CHECK(cudaMemcpy(histogram, d_concatenated_histogram, NUM_BUCKETS * sizeof(int), cudaMemcpyDeviceToHost));

        std::cout << "Histogram counters:" << std::endl << std::endl;
        int num_buckets_to_print = 4;
        for (int i = 0; i < NUM_BUCKETS; i += NUM_BUCKETS / num_buckets_to_print) {
            std::cout << "Bucket [" << i * (MAX_VALUE / NUM_BUCKETS) << ", " << (i + 1) * (MAX_VALUE / NUM_BUCKETS) - 1 << "]: " << histogram[i];
            std::cout << std::endl;
            if (i < NUM_BUCKETS - NUM_BUCKETS / num_buckets_to_print - 1) {
                std::cout << "..." << std::endl;
            }
        }
    }

    free(input);
    free(histogram);
    nvshmem_free(d_input);
    nvshmem_free(d_histogram);

    // 最终确定 nvshmem
    nvshmem_finalize();

    return 0;
}
编译和运行命令:
nvcc -x cu -arch=sm_70 -rdc=true -I $NVSHMEM_HOME/include -L $NVSHMEM_HOME/lib -lnvshmem -lcuda -o histogram_step2 histogram_step2.cpp
nvshmrun -np $NUM_DEVICES ./histogram_step2
运行结果如下:
Tabulation time = 0.195561 ms

Combination time = 0.029666 ms

Histogram counters:

Bucket [0, 65535]: 4135
...
Bucket [262144, 327679]: 4028
...
Bucket [524288, 589823]: 4088
...
Bucket [786432, 851967]: 4100
比较复制式和分布式方法加粗样式
到目前为止,我们一直专注于编写语法正确的代码,而没有考虑性能。现在我们来检查分布式和复制式方法的性能。在这两种情况下,改变NUM_BUCKETS参数和NUM_INPUTS参数,同时注意直方图建表和组合时间。是否一种方法比另一种快? 如果是,是否存在性能比率相反的情况?
为了方便起见,我们提供了以下两种实现的解决方案。
复制式方法
源代码如下:
#include <iostream>
#include <cstdlib>
#include <chrono>

#include <nvshmem.h>
#include <nvshmemx.h>

inline void CUDA_CHECK (cudaError_t err) {
    if (err != cudaSuccess) {
        fprintf(stderr, "CUDA error: %s\n", cudaGetErrorString(err));
        exit(-1);
    }
}

#define NUM_BUCKETS   16
#define MAX_VALUE     1048576
#define NUM_INPUTS    65536

__global__ void histogram_kernel(const int* input, int* histogram, int N)
{
    int idx = threadIdx.x + blockIdx.x * blockDim.x;

    if (idx < N) {
        int value = input[idx];

        int histogram_index = ((size_t) value * NUM_BUCKETS) / MAX_VALUE;

	    atomicAdd(&histogram[histogram_index], 1);
    }
}

int main(int argc, char** argv) {
    // 初始化 NVSHMEM
    nvshmem_init();

    // 获取 NVSHMEM 处理元素 ID 和 PE 数量
    int my_pe = nvshmem_my_pe();
    int n_pes = nvshmem_n_pes();

    // 每个 PE(任意)选择与其 ID 对应的 GPU
    int device = my_pe;
    CUDA_CHECK(cudaSetDevice(device));

    // 每台设备处理 1 / n_pes 的部分工作。
    const int N = NUM_INPUTS / n_pes;

    // 在主机上构建直方图输入数据
    int* input = (int*) malloc(N * sizeof(int));

    // 为每个 PE 初始化一个不同的随机数种子。
    srand(my_pe);

    // 输入数据范围从 0 至 MAX_VALUE - 1 不等
    for (int i = 0; i < N; ++i) {
        input[i] = rand() % MAX_VALUE;
    }

    // 复制到设备
    int* d_input;
    d_input = (int*) nvshmem_malloc(N * sizeof(int));
    CUDA_CHECK(cudaMemcpy(d_input, input, N * sizeof(int), cudaMemcpyHostToDevice));

    // 分配直方图数组
    int* histogram = (int*) malloc(NUM_BUCKETS * sizeof(int));
    memset(histogram, 0, NUM_BUCKETS * sizeof(int));

    int* d_histogram;
    d_histogram = (int*) nvshmem_malloc(NUM_BUCKETS * sizeof(int));
    CUDA_CHECK(cudaMemset(d_histogram, 0, NUM_BUCKETS * sizeof(int)));

    // 为合理准确的计时执行一次同步
    nvshmem_barrier_all();

    using namespace std::chrono;

    high_resolution_clock::time_point tabulation_start = high_resolution_clock::now();

    // 执行直方图
    int threads_per_block = 256;
    int blocks = (NUM_INPUTS / n_pes + threads_per_block - 1) / threads_per_block;

    histogram_kernel<<<blocks, threads_per_block>>>(d_input, d_histogram, N);
    CUDA_CHECK(cudaDeviceSynchronize());

    nvshmem_barrier_all();

    high_resolution_clock::time_point tabulation_end = high_resolution_clock::now();

    high_resolution_clock::time_point combination_start = high_resolution_clock::now();

    // 在所有 PE 上执行归约
    nvshmem_int_sum_reduce(NVSHMEM_TEAM_WORLD, d_histogram, d_histogram, NUM_BUCKETS);

    high_resolution_clock::time_point combination_end = high_resolution_clock::now();

    // 打印 PE 0 上的结果
    if (my_pe == 0) {
        duration<double> tabulation_time = duration_cast<duration<double>>(tabulation_end - tabulation_start);
        std::cout << "Tabulation time = " << tabulation_time.count() * 1000 << " ms" << std::endl << std::endl;

        duration<double> combination_time = duration_cast<duration<double>>(combination_end - combination_start);
        std::cout << "Combination time = " << combination_time.count() * 1000 << " ms" << std::endl << std::endl;

        // 将数据复制回主机
        CUDA_CHECK(cudaMemcpy(histogram, d_histogram, NUM_BUCKETS * sizeof(int), cudaMemcpyDeviceToHost));

        std::cout << "Histogram counters:" << std::endl << std::endl;
        int num_buckets_to_print = 4;
        for (int i = 0; i < NUM_BUCKETS; i += NUM_BUCKETS / num_buckets_to_print) {
            std::cout << "Bucket [" << i * (MAX_VALUE / NUM_BUCKETS) << ", " << (i + 1) * (MAX_VALUE / NUM_BUCKETS) - 1 << "]: " << histogram[i];
            std::cout << std::endl;
            if (i < NUM_BUCKETS - NUM_BUCKETS / num_buckets_to_print - 1) {
                std::cout << "..." << std::endl;
            }
        }
    }

    free(input);
    free(histogram);
    nvshmem_free(d_input);
    nvshmem_free(d_histogram);

    // 最终确定 nvshmem
    nvshmem_finalize();

    return 0;
}
编译和运行指令:
nvcc -x cu -arch=sm_70 -rdc=true -I $NVSHMEM_HOME/include -L $NVSHMEM_HOME/lib -lnvshmem -lcuda -o histogram_step1 histogram_step1.cpp
nvshmrun -np $NUM_DEVICES ./histogram_step1
运行结果如下:
Tabulation time = 0.035362 ms

Combination time = 0.039909 ms

Histogram counters:

Bucket [0, 65535]: 4135
...
Bucket [262144, 327679]: 4028
...
Bucket [524288, 589823]: 4088
...
Bucket [786432, 851967]: 4100
分布式方法
源代码如下:
#include <iostream>
#include <cstdlib>
#include <chrono>

#include <nvshmem.h>
#include <nvshmemx.h>

inline void CUDA_CHECK (cudaError_t err) {
    if (err != cudaSuccess) {
        fprintf(stderr, "CUDA error: %s\n", cudaGetErrorString(err));
        exit(-1);
    }
}

#define NUM_BUCKETS   16
#define MAX_VALUE     1048576
#define NUM_INPUTS    65536

__global__ void histogram_kernel(const int* input, int* histogram, int N)
{
    int idx = threadIdx.x + blockIdx.x * blockDim.x;

    int n_pes = nvshmem_n_pes();
    int buckets_per_pe = NUM_BUCKETS / n_pes;

    if (idx < N) {
        int value = input[idx];

        // 计算“全局”直方图索引号
        int global_histogram_index = ((size_t) value * NUM_BUCKETS) / MAX_VALUE;

        // 找出直方图指数对应的 PE。
        // 假设每个 PE 的桶数量相同
        // 我们从包含第一个桶的 PE 0 开始
        // 直到第一个值为 1 / n_pes 的贮体为止
        // 对其他 PE 采用类似方法。我们可在这个阶段采取简单的
        // 整数除法。
        int target_pe = global_histogram_index / buckets_per_pe;

        // 现在求出 PE 的局部直方图索引号。
        // 我们只需要用 PE 的起始桶的偏离值即可。
        int local_histogram_index = global_histogram_index - target_pe * buckets_per_pe;

        nvshmem_int_atomic_add(&histogram[local_histogram_index], 1, target_pe);
    }
}

int main(int argc, char** argv) {
    // 初始化 NVSHMEM
    nvshmem_init();

    // 获取 NVSHMEM 处理元素 ID 和 PE 数量
    int my_pe = nvshmem_my_pe();
    int n_pes = nvshmem_n_pes();

    // 每个 PE(任意)选择与其 ID 对应的 GPU
    int device = my_pe;
    CUDA_CHECK(cudaSetDevice(device));

    // 每台设备处理 1 / n_pes 的部分工作。
    const int N = NUM_INPUTS / n_pes;

    // 在主机上构建直方图输入数据
    int* input = (int*) malloc(N * sizeof(int));

    // 为每个 PE 初始化一个不同的随机数种子。
    srand(my_pe);

    // 输入数据范围从 0 至 MAX_VALUE - 1 不等
    for (int i = 0; i < N; ++i) {
        input[i] = rand() % MAX_VALUE;
    }

    // 复制到设备
    int* d_input;
    d_input = (int*) nvshmem_malloc(N * sizeof(int));
    CUDA_CHECK(cudaMemcpy(d_input, input, N * sizeof(int), cudaMemcpyHostToDevice));

    // 分配直方图数组 - 大小等同于主机上的
    // 完整直方图,且只分配设备上每个 GPU 的相关部分。
    int* histogram = (int*) malloc(NUM_BUCKETS * sizeof(int));
    memset(histogram, 0, NUM_BUCKETS * sizeof(int));

    int buckets_per_pe = NUM_BUCKETS / n_pes;

    int* d_histogram;
    d_histogram = (int*) nvshmem_malloc(buckets_per_pe * sizeof(int));
    CUDA_CHECK(cudaMemset(d_histogram, 0, buckets_per_pe * sizeof(int)));

    // 此外,还要为连接分配完整大小的设备直方图
    int* d_concatenated_histogram = (int*) nvshmem_malloc(NUM_BUCKETS * sizeof(int));
    CUDA_CHECK(cudaMemset(d_concatenated_histogram, 0, NUM_BUCKETS * sizeof(int)));

    // 为合理准确的计时执行一次同步
    nvshmem_barrier_all();

    using namespace std::chrono;

    high_resolution_clock::time_point tabulation_start = high_resolution_clock::now();

    // 执行直方图
    int threads_per_block = 256;
    int blocks = (NUM_INPUTS / n_pes + threads_per_block - 1) / threads_per_block;

    histogram_kernel<<<blocks, threads_per_block>>>(d_input, d_histogram, N);
    CUDA_CHECK(cudaDeviceSynchronize());

    nvshmem_barrier_all();

    high_resolution_clock::time_point tabulation_end = high_resolution_clock::now();

    // 连接所有 PE

    high_resolution_clock::time_point combination_start = high_resolution_clock::now();

    nvshmem_int_collect(NVSHMEM_TEAM_WORLD, d_concatenated_histogram, d_histogram, buckets_per_pe);

    high_resolution_clock::time_point combination_end = high_resolution_clock::now();

    // 打印 PE 0 上的结果
    if (my_pe == 0) {
        duration<double> tabulation_time = duration_cast<duration<double>>(tabulation_end - tabulation_start);
        std::cout << "Tabulation time = " << tabulation_time.count() * 1000 << " ms" << std::endl << std::endl;

        duration<double> combination_time = duration_cast<duration<double>>(combination_end - combination_start);
        std::cout << "Combination time = " << combination_time.count() * 1000 << " ms" << std::endl << std::endl;

        // 将数据复制回主机
        CUDA_CHECK(cudaMemcpy(histogram, d_concatenated_histogram, NUM_BUCKETS * sizeof(int), cudaMemcpyDeviceToHost));

        std::cout << "Histogram counters:" << std::endl << std::endl;
        int num_buckets_to_print = 4;
        for (int i = 0; i < NUM_BUCKETS; i += NUM_BUCKETS / num_buckets_to_print) {
            std::cout << "Bucket [" << i * (MAX_VALUE / NUM_BUCKETS) << ", " << (i + 1) * (MAX_VALUE / NUM_BUCKETS) - 1 << "]: " << histogram[i];
            std::cout << std::endl;
            if (i < NUM_BUCKETS - NUM_BUCKETS / num_buckets_to_print - 1) {
                std::cout << "..." << std::endl;
            }
        }
    }

    free(input);
    free(histogram);
    nvshmem_free(d_input);
    nvshmem_free(d_histogram);

    // 最终确定 nvshmem
    nvshmem_finalize();

    return 0;
}
编译和运行命令:
nvcc -x cu -arch=sm_70 -rdc=true -I $NVSHMEM_HOME/include -L $NVSHMEM_HOME/lib -lnvshmem -lcuda -o histogram_step1 histogram_step2.cpp
nvshmrun -np $NUM_DEVICES ./histogram_step2
运行结果如下:
Tabulation time = 0.18831 ms

Combination time = 0.028852 ms

Histogram counters:

Bucket [0, 65535]: 4135
...
Bucket [262144, 327679]: 4028
...
Bucket [524288, 589823]: 4088
...
Bucket [786432, 851967]: 4100


