如何使用导航网格NavMesh
- 官方教程
- 1、NavMesh基础定义
- 1.1 使用NavMesh的原因
- 1.2 什么是NavMesh
- 2、NavMesh的使用方法
- 2.1 获取自上而下Top down view视角地图
- 2.2 在NavMesh中进行查询以及随机产生可导航点
- 2.3 查找最短路径
- 2.4 场景加载NavMesh
- 2.5 重新计算并生成NavMesh
- 2.6 什么是Sliding
官方教程
Habitat是一个高效的真实的3D模拟器,旨在促进具身智能的研究。它相较于其他的仿真环境的优势在于速度非常快,采用单个线程可以达到每秒几千帧。
官方视频教程链接
官方jupyter文件链接
1、NavMesh基础定义
1.1 使用NavMesh的原因
我们默认认为导航约束和碰撞响应是存在的。在我们演示的离散的Habitat-sim行动空间中,默认情况下启用了这些功能。然而,当直接修改代理状态时,代理在执行动作时既不能感知障碍物,也不能感知场景的边界。我们需要引入一种机制,轻便而快速,来强制执行这些约束。本节将详细介绍这种方法。
本教程部分演示了如何加载、重新计算和保存静态场景的导航网格,并明确在离散和连续导航任务中如何使用它。
1.2 什么是NavMesh
导航网格(NavMesh)是由二维凸多边形(即,一个多边形网格)组成的集合,用于定义环境中哪些区域可供具有特定实体的代理自由穿越。换句话说,代理可以在这些区域内自由导航,不受环境中的物体、墙壁、缝隙、悬崖或其他障碍物的阻碍。相邻的多边形在图中彼此连接,从而使得能够使用高效的路径规划算法在导航网格上绘制两点之间的路径。
通过使用导航性的NavMesh近似,代理被具象化为与重力方向对齐的刚性圆柱体。然后,通过对静态场景进行体素化,将在实心体素的顶表面生成多边形,而代理的刚性圆柱体将在这些表面上无交叉或悬垂地放置,并且会遵循配置的约束,如最大可攀爬坡度和步高。
近似将agent视为圆柱体,将agent在场景中可能的位置。这是通过对场景进行体素化,然后在重力方向上重构高度图,然后重构其他的细节,使路径查找变得非常快速和高效。
2、NavMesh的使用方法
可视化导航网格:顶视图地图
PathFinder API使得在场景中生成可行走性的顶视图地图变得简便。由于导航网格是一个3D网格,而场景可以在垂直方向上拥有多个楼层或层次,我们需要在特定的世界高度(y坐标)上切割导航网格。然后,通过以可配置的分辨率(meters_per_pixel)对导航网格进行采样,垂直余量为0.5米,生成地图。
以下示例单元定义了一个matplotlib函数,用于显示带有可选关键点叠加的顶视图地图。然后,使用场景边界框的最小y坐标作为高度,或者选择使用可选配置的自定义高度生成当前场景的顶视图地图。请注意,此高度以场景全局坐标为准,因此我们不能假设0是底层。
2.1 获取自上而下Top down view视角地图
直接调用Habitat Sim中调用api中的PathFinder模块,或者可以从Habitat Labs中的Maps模块执行此操作。
在执行此操作前,稍微区分一下这两个模块,该导航网格实际上是嵌入在3D中的。因此为了获得自上而下的地图,将拥有一个特定的水平切片(Horizontal Slice),并在其中进行可视化,需要设定高度参数。将可视化半米内地导航网络。
有一个单元格,将定义几个将地图上的3D点转为2D点的函数,并使用Matplotlib显示地图。
# convert 3d points to 2d topdown coordinates
# 将定义几个将地图上的3D点转为2D点的函数
def convert_points_to_topdown(pathfinder, points, meters_per_pixel):
points_topdown = []
bounds = pathfinder.get_bounds()
for point in points:
# convert 3D x,z to topdown x,y
px = (point[0] - bounds[0][0]) / meters_per_pixel
py = (point[2] - bounds[0][2]) / meters_per_pixel
points_topdown.append(np.array([px, py]))
return points_topdown
# 使用Matplotlib显示地图
# display a topdown map with matplotlib
def display_map(topdown_map, key_points=None):
plt.figure(figsize=(12, 8))
ax = plt.subplot(1, 1, 1)
ax.axis("off")
plt.imshow(topdown_map)
# plot points on map
if key_points is not None:
for point in key_points:
plt.plot(point[0], point[1], marker="o", markersize=10, alpha=0.8)
plt.show(block=False)
# @markdown ###Configure Example Parameters:
# @markdown Configure the map resolution:
# 定义地图的分辨率
meters_per_pixel = 0.1 # @param {type:"slider", min:0.01, max:1.0, step:0.01}
# @markdown ---
# @markdown Customize the map slice height (global y coordinate):
custom_height = False # @param {type:"boolean"}
# 定义地图的高度,如果取消设置将设为地图的最低点
height = 1 # @param {type:"slider", min:-10, max:10, step:0.1}
# @markdown If not using custom height, default to scene lower limit.
# @markdown (Cell output provides scene height range from bounding box for reference.)
# 从sim.pathfinder.get_bounds()[0][1]获取地图的最低点
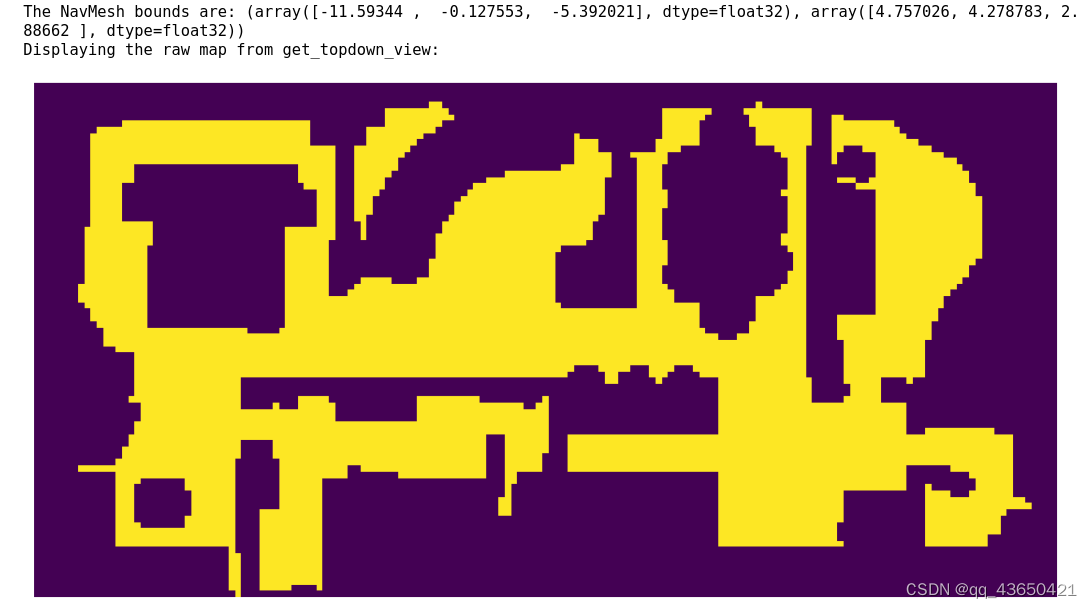
print("The NavMesh bounds are: " + str(sim.pathfinder.get_bounds()))
if not custom_height:
# get bounding box minumum elevation for automatic height
height = sim.pathfinder.get_bounds()[0][1]
# 如果pathfinder已经加载
if not sim.pathfinder.is_loaded:
print("Pathfinder not initialized, aborting.")
else:
# @markdown You can get the topdown map directly from the Habitat-sim API with *PathFinder.get_topdown_view*.
# This map is a 2D boolean array
# 直接调用sim.pathfinder.get_topdown_view获取自顶向下视图
# get_topdown_view的api接受两个参数,分别是分辨率meters_per_pixel和水平切片高度height;
sim_topdown_map = sim.pathfinder.get_topdown_view(meters_per_pixel, height)
if display:
# @markdown Alternatively, you can process the map using the Habitat-Lab [maps module](https://github.com/facebookresearch/habitat-api/blob/master/habitat/utils/visualizations/maps.py)
# 同样地可以调用habitat_lab中的maps模块中的get_topdown_map函数
hablab_topdown_map = maps.get_topdown_map(
sim.pathfinder, height, meters_per_pixel=meters_per_pixel
)
recolor_map = np.array(
[[255, 255, 255], [128, 128, 128], [0, 0, 0]], dtype=np.uint8
)
hablab_topdown_map = recolor_map[hablab_topdown_map]
print("Displaying the raw map from get_topdown_view:")
display_map(sim_topdown_map)
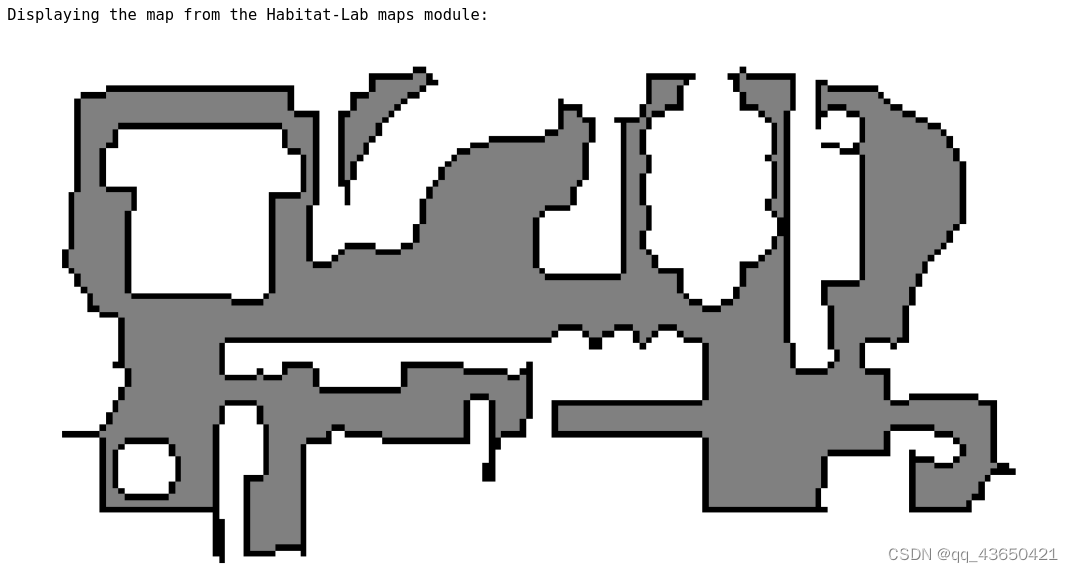
print("Displaying the map from the Habitat-Lab maps module:")
display_map(hablab_topdown_map)
# easily save a map to file:
map_filename = os.path.join(output_path, "top_down_map.png")
imageio.imsave(map_filename, hablab_topdown_map)
可以获得如下的输出:
首先打印NavMesh的bounds,可以看到NavMesh的BoundingBox;
因为custom_height为false,直接在最小高度处显示地图;
图一是通过sim.pathfinder.get_topdown_view模块打印的,
图二是通过maps.get_topdown_map模块打印的;
二者的结果非常类似。
2.2 在NavMesh中进行查询以及随机产生可导航点
# @markdown ## Querying the NavMesh
if not sim.pathfinder.is_loaded:
print("Pathfinder not initialized, aborting.")
else:
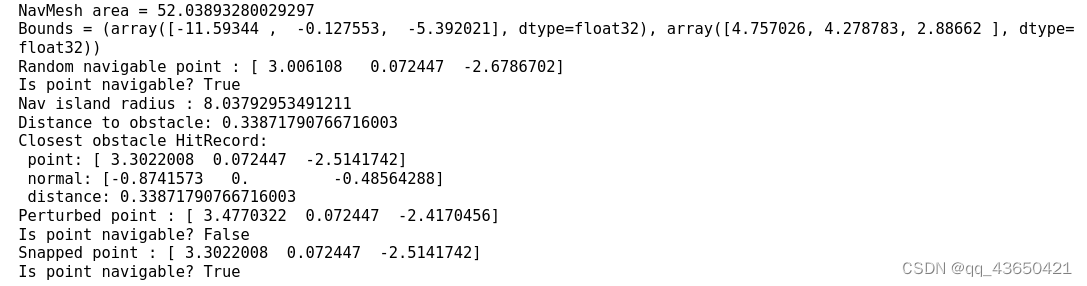
# @markdown NavMesh area and bounding box can be queried via *3navigable_area* and *get_bounds* respectively.
print("NavMesh area = " + str(sim.pathfinder.navigable_area)) # 打印所有的可导航区域
print("Bounds = " + str(sim.pathfinder.get_bounds())) # 可以查询边界
# @markdown A random point on the NavMesh can be queried with *get_random_navigable_point*.
pathfinder_seed = 1 # @param {type:"integer"}
sim.pathfinder.seed(pathfinder_seed)
nav_point = sim.pathfinder.get_random_navigable_point() # 可以获取一个随机点,即蓝色点
print("Random navigable point : " + str(nav_point))
print("Is point navigable? " + str(sim.pathfinder.is_navigable(nav_point)))
# @markdown The radius of the minimum containing circle (with vertex centroid origin) for the isolated navigable island of a point can be queried with *island_radius*.
# @markdown This is analogous to the size of the point's connected component and can be used to check that a queried navigable point is on an interesting surface (e.g. the floor), rather than a small surface (e.g. a table-top).
# 这段代码的目的是帮助用户理解如何使用 island_radius 查询导航点的孤立可行走区域的最小包围圆的半径
print("Nav island radius : " + str(sim.pathfinder.island_radius(nav_point)))
# @markdown The closest boundary point can also be queried (within some radius).
# 在max_search_radius的搜索半径内查找距离nav_point最近的点
max_search_radius = 2.0 # @param {type:"number"}
print(
"Distance to obstacle: "
+ str(sim.pathfinder.distance_to_closest_obstacle(nav_point, max_search_radius))
)
hit_record = sim.pathfinder.closest_obstacle_surface_point( # 查找最近的障碍物点
nav_point, max_search_radius
)
print("Closest obstacle HitRecord:")
print(" point: " + str(hit_record.hit_pos))
print(" normal: " + str(hit_record.hit_normal))
print(" distance: " + str(hit_record.hit_dist))
vis_points = [nav_point]
# HitRecord will have infinite distance if no valid point was found:
if math.isinf(hit_record.hit_dist):
print("No obstacle found within search radius.")
else:
# @markdown Points near the boundary or above the NavMesh can be snapped onto it.
# 扰动该点,将其延长至边界外
perturbed_point = hit_record.hit_pos - hit_record.hit_normal * 0.2
print("Perturbed point : " + str(perturbed_point))
print(
"Is point navigable? " + str(sim.pathfinder.is_navigable(perturbed_point))
)
# 计算边界内距离该扰动后点最近的点,这是采用snap_point方法
snapped_point = sim.pathfinder.snap_point(perturbed_point)
print("Snapped point : " + str(snapped_point))
print("Is point navigable? " + str(sim.pathfinder.is_navigable(snapped_point)))
vis_points.append(snapped_point)
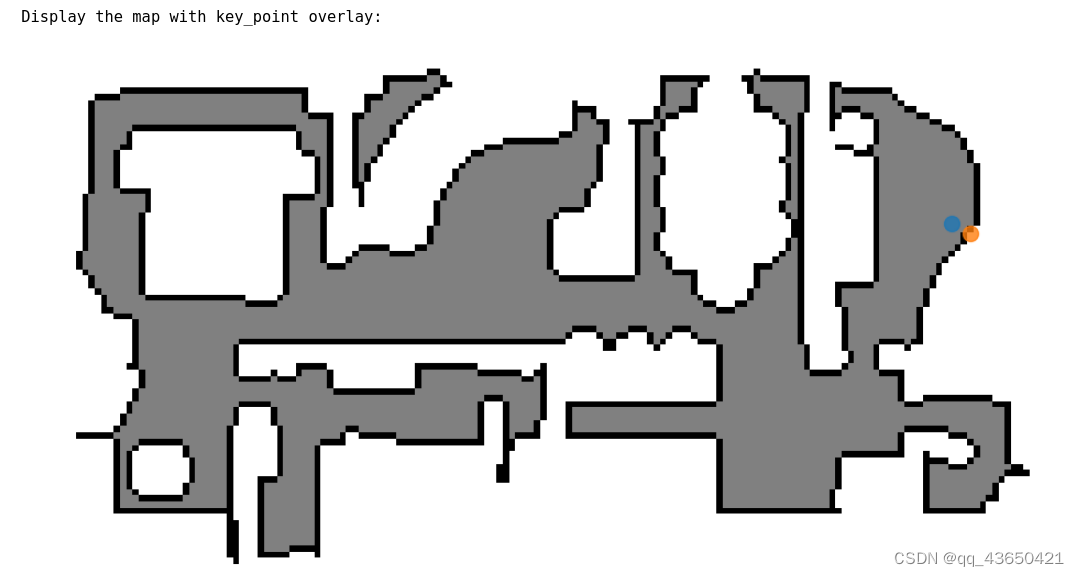
# @markdown ---
# @markdown ### Visualization
# @markdown Running this cell generates a topdown visualization of the NavMesh with sampled points overlayed.
meters_per_pixel = 0.1 # @param {type:"slider", min:0.01, max:1.0, step:0.01}
if display:
xy_vis_points = convert_points_to_topdown(
sim.pathfinder, vis_points, meters_per_pixel
)
# use the y coordinate of the sampled nav_point for the map height slice
top_down_map = maps.get_topdown_map(
sim.pathfinder, height=nav_point[1], meters_per_pixel=meters_per_pixel
)
recolor_map = np.array(
[[255, 255, 255], [128, 128, 128], [0, 0, 0]], dtype=np.uint8
)
top_down_map = recolor_map[top_down_map]
print("\nDisplay the map with key_point overlay:")
display_map(top_down_map, key_points=xy_vis_points)
蓝色点是产生的随机点,
2.3 查找最短路径
查收随机点并采用Habitat_sim中的api查找最短路径。
# @markdown ## Pathfinding Queries on NavMesh
# @markdown The shortest path between valid points on the NavMesh can be queried as shown in this example.
# @markdown With a valid PathFinder instance:
if not sim.pathfinder.is_loaded:
print("Pathfinder not initialized, aborting.")
else:
seed = 4 # @param {type:"integer"}
sim.pathfinder.seed(seed)
# fmt off
# @markdown 1. Sample valid points on the NavMesh for agent spawn location and pathfinding goal.
# fmt on
# 获得两个随机点
sample1 = sim.pathfinder.get_random_navigable_point()
sample2 = sim.pathfinder.get_random_navigable_point()
# @markdown 2. Use ShortestPath module to compute path between samples.
# 初始化habitat_sim.ShortestPath()的实例
path = habitat_sim.ShortestPath()
# 将起始点设置为产生的随机点
path.requested_start = sample1
path.requested_end = sample2
# 通过sim.pathfinder.find_path查找最短路径,found_path是一个布尔值
found_path = sim.pathfinder.find_path(path)
# 返回该路径的距离
geodesic_distance = path.geodesic_distance
path_points = path.points
# @markdown - Success, geodesic path length, and 3D points can be queried.
print("found_path : " + str(found_path))
print("geodesic_distance : " + str(geodesic_distance))
print("path_points : " + str(path_points))
# @markdown 3. Display trajectory (if found) on a topdown map of ground floor
if found_path:
meters_per_pixel = 0.025
# 获取场景的bounding box
scene_bb = sim.get_active_scene_graph().get_root_node().cumulative_bb
# 获得最小高度
height = scene_bb.y().min
if display:
# 获取自上而下地图
top_down_map = maps.get_topdown_map(
sim.pathfinder, height, meters_per_pixel=meters_per_pixel
)
# 地图重新着色
recolor_map = np.array(
[[255, 255, 255], [128, 128, 128], [0, 0, 0]], dtype=np.uint8
)
top_down_map = recolor_map[top_down_map]
# 获取网格尺寸
grid_dimensions = (top_down_map.shape[0], top_down_map.shape[1])
# convert world trajectory points to maps module grid points
# 对于场景上的轨迹,将3D点转为地图上的2D点
trajectory = [
maps.to_grid(
path_point[2],
path_point[0],
grid_dimensions,
pathfinder=sim.pathfinder,
)
for path_point in path_points
]
# 计算初始的切线来设置agent
grid_tangent = mn.Vector2(
trajectory[1][1] - trajectory[0][1], trajectory[1][0] - trajectory[0][0]
)
# 获取初始的朝向
path_initial_tangent = grid_tangent / grid_tangent.length()
initial_angle = math.atan2(path_initial_tangent[0], path_initial_tangent[1])
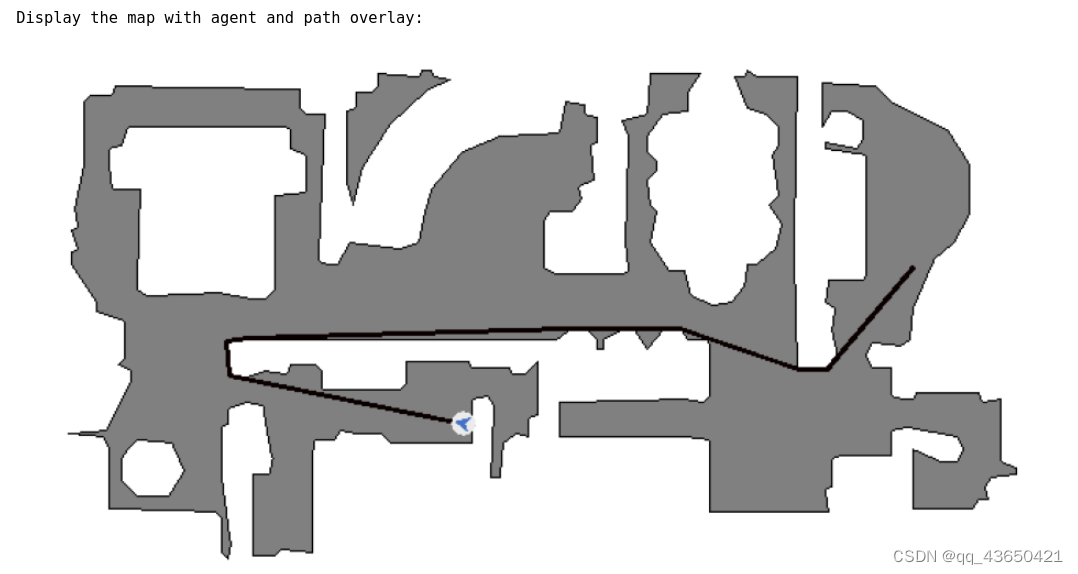
# draw the agent and trajectory on the map
# 使用draw_agent在自上而下地图上绘制轨迹
maps.draw_path(top_down_map, trajectory)
# 使用draw_agent函数绘制agent
maps.draw_agent(
top_down_map, trajectory[0], initial_angle, agent_radius_px=8
)
print("\nDisplay the map with agent and path overlay:")
display_map(top_down_map)
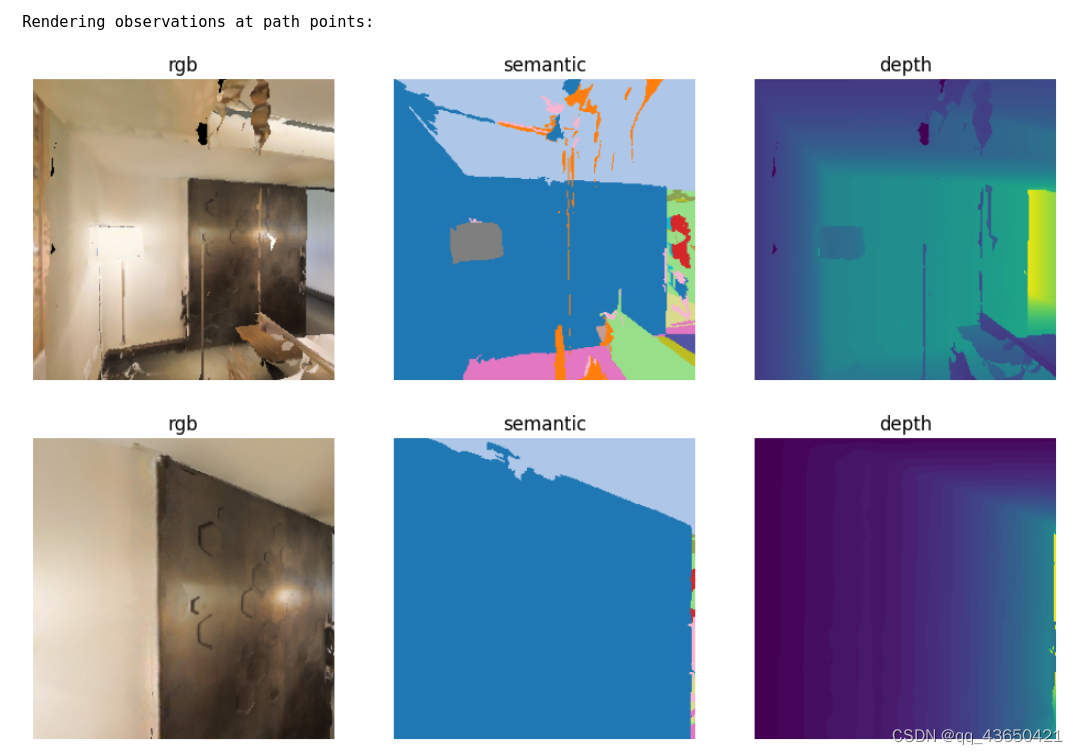
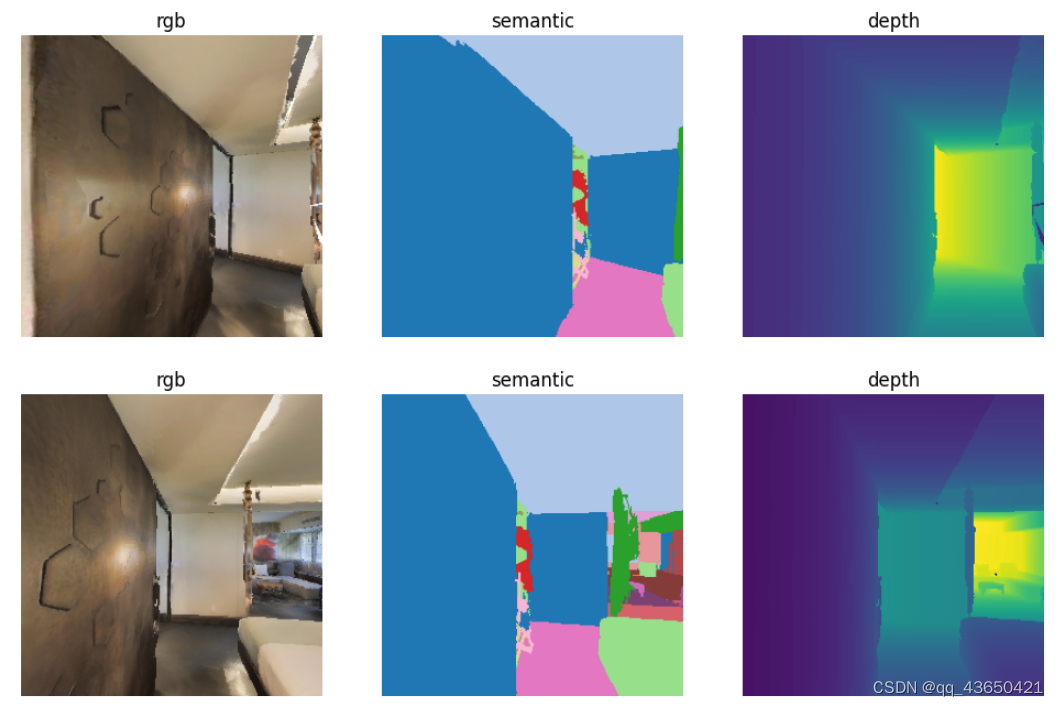
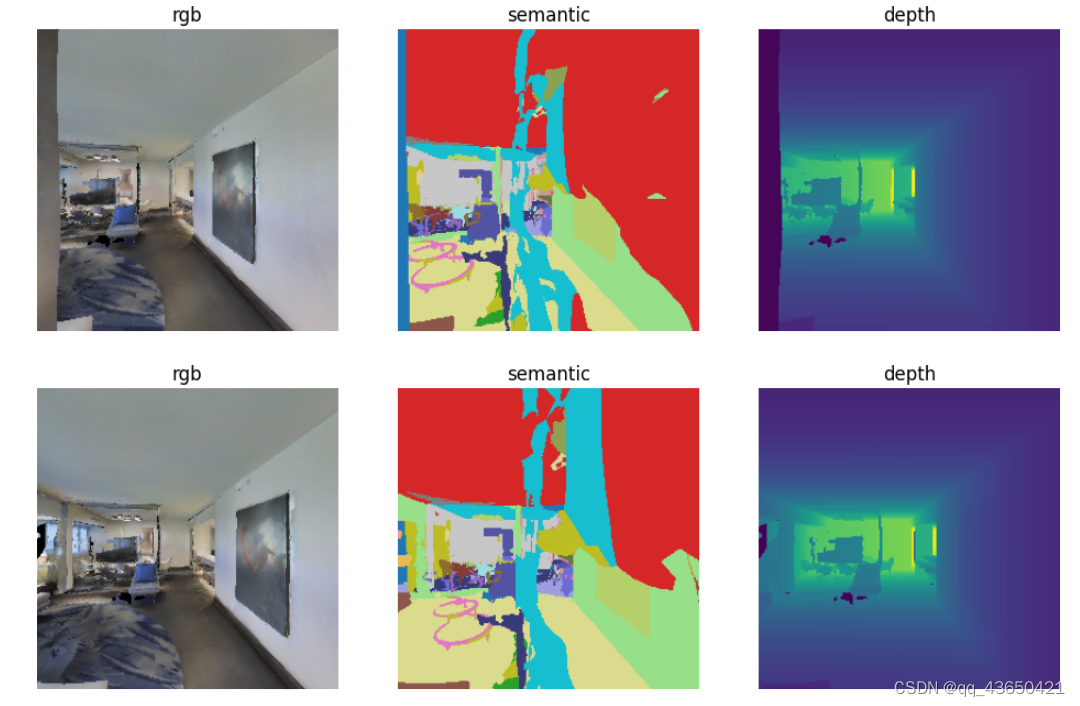
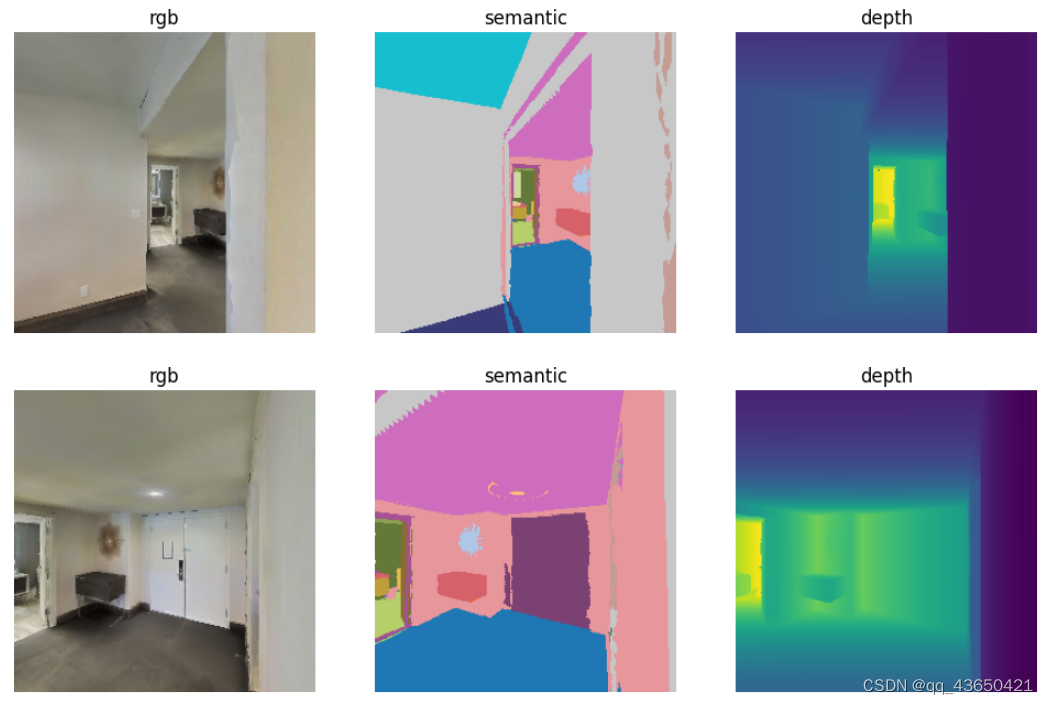
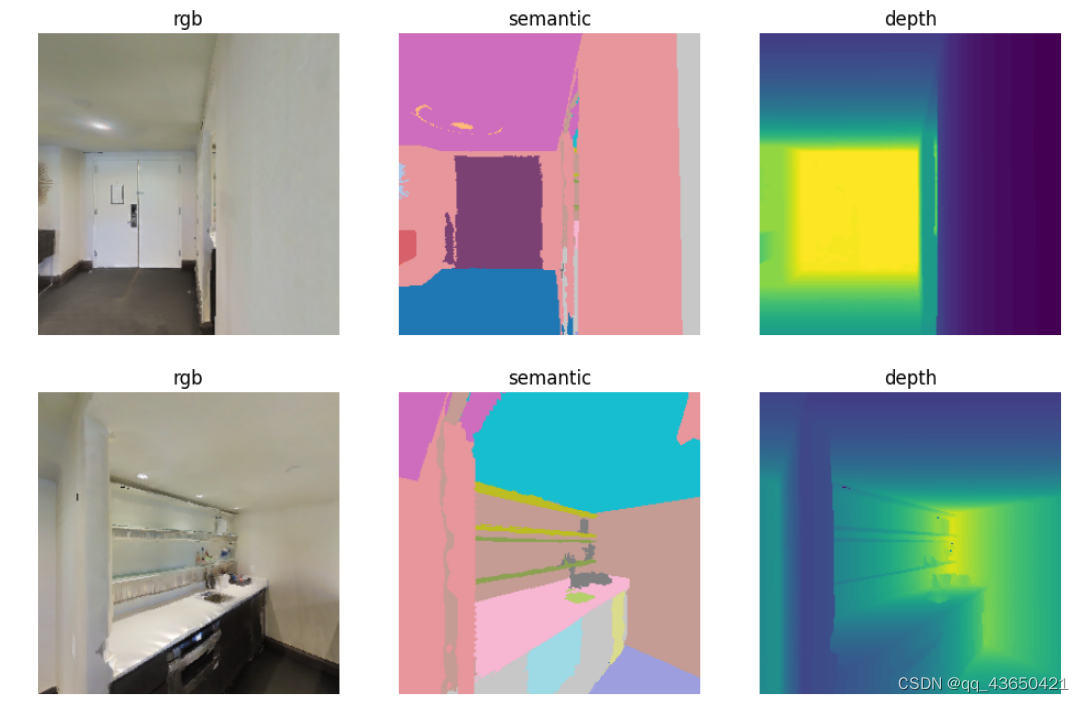
# @markdown 4. (optional) Place agent and render images at trajectory points (if found).
display_path_agent_renders = True # @param{type:"boolean"}
if display_path_agent_renders:
print("Rendering observations at path points:")
tangent = path_points[1] - path_points[0]
agent_state = habitat_sim.AgentState()
# 遍历每个轨迹点,计算切线并设置agent以及渲染
for ix, point in enumerate(path_points):
if ix < len(path_points) - 1:
tangent = path_points[ix + 1] - point
# 设置agent当前的位置
agent_state.position = point
# 这段代码使用Magnum库来计算代理在路径上某个点的观察矩阵,从而确定代理的旋转状态,并将该旋转状态应用到代理的状态中,以便在仿真环境中正确地朝向路径上的下一个点
tangent_orientation_matrix = mn.Matrix4.look_at(
point, point + tangent, np.array([0, 1.0, 0])
)
tangent_orientation_q = mn.Quaternion.from_matrix(
tangent_orientation_matrix.rotation()
)
agent_state.rotation = utils.quat_from_magnum(tangent_orientation_q)
agent.set_state(agent_state)
# 获取agent在此刻的观测
observations = sim.get_sensor_observations()
rgb = observations["color_sensor"]
semantic = observations["semantic_sensor"]
depth = observations["depth_sensor"]
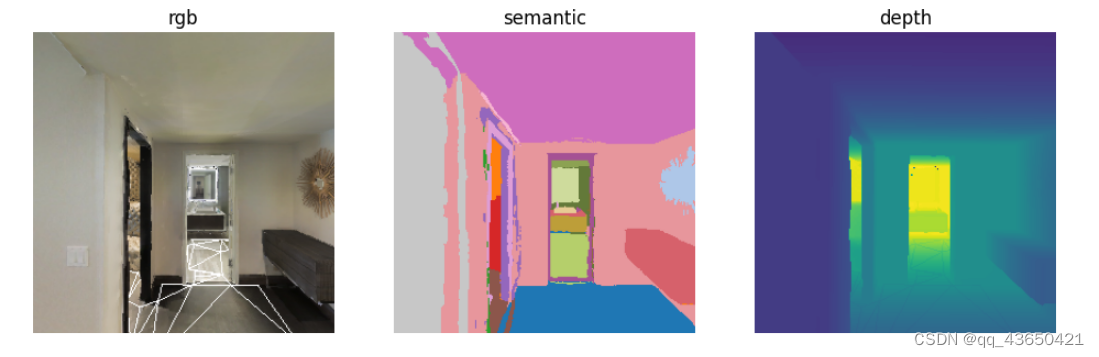
if display:
display_sample(rgb, semantic, depth)
首先打印是否找到路径;
路径的测地距离;
路径上的点;

在地图中agent的行驶路线:
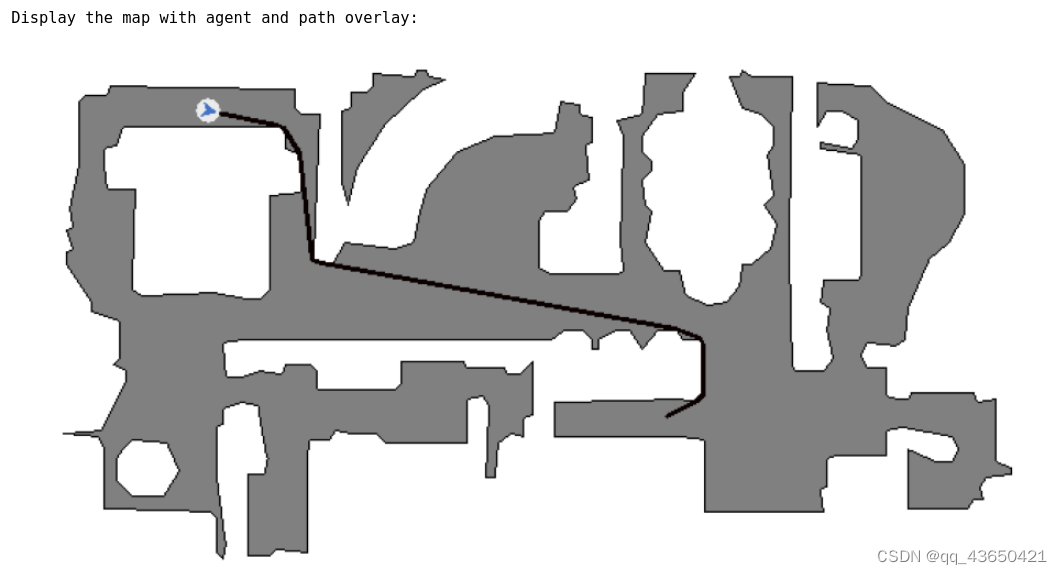
打印agent的观测,
改变seed=5可以获得截然不同的轨迹。
2.4 场景加载NavMesh
加载一个预先计算好的场景导航网格,只需将其与正在加载的场景资产一起包含,使用.navmesh文件扩展名。
如果在.glb文件中存在.navmesh文件,则会自动进行加载。
否则可以用load_nav_mesh指定路径手动进行加载。
# initialize a new simulator with the apartment_1 scene
# this will automatically load the accompanying .navmesh file
sim_settings["scene"] = "/home/lu/Desktop/embodied_ai/habitat-sim-0.2.1/data/scene_datasets/mp3d_example/17DRP5sb8fy/17DRP5sb8fy.glb"
cfg = make_cfg(sim_settings)
try:  # Got to make initialization idiot proof
    sim.close()
except NameError:
    pass
sim = habitat_sim.Simulator(cfg)

# the navmesh can also be explicitly loaded
sim.pathfinder.load_nav_mesh(
    "/home/lu/Desktop/embodied_ai/habitat-sim-0.2.1/data/scene_datasets/mp3d_example/17DRP5sb8fy/17DRP5sb8fy.navmesh"
)
2.5 重新计算并生成NavMesh
- Voxelization parameters:
Decrease these for better accuracy at the cost of higher compute cost.
用于控制初始网格到体素网格的转换;
Note: most continuous parameters are converted to multiples of cell dimensions, so these should be compatible values for best accuracy.
cell_size - xz-plane voxel dimensions. [Limit: >= 0]
cell_height - y-axis voxel dimension. [Limit: >= 0]
可以根据Agent实例参数化导航网格本身,根据agent的上坡能力将有坡度的区域也可视为可通行区域 。
- Agent parameters:
agent_height - Height of the agent. Used to cull navigable cells with obstructions.
agent_radius - Radius of the agent. Used as distance to erode/shrink the computed heightfield. [Limit: >=0]
agent_max_climb - Maximum ledge height that is considered to still be traversable. [Limit: >=0]
agent_max_slope - The maximum slope that is considered navigable. [Limits: 0 <= value < 85] [Units: Degrees] - Navigable area filtering options (default active):
filter_low_hanging_obstacles - Marks navigable spans as non-navigable if the clearence above the span is less than the specified height.
filter_ledge_spans - Marks spans that are ledges as non-navigable. This filter reduces the impact of the overestimation of conservative voxelization so the resulting mesh will not have regions hanging in the air over ledges.
filter_walkable_low_height_spans - Marks navigable spans as non-navigable if the clearence above the span is less than the specified height. Allows the formation of navigable regions that will flow over low lying objects such as curbs, and up structures such as stairways. - Detail mesh generation parameters:
region_min_size - Minimum number of cells allowed to form isolated island areas.
region_merge_size - Any 2-D regions with a smaller span (cell count) will, if possible, be merged with larger regions. [Limit: >=0]
edge_max_len - The maximum allowed length for contour edges along the border of the mesh. Extra vertices will be inserted as needed to keep contour edges below this length. A value of zero effectively disables this feature. [Limit: >=0] [ / cell_size]
edge_max_error - The maximum distance a simplfied contour’s border edges should deviate the original raw contour. [Limit: >=0]
verts_per_poly - The maximum number of vertices allowed for polygons generated during the contour to polygon conversion process.[Limit: >= 3]
detail_sample_dist - Sets the sampling distance to use when generating the detail mesh. (For height detail only.) [Limits: 0 or >= 0.9] [x cell_size]
detail_sample_max_error - The maximum distance the detail mesh surface should deviate from heightfield data. (For height detail only.) [Limit: >=0] [x cell_height]
在这个单元格中,实际上能够包含配置整个导航网格的所有设置。重建它并可视化它。
# @markdown ## Recompute NavMesh:
# @markdown Take a moment to edit some parameters and visualize the resulting NavMesh. Consider agent_radius and agent_height as the most impactful starting point. Note that large variations from the defaults for these parameters (e.g. in the case of very small agents) may be better supported by additional changes to cell_size and cell_height.
navmesh_settings = habitat_sim.NavMeshSettings()
# @markdown Choose Habitat-sim defaults (e.g. for point-nav tasks), or custom settings.
use_custom_settings = False # @param {type:"boolean"}
sim.navmesh_visualization = True # @param {type:"boolean"}
navmesh_settings.set_defaults()
if use_custom_settings:
# fmt: off
#@markdown ---
#@markdown ## Configure custom settings (if use_custom_settings):
#@markdown Configure the following NavMeshSettings for customized NavMesh recomputation.
#@markdown **Voxelization parameters**:
navmesh_settings.cell_size = 0.05 #@param {type:"slider", min:0.01, max:0.2, step:0.01}
#default = 0.05
navmesh_settings.cell_height = 0.2 #@param {type:"slider", min:0.01, max:0.4, step:0.01}
#default = 0.2
#@markdown **Agent parameters**:
navmesh_settings.agent_height = 1.5 #@param {type:"slider", min:0.01, max:3.0, step:0.01}
#default = 1.5
navmesh_settings.agent_radius = 0.1 #@param {type:"slider", min:0.01, max:0.5, step:0.01}
#default = 0.1
navmesh_settings.agent_max_climb = 0.2 #@param {type:"slider", min:0.01, max:0.5, step:0.01}
#default = 0.2
navmesh_settings.agent_max_slope = 45 #@param {type:"slider", min:0, max:85, step:1.0}
# default = 45.0
# fmt: on
# @markdown **Navigable area filtering options**:
navmesh_settings.filter_low_hanging_obstacles = True # @param {type:"boolean"}
# default = True
navmesh_settings.filter_ledge_spans = True # @param {type:"boolean"}
# default = True
navmesh_settings.filter_walkable_low_height_spans = True # @param {type:"boolean"}
# default = True
# fmt: off
#@markdown **Detail mesh generation parameters**:
#@markdown For more details on the effects
navmesh_settings.region_min_size = 20 #@param {type:"slider", min:0, max:50, step:1}
#default = 20
navmesh_settings.region_merge_size = 20 #@param {type:"slider", min:0, max:50, step:1}
#default = 20
navmesh_settings.edge_max_len = 12.0 #@param {type:"slider", min:0, max:50, step:1}
#default = 12.0
navmesh_settings.edge_max_error = 1.3 #@param {type:"slider", min:0, max:5, step:0.1}
#default = 1.3
navmesh_settings.verts_per_poly = 6.0 #@param {type:"slider", min:3, max:6, step:1}
#default = 6.0
navmesh_settings.detail_sample_dist = 6.0 #@param {type:"slider", min:0, max:10.0, step:0.1}
#default = 6.0
navmesh_settings.detail_sample_max_error = 1.0 #@param {type:"slider", min:0, max:10.0, step:0.1}
# default = 1.0
# fmt: on
navmesh_success = sim.recompute_navmesh(
sim.pathfinder, navmesh_settings, include_static_objects=False
)
if not navmesh_success:
print("Failed to build the navmesh! Try different parameters?")
else:
# @markdown ---
# @markdown **Agent parameters**:
agent_state = sim.agents[0].get_state()
set_random_valid_state = False # @param {type:"boolean"}
seed = 5 # @param {type:"integer"}
sim.seed(seed)
orientation = 0
if set_random_valid_state:
agent_state.position = sim.pathfinder.get_random_navigable_point()
orientation = random.random() * math.pi * 2.0
# @markdown Optionally configure the agent state (overrides random state):
set_agent_state = True # @param {type:"boolean"}
try_to_make_valid = True # @param {type:"boolean"}
if set_agent_state:
pos_x = 0 # @param {type:"number"}
pos_y = 0 # @param {type:"number"}
pos_z = 0.0 # @param {type:"number"}
# @markdown Y axis rotation (radians):
orientation = 1.56 # @param {type:"number"}
agent_state.position = np.array([pos_x, pos_y, pos_z])
if try_to_make_valid:
snapped_point = np.array(sim.pathfinder.snap_point(agent_state.position))
if not np.isnan(np.sum(snapped_point)):
print("Successfully snapped point to: " + str(snapped_point))
agent_state.position = snapped_point
if set_agent_state or set_random_valid_state:
agent_state.rotation = utils.quat_from_magnum(
mn.Quaternion.rotation(-mn.Rad(orientation), mn.Vector3(0, 1.0, 0))
)
sim.agents[0].set_state(agent_state)
agent_state = sim.agents[0].get_state()
print("Agent state: " + str(agent_state))
print(" position = " + str(agent_state.position))
print(" rotation = " + str(agent_state.rotation))
print(" orientation (about Y) = " + str(orientation))
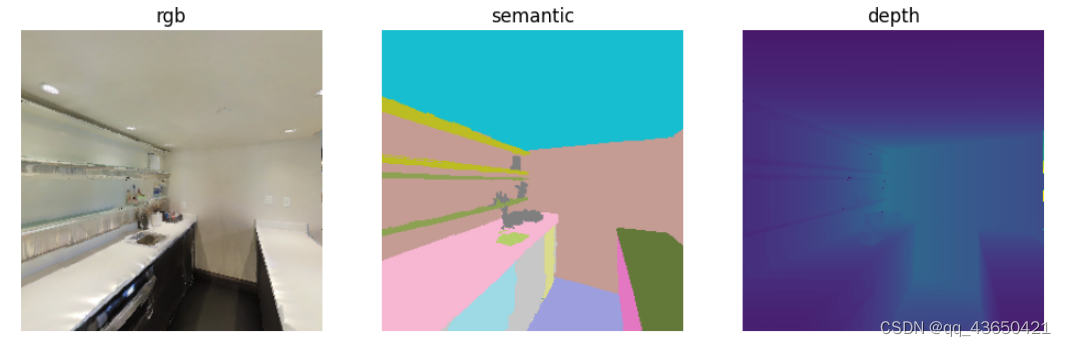
observations = sim.get_sensor_observations()
rgb = observations["color_sensor"]
semantic = observations["semantic_sensor"]
depth = observations["depth_sensor"]
if display:
display_sample(rgb, semantic, depth)
# @markdown **Map parameters**:
# fmt: off
meters_per_pixel = 0.025 # @param {type:"slider", min:0.01, max:0.1, step:0.005}
# fmt: on
agent_pos = agent_state.position
# topdown map at agent position
top_down_map = maps.get_topdown_map(
sim.pathfinder, height=agent_pos[1], meters_per_pixel=meters_per_pixel
)
recolor_map = np.array(
[[255, 255, 255], [128, 128, 128], [0, 0, 0]], dtype=np.uint8
)
top_down_map = recolor_map[top_down_map]
grid_dimensions = (top_down_map.shape[0], top_down_map.shape[1])
# convert world agent position to maps module grid point
agent_grid_pos = maps.to_grid(
agent_pos[2], agent_pos[0], grid_dimensions, pathfinder=sim.pathfinder
)
agent_forward = utils.quat_to_magnum(
sim.agents[0].get_state().rotation
).transform_vector(mn.Vector3(0, 0, -1.0))
agent_orientation = math.atan2(agent_forward[0], agent_forward[2])
# draw the agent and trajectory on the map
maps.draw_agent(
top_down_map, agent_grid_pos, agent_orientation, agent_radius_px=8
)
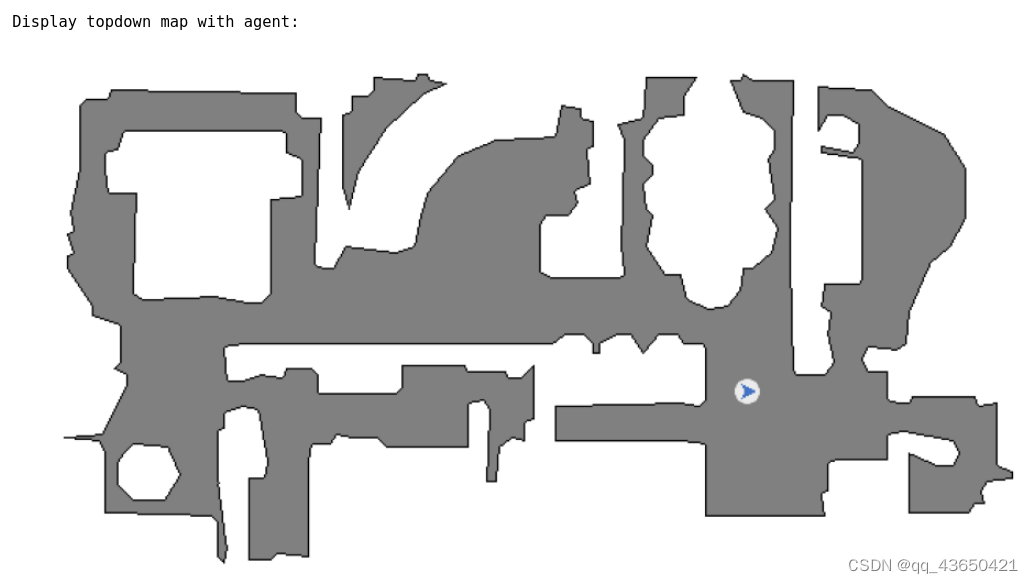
print("\nDisplay topdown map with agent:")
display_map(top_down_map)
2.6 什么是Sliding
大多数游戏引擎允许代理在执行与环境碰撞的动作时沿障碍物滑动。虽然这在游戏中是合理的行为,但它并不准确反映机器人代理与环境之间的碰撞结果。
我们注意到允许滑动会使训练变得更容易,并导致更高的仿真性能,但它损害了经过训练的策略在模拟与实际环境之间的迁移。
有关此主题的更详细阐述,请参阅我们的论文:Are We Making Real Progress in Simulated Environments? Measuring the Sim2Real Gap in Embodied Visual Navigation。
将其打开以后在现实世界中可以获得更好的表现,但会让训练更加困难。
# @title Discrete and Continuous Navigation:

# @markdown Take moment to run this cell a couple times and note the differences between discrete and continuous navigation with and without sliding.

# @markdown ---
# @markdown ### Set example parameters:
seed = 7  # @param {type:"integer"}
# @markdown Optionally navigate on the currently configured scene and NavMesh instead of re-loading with defaults:
use_current_scene = False  # @param {type:"boolean"}


sim_settings["seed"] = seed
if not use_current_scene:
    # reload a default nav scene
    sim_settings[
        "scene"
    ] = "./data/scene_datasets/mp3d_example/17DRP5sb8fy/17DRP5sb8fy.glb" # agent启动的位置
    cfg = make_cfg(sim_settings)
    try:  # make initialization Colab cell order proof
        sim.close()
    except NameError:
        pass
    sim = habitat_sim.Simulator(cfg)
random.seed(sim_settings["seed"])
sim.seed(sim_settings["seed"])
# set new initial state
sim.initialize_agent(agent_id=0)
agent = sim.agents[0]

# @markdown Seconds to simulate: 仿真的时间
sim_time = 10  # @param {type:"integer"}

# @markdown Optional continuous action space parameters:启用连续模式或是离散模式
continuous_nav = True  # @param {type:"boolean"}

# defaults for discrete control
# control frequency (actions/sec):控制频率,离散控制采用3Hz的控制频率,无跳帧
control_frequency = 3
# observation/integration frames per action
frame_skip = 1
# 而对于连续的情况每秒70个步骤
if continuous_nav:
    control_frequency = 5  # @param {type:"slider", min:1, max:30, step:1}
    frame_skip = 12  # @param {type:"slider", min:1, max:30, step:1}


fps = control_frequency * frame_skip
print("fps = " + str(fps))
control_sequence = []
for _action in range(int(sim_time * control_frequency)):
    if continuous_nav:
        # allow forward velocity and y rotation to vary
        # 计算连续时可行的前进速度和旋转速度
        control_sequence.append(
            {
                "forward_velocity": random.random() * 2.0,  # [0,2)
                "rotation_velocity": (random.random() - 0.5) * 2.0,  # [-1,1)
            }
        )
    else:
        control_sequence.append(random.choice(action_names))

# create and configure a new VelocityControl structure
# 设置速度控制结构
vel_control = habitat_sim.physics.VelocityControl()
vel_control.controlling_lin_vel = True
vel_control.lin_vel_is_local = True
vel_control.controlling_ang_vel = True
vel_control.ang_vel_is_local = True

# try 2 variations of the control experiment
# 循环是否采用滑动
for iteration in range(2):
    # reset observations and robot state
    observations = []

    video_prefix = "nav_sliding"
    sim.config.sim_cfg.allow_sliding = True
    # turn sliding off for the 2nd pass
    if iteration == 1:
        sim.config.sim_cfg.allow_sliding = False
        video_prefix = "nav_no_sliding"

    print(video_prefix)

    # manually control the object's kinematic state via velocity integration
    time_step = 1.0 / (frame_skip * control_frequency)
    print("time_step = " + str(time_step))
    for action in control_sequence:

        # apply actions
        if continuous_nav:
            # update the velocity control
            # local forward is -z
            # 连续操作,采用预先计算好的动作
            vel_control.linear_velocity = np.array([0, 0, -action["forward_velocity"]])
            # local up is y
            vel_control.angular_velocity = np.array([0, action["rotation_velocity"], 0])

        else:  # discrete action navigation
            discrete_action = agent.agent_config.action_space[action]

            did_collide = False
            # 采用身体动作检查碰撞
            if agent.controls.is_body_action(discrete_action.name):
                did_collide = agent.controls.action(
                    agent.scene_node,
                    discrete_action.name,
                    discrete_action.actuation,
                    apply_filter=True,
                )
            else:
                for _, v in agent._sensors.items():
                    habitat_sim.errors.assert_obj_valid(v)
                    agent.controls.action(
                        v.object,
                        discrete_action.name,
                        discrete_action.actuation,
                        apply_filter=False,
                    )

        # simulate and collect frames
        for _frame in range(frame_skip):
            if continuous_nav:
                # Integrate the velocity and apply the transform.
                # Note: this can be done at a higher frequency for more accuracy
                # 连续导航,首先获取agent的状态
                agent_state = agent.state
                previous_rigid_state = habitat_sim.RigidState(
                    utils.quat_to_magnum(agent_state.rotation), agent_state.position
                )

                # manually integrate the rigid state
                # 使用速度控制积分器在时间补长内进行显式欧拉积分
                # 可以获得一个新的目标状态
                target_rigid_state = vel_control.integrate_transform(
                    time_step, previous_rigid_state
                )

                # snap rigid state to navmesh and set state to object/agent
                # calls pathfinder.try_step or self.pathfinder.try_step_no_sliding
                # 使用导航网格强制导航性约束获取新的end_position
                end_pos = sim.step_filter(
                    previous_rigid_state.translation, target_rigid_state.translation
                )

                # set the computed state
                # 设置当前状态
                agent_state.position = end_pos
                agent_state.rotation = utils.quat_from_magnum(
                    target_rigid_state.rotation
                )
                agent.set_state(agent_state)

                # Check if a collision occured
                # 检查filter的前后距离前置是否发生碰撞
                dist_moved_before_filter = (
                    target_rigid_state.translation - previous_rigid_state.translation
                ).dot()
                dist_moved_after_filter = (
                    end_pos - previous_rigid_state.translation
                ).dot()

                # NB: There are some cases where ||filter_end - end_pos|| > 0 when a
                # collision _didn't_ happen. One such case is going up stairs.  Instead,
                # we check to see if the the amount moved after the application of the filter
                # is _less_ than the amount moved before the application of the filter
                EPS = 1e-5
                # 检查距离是否大于某个阈值
                collided = (dist_moved_after_filter + EPS) < dist_moved_before_filter

            # run any dynamics simulation
            # 进行仿真
            sim.step_physics(time_step)

            # render observation
            observations.append(sim.get_sensor_observations())

    print("frames = " + str(len(observations)))
    # video rendering with embedded 1st person view
    if do_make_video:
        # use the vieo utility to render the observations
        vut.make_video(
            observations=observations,
            primary_obs="color_sensor",
            primary_obs_type="color",
            video_file=output_directory + "continuous_nav",
            fps=fps,
            open_vid=show_video,
        )

    sim.reset()

# [/embodied_agent_navmesh]
在开启sliding,agent在碰撞后会沿着障碍物进行滑动;
而如果关闭sliding,agent在碰撞后会被障碍区卡住。
视频展示的是连续导航的情况:
nav_outputcontinuous_nav