1.安装所需依赖
需要安装
- vue-router
- naive视图框架
npm
npm install vue-router@4
yarn
yarn add vue-router@4
npm i -D naive-ui
2.搭建naive适配框架
创建文件夹——存放通用组件
在components下创建文件夹common
![[外链图片转存失败,源站可能有防盗链机制,建议将图片保存下来直接上传(img-3xN5RdXg-1672576235136)(assets/image-20230101195121-3tuv5qd.png)]](https://img-blog.csdnimg.cn/9929f7f782d84e8487cd70e251d89b80.png)
全局配置常用组件
在之前创建的global.d.ts中添加Windows的配置
interface Window {
  $loadingBar?: import('naive-ui').LoadingBarProviderInst;
  $dialog?: import('naive-ui').DialogProviderInst;
  $message?: import('naive-ui').MessageProviderInst;
  $notification?: import('naive-ui').NotificationProviderInst;
}
![[外链图片转存失败,源站可能有防盗链机制,建议将图片保存下来直接上传(img-NKFI1VIf-1672576235137)(assets/image-20230101195305-dpk6uk4.png)]](https://img-blog.csdnimg.cn/6f21fcbb0dc24471aedb710c5759ae67.png)
配置全局naive框架
<template>
  <n-loading-bar-provider>
    <n-dialog-provider>
      <n-notification-provider>
        <n-message-provider>
          <slot></slot>
          <naive-provider-content />
        </n-message-provider>
      </n-notification-provider>
    </n-dialog-provider>
  </n-loading-bar-provider>
</template>

<script setup lang="ts">
import { defineComponent, h } from 'vue';
import { useDialog, useLoadingBar, useMessage, useNotification } from 'naive-ui';

// 挂载naive组件的方法至window, 以便在路由钩子函数和请求函数里面调用
function registerNaiveTools() {
  window.$loadingBar = useLoadingBar();
  window.$dialog = useDialog();
  window.$message = useMessage();
  window.$notification = useNotification();
}

const NaiveProviderContent = defineComponent({
  name: 'NaiveProviderContent',
  setup() {
    registerNaiveTools();
  },
  render() {
    return h('div');
  }
});
</script>
<style scoped></style>
3.改造App.vue
配置全局页面路由 + naive配置
<template>
  <n-config-provider
    :locale="zhCN"
    :date-locale="dateZhCN"
    class="h-full"
  >
    <naive-provider>
      <router-view />
    </naive-provider>
  </n-config-provider>
</template>

<script setup lang="ts">
import { dateZhCN, zhCN } from 'naive-ui';
</script>
4.配置vue-router
创建router文件——专门处理路由相关
- guard——配置路由守卫
- routes——配置常量路由
- index.ts——配置vue-router
![[外链图片转存失败,源站可能有防盗链机制,建议将图片保存下来直接上传(img-BphnMwEX-1672576235137)(assets/image-20230101200817-sze8mhu.png)]](https://img-blog.csdnimg.cn/be8f1ecd49af41f980f5d5cfa653e929.png)
安装@vueuse依赖
npm i @vueuse/core
路由守卫index.ts
import type { Router } from 'vue-router';
import { useTitle } from '@vueuse/core';

/**
 * 路由守卫函数
 * @param router - 路由实例
 */
export function createRouterGuard(router: Router) {
  router.beforeEach(async (to, from, next) => {
    // 开始 loadingBar
    window.$loadingBar?.start();
    // 页面跳转权限处理
    next()
  });
  router.afterEach(to => {
    // 设置document title
    useTitle(to.name);
    // 结束 loadingBar
    window.$loadingBar?.finish();
  });
}
配置路由
import type {RouteRecordRaw} from 'vue-router'
export const constRouter:RouteRecordRaw[] = [
    {
        name:'首页',
        path:'/',
        component:() => import('@/components/HelloWorld.vue')
    }
]
配置vue-router(index.ts)
import type { App } from 'vue';
import { createRouter, createWebHashHistory, createWebHistory } from 'vue-router';
import { createRouterGuard } from './guard';
import { constRouter } from './routes';

const { VITE_HASH_ROUTE = 'N', VITE_BASE_URL } = import.meta.env;

export const router = createRouter({
  history: VITE_HASH_ROUTE === 'Y' ? createWebHashHistory(VITE_BASE_URL) : createWebHistory(VITE_BASE_URL),
  routes:constRouter
});

/** setup vue router. - [安装vue路由] */
export async function setupRouter(app: App) {
  app.use(router);
  createRouterGuard(router);
  await router.isReady();
}

export * from './routes';
导入main.ts
import { createApp } from 'vue'
import { setupAssets } from './plugins';
import App from './App.vue'
import { setupRouter } from './router';


async function setupApp() {
    // import assets: js、css
    setupAssets();

    const app = createApp(App);

    // vue router
    await setupRouter(app);

    // mount app
    app.mount('#app');
  }

  setupApp();
测试
现在,我们看一下我们的hello,world是否出来了
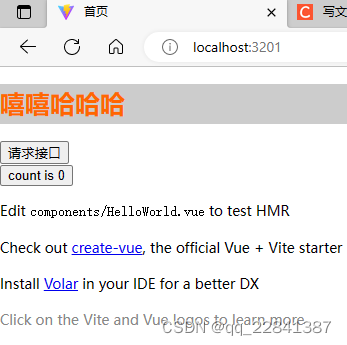
对应的修改标题(首页)和hello,world页面都出来了


