《OpenShift / RHEL / DevSecOps / Ansible 汇总目录》
说明:本文已经在 OpenShift 4.11 + ACM 2.6 + AWS 环境中验证
文章目录
- 用 HyperShift 实现 OpenShift 托管集群
- 什么是 HyperShift 托管集群以及架构
- HyperShift 托管集群的价值
- 成本优势
- 部署优势
- 管理优势
- 在 RHACM 上管理 OpenShift 托管集群生命周期
- 创建托管集群
- 升级托管集群
- 扩展托管集群
- 手动扩展 Worker 节点
- 自动扩展 Worker 节
- 参考
用 HyperShift 实现 OpenShift 托管集群
什么是 HyperShift 托管集群以及架构
红帽 HyperShift 是实现以托管的方式运行 OpenShift 集群 Control Plane 控制平面的开源项目,使用 HyperShift 可以在一个 RHACM 管理集群中统一运行多个托管 OpenShift 集群的 Control Plane,而这些托管集群的 Worker 还是运行在各自集群中。
基于 HyperShift 的 OpenShift 托管集群和标准的 OpenShift 集群最显著不同点是集群的 Control Plane 运行差异。
- 一个标准 OpenShift 集群的 Control Plane 和 Worker 同时运行在一个 OpenShift 集群中。Control Plane 对应的 Pod 是通过 Operator 管理生命周期的,相关 Pod 直接运行在 Control Plane 节点的 CoreOS 中,且运行 Control Plane 的相关资源分布在该集群的多个 Namespace 中。
- 一个托管 OpenShift 集群的 Control Plane 和 Worker 分别运行在管理集群中和被管集群中。Control Plane 对应的 Pod 是通过 Deployment 或 StatefulSet 管理生命周期的,相关 Pod 集中运行在管理集群中与托管集群对应的 Namespace 中。
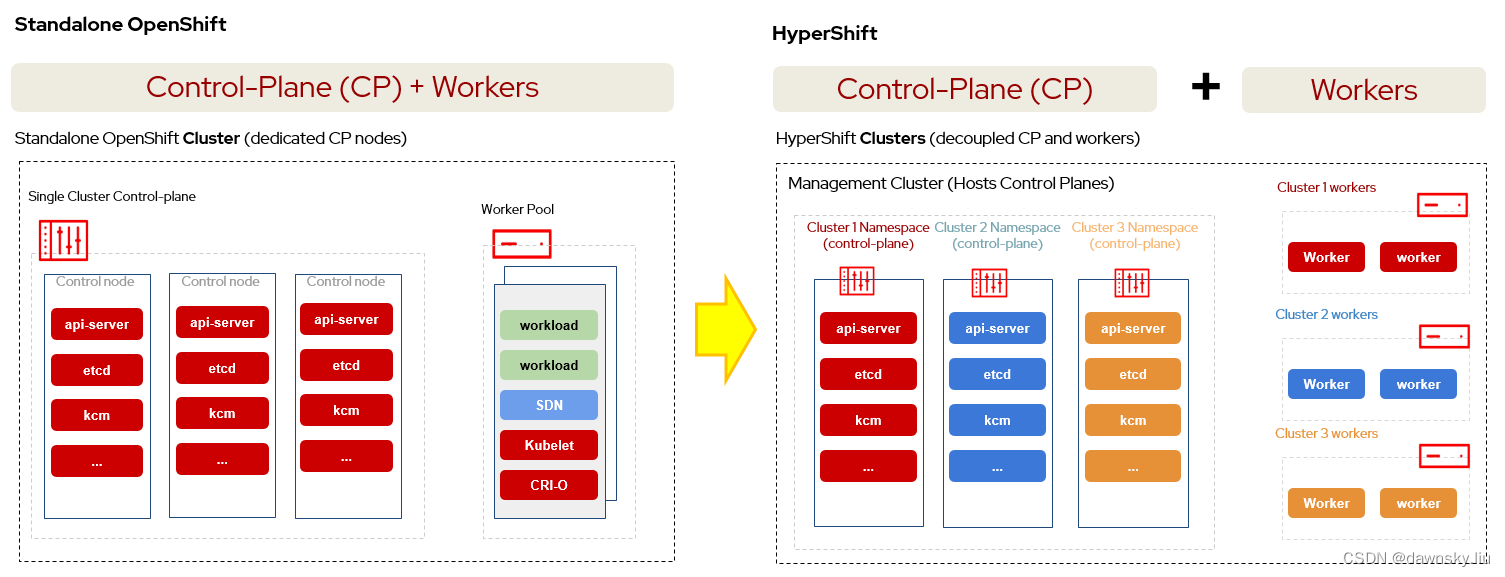
一个托管集群其实是一个逻辑上的集群,因为托管集群的 Control Plane 和 Worker 实际上是分开运行在两个物理集群中。其中 Control Plane 运行在 “管理集群” 中的对应的命名空间内,而 Worker 是运行在 “被管集群” 中。
另外,也正是 Control Plane 被托管在 “管理集群” 中运行,因此针对托管集群的 Control Plane 管理操作(例如扩展集群节点、升级集群、配置 MachineConfig 等)都只能在 “管理集群” 中进行,而不能在 “被管集群” 中进行。
HyperShift 托管集群的价值
成本优势
为了保证可靠性标准 OpenShift 集群需要 3 个节点运行 Control Plane,因此当集群数量比较多的时候 Control Plane 消耗的硬件资源会比较多。而通过红帽的 HyperShift 实现的托管集群部署模式可以将 OpenShift 集群的 Control Plane 和 Worker 解耦运行部署,这样就可以在一个管理集群上集中运行多云环境中被托管集群的 Control Plane。另外托管集群的 Control Plane 是通过 Deployment 部署运行的,Deployment 自身的自愈性使得 Control Plane 即便是在单 Pod 运行的时候也具备一定的可靠性。这些都使得在大规模运行托管集群的时候具备节省 IaaS 资源的优势。
部署优势
由于一个 HyperShift 托管集群的 Control Plane 和 Worker 是分开运行的,因此这个逻辑上的集群可以分别运行在不同的硬件架构或网络环境上。例如 Control Plane 运行在 X86 架构的硬件上,而 Worker 可以运行在 ARM 架构的硬件上;或者 Control Plane 运行在私有云中,而 Worker 可以运行在不同公有云中。
管理优势
“管理集群” 的管理员可以集中管理所有托管集群的 Control Plane 配置,例如扩展集群节点、升级集群、配置 MachineConfig 等,这些配置无需 “托管集群” 的使用用户负责。这种集中的 Control Plane 管理模式可以让大量集群的管理操作具有更好的统一性、一致性和可控性。
在 RHACM 上管理 OpenShift 托管集群生命周期
虽然 HyperShift 是一个独立运行的开源项目,但在 OpenShift 多云环境中是结合 RHACM 使用的,这样通过 HyperShift 创建的 “托管集群” 会自动被 RHACM 纳管。因此以下操作是在运行 RHACM 的 “管理集群” 中进行的。
创建托管集群
- 在 “管理集群” 中执行以下 YAML,创建一个名为 production 的托管集群。该 YAML 使用 HypershiftDeployment API 定义了托管集群的配置,其中包括 “hostedClusterSpec” 定义的 Control Plane 配置,以及 “nodePools” 定义的 Worker 配置(2 个 NodePool 分别在 ASW 的 us-west-2b 和 us-west-2c 的 Zone 中各运行 1 个 replicas)。
---
apiVersion: cluster.open-cluster-management.io/v1alpha1
kind: HypershiftDeployment
metadata:
  name: production
  namespace: hypershift
spec:
  hostingCluster: local-cluster
  hostingNamespace: clusters
  hostedClusterSpec:
    networking:
      machineCIDR: 10.0.0.0/16
      networkType: OVNKubernetes
      podCIDR: 10.132.0.0/14
      serviceCIDR: 172.31.0.0/16
    platform:
      type: AWS
    pullSecret:
      name: production-pull-secret
    release:
      image: quay.io/openshift-release-dev/ocp-release:4.11.8-x86_64
    services:
    - service: APIServer
      servicePublishingStrategy:
        type: LoadBalancer
    - service: OAuthServer
      servicePublishingStrategy:
        type: Route
    - service: Konnectivity
      servicePublishingStrategy:
        type: Route
    - service: Ignition
      servicePublishingStrategy:
        type: Route
    sshKey: {}
  nodePools:
  - name: production-us-west-2b
    spec:
      clusterName: production
      management:
        autoRepair: false
        replace:
          rollingUpdate:
            maxSurge: 1
            maxUnavailable: 0
          strategy: RollingUpdate
        upgradeType: Replace
      platform:
        aws:
          instanceType: m5.large
        type: AWS
      release:
        image: quay.io/openshift-release-dev/ocp-release:4.11.8-x86_64
      replicas: 1
  - name: production-us-west-2c
    spec:
      clusterName: production-1
      management:
        autoRepair: false
        replace:
          rollingUpdate:
            maxSurge: 1
            maxUnavailable: 0
          strategy: RollingUpdate
        upgradeType: Replace
      platform:
        aws:
          instanceType: m5.large
        type: AWS
      release:
        image: quay.io/openshift-release-dev/ocp-release:4.11.8-x86_64
      replicas: 1
  infrastructure:
    cloudProvider:
      name: aws-credentials
    configure: True
    platform:
      aws:
        region: us-west-2
        zones:
        - us-west-2b
        - us-west-2c
- 执行命令查看 HypershiftDeployment 的状态,当 HypershiftDeployment 状态如下时可以继续以下步骤。
$ oc get HypershiftDeployment -n hypershift
NAME          TYPE   INFRA                  IAM                    MANIFESTWORK           PROVIDER REF   PROGRESS    AVAILABLE
production    AWS    ConfiguredAsExpected   ConfiguredAsExpected   ConfiguredAsExpected   AsExpected     Partial     False
- 执行命令查看运行 production 托管集群 Control Plane 资源的 Deployment,它们都运行在与其对应的 clusters-production 命名空间中。
$ oc get deployment -n clusters-production
- 执行命令,在获得新的托管集群的 kubeconfig 和 kubeadmin 用户的登录密码后可登录访问托管集群。
$ oc get secret production-kubeadmin-password -n local-cluster --template='{{ .data.password }}' | base64 -d > $HOME/.kube/production.kubeadmin-password
$ oc get secret production-admin-kubeconfig -n local-cluster --template='{{ .data.kubeconfig }}' | base64 -d > $HOME/.kube/production-kubeconfig
$ export KUBECONFIG=$HOME/.kube/production-kubeconfig
$ oc whoami --show-console
- 执行命令,查看托管集群中的对象。
$ oc get co
NAME                                       VERSION   AVAILABLE   PROGRESSING   DEGRADED   SINCE   MESSAGE
console                                    4.11.8    True        False         False      2m21s
csi-snapshot-controller                    4.11.8    True        False         False      3m33s
dns                                        4.11.8    True        False         False      2m28s
image-registry                             4.11.8    True        False         False      2m2s
ingress                                    4.11.8    True        False         False      2m24s
insights                                   4.11.8    True        False         False      4m13s
kube-apiserver                             4.11.8    True        False         False      8m57s
kube-controller-manager                    4.11.8    True        False         False      8m57s
kube-scheduler                             4.11.8    True        False         False      8m57s
kube-storage-version-migrator              4.11.8    True        False         False      3m41s
monitoring                                 4.11.8    True        False         False      46s
network                                    4.11.8    True        False         False      8m25s
openshift-apiserver                        4.11.8    True        False         False      8m57s
openshift-controller-manager               4.11.8    True        False         False      8m57s
openshift-samples                          4.11.8    True        False         False      2m4s
operator-lifecycle-manager                 4.11.8    True        False         False      8m44s
operator-lifecycle-manager-catalog         4.11.8    True        False         False      8m44s
operator-lifecycle-manager-packageserver   4.11.8    True        False         False      8m57s
service-ca                                 4.11.8    True        False         False      4m13s
storage                                    4.11.8    True        False         False      7s
- 退出托管集群,重回到管理集群
$ unset KUBECONFIG
升级托管集群
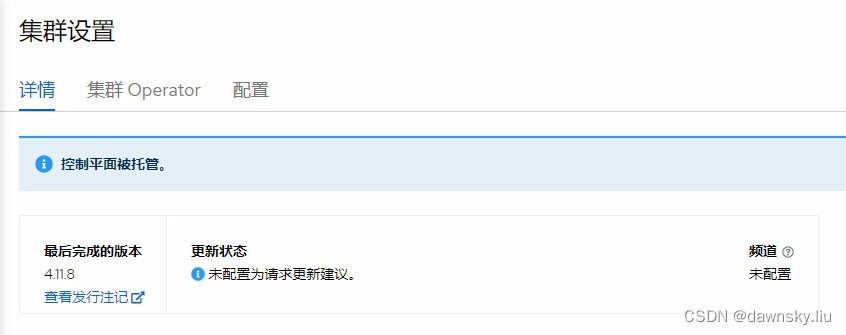
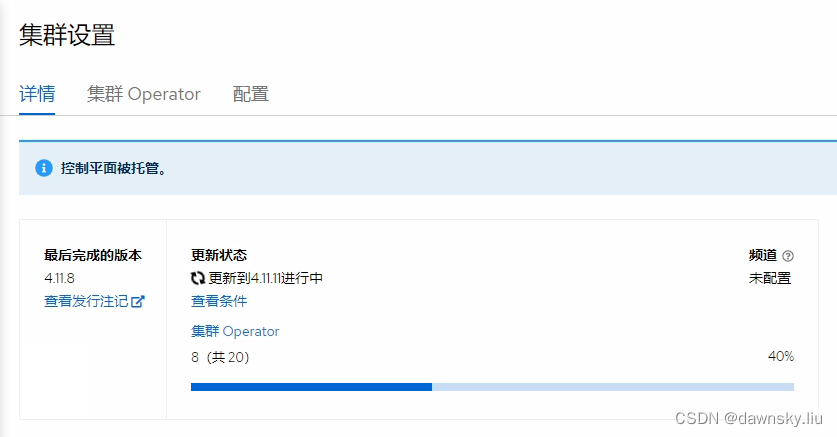
- 在 “托管集群” 控制台的 “集群设置” 页面中确认有 “控制平面被托管” 的提示,并且无法从控制台对该集群进行升级操作。
- 在 “管理集群” 的 OpenShift 控制台中找到名为 production 的 HypershiftDeployment 对象实例,然后修改该其内容。将 hostedClusterSpec 和 nodePools 中的 3 处 “quay.io/openshift-release-dev/ocp-release:4.11.8-x86_64” 改为 “quay.io/openshift-release-dev/ocp-release:4.11.11-x86_64”,然后保存。
- 在 “托管集群” 控制台的 “集群设置” 页面中确认升级过程已经开始,直到托管集群完成升级即可。
扩展托管集群
手动扩展 Worker 节点
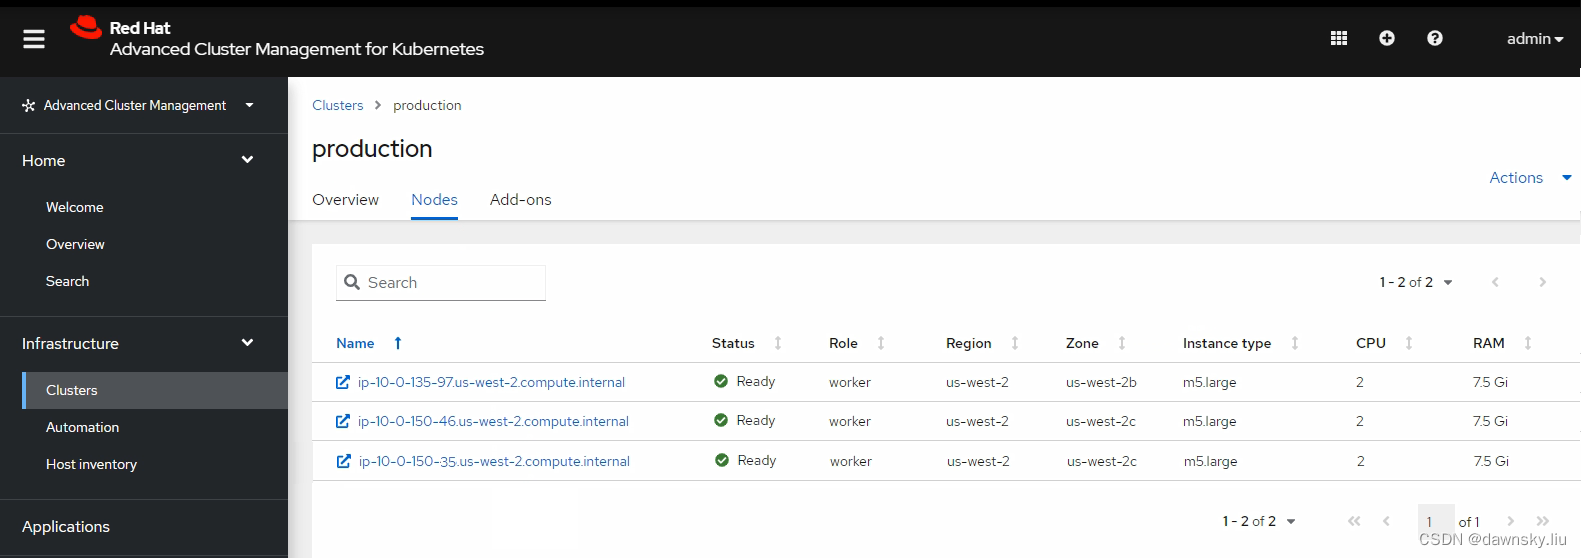
- 在 RHACM 控制台查看名为 production 的 “托管集群”,此时有 2 个节点。

- 在 “管理集群” 的 OpenShift 控制台中找到名为 production 的 HypershiftDeployment 对象实例,将名为 production-us-west-2c 的 nodePools 中的 replicas 改为 2,然后保存。
- 经过一定时间再次在 RHACM 控制台查看名为 production 的 “托管集群”,确认在 us-west-2c 的 Zone 中已运行有 2 个节点了。
自动扩展 Worker 节
- 在 “管理集群” 的 OpenShift 控制台中找到名为 production 的 HypershiftDeployment 对象实例,将名为 production-us-west-2c 的 nodePools 中的 replicas 部分内容替换为以下 autoScaling 的内容。
replicas: 2
      autoScaling:
        min: 2
        max: 4
- 在 production “托管集群” 中使用 Deployment 运行 openshift/hello-openshift 容器,并为该 Deployment 中的容器设置以下资源限制。
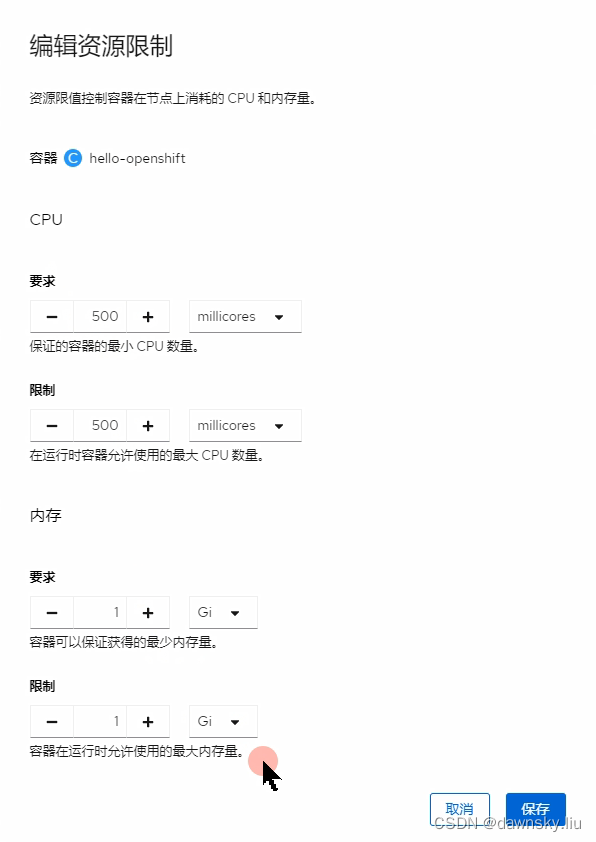
- 根据情况增加运行 hello-openshift 的 Pod 数量。

- 经过一定时间在 RHACM 控制台查看名为 production 的 “托管集群”,确认在 us-west-2c 的 Zone 中运行的节点数量增加了,最多运行在 us-west-2c 中的节点可增加到 4 个。
- 还可减少运行 hello-openshift 的 Pod 数量到 1。经过一定时间在 RHACM 控制台查看名为 production 的 “托管集群”,确认在 us-west-2c 的 Zone 中运行的节点数量减少到 2 个。
参考
https://github.com/redhat-cop/openshift-lab-origin/blob/master/HyperShift/Introduction.adoc
https://hypershift-docs.netlify.app/reference/api/


