循环
文章目录
- 循环
- 一、for 循环
- 1.for 语法结构
- 二、while、until 循环
- 1.while 语法结构
- 2.until 语法结构
- 三、expect

一、for 循环
1.for 语法结构
for 变量名 [ in 取值列表 ]
do
循环体
done
例子1
需求:自动循环创建10个用户
#!/bin/bash
read -p "请输入需要创建的用户名:" name
read -p "请输入需要创建的用户数量:" num

for i in `seq $num`
do
useradd $name$i
done

tail -n $i /etc/passwd
例子2
目的:通过用户列表文件创建用户
[root@nfs test]# seq 3
1
2
3

[root@nfs test]# vim test20.sh
[root@nfs test]# bash test20.sh
请输入需要创建的用户名:userA
请输入需要创建的用户数量:3
[root@nfs test]# tail -n 3 /etc/passwd
userA1:x:1012:1012::/home/userA1:/bin/bash
userA2:x:1013:1013::/home/userA2:/bin/bash
userA3:x:1014:1014::/home/userA3:/bin/bash
[root@nfs test]# cat test20.sh
#!/bin/bash
read -p "请输入需要创建的用户名:" name
read -p "请输入需要创建的用户数量:" num

for i in `seq $num`
do
useradd $name$i
done

[root@nfs test]# vim test20.sh
[root@nfs test]# cat test20.sh
#!/bin/bash
#read -p "请输入需要创建的用户名:" name
#read -p "请输入需要创建的用户数量:" num

for i in `cat username.txt`
do
useradd $i
done

#tail -n $i /etc/passwd
[root@nfs test]# cat username.txt
userA
userB
userC
userD
[root@nfs test]# tail -n 4 /etc/passwd
userA:x:1020:1020::/home/userA:/bin/bash
userB:x:1021:1021::/home/userB:/bin/bash
userC:x:1022:1022::/home/userC:/bin/bash
userD:x:1023:1023::/home/userD:/bin/bash
[root@nfs test]# vim test20.sh
[root@nfs test]# bash test20.sh username.txt
useradd:用户“userA”已存在
useradd:用户“userB”已存在
useradd:用户“userC”已存在
useradd:用户“userD”已存在
[root@nfs test]# vim new-user.txt
[root@nfs test]# cat new-user.txt
luo1
luo2
luo3
[root@nfs test]# bash test20.sh new-user.txt
[root@nfs test]# tail -n 3 /etc/passwd
luo1:x:1024:1024::/home/luo1:/bin/bash
luo2:x:1025:1025::/home/luo2:/bin/bash
luo3:x:1026:1026::/home/luo3:/bin/bash
[root@nfs test]# cat test20.sh
#!/bin/bash
#read -p "请输入需要创建的用户名:" name
#read -p "请输入需要创建的用户数量:" num

for i in `cat $1`
do
useradd $i
done

#tail -n $i /etc/passwd
[root@nfs test]#
例子3
ping测试主机的目的:通过循环工具,测试全网主机,并将在线主机记录在文本中。
步骤:
1、编写常规ping测试脚本(无循环)
2、添加循环语句。for i in ( 2…254)
3、优化脚本 (后台执行,清空脚本,循环完成提示,wait 间隔)
[root@nfs test]# vim ping.sh
[root@nfs test]# bash  ping.sh
请输入你需要测试的网段地址:192.168.200.
[root@nfs test]# cat down.txt
192.168.200.255 down
192.168.200.115 down
192.168.200.107 down
192.168.200.114 down
192.168.200.102 down
192.168.200.104 down
192.168.200.84 down
192.168.200.57 down
192.168.200.100 down
192.168.200.32 down
192.168.200.35 down
192.168.200.92 down
192.168.200.95 down
192.168.200.34 down
192.168.200.40 down
192.168.200.82 down
192.168.200.70 down
192.168.200.106 down
192.168.200.110 down
192.168.200.71 down
192.168.200.37 down
192.168.200.76 down
192.168.200.24 down
192.168.200.33 down
192.168.200.6 down
192.168.200.116 down
192.168.200.28 down
192.168.200.23 down
192.168.200.29 down
192.168.200.60 down
192.168.200.58 down
192.168.200.48 down
192.168.200.64 down
192.168.200.20 down
192.168.200.21 down
192.168.200.87 down
192.168.200.118 down
192.168.200.119 down
192.168.200.120 down
192.168.200.123 down
192.168.200.122 down
192.168.200.121 down
192.168.200.128 down
192.168.200.130 down
192.168.200.127 down
192.168.200.129 down
192.168.200.131 down
192.168.200.132 down
192.168.200.196 down
192.168.200.201 down
192.168.200.238 down
192.168.200.160 down
192.168.200.140 down
192.168.200.233 down
192.168.200.180 down
192.168.200.228 down
192.168.200.220 down
192.168.200.178 down
192.168.200.186 down
192.168.200.150 down
192.168.200.159 down
192.168.200.195 down
192.168.200.168 down
192.168.200.211 down
192.168.200.157 down
192.168.200.144 down
192.168.200.173 down
192.168.200.237 down
192.168.200.193 down
192.168.200.229 down
192.168.200.181 down
192.168.200.235 down
192.168.200.215 down
192.168.200.188 down
192.168.200.218 down
192.168.200.149 down
192.168.200.176 down
192.168.200.164 down
192.168.200.185 down
192.168.200.136 down
192.168.200.197 down
192.168.200.200 down
192.168.200.245 down
192.168.200.250 down
192.168.200.248 down
192.168.200.252 down
192.168.200.251 down
192.168.200.253 down
192.168.200.103 down
192.168.200.83 down
192.168.200.111 down
192.168.200.94 down
192.168.200.66 down
192.168.200.72 down
192.168.200.62 down
192.168.200.78 down
192.168.200.81 down
192.168.200.99 down
192.168.200.97 down
192.168.200.109 down
192.168.200.85 down
192.168.200.93 down
192.168.200.101 down
192.168.200.22 down
192.168.200.41 down
192.168.200.68 down
192.168.200.51 down
192.168.200.63 down
192.168.200.69 down
192.168.200.117 down
192.168.200.79 down
192.168.200.65 down
192.168.200.56 down
192.168.200.75 down
192.168.200.43 down
192.168.200.86 down
192.168.200.50 down
192.168.200.77 down
192.168.200.30 down
192.168.200.38 down
192.168.200.88 down
192.168.200.45 down
192.168.200.90 down
192.168.200.113 down
192.168.200.74 down
192.168.200.14 down
192.168.200.108 down
192.168.200.89 down
192.168.200.19 down
192.168.200.44 down
192.168.200.67 down
192.168.200.16 down
192.168.200.17 down
192.168.200.54 down
192.168.200.26 down
192.168.200.46 down
192.168.200.36 down
192.168.200.55 down
192.168.200.61 down
192.168.200.52 down
192.168.200.25 down
192.168.200.49 down
192.168.200.15 down
192.168.200.11 down
192.168.200.105 down
192.168.200.112 down
192.168.200.7 down
192.168.200.59 down
192.168.200.8 down
192.168.200.3 down
192.168.200.9 down
192.168.200.4 down
192.168.200.27 down
192.168.200.13 down
192.168.200.18 down
192.168.200.10 down
192.168.200.42 down
192.168.200.39 down
192.168.200.31 down
192.168.200.73 down
192.168.200.80 down
192.168.200.53 down
192.168.200.98 down
192.168.200.12 down
192.168.200.5 down
192.168.200.91 down
192.168.200.47 down
192.168.200.96 down
192.168.200.1 down
192.168.200.126 down
192.168.200.125 down
192.168.200.124 down
192.168.200.133 down
192.168.200.217 down
192.168.200.209 down
192.168.200.135 down
192.168.200.231 down
192.168.200.198 down
192.168.200.134 down
192.168.200.225 down
192.168.200.207 down
192.168.200.162 down
192.168.200.205 down
192.168.200.213 down
192.168.200.190 down
192.168.200.214 down
192.168.200.208 down
192.168.200.179 down
192.168.200.216 down
192.168.200.147 down
192.168.200.202 down
192.168.200.223 down
192.168.200.222 down
192.168.200.165 down
192.168.200.169 down
192.168.200.203 down
192.168.200.191 down
192.168.200.138 down
192.168.200.156 down
192.168.200.141 down
192.168.200.221 down
192.168.200.166 down
192.168.200.146 down
192.168.200.139 down
192.168.200.210 down
192.168.200.175 down
192.168.200.194 down
192.168.200.161 down
192.168.200.230 down
192.168.200.158 down
192.168.200.192 down
192.168.200.142 down
192.168.200.137 down
192.168.200.226 down
192.168.200.206 down
192.168.200.187 down
192.168.200.183 down
192.168.200.212 down
192.168.200.172 down
192.168.200.234 down
192.168.200.170 down
192.168.200.151 down
192.168.200.145 down
192.168.200.143 down
192.168.200.152 down
192.168.200.153 down
192.168.200.236 down
192.168.200.224 down
192.168.200.174 down
192.168.200.199 down
192.168.200.204 down
192.168.200.163 down
192.168.200.154 down
192.168.200.155 down
192.168.200.171 down
192.168.200.148 down
192.168.200.177 down
192.168.200.167 down
192.168.200.232 down
192.168.200.239 down
192.168.200.189 down
192.168.200.227 down
192.168.200.219 down
192.168.200.241 down
192.168.200.254 down
192.168.200.246 down
192.168.200.242 down
192.168.200.249 down
192.168.200.240 down
192.168.200.243 down
192.168.200.247 down
192.168.200.244 down
[root@nfs test]# cat up.txt
192.168.200.2 up
192.168.200.184 up
192.168.200.182 up
[root@nfs test]# cat  ping.sh
#!/bin/bash
#ip=192.168.200.254
#read -p "请输入测试的IP地址:" ip
>up.txt
>down.txt
read -p "请输入你需要测试的网段地址:"  ips
for i in {1..255}
do
{
ip=$ips$i
ping -c4 -W1 $ip &> /dev/null && echo "$ip up" >>up.txt || echo "$ip down" >>down.txt
} &

done
[root@nfs test]#
例子3
目的:用for循环实现批量主机 root 密码的修改
前提
1、已经完成免密登录配置(ssh-keygen)
2、定义主机地址列表
3、了解远程修改密码的方法
[root@nfs test]# cat ip.txt
192.168.200.182
192.168.200.184
192.168.200.188
[root@nfs test]# vim changepassword.sh
[root@nfs test]# bash  changepassword.sh
请输入新的密码:luo123456
root@192.168.200.182's password:
Permission denied, please try again.
root@192.168.200.182's password:
更改用户 root 的密码 。
passwd:所有的身份验证令牌已经成功更新。
更改用户 root 的密码 。
passwd:所有的身份验证令牌已经成功更新。
[root@nfs test]# ls

newpass.txt      changepassword.sh     oldpass.txt
[root@nfs test]# cat oldpass.txt
192.168.200.188
[root@nfs test]# cat newpass.txt
192.168.200.182
192.168.200.184

[root@nfs test]# cat  changepassword.sh
#!/bin/bash
read -p "请输入新的密码:" pass
for i in `cat ip.txt`
do
	ping -c1 -W1 $i &> /dev/null
	if [ $? -eq 0 ];then
	ssh $i "echo $pass | passwd --stdin root"
	echo $i >> newpass.txt
	else
	echo $i >> oldpass.txt
	fi
done
二、while、until 循环
特点:循环次数不一定是固定的
1.while 语法结构
while 条件测试
do
循环体
done
#当条件测试成立(条件测试为真),执行循环体
例子
[root@nfs test]# vim test19.sh
[root@nfs test]# bash test19.sh
1
2
3
4
5
6
7
8
9
10
^C
[root@nfs test]# cat  test19.sh
#!/bin/bash
while :
do
let i++
sleep 1
echo $i
done
2.until 语法结构
until 条件测试
do
循环体
done
#当条件测试成立(条件测试为假看作为成立),执行循环体
例子1
目的:每隔一秒循环一个数字
[root@nfs test]# vim until.sh
[root@nfs test]# bash until.sh
1
2
3
4
5
6
7
8
9
10
11
12
13
14
[root@nfs test]# cat until.sh
#!/bin/bash
until [[ $i -eq 14 ]]
do
let i++
echo $i

done
例子2
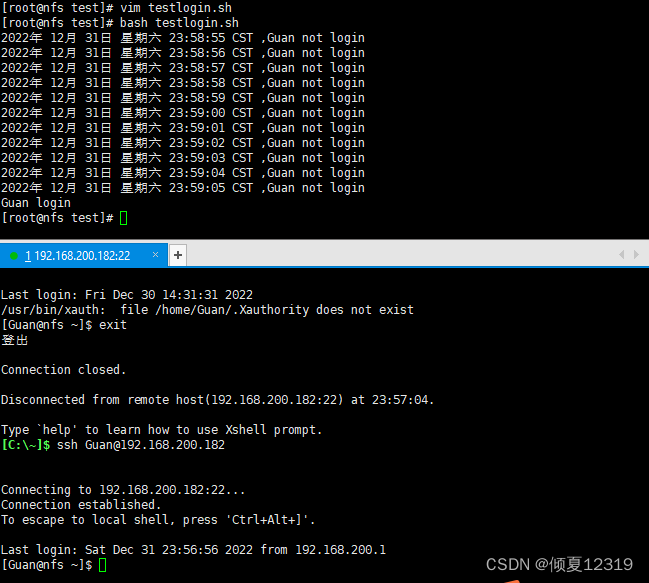
目的:每隔1秒查看Gaun用户是否登录,如此循环。直到该用户登录,请显示登录并退出监控程序,否则显示当前时间,并输出guan尚未登录
[root@nfs test]# cat testlogin.sh
#!/bin/bash
until who | grep "^guan" &> /dev/null
do
	echo "$(date) ,guan not login"
	sleep 1
done
echo "guan login"
exit
三、expect
前言:观察ssh登录的交互现象
安装
[root@nfs test]# yum install -y expect tcl tclx tcl-devel
已安装:
  expect.x86_64 0:5.45-14.el7_1  tcl.x86_64 1:8.5.13-8.el7  tcl-devel.x86_64 1:8.5.13-8.el7
  tclx.x86_64 0:8.4.0-22.el7

作为依赖被安装:
  tk.x86_64 1:8.5.13-6.el7

完毕!
[root@nfs test]# expect
expect1.1>
^C[root@nfs test]#
例子1
目的:通过expect解决ssh交互问题直接从192.168.200.182这台服务器,远程登录到ip地址为192.168.200.183这台服务器
[root@nfs test]# vim expect.exp
[root@nfs test]# expect expect.exp
spawn ssh root@192.168.200.183
root@192.168.200.183's password:
Last login: Sun Jan  1 01:03:03 2023 from 192.168.200.182
1.web1
2.web2
3.nfs
4.quit
please input a num :4
[root@nfs ~]# exit
登出
Connection to 192.168.200.183 closed.
[root@nfs test]# cat expect.exp
#!/usr/bin/expect
#spawn expect 内部命令,启动一个shell程序。
spawn ssh root@192.168.200.183
#expect 期望那些内容
expect {
"yes/no" { send "yes\r";exp_continue }
"password" { send "luo123456\r"}
#yes/no 就send发送yes,\r表示回车
#password 就send 发送 guan123456
#exp_continue,跳过循环,就继续下一条语句
#interact 允许用户交互
}
interact
例子2
公钥推送
1、准备动作:安装expect,准备公钥
2、通过shell循环判断在线主机
[root@nfs test]# vim expectssh.sh
[root@nfs test]# bash expectssh.sh
[root@nfs test]# ls
ip.txt   expectssh.sh          ping.sh       test06.sh        test13.sh  test20.sh
[root@nfs test]# cat ip.txt
192.168.200.2
192.168.200.184
192.168.200.183
192.168.200.182
[root@nfs test]# cat expectssh.sh
#!/bin/bash
#ip=192.168.200.254
#read -p "请输入测试的IP地址:" ip
>ip.txt

for i in {1..255}
do
{
ip=192.168.200.$i
ping -c4 -W1 $ip &> /dev/null
if [ $? -eq 0 ];then
echo "$ip" >> ip.txt

fi
} &

done

[root@nfs test]#
3、通过expect进行交互
[root@nfs test]# bash expectssh.sh
[root@nfs test]# spawn ssh-copy-id 192.168.200.2
/bin/ssh-copy-id: INFO: Source of key(s) to be installed: "/root/.ssh/id_rsa.pub"
/bin/ssh-copy-id: INFO: attempting to log in with the new key(s), to filter out any that are already installed

/bin/ssh-copy-id: ERROR: ssh: connect to host 192.168.200.2 port 22: Connection refused

expect: spawn id exp6 not open
    while executing
"expect eof"
spawnspawn ssh-copy-id 192.168.200.184
 ssh-copy-id 192.168.200.182
spawn ssh-copy-id 192.168.200.183
/bin/ssh-copy-id: INFO: Source of key(s) to be installed: "/root/.ssh/id_rsa.pub"
/bin/ssh-copy-id: INFO: Source of key(s) to be installed: "/root/.ssh/id_rsa.pub"
/bin/ssh-copy-id: INFO: Source of key(s) to be installed: "/root/.ssh/id_rsa.pub"
/bin/ssh-copy-id: INFO: attempting to log in with the new key(s), to filter out any that are already installed
/bin/ssh-copy-id: INFO: attempting to log in with the new key(s), to filter out any that are already installed
/bin/ssh-copy-id: INFO: attempting to log in with the new key(s), to filter out any that are already installed
/bin/ssh-copy-id: INFO: 1 key(s) remain to be installed -- if you are prompted now it is to install the new keys
/bin/ssh-copy-id: INFO: 1 key(s) remain to be installed -- if you are prompted now it is to install the new keys
root@192.168.200.182's password:
root@192.168.200.183's password:

Number of key(s) added: 1

Now try logging into the machine, with:   "ssh '192.168.200.182'"
and check to make sure that only the key(s) you wanted were added.


/bin/ssh-copy-id: WARNING: All keys were skipped because they already exist on the remote system.
		(if you think this is a mistake, you may want to use -f option)

expect: spawn id exp6 not open
    while executing
"expect eof"

Number of key(s) added: 1

Now try logging into the machine, with:   "ssh '192.168.200.183'"
and check to make sure that only the key(s) you wanted were added.

^C
[root@nfs test]# ssh root@192.168.200.183
Last login: Sun Jan  1 01:03:40 2023 from 192.168.200.182
1.web1
2.web2
3.nfs
4.quit
please input a num :4
[root@nfs ~]# exit
登出
Connection to 192.168.200.183 closed.
[root@nfs test]# ssh root@192.168.200.184
Last login: Sat Dec 31 23:16:46 2022 from 192.168.200.1
[root@web1 ~]# exit
登出
Connection to 192.168.200.184 closed.
[root@nfs test]# vim expectssh.sh
[root@nfs test]# cat expectssh.sh
#!/bin/bash
#ip=192.168.200.254
#read -p "请输入测试的IP地址:" ip
>ip.txt
rpm -q expect &> /dev/null
if [ $? -ne 0 ];then
yum install expect tcl tclx tcl-devel
fi

if [ ! -f ~/.ssh/id_rsa ];then
ssh-keygen -P "" -f ~/.ssh/id_rsa
fi

for i in {3..255}
do
{
ip=192.168.200.$i
if [ $i -eq 182 ];then
continue
fi
ping -c4 -W1 $ip &> /dev/null

if [ $? -eq 0 ];then

echo "$ip" >> ip.txt
/usr/bin/expect <<-EOF
set timeout 10
spawn ssh-copy-id $ip
expect {
"yes/no" { send "yes\r";exp_continue }
"password" { send "luo123456\r" }
}
expect eof
EOF
fi
} &

done

[root@nfs test]# bash -xv expectssh.sh //-xv可看执行过程
[root@nfs test]# cd

[root@nfs ~]# ls -a
.                         .dbus                 .pki                       zabbix
..                        .esd_auth             .ssh                       公共
2022-11-11-mysql-all.sql  .ICEauthority         .tcshrc                    模板
2022-11-12-mysql-all.sql  initial-setup-ks.cfg  test                       视频
anaconda-ks.cfg           .local                vim                        图片
.bash_history             log.txt               .viminfo                   文档
.bash_logout              mmss-mysql-all.sql    vsftpd.conf                下载
.bash_profile             -mysql-all.sql        wordpress                  音乐
.bashrc                   mysql_bin.000001      wordpress-4.9.4-zh_CN.zip  桌面
.cache                    mysql_bin.000002      wordpress-6.1.1-zh_CN.zip
.config                   mysql_bin.index       .xauthHLZ5Qs
.cshrc                    .mysql_history        .Xauthority
[root@nfs ~]# cd .ssh
[root@nfs .ssh]# ls
authorized_keys  id_rsa  id_rsa.pub  known_hosts
[root@nfs .ssh]# cat known_hosts
mysql-slave1,192.168.200.184 ecdsa-sha2-nistp256 AAAAE2VjZHNhLXNoYTItbmlzdHAyNTYAAAAIbmlzdHAyNTYAAABBBI8uTLv5JqwfjyBklfgUBUdknafi/0DUoi5n9lcqCGqVkL5udsa+sjWxPInScXNo0JBdVK3Fi3Y0/mU+yJMUAeI=
192.168.200.183 ecdsa-sha2-nistp256 AAAAE2VjZHNhLXNoYTItbmlzdHAyNTYAAAAIbmlzdHAyNTYAAABBBI8uTLv5JqwfjyBklfgUBUdknafi/0DUoi5n9lcqCGqVkL5udsa+sjWxPInScXNo0JBdVK3Fi3Y0/mU+yJMUAeI=
mysql-slave2,192.168.200.185 ecdsa-sha2-nistp256 AAAAE2VjZHNhLXNoYTItbmlzdHAyNTYAAAAIbmlzdHAyNTYAAABBBI8uTLv5JqwfjyBklfgUBUdknafi/0DUoi5n9lcqCGqVkL5udsa+sjWxPInScXNo0JBdVK3Fi3Y0/mU+yJMUAeI=
web1 ecdsa-sha2-nistp256 AAAAE2VjZHNhLXNoYTItbmlzdHAyNTYAAAAIbmlzdHAyNTYAAABBBI8uTLv5JqwfjyBklfgUBUdknafi/0DUoi5n9lcqCGqVkL5udsa+sjWxPInScXNo0JBdVK3Fi3Y0/mU+yJMUAeI=
nfs,192.168.200.182 ecdsa-sha2-nistp256 AAAAE2VjZHNhLXNoYTItbmlzdHAyNTYAAAAIbmlzdHAyNTYAAABBBI8uTLv5JqwfjyBklfgUBUdknafi/0DUoi5n9lcqCGqVkL5udsa+sjWxPInScXNo0JBdVK3Fi3Y0/mU+yJMUAeI=
[root@nfs .ssh]# >known_hosts
[root@nfs .ssh]# cd
[root@nfs ~]# bash /root/test/expectssh.sh
[root@nfs ~]# spawn ssh-copy-id 192.168.200.184
/bin/ssh-copy-id: INFO: Source of key(s) to be installed: "/root/.ssh/id_rsa.pub"
spawn ssh-copy-id 192.168.200.183
The authenticity of host '192.168.200.184 (192.168.200.184)' can't be established.
ECDSA key fingerprint is SHA256:ygT6h9ejxNmaemQtyIzVYHEbRko0BaG4PstS2LTavDM.
ECDSA key fingerprint is MD5:88:1f:c4:d2:fe:73:b9:1f:7f:26:cd:2c:ba:ad:5c:b5.
Are you sure you want to continue connecting (yes/no)? yes
/bin/ssh-copy-id: INFO: Source of key(s) to be installed: "/root/.ssh/id_rsa.pub"
/bin/ssh-copy-id: INFO: attempting to log in with the new key(s), to filter out any that are already installed
The authenticity of host '192.168.200.183 (192.168.200.183)' can't be established.
ECDSA key fingerprint is SHA256:ygT6h9ejxNmaemQtyIzVYHEbRko0BaG4PstS2LTavDM.
ECDSA key fingerprint is MD5:88:1f:c4:d2:fe:73:b9:1f:7f:26:cd:2c:ba:ad:5c:b5.
Are you sure you want to continue connecting (yes/no)? yes
/bin/ssh-copy-id: INFO: attempting to log in with the new key(s), to filter out any that are already installed

/bin/ssh-copy-id: WARNING: All keys were skipped because they already exist on the remote system.
		(if you think this is a mistake, you may want to use -f option)

expect: spawn id exp6 not open
    while executing
"expect eof"

/bin/ssh-copy-id: WARNING: All keys were skipped because they already exist on the remote system.
		(if you think this is a mistake, you may want to use -f option)

expect: spawn id exp6 not open
    while executing
"expect eof"
^C


