Android 系统桌面 App —— Launcher 开发(1)
Launcher简介
Launcher就是Android系统的桌面,俗称“HomeScreen”也就是我们开机后看到的第一个App。launcher其实就是一个app,它的作用是显示和管理手机上其他App。目前市场上有很多第三方的launcher应用,比如“小米桌面”、“91桌面”等等
注册AndroidManifest
要让app作为Launcher,需要在Manifest中添加两个category:
<category android:name="android.intent.category.HOME"/>
<category android:name="android.intent.category.DEFAULT"/>
添加后的代码
<activity android:name=".MainActivity">
    <intent-filter>
        <action android:name="android.intent.action.MAIN"/>
        <category android:name="android.intent.category.HOME"/>
        <category android:name="android.intent.category.DEFAULT"/>
        <category android:name="android.intent.category.LAUNCHER"/>
    </intent-filter>
</activity>
此时安装此app之后,点击Home键就会看到以下界面,让你选择使用哪一个桌面应用:
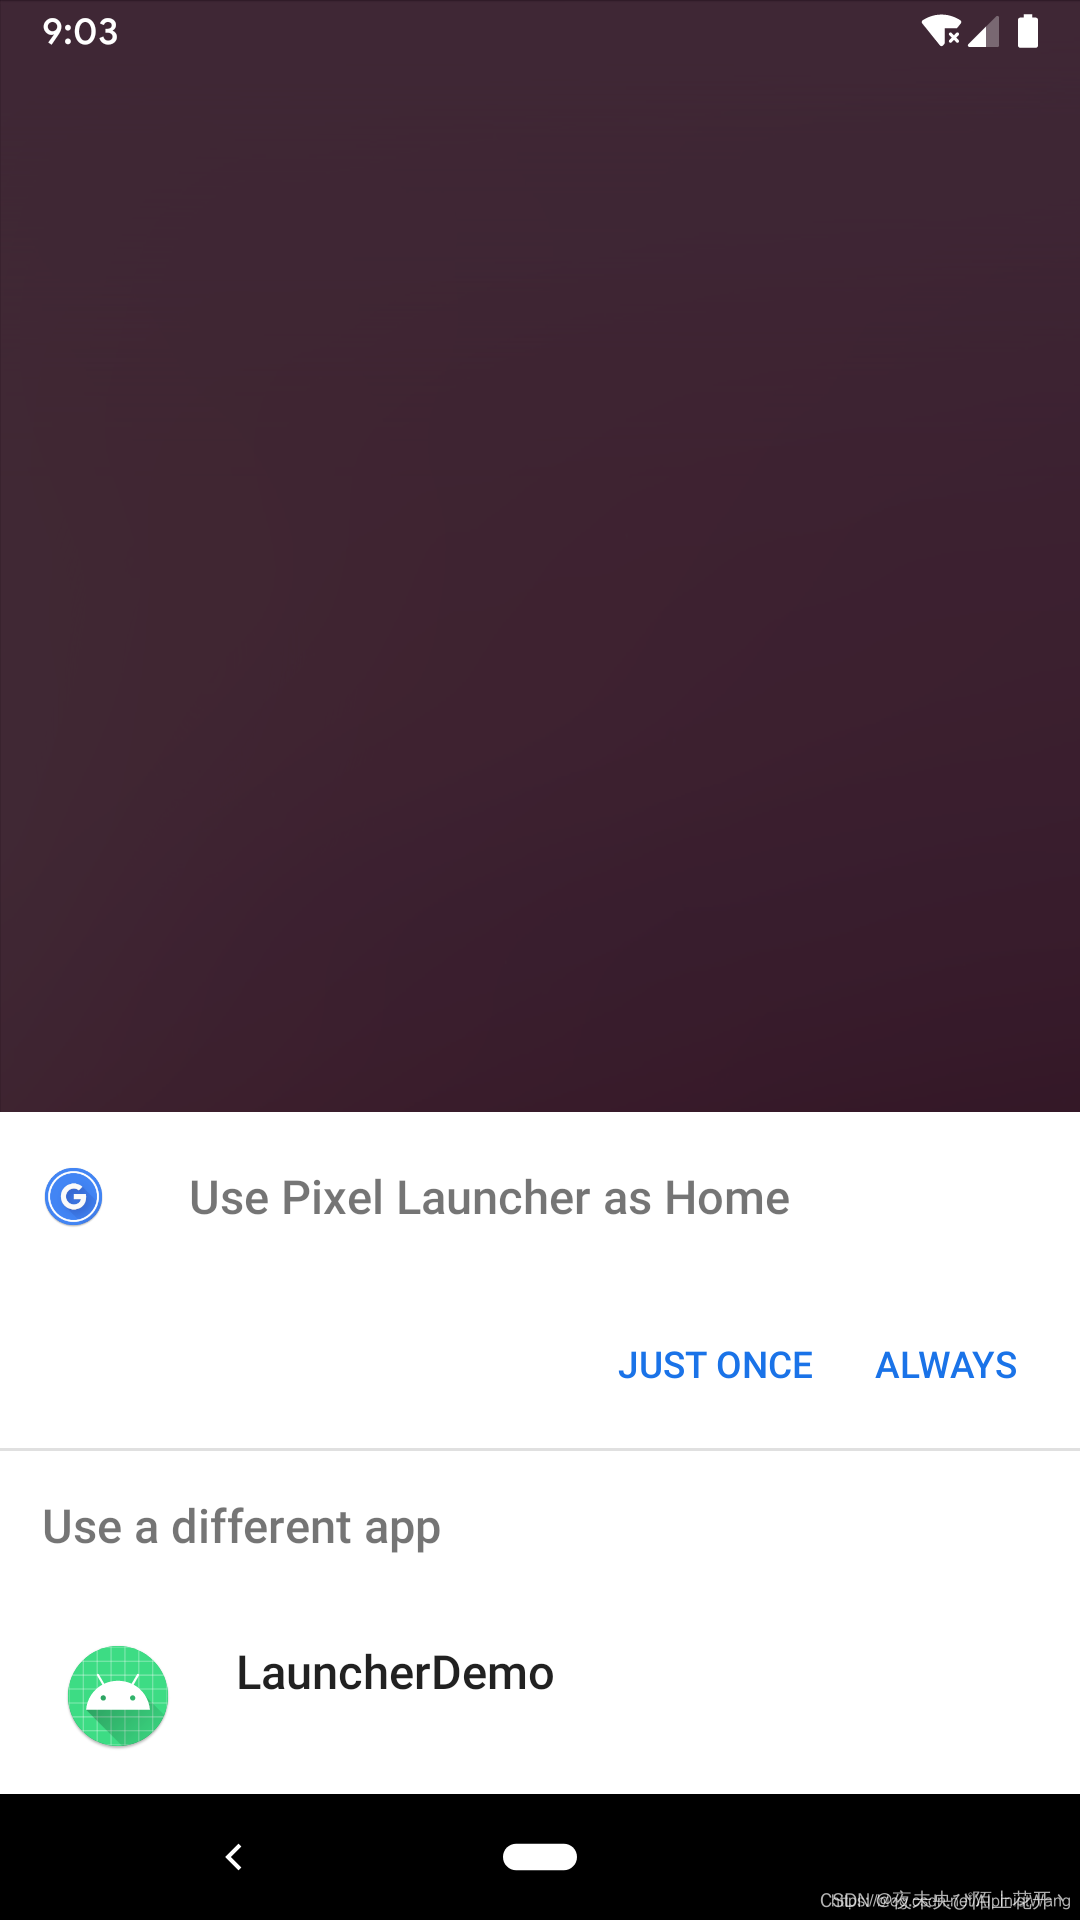
如果选择我们自己开发的 Launcher App,就会启动 我们自己的桌面应用,目前这个应用是空白的,需要添加应用列表以及相应的点击事件。
注意:普通的安卓手机都能看到另外一个界面,但是像小米、华为这样的手机就不行。
使用PackageManager扫描所有app
编辑MainActivity:
public class MainActivity extends AppCompatActivity {
@Override
protected void onCreate(Bundle savedInstanceState) {
super.onCreate(savedInstanceState);
setContentView(R.layout.activity_main);
//获取所有app,设置adapter
PackageManager pm = getPackageManager();
Intent mainIntent = new Intent(Intent.ACTION_MAIN, null);
mainIntent.addCategory(Intent.CATEGORY_LAUNCHER);
final List<ResolveInfo> activities = pm.queryIntentActivities(mainIntent, 0);
RecyclerView recyclerView = findViewById(R.id.rv);
AppAdapter adapter = new AppAdapter(activities, this);
recyclerView.setAdapter(adapter);
recyclerView.setLayoutManager(new GridLayoutManager(this, 3));
}
}
我们在MainActivity中使用PackageManager的queryIntentActivities方法扫描出手机上已安装的所有app信息。
activity_main 布局代码:
<?xml version="1.0" encoding="utf-8"?>
<androidx.constraintlayout.widget.ConstraintLayout xmlns:android="http://schemas.android.com/apk/res/android"
xmlns:tools="http://schemas.android.com/tools"
android:layout_width="match_parent"
android:layout_height="match_parent"
tools:context=".MainActivity">
<androidx.recyclerview.widget.RecyclerView
android:id="@+id/rvApps"
android:layout_width="match_parent"
android:layout_height="match_parent" />
</androidx.constraintlayout.widget.ConstraintLayout>
由于布局中使用了 RecyclerView,记得导入 RecyclerView 库:
implementation 'androidx.recyclerview:recyclerview:1.1.0'
显示app信息,添加点击事件
新建AppAdapter类:
public class AppAdapter extends RecyclerView.Adapter<AppAdapter.ViewHolder> {
private List<ResolveInfo> mList;
private Context mContext;
public AppAdapter(List<ResolveInfo> list, Context context) {
this.mList = list;
this.mContext = context;
}
@NonNull
@Override
public AppAdapter.ViewHolder onCreateViewHolder(@NonNull ViewGroup parent, int viewType) {
View inflate = LayoutInflater.from(mContext).inflate(R.layout.rv_item, parent, false);
//作为一个view填充
View view = View.inflate(parent.getContext(), R.layout.rv_item, null);
return new ViewHolder(view);
}
@Override
public void onBindViewHolder(@NonNull final AppAdapter.ViewHolder holder, final int position) {
holder.mIcon.setImageDrawable(mList.get(position).loadIcon(mContext.getPackageManager()));
holder.mTtile.setText(mList.get(position).loadLabel(mContext.getPackageManager()));
holder.itemView.setOnClickListener(new View.OnClickListener() {
@Override
public void onClick(View v) {
Intent launchIntent = new Intent();
launchIntent.setComponent(new ComponentName(mList.get(position).activityInfo.packageName,
mList.get(position).activityInfo.name));
mContext.startActivity(launchIntent);
}
});
}
@Override
public int getItemCount() {
return mList == null ? 0 : mList.size();
}
public class ViewHolder extends RecyclerView.ViewHolder {
private ImageView mIcon;
private TextView mTtile;
public ViewHolder(@NonNull View itemView) {
super(itemView);
mIcon = itemView.findViewById(R.id.iv);
mTtile = itemView.findViewById(R.id.tv);
}
}
}
在此类中使用activityInfo.loadIcon方法加载app图标,使用resolveInfo.loadLabel方法加载app名字,并且添加了点击启动对应app的点击事件。
rv_item布局文件如下:
<?xml version="1.0" encoding="utf-8"?> <androidx.constraintlayout.widget.ConstraintLayout xmlns:android="http://schemas.android.com/apk/res/android" xmlns:app="http://schemas.android.com/apk/res-auto" xmlns:tools="http://schemas.android.com/tools" android:layout_width="match_parent" android:layout_height="match_parent" android:padding="10dp"> <ImageView android:id="@+id/ivIcon" android:layout_width="wrap_content" android:layout_height="wrap_content" android:maxWidth="36dp" android:maxHeight="36dp" app:layout_constraintBottom_toTopOf="@id/tvName" app:layout_constraintEnd_toEndOf="parent" app:layout_constraintStart_toStartOf="parent" app:layout_constraintTop_toTopOf="parent" tools:src="@mipmap/ic_launcher" /> <TextView android:id="@+id/tvName" android:layout_width="wrap_content" android:layout_height="wrap_content" android:ellipsize="end" android:lines="1" android:singleLine="true" app:layout_constraintBottom_toBottomOf="parent" app:layout_constraintEnd_toEndOf="parent" app:layout_constraintStart_toStartOf="parent" app:layout_constraintTop_toBottomOf="@id/ivIcon" tools:text="@string/app_name" /> </androidx.constraintlayout.widget.ConstraintLayout>
运行效果
设置桌面背景
首先第一步我们需要先让背景显示出来,在res/valuses/styles.xml文件下添加如下代码:
<style name="LauncherAppTheme" parent="android:Theme.Wallpaper.NoTitleBar">
    <!-- Customize your theme here. -->
    <item name="colorPrimary">@color/colorPrimary</item>
    <item name="colorPrimaryDark">@color/colorPrimaryDark</item>
    <item name="colorAccent">@color/colorAccent</item>
    <item name="windowNoTitle">true</item>
</style>
接着在AndroidManifest.xml中使用这个Theme:
<application
    android:allowBackup="true"
    android:icon="@mipmap/ic_launcher"
    android:label="@string/app_name"
    android:roundIcon="@mipmap/ic_launcher_round"
    android:supportsRtl="true"
    android:theme="@style/LauncherAppTheme">
    ...
因为是app关系需要适配状态栏。添加transparentStatusBarForImage方法,在onCreate()的setContentView(R.layout.activity_main);后调用
public void transparentStatusBarForImage(Activity context) {
        if (Build.VERSION.SDK_INT >= Build.VERSION_CODES.LOLLIPOP) {
            //5.0 全透明实现
            //getWindow.setStatusBarColor(Color.TRANSPARENT)
            Window window = context.getWindow();
            window.clearFlags(WindowManager.LayoutParams.FLAG_TRANSLUCENT_STATUS);
            window.getDecorView().setSystemUiVisibility(View.SYSTEM_UI_FLAG_LAYOUT_FULLSCREEN | View.SYSTEM_UI_FLAG_LAYOUT_STABLE);
            window.addFlags(WindowManager.LayoutParams.FLAG_DRAWS_SYSTEM_BAR_BACKGROUNDS);
            window.setStatusBarColor(Color.TRANSPARENT);
        } else if (Build.VERSION.SDK_INT >= Build.VERSION_CODES.KITKAT) {
            //4.4 全透明状态栏
            context.getWindow().addFlags(WindowManager.LayoutParams.FLAG_TRANSLUCENT_STATUS);
        }
    }
使用
    @Override
    protected void onCreate(Bundle savedInstanceState) {
        super.onCreate(savedInstanceState);
        setContentView(R.layout.activity_main);
        transparentStatusBarForImage(this);
    }
会出现图标也上去的问题,在主界面的xml文件中增加android:fitsSystemWindows="true"即可
app图标大小不一样的问题,可以通过写死尺寸来控制
<?xml version="1.0" encoding="utf-8"?> <androidx.constraintlayout.widget.ConstraintLayout xmlns:android="http://schemas.android.com/apk/res/android" xmlns:app="http://schemas.android.com/apk/res-auto" xmlns:tools="http://schemas.android.com/tools" android:layout_width="match_parent" android:layout_height="match_parent" android:padding="10dp"> <ImageView android:id="@+id/iv" android:layout_width="48dp" android:layout_height="48dp" android:scaleType="fitXY" app:layout_constraintBottom_toTopOf="@id/tv" app:layout_constraintEnd_toEndOf="parent" app:layout_constraintStart_toStartOf="parent" app:layout_constraintTop_toTopOf="parent" tools:src="@mipmap/ic_launcher" /> <TextView android:id="@+id/tv" android:layout_width="wrap_content" android:layout_height="wrap_content" android:ellipsize="end" android:lines="1" android:singleLine="true" app:layout_constraintBottom_toBottomOf="parent" app:layout_constraintEnd_toEndOf="parent" app:layout_constraintStart_toStartOf="parent" app:layout_constraintTop_toBottomOf="@id/iv" tools:text="@string/app_name" /> </androidx.constraintlayout.widget.ConstraintLayout>
其他问题
1.打开应用后会把华为桌面应用给关掉,怎么做到的?不是关掉,是把回退屏蔽了,不允许退出。home键还是好用的,回到原主界面
2.锁屏后放置一段时间,它还在?还存活?存活
3.定制度比较低的安卓系统怎么找到对应的系统级别签名?去找Android各个版本的源码,哪里有签名文件
第一个问题
    @Override
    public boolean onKeyDown(int keyCode, KeyEvent event) {
        if ((keyCode == KeyEvent.KEYCODE_BACK)) {
//            Toast.makeText(this, "按下了back键   onKeyDown()", Toast.LENGTH_SHORT).show();
            return false;
        }else {
            return super.onKeyDown(keyCode, event);
        }
    }
第二个问题
界面还会在,没有回收。
注:这篇文章只是简单的桌面app实现
参考
Android 系统桌面 App —— Launcher 开发 recycleview的方式
android手把手教你开发launcher(一)(AndroidStudio版)
Launcher开发——入门篇 还有后续
Android安卓-开发一个android桌面 GridView的方式
Launcher3 包含Launcher3开发的源码解析


![java八股文面试[数据结构]——集合框架](https://img-blog.csdnimg.cn/img_convert/747a3b43849867e4e80aef6691ef69d8.png)