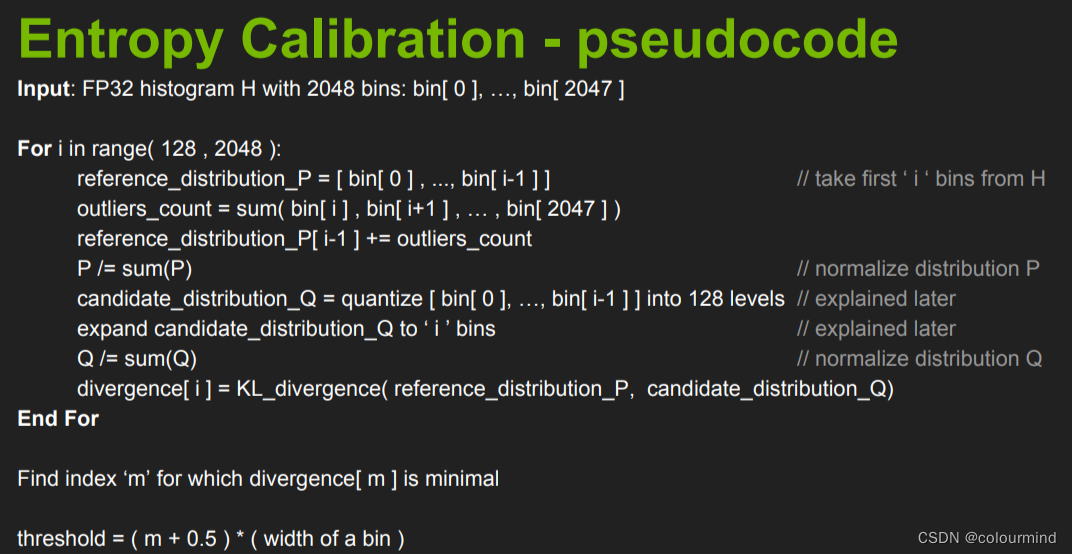
Pytorch文档
- Pytorch 官方文档
https://pytorch.org/docs/stable/index.html
- pytorch 里的一些基础tensor操作讲的不错
https://blog.csdn.net/abc13526222160/category_8614343.html
- 关于pytorch的Broadcast,合并与分割,数学运算,属性统计以及高阶操作
https://blog.csdn.net/abc13526222160/article/details/103520465
broadcast机制
对于涉及计算的两个tensor, 对于数量不匹配的dim, 可以进行自动重复拷贝,使得dim进行批评
Broadcast它能维度扩展和expand一样,它是自动扩展,并且不需要拷贝数据,能够节省内存。关键思想:
[外链图片转存失败,源站可能有防盗链机制,建议将图片保存下来直接上传(img-WMOpueEB-1692628397278)(attachment:image.png)]
import sys, os

import torch, torchvision
import torch.nn as nn
import torch.nn.functional as F
from PIL import Image
import numpy as np
import pandas as pd
from mpl_toolkits import mplot3d
import matplotlib.pyplot as plt
1. Pytorch索引与切片以及维度变换
TODO: https://zhangkaifang.blog.csdn.net/article/details/103517970
index, view, reshape, squeeze, unsqueeze, transpose/t, permute , expand/repeat
transpose()函数表示矩阵的维度交换,接受的参数为要交换的哪两个维度。
permute: transpose()函数一次只能两两交换。【b, c, h, w】=> 【b, w, h, c】,比如原来一个人的图片,交换过后图片可能不是人了,我们还希望变成原来的样子,可以看成多维度交换,其中参数为新的维度顺序。同样的道理permute函数也会把内存的顺序给打乱,因此要是涉及contious这个错误的时候,需要额外添加.contiguous()函数,来把内存的顺序变得连续。
2.1 合并与分割 cat, stack, split, chunk repeat
stack一般叠加在新的维度,concatenate在已有的dim上进行扩展,vstack,dstack,hstack分别是在dim = [0, 1, 2]上进行叠加
a = torch.rand([5, 5, 3])

print('-'*10 + 'stack' + '-'*10)
t1 = torch.stack([a, a], dim = 0)
print('pre', a.shape, 'post',t1.shape)

t1 = torch.stack([a, a], dim = 1)
print('pre', a.shape, 'post',t1.shape)

t1 = torch.stack([a, a], dim = 2)
print('pre', a.shape, 'post',t1.shape)

t1 = torch.stack([a, a], dim = 3)
print('pre', a.shape, 'post',t1.shape)

print('-'*10 + 'concatenate' + '-'*10)
t1 = torch.cat([a, a], dim = 0)
print('pre', a.shape, 'post',t1.shape)

t1 = torch.cat([a, a], dim = 1)
print('pre', a.shape, 'post',t1.shape)

t1 = torch.cat([a, a], dim = 2)
print('pre', a.shape, 'post',t1.shape)


print('-'*10 + 'v-h-d stack' + '-'*10)

t1 = torch.vstack([a, a])
print('pre', a.shape, 'post',t1.shape)

t1 = torch.hstack([a, a])
print('pre', a.shape, 'post',t1.shape)

t1 = torch.dstack([a, a])
print('pre', a.shape, 'post',t1.shape)
----------stack----------
pre torch.Size([5, 5, 3]) post torch.Size([2, 5, 5, 3])
pre torch.Size([5, 5, 3]) post torch.Size([5, 2, 5, 3])
pre torch.Size([5, 5, 3]) post torch.Size([5, 5, 2, 3])
pre torch.Size([5, 5, 3]) post torch.Size([5, 5, 3, 2])
----------concatenate----------
pre torch.Size([5, 5, 3]) post torch.Size([10, 5, 3])
pre torch.Size([5, 5, 3]) post torch.Size([5, 10, 3])
pre torch.Size([5, 5, 3]) post torch.Size([5, 5, 6])
----------v-h-d stack----------
pre torch.Size([5, 5, 3]) post torch.Size([10, 5, 3])
pre torch.Size([5, 5, 3]) post torch.Size([5, 10, 3])
pre torch.Size([5, 5, 3]) post torch.Size([5, 5, 6])
torch.split函数 按照长度进行切分
torch.split(tensor, split_size_or_sections, dim=0)
split_size_or_sections:需要切分的大小(int or list )
dim:切分维度
torch.chunk函数 按照数量进行切分
a = torch.rand([6, 256, 10, 10 ])
print('a', a.shape)

t1 = torch.split(a, [3,3], dim = 0)
print('dim %d'%(0))
for ti in t1:
    print(ti.shape)

print('dim %d'%(1))
t1 = torch.split(a, [128,128], dim = 1)
for ti in t1:
    print(ti.shape)

print('dim %d'%(2))
t1 = torch.split(a, [5,5], dim = 2)
for ti in t1:
    print(ti.shape)
a torch.Size([6, 256, 10, 10])
dim 0
torch.Size([3, 256, 10, 10])
torch.Size([3, 256, 10, 10])
dim 1
torch.Size([6, 128, 10, 10])
torch.Size([6, 128, 10, 10])
dim 2
torch.Size([6, 256, 5, 10])
torch.Size([6, 256, 5, 10])
a = torch.rand([6, 256, 10, 10 ])
print('a', a.shape)

t1 = torch.chunk(a, 2, dim = 0)
print('dim %d'%(0))
for ti in t1:
    print(ti.shape)

print('dim %d'%(1))
t1 = torch.chunk(a, 2, dim = 1)
for ti in t1:
    print(ti.shape)

print('dim %d'%(2))
t1 = torch.chunk(a, 2, dim = 2)
for ti in t1:
    print(ti.shape)
a torch.Size([6, 256, 10, 10])
dim 0
torch.Size([3, 256, 10, 10])
torch.Size([3, 256, 10, 10])
dim 1
torch.Size([6, 128, 10, 10])
torch.Size([6, 128, 10, 10])
dim 2
torch.Size([6, 256, 5, 10])
torch.Size([6, 256, 5, 10])
torch.repeat()&np.tile()
参数为沿着不同维度的扩展, 对于一个给定的tensor 给出其dims以及repeat的次数,类似于np.tile
由后往前进行匹配, 若超出当前的dims, 则新建一个dim, 进行repeat
当超出tensor 本身的 dims时,第一个dim 新起一个dim, 即沿着batch方向进行扩展
参考资料见
https://pytorch.org/docs/stable/generated/torch.Tensor.repeat.html?highlight=repeat#torch.Tensor.repeat
a = torch.tensor([1, 2, 3])
print(a.shape)
t1 = a.repeat(5, 2)
print('-'*10);print(t1.shape, a.shape); print(a,'\n', t1)

t1 = a.repeat(2, 3, 2)
print('-'*10);print(t1.shape, a.shape); print(a,'\n', t1)

a = torch.tensor([[1, 2, 3], [4, 5, 6]])
print(a.shape)

t1 = a.repeat([1, 1])
print('-'*10);print(t1.shape, a.shape); print(a,'\n', t1)

t1 = a.repeat([2, 1]) # dim0 repeat 2
print('-'*10);print(t1.shape, a.shape); print(a,'\n', t1)

t1 = a.repeat([1, 2]) # dim1 repeat 2
print('-'*10);print(t1.shape, a.shape); print(a,'\n', t1)

t1 = a.repeat([2, 1, 1])
print('-'*10);print(t1.shape, a.shape); print(a,'\n', t1)
torch.Size([3])
----------
torch.Size([5, 6]) torch.Size([3])
tensor([1, 2, 3])
 tensor([[1, 2, 3, 1, 2, 3],
        [1, 2, 3, 1, 2, 3],
        [1, 2, 3, 1, 2, 3],
        [1, 2, 3, 1, 2, 3],
        [1, 2, 3, 1, 2, 3]])
----------
torch.Size([2, 3, 6]) torch.Size([3])
tensor([1, 2, 3])
 tensor([[[1, 2, 3, 1, 2, 3],
         [1, 2, 3, 1, 2, 3],
         [1, 2, 3, 1, 2, 3]],

        [[1, 2, 3, 1, 2, 3],
         [1, 2, 3, 1, 2, 3],
         [1, 2, 3, 1, 2, 3]]])
torch.Size([2, 3])
----------
torch.Size([2, 3]) torch.Size([2, 3])
tensor([[1, 2, 3],
        [4, 5, 6]])
 tensor([[1, 2, 3],
        [4, 5, 6]])
----------
torch.Size([4, 3]) torch.Size([2, 3])
tensor([[1, 2, 3],
        [4, 5, 6]])
 tensor([[1, 2, 3],
        [4, 5, 6],
        [1, 2, 3],
        [4, 5, 6]])
----------
torch.Size([2, 6]) torch.Size([2, 3])
tensor([[1, 2, 3],
        [4, 5, 6]])
 tensor([[1, 2, 3, 1, 2, 3],
        [4, 5, 6, 4, 5, 6]])
----------
torch.Size([2, 2, 3]) torch.Size([2, 3])
tensor([[1, 2, 3],
        [4, 5, 6]])
 tensor([[[1, 2, 3],
         [4, 5, 6]],

        [[1, 2, 3],
         [4, 5, 6]]])
2.2 torch生成grid函数
-
torch.arange类似于np.arange[left, right), not include right. -
torch.linspace包括left, right, 且分割为若干个点 -
torch.meshgrid叠加后生成 x 和 y (opencv坐标系)下两个h*w的tensor。为了组装为后期可以用的点,所以需要先翻转后使用。
xs = torch.linspace(-10, 10, 10)
ys = torch.linspace(-5, 5, 10)


x, y = torch.meshgrid(xs, ys, indexing='ij')
z = x + y

ax = plt.axes(projection= '3d')
ax.plot_surface(x.numpy(), y.numpy(), z.numpy())
plt.show()
[外链图片转存失败,源站可能有防盗链机制,建议将图片保存下来直接上传(img-m1idlV1z-1692628397282)(output_15_0.png)]

def coords_grid(batch, ht, wd, device, ifReverse = True):
    #ht,wd 55, 128
    coords = torch.meshgrid(torch.arange(ht, device=device), torch.arange(wd, device=device))

    if ifReverse:
        #NOTE, coords 为 x, y (opencv 坐标系下), y, x (numpy 坐标系)
        coords = torch.stack(coords[::-1], dim=0).float() # coords shape [ 2, ht, wd]
    else:
        #NOTE coords 为 x, y (numpy 坐标系下)
        coords = torch.stack(coords, dim=0).float()
    # 通过[::-1]转变为 y, x(numpy 坐标系)
    #coords = torch.reshape(coords, [1, 2, ht, wd])
    coords = coords.repeat(batch, 1, 1, 1)
    return coords
DEVICE = 'cuda'
grid_opencv = coords_grid(2, 12, 5, DEVICE, ifReverse=True)
grid_numpy = coords_grid(2, 12, 5, DEVICE, ifReverse= False)

print(grid_numpy.shape, grid_opencv.shape)

def visualize_grid(grid):
    # sample 1, x & y
    plot_x = grid[0, 0, :, :].reshape([-1]).cpu().numpy()
    plot_y = grid[0, 1, :, :].reshape([-1]).cpu().numpy()

    return plot_x, plot_y

plt.figure(figsize=(8,6))
for pici, grid in enumerate([grid_opencv, grid_numpy]):
    plt.subplot(2, 1, pici + 1)
    plt.title(['opencv', 'numpy'][pici])
    plot_x, plot_y = visualize_grid(grid)
    for i in range(len(plot_x)):
        plt.scatter([plot_x[i]], [plot_y[i]], c = 'grey', marker = 'o')
        plt.annotate(xy = (plot_x[i], plot_y[i]), s= str(i))

plt.show()
/home/chwei/.local/lib/python3.6/site-packages/torch/functional.py:445: UserWarning: torch.meshgrid: in an upcoming release, it will be required to pass the indexing argument. (Triggered internally at  ../aten/src/ATen/native/TensorShape.cpp:2157.)
  return _VF.meshgrid(tensors, **kwargs)  # type: ignore[attr-defined]


torch.Size([2, 2, 12, 5]) torch.Size([2, 2, 12, 5])
[外链图片转存失败,源站可能有防盗链机制,建议将图片保存下来直接上传(img-4XGp96GA-1692628397283)(output_17_2.png)]
3.1 数学运算
add/sub/mul/div加减乘除
a = torch.rand(3, 4)
b = torch.rand(4) # 这里基于pytorch 的broadcasting进行了dim 0的 broadcast

c = a + b

print(a.shape, b.shape, c.shape)
#print(a+b)
#print(torch.add(a, b))

print(torch.all(torch.eq(a-b, torch.sub(a, b))))
print(torch.all(torch.eq(a*b, torch.mul(a, b))))
print(torch.all(torch.eq(a/b, torch.div(a, b))))
torch.Size([3, 4]) torch.Size([4]) torch.Size([3, 4])
tensor(True)
tensor(True)
tensor(True)
3.2 torch.matmul函数
-
基础case 1: 两个tensor 都是1 dim, If both tensors are 1-dimensional, the dot product (scalar) is returned.
-
基础case 2: 两个tensor 都是2 dims, If both arguments are 2-dimensional, the matrix-matrix product is returned.
-
基础case 3: 一个tensor 是1 dim, 另外一个 2dim. tensor with 1 dim进行扩展到2dim, 以适应 matrix-product
If the first argument is 1-dimensional and the second argument is 2-dimensional, a 1 is prepended to its dimension for the purpose of the matrix multiply. After the matrix multiply, the prepended dimension is removed.
If the first argument is 2-dimensional and the second argument is 1-dimensional, the matrix-vector product is returned. -
基础case 4: Batch Brocasted & batch matrix-product
思路: 把 first dim (batch dim) 排除, 每个sample 进行 matrix-product or vector product
若 有一个tensor 其维度不匹配, 沿着batch dim进行扩展broadcast之后计算
If both arguments are at least 1-dimensional and at least one argument is N-dimensional (where N > 2), then a batched matrix multiply is returned.
If the first argument is 1-dimensional, a 1 is prepended to its dimension for the purpose of the batched matrix multiply and removed after.
If the second argument is 1-dimensional, a 1 is appended to its dimension for the purpose of the batched matrix multiple and removed after.
The non-matrix (i.e. batch) dimensions are broadcasted (and thus must be broadcastable).
For example, if input is a ( j × 1 × n × n ) ( j × 1 × n × n ) (j \times 1 \times n \times n)(j×1×n×n) (j×1×n×n)(j×1×n×n) tensor and other is a ( k × n × n ) ( k × n × n ) (k \times n \times n)(k×n×n) (k×n×n)(k×n×n) tensor, out will be a ( j × k × n × n ) ( j × k × n × n ) (j \times k \times n \times n)(j×k×n×n) (j×k×n×n)(j×k×n×n) tensor.
这里 j j j 是 batch dim, 而 matrix product 执行的位置在于$ (1 \times n \times n) \times (k \times n \times n) $
Note that the broadcasting logic only looks at the batch dimensions when determining if the inputs are broadcastable, and not the matrix dimensions.
For example, if input is a ( j × 1 × n × m ) ( j × 1 × n × m ) (j \times 1 \times n \times m)(j×1×n×m) (j×1×n×m)(j×1×n×m) tensor and other is a ( k × m × p ) ( k × m × p ) (k \times m \times p)(k×m×p) (k×m×p)(k×m×p) tensor, these inputs are valid for broadcasting even though the final two dimensions (i.e. the matrix dimensions) are different. out will be a ( j × k × n × p ) ( j × k × n × p ) (j \times k \times n \times p)(j×k×n×p) (j×k×n×p)(j×k×n×p) tensor.
# vector x vector case 1
tensor1 = torch.randn(3)
tensor2 = torch.randn(3)
out = torch.matmul(tensor1, tensor2)
print('input', tensor1.shape, tensor2.shape, 'output',out.shape)
# matrix x matrix case 2
tensor1 = torch.randn(3, 1)
tensor2 = torch.randn(1, 3)
out = torch.matmul(tensor1, tensor2)
print('input', tensor1.shape, tensor2.shape, 'output',out.shape)

# matrix x vector case 3
tensor1 = torch.randn(3, 4)
tensor2 = torch.randn(4)
out = torch.matmul(tensor1, tensor2)
print('input', tensor1.shape, tensor2.shape, 'output',out.shape)

# batched matrix x broadcasted vector
tensor1 = torch.randn(10, 3, 4) # first dim is batch dim
tensor2 = torch.randn(4)
out = torch.matmul(tensor1, tensor2)
print('input', tensor1.shape, tensor2.shape, 'output',out.shape)

# batched matrix x batched matrix
tensor1 = torch.randn(10, 3, 4) # first dim is batch dim
tensor2 = torch.randn(10, 4, 5) # first dim is batch dim
out = torch.matmul(tensor1, tensor2)
# matrix product (3 * 4 ) * (4 * 5) -> 3 * 5
print('input', tensor1.shape, tensor2.shape, 'output',out.shape)


# batched matrix x broadcasted matrix
tensor1 = torch.randn(10, 3, 4) # first dim is batch dim
tensor2 = torch.randn(4, 5)
out = torch.matmul(tensor1, tensor2)
# matrix product (3 * 4 ) * (4 * 5) -> 3 * 5
print('input', tensor1.shape, tensor2.shape, 'output',out.shape)
input torch.Size([3]) torch.Size([3]) output torch.Size([])
input torch.Size([3, 1]) torch.Size([1, 3]) output torch.Size([3, 3])
input torch.Size([3, 4]) torch.Size([4]) output torch.Size([3])
input torch.Size([10, 3, 4]) torch.Size([4]) output torch.Size([10, 3])
input torch.Size([10, 3, 4]) torch.Size([10, 4, 5]) output torch.Size([10, 3, 5])
input torch.Size([10, 3, 4]) torch.Size([4, 5]) output torch.Size([10, 3, 5])
3.3 pow矩阵的次方以及sqrt/rsqrt/exp/log
a =torch.full([2, 2], 3) # 使用torch.full函数创建一个shape[2, 2],元素全部为3的张量
print(a.pow(2))
print(torch.pow(a, 2))
print(a**2)

b = a**2
print(b.sqrt())
print(b.rsqrt())         # 平方根的导数

print('=============================')
a = torch.exp(torch.ones(2, 2))
print(a)
print(torch.log(a))     # 默认以e为底,使用2为底或者其他的,自己设置.
tensor([[9, 9],
        [9, 9]])
tensor([[9, 9],
        [9, 9]])
tensor([[9, 9],
        [9, 9]])
tensor([[3., 3.],
        [3., 3.]])
tensor([[0.3333, 0.3333],
        [0.3333, 0.3333]])
=============================
tensor([[2.7183, 2.7183],
        [2.7183, 2.7183]])
tensor([[1., 1.],
        [1., 1.]])
3.4 round矩阵近似运算
.floor()向下取整,.ceil()向上取整,.trunc()截取整数,.frac截取小数。
a = torch.tensor(3.14)
# .floor()向下取整,.ceil()向上取整,.trunc()截取整数,.frac截取小数。
print(a.floor(), a.ceil(), a.trunc(), a.frac())

print(a.round())
b = torch.tensor(3.5)
print(b.round())
tensor(3.) tensor(4.) tensor(3.) tensor(0.1400)
tensor(3.)
tensor(4.)
3.6. clamp(裁剪)用的多
主要用在梯度裁剪里面,梯度离散(不需要从网络层面解决,因为梯度非常小,接近0)和梯度爆炸(梯度非常大,100已经算是大的了)。因此在网络训练不稳定的时候,可以打印一下梯度的模看看,w.grad.norm(2)表示梯度的二范数(一般100,1000已经算是大的了,一般10以内算是合适的)。
a.clamp(min):表示tensor a中小于10的都赋值为10,表示最小值为10;
grad = torch.rand(2, 3)*15
print(grad)
print(grad.max(), grad.median(), grad.min())
print('============================================')
print(grad.clamp(10))     # 最小值限定为10,小于10的都变为10;

print(grad.clamp(8, 15))
print(torch.clamp(grad, 8, 15))
tensor([[ 3.7078, 11.4988,  7.9875],
        [ 0.6747,  0.6269, 12.3761]])
tensor(12.3761) tensor(3.7078) tensor(0.6269)
============================================
tensor([[10.0000, 11.4988, 10.0000],
        [10.0000, 10.0000, 12.3761]])
tensor([[ 8.0000, 11.4988,  8.0000],
        [ 8.0000,  8.0000, 12.3761]])
tensor([[ 8.0000, 11.4988,  8.0000],
        [ 8.0000,  8.0000, 12.3761]])
4. 统计属性相关操作 TODO
4.1. norm范数,prod张量元素累乘(阶乘)
4.2. mean/sum/max/min/argmin/argmax
4.3. kthvalue()和topk()
这里: topk(3, dim=1)(最大的3个)返回结果如下图所示,如果把largest设置为False就是默认最小的几个。
这里: kthvalue(k,dim=1)表示第k小的(默认表示小的)。下面图中的一共10中可能,第8小就是表示第3大。
4.4. 比较运算符号>,>=,<,<=,!=,==
greater than表示大于等于。equal表示等于eq。
5. batch检索
torch.where, gather, index_select, masked_select, nonzero函数
TODO: https://www.cnblogs.com/liangjianli/p/13754817.html#3-gather%E5%87%BD%E6%95%B0
5.1 torch.where
高阶操作where和gather
5.2 torch.gather
TODO 依旧不是很理解,没有完全理解
gather 收集输入的特定维度指定位置的数值
注意,torch.gather里的index tensor必须是longtensor类型
- 官方解释
https://pytorch.org/docs/stable/generated/torch.gather.html?highlight=gather#torch.gather
out[i][j][k] = input[index[i][j][k]][j][k]  # if dim == 0
out[i][j][k] = input[i][index[i][j][k]][k]  # if dim == 1
out[i][j][k] = input[i][j][index[i][j][k]]  # if dim == 2
a = torch.rand([4, 5])
indexes = torch.LongTensor([[4, 2],[3, 1],[2, 4],[1,2]])

# 这个在q-learning中的batch actions中常见,注意一下
a_ = torch.gather(a, dim = 1, index = indexes)

print(a.shape, a_.shape, '\n', a, '\n', a_)


indexes = torch.LongTensor([[ 0, 2, 2], [1, 2, 3]])
a_ = torch.gather(a, dim = 0, index = indexes)
print(a.shape, a_.shape, '\n', a, '\n', a_)
torch.Size([4, 5]) torch.Size([4, 2])
 tensor([[0.1330, 0.2177, 0.2177, 0.3287, 0.0809],
        [0.1803, 0.4438, 0.9827, 0.6353, 0.3548],
        [0.4980, 0.6792, 0.3885, 0.6338, 0.4985],
        [0.8367, 0.4682, 0.0805, 0.6161, 0.4861]])
 tensor([[0.0809, 0.2177],
        [0.6353, 0.4438],
        [0.3885, 0.4985],
        [0.4682, 0.0805]])
torch.Size([4, 5]) torch.Size([2, 3])
 tensor([[0.1330, 0.2177, 0.2177, 0.3287, 0.0809],
        [0.1803, 0.4438, 0.9827, 0.6353, 0.3548],
        [0.4980, 0.6792, 0.3885, 0.6338, 0.4985],
        [0.8367, 0.4682, 0.0805, 0.6161, 0.4861]])
 tensor([[0.1330, 0.6792, 0.3885],
        [0.1803, 0.6792, 0.0805]])
10. torch vision下的一些操作
10.1 F.grid_sample
根据位置 对 batch 里的 feature flow 进行采样,可以理解为index, 但本函数允许index里为float类型(采用bilinear插值实现)
函数
torch.nn.functional.grid_sample(input, grid, mode='bilinear', padding_mode='zeros', align_corners=None)
iven an input and a flow-field grid, computes the output using input values and pixel locations from grid.
input: (N, C, Hin, Win)
grid: (N, Hout, Wout, 2) , 其中最后一维为opencv 坐标系下的x & y,
output: (N, C, Hout, Wout)
NOTE,输入的grid,需根据 input 的Hin, Win进行归一化到 -1 ~ 1,
grid specifies the sampling pixel locations normalized by the input spatial dimensions.
Therefore, it should have most values in the range of [-1, 1]. For example, values x = -1, y = -1 is the left-top pixel of input, and values x = 1, y = 1 is the right-bottom pixel of input.
参考资料:https://pytorch.org/docs/stable/generated/torch.nn.functional.grid_sample.html?highlight=grid_sample#torch.nn.functional.grid_sample
以下通过图片展示如何使用:
DEVICE = 'cuda'

def load_image(imfile):
    img = np.array(Image.open(imfile)).astype(np.uint8)
    img = torch.from_numpy(img).permute(2, 0, 1).float() # h, w, dim -> dim, h, w
    return img.to(DEVICE)

def visualize(img):
    #input imgshape: 3, w, h
    # NOTE, dims convert, device convert, numpy convert, and dtype convert
    return img.permute(1, 2, 0).cpu().numpy().astype(np.uint8)

def coords_grid(batch, ht, wd, device, ifReverse = True):
    #ht,wd 55, 128
    coords = torch.meshgrid(torch.arange(ht, device=device), torch.arange(wd, device=device))

    if ifReverse:
        #NOTE, coords 为 x, y (opencv 坐标系下), y, x (numpy 坐标系)
        coords = torch.stack(coords[::-1], dim=0).float() # coords shape [ 2, ht, wd]
    else:
        #NOTE coords 为 x, y (numpy 坐标系下)
        coords = torch.stack(coords, dim=0).float()
    # 通过[::-1]转变为 y, x(numpy 坐标系)
    #coords = torch.reshape(coords, [1, 2, ht, wd])
    coords = coords.repeat(batch, 1, 1, 1)
    return coords
# 载入图片并显示
img1, img2 = load_image('demo-frames/frame_0016.png'), load_image('demo-frames/frame_0017.png')

inputImg = torch.cat([img1.unsqueeze(0), img2.unsqueeze(0)], 0)
print(img1.shape, img2.shape, inputImg.shape)
 #------ visualize -----------
img1_, img2_ = visualize(img1), visualize(img2)

plt.subplot(2, 1, 1)
plt.imshow(img1_)

plt.subplot(2, 1, 2)
plt.imshow(img2_)
plt.show()
torch.Size([3, 436, 1024]) torch.Size([3, 436, 1024]) torch.Size([2, 3, 436, 1024])
[外链图片转存失败,源站可能有防盗链机制,建议将图片保存下来直接上传(img-zA8xwrlK-1692628397284)(output_36_1.png)]
# 生成grid
hImg, wImg = img1.shape[-2:]


grid =  coords_grid(batch = 2, ht = 100, wd = 100, device = 'cuda', ifReverse = True)
print(grid.shape) # dim 1: y & x(numpy 坐标系), x & y (opencv坐标系)
torch.Size([2, 2, 100, 100])
# grid归一化操作
grid = grid.permute(0, 2, 3, 1)
ygrid, xgrid = grid.split([1, 1], dim = -1) # 这里的xgrid, ygrid指的是 numpy 坐标系
print(grid.shape, xgrid.shape, ygrid.shape)

ygrid = 2 * ygrid/(wImg - 1) -1
xgrid = 2 * xgrid/(hImg - 1) -1

grid = torch.cat([ygrid, xgrid], dim=-1)
grid = grid.to(DEVICE)
# 输入的grid 最后一维为 opencv坐标系下的x & y

inputImg_ = F.grid_sample(inputImg, grid, align_corners=True) # size 7040, 1, 9,9
torch.Size([2, 100, 100, 2]) torch.Size([2, 100, 100, 1]) torch.Size([2, 100, 100, 1])
plt.subplot(1, 2, 1)
img_i = visualize(inputImg[0, :, :, :])
plt.imshow(img_i)
plt.subplot(1, 2, 2)

img_o = visualize(inputImg_[0, :, :, :])
plt.imshow(img_o)
plt.show()

print(inputImg.shape, img_i.shape, img_o.shape)
[外链图片转存失败,源站可能有防盗链机制,建议将图片保存下来直接上传(img-l9dvPqBJ-1692628397285)(output_39_0.png)]
torch.Size([2, 3, 436, 1024]) (436, 1024, 3) (100, 100, 3)
上/下采样 方法1
F.interpolate
功能:利用插值方法,对输入的张量数组进行上\下采样操作,换句话说就是科学合理地改变数组的尺寸大小,尽量保持数据完整。
官方文档: https://pytorch.org/docs/stable/generated/torch.nn.functional.interpolate.html?highlight=f%20interpolate#torch.nn.functional.interpolate
img1, img2 = load_image('demo-frames/frame_0016.png'), load_image('demo-frames/frame_0017.png')
inputImg = torch.cat([img1.unsqueeze(0), img2.unsqueeze(0)], 0)
print(img1.shape, img2.shape, inputImg.shape)
torch.Size([3, 436, 1024]) torch.Size([3, 436, 1024]) torch.Size([2, 3, 436, 1024])
new_size = (2* inputImg.shape[2], 2 * inputImg.shape[3])
mode = 'bilinear'
inputImg_ = F.interpolate(inputImg, size=new_size, mode=mode, align_corners=True)
plt.subplot(2, 1, 1)
img_i = visualize(inputImg[0, :, :, :])
plt.imshow(img_i)
plt.subplot(2, 1, 2)
img_o = visualize(inputImg_[0, :, :, :])
plt.imshow(img_o)
plt.show()

print(inputImg.shape, img_i.shape, img_o.shape)
[外链图片转存失败,源站可能有防盗链机制,建议将图片保存下来直接上传(img-CNtrY6FN-1692628397286)(output_43_0.png)]
torch.Size([2, 3, 436, 1024]) (436, 1024, 3) (872, 2048, 3)