目录
一、ChatGLM的int8量化
二、全流程量化
三、量化校准
目前随着模型规模越来越大,对于没有很多算力的人来说,使用大模型的门槛越来越高,因此ChatGLM提供的模型支持,fp16、int8和int4的量化,来降低加载模型的显存,让更多的人能使用该大模型。两三年之前把玩过tensort fp16 量化加速Bert,但是并没有好好研究模型量化的原理细节,以及int8的量化如何实现。所以近期借着ChatGLM的源码把它的int8实现方案弄懂了,发现其实它的方案比较简单,只是对权重weight进行了量化和反量化(weightOnly),并没有完整的对weight和activation进行量化。因此也把activation和weight的int8 量化的一些知识进行了梳理,写下该篇博文。
一、ChatGLM的int8量化
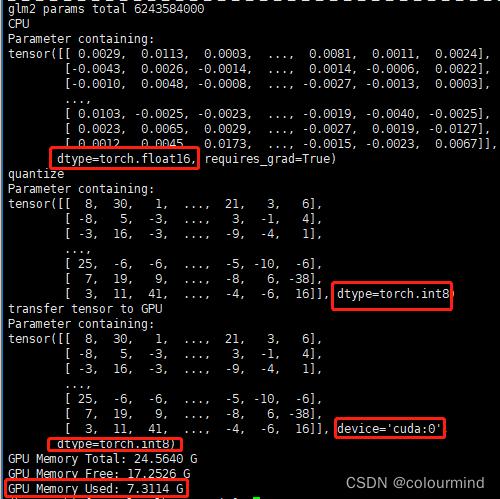
首先直接看看chatGLm2-6B在未采用量化和采用量化的显存占用和推理时间对比。加载模型是的显存占用和权重查看,未量化和量化代码如下:
import os
os.environ['CUDA_VISIBLE_DEVICES'] = '1'
from transformers import AutoModel, AutoTokenizer
device = 1
import pynvml

def static_gpu_memory(device):
    pynvml.nvmlInit()  # 初始化
    handle = pynvml.nvmlDeviceGetHandleByIndex(device)
    memo_info = pynvml.nvmlDeviceGetMemoryInfo(handle)
    print("GPU Memory Total: %.4f G" % (memo_info.total / 1024 / 1024 / 1000))
    print("GPU Memory Free: %.4f G" % (memo_info.free / 1024 / 1024 / 1000))
    print("GPU Memory Used: %.4f G" % (memo_info.used / 1024 / 1024 / 1000))

def glm2_noquantize():
    # tokenizer = AutoTokenizer.from_pretrained("/AI_TEAM/cbfeng/ChatGLM-6B-main/THUDM/chatglm2-6b",
    #                                           trust_remote_code=True)
    # model = AutoModel.from_pretrained("/AI_TEAM/cbfeng/ChatGLM-6B-main/THUDM/chatglm-6b",trust_remote_code=True,device_map='auto')
    model = AutoModel.from_pretrained("/AI_TEAM/cbfeng/ChatGLM-6B-main/THUDM/chatglm2-6b", trust_remote_code=True)
    total = 0
    for _, param in model.named_parameters():
        if len(param.shape) == 1:
            total += param.shape[0]
        else:
            total += param.shape[0] * param.shape[1]

    print(f'glm2 params total {total}')
    print(model)
    for layer in model.transformer.encoder.layers:
        weight = layer.self_attention.query_key_value.weight
        print(weight.dtype)
        print(weight)
        break
    model.cuda()
    for layer in model.transformer.encoder.layers:
        weight = layer.self_attention.query_key_value.weight
        print(weight.dtype)
        print(weight)
        break
    static_gpu_memory(device)


def glm2_quantize(bits=8):
    # tokenizer = AutoTokenizer.from_pretrained("/AI_TEAM/cbfeng/ChatGLM-6B-main/THUDM/chatglm2-6b",
    #                                           trust_remote_code=True)
    model = AutoModel.from_pretrained("/AI_TEAM/cbfeng/ChatGLM-6B-main/THUDM/chatglm2-6b", trust_remote_code=True)
    total = 0
    for _,param in model.named_parameters():
        if len(param.shape) == 1:
            total += param.shape[0]
        else:
            total += param.shape[0] * param.shape[1]

    print(f'glm2 params total {total}')
    print("CPU")
    for layer in model.transformer.encoder.layers:
        weight = layer.self_attention.query_key_value.weight
        print(weight)
        break
    print("quantize")
    model = model.quantize(bits)
    # print(model)
    for layer in model.transformer.encoder.layers:
        weight = layer.self_attention.query_key_value.weight
        print(weight)
        break
    print("transfer tensor to GPU")
    model.cuda()
    for layer in model.transformer.encoder.layers:
        weight = layer.self_attention.query_key_value.weight
        print(weight)
        break
    static_gpu_memory(device)

if __name__ == '__main__':
    # glm2_noquantize()
    bits = 8
    glm2_quantize(bits)
运行结果如下:
不采用量化

采用量化
生成耗时,输入——你好呀,请问你是谁?代码如下:
import os
os.environ['CUDA_VISIBLE_DEVICES'] = '1'
from transformers import AutoModel, AutoTokenizer
device = 1
import pynvml
from transformers.generation.utils import LogitsProcessorList
from transformers.generation.logits_process import LogitsProcessor
import time

import torch
class InvalidScoreLogitsProcessor(LogitsProcessor):
    def __call__(self, input_ids: torch.LongTensor, scores: torch.FloatTensor) -> torch.FloatTensor:
        if torch.isnan(scores).any() or torch.isinf(scores).any():
            scores.zero_()
            scores[..., 5] = 5e4
        return scores

def glm2_noquantize_inference():
    tokenizer = AutoTokenizer.from_pretrained("/AI_TEAM/cbfeng/ChatGLM-6B-main/THUDM/chatglm2-6b",
                                              trust_remote_code=True)
    # model = AutoModel.from_pretrained("/AI_TEAM/cbfeng/ChatGLM-6B-main/THUDM/chatglm-6b",trust_remote_code=True,device_map='auto')
    model = AutoModel.from_pretrained("/AI_TEAM/cbfeng/ChatGLM-6B-main/THUDM/chatglm2-6b", trust_remote_code=True).cuda()
    max_length = 1024
    do_sample = True
    top_p = 0.9
    temperature = 0.95
    logits_processor = LogitsProcessorList()
    logits_processor.append(InvalidScoreLogitsProcessor())
    gen_kwargs = {"max_length": max_length, "do_sample": do_sample, "top_p": top_p,
                  "temperature": temperature, "logits_processor": logits_processor}
    text = "你好呀,请问你是谁?"
    t1 = time.time()
    total = 0
    for i in range(20):
        input_ids = tokenizer([text], return_tensors="pt", padding=True)
        input_ids = input_ids.to("cuda")
        outputs = model.generate(**input_ids, **gen_kwargs)
        outputs = outputs.cpu().tolist()[0][len(input_ids["input_ids"][0]):]
        response = tokenizer.decode(outputs)
        total += len(response)
        if i == 19:
            print(response.replace("\n\n","\n"))
    t2 = time.time()
    print(f"glm2_noquantize_inference total time {round(t2-t1,4)} s total tokens {total} each token time cost is {round(1000*(t2-t1)/total,4)} ms")


def glm2_quantize_inference():
    tokenizer = AutoTokenizer.from_pretrained("/AI_TEAM/cbfeng/ChatGLM-6B-main/THUDM/chatglm2-6b",
                                              trust_remote_code=True)
    # model = AutoModel.from_pretrained("/AI_TEAM/cbfeng/ChatGLM-6B-main/THUDM/chatglm-6b",trust_remote_code=True,device_map='auto')
    model = AutoModel.from_pretrained("/AI_TEAM/cbfeng/ChatGLM-6B-main/THUDM/chatglm2-6b", trust_remote_code=True).quantize(8).cuda()
    max_length = 1024
    do_sample = True
    top_p = 0.9
    temperature = 0.95
    logits_processor = LogitsProcessorList()
    logits_processor.append(InvalidScoreLogitsProcessor())
    gen_kwargs = {"max_length": max_length, "do_sample": do_sample, "top_p": top_p,
                  "temperature": temperature, "logits_processor": logits_processor}
    text = "你好呀,请问你是谁?"
    t1 = time.time()
    total = 0
    for i in range(20):
        input_ids = tokenizer([text], return_tensors="pt", padding=True)
        input_ids = input_ids.to("cuda")
        outputs = model.generate(**input_ids, **gen_kwargs)
        outputs = outputs.cpu().tolist()[0][len(input_ids["input_ids"][0]):]
        response = tokenizer.decode(outputs)
        total += len(response)
        if i == 19:
            print(response.replace("\n\n", "\n"))
    t2 = time.time()
    print(f"glm2_noquantize_inference total time {round(t2-t1,4)} s total tokens {total} each token time cost is {round(1000*(t2-t1)/total,4)} ms")

if __name__ == '__main__':
    glm2_noquantize_inference()

    glm2_quantize_inference()
结果如下:
未量化
我是 ChatGLM2-6B,是清华大学KEG实验室和智谱AI公司共同训练的语言模型。
glm2_noquantize_inference total time 10.3523 s total tokens 605 each token time cost is 17.1112 ms
量化
我是 ChatGLM2-6B,是清华大学KEG实验室和智谱AI公司共同训练的语言模型。我的任务是针对用户的问题和要求提供适当的答复和支持。你有什么问题需要帮助吗?
glm2_noquantize_inference total time 21.3963 s total tokens 579 each token time cost is 36.9539 ms
从效果来看,ChatGLM2-6B不量化的时候加载模型参数显存占用12.8G左右,生成每个token耗时17ms;采用其int8量化占用显存7.3G,生成每个token耗时37ms。也就是说chatGLM的量化并没有加速推理的能力,只有降低显存的能力。
ChatGLM2的int8量化实现细节
量化整体流程示意图如下
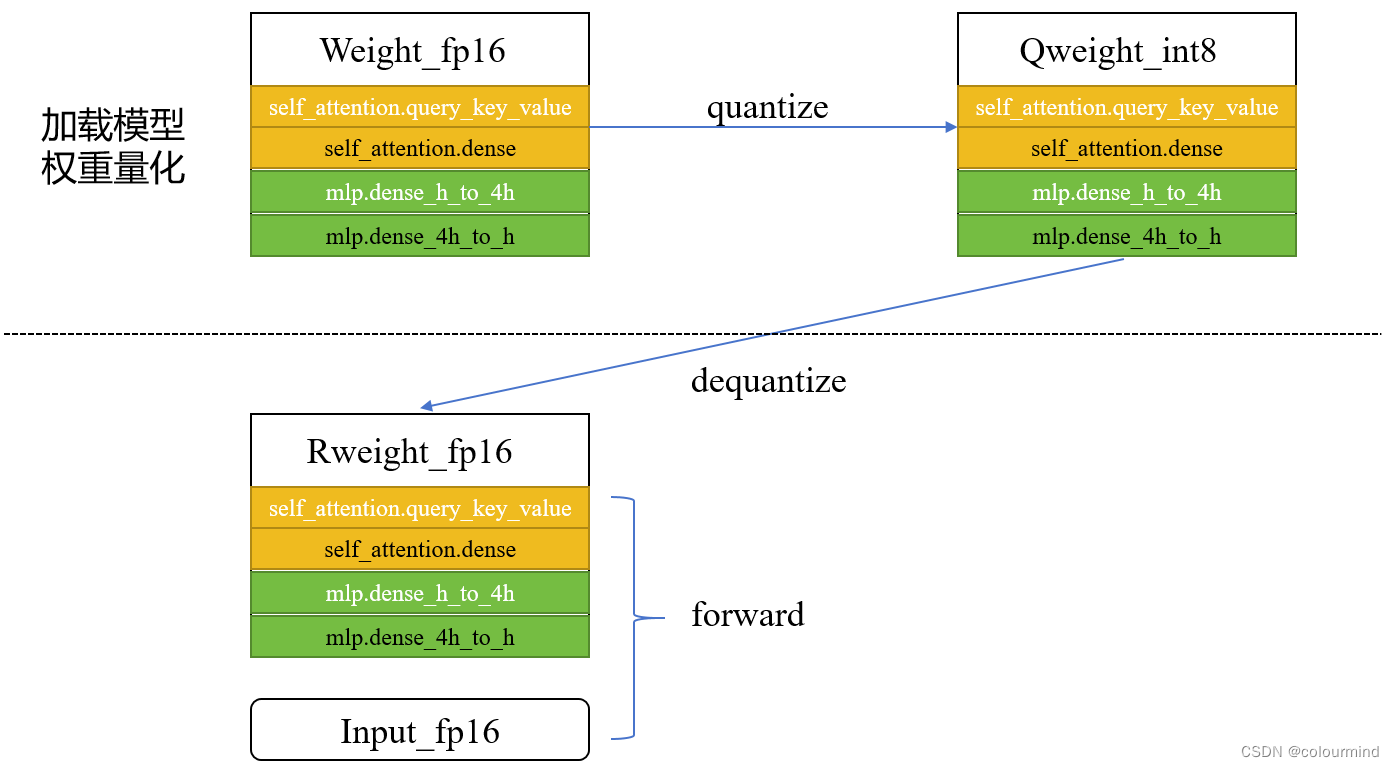
1、加载模型权重量化
加载模型的fp16权重,采用min_max对weight_fp16进行int8量化,得到Qweight_int8
2、前向推理反量化
在推理的时候,把上述的Qweight_int8进行反量化得到新的权重Rweight_fp16,然后由这个新权重和输入input_fp16完成后面的前向计算
注意的是模型量化attention模块和mlp相应的权重,没有对输入也进行量化。同时前向计算过程中,相比没有量化的时候,多了一次反量化的计算,而计算精度仍然是fp16之间的计算,所以整体耗时会增加。
量化代码
if weight is None or empty_init:
    self.weight = torch.empty(shape[0], shape[1] * weight_bit_width // 8, dtype=torch.int8, device=device)
    self.weight_scale = torch.empty(shape[0], dtype=dtype, device=device)
else:
    self.weight_scale = weight.abs().max(dim=-1).values / ((2 ** (weight_bit_width - 1)) - 1)
    self.weight = torch.round(weight / self.weight_scale[:, None]).to(torch.int8)
    if weight_bit_width == 4:
                self.weight = compress_int4_weight(self.weight)
可以看到对权重的量化是先采用min_max计算scale,然后权重值除以scale,取整转化为int8类型。
反量化和推理代码
class W8A16Linear(torch.autograd.Function):
    @staticmethod
    def forward(ctx, inp: torch.Tensor, quant_w: torch.Tensor, scale_w: torch.Tensor, weight_bit_width):
        ctx.inp_shape = inp.size()
        ctx.weight_bit_width = weight_bit_width
        out_features = quant_w.size(0)
        inp = inp.contiguous().view(-1, inp.size(-1))
        weight = extract_weight_to_half(quant_w, scale_w, weight_bit_width)
        ctx.weight_shape = weight.size()
        output = inp.mm(weight.t())
        ctx.save_for_backward(inp, quant_w, scale_w)
        return output.view(*(ctx.inp_shape[:-1] + (out_features,)))

    @staticmethod
    def backward(ctx, grad_output: torch.Tensor):
        inp, quant_w, scale_w = ctx.saved_tensors
        weight = extract_weight_to_half(quant_w, scale_w, ctx.weight_bit_width)
        grad_output = grad_output.contiguous().view(-1, weight.size(0))
        grad_input = grad_output.mm(weight)
        grad_weight = grad_output.t().mm(inp)
        return grad_input.view(ctx.inp_shape), grad_weight.view(ctx.weight_shape), None, None

def extract_weight_to_half(weight: torch.Tensor, scale_list: torch.Tensor, source_bit_width: int):
    assert scale_list.dtype in [torch.half, torch.bfloat16]
    assert weight.dtype in [torch.int8]
    return weight.to(scale_list.dtype) * scale_list[:, None]
二、全流程量化
这里的全流程量化指的是包含了激活值和权重两部分量化,在保证模型性能降低的不多的同时,还能减少推理时间。当然要取得这样的效果,需要做好量化和反量化的算法优化,以及适配不同硬件的优化,特别是在大模型上更加困难。
量化的基本公式
量化包含了量化和反量化,量化原理是把高精度的数值转化为低精度,降低存储消耗,同时低精度的计算也能减少计算耗时。反量化就是把低精度转化为之前的进度。基本公式如下:

其中r是浮点数,q是量化后的整数,round表示去整数;s是scale,表示浮点数和整数之间的量化因子,Z是zero point表示浮点数中的0经过量化后的整数值。计算方法如下:

min和max分别表示最小值和最大值,注意的是Z是没有进度损失的。只有在q和r间存在精度损失。
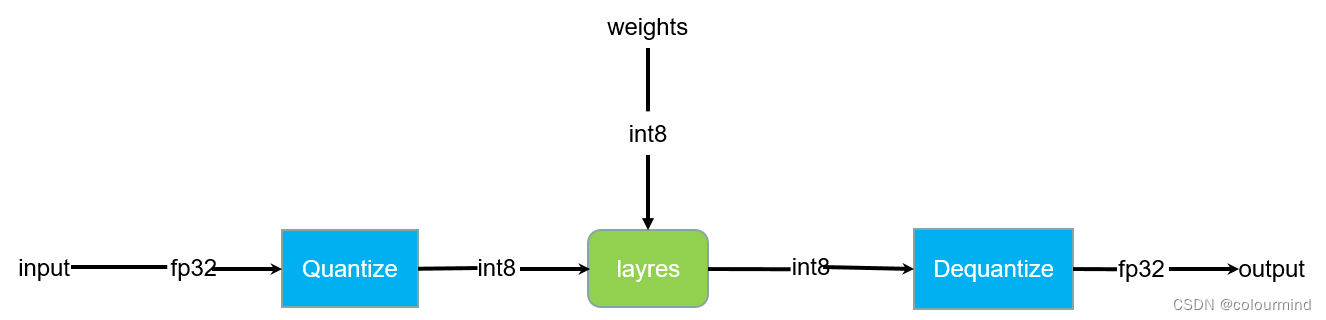
activation和weight量化示意图
输入也把fp32量化为int8,然后和量化后的int8权重进行int8的计算,直到模型的输出,反量化成fp32。上图只是个简单的示意图,中间省略了很多细节,int8量化后计算过程中可能会导致溢出,会采用int32来保存中间激活值;同时又的算子需要高精度的计算,要把激活值反量化为fp32或者fp16进行计算。另外激活值和权重的量化策略可能也不一样,根据INVIDIA的实验,权重的量化接采用Min-Max量化就可以了,而激活值分布不一,不能采用Min-Max量化——(很大概率导致不饱和量化),因此需要对原始激活值选择一个量化的阈值;同时每一层的量化也有自己的量化阈值,这样才能更充分的利用量化值域,提高模型的性能。
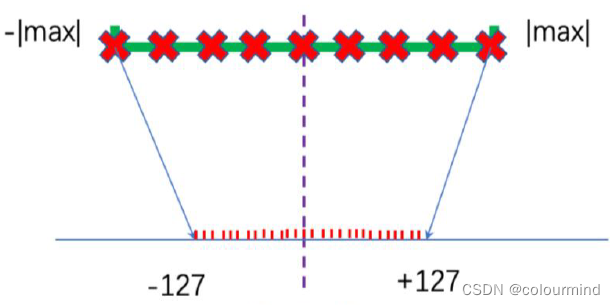
饱和量化

非饱和量化
上图所示饱和量化对量化后的值域利用的更充分,而非饱和量化值域有很多没有被利用起来。因此需要选择一个量化阈值,把阈值之外的量化为最大值或者最小值。
三、量化校准
量化校准就是对激活值进行量化的过程中,不断的调整量化阈值,使得量化前后的激活分布差异最小化。为什么要进行这样的校准呢?如果不进行这样的校准,由于激活值分布不均匀,直接采用Min-Max量化,会导致模型的性能下降太多。
怎么样进行量化校准呢?
对于一个训练好的模型,
1、选择一部分验证集,喂入模型,统计每一层的激活值
2、采用下图所示伪代码算法过程,找到每一层量化前后激活值分布差异最小的量化阈值。
3、更具量化阈值,计算量化scae以及zero point
4、依据scae以及zero point对所有激活值进行量化
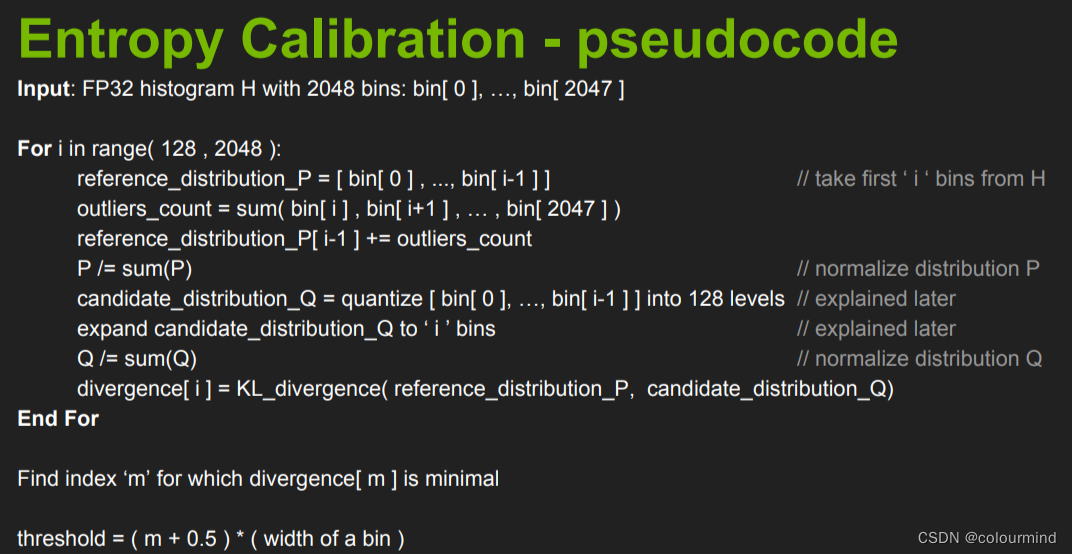
详细代码可见——TensorRT基于Entropy的校准
参考
ChatGLM2-6B
大语言模型的模型量化(INT8/INT4)技术