1.从微信里选择图片或文件上传
使用的vant的上传组件 原生用 wx.chooseMessageFile()
html
 <!-- 从微信上面选择文件 -->
    <van-uploader file-list="{{ file }}" bind:after-read="afterRead" max-count="{{3}}" deletable="{{ true }}" bind:delete="deleteAll" accept="all">
      <van-button custom-class="fup" square icon="plus" type="default"></van-button>
    </van-uploader>
max-count 是限制上传图片数量 可以不设置该属性


js
// 从微信选择上传文件
  afterRead(e) {
    let that = this
    console.log("上传的文件:", e.detail.file);
    wx.uploadFile({
      accept: "all",
      url: 'http://www.com/upload', // 仅为示例,非真实的接口地址
      filePath: e.detail.file.url,
      name: 'file',
      header: {
        'token': wx.getStorageSync("token"),// 请求需要token就带,不需要就删除
      },
      success(res) {
        console.log(res);
        let data = JSON.parse(res.data)
        data.data.name = e.detail.file.name
        if (data.code == 1) {
          wx.showToast({
            icon: 'none',
            title: '上传成功!',
            duration: 2000
          })
          // 上传完成需要更新 fileList
          let file = that.data.file
          file.push(data.data)
          that.setData({
            file
          })
          console.log(that.data.file);
        } else {
          wx.showToast({
            icon: 'none',
            title: '上传失败!',
            duration: 2000
          })
        }
      },
    });
  },
  // 删除上传文件
  deleteAll(e) {
    console.log(e);
    let filearr = this.data.file
    filearr.splice(e.detail.index, 1)
    this.setData({
      file: filearr
    })
    console.log(this.data.file);
  },
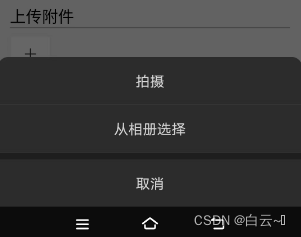
2.从相册选择图片上传
html
 <!-- 从相册选择图片 -->
    <view style="display: flex;justify-content: start;flex-wrap: wrap;margin-top: 20rpx;">
      <view wx:for="{{file}}" wx:key="{{index}}" class="img">
        <image src="{{item.url}}" mode="widthFix" />
        <view class="del" bindtap="deleteAll" data-index="{{index}}">
          <van-icon name="cross" />
        </view>
      </view>
    <van-button custom-class="fup" bindtap="pushimg" square icon="plus" type="default"></van-button>
    </view>
js
// 删除上传文件
  deleteAll(e) {
    console.log(e);
    let filearr = this.data.file
    filearr.splice(e.detail.index, 1)
    this.setData({
      file: filearr
    })
    console.log(this.data.file);
  },
  // 从相册选择图片
  pushimg() {
    let that = this
    wx.chooseImage({ // 本地资源上传到服务器API
      success: function (e) {
        console.log(e);
        var tempFilePaths = e.tempFilePaths;
        wx.uploadFile({
          accept: "all",
          url: 'http://www.com/upload', // 指定服务器接口URL
          filePath: tempFilePaths[0], // 本地文件路径,即选择文件返回的路径
          header: {
            'token': wx.getStorageSync("token"),// 请求需要token就带,不需要就删除
          },
          name: 'file', // 上传文件的key,后台要用到
          success: function (res) { //成功后的回调函数
            console.log(res);
            let data = JSON.parse(res.data)
            data.data.name = new Date()
            if (data.code == 1) {
              wx.showToast({
                icon: 'none',
                title: '上传成功!',
                duration: 2000
              })
              // 上传完成需要更新 fileList
              let file = that.data.file
              file.push(data.data)
              that.setData({
                file
              })
              console.log(that.data.file);
            } else {
              wx.showToast({
                icon: 'none',
                title: '上传失败!',
                duration: 2000
              })
            }
          }
        })
      }
    })
  },
less
.img {
  position: relative;
  width: 80px;
  margin-right: 15rpx;
  overflow: hidden;
  image {
    width: 100%;
  }

  .del {
    color: #ffffff;
    background-color: #000000;
    width: 40rpx;
    height: 40rpx;
    position: absolute;
    text-align: center;
    top: -13rpx;
    right: -13rpx;
    border-radius: 50%;
    z-index: 99;
    font-size: 20rpx;
    padding-top: 10rpx;
    padding-right: 10rpx;
    box-sizing: border-box;
  }
}

