100 主子表代码生成详解
1 新建数据库表结构(主子表)
-- ----------------------------
-- 客户表
-- ----------------------------
drop table if exists sys_customer;
create table sys_customer (
  customer_id           bigint(20)      not null auto_increment    comment '客户id',
  customer_name         varchar(30)     default ''                 comment '客户姓名',
  phonenumber           varchar(11)     default ''                 comment '手机号码',
  sex                   varchar(20)     default null               comment '客户性别',
  birthday              datetime                                   comment '客户生日',
  remark                varchar(500)    default null               comment '客户描述',
  primary key (customer_id)
) engine=innodb auto_increment=1 comment = '客户表';


-- ----------------------------
-- 商品表
-- ----------------------------
drop table if exists sys_goods;
create table sys_goods (
  goods_id           bigint(20)      not null auto_increment    comment '商品id',
  -- 必须要有的关联字段(外键)
  customer_id        bigint(20)      not null                   comment '客户id',
  name               varchar(30)     default ''                 comment '商品名称',
  weight             int(5)          default null               comment '商品重量',
  price              decimal(6,2)    default null               comment '商品价格',
  date               datetime                                   comment '商品时间',
  type               char(1)         default null               comment '商品种类',
  primary key (goods_id)
) engine=innodb auto_increment=1 comment = '商品表';
2 代码生成使用
(1)登录系统(系统工具 -> 代码生成 -> 导入主表与子表)
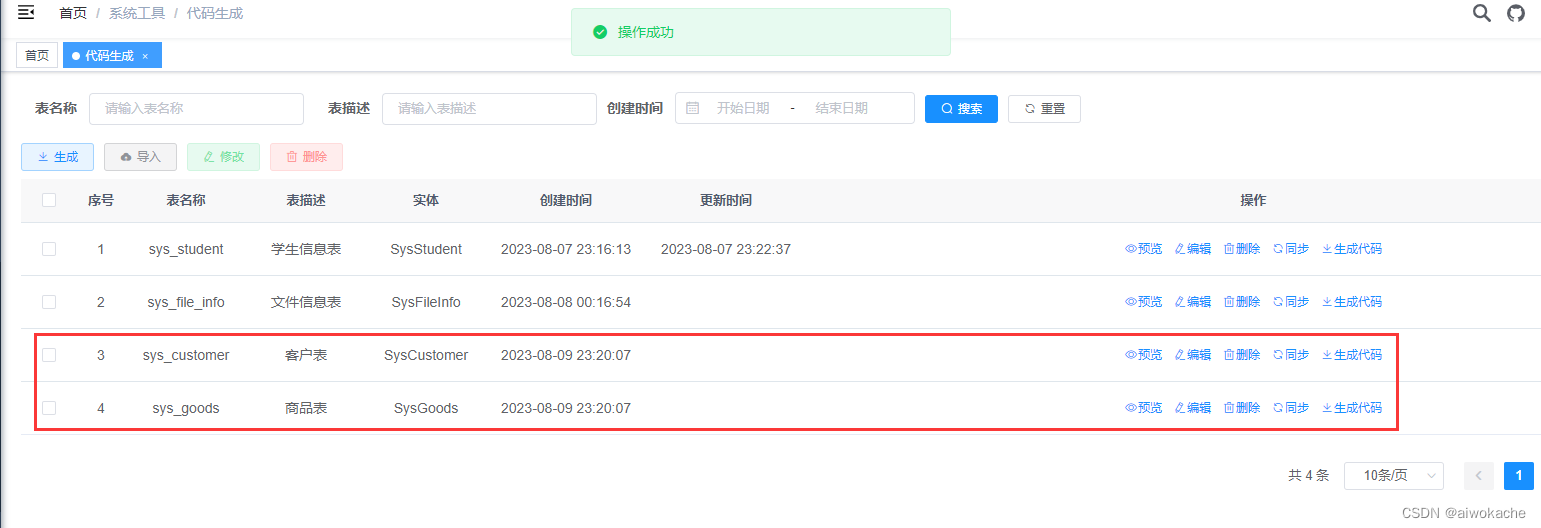
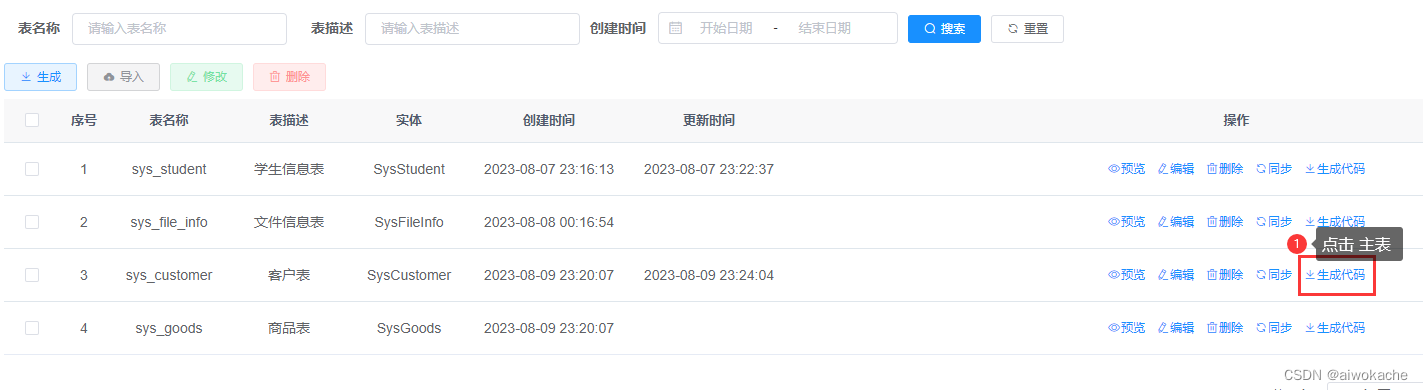
(2)代码生成列表中找到需要表(可预览、编辑、同步、删除生成配置)

(3)点击生成代码会得到一个ruoyi.zip执行sql文件,按照包内目录结构复制到自己的项目中即可
(4)执行customerMenu.sql生成菜单

-- 菜单 SQL
insert into sys_menu (menu_name, parent_id, order_num, path, component, is_frame, is_cache, menu_type, visible, status, perms, icon, create_by, create_time, update_by, update_time, remark)
values('客户', '3', '1', 'customer', 'system/customer/index', 1, 0, 'C', '0', '0', 'system:customer:list', '#', 'admin', sysdate(), '', null, '客户菜单');
-- 按钮父菜单ID
SELECT @parentId := LAST_INSERT_ID();
-- 按钮 SQL
insert into sys_menu (menu_name, parent_id, order_num, path, component, is_frame, is_cache, menu_type, visible, status, perms, icon, create_by, create_time, update_by, update_time, remark)
values('客户查询', @parentId, '1', '#', '', 1, 0, 'F', '0', '0', 'system:customer:query', '#', 'admin', sysdate(), '', null, '');
insert into sys_menu (menu_name, parent_id, order_num, path, component, is_frame, is_cache, menu_type, visible, status, perms, icon, create_by, create_time, update_by, update_time, remark)
values('客户新增', @parentId, '2', '#', '', 1, 0, 'F', '0', '0', 'system:customer:add', '#', 'admin', sysdate(), '', null, '');
insert into sys_menu (menu_name, parent_id, order_num, path, component, is_frame, is_cache, menu_type, visible, status, perms, icon, create_by, create_time, update_by, update_time, remark)
values('客户修改', @parentId, '3', '#', '', 1, 0, 'F', '0', '0', 'system:customer:edit', '#', 'admin', sysdate(), '', null, '');
insert into sys_menu (menu_name, parent_id, order_num, path, component, is_frame, is_cache, menu_type, visible, status, perms, icon, create_by, create_time, update_by, update_time, remark)
values('客户删除', @parentId, '4', '#', '', 1, 0, 'F', '0', '0', 'system:customer:remove', '#', 'admin', sysdate(), '', null, '');
insert into sys_menu (menu_name, parent_id, order_num, path, component, is_frame, is_cache, menu_type, visible, status, perms, icon, create_by, create_time, update_by, update_time, remark)
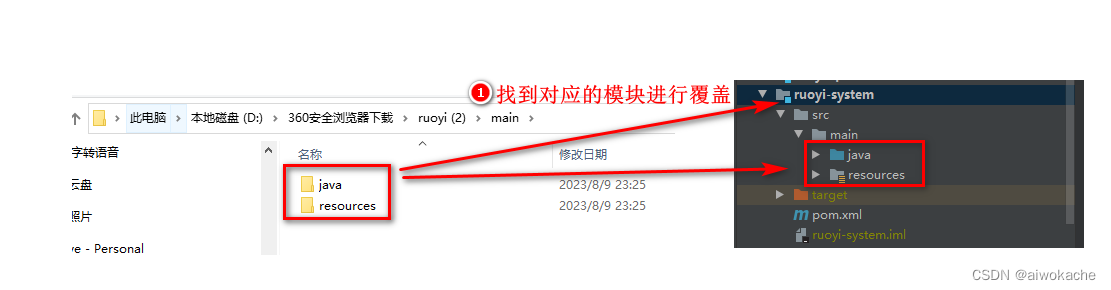
values('客户导出', @parentId, '5', '#', '', 1, 0, 'F', '0', '0', 'system:customer:export', '#', 'admin', sysdate(), '', null, '');(5)覆盖前端代码:主要是里面的模板有不同

(6)覆盖后端代码:主要是里面的模板有不同
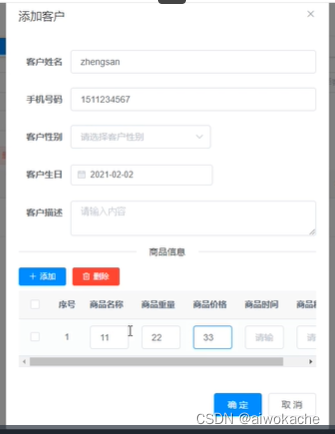
(7)测试
- F5刷新ruoyi-system
- 重启前后端
- 测试成功
3 后台(区别)详解
(1)SysCustomer:客户
    /**
     * 关联关系 商品信息 集合。
     * 后续:前端会把商品信息传进来。
     * */
    private List<SysGoods> sysGoodsList;
(2)SysGoods:商品。就跟单表一样
(3)SysCustomerServiceImpl:大区别
package com.ruoyi.system.service.impl;

import java.util.List;
import org.springframework.beans.factory.annotation.Autowired;
import org.springframework.stereotype.Service;
import java.util.ArrayList;
import com.ruoyi.common.utils.StringUtils;
import org.springframework.transaction.annotation.Transactional;
import com.ruoyi.system.domain.SysGoods;
import com.ruoyi.system.mapper.SysCustomerMapper;
import com.ruoyi.system.domain.SysCustomer;
import com.ruoyi.system.service.ISysCustomerService;

/**
 * 客户Service业务层处理
 *
 * @author ruoyi
 * @date 2023-08-09
 */
@Service
public class SysCustomerServiceImpl implements ISysCustomerService
{
    @Autowired
    private SysCustomerMapper sysCustomerMapper;

    /**
     * 查询客户
     *
     * 区别:XxxMapper.xml中会是一个关联查询
     */
    @Override
    public SysCustomer selectSysCustomerByCustomerId(Long customerId)
    {
        return sysCustomerMapper.selectSysCustomerByCustomerId(customerId);
    }

    /**
     * 查询客户列表
     *
     * 区别:XxxMapper.xml中会是一个关联查询
     */
    @Override
    public List<SysCustomer> selectSysCustomerList(SysCustomer sysCustomer)
    {
        return sysCustomerMapper.selectSysCustomerList(sysCustomer);
    }

    /**
     * 新增客户
     *
     * 区别:新增对应的商品信息(列表)
     */
    @Transactional
    @Override
    public int insertSysCustomer(SysCustomer sysCustomer)
    {
        int rows = sysCustomerMapper.insertSysCustomer(sysCustomer);
        insertSysGoods(sysCustomer);
        return rows;
    }

    /**
     * 修改客户
     */
    @Transactional
    @Override
    public int updateSysCustomer(SysCustomer sysCustomer)
    {
        /**
         * 删除子表中的全部数据
         */
        sysCustomerMapper.deleteSysGoodsByCustomerId(sysCustomer.getCustomerId());
        /**
         * 子表数据入库
         */
        insertSysGoods(sysCustomer);
        /**
         * 主表信息修改入库
         */
        return sysCustomerMapper.updateSysCustomer(sysCustomer);
    }

    /**
     * 批量删除客户
     */
    @Transactional
    @Override
    public int deleteSysCustomerByCustomerIds(Long[] customerIds)
    {
        /**
         * 删除子表数据
         */
        sysCustomerMapper.deleteSysGoodsByCustomerIds(customerIds);
        /**
         * 删除主表数据
         */
        return sysCustomerMapper.deleteSysCustomerByCustomerIds(customerIds);
    }

    /**
     * 删除客户信息
     */
    @Transactional
    @Override
    public int deleteSysCustomerByCustomerId(Long customerId)
    {
        /**
         * 删除子表数据
         */
        sysCustomerMapper.deleteSysGoodsByCustomerId(customerId);
        /**
         * 删除主表数据
         */
        return sysCustomerMapper.deleteSysCustomerByCustomerId(customerId);
    }

    /**
     * 新增商品信息
     * 即从客户中获取对应的商品信息列表,然后入库
     */
    public void insertSysGoods(SysCustomer sysCustomer)
    {
        List<SysGoods> sysGoodsList = sysCustomer.getSysGoodsList();
        Long customerId = sysCustomer.getCustomerId();
        if (StringUtils.isNotNull(sysGoodsList))
        {
            List<SysGoods> list = new ArrayList<SysGoods>();
            for (SysGoods sysGoods : sysGoodsList)
            {
                sysGoods.setCustomerId(customerId);
                list.add(sysGoods);
            }
            if (list.size() > 0)
            {
                sysCustomerMapper.batchSysGoods(list);
            }
        }
    }
}
(4)SysCustomerMapper.xml:大区别
<?xml version="1.0" encoding="UTF-8" ?>
<!DOCTYPE mapper
PUBLIC "-//mybatis.org//DTD Mapper 3.0//EN"
"http://mybatis.org/dtd/mybatis-3-mapper.dtd">
<mapper namespace="com.ruoyi.system.mapper.SysCustomerMapper">

    <resultMap type="SysCustomer" id="SysCustomerResult">
        <result property="customerId"    column="customer_id"    />
        <result property="customerName"    column="customer_name"    />
        <result property="phonenumber"    column="phonenumber"    />
        <result property="sex"    column="sex"    />
        <result property="birthday"    column="birthday"    />
        <result property="remark"    column="remark"    />
    </resultMap>

    <resultMap id="SysCustomerSysGoodsResult" type="SysCustomer" extends="SysCustomerResult">
        <collection property="sysGoodsList" notNullColumn="sub_goods_id" javaType="java.util.List" resultMap="SysGoodsResult" />
    </resultMap>

    <resultMap type="SysGoods" id="SysGoodsResult">
        <result property="goodsId"    column="sub_goods_id"    />
        <result property="customerId"    column="sub_customer_id"    />
        <result property="name"    column="sub_name"    />
        <result property="weight"    column="sub_weight"    />
        <result property="price"    column="sub_price"    />
        <result property="date"    column="sub_date"    />
        <result property="type"    column="sub_type"    />
    </resultMap>

    <sql id="selectSysCustomerVo">
        select customer_id, customer_name, phonenumber, sex, birthday, remark from sys_customer
    </sql>

    <select id="selectSysCustomerList" parameterType="SysCustomer" resultMap="SysCustomerResult">
        <include refid="selectSysCustomerVo"/>
        <where>
            <if test="customerName != null  and customerName != ''"> and customer_name like concat('%', #{customerName}, '%')</if>
            <if test="phonenumber != null  and phonenumber != ''"> and phonenumber = #{phonenumber}</if>
            <if test="sex != null  and sex != ''"> and sex = #{sex}</if>
            <if test="birthday != null "> and birthday = #{birthday}</if>
        </where>
    </select>

    <!--
        区别:关联查询
    -->
    <select id="selectSysCustomerByCustomerId" parameterType="Long" resultMap="SysCustomerSysGoodsResult">
        select a.customer_id, a.customer_name, a.phonenumber, a.sex, a.birthday, a.remark,
 b.goods_id as sub_goods_id, b.customer_id as sub_customer_id, b.name as sub_name, b.weight as sub_weight, b.price as sub_price, b.date as sub_date, b.type as sub_type
        from sys_customer a
        left join sys_goods b on b.customer_id = a.customer_id
        where a.customer_id = #{customerId}
    </select>

    <insert id="insertSysCustomer" parameterType="SysCustomer" useGeneratedKeys="true" keyProperty="customerId">
        insert into sys_customer
        <trim prefix="(" suffix=")" suffixOverrides=",">
            <if test="customerName != null">customer_name,</if>
            <if test="phonenumber != null">phonenumber,</if>
            <if test="sex != null">sex,</if>
            <if test="birthday != null">birthday,</if>
            <if test="remark != null">remark,</if>
         </trim>
        <trim prefix="values (" suffix=")" suffixOverrides=",">
            <if test="customerName != null">#{customerName},</if>
            <if test="phonenumber != null">#{phonenumber},</if>
            <if test="sex != null">#{sex},</if>
            <if test="birthday != null">#{birthday},</if>
            <if test="remark != null">#{remark},</if>
         </trim>
    </insert>

    <update id="updateSysCustomer" parameterType="SysCustomer">
        update sys_customer
        <trim prefix="SET" suffixOverrides=",">
            <if test="customerName != null">customer_name = #{customerName},</if>
            <if test="phonenumber != null">phonenumber = #{phonenumber},</if>
            <if test="sex != null">sex = #{sex},</if>
            <if test="birthday != null">birthday = #{birthday},</if>
            <if test="remark != null">remark = #{remark},</if>
        </trim>
        where customer_id = #{customerId}
    </update>

    <delete id="deleteSysCustomerByCustomerId" parameterType="Long">
        delete from sys_customer where customer_id = #{customerId}
    </delete>

    <delete id="deleteSysCustomerByCustomerIds" parameterType="String">
        delete from sys_customer where customer_id in
        <foreach item="customerId" collection="array" open="(" separator="," close=")">
            #{customerId}
        </foreach>
    </delete>

    <delete id="deleteSysGoodsByCustomerIds" parameterType="String">
        delete from sys_goods where customer_id in
        <foreach item="customerId" collection="array" open="(" separator="," close=")">
            #{customerId}
        </foreach>
    </delete>

    <delete id="deleteSysGoodsByCustomerId" parameterType="Long">
        delete from sys_goods where customer_id = #{customerId}
    </delete>

    <insert id="batchSysGoods">
        insert into sys_goods( goods_id, customer_id, name, weight, price, date, type) values
		<foreach item="item" index="index" collection="list" separator=",">
            ( #{item.goodsId}, #{item.customerId}, #{item.name}, #{item.weight}, #{item.price}, #{item.date}, #{item.type})
        </foreach>
    </insert>
</mapper>
4 前端(区别)详解
(1)ruoyi-ui\src\views\system\customer\index.vue
<template>
        <!--
          1、指定了商品信息(列表)
          2、选择事件:@selection-change="handleSysGoodsSelectionChange"
        -->
        <el-table :data="sysGoodsList" :row-class-name="rowSysGoodsIndex" @selection-change="handleSysGoodsSelectionChange" ref="sysGoods">
          <el-table-column type="selection" width="50" align="center" />
          <el-table-column label="序号" align="center" prop="index" width="50"/>
          <el-table-column label="商品名称" prop="name" width="150">
            <template slot-scope="scope">
              <el-input v-model="scope.row.name" placeholder="请输入商品名称" />
            </template>
          </el-table-column>
          <el-table-column label="商品重量" prop="weight" width="150">
            <template slot-scope="scope">
              <el-input v-model="scope.row.weight" placeholder="请输入商品重量" />
            </template>
          </el-table-column>
          <el-table-column label="商品价格" prop="price" width="150">
            <template slot-scope="scope">
              <el-input v-model="scope.row.price" placeholder="请输入商品价格" />
            </template>
          </el-table-column>
          <el-table-column label="商品时间" prop="date" width="240">
            <template slot-scope="scope">
              <el-date-picker clearable v-model="scope.row.date" type="date" value-format="yyyy-MM-dd" placeholder="请选择商品时间" />
            </template>
          </el-table-column>
          <el-table-column label="商品种类" prop="type" width="150">
            <template slot-scope="scope">
              <el-select v-model="scope.row.type" placeholder="请选择商品种类">
                <el-option label="请选择字典生成" value="" />
              </el-select>
            </template>
          </el-table-column>
        </el-table>
</template>
<script>
export default {
  name: "Customer",
  data() {
      // 商品表格数据,初始化为空
      sysGoodsList: [],
  },
  methods:{
    /** 修改按钮操作 */
    handleUpdate(row) {
      this.reset();
      const customerId = row.customerId || this.ids
      getCustomer(customerId).then(response => {
        this.form = response.data;
        /**
         * 从客户中获取商品集合(列表)
         */
        this.sysGoodsList = response.data.sysGoodsList;
        this.open = true;
        this.title = "修改客户";
      });
    },
    /** 提交按钮 */
    submitForm() {
      this.$refs["form"].validate(valid => {
        if (valid) {
         /**
          * 提交时把商品赋值到对应的客户中
          */
          this.form.sysGoodsList = this.sysGoodsList;
          if (this.form.customerId != null) {
            updateCustomer(this.form).then(response => {
              this.$modal.msgSuccess("修改成功");
              this.open = false;
              this.getList();
            });
          } else {
            addCustomer(this.form).then(response => {
              this.$modal.msgSuccess("新增成功");
              this.open = false;
              this.getList();
            });
          }
        }
      });
    },
    /** 商品添加按钮操作 */
    handleAddSysGoods() {
      let obj = {};
      obj.name = "";
      obj.weight = "";
      obj.price = "";
      obj.date = "";
      obj.type = "";
      this.sysGoodsList.push(obj);
    },
  }
}
</script>
101 【更】3.4.0版本更新介绍
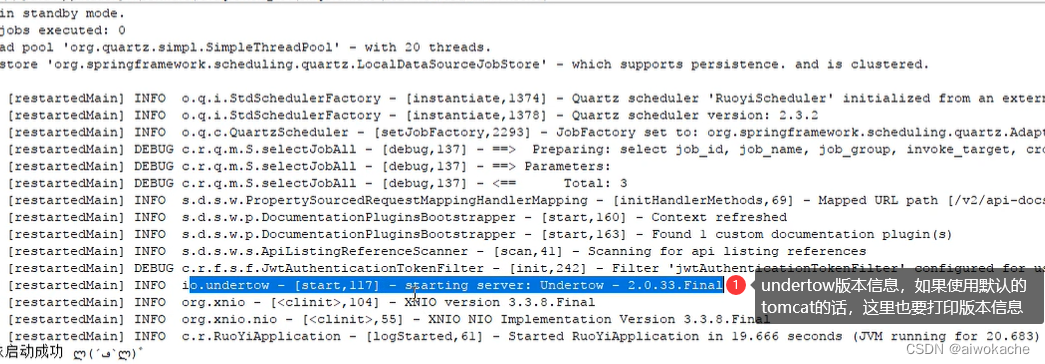
102 使用undertow容器来替代tomcat容器
1 undertow与tomcat的区别与联系
- springboot默认使用tomcat做为http容器。
- undertow与tomcat是一样的。
- undertow在处理高并发请求、对内存的优化要好于tomcat。
2 替换过程详解
(1)ruoyi-framework\pom.xml模块修改web容器依赖,使用undertow来替代tomcat容器
        <!-- SpringBoot Web容器 -->
        <dependency>
            <groupId>org.springframework.boot</groupId>
            <artifactId>spring-boot-starter-web</artifactId>
            <exclusions>
                <!-- 排除springboot默认使用的tomcat容器 -->
                <exclusion>
                    <artifactId>spring-boot-starter-tomcat</artifactId>
                    <groupId>org.springframework.boot</groupId>
                </exclusion>
            </exclusions>
        </dependency>

        <!-- web 容器使用 undertow 替换 tomcat -->
        <!-- undertow的版本默认跟随springboot的版本-->
        <dependency>
            <groupId>org.springframework.boot</groupId>
            <artifactId>spring-boot-starter-undertow</artifactId>
        </dependency>
(2)修改application.yml,使用undertow来替代tomcat容器
# 开发环境配置
server:
  # 服务器的HTTP端口,默认为80
  port: 80
  servlet:
    # 应用的访问路径
    context-path: /
  # undertow 配置(可以参考官网,设置更多的属性)
  undertow:
    # HTTP post内容的最大大小。当值为-1时,默认值为大小是无限的
    max-http-post-size: -1
    # 以下的配置会影响buffer,这些buffer会用于服务器连接的IO操作,有点类似netty的池化内存管理
    # 每块buffer的空间大小,越小的空间被利用越充分
    buffer-size: 512
    # 是否分配的直接内存
    direct-buffers: true
    threads:
      # 设置IO线程数, 它主要执行非阻塞的任务,它们会负责多个连接, 默认设置每个CPU核心一个线程
      io: 8
      # 阻塞任务线程池, 当执行类似servlet请求阻塞操作, undertow会从这个线程池中取得线程,它的值设置取决于系统的负载
      worker: 256
(3)修改文件上传工具类FileUploadUtils#getAbsoluteFile
使用undertow容器以后上传文件可能会报错,这是因为undertow和tomcat的底层实现是不一样的,因此undertow是不需要去创建的:
private static final File getAbsoluteFile(String uploadDir, String fileName) throws IOException
{
	File desc = new File(uploadDir + File.separator + fileName);

	if (!desc.getParentFile().exists())
	{
		desc.getParentFile().mkdirs();
	}
	// undertow文件上传,因底层实现不同,无需创建新文件
	// if (!desc.exists())
	// {
	//    desc.createNewFile();
	// }
	return desc;
}
(3)测试
- 重启后端
- 简单测试几个功能:文件上传
3 拓展:模拟高并发的场景
103 实现优雅关闭应用(集成springboot自带的监控工具actuator)
1 为什么要优雅关闭呢?
比如每一秒有上百笔的并发请求到订单接口,如果直接停掉应用,那这上百笔订单的线程没执行完导致这些订单就丢失了,这种情况是很严重的。所以一定要等到这些订单线程全部执行完之后,再去停掉应用,才能防止一些正在执行或者在执行的过程中的线程被强制停掉。
2 详细步骤
(1)ruoyi-admin/pom.xml中引入actuator依赖
<!-- 依赖springboot自带的监控工具actuator -->
        <dependency>
            <groupId>org.springframework.boot</groupId>
            <artifactId>spring-boot-starter-actuator</artifactId>
        </dependency>
(2)ruoyi-admin/application.yml配置文件中endpoint开启shutdown
# 可监控:内存、线程、日志
management:
  endpoint:
    shutdown:
      # shutdown打开,即允许使用它去停止应用
      enabled: true
  endpoints:
    web:
      exposure:
        # 优雅关闭
        # include其实我们可以配置成" * ",但不建议这么写,因为很多东西都暴露出去对就项目来说是有风险的
        include: "shutdown"
      # 前缀路径
      base-path: /monitor
(3)SecurityConfig#configure():因为在没有登录的情况下就停止了,所以需要配置白名单。
.antMatchers(HttpMethod.GET, "/", "/*.html", "/**/*.html", "/**/*.css", "/**/*.js", "/profile/**").permitAll()
/**
* 1、其中" /monitor/ "对应base-path: /monitor,shutdown对应include: "shutdown"
*/
.antMatchers("/monitor/shutdown").permitAll()
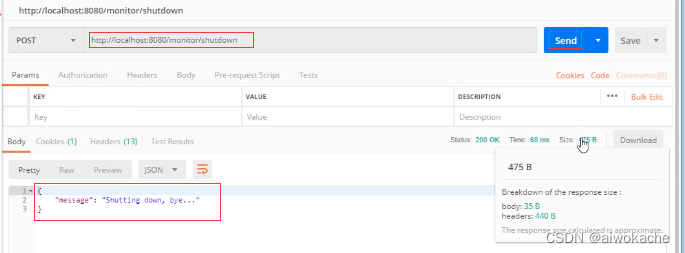
.antMatchers("/swagger-ui.html", "/swagger-resources/**", "/webjars/**", "/*/api-docs", "/druid/**").permitAll()(4)Post请求测试验证优雅停机 curl -X POST http://localhost:80/monitor/shutdown
- 重启后端
-
这个接口是自带的,所以需要按照它的规则去请求。是POST请求,可以用postman工具发送post请求:
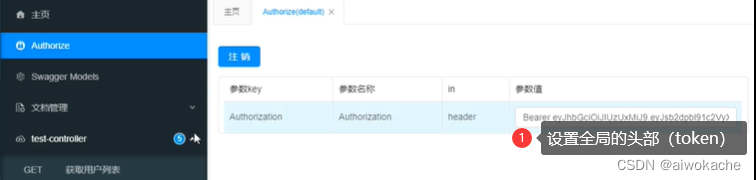
104 实现swagger文档增强(knife4j)
1 为什么要增强?
- swagger界面风格、英文
- knife4j对比swagger相比有以下优势,友好界面,离线文档,接口排序,安全控制,在线调试,文档清晰,后端注解增强,容易上手。
2 前端ui增强,详细步骤
(1)ruoyi-admin\pom.xml模块添加整合依赖(替换掉swagger的ui)
- 针对不分离版
- 把swagger的ui删除掉后:
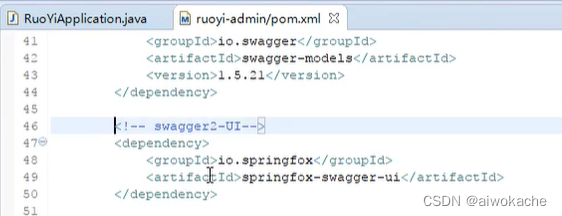
- 替换成knife4j的ui:
<!-- knife4j -->
<dependency>
	<groupId>com.github.xiaoymin</groupId>
	<artifactId>knife4j-spring-boot-starter</artifactId>
	<version>3.0.3</version>
</dependency>
- 把swagger的ui删除掉后:
- 针对分离版本
- 直接在ruoyi-admin\pom.xml加入knife4j的依赖即可
(2)修改首页跳转访问地址
针对不分离版本:SwaggerController.java修改跳转访问地址" /doc.html "
// 默认swagger-ui.html前端ui访问地址
public String index()
{
	return redirect("/swagger-ui.html");
}
// 修改成knife4j前端ui访问地址doc.html
public String index()
{
	return redirect("/doc.html");
}
针对前后端分离版本:ruoyi-ui\src\views\tool\swagger\index.vue修改跳转访问地址为" /doc.html ":

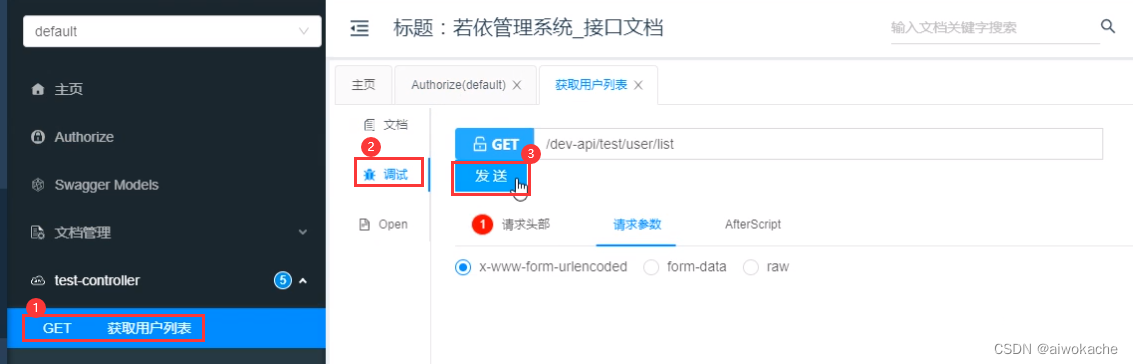
(3)测试
-
重启前后端
-
浏览器访问:http://localhost:8080/doc.html#/home
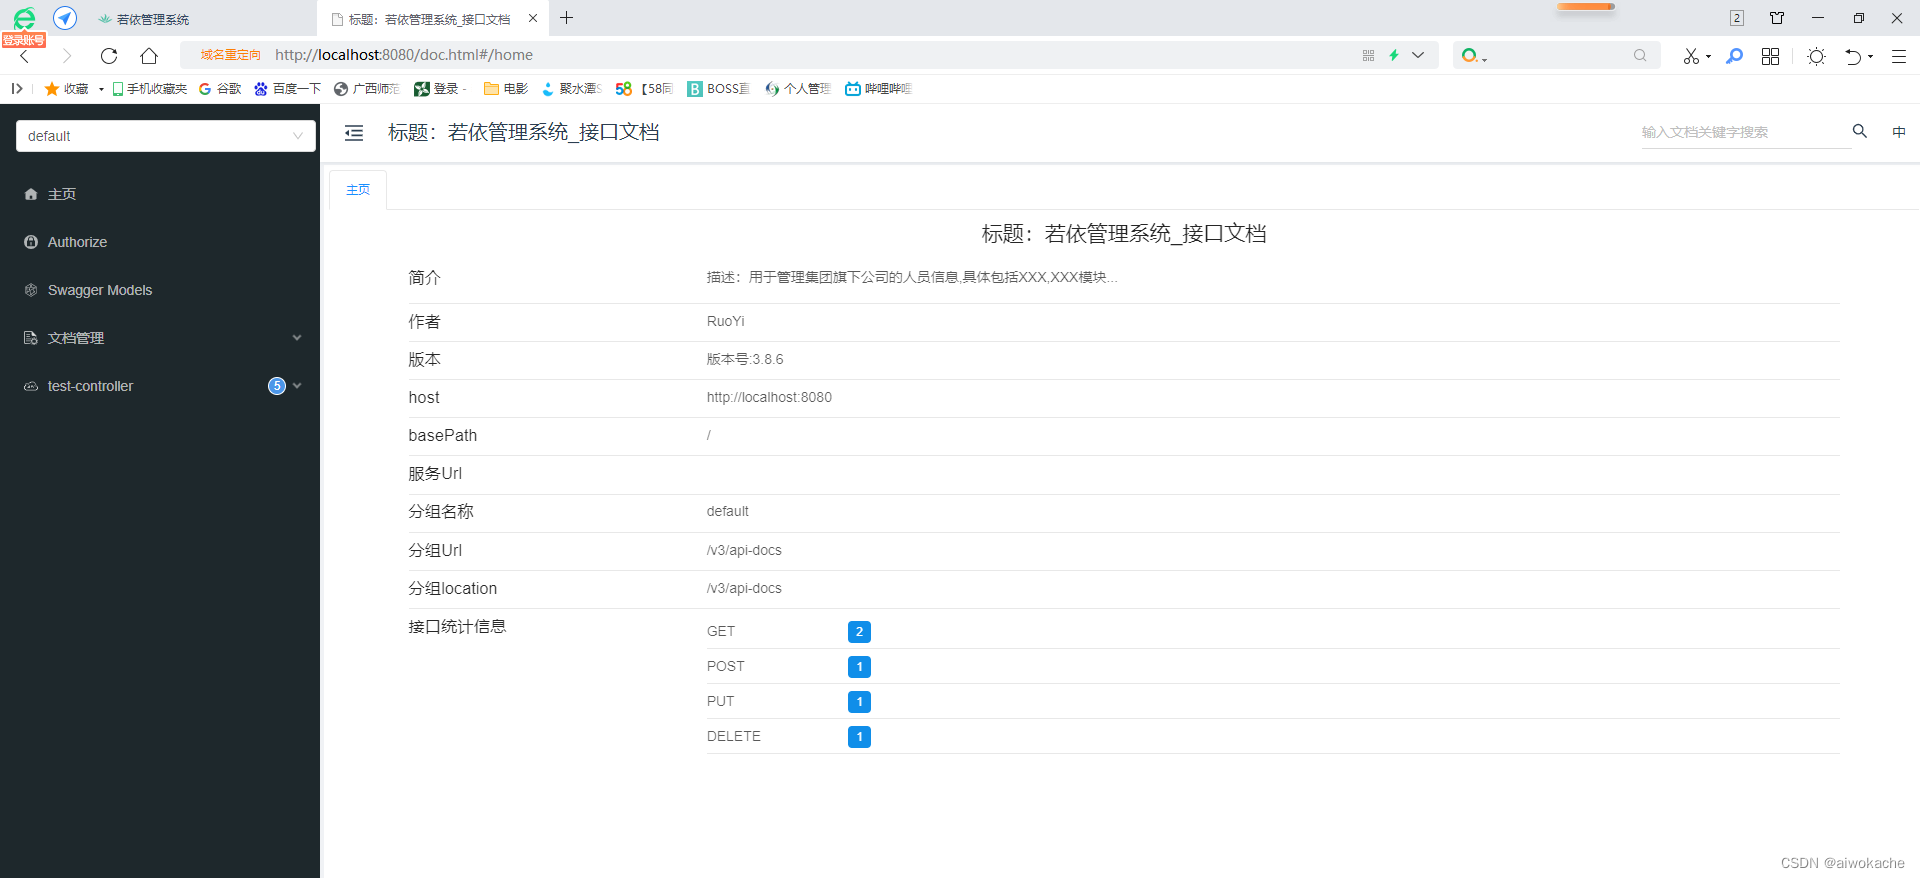
-
登录系统,访问菜单系统工具/系统接口,出现如下图表示成功

(4)提示:引用knife4j-spring-boot-starter依赖,项目中的swagger依赖可以删除。
3 使用案例